SPECTRALIS Training Guide
|
|
|
- Margery O’Neal’
- 5 years ago
- Views:
Transcription

1 SPECTRALIS Training Guide
2
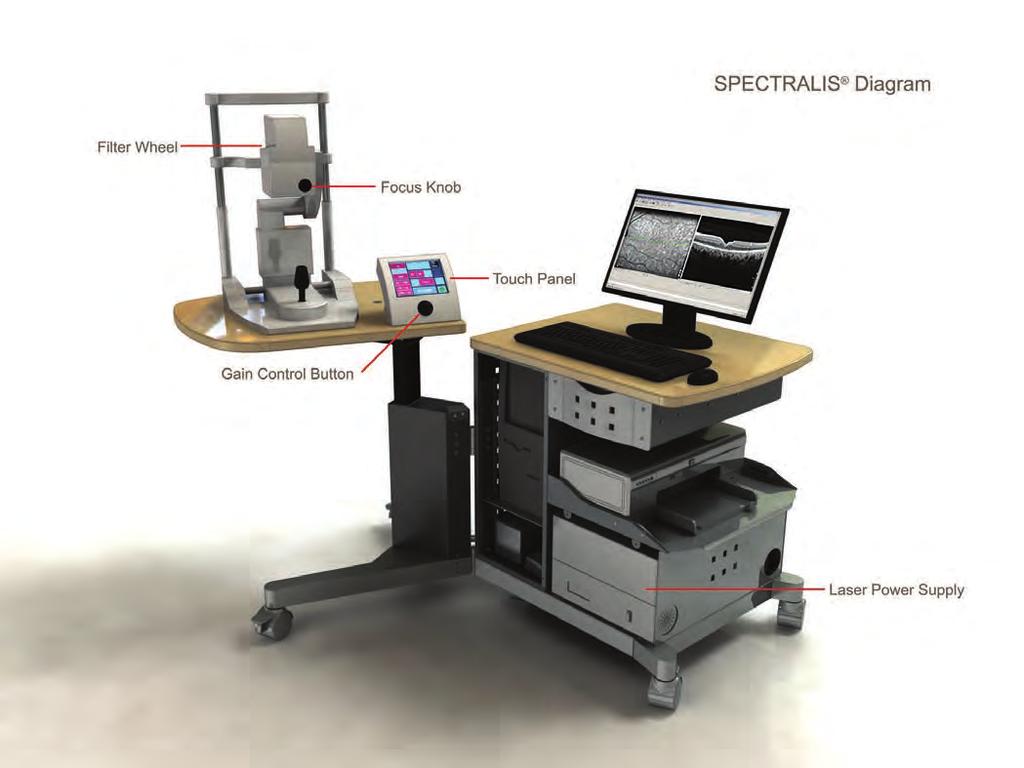
3 SPECTRALIS Diagram 1
4
5 SPECTRALIS Training Guide Table of Contents 1. Entering Patient Information & Aligning the Patient a. Start Up/Shut Down the System... 4 b. Examine a New Patient... 5 c. Re-examine an Existing Patient... 6 d. Search for a Patient... 7 e. Align the Patient Acquiring OCT Images a. Set a Custom OCT Scan... 9 b. Acquire an IR+OCT Image c. Position the ETDRS Grid d. Set a Reference for a Follow-Up Scan e. Perform a Follow-Up Exam f. Acquire a BluePeak AF + OCT Image Acquiring IR & BluePeak AF Fundus Images a. Acquire an IR Image b. Acquire a BluePeak AF image Acquiring Angiography Images a. Perform an FA b. Perform an ICGA c. Perform an FA + ICGA Print Reports a. Print Retinal OCT Reports b. Print an RNFL Single Exam Report OU with FoDi c. Print an Asymmetry Analysis Single Exam Report OU d. Print an RNFL & Asymmetry Analysis Single Eye Exam Report 29 e. Print Multiple Images on a Page f. Print a Follow-Up Report Database and Lens Cleaning a. Transfer Patient Images b. Archive Images c. Cleaning the Lens d. Delete a Patient Record c. Acquire a Composite Image
. This is located next to the PC, beneath the printer. 3.")
. 3. Once the PC has completely powered down, switch off the external hard drives.")
6 Start Up/Shut Down the System How to Start Up/Shut Down the System Start Up Power Switch 1. Turn on the external hard drives if necessary. 2. Turn on the Laser Power Supply by pressing the green switch in front (Figure 1). This is located next to the PC, beneath the printer. 3. Power up the PC. Shut Down Figure 1: Laser Power Supply 1. Using the Windows Start menu, select Shut down. 2. Select Shut down from the Shut Down Windows pop-up window (Figure 2). 3. Once the PC has completely powered down, switch off the external hard drives. 4. Switch off the Laser Power Supply. Figure 2: Shut Down 4
. 3. Enter, at minimum, the patient s last name, first name, and date of birth into the appropriate fields (Figure 4).")
7 Examine a New Patient Figure 3: New Patient Icon Figure 4: Patient Data How to Enter Patient Data 1. Double click on the Heidelberg Eye Explorer (HEYEX ) icon on the desktop. 2. Once the program opens, click the New Patient icon at the top of the screen (Figure 3). 3. Enter, at minimum, the patient s last name, first name, and date of birth into the appropriate fields (Figure 4). 4. Click OK. 5. Select the SPECTRALIS system for the device type (Figure 5). 6. Enter operator initials. 7. Click OK. 8. Enter the correct cornea curvature or click OK to accept the default eye data (Figure 6). 9. The acquisition module will now open and you can begin the exam. Figure 5: Device Type Figure 6: Eye Data 5
8 Re-examine an Existing Patient How to Re-examine an Existing Patient Figure 7: New Exam Icon Figure 8: Device Type Filter the database by following the above steps and then continue with the instructions below. 1. From the database window, load the selected patient to the right pane of the screen. 2. Use the New Exam icon to begin an exam (Figure 7). 3. Click Yes when asked to re-examine a patient. 4. Select the SPECTRALIS system for the device type (Figure 8). 5. Enter operator initials. 6. Click OK. 7. Enter the correct cornea curvature or click OK to accept the default eye data (Figure 9). 8. The acquisition module will now open and you can begin the exam. Figure 9: Eye Data 6
. 2.")
9 Search for a Patient How to Search for a Patient Figure 10: Name Field Figure 11: Unload Icon 1. From the main database window, type any portion of the patient s first and last name into the Name field. The first initial of each name, separated by a space is sufficient (Figure 10). 2. Click Update Display. 3. Select the patient name from the filtered list. 4. Once finished with the patient file, unload the name with the Unload icon (Figure 11). 5. Delete all text from the name field. 6. Click Update Display to reload the entire database. 7


10 Align the Patient How to Align the Patient Figure 12: Camera Centered 1. After entering in the patient data, turn on the camera by activating the yellow start button located on the monitor. 2. Adjust the joystick so the camera is centered on the red line, or one finger between camera and base (Figure 12). 3. Instruct the patient to come forward into the chinrest and adjust the chinrest so the pupil is aligned with the center of the live window (Figure 13). 4. Adjust the table height to the patient s comfort. Figure 13: Align Pupil with Lens 8

11 Set a Custom OCT Scan How to Set a Custom OCT Scan Figure 14: Click and Hold Custom Scan Button Figure 15: Name and Description 1. Turn on the camera. 2. Press the IR+OCT button on the touch panel or OCT button on the bottom right of the monitor. 3. Wait for the OCT module to calibrate. 4. Select the scan parameters required for the custom scan, including the Automatic Real-time Tracking (ART) settings and the fixation target. 5. Click and hold one of the custom scan buttons for three seconds (Figure 14) until the Save Preset dialogue box appears, enter a six character name and a description (Figure 15). 6. Click OK. 9

12 Acquire an IR+OCT Image Figure 16: Image in Top One-Third Figure 17: Tilted Scan Figure 19: Gain Control Button How to Acquire an IR+OCT Image 1. Press the IR+OCT button on the touch panel or the OCT button on the bottom right of the monitor. 2. Wait for the OCT module to calibrate. 3. Once the OCT goes live, select a preset scan pattern (Fast, RNFL, etc.). 4. Once the patient is aligned with the camera, begin by pushing the base of the camera forward towards the patient s pupil. 5. The patient s fundus will become visible on the computer screen. Make sure to keep the image centered. 6. Push the camera forward until the fundus image is evenly illuminated. 7. Slide the base of the camera forward until the OCT scan is within the blue markers in the top one-third of the acquisition screen (Figure 16). 8. Adjust the joystick left and right to achieve an evenly dense OCT scan. The RPE should be evenly and deeply saturated, and the scan should be as horizontal as possible (Figure 17 and 18). 9. Once the saturation and placement of the scan is optimal, activate the Automatic Real-time Tracking (ART) by pressing the black Gain Control button on the touch panel (Figure 19) or by holding down the joystick button. 10. Maintain the image quality using the smaller live image screen at the bottom of the monitor. 11. Press Acquire. 12. When all images have been acquired, click Save Images. 13. Once the images have been saved, click Exit. Figure 18: Scan Aligned Correctly 10


13 Position the ETDRS Grid How to Set the ETDRS Grid Figure 20: Thickness Map 1. Open an OCT image in the Thickness Map tab (Figure 20). 2. Scroll through the OCT scans with the mouse wheel to determine which one has the point of interest (usually the center of the fovea). 3. Drag the green marker line through the point of interest on the OCT image below the thickness map. 4. Left-click and hold one of the outer blue lines of the ETDRS grid, and drag the center of the grid to the green OCT line marker on the fundus image. 5. To save the image, switch to another view or exit the window, and select Yes in the dialogue box (Figure 21). Figure 21: Save Changes 11


14 Set a Reference for a Follow-Up Scan How to Set a Reference for a Follow-Up Scan Figure 22: Progression Menu 1. Open the OCT image. 2. Go to the Progression menu at the top of the screen (Figure 22). 3. Select Set Reference. 4. Close the OCT image. OR 5. Right-click on the desired OCT scan icon. 6. Go to Progression in the menu. 7. Select Set Reference (Figure 23). Figure 23: Right-Click Context Menu 12


. Note: only baseline scans from the eye being imaged will be selectable in the follow up window. 8.")
15 Perform a Follow-Up Exam Figure 24: Follow-Up Button Figure 25: Select Baseline Scan Figure 27: Gain Control Button How to Perform a Follow-up Exam 1. Align the patient with the camera, and evenly illuminate an IR image. 2. Press the IR+OCT button on the touch panel or the OCT button on the bottom right of the monitor. 3. Wait for the OCT module to calibrate. 4. Slide the base of the camera forward until you have an OCT scan in the top one-third of the screen. 5. Adjust the joystick left and right to achieve an evenly dense scan. The RPE should be deeply and evenly saturated, and the scan should be as horizontal as possible. 6. Once a quality OCT image is in the live window, press the Follow-Up button on the acquisition screen (Figure 24). 7. Select the appropriate baseline scan from the Select Baseline Examination window (Figure 25). Note: only baseline scans from the eye being imaged will be selectable in the follow up window. 8. Wait for the scan lines to go from red to blue, and adjust the scan and patient to closely match the baseline image at the bottom of the screen (Figure 26). 9. Activate Automatic Real-time Tracking (ART) by pressing the black Gain Control button on the touch panel (Figure 27) or by holding down the joystick button. 10. Press Acquire. 11. Repeat for any additional scans for the fellow eye. 12. Click on Save Images. 13. Click Exit. Figure 26: Align Current and Baseline Scans 13

16 Acquire a BluePeak Blue Laser Autofluorescence + OCT Image How to Acquire a BluePeak Autofluorescence + OCT Image* Figure 28: Image in Top One-Third Figure 29: Tilted Scan 1. Press the IR+OCT button on the touch panel or the OCT button on the bottom right of the monitor. 2. Wait for the OCT module to calibrate. 3. Once the OCT goes live, select a preset scan pattern (Fast, RNFL, etc.). 4. Once the patient is aligned with the camera, begin by pushing the base of the camera forward towards the patient s pupil. 5. The patient s fundus will become visible on the computer screen. Make sure to keep the image centered. 6. Push the camera forward until the fundus image is evenly illuminated. 7. Slide the base of the camera forward until the OCT scan is within the blue markers in the top one-third of the acquisition screen (Figure 28). 8. Adjust the joystick left and right to achieve an evenly dense OCT scan. The RPE should be evenly and deeply saturated, and the scan should be as horizontal as possible (Figure 29 and 30). (Continued on next page) * Not available on the SPECTRALIS OCT or SPECTRALIS OCT Plus Figure 30: Scan Aligned Correctly 14

 by pressing the black Gain Control button on the touch panel (Figure 33) or by holding down the joystick button. 13.")
17 Acquire a BluePeak Blue Laser Autofluorescence + OCT Image (continued) Figure 31: IR to BAF 9. Press the FA+OCT button on the touch panel or change the IR button to BAF on the monitor (Figure 31).** 10. Adjust the sensitivity to about 90 by turning the black Gain Control button on the touch panel, or until the vasculature in the eye is visible.*** 11. Adjust the focus using the knob on the back of the camera until the image is brightest (Figure 32). 12. When the image quality is optimized, activate the Automatic Realtime Tracking (ART) by pressing the black Gain Control button on the touch panel (Figure 33) or by holding down the joystick button. 13. Maintain the image quality using the smaller live image screen at the bottom of the monitor. 14. Press Acquire. 15. Once all images have been acquired, click Save Images. 16. Click Exit. Figure 32: Focusing Knob ** Only available on the SPECTRALIS OCT with BluePeak model. *** SPECTRALIS OCT with BluePeak does this automatically with an automatic Gain Control. Figure 33: Gain Control Button 15

.* If no touch panel exists, the Auto Brightness control will do this automatically. 5.")
 by pressing the black Gain Control button on the touch panel or by holding down the joystick button.")
18 Acquire an IR Image How to Acquire an IR Image Figure 34: Proper Exposure Figure 35: Gain Control Button 1. Once the patient is aligned with the camera, begin by pushing the base of the camera forward towards the patient s pupil. 2. The patient s fundus will become visible on the computer screen. Make sure to keep the image centered. 3. Push the camera forward until the fundus image is evenly illuminated on the computer screen with no dark corners (Figure 34). 4. Adjust the image brightness by turning the black Gain Control button on the touch panel (Figure 35).* If no touch panel exists, the Auto Brightness control will do this automatically. 5. Adjust the focus using the knob on the back of the camera until the image is brightest (Figure 36). 6. Once the image is exposed and focused properly, turn on the Automatic Real-time Tracking (ART) by pressing the black Gain Control button on the touch panel or by holding down the joystick button. 7. Allow the ART bar to fill. 8. Press Acquire when the image looks optimal. 9. Click Save Images. 10. Click Exit. * Touch panel is not available on SPECTRALIS OCT, and SPECTRALIS OCT with BluePeak Figure 36: Focusing Knob 16

 by pressing the black Gain Control button on the touch panel (Figure 39) or by holding down the joystick button. Do not adjust focus with ART active. 6.")
19 Acquire a BluePeak Blue Laser Autofluorescence Image How to Acquire a BluePeak Autofluorescence Image* Figure 37: Before and After ART 1. Align and evenly illuminate an IR image. 2. Once the image is focused and in the frame, switch to AF mode by pressing FA on the touch panel or clicking IR on the bottom right of the monitor and selecting BAF. 3. Adjust the brightness so the vasculature is visible, but the image is not too bright (Figure 37). 4. Adjust the focus using the knob on the back of the camera until the image is brightest (Figure 38). 5. Activate Automatic Real-time Tracking (ART) by pressing the black Gain Control button on the touch panel (Figure 39) or by holding down the joystick button. Do not adjust focus with ART active. 6. Allow the ART bar to fill to 15 frames. 7. Press the Acquire button on the touch panel or press the joystick button.* 8. Click Save Images. 9. Click Exit. Figure 38: Focusing Knob * Joystick acquisition button only available on SPECTRALIS OCT and SPECTRALIS OCT with BluePeak models. Figure 39: Gain Control Button 17
. Figure 40: Acquisition Mode Options If Composite 3x3 has been selected, the internal fixation moves automatically. 1.")
20 Acquire a Composite Image How to Acquire a Composite Image* 1. Select IR on the touch panel. 2. Tap twice on the Movie button on the touch panel to access the Acquisition Mode submenu (Figure 40). 3. Select either Composite 3x3 or Composite (Figure 41). Figure 40: Acquisition Mode Options If Composite 3x3 has been selected, the internal fixation moves automatically. 1. Align the patient in the camera, adjust the exposure of the image, and focus on the smallest blood vessels near the area of concern. 2. Press Acquire. 3. Repeat steps 1 & 2 until all 9 points are acquired. 4. Click Save Images. 5. The software will ask Do you want to compute composite images now? Click Yes to automatically compute the composite. (Continued on next page) * Automatic composite imaging is not available on SPECTRALIS OCT, and SPECTRALIS OCT with BluePeak Figure 41: Acquisition Mode Submenu 18

21 Acquire a Composite Image (continued) Figure 42: Acquisition Mode Options, Fixation Target If Composite is selected you must use the external fixation light. 1. Align the patient in the camera, adjust the exposure of the image, and focus on the smallest blood vessels near the area of concern. 2. Activate the external fixation light by pressing the fixation target button on the touch panel (Figure 42). 3. Press the External button. 4. Press the gray arrow to return to the main touch panel screen. 5. Activate the Automatic Real-time-Tracking (ART) by pressing the black Gain Control button on the touch panel. Be sure to have the ART set to Slowly move the camera head while looking at the live image on the monitor. The better the live image looks, the better the composite will look. Moving the camera in an orderly fashion will paint the image onto the screen best (Figure 43). 7. Keep the live image centered and evenly illuminated to avoid dark spots. 8. When finished, press Acquire. 9. Click Save Images. 10. Click Exit. Figure 43: Composite Acquisition Screen 19
22 Perform an FA How to Perform an FA* Figure 44: Filter Wheel A Position 1. Place the filter wheel in the A position (Figure 44). 2. Align and evenly illuminate an IR image. 3. Adjust the focus by using the knob on the back of the camera until the image is brightest (Figure 45). 4. Press FA on the touch panel and set the sensitivity to 85, or high enough to obtain the correct alignment. 5. Turn the focus knob until the image is brightest. 6. Select either Single or Movie from the touch panel (Figure 46). 7. Begin the injection and start the timer by pressing the Inj button. (Continued on next page) *Feature only available on: FA+OCT, HRA2 and HRA+OCT models Figure 45: Focusing Knob Figure 46: Single or Movie Option 20
.")
23 Perform an FA (continued) Figure 47: Correctly Exposed FA Figure 48: Up One Level 8. Press the Acquire button, and allow the movie to acquire images until all the blood vessels have filled, adjusting the sensitivity dial as needed (Figure 47). Do not activate Automatic Real-time Tracking (ART) during the transit phase. 9. Press the Stop button on the touch panel. 10. Move to the fellow eye. 11. Activate ART and acquire single images of the fellow eye. 12. Continue acquiring single images with ART activated on both the fellow and study eye according to the practice protocol (typically every 30 seconds for the first 3 minutes, then an additional set at 5 minutes). 13. When all images have been acquired, click Save Images. 14. Once images have been saved, click Exit. 15. To delete single images right-click on an image and select Delete. 16. To edit a movie, right-click on the movie and select Expand. Within the movie, select a group of images to delete by holding down the CTRL key and left-clicking on each image(s), right-click on an image and select Delete. 17. To return from the expanded movie, click on the yellow Up One Level folder icon (Figure 48). 21

24 Perform an ICGA Figure 49: Filter Wheel A Position Figure 52: Correctly Exposed ICG How to Perform an ICGA* 1. Place the filter wheel in the A position (Figure 49). 2. Align and evenly illuminate an IR image. 3. Adjust the focus by using the knob on the back of the camera until the image is brightest (Figure 50). 4. Select ICGA from the touch panel. 5. Select either Single or Movie on the touch panel (Figure 51). 6. Begin the injection and start the timer by pressing the Inj button. 7. Press Acquire once to capture a single image (if Single is selected), or to begin the capture of a Movie (if Movie is selected). 8. Allow the movie to acquire images until the blood vessels are filled, adjusting the sensitivity as needed (Figure 52). (Continued on next page) *Feature only available on: HRA2 and HRA+OCT models Figure 50: Focusing Knob Figure 51: Single or Movie Option 22
25 Perform an ICGA (continued) Figure 53: Gain Control Button Figure 54: Up One Level 9. Press the Stop button on the touch panel. 10. Move to the fellow eye. 11. Activate Automatic Real-time Tracking (ART) by pressing the black Gain Control button on the touch panel (Figure 53). 12. Continue acquiring single images with ART activated on both the fellow and study eye according to the practice protocol (typically every 30 seconds for the first 3 minutes, then an additional set at 5 minutes). 13. When all images have been acquired, click Save Images. 14. Once images have been saved, click Exit. 15. To delete single images right-click on an image and select Delete. 16. To edit a movie, right-click on the movie and select Expand. Within the movie, select a group of images to delete by holding down the CTRL key and left-clicking on each image(s), right-click on an image and select Delete. 17. To return from the expanded movie, click on the yellow Up One Level folder icon (Figure 54). 23
. 2. Align and evenly illuminate an IR image. 3.")


26 Perform an FA + ICGA Figure 55: Filter Wheel A Position Figure 58: Correct Exposure How to Perform an FA + ICGA* 1. Place the filter wheel in the A position (Figure 55). 2. Align and evenly illuminate an IR image. 3. Adjust the focus by using the knob on the back of the camera until the image is brightest (Figure 56). 4. Select FA + ICGA on the touch panel and turn down the sensitivity to 25% to prevent over exposure (Figure 57). 5. Select Single or Movie on the touch panel. 6. Begin the injection and start the timer by pressing the Inj button. 7. Press Acquire immediately after the timer is started. 8. Allow the movie to acquire images until all the blood vessels are filled, adjusting the sensitivity as needed (Figure 58). (Continued on next page) *Feature only available on: HRA2 and HRA+OCT models Figure 56: Focusing Knob Figure 57: FA + ICGA Button 24
27 Perform an FA + ICGA (continued) Figure 59: Gain Control Button Figure 60: Up One Level 9. Press the Stop button on the touch panel. 10. Move to the fellow eye. 11. Activate Automatic Real-time Tracking (ART) by pressing the black Gain Control button on the touch panel (Figure 59). 12. Continue acquiring single images with ART activated on both the fellow and study eye according to the practice protocol (typically every 30 seconds for the first 3 minutes, then an additional set at 5 minutes). 13. When all images have been acquired, click Save Images. 14. Once images have been saved, click Exit. 15. To delete single images right-click on an image and select Delete. 16. To edit a movie, right-click on the movie and select Expand. Within the movie, select a group of images to delete by holding down the CTRL key and left-clicking on each image(s), right-click on an image and select Delete. 17. To return from the expanded movie, click on the yellow Up One Level folder icon (Figure 60). 25
. 5. Click Print. How to Print a Retina Single Exam Report Figure 61: Print Options 1.")
28 Print Retinal OCT Reports How to Print a Retina Overview Report 1. Open an OCT scan. 2. Select the Display tab. 3. Click the printer icon at the top of the screen. 4. In the dialogue box, highlight Overview Report from the Reports section of the print dialogue box (Figure 61). 5. Click Print. How to Print a Retina Single Exam Report Figure 61: Print Options 1. Open an OCT image in a patient file. 2. Select the Display tab. 3. Press the printer icon. 4. In the dialogue box, highlight the Retina Single Exam Report from the Reports section of the print dialogue box (Figure 62). 5. Click Print. (Continued on next page) Figure 62: Single Image 26

29 Print Retinal OCT Reports (continued) How to Print a Thickness Map OU Report 1. Click and drag the desired OD and OS volume scans to the lightbox. 2. Highlight both scans in the lightbox (Figure 63). 3. Right click on one of the highlighted scans and select Print. 4. In the dialogue box, highlight the Thickness Map Single Exam Report OU from the reports section of the print dialogue box. 5. Click Print. How to Print a Thickness Map Report Figure 63: Both Scans Highlighted in Lightbox 1. Open an OCT volume scan in a patient s file. 2. Select the Thickness Map tab. 3. Click the printer icon at the top of the screen. 4. In the dialogue box, highlight the Thickness Map Single Exam Report from the reports section of the print dialogue box 5. Click Print. 27

. 5. Click Print.")

. 5.")
30 Print an RNFL Single Exam Report OU with Fovea-to-Disc (FoDi ) Alignment How to Print an RNFL Single Exam Report OU with FoDi Figure 64: Selected Images 1. Click and drag a desired OD and OS RNFL scan to the lightbox. 2. Highlight both images in the lightbox (Figure 64). 3. Right-click on the highlighted images and select Print (Figure 65). 4. Select RNFL Single Exam Report OU with FoDi from the Reports section of the print dialog box (Figure 66). 5. Click Print. OR Figure 65: Context Menu 1. Double click on an RNFL scan. 2. Click on the Add Current Image to the Lightbox icon, or press the down arrow key on the keyboard to add the images to the lightbox (do this for one OD and one OS image) (Figure 67). 3. Highlight both images in the lightbox (Figure 64). 4. Right-click on the highlighted images and select Print (Figure 65). 5. Select RNFL Single Exam Report OU with FoDi from the Reports section of the print dialog box (Figure 66). 6. Click Print. Figure 66: Print Options Figure 67: Add Current Image to Lightbox Icon 28
 OCT scan on both eyes. 2. In the Image Viewing Window, click and drag the OCT scans for both OD and OS to the lightbox. 3. In the lightbox, hold down the CTRL key and select both OCT scans. 4.")
31 Print an Asymmetry Analysis Single Exam Report OU / Print an RNFL & Asymmetry Analysis Single Eye Exam Report How to Print an Asymmetry Analysis Single Exam Report OU 1. Acquire a Posterior Pole (P.Pole) OCT scan on both eyes. 2. In the Image Viewing Window, click and drag the OCT scans for both OD and OS to the lightbox. 3. In the lightbox, hold down the CTRL key and select both OCT scans. 4. Right-click on one of the highlighted OCT scans and select Print. 5. In the dialogue box select Asymmetry Analysis Single Exam Report OU (Figure 68). 6. Select Print. Figure 68: Print Asymmetry Analysis Single Exam Report OU How to Print an RNFL & Asymmetry Analysis Single Exam Report 1. From the Glaucoma application on the acquisition screen, acquire an RNFL and a Posterior Pole (P.Pole) scan from the preset selections. 2. In the Display View, click and drag the RNFL and Posterior Pole scan for one eye into the lightbox. 3. In the lightbox, hold down the CTRL key and select both OCT scans. 4. Right-click on one of the OCT scans and select Print. 5. In the dialogue box select RNFL & Asymmetry Analysis Single Exam Report (Figure 69). 6. Select Print. Figure 69: Print RNFL & Asymmetry Analysis Single Eye Exam Report 29

32 Print Multiple Images on a Page How to Print Multiple Images on a Single Page (OCT) Figure 70: Expand OCT 1. Click and drag the desired OCT scan(s) to the Lightbox. a. If printing single images from a volume scan, right-click on the volume scan and select Expand to choose the desired images (Figure 70). 2. Once all desired images are added to the Lightbox, select them all. 3. Right click on one of the highlighted images and select Print. 4. In the dialogue box, choose how many images to print on the page. Each image selected will count as two images on the report. (Figure 71). 5. Click Print. How to Print Multiple Images on a Single Page (Fundus) 1. Click and drag the desired fundus images to the Lightbox. a. If printing images from a movie, right-click on the movie and select Expand to select desired images (Figure 70). 2. Once desired images are added to the lightbox, select them all. 3. Right click on one of the highlighted images and select Print. 4. In the dialogue box, choose how many images to print on the page (Figure 71). 5. Click Print. Figure 71: Select Print Options 30


33 Print a Follow-Up Report How to Print a Follow-Up Report 1. Open an OCT image in a patient file that is associated with a series. Images in the series are designated by small boxes on the image icon (Figure 72). 2. Select the Display or Thickness Profile tab. 3. Press the printer icon at the top of the screen. 4. Select one of the Follow-Up reports from the Reports section of the print dialogue box (Figure 73). 5. Click Print. Figure 72: Print Options Figure 73: Print Options 31

.")
. 9.")
34 Transfer Patient Images How to Transfer Images Between Patient Records Figure 74: No Split Icon Figure 75: Select Change Patient 1. Load both patient records with the correct and incorrect files to the right side of the database window. 2. Open the incorrect patient record. 3. Click the No Split icon to place all the images in one pane (Figure 74). 4. Highlight all images to be transferred. 5. Right-click on the highlighted images. 6. Select Change Patient from the menu (Figure 75). 7. Select from the drop-down list the name of the patient that the images should be transferred to. Click OK (Figure 76). 8. Click Yes to transfer the images (Figure 77). 9. If all images are transferred, delete the blank patient record (if no longer needed). Figure 76: Select Name Figure 77: Click Yes 32
. 2.")
. 5.")

35 Archive Images How to Archive Images Figure 78: Database Icon Figure 79: Unload Icon 1. Return to the main database window (Figure 78). 2. Select Unload All from the icons on the menu bar (Figure 79). 3. Click the Database menu at the top of the window. 4. Select Archive Images (Figure 80). 5. Select the appropriate drive from the drop-down menu on the Archive Data window (Figure 81). 6. Click Archive. 7. Allow the process to run (Figure 82). 8. When the process is complete, a dialog box will appear stating Archiving has been completed successfully. Figure 80: Database Menu Figure 81: Archive Window Figure 82: Wait While Archiving 33

36 Safely Clean the Lens & Delete a Patient Record How to Safely Clean the Lens 1. Remove the lens from the mount by turning counter-clockwise. 2. Use a blower brush to remove any loose particles. 3. With a soft microfiber cloth, wipe gently in a circular manner beginning in the center of the lens and working your way out to the edge. (If this does not clear the lens, it is best to use a few drops of pure (99.9%) ethyl alcohol on a microfiber cloth and repeat until the lens is clear.) DO NOT USE: Acetone, methanol or cleaning tissues, as these can damage the lens. 4. Place the lens back onto the mount by lining up the red dots and turning clockwise until it clicks into place (Figure 83). Figure 83: Replace the Lens How to Delete a Patient Record 1. From the Database Window, load the patient record to be deleted. 2. From the Record menu, select Delete from the drop down list. 3. Check the box to confirm that you want to permanently delete this patient record. 4. Click OK to delete the patient record. 34
37 For more information, call or visit Corporate Headquarters Heidelberg Engineering GmbH Tiergartenstr Heidelberg Germany Tel Fax UK Office Heidelberg Engineering Ltd. 55 Marlowes Breakspear Way Hemel Hempstead Hertfordshire HP1 1LE Tel Fax US Office Heidelberg Engineering, Inc 1808 Aston Avenue, Suite 130 Carlsbad, CA Tel Fax SPECTRALIS, HEYEX, FoDi and BluePeak are trademarks of Heidelberg Engineering, Inc., or Heidelberg Engineering GmbH.
RegionFinder The perfect Use. SPECTRALIS HRA, HRA+OCT and SPECTRALIS OCT
 RegionFinder The perfect Use SPECTRALIS HRA, HRA+OCT and SPECTRALIS OCT RegionFinder - The perfect Use SPECTRALIS HRA, HRA+OCT and SPECTRALIS OCT General workflow to acquire the perfect AF image Adjust
DRCR.net Image Acquisition Protocol
 DRCR.net Image Acquisition Protocol Optical Coherence Tomography Angiography (OCT-A) Using: Optovue AngioVue Version 3.0 August 14, 2017 DRCR.net OCT-A Optovue AngioVue Procedure Manual 3.0 8-14-17 Table
Sets distance refraction. Moves camera forward / backward. Moves camera up / down. Moves camera left / right. Starts image acquisition (HRT 3 only)
") The perfect Image General workflow Do not conduct any examination beforehand that can disturb the tear film (e.g., examination using a contact glass, applanation tonometry). Explain the examination process
The perfect Image General workflow Do not conduct any examination beforehand that can disturb the tear film (e.g., examination using a contact glass, applanation tonometry). Explain the examination process
Version 1.0. th March 2011
 Optical Coherence Tomography Scan and Retinal Imagingg Version 1.0 http://www.ukbiobank.ac.uk/ 5 th March 2011 This manual details the procedure for Scan and Retinal Imagingg at an Assessment Centre of
Diabetic Retinopathy Clinical Research Network (DRCR.net) UWF Optos Imaging Protocol. Version /14/14
 UWF Optos Imaging Protocol. Version /14/14") Diabetic Retinopathy Clinical Research Network (DRCR.net) UWF Optos Imaging Protocol Version 1.0 10/14/14 DRCR.net UWF Imaging Protocol FINAL 10-14-14 Page 1 of 14 Table of Contents Background... 3 P200Tx
Diabetic Retinopathy Clinical Research Network (DRCR.net) UWF Optos Imaging Protocol Version 1.0 10/14/14 DRCR.net UWF Imaging Protocol FINAL 10-14-14 Page 1 of 14 Table of Contents Background... 3 P200Tx
Diabetic Retinopathy Clinical Research Network (DRCR.net) UWF Optos 200Tx Imaging Protocol. Version 3.0 9/19/16
 UWF Optos 200Tx Imaging Protocol. Version 3.0 9/19/16") Diabetic Retinopathy Clinical Research Network (DRCR.net) UWF Optos 200Tx Imaging Protocol Version 3.0 9/19/16 DRCR.net UWF 200 Tx Imaging Protocol V3.0 9-19-15 Final Page 1 of 14 Table of Contents Background...
Diabetic Retinopathy Clinical Research Network (DRCR.net) UWF Optos 200Tx Imaging Protocol Version 3.0 9/19/16 DRCR.net UWF 200 Tx Imaging Protocol V3.0 9-19-15 Final Page 1 of 14 Table of Contents Background...
Fundus Photograph Reading Center
 Autofluorescence Using Confocal Scanning Laser Ophthalmoscope (cslo) Instruments (AF-D) 8010 Excelsior Drive, Suite 100, Madison WI 53717 Telephone: (608) 410-0560 Fax: (608) 410-0566 Table of Contents
The ideal K-12 science microscope solution. User Guide. for use with the Nova5000
 The ideal K-12 science microscope solution User Guide for use with the Nova5000 NovaScope User Guide Information in this document is subject to change without notice. 2009 Fourier Systems Ltd. All rights
Fire CR Calibration Guide
 1 Fire CR Calibration Guide This reference guide will guide you through the steps to complete the calibration for the Fire CR.. Getting Started: 1. Click on the Opal Icon on the Desktop. Figure 1 2. Once
Things to check before start-up.
 Byeong Cha Page 1 11/24/2009 Manual for Leica SP2 Confocal Microscope Enter you name, the date, the time, and the account number in the user log book. Things to check before start-up. Make sure that your
ISCapture User Guide. advanced CCD imaging. Opticstar
 advanced CCD imaging Opticstar I We always check the accuracy of the information in our promotional material. However, due to the continuous process of product development and improvement it is possible
Zeiss AxioImager.Z2 Brightfield Protocol
 Zeiss AxioImager.Z2 Brightfield Protocol 1) System Startup Please note put sign-up policy. You must inform the facility at least 24 hours beforehand if you can t come; otherwise, you will receive a charge
Accutome Connect Visual Aid
 Accutome Connect Visual Aid Table of Contents A-Scan Mode Page 3 B-Scan Mode Page 15 UBM.. Page 23 B-Scan/UBM Recording.. Page 31 2 Accutome Connect: A-Scan 3 Probe Position 2. 1. Insert probe through
Zeiss LSM 780 Protocol
 Zeiss LSM 780 Protocol 1) System Startup F Please note the sign-up policy. You must inform the facility at least 24 hours beforehand if you can t come; otherwise, you will receive a charge for unused time.
User Manual Veterinary
 Veterinary Acquisition and diagnostic software Doc No.: Rev 1.0.1 Aug 2013 Part No.: CR-FPM-04-022-EN-S 3DISC, FireCR, Quantor and the 3D Cube are trademarks of 3D Imaging & Simulations Corp, South Korea,
Contents STARTUP MICROSCOPE CONTROLS CAMERA CONTROLS SOFTWARE CONTROLS EXPOSURE AND CONTRAST MONOCHROME IMAGE HANDLING
 Operations Guide Contents STARTUP MICROSCOPE CONTROLS CAMERA CONTROLS SOFTWARE CONTROLS EXPOSURE AND CONTRAST MONOCHROME IMAGE HANDLING Nikon Eclipse 90i Operations Guide STARTUP Startup Powering Up Fluorescence
SCANNING IMAGES - USER S GUIDE. Scanning Images with Epson Smart Panel and PhotoShop [for Epson 1670 scanners]
![SCANNING IMAGES - USER S GUIDE. Scanning Images with Epson Smart Panel and PhotoShop [for Epson 1670 scanners]](/thumbs/89/98942649.jpg "SCANNING IMAGES - USER S GUIDE. Scanning Images with Epson Smart Panel and PhotoShop [for Epson 1670 scanners]") University of Arizona Information Commons Training 1 SCANNING IMAGES - USER S GUIDE Scanning Images with Epson Smart Panel and PhotoShop [for Epson 1670 scanners] p.2 Introduction and Overview Differences
University of Arizona Information Commons Training 1 SCANNING IMAGES - USER S GUIDE Scanning Images with Epson Smart Panel and PhotoShop [for Epson 1670 scanners] p.2 Introduction and Overview Differences
Using the Hitachi 3400-N VP-SEM
 Using the Hitachi 3400-N VP-SEM Opening the Chamber to Load Specimens (This may also be done later using the software) 1. Click the AIR button on the front of the machine: 2. Wait a few minutes until you
Navigated Laser Therapy. A New Era in Retinal Disease Management
 Navigated Laser Therapy A New Era in Retinal Disease Management Bringing Navigation to Retina Treatment Navilas Laser System To unleash the full potential of Retina Navigation, the Navilas Laser System
ScanArray Overview. Principle of Operation. Instrument Components
 ScanArray Overview The GSI Lumonics ScanArrayÒ Microarray Analysis System is a scanning laser confocal fluorescence microscope that is used to determine the fluorescence intensity of a two-dimensional
1.3. Before loading the holder into the TEM, make sure the X tilt is set to zero and the goniometer locked in place (this will make loading easier).
.") JEOL 200CX operating procedure Nicholas G. Rudawski ngr@ufl.edu (805) 252-4916 1. Specimen loading 1.1. Unlock the TUMI system. 1.2. Load specimen(s) into the holder. If using the double tilt holder, ensure
JEOL 200CX operating procedure Nicholas G. Rudawski ngr@ufl.edu (805) 252-4916 1. Specimen loading 1.1. Unlock the TUMI system. 1.2. Load specimen(s) into the holder. If using the double tilt holder, ensure
Zeiss LSM 880 Protocol
 Zeiss LSM 880 Protocol 1) System Startup Please note put sign-up policy. You must inform the facility at least 24 hours beforehand if you can t come; otherwise, you will receive a charge for unused time.
How do I acquire a high-quality scan on my CIRRUS HD-OCT? (Part 1 of 3 iris alignment)
") How do I acquire a high-quality scan on my CIRRUS HD-OCT? (Part 1 of 3 iris alignment) ZEISS Quick Help: CIRRUS HD-OCT Acquiring a good-quality scan on a CIRRUS HD-OCT is a 3-part process, which includes
How do I acquire a high-quality scan on my CIRRUS HD-OCT? (Part 1 of 3 iris alignment) ZEISS Quick Help: CIRRUS HD-OCT Acquiring a good-quality scan on a CIRRUS HD-OCT is a 3-part process, which includes
Tinker Tuesday Project - Drinking Glasses
 Tinker Tuesday Project - Drinking Glasses 1. Open CorelDRAW and create a new document. Near the top left corner of the screen, click File, and then click Import on the resulting menu. Select an image from
Going beyond the surface of your retina OCT-HS100 OPTICAL COHERENCE TOMOGRAPHY
 Going beyond the surface of your retina OCT-HS100 OPTICAL COHERENCE TOMOGRAPHY Automatic functions make examinations short and simple. Perform the examination with only two simple mouse clicks! 1. START
Going beyond the surface of your retina OCT-HS100 OPTICAL COHERENCE TOMOGRAPHY
 Going beyond the surface of your retina OCT-HS100 OPTICAL COHERENCE TOMOGRAPHY Full Auto OCT High specifications in a very compact design Automatic functions make examinations short and simple. Perform
KoPa Scanner. User's Manual A99. Ver 1.0. SHENZHEN OSTEC OPTO-ELECTRONIC TECHNOLOGY CO.,LTD.
 KoPa Scanner A99 User's Manual Ver 1.0 SHENZHEN OSTEC OPTO-ELECTRONIC TECHNOLOGY CO.,LTD. http://www.ostec.com.cn Content Chapter 1 Start... 1 1.1 Safety Warnings and Precautions... 1 1.2 Installation
Importing and processing gel images
 BioNumerics Tutorial: Importing and processing gel images 1 Aim Comprehensive tools for the processing of electrophoresis fingerprints, both from slab gels and capillary sequencers are incorporated into
Exploring Photoshop Tutorial
 Exploring Photoshop Tutorial Objective: In this tutorial we will create a poster composed of three distinct elements: a Bokeh, an image and title text. The Bokeh is an effect which is sometimes seen in
Photo Story Tutorial
 Photo Story Tutorial To create a new Photo Story Project: 1. Start 2. Programs 3. Photo Story 4. Begin a New Story 5. Next 6. Import Pictures 7. Click on your Flash Drive s name from the window on the
CHAPTER1: QUICK START...3 CAMERA INSTALLATION... 3 SOFTWARE AND DRIVER INSTALLATION... 3 START TCAPTURE...4 TCAPTURE PARAMETER SETTINGS... 5 CHAPTER2:
 Image acquisition, managing and processing software TCapture Instruction Manual Key to the Instruction Manual TC is shortened name used for TCapture. Help Refer to [Help] >> [About TCapture] menu for software
BX-61: Brightfield Instruction /Continue to scroll for Fluorescent Instuctions
 BX-61: Brightfield Instruction /Continue to scroll for Fluorescent Instuctions Starting up: Schematic of Olympus BX-61. 1. Turn on Olympus microscope power box (left of microscope) with toggle switch on
Figure 1 The Raith 150 TWO
 RAITH 150 TWO SOP Figure 1 The Raith 150 TWO LOCATION: Raith 150 TWO room, Lithography area, NanoFab PRIMARY TRAINER: SECONDARY TRAINER: 1. OVERVIEW The Raith 150 TWO is an ultra high resolution, low voltage
The TRC-NW8F Plus: As a multi-function retinal camera, the TRC- NW8F Plus captures color, red free, fluorescein
 The TRC-NW8F Plus: By Dr. Beth Carlock, OD Medical Writer Color Retinal Imaging, Fundus Auto-Fluorescence with exclusive Spaide* Filters and Optional Fluorescein Angiography in One Single Instrument W
Training Guide for Carl Zeiss AxioZoom V16 Stereo Microscope
 Training Guide for Carl Zeiss AxioZoom V16 Stereo Microscope ZEN 2012 Optical Imaging & Vital Microscopy Core Baylor College of Medicine (2017) Power ON Routine 1 2 If you require fluorescence imaging,
DigiScope II v3 TM Aperture Scope User s Manual
 DigiScope II v3 TM Aperture Scope User s Manual Welcome Thank you for choosing DigiScope II v3 TM Aperture scope! The DigiScope II v3 TM Aperture Scope is an exciting new device to Capture and record the
User Operation of JEOL 1200 EX II
 **Log onto Computer** Open item program Start Up Procedure User Operation of JEOL 1200 EX II 1. If scope is not running, locate an electron microscopy technician (EMT) to find out why not. 2. Turn up brightness
RENISHAW INVIA RAMAN SPECTROMETER
 STANDARD OPERATING PROCEDURE: RENISHAW INVIA RAMAN SPECTROMETER Purpose of this Instrument: The Renishaw invia Raman Spectrometer is an instrument used to analyze the Raman scattered light from samples
What s Fundus photography s purpose? Why do we take them? Why do we do it? Why do we do it? Why do we do it? 11/3/2014. To document the retina
 What s Fundus photography s purpose? To document the retina Photographers role to show the retina Document other ocular structures Why do we take them? Why do we do it? We as photographers help the MD
Going beyond the surface of your retina
 Going beyond the surface of your retina OCT-HS100 Optical Coherence Tomography Canon s expertise in optics and innovative technology have resulted in a fantastic 3 μm optical axial resolution for amazing
2 How to operate the microscope/obtain an image
 Morgagni Operating Instructions 50079 010912 2-1 2 ow to operate the microscope/obtain an image 2.1 Starting the microscope 2.1.1 Starting the microscope with several manually-operated steps 1. Turn on
University Libraries ScanPro 3000 Microfilm Scanner
 University Libraries ScanPro 3000 Microfilm Scanner Help Guide Table of Contents Getting Started 3 Loading the Film 4-5 Viewing Your Film 6-7 Motorized Roll Film Control 6 Crop Box 7 Using the Toolbar
House Design Tutorial
 House Design Tutorial This House Design Tutorial shows you how to get started on a design project. The tutorials that follow continue with the same plan. When you are finished, you will have created a
AxioVision 4.5 Brightfield Image Capture Procedure
 AxioVision 4.5 Brightfield Image Capture Procedure 1. STARTING-UP PROCEDURE: Remove blue dust cover and place on shelf under microscope. Turn on the halogen lamp by pushing the switch at the back right
1. Preliminary sample preparation
 FEI Helios NanoLab 600 standard operating procedure Nicholas G. Rudawski ngr@ufl.edu (352) 392 3077 (office) (805) 252-4916 (cell) Last updated: 03/02/18 What this document provides: an overview of basic
1 Placing particles on the slide
 Aerosols Transport Particle Removal Experiment E.S. Kenney, J.A. Taylor, and G. Ahmadi 1 Placing particles on the slide 1.1 Swing the light beneath the test section down and to the left. Figure 1: Light
Visioneer OneTouch Scanner. Installation Guide FOR WINDOWS
 Visioneer OneTouch Scanner Installation Guide FOR WINDOWS TABLE OF CONTENTS i TABLE OF CONTENTS Getting Started with your new Scanner....................... 1 Step 1: Installing the Scanner Software.......................
Renishaw InVia Raman microscope
 Laser Spectroscopy Labs Renishaw InVia Raman microscope Operation instructions 1. Turn On the power switch, system power switch is located towards the back of the system on the right hand side. Wait ~10
Color Correction and Enhancement
 10 Approach to Color Correction 151 Color Correction and Enhancement The primary purpose of Photoshop is to act as a digital darkroom where images can be corrected, enhanced, and refined. How do you know
Photoshop Elements Hints by Steve Miller
 2015 Elements 13 A brief tutorial for basic photo file processing To begin, click on the Elements 13 icon, click on Photo Editor in the first box that appears. We will not be discussing the Organizer portion
Optika ISview. Image acquisition and processing software. Instruction Manual
 Optika ISview Image acquisition and processing software Instruction Manual Key to the Instruction Manual IS is shortened name used for OptikaISview Square brackets are used to indicate items such as menu
Zeiss Deconvolution Microscope: A Quick Guide
 Zeiss Deconvolution Microscope: A Quick Guide Start-up Uncover microscope. Do not put dust cover on the floor. Plug in both cameras. The default camera is the AxioCam HRm (monochrome camera) for fluorescence
ScanGear CS-U 5.3 for CanoScan FB630U/FB636U Color Image Scanner User s Guide
 ScanGear CS-U 5.3 for CanoScan FB630U/FB636U Color Image Scanner User s Guide Copyright Notice 1999 Canon Inc. This manual is copyrighted with all rights reserved. Under the copyright laws, this manual
HP DesignJet T520. Quick Start Guide. Copyright Notice
 HP DesignJet T520 Quick Start Guide Copyright Notice The copyright law of the United States (Title 17, U.S. Code) governs the making of copies or other reproductions of copyrighted material. The person
Photoshop CC Editing Images
 Photoshop CC Editing Images Rotate a Canvas A canvas can be rotated 90 degrees Clockwise, 90 degrees Counter Clockwise, or rotated 180 degrees. Navigate to the Image Menu, select Image Rotation and then
Digital Portable Overhead Document Camera LV-1010
 Digital Portable Overhead Document Camera LV-1010 Instruction Manual 1 Content I Product Introduction 1.1 Product appearance..3 1.2 Main functions and features of the product.3 1.3 Production specifications.4
OPT3: Operating Procedure for Horiba Jobin Yvon LabRam Aramis Raman/PL System See LabSpec_6_2 General User Quick Start Guide on the computer desktop
 OPT3: Operating Procedure for Horiba Jobin Yvon LabRam Aramis Raman/PL System See LabSpec_6_2 General User Quick Start Guide on the computer desktop 1. Log in usage using the SMIF web site 2. Turn power
Davis Art Images: Create and Share Slideshows
 Davis Art Images: Create and Share Slideshows Davis Art Images, you can create and curate custom sets of images to use in your art room with Tags. Your Tagged Image Sets can then be viewed and presented
Tinker Tuesday Project - Pumpkin Carving
 Tinker Tuesday Project - Pumpkin Carving 1. Acquire a small pumpkin (between six and seven inches tall excluding the stem). A full size pumpkin will not fit in the engraver. 2. Use a knife to remove the
GlassSpection User Guide
 i GlassSpection User Guide GlassSpection User Guide v1.1a January2011 ii Support: Support for GlassSpection is available from Pyramid Imaging. Send any questions or test images you want us to evaluate
4 PHOTOSHOP SPECIAL EFFECTS HACKS FROM SCOTT KELBY
 4 PHOTOSHOP SPECIAL EFFECTS HACKS FROM SCOTT KELBY You can do some pretty cool stuff in Photoshop, with most tiny tweaks taking no time at all. However, for some of us (myself included) it s hard to know
Apple Photos Quick Start Guide
 Apple Photos Quick Start Guide Photos is Apple s replacement for iphoto. It is a photograph organizational tool that allows users to view and make basic changes to photos, create slideshows, albums, photo
KODAK Dental Imaging Software. Quick Start Guide
 KODAK Dental Imaging Software Quick Start Guide Notice Congratulations on your purchase of The KODAK Dental Imaging Software. Thank you for your confidence in our products and we will do all in our power
GXCapture 8.1 Instruction Manual
 GT Vision image acquisition, managing and processing software GXCapture 8.1 Instruction Manual Contents of the Instruction Manual GXC is the shortened name used for GXCapture Square brackets are used to
Olympus Digital Microscope Camera (DP70) checklist
 checklist") Smith College - July 2005 Olympus Digital Microscope Camera (DP70) checklist CONTENT, page no. Camera Information, 1 Startup, 1 Retrieve an Image, 2 Microscope Setup, 2 Capture, 3 Preview. 3 Color Balans,
Smith College - July 2005 Olympus Digital Microscope Camera (DP70) checklist CONTENT, page no. Camera Information, 1 Startup, 1 Retrieve an Image, 2 Microscope Setup, 2 Capture, 3 Preview. 3 Color Balans,
LSM 800 Confocal Microscope Standard Operation Protocol
 LSM 800 Confocal Microscope Standard Operation Protocol Turning on the system 1. Switch on the Main switch (labeled 1 and 2 ) mounted on the wall. 2. Turn the Laser Key (labeled 3 ) 90 clockwise for power
Picture Style Editor Ver Instruction Manual
 ENGLISH Picture Style File Creating Software Picture Style Editor Ver. 1.18 Instruction Manual Content of this Instruction Manual PSE stands for Picture Style Editor. In this manual, the windows used in
ARCHICAD Introduction Tutorial
 Starting a New Project ARCHICAD Introduction Tutorial 1. Double-click the Archicad Icon from the desktop 2. Click on the Grey Warning/Information box when it appears on the screen. 3. Click on the Create
RAITH e-line OPERATING INSTRUCTIONS
 RAITH e-line OPERATING INSTRUCTIONS 1) LOADING A SAMPLE a. Start the system i. On the Column PC (Right side monitor [R]), select the SmartSEM icon to on the desktop to begin the column software. ii. On
KEYENCE VKX LASER-SCANNING CONFOCAL MICROSCOPE Standard Operating Procedures (updated Oct 2017)
") KEYENCE VKX LASER-SCANNING CONFOCAL MICROSCOPE Standard Operating Procedures (updated Oct 2017) 1 Introduction You must be trained to operate the Laser-scanning confocal microscope (LSCM) independently.
KEYENCE VKX LASER-SCANNING CONFOCAL MICROSCOPE Standard Operating Procedures (updated Oct 2017) 1 Introduction You must be trained to operate the Laser-scanning confocal microscope (LSCM) independently.
Photoshop CC: Essentials
 Photoshop CC: Essentials Summary Workspace Overview... 2 Exercise Files... 2 Selection Tools... 3 Select All, Deselect, And Reselect... 3 Adding, Subtracting, and Intersecting... 3 Working with Layers...
Micro-Image Capture 8 Installation Instructions & User Guide
 Micro-Image Capture 8 Installation Instructions & User Guide Software installation: Micro-Image Capture Software 1. Load Micro-Image Capture software CD onto host PC. Auto Run should start driver/software
MEASUREMENT CAMERA USER GUIDE
 How to use your Aven camera s imaging and measurement tools Part 1 of this guide identifies software icons for on-screen functions, camera settings and measurement tools. Part 2 provides step-by-step operating
User Guide of ISCapture
 User Guide of ISCapture For Windows2000/XP/Vista(32bit/64bit)/Win7(32bit/64bit) Xintu Photonics Co., Ltd. Version: 2.6 I All the users of Xintu please kindly note that the information and references in
Teach Yourself Adobe Photoshop Topic 9: Photo Retouching Part 2
 http://www.gerrykruyer.com Teach Yourself Adobe Photoshop Topic 9: Photo Retouching Part 2 In the last week s lesson, you repaired damaged areas of an image, removed unwanted parts of an image, cloned
Quick Guide for Zeiss 710 Laser Scanning Confocal MGH Cancer Center
 Quick Guide for Zeiss 710 Laser Scanning Confocal MGH Cancer Center For any questions or concerns, please contact: Linda Nieman lnieman@mgh.harvard.edu Office: (617) 643-9684 Cell: (512) 565-8076 Chenyue
Fundus Photograph Reading Center
 Spectral Domain Optical Coherence Tomography (SD-OCT) Heidelberg Spectralis 8010 Excelsior Drive, Suite 100, Madison WI 53717 Telephone: (608) 410-0560 Fax: (608) 410-0566 Table of Contents 1. Heidelberg
Instructions for Rotary Marking
 (Original Instruction) Instructions for Rotary Marking COBALT LT lasermarktech.com Laser Marking Technologies, LLC 1 Thank you for choosing LMT for your laser needs! please feel free to contact us per
WORKFLOW GUIDE. Trimble TX8 3D Laser Scanner Camera and Nodal Ninja R1w/RD5 Bracket Kit
 WORKFLOW GUIDE Trimble TX8 3D Laser Scanner Camera and Nodal Ninja R1w/RD5 Bracket Kit Version 1.00 Revision A August 2014 1 Corporate Office Trimble Navigation Limited 935 Stewart Drive Sunnyvale, CA
1 ImageBrowser Software User Guide 5.1
 1 ImageBrowser Software User Guide 5.1 Table of Contents (1/2) Chapter 1 What is ImageBrowser? Chapter 2 What Can ImageBrowser Do?... 5 Guide to the ImageBrowser Windows... 6 Downloading and Printing Images
CHROMACAL User Guide (v 1.1) User Guide
 User Guide") CHROMACAL User Guide (v 1.1) User Guide User Guide Notice Hello and welcome to the User Guide for the Datacolor CHROMACAL Color Calibration System for Optical Microscopy, a cross-platform solution that
CHROMACAL User Guide (v 1.1) User Guide User Guide Notice Hello and welcome to the User Guide for the Datacolor CHROMACAL Color Calibration System for Optical Microscopy, a cross-platform solution that
House Design Tutorial
 Chapter 2: House Design Tutorial This House Design Tutorial shows you how to get started on a design project. The tutorials that follow continue with the same plan. When we are finished, we will have created
Progeny Imaging. User Guide V x and Higher. Part Number: ECN: P1808 REV. F
 Progeny Imaging User Guide V. 1.6.0.x and Higher Part Number: 00-02-1598 ECN: P1808 REV. F Contents 1 About This Manual... 5 How to Use this Guide... 5 Text Conventions... 5 Getting Assistance... 6 2 Overview...
Quick Guide for Zeiss 710 Laser Scanning Confocal MGH Cancer Center
 Quick Guide for Zeiss 710 Laser Scanning Confocal MGH Cancer Center For any questions or concerns, please contact: Linda Nieman lnieman@mgh.harvard.edu Office: (617) 643-9684 Cell: (512) 565-8076 Chenyue
Toothbrush Holder. A drawing of the sheet metal part will also be created.
 Prerequisite Knowledge Previous knowledge of the following commands is required to complete this lesson; Sketch (Line, Centerline, Circle, Add Relations, Smart Dimension,), Extrude Boss/Base, and Edit
LEICA TCS SP5 AOBS TANDEM USER MANUAL
 LEICA TCS SP5 AOBS TANDEM USER MANUAL STARTING THE SYSTEM...2 THE LAS AF SOFTWARE...3 THE «ACQUIRE» MENU...5 CHOOSE AND CREATE A SETTING...6 THE CONTROL PANEL...8 THE DMI6000B MICROSCOPE...10 ACQUIRE ONE
Picture Style Editor Ver Instruction Manual
 ENGLISH Picture Style File Creating Software Picture Style Editor Ver. 1.12 Instruction Manual Content of this Instruction Manual PSE is used for Picture Style Editor. In this manual, the windows used
Introduction to: Microsoft Photo Story 3. for Windows. Brevard County, Florida
 Introduction to: Microsoft Photo Story 3 for Windows Brevard County, Florida 1 Table of Contents Introduction... 3 Downloading Photo Story 3... 4 Adding Pictures to Your PC... 7 Launching Photo Story 3...
Stitch n Bloom Jacket
 Stitch n Bloom Jacket Created by Debra Rutledge This all-over floral arrangement is designed for embellishing a ready-made denim jacket, but may be easily modified to accommodate any jacket style. Supplies
AutoCAD Tutorial First Level. 2D Fundamentals. Randy H. Shih SDC. Better Textbooks. Lower Prices.
 AutoCAD 2018 Tutorial First Level 2D Fundamentals Randy H. Shih SDC PUBLICATIONS Better Textbooks. Lower Prices. www.sdcpublications.com Powered by TCPDF (www.tcpdf.org) Visit the following websites to
This document contains work instructions related to utilizing the dental imaging application, XrayVision version 4.0.
 Apteryx Inc. 313 S. High St. Suite 200 Akron, OH 44308 330-376-0889 voice 330-376-0788 fax sales@apteryx.com www.apteryx.com XrayVision Quick Start User Manual Abstract Abstract Abstract This document
Leica Sp5 II Confocal User Guide
 Leica Sp5 II Confocal User Guide Turning on the Confocal System (instructions are posted in the room) 1. Turn on Laser Power Button 2. Turn Key to On position 3. Turn on Scanner Power Button 4. Turn on
The user should already be familiar with operation of the instrument in STEM mode, use of the Microscope Control interface, and TIA.
 FEI Tecnai F20 S/TEM: EDS system operation Nicholas G. Rudawski ngr@ufl.edu (805) 252-4916 (352) 392-3077 Last updated: 01/22/18 The user should already be familiar with operation of the instrument in
Picture Style Editor Ver Instruction Manual
 ENGLISH Picture Style File Creating Software Picture Style Editor Ver. 1.15 Instruction Manual Content of this Instruction Manual PSE stands for Picture Style Editor. indicates the selection procedure
3D Capture. Using Fujifilm 3D Camera. Copyright Apis Footwear
 3D Capture Using Fujifilm 3D Camera Copyright 201 4 Apis Footwear Camera Settings Before shooting 3D images, please make sure the camera is set as follows: a. Rotate the upper dial to position the red
MAKE SURE YOUR SLIDES ARE CLEAN (TOP & BOTTOM) BEFORE LOADING DO NOT LOAD SLIDES DURING SOFTWARE INITIALIZATION
 BEFORE LOADING DO NOT LOAD SLIDES DURING SOFTWARE INITIALIZATION") Olympus VS120-L100 Slide Scanner Standard Operating Procedure Startup 1) Red power bar switch (behind monitor) 2) Computer 3) Login: UserVS120 account (no password) 4) Double click: WAIT FOR INITIALIZATION
Olympus VS120-L100 Slide Scanner Standard Operating Procedure Startup 1) Red power bar switch (behind monitor) 2) Computer 3) Login: UserVS120 account (no password) 4) Double click: WAIT FOR INITIALIZATION
RICOH Stereo Camera Software R-Stereo-GigE-Calibration
 RICOH Stereo Camera Software R-Stereo-GigE-Calibration User's Guide RICOH Industrial Solutions Inc. 1/18 Contents 1. FUNCTION OVERVIEW... 3 1.1 Operating Environment... 3 2. OPERATING PROCEDURES... 4 3.
LSM 710 Confocal Microscope Standard Operation Protocol
 LSM 710 Confocal Microscope Standard Operation Protocol Basic Operation Turning on the system 1. Switch on Main power switch 2. Switch on System / PC power button 3. Switch on Components power button 4.
User Manual for HoloStudio M4 2.5 with HoloMonitor M4. Phase Holographic Imaging
 User Manual for HoloStudio M4 2.5 with HoloMonitor M4 Phase Holographic Imaging 1 2 HoloStudio M4 2.5 Software instruction manual 2013 Phase Holographic Imaging AB 3 Contact us: Phase Holographic Imaging
JSM 6060 LV SCANNING ELECTRON MICROSCOPE STANDARD OPERATING PROCEDURES
 JSM 6060 LV SCANNING ELECTRON MICROSCOPE STANDARD OPERATING PROCEDURES RULES All users must go through a series of standard operation procedure training. For more information contact: Longlong Liao Teaching