How to Upholster Furniture
|
|
|
- Adrian Park
- 6 years ago
- Views:
Transcription

1 All rights reserved. All literary work contained within How to Upholster Furniture belongs to and is the sole property of its authors, Betty and Richard Hanson. Reproduction, copying, or any other form of use of pieces contained within the ebook is strictly forbidden without prior written permission from the authors. Note: The owner of this ebook is permitted to print ONE copy for his or her own use. Limits of liability / Disclaimer of Warranty: The authors make no representation or warranties with respect to the accuracy, applicability, fitness, or completeness to this program. They disclaim any warranties (expressed or implied), merchantability, or fitness for any particular purpose. The authors shall in no event be held liable for any loss or damages, including but not limited to special, incidental, consequential, or other damages. 1
2 Table of Contents All Rights Reserved.. Disclaimer and Liability. Introduction. 6 Tools. 8 Materials. 11 Special Notes.. 13 Section 1: Reupholstering Slip Seat 14 A. Measure for Fabric.. 14 B. Remove Slip Seat From Frame 15 C. Remove Old Fabric. 15 D. Examine Padding. 16 E. Examine and Prepare Base F. Apply Padding. 17 Foam Padding.. 17 Cotton Padding. 18 G. Cut and Apply Fabric 19 Apply Fabric to Base 19 Corners.. 21 H. Apply Bottom Cover. 23 I. Re-attach to Frame.. 24 Section 2: Sewing. 25 A. Self-Welt
3 B. Throw Cushion. 27 Cutting Fabric 27 Sewing Self-welt into Cushion. 28 Sewing 2 nd Piece to Welted Piece. 30 Stuff Cushion. 31 Blindstitching Cushion.. 32 Section 3: Reupholstering Chair.. 34 A. Measure Chair for Fabric 35 B. Frame Identification.. 37 C. Remove Old Fabric from Chair. 38 Bottom Cover.. 38 Outside Back 38 Outside Arms.. 38 Back and Front Bands.. 38 Inside Back 38 Inside Arms.. 39 Seat. 39 D. Examine Frame 39 E. Upholster Seat.. 40 Padding. 41 Seat Fabric Cut and Install. 42 Seat Front Arm Post Cuts. 44 Seat Back Corner Cut.. 46 F. Upholster Inside Arm.. 47 Webbing Inside Arm. 47 Burlap Inside Arm. 48 3
4 Padding Inside Arm. 48 Cotton Padding. 48 Foam Padding.. 49 Cut and Install Fabric 51 Inside Arm Front Arm Post Cut. 52 Inside Arm Back Cuts 53 Inside Arm Final Front Post Cut 54 Inside Arm Front Top Corner.. 57 G. Upholster Inside Back. 57 Webbing Inside Back.. 58 Burlap Inside Back 58 Padding Inside Back 58 Cotton Padding. 58 Foam Padding.. 59 Cut Inside Back Fabric. 60 Apply Inside Back Fabric 60 Inside Back Cuts.. 62 Inside Back Top Corner.. 65 H. Front Band. 66 Front Leg Cuts 68 I. Back Band 71 J. Outside Arm.. 71 Apply Outside Arm Welt 72 Cut and Apply Fabric.. 73 Padding Outside Arm.. 75 Tacking
5 Trim and Pin Front Edge.. 76 Blindstitch Outside Arm Front. 77 Fabric Tacked to Back Post.. 78 Back Leg Cut. 79 K. Buttons.. 80 L. Outside Back.. 82 Outside Back Welt.. 82 Cut and Apply Fabric. 83 Blindstitch Sides of Back 83 Outside Back Leg Cuts 84 M. Bottom Cover.. 85 Section 4: Techniques 87 Blindstitching. 87 Webbing. 89 5
6 Introduction In the 27 years we have had an upholstery shop we have taught do-it-yourself upholstery classes. Also, people come to our upholstery shop and ask for advice about doing their own upholstery projects. How to Upholster Furniture is a step-by-step guide to basic upholstery techniques. The techniques presented are used in all phases of furniture upholstery. You cannot cover every facet of upholstery in one book. That is why we chose to upholster a chair to show you most of the basic techniques that are used in all upholstery projects from a simple slip seat to a complicated sofa. We have found that learning upholstery is so visual that people learn faster if they can see what they should do as well as read about Therefore, this book contains many pictures. If you are just beginning to learn how to upholster, the pictures, along with the explanations, should make learning the techniques faster than just reading about them. If you have some experience reupholstering, we hope that some of the techniques we show you will add to your upholstery skills. Like any other skill, learning to upholster takes practice and experience. If you intend to do upholstery as a business, it is best to either have an experienced upholsterer as a mentor or to apprentice in an upholstery shop. 6
7 The chair used in this book was purchased at a flea market for a few dollars. It is a basic chair with a tight seat (no loose cushion). But the techniques used in reupholstering this chair can be applied to any piece of furniture you might re-upholster. We reupholstered this chair which means we went down to the frame. We reglued some parts of the frame, replaced the old webbing and padding. Recovering a chair is just replacing the fabric, no frame repair or replacing padding. There are some specialized hand tools that will be required in doing a good job reupholstering. There are materials made just for upholstered furniture. We will introduce you to these. Safety precautions should always be taken when working with any type of tool. Safety glasses to protect your eyes. Some older upholstery pieces are very dusty, and a dust mask would be in order. And, always practice common sense when using tools. 7
8 Tools You may already have some of the tools that you will be using, such as: screwdriver, pliers, hammer, etc Some of the tools you will be using the most are: Mallet (rawhide, wooden, or plastic) Used for tapping the handle of the staple remover when removing staples or tacks. Good Scissors White Chalk To mark fabric; a dustless board chalk is best. If you don t have these items, you should be able to purchase them at a local hardware store. Other tools that are not as easy to find, but will make reupholstery a lot easier are: 8
9 Staple Remover (different types) To remove a staple, you place the point of the staple remover under the staple and pry it loose. Tack Remover Looks like a little chisel with a groove in the center. To remove a tack, straddle the head of the tack and then pry it loose. Magnetic Tack Hammer Double-ended hammer, one end is magnetized for holding tacks and the other end is used for driving tacks. Stapler All good frames are made of hardwood. If you attempt to staple hardwood with a hand stapler, it probably won t drive the staple in all the way. Some of the electric home staplers also lack the power to drive the staples far enough into a hardwood frame to hold the fabric securely. If you are going to purchase an electric stapler, make sure it has enough power to drive a 3/8 and ½ staple into hardwood. The professional upholsterer uses a pneumatic stapler. If you have compressor and want to buy a pneumatic stapler, it can be a bit costly. However, if you check some sales or auctions in your area, you may be able to find one at a reasonable price. You can also find them on ebay. Before you buy a pneumatic stapler, make sure you can get staples for it. 9

10 Webbing Stretcher Is used to stretch webbing as it is applied to the frame. One end has, what looks like, 6 very sharp pointed nails which grab the webbing. Curved Needle Is used for hand sewing and sewing in tight places. They come in various sizes, but the most common size is 3. Straight Needle The most common use of the straight needle is putting on buttons. They range in sizes from 6 to l6. Upholstery Pins Are used to temporarily hold fabric in place. You can get a round-headed pin or a T-pin. The T-pin is a finer pin and can be used with more delicate fabrics. Some of the above tools can be purchased at a fabric store or a local upholstery shop. 10
11 Materials This a list of materials used in reupholstery. Some of them can be bought at a fabric store that sells upholstery materials and supplies. If you can t find them at a fabric store, you can go to an upholstery shop and purchase them. Tacks The most common tack you will be using is a #6 tack. It is used to fasten the fabric to the frame, apply burlap and the bottom cover, and other materials. For apply webbing, #14 webbing tacks are used. Staples Used to fasten most materials to the frame; you will use a 3/8 staple. If you use staples to apply webbing, use ½ staples. Webbing Is used as a platform for springs or as a base for padding, such as cotton or foam. It comes in either jute or synthetic jute. Burlap Is used on top of springs and webbing. It comes in either jute or synthetic. 11

12 Foam Is probably the most common padding in upholstery. Foam comes in different thicknesses. When buying foam, there are two things you should keep in mind. The first is the firmness. Firmness is how much weight it takes to compress a piece of foam a certain amount. A firmness of 24 means it takes 24 lbs. to compress that piece of foam a certain amount. 24 is considered soft. 50 is considered a firm foam. The most common firmness is about 33. The next thing you should look at is the density. Most people use the term density for firmness. Density is the weight of a cubic foot of foam. Density is considered to be most important indicator of overall foam quality. High density foam is less likely to bottom out, fatigue or dish. A density of 2.8 or above is considered good quality. Cotton Is either natural or synthetic. It is used on top of foam or springs and as a padding on arms and backs. Cardboard Tacking Strip Is a ½ wide, thin piece of cardboard, used for creating a straight edge along the underside of a piece of fabric. Comes either in strips or rolls. 12

13 Handsewing Thread #18 Nylon handsewing thread is used when closing seams with a curved needle. Edge Roll Is a rolled edging fastened to the edge of frames to soften the edge for comfort and protect the fabric from rubbing against the wooden frame. Welt Cord A soft core used in forming the shape of self-welt. Note: When we use the term, tacking, or tack in place or drive the tack home, this can mean either using upholstery tacks or staples. When we use the term baste-tack, this can only be done with upholstery tacks. Baste-Tacking is a method where the tack is only driven in half-way so that it may be removed later or driven all the way in. 13

14 Section 1: Reupholstering a Slip Seat A slip seat is found on dining room chairs. Usually, a solid board that is padded and covered with fabric. Then screwed to the frame. Many of the details that go into a slip seat are difficult to explain in words. We have attempted to make them easier to understand by including a series of pictures. The steps to follow in reupholstering a slip seat are: A. Measure for fabric Measure length (front to back) Measure width (side to side) at widest point Add at least 6 inches to these measurements. For example, if the length is 22 inches, add 6 inches ( = 28). Do the same with the width. This is the amount of fabric needed to cover this seat. The extra 6 inches added to the length and to the width is for handling when applying the fabric. 14

15 B. Remove Slip Seat from frame Turn entire chair frame upside down, locate screws, usually there are 4 of them. Remove screws and remove slip seat If you have more than one seat, number the seat and number the frame. The reason is that screw holes may not be in same position in each frame. Otherwise, when you put the seats back together if you get seat with the wrong frame, will not fit properly. C. Remove old fabric Some people, when removing old fabrics, just use a screwdriver, pliers and hammer. The way they do it is: put the blade of the screwdriver next to the staple or tack, tap the screwdriver with the hammer to partially remove the staple or tack, and then grab it with the pliers to remove it the rest of the way. An easier way is to use a staple or tack remover with a mallet. Put the staple remover next to the staple, tap it with a mallet so the staple remover goes under the staple and then pry the staple out with the remover 15

16 If staple doesn t come all the way out, use a pair of side cutters to gently grab the staple and pivot the side cutters to remove the staple. When all the staples are removed, remove the fabric. D. Examine Padding If padding is in good condition, you can reuse it. If the padding is dirty, dusty or falling apart, you will want to replace it. Replacement options are usually cotton or foam. Before removing the old padding that you are going to replace, measure to see how thick it is. You will want to use replacement padding the same thickness. E. Examine and prepare base Wooden Base -- If board cracked, replace it. Webbed Base -- If webbing bad, replace it. (See how to web in Techniques Section) Cover webbing with burlap. Spring Base -- Usually Zig Zag (S-curved) and Seldom go bad. Cover springs with burlap. 16

17 F. Apply padding If the padding is the old hair type padding, it is probably dusty and dirty and should be replaced with foam or cotton. If the padding is cotton, it may need to be replaced. Also, if the old padding is foam, it may not have any resiliency left in it and will need to be replaced. Foam Padding The easiest is to replace the old padding with a new piece of foam. In step D you measured the thickness of the old padding. Usually, it will be 1, 1 1/2 or 2 inches thick. Purchase a piece of firm foam in the thickness you need. The reason for firm foam: foam compresses when you sit on it, and a soft piece of foam only 1 or 2 inches thick will compress all the way down to the board and be uncomfortable. Use a piece of firm foam that is a little larger then the base of your seat. Put the base on the foam and draw a line around the outside edges 1/4" larger all the way around. A black sharpie marker marks well on foam. Cut the foam on the line you just marked. An electric kitchen knife will make a clean cut. The cut piece of foam is shown in the picture. 17

18 It is best to glue the foam to the base, although it is not necessary. You can buy foam glue a hardware store or home center, but it is expensive. Cotton Padding Place a smaller piece of cotton on the base, as shown. Feather the edges. This will give the seat a slight crown when finished. Place cotton on the base, a little larger than the base. And tear off the excess. Apply as many layers of cotton as needed, to achieve the desired thickness. 18


19 G. Cut and apply fabric Marking and cutting fabric In step A you measured the fabric and allowed extra to grab a hold of when you're applying the fabric to this seat. Double check your measurements before cutting your fabric. Cut the fabric. At this point is a good practice to mark an X on the underside of the fabric with chalk to indicate which is the front of the seat. Applying fabric to base Put the fabric on top of the cotton. Center it on the base and turn it upside down. Place a baste-tack in the center of all 4 sides. 19


20 Next checked to see that the fabric is centered on the base. If it is not centered, remove the baste-tacks and center it. The black line is where the tacks will be placed at the rear of the seat. Place the tacks about 1 ½ apart, stopping about 2 from each corner. Stretch the fabric toward the front. Place a row of tacks on the underside of the front. Spaced 1 ½ apart and stopping 2 from each corner. Follow the same procedure and do the sides of the slip seat. 20


21 Corners Starting on one side of the slip seat stretch the fabric toward one of the corners and tack in place. Make a cut next to the tack, but not all the way to the corner. The yellow dot marks the corner of the wooden base of the slip seat. The black line shows where the cut should be made. Next, cut along black line shown in the picture to remove excess fabric. 21


22 Cut along the black line on the side of the slip seat to remove excess fabric before the corner fold is made. Fold fabric under, as shown in picture. Next, tack in place, as shown in the picture. Follow the same procedure on the remaining three corners. 22


23 H. Apply bottom cover Usually, a bottom cover is applied. It is a thin black synthetic material, called accord. Position the accord over the bottom of the seat so that it extends over the edges. Baste-tack the accord in place on all 4 sides, as indicated by the 4 yellow dots. Then cut off the excess, leaving about 1 overhang on all sides. Remove the baste-tack from one side. Fold under the accord about 3/8 to ½ from the edge of the board. Tack in place. Repeat the same procedure on the other 3 sides. 23
24 I. Re-attach to frame Attach completed seat to the frame. 24
25 Section 2: Sewing Some of the following projects will require some sewing. So at this time we are going to discuss some of the sewing techniques used in reupholstering. Upholstery shops use industrial machines with a walking foot. Some of the other features that the industrial upholstery machine has that the home machine doesn t are: the foot lifts higher and has a larger motor. Many do-it-yourselfers use a home sewing machine. If you are using a home sewing machine, it is best to see if your machine will sew through 4 layers of fabric. Some fabrics are too heavy for a home machine to sew through this many layers. A needle made for sewing on heavier materials should be used on upholstery fabrics. When purchasing fabric for your project, keep in mind the thickness that your machine can handle. You will have to decide if your home machine can sew upholstery fabric without damaging the machine. A. Self-Welt Welt is the small round trim that goes around the edge of a cushion, top of a skirt, and other places on upholstered furniture. The most common welt is 5/32 in diameter. Welt needs to be made on a sewing machine. To make welt, you first need to purchase welt cord. The steps to making self-welt are: Measure how much welt will be needed. Cut strips of fabric 1 ½ wide. 25


26 Join the strips together until you get the length you want. Join strips by laying one strip face down on another strip and sewing a ½ seam. Fold the fabric around the welting cord. Put the folded fabric and cord under the foot, guiding with you fingers, sew the cording snuggly inside the strip of fabric This picture shows welt being sewn on a commercial machine with a welt foot. 26


27 This shows welt being sewn on a home machine with a zipper foot. Joint seams should be opened flat when sewing welt to eliminate bulk. When sewing, always be careful to keep your fingers away from the needle. B. Throw Cushion A throw cushion is sometimes called a throw pillow or decorative cushion. They can be made any size you wish. However, many throw cushions are 16 square. The steps in making a throw cushion are: Cutting the fabric Throughout this book we will use ½ seams. Therefore, when cutting the fabric for a 16 throw cushion, cut two 17 squares. 27


.")
28 A throw cushion can be made with or without self-welt. If you are using self-welt, determine the length you need. Sewing self-welt into cushion Place the self-welt on the front side of one of the cushion pieces, with the beginning starting in the center of the bottom. Begin sewing the self-welt to the cushion piece, aligning the edges of the self-welt to the edge of the cushion piece. Stop 1 ½ from each corner and make 3 diagonal relief cuts in welt seam allowance. One cut before corner, one cut where turn corner, and one cut past the corner. (Do not cut into stitching). After making relief cuts, proceed sewing to ½ from corner. Leave needle in fabric, raise foot, and pivot fabric and welt around corner. 28


29 Follow same procedure around cushion piece, stopping 2 from in the end of the first welt end, leaving needle in fabric. The ends of the self-welt should overlap 1. You will need to remove some stitches from self-welt seam on both ends to be able to seam the ends of the fabric together Put the two ends of the selfwelt fabric together face to face and sew a 1/2 seam to join them together. 29


30 Flatten the seam and cut the ends of the welt cord so they butt together, as shown in the picture. Continue sewing the selfwelt to the front of the cushion piece. Sewing 2 nd Cushion Piece to Welted Piece First align corners with the welted piece and pin together. Then, put 2 or 3 pins on each side. 30

.")
31 You need to leave the center of the bottom side open for stuffing. Start sewing about 3 from one corner and sew around to the other side of the bottom. When you get to the corners, leave the needle in the fabric, lift sewing foot and pivot. When finish sewing, turn the cushion with right side out. Check to see if any threads are showing, as in picture. If so, turn the cushion inside out again, re-sew this spot, trying to get closer to the welt cord seam. Then, re-check. Stuff Cushion There are many types of cushion fillings available. There is shredded foam, down, and probably the most common is polyester batting (Dacron). These fillings can be put directly into your finished cushion cover or placed into a separate inner bag that is inserted into your finished cushion cover. You can also buy pre-made cushion forms that can be stuffed into cushions. Any insert should be an inch larger than your finished cover. If your finished cover is 16 X 16, you will need an insert that is 17 X 17 so that it fills your finished cushion cover. 31


32 Blindstitching Cushion Is a method of hand sewing fabric together where stitches are not seen. Use a curved needle threaded with #l8 hand sewing thread in a color to match the color of the fabric. In the following illustrations, we are using a contrasting thread color so that it can be more easily seen. First, fold the seam opening and pin close for ease of sewing. Thread one end of thread through eye of needle and tie a knot in the other end. Insert needle in folded seam allowance and allow it to exit where the machine sewing stopped. 32


33 To start closing the opening, insert the needle in the fold directly across from where it just exited. The next exit point is about 3/8 from where the needle was inserted. Pull the needle and thread through the fabric, and pull snugly. Insert the needle directly across from where it just exited and exiting about 3/8 from that point. Pull the needle and thread through the fabric and pull snugly. Continue this procedure, alternating sides, until you reach the end of the opening. When you have reached the end of the opening, pull thread through snugly. The seam we just completed went right to left in the pictures. To insure the seam won t pull apart, you will make 4 or 5 stitches going left to right. Begin opposite where last stitch exited. Alternate sides, pull thread snugly and cut off thread. This completes closing of the cushion. 33


34 Section 3: Reupholstering a Chair In this section we will be working with a chair that is fully upholstered. Since there are a lot more pieces to this chair, it will be a good idea to take notes as you take it apart. Or, if you have a digital camera, you can take a lot of pictures as you are taking the chair apart. This will help you in putting it back together with the new fabric. Another suggestion would be to mark the old fabric pieces as you take them off or before you take them off: Identifying the each piece, marking the top of the piece, and any other notes that would help you. You can identify the pieces as you take them off by the following abbreviations. S----Seat IA---Inside arm IB---Inside back B----Band OA Outside arm OB Outside back 34

35 A. Measure Chair for Fabric When measuring your chair for fabric, remember to always allow extra fabric to hold onto with your hand when applying the fabric. Write down your measurements. See Example. 35

36 Now, make a diagram of how your measurements will lay out on 54 wide fabric. After you add the lengths of the pieces together, you should have amount of fabric needed. This chair takes 3 ½ yds of fabric. 36


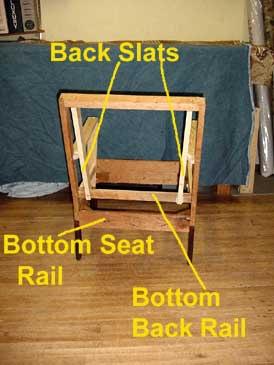
37 B. Frame Identification 37
38 C. Remove Old Fabric from Chair Old fabric is removed in the reverse order that it is put on. Bottom Cover While the chair is upside down and the bottom cover has been removed, now is a good time to remove the stapes or tacks from bottom of the outside back, outside arms, and nosing. Outside Back The sides of the outside back may be fastened in different ways, for example, blindstitched, pre-nailed tack strip, plygrip. The top of the inside back is usually fastened with ½ cardboard tacking strip. Outside Arms Back and Front Bands Inside Back The sides of the inside back fabric are usually tucked between the back slats and the back posts. And the tacks will be in the back posts. The bottom of the inside back is between the bottom back rail and the top of the back seat rail, and is tacked to the top of the back seat rail. Top of inside back is tacked to the outside of the top back rail. 38
39 Inside Arms The top of the inside arm will be fastened to the outside of the top arm rail. The bottom of the inside arm will be tacked to the top of the side seat rail. The back of the inside arm will be between the back slats and the back posts. It will be tacked to the back post. The front of the inside arm will be tacked to the outside of the front arm post. Seat Remove the tacks from the front, back and side seat rails. At this point determined the thickness of the padding, whether it be foam or cotton. D. Examine Frame for Loose Joints If the frame has any loose joints, they should be repaired at this time. This can be done by: Prying the joint partially a part. Clean out old glue from joint Apply wood glue to joint and clamp. Allow the glue enough time to dry before removing the clamps. 39


40 Sometimes you have to remove the corner blocks to spread the joints apart. Mark the corner blocks so you know which corner they came from. Before reinstalling the corner blocks, you will need to remove the old glue and reapply new wood glue. E. Upholster seat The first thing to do when upholstering a seat is to apply a layer of burlap over the springs or webbing. Attach edgeroll to the front seat rail and short pieces on the side. Edgeroll can be cut to length with a utility knife. Edgeroll is tacked to the top of the seat rails. 40


41 Edgeroll has a lip on it. You can tack through the lip. If the seat rail is not wide enough, you can nail through the Edgeroll into the seat rail. Edgeroll is used to soften and round the edge of the seat rail. It comes in different diameters and is sold by the foot. Padding If you are going to replace the padding with new foam, make a paper pattern, as shown. Use the paper pattern to mark the foam. Cut it to size. Then glue stretcher (muslin or other lightweight fabric) to the front and front sides of the foam. Tack the stretcher to the frame as shown. 41


42 Put a layer of cotton over the foam. Seat Fabric cut and install Recheck your measurements and cut your seat fabric. Position your fabric over the padded seat base, making sure you have enough fabric hanging over all 4 sides for ease of handling and tacking. Pull the fabric around the bottom of the Front Rail, and baste-tack at the bottom center of bottom front seat rail. Then, stretch the back of the seat fabric between the bottom back rail and top of back seat rail. Baste-tack to the top of the center of the back seat rail. 42

43 Then go back to the Front of Seat. Pull and smooth fabric to one side of Front and put another baste-tack in the bottom of the Front Seat Rail at this point. Then, do the same to the other side of the Front Seat Rail. Stretch the fabric to the back of the chair. Baste-tack the fabric to each side of the top of the back seat rail. Check to see if the fabric is positioned correctly. If not, remove the baste tacks and re-position. At the back, remove the baste-tacks, one at a time. Grip the edge of the fabric with one hand; use the other hand to smooth the fabric toward the back and place more tacks in the top of the back seat rail and drive them all the way in. The yellow line indicates where the tacks should be placed. Now go to the Front of the Seat: Remove the center tack from the bottom of the front rail. Grip the edge of the fabric at the center with one hand. Use the other hand to smooth and stretch the fabric toward the front. Put a tack at the bottom of the front Seat Rail where it is stretched tight and drive it all the way in. Next, still at the Front. Move 3 or 4 inches from the Center. Grip, smooth and pull fabric tight and place another tack in the bottom of the front seat rail. Continue this same procedure, working your way toward the leg. Stop about 3 from the leg. Do this on both sides of the center tack. 43

.")

44 Seat Front Arm Post Cuts Now we are ready to make some cuts around the Front Arm Posts. On one side fold the fabric back on top of itself. The fold should be touching the Front Arm Post. Mark your fabric for the Y cut with chalk or fabric marker (as shown in picture). Double check to see that the mark you made is in the right position. Then, cut along the lines. In back of the front arm post, tuck the fabric under the bottom arm rail and tack it to the top of the side seat rail. 44

45 In front of the arm post, pull the fabric around and tack in place. Note: This chair will have an upholstered outside arm. ON a chair without an outside arm you would have to pull the fabric and tack it to the underside of the Side Seat Rail. Continue working the side seat fabric toward the back post. Stretch and smooth the fabric and tack it to the top of the Side seat Rail. Stop tacking about 4 before you get to the back post. Drive the tacks all the way in. On the other side, follow the same procedure of folding, marking, cutting and tacking the fabric in place. When tacking this side, make sure that you stretch it tight enough so the fabric doesn t wrinkle To test if it will wrinkle: push down on the seat with both hands and let up. There should be no wrinkles. If there are wrinkles, you will need to remove some tacks, re-stretch the seat fabric and re-tack. 45


46 Seat Back Corner Cuts Fold the fabric back over itself at a 45 angle from the back post. The fold in the fabric should touch the back post. Mark the fabric at a 45 angle from the back post, as shown in picture. Cut along this mark. Fold fabric around the back post. Stretch the fabric and tack in place on either side of the back post. Do the same procedure at the other Back Corner. Note: When making the cuts, whether by the Front Arm Posts or the Back Posts, it is better to make the cuts short than to cut too far. If you cut too far on your first cut, you will leave a gap that exposes the padding. If the cut is too short, you will not be able to pull it tight enough around the post. If it is cut too short, make little snips where the cut has ended to lengthen the cut until it fits right. At this point, stand back and see if the chair seat meets your approval or needs some more adjustment. 46

47 F. Upholster Inside Arms If the old padding and base are in good condition, reuse it. If you need to replace the old padding and base, these are the steps for installing the new webbing, burlap and padding. Webbing Inside Arm When installing the webbing, just stretch snugly by hand and tack in place. If you use a webbing stretcher, be sure you don t use so much pressure that you break the bottom arm rail. Divide the space equally for applying the vertical webbing. Tack the webbing to the bottom arm rail and then stretch to the top arm rail. Tack in place. When applying the webbing, sometimes it is easier if you turn the chair on its side. If a horizontal piece of webbing is required, tack it between the front arm post and the back post. 47


48 Burlap Inside Arm First, tack the burlap to the bottom arm rail. Then stretch the burlap up to the top arm rail. Tack in place. Padding Inside Arm If the old padding was cotton and you are replacing it, just tear off layers of cotton and apply them until you get the desired thickness. You can tack the first layer you put on to top arm rail. It will keep it and additional layers from shifting. Next, tack it to the front arm post. Then stretch it to the rear and tack it to the back post. Fold the edges of the burlap over and tack in place. Cotton Padding 48

49 When putting cotton on the inside arm, it is best to start with a piece a little bigger than you need. Tear the excess off, using your fingers, to the correct size. This will give you a feathered edge. Allow the cotton to go under the arm rail about 1 so that there will be no gap between the seat and the bottom of the inside arm. Foam Padding If you are replacing the foam padding, you determined the thickness of it when you stripped the old padding off the chair. Obtain a piece of foam the thickness you require, large enough for 2 arms. Measure the inside arm: front to back and top to bottom of the area you want to cover, adding 1 or 2 in each direction. Make a paper pattern, like you did for the seat foam. Remember to leave enough foam at the bottom, so will not have a gap between the bottom of the inside arm and seat. Lay your paper pattern on the foam. Mark around the pattern and cut. Lay your cut piece of foam on the inside arm. Check to see if it fits properly. 49

50 Now that you have your first arm has been cut, lay it face down on a piece of foam. Then mark and cut a second piece for the other arm. Foam can be attached to the arm by either gluing it to the burlap or gluing stretchers to the top edge and front edge of the arm foam and tacking the stretchers to the frame. Put the stretchers on the same way as you did for the seat foam. Next, put a layer of cotton over the foam. Tear the excess off and make sure that a little bit tucks in at the bottom between the bottom of the arm and the seat. Inside Arm Fabric - Cut and Install Recheck measurements and cut inside arms. Position your fabric over the padded inside arm. Make sure you have enough fabric hanging over all 4 sides for handling and tacking. Baste-tack in the center of the top arm rail, the front arm post and the back post. Do not put a tack in the bottom at this time. We are doing this to make sure the fabric is positioned correctly. If positioned correctly, baste-tack a few more tacks in the outside of the top arm rail. 50
. Let the bottom edge of the fabric rest smoothly on the seat.")

51 Inside Arm - Front Arm Post Cuts Smooth the fabric downward toward the seat. Make sure it is smooth, with no wrinkles. Tucking fabric in a little way between the arm padding and the seat (as shown in picture). Let the bottom edge of the fabric rest smoothly on the seat. Next, we will make cuts to fit the fabric around the front arm post. First, locate the backside of the front arm post. The yellow lines indicate the position of the front arm post. Mark a line straight in to the back of the front arm post. About 1 ½ before you reach the backside of the front arm post, mark another line to the front side of the front arm post (as shown in picture). Cut along the lines you just marked, stopping about ½ before you reach the crease where the fabric is tucked between the arm padding and seat. 51
 Mark another line about 1 ½ to 2 below the first lines.")

52 Cuts at Back of Inside Arm At the back of the inside arm, fold the fabric back over itself. The fold should touch the burlap of the inside back. Mark a line to the top of the bottom back rail. Starting 1 ½ back, mark another line down to the bottom of the back rail. better. (see picture) Mark another line about 1 ½ to 2 below the first lines. This last mark will make a tail that helps the inside arm fit Cut along the lines you just marked. Stop a ½ before you get to the fold. Tuck the bottom fabric between the seat and the bottom arm rail. Stretch the fabric to bottom and tack in place along the top of the side seat rail. Tuck the tail, as seen in picture, between the bottom back rail and the back seat rail and tack to the side of the back post. Next, remove the baste-tacks at the top of the arm. Stretch the fabric the fabric upward and tack in place to the outside of the top arm rail. With the fabric still folded over itself at the back of the inside arm, mark the top of the inside arm for a Y cut. (As shown in picture). 52


53 Cut along the lines you just marked for the Y. Tack the Y flaps in place. Tuck the fabric between the back post and the back slat. Baste-tack fabric to back post. Front Inside Arm Post Final Cut The final inside arm cut is made at the front where the inside arm meets the seat. The yellow lines indicate the position of the front arm post. Cut along the white mark (as shown in the picture). 53


54 After the cut is made, pull the fabric around and tack in place at the bottom. At the front of the arm, tuck the excess fabric into the crevice where the front of the arm meets the seat. Inside Arm Front Top Corner Stretch the fabric toward the top of the arm. Tack in place. Continue to tack between the top tack and the bottom tack. Make a fold at the top of the arm (as shown). Tack the fold to the front arm post. 54


55 With the fold tacked in place. Make a cut on the top of the inside arm (as shown in picture). After the cut in the previous step has been made, pull the fabric forward and cut off the excess. Leave about 1 to fold under. Fold the excess fabric under (the 1 you left in last cut). 55


56 Pull the folded flap down and tack in place. Blindstitch this fold closed. Remove baste-tacks from the inside of the back post. Stretch the toward the back and tack in place along the inside of the back post. 56

57 G. Upholster Inside Back When working on the inside back, some of the procedures will be easier with the chair lying on its back. If padding and base are in good condition, reuse it. If you need to replace the old padding and base, these are the steps for installing the new webbing, burlap and padding. Webbing Inside Back Divide the space equally for applying the vertical webbing. When applying the webbing, sometimes it is easier if you turn the chair on its back. Usually, the base consists of about 3 strips of vertical webbing and about 3 strips of horizontal webbing Tack the vertical webbing to the bottom back rail and then stretch it to the top back rail. The horizontal webbing is interwoven with the vertical webbing and tacked to the back slats. If you using a webbing stretcher, don t apply too much pressure. 57

58 Burlap Inside Back Tack the burlap to the top back rail, the bottom back rail and the back slats. Padding Inside Back Cotton Padding If the old padding was cotton and you are replacing it, place layers cotton on the inside back until you get the thickness you desire. When putting cotton on the inside back, it is best to start with a piece a little bigger than you need and tear the excess off. This will give you a feathered edge. Allow the cotton to go under the bottom back rail about 1 so that there will be no gap between the seat and the bottom of the inside back. 58


59 Foam Padding If you are replacing the foam padding, you determined the thickness of it when you stripped the old padding off the chair. Obtain a piece of foam the thickness you require a little larger than the inside back. Measure the inside back top to bottom and side to side and add 1 to 2 in each direction. If the old piece of foam fits the area correctly but is not in any condition to be re-used, you can use it as a pattern to mark your new foam. Or, you can get a large enough piece of kraft paper, lay it on the inside back base and mark it for a pattern. Next, mark the foam, using the old foam or the new pattern. To cut the foam you can use an electric carving knife. Place the foam on the burlap base. 59


60 Cover the foam with a layer of cotton. Tuck the cotton in around the sides where the inside back foam meets the inside arms and where the bottom of the foam meets the seat. The cotton should be tucked under the bottom back rail at least 1 to prevent a gap between the seat and the inside back. Cut Inside Back Fabric Tear the cotton even with the top back rail and the side back posts. Re-check your measurements and cut a piece of inside back fabric. Apply Inside Back Fabric Position fabric, face up, on the Inside Back padding. You will need fabric at the top and sides for handling and tacking and enough to pull through around the bottom for handling and tacking to the bottom seat rail. Baste-tack the bottom of the inside back fabric to the top of the back seat rail, using about 4 tacks. 60

61 Stretch the fabric toward the top of the inside back. Bastetack to the top of the top back rail, using about 4 tacks. This chair has a band fastened to the top of the back rail and sides of the back posts. Chairs without a band would have the fabric tacked to the backside of the back top rail. Now stand back and see if the fabric is positioned correctly. If not, make necessary adjustments. Tack the bottom of the inside back in place on top of the bottom seat rail, stopping 3 to 4 from each back post. The yellow line indicates where the tacks will be placed. Now go to the top of the inside back. Remove the bastetacks from the top back rail. Stretch the fabric toward the top. Put tacks in the top back rail. Drive these tacks all the way in. 61


62 Inside Back Cuts The fabric is now fastened at the bottom and top. Fold one edge of the fabric over toward the center. Press it snugly into the crevice between the inside back and the inside arm. The white lines show where the cuts should be made. The top cut angles up slightly toward the top of the inside arm. Stops 1/2 below the top of the inside arm. The yellow line indicates the top level of the inside arm. The next cut is made to the top level of the back seat rail. Then come back about 1 ½ and make an angled cut toward the bottom level of the bottom seat rail. About 2 below the second cut, make the third cut. Tail A will be used when tacking the inside back to the frame. Start folding the fabric around the back post. You will probably have to make one more angled cut. 62


63 Now, check the cuts at the top of the arm and the back post. You may need to make the cuts a little deeper for it to fit properly. When it fits properly, fold the loose flaps under. Tack in place. Tuck the inside back fabric in the crevice between the inside back and the inside arm to see if the cut needs to be made a little deeper. If necessary, make an additional cut of 1/8 to ¼ at a time so it will fit right. Tuck tail A between the seat and the inside arm. Fasten to the top of the side seat rail. 63


64 Stretch in the inside arm fabric to the back of the chair and tack to the inside of the back post. Stretch the inside back fabric and tack it to the back post. On the other side of the inside back repeat the same procedures. 64


65 Inside Back Top Corners Bring fabric from the side over the top and tack in place. Make a cut as shown in picture. After the first cut, cut off the excess fabric. Leave about 1 for folding under. Fold the 1 piece under and tack in place. Follow the same procedure on the other corner. 65


66 H. Front Band Measure up from the bottom of the seat rail. Draw a chalk line where the band will go. Cut the band fabric and welt, adding extra for handling. Make self-welt. Sew self-welt to top of band fabric. Center the band piece. Align the welt thread line with the chalk line and put a tack in at this point. 66


67 Keep the welt thread line aligned with the chalk line and continue tacking across the front and around the sides. Starting by the front arm post on one side and continuing to the front arm post on the other side, tack a piece of cardboard tacking strip. Push it firmly against the welt seam. This holds the welt cord firmly in place. Apply a layer of cotton. Hold it in place with a few tacks. Tear off the excess. 67


68 Next step is to pull the fabric down over the cotton. The fabric is tight at the corners. When you pull the fabric down, the cotton will be moved out of place at the corners. Here is an upholsterer s tool used to prevent this. Take a piece of cardboard, fold it in half. Then place it, as shown in the picture, with the top of the cardboard up against the welt. Place another piece of cardboard at the other corner. Now when you pull the fabric down, the cardboard will prevent the cotton from moving at the corners. Tack the band to the bottom of the front seat rail to within 4 of the legs. Front Leg Cuts These leg cuts apply in many situations. So, we will show you in detail how to do them. Find the intersection of the front leg and the front seat rail. Make a cut slightly angling from the center of the leg to this point. Finish tacking fabric to bottom of the front seat rail. 68


69 Find the intersection of the front leg and the side seat rail. Make an angled cut from the center of the leg to this point. Cut the excess off. Leave about 1 for folding under. Fold the 1 flap under. 69


70 Tack the side portion of the front band to the bottom of the side seat rail. Stretch and tack the end of the band to the side of the arm post. Do the same procedures to the other side of the front band. 70

71 I. Back band The procedure for putting the back band on is the same as putting the front band on. The only difference is the corners. At the corners, you fold the fabric back to the back side of the frame and tack in place. The bottom of the band is under the outside arm. J. Outside Arm The outside arm can be put on with or without welt. Sometimes, it is easier to work on the outside arm with the chair laying on its side. 71


72 Apply Outside Arm Welt Make a piece of self-welt to go the length of the top arm rail and down the front arm post to the bottom of the seat rail, adding a few inches to work with. Start tacking the welt to the outside of the front arm post, so it extends 2 below the bottom of the side seat rail. Keep the edge of the selfwelt even with the edge of the front arm post. Tack into place until you get to the top of the front arm post Now make a v cut in the welt seam to make it easier to turn the corner. Tack the self-welt along the top arm rail, keeping the edge of the self-welt even with top edge of the top arm rail. 72


73 When you get to the back post, open the welt seam and cut out the cord so it is even with the back edge of the back post. Fold the welt fabric around the back side of the back post and tack in place. Do this same procedure where you began at the bottom of the front arm post. Cut and Apply Outside Arm Fabric Fabric should extend over the front post and the back post and 4 beyond the bottom seat rail. Now position the fabric over the outside arm, so it extends over beyond the front arm post and the back arm post. Place a chalk mark in the welt seam and the backside of the top of the outside arm fabric. 73


74 Flip the fabric back over the inside arm. Line the chalk marks up. Tack in place. Continue tacking the outside arm fabric to the top arm rail. Tack cardboard tack strip to hold the outside arm fabric firmly against the welt cord. 74


75 Tack a cardboard tack strip down the front of the arm post to hold the welt cord in place. This tack strip is needed to firmly hold the welt cord in place while blindstitching. Padding Outside Arm If you want to pad the outside arm, tack a piece of burlap or scrap fabric to the chair frame, as shown, as base for the padding. Trim off excess. Place the cotton on the burlap or fabric base so that it extends over the front arm post, back post and the side seat rail. Feather the edge of the cotton where it meets the welt on the top arm rail. Tear the cotton so that it is even with the welt on the front arm post and back post and side seat rail. 75


76 Tacking Flip the outside arm fabric over the cotton. Stretch and tack the fabric to the bottom of the side seat rail. Stop 3 from the front arm post and 3 from the back leg. Trim and Pin Front Edge Fold the front edge of the outside arm fabric back so that the fold is even with the welt. Cut off the excess fabric, leaving 1 to fold under. Tuck the front edge of the outside arm fabric under until the fold meets the welt. Start near the top of the outside arm and pin in place. Place pins about 5 or 6 apart until the fold is pinned in place. 76

 Directly across from where the thread exited the fold, insert the needle in the welt as close to the welt thread as close as you can get.")
77 Blindstitch Outside Arm Front Thread a curved needle with #18 hand sewing thread. Put overhand knot in the other end of thread. To anchor knot to start sewing, insert needle in underside of fold and exiting the fold across from the top corner of the welt. Pull the thread through so that the knot is in the underside of the fold. (Knot won t be seen.) Directly across from where the thread exited the fold, insert the needle in the welt as close to the welt thread as close as you can get. Exit from the welt about ¼ to 3/8 going in a downward direction. Pull needle and thread through. Snug the fold against the welt. 77


78 Directly across from where the thread exited the welt, insert the needle into the fold and exit it from the fold about ¼ to 3/8 downward. Pull needle and thread through. Snug the fold against the welt. Continue stitching in a downward direction, alternating between the welt and the fold until you reach the bottom of the outside arm. No secure the thread so that the seam won t pull apart. After you reach the bottom of the outside arm, make 4 or 5 stitches going upward. After these stitches, cut the thread. Outside Arm Fabric Tacked to Back Post Pull the top back edge of the outside arm fabric around the back post and tack in place. Continue tacking to within 4 of the bottom of the back seat rail. 78


79 Back Leg Cut Locate the junction of the side seat rail and the back leg. Make an angled cut to this point. Leaving a ¾ flap, cut off the excess. Fold the flap under. Tack to the back of the back post. Complete the other outside arm, using these same procedures. 79


80 K. Buttons If you are using buttons on the inside back, lay out the button design with pins. Mark each button position with chalk. Thread a 30 piece of button twine through the eye of the button. Thread both ends of the twine through the eye of a 10 needle. Insert the point of the needle in one of the chalk marks. Push through the fabric, cotton, foam and webbing to exit on the back side. 80
.")

81 On one of the pieces of twine (End A) start to form a knot. Place the end of the other end of the twine (End B) in loop in the knot. Pull the knot tight. Place either a small piece of fabric or a piece of cotton about the size of a golf ball between the two pieces of twine (as shown in picture). Pull End B to slip the knot against the cotton or fabric. The more you pull, the deeper the button will be on the front of the inside back. After all the buttons are installed and pulled in as deep as you want, tie 3 knots in Ends A and B of each button to prevent the slip knot from slipping. Cut off excess twines. 81

82 L. Outside Back Outside Back Welt Most outside backs have welt around the top and sides. But, you may choose do it without welt. Make a piece of self-welt long enough to go around the top and sides of the outside back plus a few extra inches to work with Open the welt seam about 1 and cut 1 of welt cord out. Fold under the end of the welt fabric, so you will not have raw edges showing. Start tacking the welt to the back side of the back post, even with the bottom of the back seat rail. Keep the edge of the self-welt even with the edge of the back post. Tack into place until you are within 2 of the top of the back post At the top corner make a v cut in the welt seam to make it easier to turn the corner. Continue tacking the self-welt along the top back rail. Make another v cut at the other corner. Turn the corner and continue tacking. When you get to the bottom, fold under the end of the welt fabric to avoid exposing any raw edges. 82
83 Cut and Apply Outside Back Fabric Re-check measurements and cut fabric. Procedures for applying the Outside Back are the same as we used in applying the Outside Arm Fabric (see pages 69 through 75). Center the fabric on the outside back. Holding the top in position against the welt along the top back rail, flip the bottom of the outside back fabric over the top of the inside back. Tack the fabric across the top. Tack cardboard tack strip across the top of the outside back. Tack cardboard tack strip against the welt on both sides. If you are padding the outside back, refer to the instructions for the outside arm and follow those procedures. Flip the outside back fabric over. Stretch and tack to the bottom of the back seat rail, stopping 4 from each leg. On one side of the outside back, trim the fabric so that about ¾ is extending over the welt. Now tuck the ¾ under so that the fold is touching the welt. Start near the top of the outside back and pin in place. Repeat the same procedure on the other side of the outside back. Blindstitch Sides of Outside Back Blindstitch each side of the outside back, starting at the top of the outside back, and continue to within 4 of the bottom. Do not cut the blindstitching thread at this point. Because we will finish the blindstitching after the leg cuts are made. 83


84 Outside Back Leg Cuts Locate the intersection of the back leg and the bottom of the back seat rail. Make an angled cut. Cut off the excess, leaving ½ to ¾ for fold under. Fold under, pin in place. Tack to the bottom of the back seat rail and finish blindstitching. Do same procedures to other side of outside back. 84


85 M. Bottom Cover Turn the chair upside down, resting on its arm tops. Measure the length and width of the bottom of the chair at their widest points, adding two inches to this measurement in each direction. Cut a piece of bottom cover, usually referred to as Accord. With the Accord centered over the bottom of the chair and extending over all edges, baste-tack in the bottom center of each seat rail. (Indicated by the yellow dots.) You should have 1 extending over each seat rail. If the overlap is more than 1, trim off the excess. Remove baste-tack from one side. Fold Accord under and tack in place. Do this on all 4 sides. 85


86 At each leg, fold the fabric as shown. Make a cut up to the leg. Trim off some of the excess. Fold under. Finish tacking. Bottom cover is complete. Also, chair is complete. 86

87 Section 4: Techniques Blindstitching A way of making an invisible seam closing. Upholsterer s use a curved needle with a #18 hand sewing thread for most blindstitching. On lighterweight fabrics, a lighterweight thread can be used. Thread a 3 ½ curved needle with a length of hand sewing thread about 2 1/2 times longer than the opening. Tie a knot in one end of the thread. And thread the other end through the eye of the needle. The following pictures will show a step-by-step sequence of hand sewing. Before you insert the needle, fold the seam allowances and pin together. Makes sewing easier. To anchor the knot, insert needle in the underside of fold and exit in the same fold where the machine sewing ended. Pull the thread through so that the knot is in the underside of the fold. (Knot won t be seen.) 87


.")
88 Directly across from where the thread exited the fold, insert the needle in the other fold. Exit from the same fold about ¼ to 3/8 to the left. Pull needle and thread through. Snug the fold against the opposite fold. Continue stitiching across the opening, alternating from one side to the other. When you reach the end of the opening, then take about 4 more stitches in the opposite direction (the direction you just came from). This will prevent the stitches from coming loose. Cut off thread. 88


89 Webbing. Is attached to the frame with #14 tacks. However, some upholsterers prefer to us ½ staples. When using tacks you will learn the 5, 4, 3 method. But if you are using staples, use a sufficient number to hold the webbing so that it will not tear loose. You can use either jute webbing or synthetic webbing. The first step is to mark where you want the webbing to go. If you are going to replace webbing and you want to put it in the same place as the old, mark the frame on either side of the old webbing so that you will know where to place the new webbing. Next, take a piece of webbing fold it over about 1. Place it in the space you want it to go, making sure that the fold is about ¼ from the outside of the frame. With a webbing tack, baste-tack it in place in the middle of the fold. Square the webbing with the frame and drive a tack into each side of the fold, near the edge of the frame. When the 3 tacks are in place, make sure they are driven in all the way. 89


90 Place 2 more tacks in the webbing, staggered a little bit out of line with the others, and drive them home. This makes 5 tacks. Next, go to the other side of the frame where the webbing will be hanging over. Pull the webbing across the frame toward you. Place the webbing stretcher underneath the overhanging webbing, with the padded end against the frame. At a point on the webbing about 1 shorter than the webbing stretcher, insert the prongs through the webbing from underneath. With the prongs through the webbing, the webbing stretcher will be at an angle. Push down on the webbing stretcher and you will see the webbing tighten. Do not use too much pressure or you will begin to bend the frame. 90


91 While holding the webbing stretcher with one hand, use the other hand to pick up a tack with a magnetic tack hammer. And drive a tack either side of the center of the webbing and a tack at each edge of the webbing. Drive all these tacks home. There are now 4 tacks holding the webbing and the webbing stretcher can be released. Next, fold the webbing over and drive in 3 more tacks between the first 4. Cut the webbing. Repeat these same steps for the remaining pieces of webbing going in this same direction. 91

92 Next, we are going to install the webbing that goes 90 to the webbing you just installed. Determine the spacing. This webbing should be woven over and under the pieces of webbing you previously installed. This adds strength to the webbing when weight is applied. Use the same procedures as above. First, place 5 tacks on one side. Then, stretch the webbing and drive in 4 more tacks on the opposite side. Fold the webbing over and drive in the last 3 tacks. 92
Materials & Supplies. Upholstering an Accent Chair in Two Pieces with Button Details
 Rowley How-To Guide Upholstering an Accent Chair in Two Pieces with Button Details Any chair can go from drab to fab with a few basic upholstery techniques. See how we ve transformed a flea-market find
Design, Build and Upholster a Custom Chair
 Rowley How-To Guide Design, Build and Upholster a Custom Chair Sometimes the perfect furniture piece to complete a room may not exist. In this case, why not design, build and upholster to your own specifications,
EC How to Make Slipcovers
 University of Nebraska - Lincoln DigitalCommons@University of Nebraska - Lincoln Historical Materials from University of Nebraska- Lincoln Extension Extension 1984 EC84-410 How to Make Slipcovers Margaret
HOW TO MAKE A SLIPCOVER INSTRUCTIONS Instructions are for slipcovering a wing-back chair. The principle is the same for an arm chair or sofa.
 HOW TO MAKE A SLIPCOVER INSTRUCTIONS Instructions are for slipcovering a wing-back chair. The principle is the same for an arm chair or sofa. YOU WILL NEED: Slipcover fabric Piping cord Zipper Thread Ruler
CHAIR COVER AND PILLOW A. 1 Front. 2 Side. 3 Arm Front. 4 Skirt Front. 5 Back. 6 Pillow CUTTING LAYOUTS CHAIR COVER AND PILLOW A
 ## PATTERN PIECES 4069 McCALL'S CRAFTS CHAIR COVER AND PILLOW A 1 Front 2 Side CHAIR COVER C,D 7 Guide PAGE 1 of 6 3 Arm Front 4 Skirt Front 5 Back 6 Pillow CUTTING LAYOUTS Cut other pieces first, allowing
SUPPLIES OTHER SUPPLIES Carson 10 Teddy Bear Pattern
 SUPPLIES Fat 1/8 yd of 5/8 faux fur or mohair (sample is faux fur) 5 x 5 piece of wool felt for paw pads 11mm black glass eyes (1 pair) Small piece white felt (optional) eye whites 2 1 1/8 Joint discs
Monroe sofa. assembly instructions
 Monroe sofa assembly instructions Smooth & Wrinkle-Free Fabric Covers: In addition to these printed instructions, you may want to watch our beauty tips videos on the customer service page of our website.
A Slim,Comfortable. In 1979 I spent five months designing. This system works for most chairs and uses common materials
 A Slim,Comfortable This system works for most chairs and uses common materials An upholstered slip seat complements a beautiful chair. Using modern materials, it s not difficult to construct an elegant
SUPPLIES OTHER SUPPLIES Marco 12 Teddy Bear Pattern
 SUPPLIES Fat ¼ yd of 1 sparse, straight mohair 4 x 4 piece of wool felt or ultrasuede 10mm black glass eyes (1 pair) 2 1 ¼ Joint discs 4 1 ½ Joint discs 4 1 ¾ Joint discs Jointing hardware of choice (5
SUPPLIES. OTHER SUPPLIES Marking pen Masking tape Aleene s Stop Fraying Toothpick Basic sewing supplies (See Tools link at
 SUPPLIES 30 x 9 piece of 5/8 curly matted mohair 7 x 6 piece of wool felt or ultrasuede 8 mm black glass eyes (1 pair) 6-1 fiberboard discs (neck & front legs) 4-1 ¼ fiberboard discs (rear legs) 5 Cotterpins
Bound and Determined:
 Think You Don t Have Time to Create Beautiful Quilts? From quick-quilt adaptations of classic patterns to fun, fresh novelty designs, McCall s Quick Quilts provides you with a treasury of time- and effort-saving
Tux chair & half. assembly instructions
 Tux chair & half assembly instructions Smooth & Wrinkle-Free Fabric Covers: In addition to these printed instructions, you may want to watch our beauty tips videos on the customer service page of our website.
Brother PQ- Series Accessories
 Brother PQ- Series Accessories The PQ-series of high-speed straight stitch machines (1300, 1500 and 1500S) are designed to sew quickly and accurately with a wide variety of fabrics, even combinations of
Monroe loveseat. assembly instructions
 Monroe loveseat assembly instructions Smooth & Wrinkle-Free Fabric Covers: In addition to these printed instructions, you may want to watch our beauty tips videos on the customer service page of our website.
Ray chair & half. assembly instructions
 Ray chair & half assembly instructions Smooth & Wrinkle-Free Fabric Covers: In addition to these printed instructions, you may want to watch our beauty tips videos on the customer service page of our website.
Tux sofa. assembly instructions
 Tux sofa assembly instructions Smooth & Wrinkle-Free Fabric Covers: In addition to these printed instructions, you may want to watch our beauty tips videos on the customer service page of our website.
at Hom by Helen H. Matheis
 at Hom by Helen H. Matheis REUPHOLSTERING at Home Helen H. Matheis F SAGGING SPRINGS and bumpy padding in your chairs and I davenports are spoiling the comfort and good looks of these pieces, you can reupholster
Beginning Level (9-11 Years)
") OKLAHOMA COOPERATIVE EXTENSION SERVICE 4-H Fabrics & Fashions Construction Items Beginning Level (9-11 Years) Division of Agricultural Sciences and Natural Resources Oklahoma State University OKLAHOMA
OKLAHOMA COOPERATIVE EXTENSION SERVICE 4-H Fabrics & Fashions Construction Items Beginning Level (9-11 Years) Division of Agricultural Sciences and Natural Resources Oklahoma State University OKLAHOMA
Laney chair. assembly instructions
 Laney chair assembly instructions Smooth & Wrinkle-Free Fabric Covers: In addition to these printed instructions, you may want to watch our beauty tips videos on the customer service page of our website.
SUPPLIES TOOLS Mini Teddy Bear Pattern
 SUPPLIES TOOLS 7 X 9 piece of 1/2 ultra sparse mohair 2 x 2 piece of felt (footpads) 5 Mini T cotterpins 6 ½ joint discs 4 3/8 joint discs 5mm black glass eyes (1 pair) Artificial sinew (or strong waxed
BERNINA. Overlocker Workbook 2
 Overlocker Plus For current BERNINA models 2016 BERNINA of America. Permission granted to copy and distribute in original form only. Content may not be altered or used in any other form or under any other
Sewing Roll. Base Fabric. Base Fabric. Third Fabric. Second Fabric (Bottom Pockets) Pockets)
 Pockets)") You will need Brother Creative Sewing Pack (Free Motion Foot, Braiding Foot, Narrow Hem Foot, Piping Foot and Concealed Zipper Foot) Base fabric 1 x fat ¼ (50cm square) cut in half Second fabric 50cm x
You will need Brother Creative Sewing Pack (Free Motion Foot, Braiding Foot, Narrow Hem Foot, Piping Foot and Concealed Zipper Foot) Base fabric 1 x fat ¼ (50cm square) cut in half Second fabric 50cm x
Linda Brown, Sue Dittler, Sandy Miller, Lucy Ricardo, and Carole Thommen
 Linda Brown, Sue Dittler, Sandy Miller, Lucy Ricardo, and Carole Thommen Edited by: Sharon Reilly Teena Livsey YO-YO s especially ornament balls By: Lucy Ricardo Supply list: Scraps of fabric 1 ½ circle
Flat Bench Cushion with Buttons & Piping
 Published on Sew4Home Flat Bench Cushion with Buttons & Piping Editor: Liz Johnson Friday, 02 March 2018 1:00 A bench cushion is one of the top projects new sewers list as the decorating puzzle that finally
Laney loveseat. assembly instructions
 Laney loveseat assembly instructions Smooth & Wrinkle-Free Fabric Covers: In addition to these printed instructions, you may want to watch our beauty tips videos on the customer service page of our website.
Serging Ahead For all current BERNINA serger models
 2 Serging Ahead For all current BERNINA serger models 2011 BERNINA of America, Inc. Permission granted to copy and distribute in original form only. Content may not be altered or used in any other form
Part 17: Chapter 33 Trimming Over-Stuffed Pieces
 Part 17: Chapter 33 Trimming Over-Stuffed Pieces SOME of the chairs we have just described were provided with removable wooden panels, which simplified the finishing of the arms and wings. Fig. 267 shows
cut & sew AXOLOTL PLUSH a sewing pattern by
 cut & sew AXOLOTL PLUSH a sewing pattern by 2 axolotl plush If you re reading this, then you likely purchased some of my Cut & Sew Axolotl Plush fabric from Spoonflower. So thank you! This cute belly-down
Cut 1 lightweight interfacing
 1 2 A note on interfacing for this bag: This pattern is intended to produce a slouchy bag, so you will want to look carefully at your fabrics before you decide on which interfacing and stabilisers to use.
Armless. looseback sofa. assembly instructions
 Armless looseback sofa assembly instructions Smooth & Wrinkle-Free Fabric Covers: In addition to these printed instructions, you may want to watch our beauty tips videos on the customer service page of
Basic Bearmaking Instructions
 Laying out the Pattern Basic Bearmaking Instructions We recommend that you read the instructions right through before commencing. This will help you to understand the steps you need to take. Copying your
Figuring the amount of fabric needed: 0 Measure the window and record each measurement A. Width inside frame B. Length inside frame C. Width outside f
 _ MAKING DOM-AN smut-s : 1 y,_ H z i. I i 1 ~ :... L illiqlgiilliillql' 'iiliilliill'idnz The Roman shade is a popular, versatile window treat ment. Its tailored appearance blends with many decorating
ESPADRILLES Boots Instructions
 ESPADRILLES Boots Instructions SUPPLIES NEEDED: Espadrille Soles Espadrille Creative Yarn Espadrille Large Curved or Straight Needle Espadrille Needle Pullers Espadrille Yarn Wax Espadrille Glass Head
SeCecttay cutd VUfay, PLASTICS for UPHOLSTERY. Federal Cooperative Extension Service Oregon State College Corvallis
 SeCecttay cutd VUfay, PLASTICS for UPHOLSTERY Federal Cooperative Extension Service Oregon State College Corvallis Cooperative Extension Work in Agriculture and Home Economics, F. E. Price, director. Oregon
london calling bag a sewing pattern by
 a sewing pattern by london calling bag This project on its own is a very big gusseted bag with a zippered top closure. But the optional details include a front pocket with Union Jack applique, buckle adjustable
Do It Yourself Upholstery Instructions
 Do It Yourself Upholstery Instructions 1 Part 1: Chapter 1 Part 2: Chapter 2 Chapter 3 Part 3: Chapter 4 Chapter 5 Part 4: Chapter 6 Part 5: Chapter 7 Chapter 8 Part 6: Chapter 9 Chapter 10 Part 7: Chapter
Sasha Sundress, Knickers, Bolero & Flip-flops
 Sasha Sundress, Knickers, Bolero & Flip-flops Materials: 0.5 metre Cotton Fabric 0.25 metre fabric for lining Bolero 0.5 metre 1/4 wide elastic for Waist and legs 2 Snap Fasteners Small Beads or Sequins
Thread Catcher Patern. withdetachable Pincushion and OptionalPosy
 Thread Catcher Patern withdetachable Pincushion and OptionalPosy andscisorstab Sew In Style Thr hread Catcher with Detachable Pincushion and Optional Posy and Scissors Tab Materials and Supplies Outside
Treviso POCKET BILLIARD TABLE INSTALLATION MANUAL. SERVICE DEPARTMENT P.O. BOX 68 BRISTOL, WI 53104
 Treviso TM POCKET BILLIARD TABLE INSTALLATION MANUAL www.brunswickbilliards.com SERVICE DEPARTMENT P.O. BOX 68 BRISTOL, WI 53104 51-905881-000 NOVEMBER 2008 NOTE: Please use the instructions in this manual
TRUE TECHNICAL SERVICE MANUAL - ALL MODELS. DOORS/DRAWERS/LIDS
 DOORS/DRAWERS/LIDS 55 56 NOTES DOORS/DRAWERS/LIDS Swing s 73 74 NOTES INSTALLATION OF A GDM-SWING DOOR Phillips Head Screwdriver (2) - 1/8" Drift Punches (forged) Top Bracket NOTE: It may be necessary
Fabric Replacement Top and Doors
 Fabric Replacement Top and Doors Installation Instructions For: Wrangler/TJ 1997 and Newer Part Number: 51131 WARNING This product is designed to enhance the appearance of the vehicle and to shield the
Bosun s Chair Kit. Kit # * *1 MATERIALS LIST:
 103824*1 103824*1 Bosun s Chair Kit Bosun s Chair Kit Kit #323034 The Sailrite Bosun s Chair Kit makes a padded bosun s chair using Sunbrella acrylic fabric and closed cell foam. The design features a
Sailcloth Fabric Replacement Top and Doors with Tinted Side and Rear Curtains Installation Instructions
 Sailcloth Fabric Replacement Top and Doors with Tinted Side and Rear Curtains Installation Instructions TM For: Wrangler / TJ 2003 - Current Part Number: 79129 Inc. This product is only designed for the
- OUR TOP TIPS - Seam allowance is 1.5cm or 5/8 unless otherwise stated. Use the markings on the base of your machine to help you keep to this.
 - OUR TOP TIPS - Always check the size chart to work out which size is best suited to you. Sew Over It patterns tend to have less ease than other patterns as most of the designs are intended to have a
earl Pearl Frame Instruction Addendum How to Load Fabric to Frame Model BLQF Model BLQF
 earl Pearl Frame Instruction Addendum How to Load Fabric to Frame Model BLQF Model BLQF www.babylock.com Step 1 Anatomy of the Frame Note: A little preparation the first time you use your quilting frame
Name: Class: Monster Doll. Grading Rubric
 Name: Class: Monster Doll Grading Rubric Grade yourself on the skills listed below. (0 being the lowest, and 5 being the highest.) Once you have graded yourself in each area, pin your grading sheet to
shiba cube puppy plush a sewing pattern by
 shiba cube puppy plush a sewing pattern by If you ve ever sewn a cube before, this pattern takes it to the next level! The classic geometric shape forms a chubby little puppy body complete with four stubby
Copyright Bumblebee Linens LLC
 Crafts Instructions Included 1. Hankie Wedding Dress 2. Pillowcase Dress 3. Hankie Bonnet 4. Hankie Pin Cushion 5. Hankie Angel 6. Hankie Bunny 7. Pillowcase Reusable Grocery Bag 8. Linen Towel Drawstring
FANTASTIC DRAWSTRING PURSE Jenny Haskins
 FANTASTIC DRAWSTRING PURSE Jenny Haskins Purses are so in vogue at present but they are also really outrageously priced so here is a beautiful purse that is fun to make and looks just magic. NOTE: Pattern
{ FEATURING PARADISE COLLECTION}
 { FEATURING PARADISE COLLECTION} F R E E P R O J E C T S H E E T DESIGNED WITH LOVE BY DESIGNED WITH LOVE BY FABRICS DESIGNED BY PATRICIA BRAVO for ART GALLERY FABRICS Finished Size: 56.5" by 64.5" Block
Harriet Chair with Modifications
 Harriet Chair with Modifications This modification of the Harriet chair includes a slat back, padded seat, and is 2 inches wider than the original plan. The overall dimensions of the finished chair: 38
Prima Diva. .Style, function and loads of compliments That s what the Stella Sling Bag brings!!
 .Style, function and loads of compliments That s what the Stella Sling Bag brings!! Supplies: 1/2 Yard Main Print (Outside of wallet, Outside of pockets, optional strap, etc..) 5/8 Yard Accent Print (Lining
Make your own Blacksmithing Bellow By Bobby Floyd (Jan. 2014)
") 1 Make your own Blacksmithing Bellow By Bobby Floyd (Jan. 2014) Some before rehabilitation photos of this small blacksmithing bellow ca. 1900 (Length 45, Width 25 ½, Weight 33 lbs.). More before photos
1 Make your own Blacksmithing Bellow By Bobby Floyd (Jan. 2014) Some before rehabilitation photos of this small blacksmithing bellow ca. 1900 (Length 45, Width 25 ½, Weight 33 lbs.). More before photos
sugar skull kit ty plush a sewing pattern by
 sugar skull kit ty plush a sewing pattern by sugar skull kit ty plush This pattern pays homage to the beautiful calaveras seen in Dia de Muertos art. It s a simple kitty plush with button jointed limbs
HOW TO MAKE A COMPOSITION ZISA DOLL
 HOW TO MAKE A COMPOSITION ZISA DOLL WITH STUFFED FELT BODY AND 3D PRINTED HANDS AND HEAD A composition doll is made of different materials, in this case the body and limbs are sewn in felt and then padded,
Owen 2 of 9 Measurements: Standing: 34cm / 13.5 inches Sitting: 25.5cm / 10 inches
 Owen Jane Watling A truly special bear, Owen is worked in double knitting yarn and is based on a traditional teddy bear. He is knitted entirely in the round and has jointed arms and legs. The method used
Recaro sport seat strip down and rebuild
 Recaro sport seat strip down and rebuild So why do this, well I managed to find a set of Recaro s left in a wet shed for over 25 years and Rather than pay for someone to strip these down i decided to have
Modular ottoman. assembly instructions
 Modular ottoman assembly instructions Smooth & Wrinkle-Free Fabric Covers: In addition to these printed instructions, you may want to watch our beauty tips videos on the customer service page of our website.
NOTES 1. Please wash, dry & iron your fabric before beginning. 2. Use a 1/4 seam allowance throughout. 3. All seams are sewn Right Sides together.
 OTHER TOOLS & SUPPLIES - fiber stuffing or fabric scraps - paper printer - 24 contrasting embroidery floss & an embroidery hoop, for eyes - 2 yds of ribbon, for hanging (optional) - basic sewing supplies:
Square Patchwork & Tufted Couch Cushion
 Published on Sew4Home Square Patchwork & Tufted Couch Cushion Editor: Liz Johnson Tuesday, 05 June 2018 1:00 Round things that make me smile: baby thighs, ice scream scoops, rolling hills, tufted cushions.
Soft & Stuffable Fabric Shopping Bags: Shop Pretty
 Published on Sew4Home Soft & Stuffable Fabric Shopping Bags: Shop Pretty Editor: Liz Johnson Wednesday, 07 June 2017 1:00 As more and more stores up their recycling commitment (some entire cities have
Installation Instructions
 Installation Instructions 000964 Revision F Installation Instructions for PIRIT Read this manual fully prior to starting installation. Call American eating Customer ervice with any questions. What you
pholstered Vanity Seat
 U pholstered Vanity Seat For years I sat on an extremely uncomfortable chair to apply my makeup. I finally replaced it with this sturdy seat that is both attractive and comfortable. This finished size
You will need. Equipment
 1 KITE MOBILE Here s how to make a colourful kite to fly in your bedroom whatever the weather! You can use the kite tail to display favourite photos, postcards or trinkets. Just attach them with coloured
Owyhee County 4-H. Cloverbud. Activity Book
 Owyhee County 4-H Cloverbud Activity Book Name Age Year in 4-H 20 Club Name Member s Signature Parent/Guardian s Signature Leader s Signature Projects or activities I worked on this year were: I attended
Basic Sewing Portfolio. Name
 Basic Sewing Portfolio Name Back stitching Whip stitch Starting in the corner of a sample begin stitching diagonally. 3-4 stitches Hold up the back stitching lever and backstitch to the beginning. Release
Six FUN! projects for those who are new to sewing, returning to sewing or just want to sharpen basic skills.
 Six FUN! projects for those who are new to sewing, returning to sewing or just want to sharpen basic skills. 1. Clutter Control Bags 2. 3-Button Book Cover 3. Fabric Stash Pincushion 4. Pocket Tissue Case
Making Slip Covers. Two, they must be made securely, so that they will bear hard use.
 Making Slip Covers Fabric-Covered Chairs, couches and stools have become an important part of decoration. Colors can be changed and color schemes emphasized, antiques or any beautiful furniture can be
MACHINE QUILTING FRAME
 MACHINE QUILTING FRAME YOU WILL NEED TO PURCHASE: 5 pieces of 1-1/4 thin wall metal conduit (EMT) cut to your preferred length for the rollers. (Maximum 120 ) DETERMINING YOUR ROLLER LENGTH: Determine
Impulse. 1/4 yard each very dark green (A), dark green (B),
, dark green (B),") design by LUCY A. FAZELY & MICHAEL L. BURNS Purple/Blue Impulse 12" x 12" Block Make 12 Blue/Green Impulse 12" x 12" Block Make 12 Orange/Red/Green Impulse 12" x 12" Block Make 12 Red/Purple Impulse 12"
design by LUCY A. FAZELY & MICHAEL L. BURNS Purple/Blue Impulse 12" x 12" Block Make 12 Blue/Green Impulse 12" x 12" Block Make 12 Orange/Red/Green Impulse 12" x 12" Block Make 12 Red/Purple Impulse 12"
Brook sectional corner. assembly instructions
 Brook sectional corner assembly instructions Smooth & Wrinkle-Free Fabric Covers: In addition to these printed instructions, you may want to watch our beauty tips videos on the customer service page of
Armless. tightback loveseat. assembly instructions
 Armless tightback loveseat assembly instructions Smooth & Wrinkle-Free Fabric Covers: In addition to these printed instructions, you may want to watch our beauty tips videos on the customer service page
Ali sectional right. assembly instructions
 Ali sectional right assembly instructions Smooth & Wrinkle-Free Fabric Covers: In addition to these printed instructions, you may want to watch our beauty tips videos on the customer service page of our
EVERYDAY BISCUITS. Finished Size: 42" x 60" Designed by Annis Clapp P101
 EVERYDAY BISCUITS Finished Size: 42" x 60" Designed by Annis Clapp P101 P101 EVERYDAY BISCUITS Please read all instructions carefully before beginning. Do not prewash fabrics. Dark fabrics should be checked
19" emily, Jenny, & Portrait Dolls. By Dianna effner. Body Pattern and Construction. Strip
 Original Designs for the Doll Industry, Inc. PO BOX 174 JAMESTOWN, MISSOURI 65046 19" emily, Jenny, & Portrait Dolls Copyright 2001 By Dianna effner Body Pattern and Construction ArmATure ConSTruCTIon
cut & sew owl plush a sewing pattern by
 cut & sew owl plush a sewing pattern by 2 cut & sew owl plush If you re reading this, then you likely purchased some of my Cut & Sew Owl Plush fabric from Spoonflower. So thank you! This pattern is for
To register your machine warranty and receive Baby Lock product updates and offers, go to If you have questions with
 To register your machine warranty and receive Baby Lock product updates and offers, go to www.babylock.com/profile. If you have questions with registration, visit your Authorized Baby Lock Retailer. CONTENTS
Digital Device Sleeve
 Published on Sew4Home Digital Device Sleeve Editor: Liz Johnson Tuesday, 22 September 2015 1:00 Finding great gift ideas for guys is tough, starting with the search for the perfect fabric, which can be
Chatelaine. Read on for project instructions to create a beautiful and useful chatelaine! Chatelaine
 Chatelaine Chatelaines have a long history, dating back to the 18th century. A chatelaine is a decorative belt hook or clasp worn at the waist with a series of chains (or cords, in this project) suspended
Sweet Softies: Funny Bunny
 Published on Sew4Home Sweet Softies: Funny Bunny Editor: Liz Johnson Thursday, 08 April 2010 10:00 Stuffed animals make me happy. They live on my desk at home and at work, so I can glance over at them
Learn To Sew: Xtra EZ Pony Tail Bolster Pillow
 Published on Sew4Home Learn To Sew: Xtra EZ Pony Tail Bolster Pillow Editor: Liz Johnson Thursday, 17 October 2013 1:00 This finished pillow may look complex, but the steps are... as the name promises:xtra
Encircled Throw Quilt Pattern
 Pattern Instructions Encircled Throw Quilt Pattern Geometrics are a favorite with quilters, with circles being a coveted favorite. This charming quilt pattern is designed to work with the Circles Sew Simple
2016 Courtesy of Art Gallery Quilts LLC. All Rights Reserved.
 ST YL E NAME 2016 Courtesy of Art Gallery Quilts LLC. All Rights Reserved. CONSTRUCTION Sew all rights sides together with ¼"seam allowance. Arrange the triangles together in rows. QUILT DESIGNED BY AGF
1. Print our the Fox Hat pattern (pages 8-11 of this tutorial) at 100% of actual size. Cut out the
 at 100% of actual size. Cut out the") Other Supplies - 2 black buttons (for eyes) - One bag of fiber stuffing - Paper printer - Basic sewing supplies: - sewing machine - needle & coordinating thread - straight pins - scissors & fabric shears
Other Supplies - 2 black buttons (for eyes) - One bag of fiber stuffing - Paper printer - Basic sewing supplies: - sewing machine - needle & coordinating thread - straight pins - scissors & fabric shears
woodworkersjournal.com MATERIAL LIST
 MATERIAL LIST T x W x L 1 Legs (2) 1 1 2" x 3 1 2" x 36 7 16" 2 End Uprights (2) 1 1 2" x 3 1 2" x 32 1 2" 3 Stringers (4) 1 1 2" x 3 1 2" x 42" 4 Top Cladding, Long (2) 3/4" x 7 1 4" x 65 3 4" 5 Side
Soft & Stuffable Fabric Shopping Bags
 Published on Sew4Home Soft & Stuffable Fabric Shopping Bags Editor: Liz Johnson Wednesday, 03 June 2015 1:00 As more and more stores up their recycling commitment (some entire cities have banned plastic
j e n n y l o v e s b e n n y B o u t i q u e B e a r s Sunday by Jenny Lee
 j e n n y l o v e s b e n n y B o u t i q u e B e a r s Sunday by Jenny Lee Please meet an old friend of mine...the original Sunday!! Sunday loves nothing better than to laz around and do absolutely NOTHING!!...hmmm
a free sewing pattern by
 a free sewing pattern by 2 kitty wallet This project is a fun companion piece to my Kitty Purse pattern. It's a bi-fold wallet with the traditional slots for cards (6) and one for receipts or bills. A
Double Layer Half Apron with Fancy Details
 Published on Sew4Home Double Layer Half Apron with Fancy Details Editor: Liz Johnson Tuesday, 18 July 2017 1:00 With this design, we've packed a whole lot of style into one half apron. To start, why settle
Pretty Quick Pillow Case PO Box 1206 Langley, WA
 Pretty Quick Pillow Case www.jillmccloydesigns.com PO Box 1206 Langley, WA 98260 info@jillmccloydesigns.com Pillow cases make terrific projects. They are pretty, practical, quick, easy to make, and may
Kindle Case with Pocket 1 An In-the-Hoop Project
 Kindle Case with Pocket 1 An In-the-Hoop Project 2011, 2015 Peggy Severt, Pegboard Crafts Updated April 2015. Minor improvements. pegboard1@yahoo.com or peggy@pegboardcrafts.com http://www.pegboardcrafts.com
Binding a Limp-bound Book which make great site tokens or personal largess
 Binding a Limp-bound Book which make great site tokens or personal largess As presented by THLady Jorhildr Hrafnkelsdottir version 1.2 2 Miniature Bookbinding - THLady Jorhildr Hrafnkelsdottir Larger books
The Granny An in-the-hoop project
 The Granny An in-the-hoop project An over-the-shoulder/around the neck purse with 3 pockets. Back pocket is zippered and full length of the purse. Middle pocket is open, behind the flap. Front pocket has
Page 1. Jumblenut. The Head. Design by Barbara Allen
 Page 1 Needle felting Needle felting is quite different from creating felt by shrinking wet wool. There s no water involved, it requires very little space and creates no mess at all. It s a craft that
Mount to the Wall INSTALLATION MANUAL
 Mount to the Wall 15 Locate the Wooden Studs This step applies to wooden stud wall installation only. Determine and mark the exact locations of two stud centers on the wall. Wooden studs should be spaced
WESTPORT 8' SLATE POOL TABLE ASSEMBLY INSTRUCTIONS
 WESTPORT 8' SLATE POOL TABLE ASSEMBLY INSTRUCTIONS NG2690A THANK YOU! Thank you for purchasing this product. We work around the clock and around the globe to ensure that our products maintain the highest
BIFOLD FUTON FRAME TRINITY ARM. Seat Rails and Slats x 1. *Note: Use 4pc of 100mm Bolts and 4pc of 60mm Bolts to attach the arms to the Stretchers.
 1A Parts in this box. 2pc with extra holes 2pc with extra holes & plastic stoppers Arms x 2 Back Rails and Slats x 1 Full Size: Slat Supports x 6 3pc are longer for the Back deck Back Side Rails x 2 Seat
axolotl PLUSH a free sewing pattern by
 axolotl PLUSH a free sewing pattern by 2 axolotl plush This cute belly-down plush is a chibi version of everyone's favorite amphibious salamander. It has the same external gills and tail fin as the original,
Jamie - 11 Soccer Bear
 Jamie - 11 Soccer Bear Artist Designed Bear with Flexlimb by Laura Matthews of TeddiesbyLauraLynn.com and FreeTeddyBearPatterns.NET This is not intended to be a child s toy due to the glass eyes and pellets.
owl bear plush a free sewing pattern by
 owl bear plush a free sewing pattern by 2 owl bear plush This pattern is a variation of my previous owl plush, an adorable bear version that's an homage to the classic monsters from Dungeons and Dragons