Impulse. 1/4 yard each very dark green (A), dark green (B),
|
|
|
- Pamela Cooper
- 5 years ago
- Views:
Transcription

, dark green (B), medium green (C), dark red")
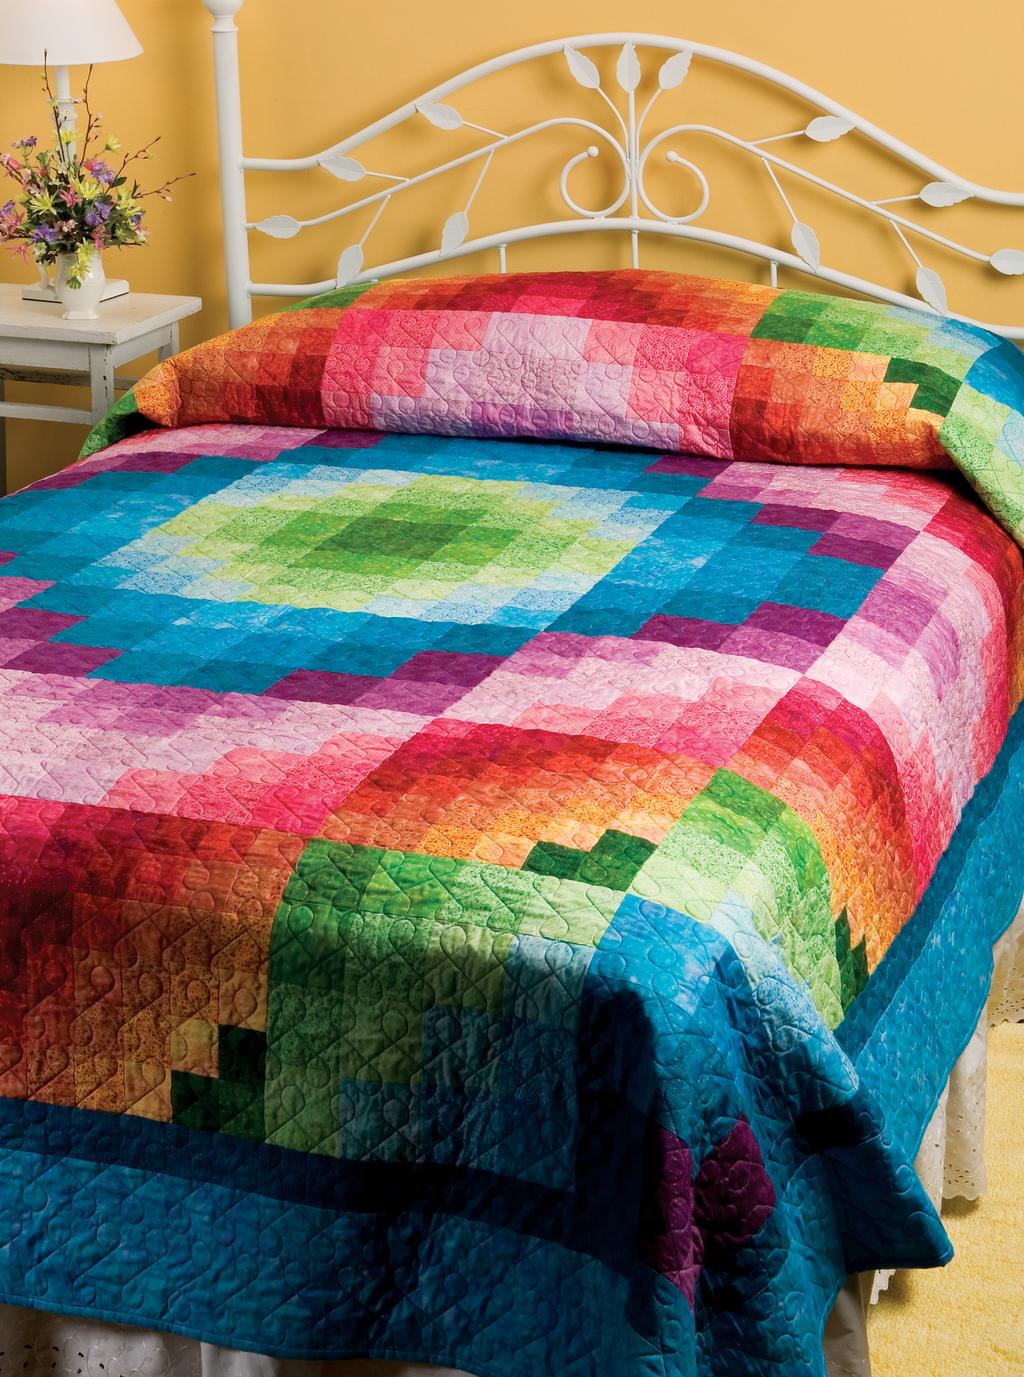
1 design by LUCY A. FAZELY & MICHAEL L. BURNS Purple/Blue Impulse 12" x 12" Block Make 12 Blue/Green Impulse 12" x 12" Block Make 12 Orange/Red/Green Impulse 12" x 12" Block Make 12 Red/Purple Impulse 12" x 12" Block Make 12 Impulse The traditional Trip Around the orld design uses all the same-size squares to create the rounds. In this quilt, the trip is created with three different-size squares in colorful blocks. PROJECT SPECIFICATIONS Skill Level: Beginner Quilt Size: 88" x 112" Block Size: 12" x 12" Number of Blocks: 48 MATERIALS 1/4 yard each very dark green (A), dark green (B), medium green (C), dark red (G), medium red (H), light red (I), light blue (N) and medium purple (R) 1/3 yard each very dark red (F) and light gold (Z) 3/8 yard each light green (D), pale red (J), pale blue (O), light purple (S), copper (U) and gold (Y) 1/2 yard each pale green (E), dark purple (Q), pale purple (T), light copper (V), dark orange () and orange (X) 5/8 yard each dark blue (L) and very dark purple (P) 11/2 yards very dark blue (K) 3 yards medium blue (M) Backing 94" x 118" Batting 94" x 118" All-purpose thread to match fabrics Quilting thread Basic sewing tools and supplies CUTTING Step 1. Cut one by fabric width strip each fabrics B and H. Step 2. Cut two by fabric width strips each fabrics A and G. Step 3. Cut three by fabric width strips each fabrics F and Z. Step 4. Cut four by fabric width strips each fabrics U and Y. Step 5. Cut five by fabric width strips each fabrics V and X. Step 6. Cut six by fabric width strips fabric. Step 7. Cut nine by fabric width strips fabric K for inner borders. Join strips on short ends to make one long strip; press seams open. Subcut 1
2 2
3 IMPULSE strip into two 961/2" AA strips and two 761/2" BB strips. Step 8. Cut (10) by fabric width strips fabric M for binding. Step 9. Cut one 31/2" by fabric width strip each fabrics B, H, M and Q. Step 10. Cut two 31/2" by fabric width strips each fabrics C, I, N and R. Step 11. Cut three 31/2" by fabric width strips each fabrics D, J, O and S. Step 12. Cut four 31/2" by fabric width strips each fabrics E and T. Step 13. Cut two 41/2" by fabric width strips each fabrics Q and M. Step 14. Cut four 41/2" by fabric width strips each fabrics L and P. Step 15. Cut six 41/2" by fabric width strips fabric K. Step 16. Cut (10) 61/2" by fabric width strips fabric M for outside borders. Join strips on short ends to make one long strip; press seams open. Subcut strip into two 1001/2" CC and two 881/2" DD strips. PIECING THE PURPLE/BLUE IMPULSE BLOCKS Step 1. Referring to Figure 1, sew Q to P to K with right sides together along length; press seams in one direction. Repeat for two strip sets. Repeat with P, K and L strips and K, L and M strips. Q P K Figure 1 Step 2. Subcut the strip sets into (12) 41/2" segments each referring to Figure 2. P K L K L M Cut 12 segments each 4 1 /2" 4 1 /2" 4 1 /2" block; press seams in one direction. Repeat to make 12 blocks. Figure 3 PIECING THE BLUE-GREEN IMPULSE BLOCKS Step 1. Referring to Figure 4, sew B to C to D to E with right sides together along length; press seams in one direction. Repeat with C, D, E and O strips; D, E, O and N strips; and E, O, N and M strips. B C D E Figure 4 Step 2. Subcut the strip sets into (12) 31/2" segments each referring to Figure 5. C D E O Step 3. Join one of each segment as shown in Figure 6 to complete one Blue/Green Impulse block; press seams in one direction. Repeat to make 12 blocks. PIECING THE ORANGE/RED/GREEN IMPULSE BLOCKS Step 1. Referring to Figure 7, sew to X to Y to Z to A to B with right sides together along length; press seams in one direction. Repeat with V,, X, Y, Z and A strips; U, V,, X, Y and Z strips; F, U, V,, X and Y strips; G, F, U, V, and X strips; and H, G, F, U, V and strips. D E O N Figure 5 E O N M Cut 12 segments each 3 1 /2" 3 1 /2" 3 1 /2" 3 1 /2" Figure 6 Figure 2 Step 3. Join one of each segment as shown in Figure 3 to complete one Purple/Blue Impulse X Y Z A B V X Y A Z U V X Y Z F U V X Y Figure 7 G F U V X G H F U V 3


4 Step 2. Subcut the strip sets into (12) segments each referring to Figure 8. Cut 12 segments each Figure 8 Step 3. Join one of each segment as shown in Figure 9 to complete one Orange/Red/Green Impulse block; press seams in one direction. Repeat to make 12 blocks. Figure 9 PIECING THE RED/PURPLE IMPULSE BLOCKS Step 1. Referring to Figure 10, sew T to J to I to H with right sides together along length; press seams in one direction. Repeat with S, T, J and I strips; R, S, T and J strips; and Q, R, S and T strips. H I J T I J T S J T S R T S R Q Figure 10 Step 2. Subcut the strip sets into (12) 31/2" segments each referring to Figure 11. Cut 12 segments each 31/2" 31/2" 31/2" Figure 11 31/2" Figure 12 Step 3. Join one of each segment as shown in Figure 12 to complete one Red/Purple Impulse block; press seams in one direction. Repeat to make 12 blocks. 4
5 IMPULSE COMPLETING THE QUILT Step 1. Arrange and join the blocks in rows referring to Figure 13; press seams in adjacent rows in opposite directions. Step 2. Sew an AA strip to opposite long sides and BB strips to the top and bottom of the pieced center; press seams toward the AA and BB strips. Step 3. Sew CC strips to opposite long sides and DD strips to the top and bottom of the pieced center; press seams toward CC and DD strips. Step 4. Complete the quilt using the previously cut binding strips and referring to Completing Your Quilt. Figure 13 DD BB COLOR KEY Very dark green (A) Dark green (B) Medium green (C) Light green (D) Pale green (E) Very dark red (F) Dark red (G) Medium red (H) Light red (I) Pale red (J) Very dark blue (K) Dark blue (L) Medium blue (M) Light blue (N) Pale blue (O) Very dark purple (P) Dark purple (Q) Medium purple (R) Light purple (S) Pale purple (T) Copper (U) Light copper (V) Dark orange () Orange (X) Gold (Y) Light gold (Z) CC AA Impulse Placement Diagram 88" x 112" 5
6 Completing Your Quilt Finishing the Top from top raw edge to bottom raw edge, including the Settings. Most quilts are made by sewing individual two border strips already added. Cut two border strips blocks together in rows that, when joined, create a that length by the chosen width of the border. Sew a design. There are several other methods used to join strip to each of the two remaining sides as shown in blocks. Sometimes the setting choice is determined by Figure 4. Press the seams toward the border strips. the block s design. For example, a House block should be placed upright on a quilt, not sideways or upside down. To make mitered corners, measure the quilt as before. To this add twice the width of the border and ½" for Plain blocks can be alternated with pieced or appliquéd seam allowances to determine the length of the strips. blocks in a straight set. Making a quilt using plain blocks Repeat for opposite sides. Sew on each strip, stopping saves time; half the number of pieced or appliquéd blocks stitching ¼" from corner, leaving the remainder of the are needed to make the same-size quilt as shown in strip dangling. Figure 1. Press corners at a 45-degree angle to form a crease. Stitch from the inside quilt corner to the outside on the creased line. Trim excess away after stitching and press mitered seams open (Figures 5 7). Figure 1 Adding Borders. Borders are an integral part of the quilt and should complement the colors and designs used in the quilt center. Borders frame a quilt just like a mat and frame do a picture. If fabric strips are added for borders, they may be mitered or butted at the corners as shown in Figures 2 and 3. To determine the size for butted border strips, measure across the center of the completed quilt top from one side raw edge to the other side raw edge. This measurement will include a ¼" seam allowance. Figure 5 Press Press seam open Figure 77 Figure 6 Carefully press the entire piece, including the pieced center. Avoid pulling and stretching while pressing, which would distort shapes. Figure 2 Figure 3 Figure 4 Cut two border strips that length by the chosen width of the border. Sew these strips to the top and bottom of the pieced center referring to Figure 4. Press the seam allowance toward the border strips. Measure across the completed quilt top at the center, Getting Ready to Quilt Choosing a Quilting Design. If you choose to hand- or machine-quilt your finished top, you will need to select a design for quilting. There are several types of quilting designs, some of which may not have to be marked. The easiest of the unmarked designs is in-the-ditch quilting. Here the 6
7 quilting stitches are placed in the valley created by the seams joining two pieces together or next to the edge of an appliqué design. There is no need to mark a top for in-the-ditch quilting. Machine quilters choose this option because the stitches are not as obvious on the finished quilt (Figure 8). Manufactured quilt-design templates are available in many designs and sizes and are cut out of a durable plastic template material that is easy to use. To make a permanent quilt-design template, choose a template material on which to transfer the design. See-through plastic is the best because it will let you place the design while allowing you to see where it is in relation to your quilt design without moving it. Place the design on the quilt top where you want it and trace around it with your marking tool. Pick up the quilting template and place again; repeat marking. Figure 8 Figure 9 Outline-quilting ¼" or more away from seams or appliqué shapes is another no-mark alternative (Figure 9) that prevents having to sew through the layers made by seams, thus making stitching easier. If you are not comfortable eyeballing the ¼" (or other distance), masking tape is available in different widths and is helpful to place on straight-edge designs to mark the quilting line. If using masking tape, place the tape right up against the seam and quilt close to the other edge. Meander or free-motion quilting by machine fills in open spaces and doesn t require marking. It is fun and easy to stitch as shown in Figure 10. Marking the Top for Figure 10 Quilting. If you choose a fancy or allover design for quilting, you will need to transfer the design to your quilt top before layering with the backing and batting. You may use a sharp mediumlead or silver pencil on light background fabrics. Test the pencil marks to guarantee that they will wash out of your quilt top when quilting is complete; or be sure your quilting stitches cover the pencil marks. Mechanical pencils with very fine points may be used successfully to mark quilts. No matter what marking method you use, remember the marked lines should never show on the finished quilt. hen the top is marked, it is ready for layering. Preparing the Quilt Backing. The quilt backing is a very important feature of your quilt. The materials listed for each quilt in this book include the size requirements for the backing, not the yardage needed. Exceptions to this are when the backing fabric is also used on the quilt top and yardage is given for that fabric. A backing is generally cut at least 6" larger than the quilt top or 2" larger on all sides. For a 64" x 78" finished quilt, the backing would need to be at least 70" x 84". To avoid having the seam across the center of the quilt backing, cut or tear one of the right-length pieces in half, and sew half to each side of the second piece as shown in Figure 11. Figure 11 Figure 12 Quilts that need a backing more than 88" wide may be pieced in horizontal pieces as shown in Figure 12. 7
8 Layering the Quilt Sandwich. Layering the quilt top with the batting and backing is time-consuming. Open the batting several days before you need it and place over a bed or flat on the floor to help flatten the creases caused from its being folded up in the bag for so long. Quilting Hand Quilting. Hand quilting is the process of placing stitches through the quilt top, batting and backing to hold them together. hile it is a functional process, it also adds beauty and loft to the finished quilt. Iron the backing piece, folding in half both vertically and horizontally and pressing to mark centers. If you will not be quilting on a frame, place the backing right side down on a clean floor or table. Start in the center and push any wrinkles or bunches flat. Use masking tape to tape the edges to the floor or large clips to hold the backing to the edges of the table. The backing should be taut. To begin, thread a sharp between needle with an 18" piece of quilting thread. Tie a small knot in the end of the thread. Position the needle about ½" 1" away from the starting point on quilt top. Sink the needle through the top into the batting layer but not through the backing. Pull the needle up at the starting point of the quilting design. Pull the needle and thread until the knot sinks through the top into the batting (Figure 14). Place the batting on top of the backing, matching centers using fold lines as guides; flatten out any wrinkles. Trim the batting to the same size as the backing. Fold the quilt top in half lengthwise and place on top of the batting, wrong side against the batting, matching centers. Unfold quilt and, working from the center to the outside edges, smooth out any wrinkles or lumps. To hold the quilt layers together for quilting, baste by hand or use safety pins. If basting by hand, thread a long thin needle with a long piece of unknotted white or offwhite thread. Starting in the center and leaving a long tail, make 4" 6" stitches toward the outside edge of the quilt top, smoothing as you baste. Start at the center again and work toward the outside as shown in Figure 13. If quilting by machine, you may prefer to use safety pins for holding your fabric sandwich together. Start in the center of the quilt and pin to the outside, leaving pins open until all are placed. hen you are satisfied that all layers are smooth, close the pins. Figure Figure 14 Figure 15 Some stitchers like to take a backstitch here at the beginning while others prefer to begin the first stitch here. Take small, even running stitches along the marked quilting line (Figure 15). Keep one hand positioned underneath to feel the needle go all the way through to the backing. hen you have nearly run out of thread, wind the thread around the needle several times to make a small knot and pull it close to the fabric. Insert the needle into the fabric on the quilting line and come out with the needle ½" 1" away, pulling the knot into the fabric layers the same as when you started. Pull and cut thread close to fabric. The end should disappear inside after cutting. Some quilters prefer to take a backstitch with a loop through it for a knot to end. Machine Quilting. Successful machine quilting requires practice and a good relationship with your sewing machine. Prepare the quilt for machine quilting in the same way as for hand quilting. Use safety pins to hold the layers together instead of basting with thread. 8
9 Presser-foot quilting is best used for straight-line quilting because the presser bar lever does not need to be continually lifted. Set the machine on a longer stitch length (3.0 or 8 10 stitches to the inch). Too tight a stitch causes puckering and fabric tucks, either on the quilt top or backing. An even-feed or walking foot helps to eliminate the tucks and puckering by feeding the upper and lower layers through the machine evenly. Before you begin, loosen the amount of pressure on the presser foot. Special machine-quilting needles work best to penetrate the three layers in your quilt. Finishing the Edges After your quilt is tied or quilted, the edges need to be finished. Decide how you want the edges of your quilt finished before layering the backing and batting with the quilt top. Bringing the backing fabric to the front is another way to finish the quilt s edge without binding. To accomplish this, complete the quilt as for hand or machine quilting. Trim the batting only even with the front. Trim the backing 1" larger than the completed top all around. Turn the backing edge in ½" and then turn over to the front along edge of batting. The folded edge may be machine-stitched close to the edge through all layers or blind-stitched in place to finish. The front may be turned to the back. If using this method, a wider front border is needed. The backing and batting are trimmed 1" smaller than the top, and the top edge is turned under ½" and then turned to the back and stitched in place. Binding. The technique of adding extra fabric at the edges of the quilt is called binding. The binding encloses the edges and adds an extra layer of fabric for durability. ithout Binding Self-Finish. There is one way to eliminate adding an edge finish. This is done before quilting. Place the batting on a flat surface. Place the pieced top right side up on the batting. Place the backing right sides together with the pieced top. Pin and/ or baste the layers together to hold flat referring to Layering the Quilt Sandwich. Begin stitching in the center of one side using a ¼" seam allowance, reversing at the beginning and end of the seam. Continue stitching all around and back to the beginning side. Leave a 12" or larger opening. Clip corners to reduce excess. Turn right side out through the opening. Slipstitch the opening closed by hand. The quilt may now be quilted by hand or machine. The disadvantage to this method is that once the edges are sewn in, any creases or wrinkles that might form during the quilting process cannot be flattened out. Tying is the preferred method for finishing a quilt constructed using this method. To prepare the quilt for the addition of the binding, trim the batting and backing layers flush with the top of the quilt using a rotary cutter and ruler or shears. Using a walking-foot attachment (sometimes called an evenfeed foot attachment), machine-baste the three layers together all around approximately 1/8" from the cut edge. Bias binding may be purchased in packages and in many colors. The advantage to self-made binding is that you can use fabrics from your quilt to coordinate colors. Double-fold, straight-grain binding and double-fold, bias-grain binding are two of the most commonly used types of binding. Double-fold, straight-grain binding is used on smaller projects with right-angle corners. Double-fold, bias-grain binding is best suited for bed-size quilts or quilts with rounded corners. To make double-fold, straight-grain binding, cut 2¼"- wide strips of fabric across the width or down the length 9
10 of the fabric totaling the perimeter of the quilt plus 10". The strips are joined as shown in Figure 16 and pressed in half wrong sides together along the length using an iron on a cotton setting with no steam. Sew diagonally off the corner of the quilt As you approach the beginning of the binding strip, stop stitching and overlap the binding ½" from the edge; trim. Join the two ends with a ¼" seam allowance and press the seam open. Reposition the joined binding along the edge of the quilt and resume stitching to the beginning. To finish, bring the folded edge of binding strip quilt Figure 16 Figure 17 the binding over the raw edges and blind-stitch the binding in place over the machine-stitching line on the back side. Hand-miter the corners on the back as shown in Figure 20. Figure 20 Miter and stitch the Lining up the raw edges, place the binding on the top of the quilt and begin sewing (again using the walking foot) approximately 6" from the beginning of the binding strip. Stop sewing ¼" from the first corner, leave the needle in the quilt, turn and sew diagonally to the corner as shown in Figure 17. To make double-fold, bias-grain binding, cut 2¼"-wide bias strips from a large square of fabric. Join the strips as illustrated in Figure 16 and press the seams open. Fold the beginning end of the bias strip ¼" from the raw edge and press. Fold the joined strips in half along the long side, wrong sides together, and press with no steam (Figure 21). Fold the binding at a 45-degree angle up and away from the quilt as shown in Figure 18 and back down flush with the raw edges. Starting at the top raw edge of the quilt, begin sewing the next side as shown in Figure 19. Repeat at the next three corners. Fold the binding strip up at right angles Figure 21 Follow the same procedures as previously described for preparing the quilt top and sewing the binding to the quilt top. Treat the corners just as you treated them with straight-grain binding. quilt Figure 18 fold Fold the binding strip down and start sewing at the edge Since you are using bias-grain binding, you do have the option to just eliminate the corners if this option doesn t interfere with the patchwork in the quilt. Round the corners off by placing one of your dinner plates at the corner and rotary-cutting the gentle curve (Figure 22). Figure 19 Figure 22 10
11 As you approach the beginning of the binding strip, stop stitching and lay the end across the beginning so it will slip inside the fold. Cut the end at a 45-degree angle so the raw edges are contained inside the beginning of the strip (Figure 23). Resume stitching to the beginning. Bring the fold to the back of the quilt and hand-stitch as previously described. the two triangles with a 1/4" seam allowance as shown in Figure 27; press seam open to reduce bulk. 21" 21" Figure 26 Figure 27 Figure 23 Overlapped corners are not quite as easy as rounded ones, but they are a bit easier than mitering. To make overlapped corners, sew binding strips to opposite sides of the quilt top. Stitch edges down to finish. Trim ends even. Mark lines every 21/4" on the wrong side of the fabric as shown in Figure 28. Bring the short ends together, right sides together, offsetting one line as shown in Figure 29; stitch to make a tube. This will seem awkward. Sew a strip to each remaining side, leaving 1½" 2" excess at each end. Turn quilt over and fold binding down even with previous finished edge as shown in Figure /4" Figure 28 Figure 29 Figure 24 Fold binding in toward quilt and stitch down as before, enclosing the previous bound edge in the seam as shown in Figure 25. It may be necessary to trim the folded-down section to reduce bulk. Figure 25 Instead of cutting individual bias strips and sewing them together, you may make continuous bias binding. Cut a square 21" x 21" from chosen binding fabric. Cut the square once on the diagonal to make two triangles as shown in Figure 26. ith right sides together, join Begin cutting at point A as shown in Figure 30; continue cutting along marked line to make one continuous strip. Fold strip in half along length with wrong sides together; press. Sew to quilt edges as instructed previously for bias binding. Figure 30 Final Touches If your quilt will be hung on the wall, a hanging sleeve is required. Other options include purchased plastic rings or fabric tabs. The best choice is a fabric sleeve, which will evenly distribute the weight of the quilt across the top edge, rather than at selected spots where tabs or rings are stitched, keep the quilt hanging straight and not damage the batting. hen the quilt is finally complete, it should be signed and dated. Use a permanent pen on the back of the quilt. Other methods include cross-stitching your name and date on the front or back or making a permanent label which may be stitched to the back. A 11
A simple strip-pieced large center block turned on point with triangle corners makes for a quick yet sophisticated wall quilt. seams toward E.
 the man cave DESIGN BY TRICIA LYNN MALONEY A simple strip-pieced large center block turned on point with triangle corners makes for a quick yet sophisticated wall quilt. SPECIFICATIONS Skill Level: Confident
Fox Fun Mug Rug H I J. Figure 1
 one day only DESIGN BY JOANNA WILCZYNSKA Fox Fun Mug Rug Good things come in small packages. Create a cute coaster that may end up on a wall instead. ScRap- FRIENDLY PROJECT SPECIFICATIONS Skill Level:
set; press. Repeat to make 17 strip sets. Cut each strip set into 8 (21/2" x 41/2") B segments as shown in Figure 1.
 B segments as shown in Figure 1.") DESIGN BY SUE HARVEY Posy Patch Frayed edges form the petals in this garden of pastel posies. SPECIFICATIONS Skill Level: Confident Beginner Quilt Size: 56" x 72" Block Size: 8" x 8" Number of Blocks:
DESIGN BY SUE HARVEY Posy Patch Frayed edges form the petals in this garden of pastel posies. SPECIFICATIONS Skill Level: Confident Beginner Quilt Size: 56" x 72" Block Size: 8" x 8" Number of Blocks:
Wrap your favorite novel in a quilted cover to protect it and turn heads. It adjusts to fit any size paperback and has a handy bookmark.
 DESIGNED & QUILTED BY CINZIA ALLOCCA Mini Quilt Bookwrap SPECIFICATIONS Skill Level: Confident Beginner Bookwrap Size: 17" x 9" (excluding ties and bookmark) Wrap your favorite novel in a quilted cover
Photo location courtesy of Judith Batty. McCallsQuilting.com McCall s Quick Quilts 1
 Photo location courtesy of Judith atty. McCallsQuilting.com 017 McCall s Quick Quilts 1 Changing Lanes simple patches of color make this unusual quilt quick & colorful Designed and Sewn by Stephanie Sheridan
Bound and Determined:
 Think You Don t Have Time to Create Beautiful Quilts? From quick-quilt adaptations of classic patterns to fun, fresh novelty designs, McCall s Quick Quilts provides you with a treasury of time- and effort-saving
2016 Courtesy of Art Gallery Quilts LLC. All Rights Reserved.
 ST YL E NAME 2016 Courtesy of Art Gallery Quilts LLC. All Rights Reserved. CONSTRUCTION Sew all rights sides together with ¼"seam allowance. Arrange the triangles together in rows. QUILT DESIGNED BY AGF
Accent on Amish Welcome!
 Quilt Along Accent on Amish Welcome! Designed by The Staff of McCall s Quilting Made and Machine Quilted by Sheryl Martin Skill Level Beginner Finished Quilt Size 44H x 44H Number of Blocks & Finished
Central. Fabric. Dot to Dot Quilt. Supplies Needed. Instructions. Skill Level 2: Experience necessary. Project Instructions
 Fabric Project Instructions Central Dot to Dot Quilt Skill Level 2: Experience necessary Crafting Time: Weekend Project Supplies Needed 1 Fabric Central Dot Bundle 1 1 Fabric Central Dot Bundle 2 Fabric
Benartex Bows Table Runner A Foundation Pieced Design Skill Level: Beginner
 Benartex Bows Table Runner A Foundation Pieced Design Skill Level: Beginner Designed By Alexandra Henry Sewn By Alexandra Henry http://www.artbyalexa.com Use Pellon Stitch-N-Tear Lite to foundation piece
Encircled Throw Quilt Pattern
 Pattern Instructions Encircled Throw Quilt Pattern Geometrics are a favorite with quilters, with circles being a coveted favorite. This charming quilt pattern is designed to work with the Circles Sew Simple
Kimono Collection MATERIALS. Finished quilt size CUTTING
 Kimono Collection Colourful Japanese fabrics take the place of traditional paper in these tiny origami kimonos and a simple nine-patch quilt shows them off to perfection. MATERIALS Nine pieces of assorted
The Love Quilt Project Lap Quilt Pattern. Finished Quilt Size Lap quilt, 54 x 54
 The Love Quilt Project Lap Quilt Pattern Finished Quilt Size Lap quilt, 54 x 54 1 The Love Quilt Lap Quilt Pattern Fabric Requirements: Quilting cottons are recommended. You may select the same fabrics
General Instructions for Quilted Projects
 General Instructions for Quilted Projects Projects Designed Exclusively For Licensed Martha Pullen ~ Teaching Beginning Sewing Teachers 2003 Martha Pullen Company, Inc. General Instructions for Quilted
P layful Cuties Quilt - Coral
 Finished Size: 40 ½" x 49" (1.03 meters x 1.24 meters) P layful Cuties Quilt - Coral Supp lies Needed 3 Wishes Fabric Playful Cuties - Coral Collection 1 yd. (91.44cm) - 12967-Gray ¾ yd. (68.58cm) - 12966-Lt.
f e a t u r i n g C a M p S I t e C O L L E C T I O N B Y a G f S t U D I O f r e e p a t t e r n
 free pattern featuring CAMPSITE COLLECTION BY AGF STUDIO QUILT DESIGNED BY AGF STUDIO FABRICS DESIGNED BY AGF STUDIO CAP-C-9000 Sneaky Little Foxes CAP-C-9001 Camping Stories CAP-C-9002 Wild Gatherings
Canadian Quilters Association Pattern: Quilting Tools Tote Bag
 Canadian Quilters Association Pattern: Quilting Tools Tote Bag Description: * Size: 24 x 28", storage for: 6 x 24" ruler and 18 x 24" cutting mat, and all other equipment. * Easy to carry to workshops
{ FEATURING PARADISE COLLECTION}
 { FEATURING PARADISE COLLECTION} F R E E P R O J E C T S H E E T DESIGNED WITH LOVE BY DESIGNED WITH LOVE BY FABRICS DESIGNED BY PATRICIA BRAVO for ART GALLERY FABRICS Finished Size: 56.5" by 64.5" Block
Royal Purple Blossoms
 Royal Purple Blossoms The cutwork and colors of this mat have a distinctly Oriental flair. Project Specifications Skill Level: Beginner Candle Mat Size: 17" diameter Fabric & Batting Fat quarter of light
free pattern featuring aligned COLLECTION BY AGF STUDIO
 free pattern featuring aligned COLLECTION BY AGF STUDIO QUILT DESIGNED BY AGF STUDIO FABRICS DESIGNED BY AGF STUDIO CAP-A-7000 Interconnected CAP-A-7001 Slanted CAP-A-7002 Hyphenated CAP-A-7003 Lineup
Cross & Crown Quilt. Approx Design Size: 27" square
 LeisureArtsLibrary.com Quilt #800382 ross & rown Quilt Approx Design Size: 27" square Originally published in the Spring 1994 issue of elebrations to ross Stitch and raft magazine 2008 by Leisure Arts,
Picnic Stars Table Topper
 Free Project for more basic quilting resources and patterns visit landauerpub.com Picnic Stars Table Topper A free project from Landauer Publishing from Thimbleberries Four Seasons of Calendar Table Toppers
Note: Yardage and supplies listed are for all three bags.
 Stash Pouches Finished sizes: Large 10" (25.4 cm) wide x 81/2" (21.6 cm) tall x 31/2" (8.9 cm) deep Medium 9" (22.9 cm) wide x 7" (17.8 cm) tall x 3" (7.6 cm) deep Small 8" (20.3 cm) wide x 6" (15.2 cm)
P118 CONFETTI. Finished Size: 16" x 16" or 40" x 40" Designed by Annis Clapp. fast2sew Ultimate Seam Guide
 P8 CONFETTI Finished Size: 6" x 6" or 40" x 40" Designed by Annis Clapp fastsew Ultimate Seam Guide CONFETTI Read all instructions carefully before starting. Prewash and iron fabrics. All strips are cut
Crazy Love. Crazy Love fabrics designed by Jennifer Paganelli for FreeSpirit. Quilt designed by Marsha Evans Moore. Size: 50 x 70
 Crazy Love Crazy Love fabrics designed by Jennifer Paganelli for FreeSpirit Quilt designed by Marsha Evans Moore Size: 50 x 70 Materials required: Fat quarters or ¼ yard of 21-25 of the following Crazy
Cheri Good Quilt Design s Ribbon Star
 Cheri Good Quilt Design s Ribbon Star Designer: Cheri Good Quilt Designs Ribbon Star Size 56 x 56 #110A Ribbon Star Strip Quilt Supplies Finished quilt size: 56 x 56 Cotton thread to match fabrics Basic
Acrylic Ruler/Mat Tote Bag
 Acrylic Ruler/Mat Tote Bag Outside Pocket holds 12 1/2' and 16" square up rulers Inside pockets hold 6" x 24" ruler, 6" x 12" ruler, 6" x 6" ruler Plus the inside has pockets for other rulers, notions,
featuring CITY LOFT AGF STUDIO COLLECTION Shutters
 featuring CITY LOFT COLLECTION BY AGF STUDIO Shutters FREE PATTERN Shutters Q U I LT D E S I G N E D B Y A G F S T U D I O FA B R I C S D ES I G N E D BY AG F S T U D I O FUS-CL-900 FUS-CL-901 BRAVE BLOOMED
{ FEATURING PRISMA ELEMENTS}
 { FEATURING PRISMA ELEMENTS} FREE PROJECT SHEET DESIGNED BY FABRICS DESIGNED BY AGF-STUDIO FOR ART GALLERY FABRICS FINISHED SIZE: 52 1/2" x 73" CUTTING DIRECTIONS ¼" seam allowances are included. FABRIC
Pocketfuls of Christmas Door or Wall Tree
 Pocketfuls of Christmas Door or Wall Tree 25 pockets to help count down the days before Christmas! Supply list: Color #1: Color #2: 5/8 yd green for tree and tree stump 1 yd for backing and binding ½ yd
Section 1, Center Section Make One. Fabric Fabric # of Cutting Directions ID Location Strips
 Please read all instructions carefully prior to beginning quilt. All piecing uses a very accurate scant quarter inch seam allowance. In this quilt, accuracy is absolutely critical, so sew several sample
featuring BACHELORETTE
 featuring BACHELORETTE COLLECTION BY FREE PATTERN AGF STUDIO Q U I LT D E S I G N E D B Y A G F S T U D I O FA B R I C S D ES I G N E D BY AG F S T U D I O FUS-BC-500 GARDEN ROCKET BACHELORETTE FUS-BC-504
Under The S ea Table Runner
 Finished Size: 12" x 48" (30.48cm x 121.92cm) Under The S ea Supp lies Needed B efore you begin 3 Wishes Fabric Under the Sea Collection 1 yd. (91.44cm) 12281-Lt. Blue 3 8 yd. (34.29cm) 12289-Lt. Blue
- 1 - Sewing Directions: 1. Trim each 8-1/2 square with the Outer Edge Template. Trim each 6-1/2 square with the Quarter Circle Template.
 Quilt Designed by Lucy A. Fazely Finished Quilt Approx. 70 x 80 - Finished Block Size: 8 x 8 Sing the Blues fabrics by Exclusively Quilters - Style #4039 Fabric Requirements: Based on 42 wide fabric 1-2/3
Monkey Wrench Sue and Sam
 Monkey Wrench Sue and Sam This redwork Sunbonnet Sue and Sam quilt, finished size 31 x 45, makes a great baby quilt, wall hanging Sew all the Sam blocks blue for a boy s room. Skill Level: Intermediate
Getting Started. Supplies 11 fat quarters of Robert Kaufman Girl Scouts Fabric Collection (two must be the same) 1-2/3 yards backing 45 x 60 batting
 1-2/3 yards backing 45 x 60 batting") Friendship Quilt Dear Girl Scout, I m glad you decided to make the Friendship Quilt. Sewing is a great skill to have, because you can make so many different things for your room and more. Plus, it is fun
Friendship Quilt Dear Girl Scout, I m glad you decided to make the Friendship Quilt. Sewing is a great skill to have, because you can make so many different things for your room and more. Plus, it is fun
Project: Batik Triangles Table Topper
 Like to make the most of everything? Experiment with our challenge to create something special from a specific set of materials. DESIGNER: MONIQUE DILLARD OF OPEN GATE QUILTS (OPENGATEQUILTS.COM) 20 6
free pattern featuring paperie COLLECTION BY AMY SINIBALDI
 free pattern featuring paperie COLLECTION BY AMY SINIBALDI QUILT DESIGNED BY AMY SINIBALDI COLOR OPTION FABRICS DESIGNED BY AMY SINIBALDI PPE-340 HAPPILY EVER AFTER PPE-341 COSETTE PPE-342 MANUSCRIPT PPE-343
featuring LETTERS COLLECTION AGF STUDIO
 featuring LETTERS FREE PATTERN COLLECTION BY AGF STUDIO QUILT DESIGNED BY AGF STUDIO FABRICS DESIGNED BY AGF STUDIO CAP-L-3000 ROSES & LETTERS CAP-L-3001 LOVE PUZZLE CAP-L-3002 XOXOXO CAP-L-3003 LOVE LIFE
Love Always Quilt. Additional Supp lies Needed. Fabrics Needed. Finished Size: 44" x 58 ½" (113.03cm x cm)
") Love Always Quilt Finished Size: 44" x 58 ½" (113.03cm x 148.59cm) Fabrics Needed 3 Wishes Fabric Love Always Collection 1 Panel 13819-Multi (Bird & Flower Panel) 1 yd. (91.44cm) 13823-Purple (Purple Tonal)
Love Always Quilt Finished Size: 44" x 58 ½" (113.03cm x 148.59cm) Fabrics Needed 3 Wishes Fabric Love Always Collection 1 Panel 13819-Multi (Bird & Flower Panel) 1 yd. (91.44cm) 13823-Purple (Purple Tonal)
PINWHEEL STAR WORKSHOP QUILT
 PINWHEEL STAR WORKSHOP QUILT Finished Size: 9" x 9" FABRIC REQUIREMENTS fat quarter or less of each fabric Fabric A - Medium (or dark) print for center star Fabric B - Dark (or medium) print for pinwheels,
Scooter Strips Wall Hanging
 Scooter Strips Wall Hanging This wall hanging is a quirky take on the traditional log cabin quilt block. It uses fabric of different widths to make the central block off-centre. Adding border strips to
Venn Diagram Placemats (D-031)
") OTHER TOOLS & SUPPLIES For (4) Mats - (2) Large, (2) Mini - 1/4 yd quilt batting (60 wide) - 5 yds extra-wide double-fold bias binding - Basic sewing supplies; - sewing machine - needle & coordinating
OTHER TOOLS & SUPPLIES For (4) Mats - (2) Large, (2) Mini - 1/4 yd quilt batting (60 wide) - 5 yds extra-wide double-fold bias binding - Basic sewing supplies; - sewing machine - needle & coordinating
GEESE AMONG THE STARS
 P REVERSE PAPER PIECING GEESE AMONG THE STARS Foundation Paper Piecing Made Easy Lap Size or Miniature Designed by Annis Clapp Machine Quilted by Donna Akins fastsew Ultimate Seam Guide GEESE AMONG THE
featuring CITY LOFT COLLECTION AGF STUDIO
 featuring CITY LOFT FREE PATTERN COLLECTION BY AGF STUDIO QUILT DESIGNED BY AGF STUDIO FABRICS DESIGNED BY AGF STUDIO FUS-CL-900 BRAVE BLOOMED CITY FUS-CL-901 HULA HOOPS CITY FUS-CL-902 WAVING BUDS CITY
Alternating Four Patch Quilt: 43 x 51 inches 20 blocks, 8 inch finished
 Free Pattern by Shirley Sandoz of Mystery Bay Quilt Design www.mysterybayquiltdesign.com or email shirley@mysterybayquiltdesign.com Alternating Four Patch Quilt: 43 x 51 inches 20 blocks, 8 inch finished
free pattern featuring Rayon Striped COLLECTION BY AGF Studio
 free pattern featuring Rayon Striped COLLECTION BY AGF Studio FABRICS DESIGNED BY AGF Studio Rayon Solids Rayon striped R-ST-5000 Classic Stripes RS-805 Honey R-ST-5001 Mariner Stripes RS-804 Aurora Red
Little Forest Quilt. 1. Use a rotary cutter and acrylic ruler to cut the number of pieces from each fabric as shown.
 Little Forest Quilt Finished Size: 40 ½" x 48 ½" (102.87cm x 123.19cm). Supplies Needed 3 Wishes Fabric Little Forest Collection 5 8 yd. (57.15 cm) - 12944-Gray 3 8 yd. (34.29cm) - 12949-Brown (binding)
featuring ALIGNED COLLECTION BY AGF STUDIO MONDRIATION FREE PATTERN
 featuring ALIGNED COLLECTION BY AGF STUDIO MONDRIATION FREE PATTERN MONDRIATION QUILT DESIGNED BY AGF STUDIO FABRICS DESIGNED BY AGF STUDIO CAP-A-7000 INTERCONNECTED CAP-A-7001 SLANTED CAP-A-7002 HYPHENATED
PROJECT TITLE: Celtic Unity. PROJECT MAKER: Leanne Ballschmieter Quilted by: Emily Klein-Ballschmieter ISSUE: 28-05
 PROJECT TITLE: Celtic Unity PROJECT MAKER: Leanne Ballschmieter Quilted by: Emily Klein-Ballschmieter ISSUE: 28-05 PROJECT BLURB: Fascinated by the Celtic interlinked designs Leanne finally plucked up
Cat's Night Out. Prepare Templates: Prepare templates as directed on the Template Pages.
 Quilt by Lucy A. Fazely & Michael L. Burns Finished Quilt: 78" x 80-1/2" - Finished Block Size: 6" to 12" Nature's Studio fabrics by Classic Cottons - Style #3644 Fabric Requirements: Based on 44" wide
featuring STARGAZER COLLECTION BY AGF STUDIO Space Trip FREE PATTERN
 featuring STARGAZER COLLECTION BY AGF STUDIO Space Trip FREE PATTERN Space Trip DESIGNED BY FABRICS DESIGNED BY CAP-ST-1106 TWINKLY PHASES CAP-ST-1108 PLANETARIUM CAP-ST-1103 INTERRUPTED SIGNAL CAP-ST-1104
Pretty Pleated Squares Table Runner
 Published on Sew4Home Pretty Pleated Squares Table Runner Editor: Liz Johnson Friday, 16 February 2018 1:00 The beauty of this runner is in the texture of the pleated squares side by side with the plain
FREE PROJECT SHEET DESIGNED WITH LOVE BY
 FREE PROJECT SHEET DESIGNED WITH LOVE BY QUILT DESIGNED WITH LOVE BY PAT BRAVO FABRICS DESIGNED BY AGF IN-HOUSE STUDIO AND PAT BRAVO FOR ART GALLERY FABRICS Finished Size: 62 ½ " 57" FABRIC REQUIREMENTS
Fabric Preparation: At the Computer: 1. Fabric A - (Print) Cut Five - 2½ x 32 strips (to be embroidered) Cut One - 26 x 32 (Back)
 Cut Five - 2½ x 32 strips (to be embroidered) Cut One - 26 x 32 (Back)") Fabric Preparation: 1. Fabric A - (Print) Cut Five - 2½ x 32 strips (to be embroidered) Cut One - 26 x 32 (Back) Cut Four - 2 x 44 (Binding and Ties) Fabric B - (Solid) Batting - Cut Four - 8 x 44 Cut
Fabric Preparation: 1. Fabric A - (Print) Cut Five - 2½ x 32 strips (to be embroidered) Cut One - 26 x 32 (Back) Cut Four - 2 x 44 (Binding and Ties) Fabric B - (Solid) Batting - Cut Four - 8 x 44 Cut
SUMMER FOUR ALL SEASONS. Fabrics by Kim Schaefer. Quilt designed by Jean Ann Wright makower uk (800)
") FOUR ALL SEASONS SUMMER Fabrics by Kim Schaefer 1384 Broadway New York, NY 10018 Quilt designed by Jean Ann Wright makower uk (800) 223-5678 www.andoverfabrics.com Quilt size: 71" x 92" 8/26/10 Introducing
FOUR ALL SEASONS SUMMER Fabrics by Kim Schaefer 1384 Broadway New York, NY 10018 Quilt designed by Jean Ann Wright makower uk (800) 223-5678 www.andoverfabrics.com Quilt size: 71" x 92" 8/26/10 Introducing
featuring WOODLANDS COLLECTION AGF STUDIO
 featuring WOODLANDS FREE PATTERN COLLECTION BY AGF STUDIO QUILT DESIGNED BY AGF STUDIO FABRICS DESIGNED BY AGF STUDIO FUS-W-600 PARADIS WOODLANDS FUS-W-601 WREATHED WOODLANDS FUS-W-602 BUCK FOREST WOODLANDS
Checkered Baby Quilt
 Checkered Baby Quilt by Deb Gehringer of Monday Morning Designs Hi, I'm Deb Gehringer, the creator behind Monday Morning Designs. If you're a beginner quilter, this baby quilt is a great choice because
FREE PATTERN. featuring ETHEREAL COLLECTION BY AGF STUDIO
 FREE PATTERN featuring ETHEREAL COLLECTION BY AGF STUDIO QUILT DESIGNED BY AGF STUDIO FABRICS DESIGNED BY AGF STUDIO FUS-E-100 WILD POSY ETHEREAL FUS-E-101 TEENSY WEENSY ETHEREAL FUS-E-102 MILLEFIORI ETHEREAL
Perfect Binding Corners
 Perfect Binding Corners Beginners Guide for Perfect Binding & Corners By Pearl P. Pereira Copyrignt 2017 P3 DESIGNS www.p3designs.com How to Make Perfect Binding & Corners My Favorite binding strip size
featuring NEST COLLECTION AGF STUDIO
 featuring NEST FREE PATTERN COLLECTION BY AGF STUDIO Q U I LT D E S I G N E D B Y A G F S T U D I O FA B R I C S D ES I G N E D BY AG F S T U D I O CAP-N-6000 CAP-N-6001 CARE BEARS PLAYING DOTS CAP-N-6004
featuring NEST AGF STUDIO COLLECTION Sir BeaR
 featuring NEST COLLECTION BY AGF STUDIO FREE PATTERN Q U I LT D E S I G N E D B Y A G F S T U D I O FA B R I C S D ES I G N E D BY AG F S T U D I O CAP-N-6000 CAP-N-6001 CARE BEARS PLAYING DOTS CAP-N-6004
Learn To Sew: Xtra EZ Pony Tail Bolster Pillow
 Published on Sew4Home Learn To Sew: Xtra EZ Pony Tail Bolster Pillow Editor: Liz Johnson Thursday, 17 October 2013 1:00 This finished pillow may look complex, but the steps are... as the name promises:xtra
Making Double Fold Straight of Grain Quilt Binding
 Making Double Fold Straight of Grain Quilt Binding Tools and Supplies: Cutting mat, rotary cutter with a sharp blade, walking foot, 6x24 ruler, seam allowance guide, pencil, quilting gloves Be sure your
featuring REVERIE AGF STUDIO COLLECTION em ji
 featuring REVERIE COLLECTION BY FREE PATTERN AGF STUDIO DESIGNED BY AGF STUDIO FA B R I C S D ES I G N E D BY AG F S T U D I O FUS-R-800 SPRAYED BLOOMS REVERIE FUS-R-804 AVES CHATTER REVERIE FUS-R-808
Candy Bloom Quilt ~ ~ ~ ~ ~ ~ ~ ~ ~ ~ ~ ~ ~
 Candy Bloom Quilt ~ ~ ~ ~ ~ ~ ~ ~ ~ ~ ~ ~ ~ This gorgeous quilt in a fresh red, blue and cream colourway has a celebration feel, with rows of pretty bunting-style patchwork hung on narrow strips of pale
Sapphire Sapphire Fabric Requirements: Cutting Directions:
 Quilt Designed by Deb Mosa Finished Quilt Approx. x - Finished Block Size: x Sapphire fabrics by Exclusively Quilters - Style #90 Fabric Requirements: Based on wi fabric -/ yards large (#00-0) yards (#00-)
mermaid quilt a sewing pattern by
 a sewing pattern by mermaid quilt This project is a simple and straightforward piece for applique lovers. I personally designed it for a coworker s daughter -- a sweet little girl who s current obsession
A SPOOKY SLEEPOVER. This is a free pattern provided by The Red Boot Quilt Company The Red Boot Quilt Company
 A SPOOKY SLEEPOVER The Red Boot Quilt Company The Red Boot Quilt Company A SPOOKY SLEEPOVER Approx. Size 38 1/2in x 57 1/2in BEFORE THE FUN BEGINS Please read all instructions before you begin. Abbreviations.
Make Templates: Trace templates onto template plastic. Cut out and label.
 Quilt Designed by Deb Mosa Finished Quilt Approx. 70 x 70 - Finished Center Size: 48 x 48 Cotillion fabrics by Exclusively Quilters - Style #3999 Fabric Requirements: Based on 44" wide fabric 3-3/4 yards
featuring ABLOOM AGF STUDIO COLLECTION Arbor
 featuring ABLOOM COLLECTION BY Arbor FREE PATTERN AGF STUDIO Arbor QUILT DESIGNED BY AGF STUDIO FABRICS DESIGNED BY AGF STUDIO FUS-A-400 FLORET STAINS ABLOOM FUS-A-401 FASHION SCENT ABLOOM FUS-A-402 BOHEMIAN
Constellation. Splendor by Amy Butler
 Featuring Splendor by Amy Butler Blazing Star blocks and Half-Star triangles create a vibrating constellation surrounding the large star in the center of this colorful quilt. The Splendor collection by
Quilt-Along-With-Me! Geo Dreams Quilt
 Quilt-Along-With-Me! Geo Dreams Quilt Pattern & Series by Amanda from 3and3quarters.net FINAL QUILT SIZE 145cm x 145cm (57 x 57 ) 1 The Geo Dreams quilt is a generously sized lap quilt made up of four
and FABRIC REQUIREMENTS CUTTING DIRECTIONS artgalleryfabrics.com Table Runner FINISHED SIZE: 36" x 36" Fabric A Fabric B Fabric C Fabric D Fabric E
 artgalleryfabrics.com Table Runner FINISHED SIZE: 36" x 36" and By FABRIC REQUIREMENTS Fabric A Fabric B Fabric C Fabric D Fabric E PEP-68201 PEP-58201 PEP-58202 PEP-68202 PE-433 Backing Fabric PEP- 58205
featuring BACHELORETTE
 featuring BACHELORETTE FREE PATTERN COLLECTION BY AGF STUDIO Q U I LT D E S I G N E D B Y A G F S T U D I O FA B R I C S D ES I G N E D BY AG F S T U D I O FUS-BC-500 GARDEN ROCKET BACHELORETTE FUS-BC-504
featuring pastel thrift COLLECTION BY agf studio Rarities free pattern
 featuring pastel thrift COLLECTION BY agf studio Rarities free pattern Rarities QUILT DESIGNED BY AGF STUDIO FINISHED SIZE 68" 68" FABRICS DESIGNED BY AGF STUDIO PST - 85507 REMINDER HIDDEN PST - 85504
Beginning Level (9-11 Years)
") OKLAHOMA COOPERATIVE EXTENSION SERVICE 4-H Fabrics & Fashions Construction Items Beginning Level (9-11 Years) Division of Agricultural Sciences and Natural Resources Oklahoma State University OKLAHOMA
OKLAHOMA COOPERATIVE EXTENSION SERVICE 4-H Fabrics & Fashions Construction Items Beginning Level (9-11 Years) Division of Agricultural Sciences and Natural Resources Oklahoma State University OKLAHOMA
featuring WONDERFUL THINGS
 featuring WONDERFUL THINGS FREE PATTERN COLLECTION BY BONNIE CHRISTINE Q U I LT D E S I G N E D B Y B O N N I E C H R I S T I N E A N D M A X I E M A K E S HONEST WHISPER FA B R I C S D ES I G N E D BY
By Judy Hahner. Fabric Refer to Fabric Legend on page 2 for yardage and cutting instructions for blocks, borders, backing, and binding.
 By Judy Hahner OESD s Whimsical Wildflowers Collection #009 and Quilting Whimsy #006 were used to design the blocks used in this fresh, fun, and fanciful quilt. The blocks are designed for the BERNINA
featuring METROPOLITAN
 featuring METROPOLITAN FREE PATTERN COLLECTION BY AGF STUDIO QUILT DESIGNED BY AGF STUDIO FABRICS DESIGNED BY AGF STUDIO FUS-CL-900 BRAVE BLOOMED CITY FUS-CL-901 HULA HOOPS CITY FUS-CL-902 WAVING BUDS
Select nine fabrics that go nicely together. 1 light, 4 medium, and 4 dark prints.
 Kathy s Version of the Disappearing Nine Patch Quilt 46 ½ x 64 ½ This version uses nine fabrics, is stripped pieced, and has side borders only. As simple as pie to make and yet so warm and cozy. Use the
Sondalo Table Runner
 www.fabriceditions.com Sondalo Table Runner Finished Size: 14½" x 54½" Supp lies Needed 2 Fabric Palette Sondalo Fat Quarter Bundles (18" x 21") (10 different designs) 16" x 56" Low-loft batting 17" x
FREE PATTERN. featuring STARGAZER COLLECTION BY AGF STUDIO
 FREE PATTERN featuring STARGAZER COLLECTION BY AGF STUDIO QUILT DESIGNED BY FABRICS DESIGNED BY CAP-ST-1106 TWINKLY PHASES CAP-ST-1108 PLANETARIUM CAP-ST-1103 INTERRUPTED SIGNAL CAP-ST-1104 TO BEARFINITY
Token. Imperial. TABLE RUNNER DESIGNED BY FINISHED SIZE 16" x 48" FABRICS DESIGNED BY MWK-1117 DESERT NEEDLEWORK GLORY MWK-1120 WISPY DAYBREAK NIMBUS
 Imperial Token TABLE RUNNER DESIGNED BY FINISHED SIZE 16" x 48" FABRICS DESIGNED BY MWK-1117 DESERT NEEDLEWORK GLORY MWK-1120 WISPY DAYBREAK NIMBUS MWK-1112 CACTI FIELD FESTIVAL MWK-2115 LIMESTONE FEEL
Baby, Throw and Queen Size Pattern
 Aloha Ripple Quilt Baby, Throw and Queen Size Pattern By Andrea Smith of Happy Cloud Creations Baby: 36 1/2 x 42 1/2 inches Throw: 60 1/2 x 70 1/2 inches Queen: 84 1/2 x 98 1/2 inches Basic Instructions
c) Fold & press the Binding in half lengthwise, Wrong Sides facing, and unfold.
 Fold & press the Binding in half lengthwise, Wrong Sides facing, and unfold.") OTHER TOOLS & SUPPLIES - 1 yd of quilt batting (58 wide) - (2) 1-1/2 to 2 metal rings - (10) 7/16 metal grommets - paper printer - basic sewing supplies: - sewing machine with even feed foot - needle &
OTHER TOOLS & SUPPLIES - 1 yd of quilt batting (58 wide) - (2) 1-1/2 to 2 metal rings - (10) 7/16 metal grommets - paper printer - basic sewing supplies: - sewing machine with even feed foot - needle &
Supplies Needed. Instructions. Project Instructions ABC Pieced Quilt. Skill Level 2: Some experience necessary. Approx. Crafting Time: Weekend project
 The Land of Whimzie Project Instructions ABC Pieced Quilt Skill Level 2: Some experience necessary Approx. Crafting Time: Weekend project The Land of Whimzie Finished Size: 40 ½" x 40 ½" Supplies Needed
featuring Legendary COLLECTION Pat Bravo
 featuring Legendary free pattern COLLECTION BY Pat Bravo Q U I LT D E S I G N E D B Y P AT B R A V O FA B R I C S D ES I G N E D BY PAT B R AVO BOHO SOUL LGD-49700 Stitched Anthomania Boho LGD-49706 Collar
Red Cross. A free pattern designed by Tracey Petersen of Peppermint Patch Quilts. finished size 58 by 60
 Red Cross A free pattern designed by Tracey Petersen of finished size 58 by 60 Red Cross What you make: A 58 by 60 simply pieced quilt. The offset cross design makes a stunning quilt. This quilt uses a
Makeup Brush Roll-up Case with Secret Pocket
 Published on Sew4Home Makeup Brush Roll-up Case with Secret Pocket Editor: Liz Johnson Monday, 22 June 2015 1:00 This is our second brush caddy design, the first one having held a firm place on our Most
Trick or Treat Quilt-a-long Mini Quilt One Skill Level: Advanced Beginner
 Trick or Treat Quilt-a-long Mini Quilt One Skill Level: Advanced Beginner http://www.pellonprojects.com Designed By Alexandra Henry Stitched By Alexandra Henry http://www.artbyalexa.com This is setting
f e a t u r i n g M a K e r C O L L E C T I O N B Y a G f S t U D I O f r e e p a t t e r n
 f e a t u r i n g M A K ER free pattern COLLECTION BY AGF STUDIO Q U I LT D E S I G N E D B Y A G F S T U D I O T O S U N S ET FA B R I C S D ES I G N E D BY AG F S T U D I O MKR-2880 MAKE THE CUT STRAIGHT
GHOSTS & GHOULS. This is a free pattern provided by The Red Boot Quilt Company 2017 STRICTLY NOT FOR RESALE OR DISTRIBUTION
 GHOSTS & GHOULS This is a free pattern provided by The Red Boot Quilt Company 2017 STRICTLY NOT FOR RESALE OR DISTRIBUTION The Red Boot Quilt Company GHOSTS & GHOULS Wall-hanging 40 1/2in square Trick
FREE PATTERN. featuring RAISE THE VOLUME COLLECTION BY AGF STUDIO
 FREE PATTERN featuring RAISE THE VOLUME COLLECTION BY AGF STUDIO QUILT DESIGNED BY AGF STUDIO FABRICS DESIGNED BY AGF STUDIO CAP-RV-8000 MEASURED TEMPO CAP-RV-8001 WAVES OF ECHO CAP-RV-8002 TWINKLING TUNE
Materials for Peppermint Candy Pillow
 Peppermint Candy Pillow Tutorial This adorable Peppermint Candy Pillow by BERNINA Ambassador Nancy Mahoney will give your decor a new look, whether for your bed or a decorative pillow for your couch. The
DIY Christmas Advent Calendar Sewing Tutorial
 DIY Christmas Advent Calendar Sewing Tutorial I love counting down the days until Christmas with my children and seeing the smiles on their faces each morning as they get to check the advent calendar to
Cut squares as indicated:
 Quilt Designed by Deb Mosa Finished Quilt Approx. 68 x 80 - Finished Block Size: 12 x 12 Night Owls fabrics by Exclusively Quilters - Style #3804 Fabric Requirements: Based on 42 wide fabric 2-1/4 yards
Sanctuary { FEATURING BAZAAR STYLE COLLECTION} DESIGNED WITH LOVE BY
 Sanctuary { FEATURING BAZAAR STYLE COLLECTION} FREE PROJECT SHEET DESIGNED WITH LOVE BY QUILT DESIGNED WITH LOVE BY Finished Size: 85½" 85½" BLOCK SIZE: 12" 12" To download the instructions for this pattern
FREE PATTERN. featuring VIRTUOSA COLLECTION BY BARI J.
 FREE PATTERN featuring VIRTUOSA COLLECTION BY BARI J. QUILT DESIGNED BY BLAIR STOCKER FABRICS DESIGNED BY INTENSE DRAMATIST VRT-21800 PRIMA FLORA CALMA VRT-21804 EPISODIC BLOOMS AQUA VRT-21801 OVERTURE
featuring ABLOOM COLLECTION AGF STUDIO
 featuring ABLOOM FREE PATTERN COLLECTION BY AGF STUDIO Q U I LT D E S I G N E D B Y A G F S T U D I O FA B R I C S D ES I G N E D BY AG F S T U D I O FUS-A-400 FLORET STAINS ABLOOM FUS-A-404 VINTAGE RUSH