a free sewing pattern by
|
|
|
- Paul Heath
- 6 years ago
- Views:
Transcription


1 a free sewing pattern by

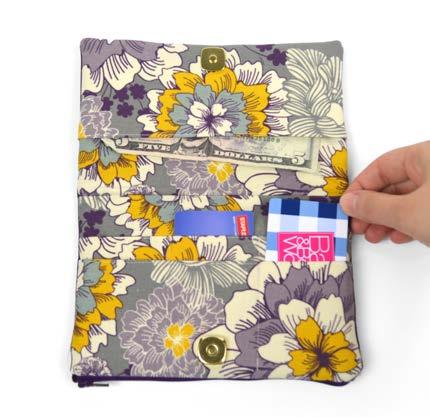
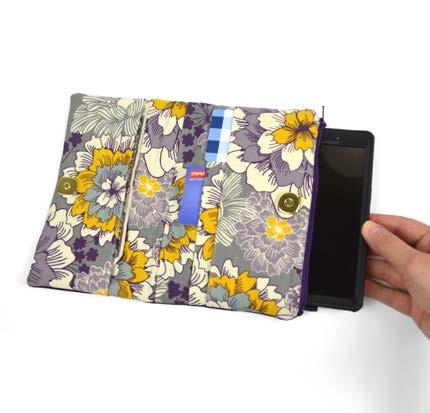
2 2 kitty wallet This project is a fun companion piece to my Kitty Purse pattern. It's a bi-fold wallet with the traditional slots for cards (6) and one for receipts or bills. A lapped zipper pocket on the front has a fun kitty ear silhouette and is perfect for coins but also large enough for pens or pencils. And to finish it off, it has another padded zippered pouch inside that's the right size for a phone. difficulty: makes: One wallet: 7½" wide and 4½" tall (when folded) skills used: Fusible web applique Zipper sewing Edge stitching Using interfacing Curved sewing This project has a lot of little details and most of the shapes are squares and rectangles so it's easy to get things confused. Lining up the pieces accurately is also crucial. For the best results, consider labeling all of the pieces and don't be afraid to adjust your seam allowances as a failsafe so your pieces line up. // Choly Knight // Items made using this pattern may be sold. Credit to Choly Knight or Sew Desu Ne? is appreciated.
 I used Pellon Decor Bond ¼ yd.")
3 3 materials & tools: ¼ yd. of fabric for outer wallet ½ yd. of lightweight fabric for lining 2/3 yds. of lightweight fusible interfacing (I used Pellon SF-101) ¼ yd. of heavyweight interfacing (optional; see tip below) I used Pellon Decor Bond ¼ yd. of thin cotton quilt batting Two 8" long zippers 2 x 4 of appliqué fabric 2 x 4 of light or heavy duty fusible web ¾" magnetic snap sewing thread to match main fabric and applique fabrics basic sewing tools (sewing machine, scissors, iron, needles, pins, fabric marker, seam ripper) suggested fabrics: outer wallet: lightweight fabrics: Quilting cotton, light twill, and other lightweight fabrics work nicely for this wallet design, but it will need 2 layers of interfacing to bring it up to the needed body and stiffness. One lightweight layer (I like Pellon SF101), and one heavyweight layer (such as Pellon Decor Bond) produce the best result. medium-weight fabrics: Fabrics such as twill or canvas are good medium-weight options. These will likely need one layer of lightweight interfacing (such as Pellon SF101) to eliminate any flimsiness. wallet lining: light to medium-weight fabrics: Quilting cotton is the best bet for the lining of the wallet, as it's easy to sew and keeps its shape better than typical apparel and bag lining fabrics. You'll have a much easier time in the long run.


4 4 printing the pattern: To print the pattern, set your computer to print pages If you re unfamiliar with printing and assembling a.pdf pattern, read the steps below. 1 At the print dialog box, check the box that says print at Actual Size or 100%. Any other selection (such as Fit to page ) will distort the pattern so it s slightly larger or smaller and we don t want that. 2 Print the pages needed for the file. You might have one or more. Either way, be sure you have the full collection by noting the page numbers in the corner. 3 It s likely your printer will have a margin that ensures your image doesn t print to the very edge. Assembly will be easier if you trim off this blank margin edge. This will give you pages that overlap slightly during assembly. If you trim across the gray outline boxes, this will give you pages that don t overlap but rather butt against each other. 4 5 To line up the pattern pages, match up the corresponding diamond shapes. Each diamond will have a letter, so it s simply a matter of matching A1 to A2, B3 to B4 and so on. The faint gray lines indicate the border of every page, you should be able to line those up as well. When the diamond goes together, tape it in place. If you have many pages, it s easier to tape up the pages into rows first. Then tape the rows together into a full block. You can trace the patterns onto a different paper, or you can also just cut them straight from the printer paper -- be sure that each piece is fully taped together along the joins so they don t fall apart when you cut them.


5 5 cutting the fabric: Place pattern on the fabric, and make sure the grain line is parallel to the selvedges. Each end of the line should be equally distant to the selvedge. Pin the pattern in place, use pattern weights, or trace the outline of the pattern with a washable marker. Using the paper as a template, cut out the fabric. Cut the required amount according to the pattern. cutting layout: lining fabric 29 wide A B D G I I ½ yd.; 18 long lightweight interfacing A F B H 20 wide E 2/3 yd.; 24 long outer wallet fabric C C C C C C C C 22 wide H I H E F I F heavyweight interfacing 20 wide quilt batting ¼ yd. ¼ yd. ¼ yd. 20 wide before you begin: Briefly read the project instructions so you know what to expect. If desired, mark the cut fabric pieces with the markings and symbols from the pattern. Or wait until the applicable step before transferring. Note that the seam allowance used throughout the project is ½" unless otherwise noted.
.")


6 6 the lining: mark each end of fold lines connect marked lines 1. mark the fold lines Grab your credit card pocket piece (A). Take this time to fuse your lightweight interfacing to the wrong side of the fabric. This will make your pockets much more crisp and flat. Grab the paper pattern for the credit card pockets. Transfer over the fold lines by using the paper as a guide to mark each end of the lines -- mark the mountain folds onto the right side of the fabric. Once all the ends of the lines are marked, go back and connect them with a ruler. connect valley lines on wrong side fold mountain lines with wrong sides together stitch along each folded line 2. stitch the mountain folds Repeat the same process in step 1, but instead transfer the valley folds onto the wrong side of the fabric. Flip your piece back over and fold it (wrong sides together) along one of the marked lines. Crease it with your finger if necessary. Edge stitch the fabric along the line you just folded, about ⅛" from the edge. Repeat with the rest of the traced lines on the right side of the fabric.

 and crease it.")


 end of your magnetic snap and hold it so the socket faces up and the")
7 7 fold valley lines with right sides together stitch along each folded line fold along each stitch like an accordion 3. sew the valley folds Repeat step 2 with the wrong side of the fabric and all of the valley fold lines you traced. Once again fold the fabric along the line (right sides together) and crease it. Edge stitch along the line to secure the fold. Repeat with the remaining lines on the wrong side of the fabric. Once all stitching is complete, fold the pockets along all the folds you just made. The piece should want to fold like an accordion. press prongs into fabric 4. prep the snap cut into indentations insert snap into clipped holes If you haven't already, locate the snap placement marking located on the paper pattern for the pocket. Transfer over the lines to the right side of the fabric. Grab the fatter (socket) end of your magnetic snap and hold it so the socket faces up and the prongs are vertical. Press the prongs into the fabric to leave a small mark. Cut small clips into the indentations (through the first layer of fabric only) to make room for the prongs. Insert the prongs through the clips and to the other side of the fabric.


.")

8 8 place washer over prongs, bend outward 5. install the snap stitch along dividing lines Flip the pocket piece over to the back and finish installing the snap. This usually involves placing a metal washer over the prongs and bending the prongs outward, but your manufacturer's instructions may differ. Flip the pocket back over to the front and transfer over the pocket dividing lines. You can copy them from the pattern or draw 3" in from each edge. Stitch through all the layers down the traced lines and on each side of the pockets to secure the folds together. fold mountain lines with wrong sides together 6. sew the bill slot Grab your bill slot piece (B). Take this time to fuse your lightweight interfacing to the wrong side of the fabric. This will make the slot much more crisp and flat. Repeat steps 1 & 2 for this part, transferring over the mountain and valley folds the same way as for the credit card pockets. Then stitch along the mountain fold as before. Flip over and stitch along the valley fold as well for two folds total. Fold the slot along the stitched lines like for the credit card pockets. Stitch along each side about ⅛" from the edge to hold the folds in place. stitch along each folded line


 trim it down to 8\"")

9 9 match up notched edges 7. sew the two lining halves Grab your finished credit card pockets and bill slot pieces. If you haven't already, locate the notch markings found on the paper pattern. These indicate the edges that should be matched up for the center of the inner wallet. Line up the notched edges of both the credit card pocket the bill slot. Sew the two pieces along this edge. Repeat step 4 with the bill slot and the remaining half of the magnetic snap, so now both halves are secured in place. You can test that the snap matches up when the lining is folded in half. the outer wallet: install other half of snap trim zipper to 8" long sandwich end of zipper between two tabs trim allowance to ¼" 8. sew the zipper tabs Grab one of your zippers and (if it's longer) trim it down to 8" long. Use this opportunity to trim off the metal stops at the beginning and end to avoid any accidental needle breakage. Take two of your zipper tabs (C) and sandwich one end of the zipper between them (right sides of the tab facing) Sew through all three layers with the regular ½" seam allowance. Trim the seam allowance down to ¼". Press the zipper tabs away from the zipper. press tabs away from zipper
 Grab your coin pouch front piece (D).")
 and align the long straight edge over the zipper with the")

 (F) 10.")


10 10 ear facing (E) coin pouch front (D) 9. sew the coin pouch: front press zipper away from (E) Grab your coin pouch front piece (D). Align the zipper against one long edge, right sides both facing up. Grab your ear facing piece (E) and align the long straight edge over the zipper with the right side facing down. This should sandwich the zipper between pieces D & E. Sew the three layers together with a ¼" seam allowance. Use a zipper foot if you have one. Once complete, press the coin pouch front away from the zipper. Leave the ear facing pointing toward the zipper. (D) (F) 10. add the wallet back Grab your wallet back piece (F). Take this time to fuse your lightweight interfacing to the wrong side of the fabric. If you're using a lightweight fabric, layer and fuse the heavyweight interfacing on top, centered within the seam lines. Lay the wallet back so the right side is facing up. Layer the other edge of the zipper over it with the right side facing down. The edge of the zipper tape should line up with the longer (8½" long) edge of the wallet back (you'll need to fold the ear facing out of the way to do this).
 underneath Grab your coin pouch back piece (G) and align the")


 side. You should have 6 whiskers total.")
 piece.")
11 11 after pressing (F) away from zipper: (G) (D) (G) (F) (F) (F) (D) (E) 11. sew the coin pouch: back (G) underneath Grab your coin pouch back piece (G) and align the long edge over the zipper so the zipper is sandwiched once again. Sew along this edge through all three layers. Once complete, press the wallet back away from the zipper, but keep the coin pouch back pointing toward the zipper. The coin pouch front and back piece edges should line up pretty closely now. trace onto paper side fuse onto applique fabric hold applique while pulling paper away 12. prepare the applique Take your fusible web and trace all of the whisker pieces onto the smooth (paper) side. You should have 6 whiskers total. Fuse the bumpy (adhesive) side onto the wrong side of your applique fabric. Cut out the whiskers and arrange them on the wallet front (H) piece. You can do this by setting your paper pattern on top of the fabric piece (right sides up), align the whisker piece on top where the placement markings are, then carefully pull the paper pattern away while holding the applique piece in place.


 this layer in place, centered within the shape.")

 with the kitty ear edge of the wallet front (H).")
12 12 fuse whiskers in place sew around shape edge add lightweight interfacing 13. sew the applique Fuse the whiskers in place with your iron. If you used heavy duty fusible web, you can keep the pieces fused without sewing, or you can sew them in place a number of ways. I ve used a zigzag stitch here. Take this time to fuse your lightweight interfacing to the wrong side of the fabric. If your fabric is lightweight, it will also need a layer of heavyweight interfacing to keep it holding its shape. Fuse (or sew, if you prefer) this layer in place, centered within the shape. The piece shouldn't have seam allowances in order to reduce bulk. add heavyweight interfacing sew along ear edge trim along ears 14. sew the front to the facing Grab your outer wallet so far and align the kitty ear edge of the facing (E) with the kitty ear edge of the wallet front (H). Sew along this edge, being sure to pivot at the corners. Once complete, clip the seam allowance at the corners to increase flexibility once the edge is turned. Trim the excess seam allowance around the ears to decrease bulk.


13 13 wallet back (F) wallet front (H) 15. turn and baste the ears Turn the ears right side out and press them firmly so they look crisp. Flatten out the outer wallet so it's as shown in the photo, with the front section (with the ears) and lining fabrics pointing in one direction and the wallet back pointing in the other. The zipper should be nicely tucked away behind the ears. Baste the edges of the ears to keep them from moving while the rest of the wallet is sewn. compare outer wallet to lining trim zipper; add zipper tabs 16. prep the phone pouch At this time, compare the finished size of the outer wallet to the lining (that you finished in step 7). They should be exactly the same length. But if something is off by more than ½", you can redo the seam back in step 7 larger or smaller to adjust the length of the lining. Grab your second zipper and repeat step 8 with it. Trim it down to 8" long, and sew zipper tabs (C) on each end. Then trim the seam allowance to ¼" and press the tabs away from the zipper.


 aligned with the remaining batting piece (on")

14 14 layer zipper over wallet back layer phone pouch (& batting) over zipper 17. sew the phone pouch zipper Grab your outer wallet and align one edge of the zipper tape along the short edge of the wallet back (not the side with the ears). The right side should be facing down. Grab one of your phone pouch pieces (I). Align a corresponding batting piece over the wrong side. Then align the stack of two fabrics over the zipper so the edge lines up with the zipper tape and the right side faces down. Sew through all four layers -- the batting, phone pouch, zipper, and wallet back -- with a ¼" seam allowance. Press all the layers away from the zipper when complete. phone pouch (I) wallet lining (credit card pocket side) 18. sew the phone pouch zipper con't Grab your remaining phone pouch piece (I) aligned with the remaining batting piece (on the wrong side). Align the other side of the zipper tape with the phone pouch, right sides both facing up. Grab your wallet lining piece so far and align the short edge of the credit card pocket side over the zipper. The right side should be facing down. Sew through all four layers once again -- the wallet lining, zipper, phone pouch, and batting -- with a ¼" seam allowance.


15 15 press fabrics away from zipper align outer wallet & wallet lining leave open for turning 19. sew the phone pouch Press all fabrics away from the zipper so they're opened up as shown in the first photo. Fold the fabrics so the outer wallet meets up with the wallet lining, and the two phone pouch sides meet as well. Line up all the raw edges and the zipper should be in the middle. Sew around the perimeter of the rectangle, but leave a 2-3" opening in the phone pouch fabric for turning the wallet later. trim excess batting sew opening in phone pouch closed 20. finish the wallet Trim the excess seam allowance around the edge of the wallet, especially around the phone pouch to reduce the extra bulk from the batting. Turn the wallet right side out and define the corners with a chopstick or similar blunt tool. Tuck under the seam allowance in the phone pouch and stitch close to the fold to close it up. To finish the wallet, tuck the phone pouch inside the wallet and zip it up. Then close up your wallet by folding it in half and aligning the snaps! congrats! this completes your wallet! Now go try it out!
16 pg. 1/8 applique placement Kitty Wallet PATTERN WALLET FRONT (H) Cut 1 from outer fabric Cut 1 from lightweight interfacing Cut 1 from heavyweight interfacing (without seam allowances) ½ seam allowance applique placement Cut 1 from lightweight interfacing ½ seam allowance EAR FACING (E) Cut 1 from outer fabric ZIPPER TABS (C) Cut 8 from outer fabric ½ seam allowance C
17 pg. 2/8 valley fold A1 A2
18 8 pg. 3/8 Kitty Wallet PATTERN CREDIT CARD POCKETS (A) Cut 1 from lining fabric Cut 1 from fusible lightweight interfacing ½ seam allowance pocket dividing lines pocket dividing lines mountain fold mountain fold valley fold A1 A2 A3 A4
19 8 pg. 4/8 mountain fold A3 A4 snap placement snap placement A5 A6
20 8 pg. 5/8 A5 A6 Kitty Wallet PATTERN BILL SLOT (B) Cut 1 from lining fabric Cut 1 from fusible lightweight interfacing ½ seam allowance valley fold
21 pg. 6/8 Kitty Wallet PATTERN WALLET BACK (F) Cut 1 from outer fabric Cut 1 from lightweight interfacing Cut 1 from heavyweight interfacing (without seam allowances) ½ seam allowance
22 pg. 7/8 Kitty Wallet PATTERN PHONE POUCH (I) Cut 2 from lining fabric Cut 2 from quilt batting ½ seam allowance WHISKER APPLIQUE trace & cut 6
23 pg. 8/8 Kitty Wallet PATTERN COIN POUCH FRONT (D) Cut 1 from lining fabric ½ seam allowance Kitty Wallet PATTERN COIN POUCH BACK (G) Cut 1 from lining fabric ½ seam allowance
NIGHT FURY HOODIE HACK. a free sewing pattern by
 NIGHT FURY HOODIE HACK a free sewing pattern by 2 NIGHT FURY HOODIE These instructions are meant to work alongside my cosplay hoodie pattern, but you can use the tips and templates here to modify your
maneki neko coin pouch a sewing pattern by
 maneki neko coin pouch a sewing pattern by maneki neko coin pouch Maneki Neko is Japanese for beckoning cat, often known as a Lucky Cat in English. These adorable kitties are used in Asian businesses to
MewnicorN. pillow plush. a sewing pattern by
 MewnicorN pillow plush a sewing pattern by 2 A super cute plush that's big and cuddly enough to be a pillow! This simple stuffed cat is sure to warm the heart of any magic-lover with its majestic unicorn
owl bear plush a free sewing pattern by
 owl bear plush a free sewing pattern by 2 owl bear plush This pattern is a variation of my previous owl plush, an adorable bear version that's an homage to the classic monsters from Dungeons and Dragons
london calling bag a sewing pattern by
 a sewing pattern by london calling bag This project on its own is a very big gusseted bag with a zippered top closure. But the optional details include a front pocket with Union Jack applique, buckle adjustable
tri-fold wallet a sewing pattern by
 a sewing pattern by tri-fold wallet This project is for a basic wallet that folds up into thirds, but it features a contrast front band, snap closure, credit card pockets, cash pocket, and zippered coin
axolotl PLUSH a free sewing pattern by
 axolotl PLUSH a free sewing pattern by 2 axolotl plush This cute belly-down plush is a chibi version of everyone's favorite amphibious salamander. It has the same external gills and tail fin as the original,
a free sewing pattern by
 a free sewing pattern by 2 Decorate your desk or nightstand with this palm-sized fox! It's extra-large tail is especially charming as it wraps around the tiny fox body and helps it balance upright. But
narwhal plush a free sewing pattern by
 narwhal plush a free sewing pattern by 2 narwhal plush Make your own 'unicorn of the sea' with this cute pocket-sized narwhal! With just 4 pattern pieces, it sews up quickly and is great for a beginner
Night fury. plush. a sewing pattern by
 Night fury plush a sewing pattern by 2 Night Fury Plush skills used: Get ready for your own dragon-riding adventure with this fun night fury plush! This pattern will show you how to make this cute dragon
a free sewing pattern by
 a free sewing pattern by 2 rat plush Whether you think rats are adorable or excitingly scary, this pattern is sure to make something you'll love! The instructions here go over making a sweet little rodent
a sewing pattern by moon kitty headband
 a sewing pattern by moon kitty headband moon kitty headbands These headbands are a classic piece for your head with a twist for Sailor Moon fans -- or at least cat fans! Make yours from black, white, or
a free sewing pattern by
 a free sewing pattern by 2 Kupo! Fans of Final Fantasy are sure to love this extra fuzzy Moogle! It has all the classic details that make the character so adorable -- including little wings, kitty ears,
CHOCOBO. plush. a free sewing pattern by
 CHOCOBO plush a free sewing pattern by 2 chocobo plush Kweh! Final Fantasy fans are sure to love this chibi version of the classic rideable bird. It has a large head, a prominent beak and a big feather
hard core hook case a sewing pattern by
 hard core hook case a sewing pattern by hard core hook case This case is something I designed for myself to store my crochet hooks and other tools. What gives it an edge are the contrast patches, skull
dragon & unicorn hooded cowl a free sewing pattern by
 dragon & unicorn hooded cowl a free sewing pattern by 2 hooded cowl When you re ready to break out a scarf or hat for chilly weather, try putting on this cozy cowl! It s a hood and scarf in one with cute
the totoro bag a sewing pattern by
 the totoro bag a sewing pattern by the totoro bag sewing tutorial the totoro bag This bag was inspired by the character Totoro from the movie My Neighbor Totoro. It features an inner pocket, raw edge applique,
a free sewing pattern by
 kitty bean plush a free sewing pattern by 2 kitty bean plush This cute and simple plush is a variation on a tsum-tsum in that it has a long round body that's perfect for stacking! Though the basic shape
sakura purse a sewing pattern by
 a sewing pattern by sewing tutorial sakura purse This little purse was inspired by sakura (cherry) blossoms and springtime in general. It features a snap closure and interesting curved shape at the opening.
shiba cube puppy plush a sewing pattern by
 shiba cube puppy plush a sewing pattern by If you ve ever sewn a cube before, this pattern takes it to the next level! The classic geometric shape forms a chubby little puppy body complete with four stubby
box pouch a sewing pattern by
 a sewing pattern by box pouch This project is a basic zippered pouch pattern, but with every corner boxed out for lots of extra holding room. It s constructed with French seams for a neat interior, and
retro circle purse a sewing pattern by
 a sewing pattern by retro circle purse This purse design was just kind of a crazy experiment I had to create a purse that opened out on the side instead of on the top. It s finished off with a mod-like
sugar skull kit ty plush a sewing pattern by
 sugar skull kit ty plush a sewing pattern by sugar skull kit ty plush This pattern pays homage to the beautiful calaveras seen in Dia de Muertos art. It s a simple kitty plush with button jointed limbs
the give me all the bacon & eggs you have tablet case a sewing pattern by
 the give me all the bacon & eggs you have tablet case a sewing pattern by bacon & egg tablet case This project on its own is just a simple zippered pouch, sized for a 7 tablet with accompanying small pouch.
Mer-kitty. plush. a free sewing pattern by
 Mer-kitty plush a free sewing pattern by 2 mer-kitty plush In celebration of Mer'may' is this adorable ocean feline! A combination of a mermaid and cute kitty, this mer-kitty has a big colorful fish tail
a free sewing pattern by
 a free sewing pattern by 2 witch kitty plush Ready your broom and cape! This adorable little kitty is all decked out for Halloween. The pattern comes with loads of cute details, including a capelet with
pleated clutch a sewing pattern by
 a sewing pattern by pleated clutch This project is for a small and simple clutch, assembled with a French seam, and a front decorated in lots of detailed pleats. It also features a wrist strap for holding
battie treat bag a sewing pattern by
 a sewing pattern by battie treat bag This project is for a simple small bucket bag but with added details that make it perfect for stashing away treats for Halloween. It features tiny bat wings, ears,
love dragon plush a free sewing pattern by
 love dragon plush a free sewing pattern by 2 love dragon plush A combination of a Valentine's and Chinese New Year celebration with the most adorable result! This little dragon pattern is done in the more
astrobunny & cosmokitty plush a sewing pattern by
 astrobunny & cosmokitty plush a sewing pattern by astrobunny & cosmokitty plushies Ever on an adventure, best friends Astrobunny and Cosmokitty are searching the farthest reaches of space to see what new
scientist's satchel a sewing pattern by
 scientist's satchel a sewing pattern by scientist s satchel sewing tutorial scientist s satchel This project is a steampunk inspired messenger bag with a vertical zippered pocket on the front flap. It
neko atsume plushies a sewing pattern by
 neko atsume plushies a sewing pattern by neko atsume plushies These plushies are of course inspired by the adorable Neko Atsume (kitty collector) kitties -- specifically Pepper, Dottie, and Misty. They
dolphin plushies a sewing pattern by
 a sewing pattern by dolphin plushies These plushies are made to mimic a cute baby dolphin! Completely chubby and pudgy with a tiny bottle nose, round body, and bitty dorsal, side, and tail fins. They re
mermaid quilt a sewing pattern by
 a sewing pattern by mermaid quilt This project is a simple and straightforward piece for applique lovers. I personally designed it for a coworker s daughter -- a sweet little girl who s current obsession
gothic lolita satchel
 gothic lolita satchel a sewing pattern by gothic lolita satchel sewing tutorial gothic lolita satchel This satchel was inspired by the Gothic Lolita style so popular amongst Harajuku fashionistas in Japan.
tablet sleeve a sewing pattern by
 a sewing pattern by tablet sleeve This project is a simple zippered pouch made to fit most 7 tablets. It features a zipper that wraps around the top half of the pouch so it opens wide and fits snugly around
side cinch tote a sewing pattern by
 a sewing pattern by sewing tutorial side cinch tote This bag features a set of purchased handles, patchwork stripes, boxed out corners, and sides that cinch up with cording or ribbon to create cute bows
tiny totoro tote a sewing pattern by
 a sewing pattern by sewing tutorial tiny totoro tote This simple tote was inspired by the chibi-totoro that turn in up the movie My Neighbor Totoro. The applique is optional, but on its own it s a great
yoshi egg potholder a sewing pattern by
 yoshi egg potholder a sewing pattern by yoshi egg potholder These rounded potholders were inspired by the eggs laid by the character Yoshi from the Super Mario video games. They feature a bias bound edge
a free sewing pattern by
 a free sewing pattern by 2 sloth plush Bask in your lazy side with this adorable and interactive sloth plush. The claws have Velcro so it's able to hang on anything at the ready like the corner of a door,
cut & sew owl plush a sewing pattern by
 cut & sew owl plush a sewing pattern by 2 cut & sew owl plush If you re reading this, then you likely purchased some of my Cut & Sew Owl Plush fabric from Spoonflower. So thank you! This pattern is for
ruffled strip clutch a sewing pattern by
 a sewing pattern by ruffled strip clutch This project is a simple zippered pouch but has an interesting textural twist. It features contrast corner patches and is also covered in an array of frayed and
Bon Voyage - bag pattern -
 ~~~ Bon Voyage Bag Pattern ~~~ 2014 Geta Grama; www.romanianquiltstudio.com Bon Voyage - bag pattern - Size: 18 wide at top; 21 wide at bottom; 15'' tall (without straps); 5'' deep; two interior pockets;
cut & sew kitty bean plush a free sewing pattern by
 cut & sew kitty bean plush a free sewing pattern by 2 cut & sew kitty bean plush If you re reading this, then you likely purchased some of my Cut & Sew Kitty Bean Plush fabric from Spoonflower. So thank
wing hair clips a sewing pattern by
 a sewing pattern by wing hair clips These adorable little hair clips are a very simple project. It s easy to throw together a few for a craft night or several dozen for your next craft show. They re fun
wampa plush a sewing pattern by
 a sewing pattern by difficulty: wampa plush This project is an geeky Star Wars homage to the monster from the beginning of The Empire Strikes back. The creature features a detachable arm with a bloody
gunter plush a sewing pattern by
 a sewing pattern by gunter plush This project is a huggable little plush made to look like Gunter, the mischievous little penguin and the Ice King s buddy from Adventure Time. It features little wings
Cut 1 lightweight interfacing
 1 2 A note on interfacing for this bag: This pattern is intended to produce a slouchy bag, so you will want to look carefully at your fabrics before you decide on which interfacing and stabilisers to use.
cut & sew fox plush a free sewing pattern by
 cut & sew fox plush a free sewing pattern by 2 If you re reading this, then you likely purchased some of my Cut & Sew Fox Plush fabric from Spoonflower. So thank you! Decorate your desk or nightstand with
Sewing Tutorial: The Wampa Plush
 Sewing Tutorial: The Wampa Plush This plush is one of the many free projects I ve started posting on my website as part of an adventure to destash my huge collection of scrap fabrics ^-^ I wanted to make
eevee evolution blob plush a free sewing pattern by
 eevee evolution blob plush a free sewing pattern by 2 eevee blob plush Everyone s got a favorite Eevee evolution! This pattern will take you through making ALL 9 evolutions in cute blob plush form! At
ringo shiina sling a sewing pattern by
 ringo shiina sling a sewing pattern by ringo shiina sling sewing tutorial ringo shiina sling This bag is basically just a sling style bag shaped like a guitar, but the inspiration is from my favorite musician,
the big shopping bag a sewing pattern by
 the big shopping bag a sewing pattern by big shopping bag sewing tutorial the big shopping bag This project is a basic tote, but in an extra large size. With added vinyl bottom and sides, as well as a
Escape Mini Bags Finished size: 8" x 10" x 2" Makes 2 Bags
 TM Escape Mini Bags Finished size: 8" x 10" x 2" Makes 2 Bags SUPPLIES NEEDED 2-1 Yard Cottons (Escape Brown Floral and ) 2 - ¼ Yard Cottons (Escape Green Floral) 3 8 yd. Pellon 987F Fusible Fleece 1 ½
mario block plush a sewing pattern by
 mario block plush a sewing pattern by mario block plush difficulty: This plush was of course inspired by the? block from the various Super Mario games. It s a simple cube done up with the details to make
All seam allowances are 1/2 unless otherwise noted. All pattern pieces include the seam allowance. Please read all instructions before beginning.
 This small bag will allow you to try out several fun bag-making techniques; adding a metal twist lock, using piping in a bag, making darts, and adding elastic pockets. Use your favorite print and combine
Basketball Coin Purse An in-the-hoop project
 Basketball Coin Purse An in-the-hoop project 2009 Peggy Severt, Pegboard Crafts pegboard1@yahoo.com or peggy@pegboardcrafts.com http://www.pegboardcrafts.com (419) 586-3135 Do not resize this design. The
The Sunshine An in-the-hoop project
 The Sunshine An in-the-hoop project All the music I walk to is on my phone, but my new iphone 6+ is too big to fit in my pocket. This case is the perfect solution. That s my iphone 6+ peeking out of it
Urban Jungle Bag Advanced
 Urban Jungle Bag Advanced Designed by Sara Lawson Sewn By Sara Lawson http://sewsweetness.com This adorable bag features leather handles and accent detailing on the front and sides. With a zipper top,
Shamrock Coin Purse An in-the-hoop project
 Shamrock Coin Purse An in-the-hoop project 2012 Peggy Severt, Pegboard Crafts pegboard1@yahoo.com or peggy@pegboardcrafts.com http://www.pegboardcrafts.com (419) 586-3135 Do not resize this design. The
Note: Yardage and supplies listed are for all three bags.
 Stash Pouches Finished sizes: Large 10" (25.4 cm) wide x 81/2" (21.6 cm) tall x 31/2" (8.9 cm) deep Medium 9" (22.9 cm) wide x 7" (17.8 cm) tall x 3" (7.6 cm) deep Small 8" (20.3 cm) wide x 6" (15.2 cm)
cut & sew Mer-kitty plush a sewing pattern by
 cut & sew Mer-kitty plush a sewing pattern by 2 mer-kitty plush If you re reading this, then you likely purchased some of my Cut & Sew Mer-kitty Plush fabric from Spoonflower. So thank you! In celebration
cut & sew ferret plush a sewing pattern by
 cut & sew ferret plush a sewing pattern by 2 ferret plush If you re reading this, then you likely purchased some of my Cut & Sew Ferret Plush fabric from Spoonflower. So thank you! Make your favorite cat
energy tank cup sleeve a sewing pattern by
 energy tank cup sleeve a sewing pattern by energy tank cup sleeve This project is inspired by the Megaman video games, and is made to look like the energy tank one collects in the games. What better place
Soft & Stuffable Fabric Shopping Bags: Shop Pretty
 Published on Sew4Home Soft & Stuffable Fabric Shopping Bags: Shop Pretty Editor: Liz Johnson Wednesday, 07 June 2017 1:00 As more and more stores up their recycling commitment (some entire cities have
love koi plushies a sewing pattern by
 love koi plushies a sewing pattern by love koi plushies This project was both inspired by the Japanese pun where koi means both carp and love and the beautiful yin-yang moon-spirit carp from Avatar: The
Sleek Fabric Wallet with Zippered Coin Pouch
 Published on Sew4Home Sleek Fabric Wallet with Zippered Coin Pouch Editor: Liz Johnson Thursday, 18 February 2016 1:00 Someone told me the other day that he believed money would soon become completely
skeleton tie a sewing pattern by
 skeleton tie a sewing pattern by skeleton tie sewing tutorial skeleton tie This project on its own is just a basic tie, simplified to be an easy costume piece. The optional applique makes it look just
Skull Coin Purse An in-the-hoop project
 Skull Coin Purse An in-the-hoop project 2009 Peggy Severt, Pegboard Crafts pegboard1@yahoo.com or peggy@pegboardcrafts.com http://www.pegboardcrafts.com (419) 586-3135 Do not resize this design. The zipper
Beaded Clutch. Other Supplies 7 zipper
 Beaded Clutch Other Supplies 7 zipper Preparation 1. Print out the templates found on the last three pages of this tutorial at 100% of actual size and trace them onto folded double layers of your fabric
Frou Frou Bag Intermediate
 Frou Frou Bag Intermediate Sewn By Sara Lawson http://www.sewsweetness.com This bag features ruffled flaps, snap closure and an adjustable strap. The small front pockets are 3-dimensional. Beautiful detailing
The Allie An in-the-hoop project
 The Allie An in-the-hoop project A wallet/coin purse for the 5x7 hoop. The Allie has 3 credit card slots in the front section which features a large flap with a snap closure. You can carry coins or other
Soft & Stuffable Fabric Shopping Bags
 Published on Sew4Home Soft & Stuffable Fabric Shopping Bags Editor: Liz Johnson Wednesday, 03 June 2015 1:00 As more and more stores up their recycling commitment (some entire cities have banned plastic
Kindle Case with Pocket 1 An In-the-Hoop Project
 Kindle Case with Pocket 1 An In-the-Hoop Project 2011, 2015 Peggy Severt, Pegboard Crafts Updated April 2015. Minor improvements. pegboard1@yahoo.com or peggy@pegboardcrafts.com http://www.pegboardcrafts.com
World s Easiest Tote Bag!!!
 World s Easiest Tote Bag!!! Tutorial by Shruti Dandekar Finished Size : 12 x 4 x 18 An easy and quick to make Tote Bag with instructions on making the handles and a zip pocket. World s Easiest Tote Bag
The Jan An In-the-Hoop Project
 The Jan An In-the-Hoop Project Shoulder purse with 2 zippered pockets. Optional quilting. 2009 Peggy Severt, Pegboard Crafts pegboard1@yahoo.com or peggy@pegboardcrafts.com http://www.pegboardcrafts.com
Sew Spoiled Designs. Weekender Travel Tote. Sew Spoiled. By Leah Williams. Sew Quick, Sew Easy,
 Sew Spoiled Designs Weekender Travel Tote By Leah Williams Sew Quick, Sew Easy, Sew Spoiled Sew Spoiled 2009 Sew Spoiled patterns content within the tutorial is copyrighted and cannot be reproduced elec-
Kitties-To-Go Handbag
 Published on Sew4Home Kitties-To-Go Handbag Editor: Liz Johnson Wednesday, 21 February 2018 1:00 Tabby Road is a classic collection from Tula Pink that debuted well over a year ago, but has continued to
Kindle Case with Pocket 3 An In-the-Hoop Project
 Kindle Case with Pocket 3 An In-the-Hoop Project 2011, 2015 Peggy Severt, Pegboard Crafts Updated April 2015. Minor improvements. pegboard1@yahoo.com or peggy@pegboardcrafts.com http://www.pegboardcrafts.com
The Beth An in-the-hoop project
 The Beth An in-the-hoop project A classic wristlet. Tab on front pocket snaps closed to keep your phone safe. The back zipper opens to reveal 6 credit card slots and room to hold other necessities. Comes
OTHER TOOLS & SUPPLIES
 OTHER TOOLS & SUPPLIES - Fat Eighth of fusible fleece - 1/4 yd of fusible cotton interfacing (22 wide) - 1 yd of piping in coordinating color - (1) 1 D-Ring - (1) 1 swivel hook - (1) 8 closed-end zipper
How to Sew an Oilcloth Wallet By: Aurora Sisneros
 Sewing Project How to Sew an Oilcloth Wallet By: Aurora Sisneros Let s face it, our wallets get a lot of wear and tear on a daily basis. Being pulled in and out of purses, opened and closed over and over
Prima Diva. .Style, function and loads of compliments That s what the Stella Sling Bag brings!!
 .Style, function and loads of compliments That s what the Stella Sling Bag brings!! Supplies: 1/2 Yard Main Print (Outside of wallet, Outside of pockets, optional strap, etc..) 5/8 Yard Accent Print (Lining
Gadget Bag In-the-hoop project
 Gadget Bag In-the-hoop project 2009 Peggy Severt, Pegboard Crafts pegboard1@yahoo.com or peggy@pegboardcrafts.com http://www.pegboardcrafts.com (419) 586-3135 Do not resize this design. The zipper will
Below is an updated Materials List followed by instructions for the added option of interfacing the Tote and Handbag with Timtex!.
 Chelsea Bags New! Instructions for interfacing the Chelsea Bags with Timtex!. Below is an updated Materials List followed by instructions for the added option of interfacing the Tote and Handbag with Timtex!.
c) Fold & press the Binding in half lengthwise, Wrong Sides facing, and unfold.
 Fold & press the Binding in half lengthwise, Wrong Sides facing, and unfold.") OTHER TOOLS & SUPPLIES - 1 yd of quilt batting (58 wide) - (2) 1-1/2 to 2 metal rings - (10) 7/16 metal grommets - paper printer - basic sewing supplies: - sewing machine with even feed foot - needle &
OTHER TOOLS & SUPPLIES - 1 yd of quilt batting (58 wide) - (2) 1-1/2 to 2 metal rings - (10) 7/16 metal grommets - paper printer - basic sewing supplies: - sewing machine with even feed foot - needle &
Sunday: My Way-Life s Little Everything Bag
 Sunday: My Way-Life s Little Everything Bag The Sunday Bag was designed to be like a lazy Sunday afternoon- A Blank Canvas. The design was created to be simple; a beginner sew, but an open canvas for those
~~~ Little Wonders Pouch Patterns ~~~ 2014 Geta Grama; Boxy Pouch
 Boxy Pouch Pouch size: 6 wide at bottom; 9 wide at top; 7½ tall; 3 deep ~ Please read all the instructions carefully before starting to make the pouch ~ Page 1 1. Materials List Main fabric: 10 x 20 (I
cardcaptor sakura brooch
 a sewing pattern by cardcaptor sakura brooch This simple little brooch is a fun fabric alternative to a plastic or metal pin. While the pattern specifically caters to Cardcaptor Sakura fans, the same techniques
PLANNER COVER BY SARAH THOMAS OF SARIDITTY
 XXy asdf asdfy XXX Star Blazer PLANNER COVER BY SARAH THOMAS OF SARIDITTY Thank you for downloading this pattern for your Quilter s Planner. Sarah originally developed her Star Blazer Mini for Modern Quilts
All seam allowances are 1/2 unless otherwise noted. All pattern pieces include the seam allowance. Please read all instructions before beginning.
 This beginner-friendly bag features an easy to install top zipper, and two topstitched pockets on the inside. Use your favorite fabric print and adorn it with the optional grosgrain ribbons! All seam allowances
*All seam allowances are 1/4 unless otherwise noted. All pattern pieces include the seam allowance.
 Kelley Crossbody Bag Supplemental Instructions to Online Video Course www.craftygemini.com http://craftygemini.com/2016cgbagclub 2015 Crafty Gemini LLC. All rights reserved. *This pattern cannot be photocopied,
The Katey An in-the-hoop project
 The Katey An in-the-hoop project An over-the-shoulder/cross-body purse with 3 pockets. Back pocket is zippered and full length of the purse. Middle pocket is open. Front pocket has a flap closure and includes
Closet Hanger Safe for Travel & More
 Published on Sew4Home Closet Hanger Safe for Travel & More Editor: Liz Johnson Friday, 15 May 2015 1:00 We originally designed this clever little storage solution for the frequent travelers out there.
Embroidered Scrap Bag Carol A. Brown
 Embroidered Scrap Bag Carol A. Brown Materials: 1. Outer fabric (sturdy fabric such as poplin): at least 12 1/2 wide by 22 high. 2. Medium weight fusible interfacing: same size as for fabric. 3. Lining
Nesting Pencil Cases
 Nesting Pencil Cases We re Back to School in a couple of weeks, so why not get prepared a little early with our set of three nesting pencil cases? Of course, if school is no longer an issue for you, this
Bowled Over Bag. Supplies Needed. Notes. Swatches. Special Thanks To
 Supplies Needed Main fabric (front, back, and side panels) 1yd Contrasting fabric and lining 2 yds 20in Coats heavyweight metal zipper 2/3 of a yard of VELCRO FABRIC FUSION brand fastener Dual duty xp
Woven Border Print Pillow with Poms
 Published on Sew4Home Woven Border Print Pillow with Poms Editor: Liz Johnson Tuesday, 11 February 2014 1:00 Border prints are exactly what they sound like they'd be: a wide motif band running the entire
Snowman Gift Card Case In-the-hoop project
 Snowman Gift Card Case In-the-hoop project 2008 Peggy Severt, Pegboard Crafts pegboard1@yahoo.com or peggy@pegboardcrafts.com http://www.pegboardcrafts.com (419) 586-3135 Do not resize these designs. The
Trick or Treat Fabric Baskets
 Trick or Treat Fabric Baskets Trick or Treat Fabric provided by Riley Blake Designs Stitch up one of our baskets to delight your little trick-or-treaters! They re easy and fun to make they d also make