Universal Shelving System Walmart Installation Manual
|
|
|
- Georgiana Cobb
- 5 years ago
- Views:
Transcription


1 Universal Shelving System Walmart Installation Manual Patent Pending FREE STANDING SELF SUPPORTING GRAVITY FLOW Does not attach to cooler walls or door frames Certified Destin Global, Inc. PO Box Sarasota, FL Office Cell Made in the USA DGA1313 1/12
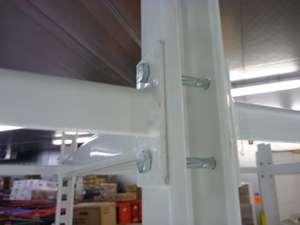
2 Table of Contents Section 1: Getting Started (Parts and Mapping work site) Section 2: Upright Box Assembly Section 3: Shelving Installation and Upright Box Positioning (level shelving, center alignment behind glass doors) Parts and Tooling Part Number Destin Parts Descriptions D30X43SW 30 X 43 DEEP SHELF D30X43PW 30 X 43 MILK STOP PERIMETER GUARD D30X43DW 43 LANE DIVIDER D30X36SW 30 X 36 DEEP SHELF D30X36PW 30 X 36 MILK STOP PERIMETER GUARD D30X36DW 36 LANE DIVIDER DXBARW CROSS BAR SUPPORT BRACKET D84URW UPRIGHT POST ASSEMBLY with LEVELER D30PTMW PRICE TAG MOLDING, PTM DBOLTS2 7/16-20 X 2 1/4 BOLTS DNUTS 7/16 NYLON LOCKING NUT Tools Required: 7/16 socket and a 7/16 wrench 3/4 open-end wrench Tape measure Cordless drill with a socket adapter Torpedo level Contact Information: Customer Service: Hr Emergency: DGICS@DestinGlobal.com DGA1313 2/12


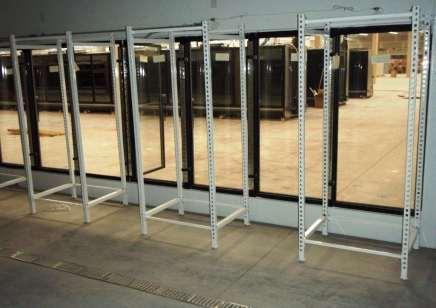
3 Section 1: Getting started 1. Identify and confirm the packing list with components received. 2. Map your cooler layout by counting the number of doors, for each individual line-up A line-up may include 1 or more sets of glass door frames. 3. Locate the Upright Posts, Cross Bar Support Brackets, Bolts & Locking Nuts. 4. Assemble all Upright Boxes with Crossbars provided. Notes: A line-up is where no mullions or spacing exists between glass door frames Notes: STYLELINE/Commercial Door, each glass door frame has flanges. Therefore, each frame must be installed as an independent line-up. Upright Box Assembly Parts Upright Box Assembly (Figure 1) (Figure 2) Example: 13 door line-up requires: 15 Uprights and 32 Crossbars Note: Line-ups with odd number of cooler doors of 13 or more will need a 3 Upright Box added to adjust center alignment with the glass doors. Locate double light fixture closest to the center of the line-up. Position the 3 Upright Box assembly side by side to the single Upright Box closest to the center double light fixture. 13 Door Example: Position a Upright Box behind door 7 and the 3 Upright Box behind doors 8 & 9. 3 Upright Box assembly: 3 UR posts secured to 8 Cross Bars DGICS@DestinGlobal.com DGA1313 3/12
4 5. Even line-ups of less than 12 cooler doors: 2, 4, 6, 8 & 10 doors will require utilizing a 3 Upright Box assembly to complete the installation. NOTE: 3 Upright Box is the assembly of 3 Uprights secured w/8 Cross Bars as illustrated below. Even line-ups of 12 or more cooler doors, an additional Upright Box will be needed. Locate the most center of line-up where there are 2 frames w/double lights. Position 2 nd Upright Box, side by side where the 2 door frames are joined. This will insure shelving center alignment with the cooler doors. Very, Very Important: Center Boxes behind cooler doors with the Upright Boxes 10 from cooler wall. Open channel side of Upright Boxes must face cooler doors. The 43 bottom shelves must be 4 from cooler wall utilizing the 3 rd hook when shelf is installed DGICS@DestinGlobal.com DGA1313 4/12

5 Section 2: Upright Box Assembly 1. Assemble the Upright Boxes as shown in graphic Note: Assemble all upright boxes first with the open channel of the Upright Post and Cross Bar front, facing the cooler door DGA1313 5/12
6 Section 3: Positioning and Shelf installation 1. Place all Upright Box assemblies into position (every other door for odd door line-ups or according to cooler door layout plan). The Upright Box assembly must be aligned behind the glass doors and centered where Uprights are not visible through the glass doors from the customer s perspective. Important: Upright boxes need to be positioned 10 from cooler wall. 2. Install all bottom 43 shelves and perimeter guards utilizing the 3 rd hook from the front of shelf, 4 from cooler wall. Next install all top shelving, 36 perimeter guards first & 36 shelves next. For 36 shelves and perimeter guards, utilize the 2 nd hook from front of the 36 shelving. Note: Always check shelving alignment from the store view looking into cooler through the doors. Adjust all levelers as needed to level shelving system DGICS@DestinGlobal.com DGA1313 6/12
 utilizing the 2 nd hook from front of the Perimeter Guard (Product Stops). 4.")
7 Section 3: Continued 3. Milk / Product Stops, Install and align all bottom 43 Perimeter Guard (Product Stops) utilizing the 3 rd hook from the front of the Perimeter Guard (Product Stops). Next install all top 36 Perimeter Guard (Product Stops) utilizing the 2 nd hook from front of the Perimeter Guard (Product Stops). 4. Lane dividers are added by inserting the front single peg and back double pegs into the holes located on the Perimeter Guard (Product Stops). Note: Insert the lane divider front single peg into the receiver hole in the front of the perimeter guard. Press the back of 2-prong divider into the back receiver of perimeter guard. Follow UP Check List: PART 1 At the completion of the Destin Global shelving system installation, use the following check list as a guide to insure that all components are installed correctly and the shelving is safe and ready for use. From outside of cooler (store view), visually check shelving alignment insuring shelving is centered with glass doors. Visually scan all top shelves for alignment, shelves should be even and level Adjust Upright Post levelers as needed. Verify shelving is centered to glass doors. Review your cooler layout plan and visually check that all hardware has been installed correctly (Upright and Cross Bar Assemblies, Nuts and Bolts secured). Verify Uprights for proper placement with cooler layout plan to make sure that they are positioned and installed correctly. Important: Verify Uprights and bottom shelving are set back with exact measurements as follows: Upright posts MUST BE 10 from cooler wall. Bottom 43 shelves MUST BE 4 from cooler wall. Cleanup all packing material and dispose of properly in the dumpster DGICS@DestinGlobal.com DGA1313 7/12
8 Cooler Doors and Shelving, EVEN number layout Even Line-ups with 2, 4, 6, 8, 10 Doors: Line-ups with an even number of less than 12 cooler doors will require a 3 Upright Box Build. NOTE: The assembly of 3 Upright posts secured w/8 Cross Bars. This is a 3 UR Box assembly. Illustrated below Even Line-ups with 12 or more: Line-ups with an even number of 12 or more cooler doors, an additional Upright Box will be needed. Locate the most center of line-up where there are 2 frames and double lights. Position 2 Upright Boxes side by side. The best way to start the 12 or more door line-up would be to find the most center of the line-up where 2 door frames meet. Place 2 Upright boxes together, to the right and to the left side of where the frames are joined. This will insure shelving center alignment with the cooler doors. Note: A line-up is where no mullions or spacing exists between glass door frames. Example: 12 door line-up will require 14 Uprights and 28 Crossbars Cooler Doors and Shelving, ODD number layout Odd Door Line-Ups of 11 or less cooler doors: An Upright Box is positioned at every other door. Odd Door Line-Ups with 13 or more: An Upright box gets placed at every other door. One assembly will consist of a 3 Upright Box and is used to adjust center alignment with the glass doors. First, locate where 2 frames meet w/double lights closest to the center of the line-up. Position the 3 Upright Box side by side to the single Upright Box located at the double light fixture. See illustration below, door 7, 8 and 9. Example: 13 door line-up requires: 15 Uprights and 32 Crossbars DGICS@DestinGlobal.com DGA1313 8/12
9 Positioning and Shelf installation EXCEPTION: CD/STYLELINE glass door frames have flanges. Therefore, each frame is an independent line-up. Place all Upright Box assemblies into position every other door for odd door line-ups and according to cooler door layout plan for even door line-ups. The Upright Box assembly must be aligned behind the glass doors and centered where Uprights are not visible through the glass doors from the store view, the customer s perspective. Very, Very Important: Center Boxes behind cooler doors with the Upright Boxes 10 from cooler wall. Open channel side of Upright Boxes must face cooler doors. The bottom 43 shelves must be 4 from cooler wall when shelf is inserted utilizing the 3 rd hook from the front of interior cooler/freezer wall. Install ALL 43 bottom shelves and perimeter guards utilizing the 3 rd hook from the front of shelf and 4 from interior cooler wall. Next, install all top 36 perimeter guards first & top 36 shelves second. Install ALL 36 perimeter guards and shelves utilizing the 2 nd hook from front of shelf. Note: Always check shelving alignment from the store view looking into cooler through the doors. Adjust all levelers as needed to level shelving system DGICS@DestinGlobal.com DGA1313 9/12
10 Pre-Installation Verify number of pallets shipped were received; verify packing list counts with skid component counts. Verify cooler is ready for installation: doors installed, electrical work completed. Tools: drill, 7/16 socket wrench, 3/4 open-end wrench, tape measure, level. Installation Check List Verify shelving containers are off trailers and staged close to Walk-In cooler or Walk-In freezer. Count the number of doors in each individual line-up. Refer to the Destin Global Installation Manual to see how many Upright Post Boxes to assemble. Note: some line-ups will require a single Upright Post or Double Upright Post Box added for center alignment of shelving to glass doors. Locate and unpack the Upright Posts, Cross Bar Supports, Bolts and Nuts. Note: Place Upright open side of channel facing same direction. Insure levelers are at the bottom of assembly. Build Upright Boxes: All Upright & Crossbar channel need to be assembled in the same direction. Upright open channel facing front. Crossbar flat surface faces front and flat surface on top. Upright Boxes must be square. Place Upright Post Boxes at every other door for odd line-ups. Note: Line-ups of 13 or more will need a 3 Upright Box placed in the most center position of line-up, where 2 frames meet and with double lights. Even door line-ups of 12 or more will need an additional Upright Box installed at the most center of line-up. Upright Post Boxes must be 10 from cooler wall and centered to glass door. The Upright Post Boxes are free standing and do not attach to the cooler walls. Install all bottom 43 shelves (3 rd hook from the front of shelf into Upright Posts). Install all top 36 shelves (2 nd hook from the front of shelf into Upright Posts). Visually scan all top shelves for horizontal alignment, shelves should be even & level. Adjust using Upright Post levelers using the 3/4 open-end wrench. Leveling is crucial particularly when floor drain is located directly behind shelving line-up. Use the Upright post levelers to insure the shelving is installed level. Review your cooler layout plan and visually check that all hardware has been installed correctly and securely tightened. (Cross Bars, Upright Boxes, Nuts and Bolts secured) Verify proper placement of the Uprights & Upright Boxes with cooler layout plan to make sure that they are positioned and installed correctly. Verify shelving is centered and aligned behind cooler doors Important: Verify Upright Posts and bottom shelving are set back with exact measurements as follows: Upright Posts MUST BE 10 from cooler wall. Bottom 43 shelves utilizing 3 rd peg from the front MUST BE 4 from interior cooler/freezer wall Clean-up all skids & packing material and dispose of properly in the recycle or dumpster containers DGICS@DestinGlobal.com DGA /12
11 Positioning, Shelf and Perimeter Guard Installation DGA /12


12 DGA /12
Installation Manual Porter Road, Sarasota FL fax
 072015 Installation Manual BEFORE YOU BEGIN: Read these instructions completely and carefully. FOR YOUR SAFETY: Read and observe all CAUTIONS and WARNINGS shown throughout these instructions. Risk of injury.
M o d u l a r Design
 MOD LINETM M o d u l a r Design 072015 Installation Manual BEFORE YOU BEGIN: Read these instructions completely and carefully. FOR YOUR SAFETY: Read and observe all CAUTIONS and WARNINGS shown throughout
#916 CLASSIC 16 GUN CABINET ASSEMBLY INSTRUCTIONS
 Thank you for purchasing this quality product. A list of PARTS and INSTRUCTIONS is included to assist you. Unpack and identify all parts included on the Parts List and Hardware List. If parts are missing,
INSTALLATION GUIDE Locker With Top Shelf Transit Low Roof & Nissan NV Low Roof ( Aluminum )
") INSTALLATION GUIDE 7115 Locker With Top Shelf Transit Low Roof & Nissan NV Low Roof ( Aluminum ) QUICK START GUIDE Phase 1 - Assembly q 1.1 Setup... q 1.2 Locker w/ Top Shelf Assembly... 3-5 6-13 Phase
INSTALLATION GUIDE 7115 Locker With Top Shelf Transit Low Roof & Nissan NV Low Roof ( Aluminum ) QUICK START GUIDE Phase 1 - Assembly q 1.1 Setup... q 1.2 Locker w/ Top Shelf Assembly... 3-5 6-13 Phase
Storage Cabinets 9000 Series Assembly Instructions
 Storage Cabinets 9000 Series Assembly Instructions Thank you for selecting Salsbury s storage cabinets. We are confident that the quality and construction of the cabinets will prove to be a good investment.
INSTALLATION GUIDE N5-DS48-4
 INSTALLATION GUIDE N5-DS48-4 Shelving ( steel ) Transit High Roof & Medium Roof Promaster Standard Roof & High Roof Nissan NV High Roof Sprinter Low Roof & High Roof Box Truck / Trailer QUICK START GUIDE
INSTALLATION OF THE TRACK FOR THE STRAIGHT SIDE STEEL LADDER
 ASSEMBLY OF THE 7180 STRAIGHT SIDE STEEL LADDER TOOLS REQUIRED FOR ASSEMBLY SAFETY GLASSES (2) 1 / 2 WRENCHES OR SOCKETS STEP LADDER OF APPROPRIATE HEIGHT (2) 7 / 16" WRENCHES OR SOCKETS HACKSAW FLAT HEAD
User Instructions Multiline Otter Scoreboard Caddy Assembly
 List of parts: User Instructions Multiline Otter Scoreboard Caddy Assembly Single Caddy Double Caddy 1 1 Base assembly with attached wheels 2 4 1 1 2 4 4 8 10 20 12 Uprights (60 or 74 aluminum extrusion)
ASSEMBLY INSTRUCTIONS MANUAL
 PAGE 1 OF 9 RECOMMENDED TOOLS FOR ASSEMBLY: ALLEN WRENCH (INCLUDED) BOX WRENCH (INCLUDED) PHILLIPS SCREW DRIVER (NOT INCLUDED) PARTS IN CARTON: ALLEN WRENCH SCREWS (20 EACH) ROUND HEAD SCREWS (8 EACH)
HILGARD Part Number Spectrum Lane ~ Missoula MT ~
 HILGARD Part Number 20121 7100 Spectrum Lane ~ Missoula MT 59808 800.791.8056 ~ www.spectrumproducts.com 20121 Rev A You have purchased a Spectrum Products Hilgard Guard Chair. Providing the unit is installed
INSTALLATION GUIDE FTX FLOOR Ford Transit ( 148" Extended Wheelbase )
") INSTALLATION GUIDE 6540-FTX FLOOR Ford Transit ( 148" Extended Wheelbase ) QUICK START GUIDE Phase 1 - Assembly q 1.1 Setup... 3-4 Phase 2 - Installation q 2.1 Install Preparation... q 2.2 Floor Installation...
INSTALLATION GUIDE 6540-FTX FLOOR Ford Transit ( 148" Extended Wheelbase ) QUICK START GUIDE Phase 1 - Assembly q 1.1 Setup... 3-4 Phase 2 - Installation q 2.1 Install Preparation... q 2.2 Floor Installation...
STEP 1 STEP 2 LEVELER KIT OPTION MOBILE CASTER KIT OPTION
 B SERIES INDUSTRIAL BENCHES TOOLS REQUIRED FOR ASSEMBLY Socket set, Open end wrench set, Cordless drill with 3/8" socket bit (Magnetic recommended). BEFORE ASSEMBLY Read through the assembly instructions
Independent Containment System (ICS)
") Installing the Independent Containment System (ICS) Complete these instructions to install the Independent Containment System (ICS). Prerequisites This installation requires a team of at least two people.
Installing the Independent Containment System (ICS) Complete these instructions to install the Independent Containment System (ICS). Prerequisites This installation requires a team of at least two people.
SHELTON THERMOSTATIC SHOWER PANEL
 SKU(s): 413241 BEFORE YOU BEGIN We recommend consulting a professional if you are unfamiliar with installing plumbing fixtures. Signature Hardware accepts no liability for any damage to the plumbing, floor,
WK9 WORKTOP KIT Assembly Guide
 WK9 WORKTOP KIT Assembly Guide Tools and supplies needed for assembly: Cordless drill with #2 Phillips bit 5/16" drill bit #2 Phillips screwdriver Bubble level Sharp felt tip marker 3/8" and 7/16" wrenches
SECURITY DOORS - 2', 3', 4'
 INTRODUCTION: CAREFULLY READ THE CONTENTS OF THESE INSTRUCTIONS, AS THEY INDICATE THE CORRECT STEP BY STEP PROCEDURE TO ASSEMBLE THE PRODUCT. THE CARTON CONTENTS PAGE(S) WILL IDENTIFY THE ASSEMBLY PARTS.
LPR System Installation instructions
 Toll LPR System Installation instructions 1 General Information The following installation instructions should be used as a guide for installing Folding Guard LPR System. Good common sense and appropriate
INSTALLATION INSTRUCTIONS - NSF WALK-IN COOLER/FREEZER Wall-Mounted Shelving System - No Blocking
 The components included with this shipment comprise a fully-adjustable, heavy-duty cantilever shelving system. Installed properly, they ll provide decades of superior value in your walk-in cooler or freezer.
Assembly and installation help
 Assembly and installation help A supplement to the directions The Purpose of this tutorial is to expand (not replace) upon the directions that come with the system and to help provide shortcuts, the first
Setup. The Faraday Cage is available in two types of configurations. Cage for mounting to a full perimeter enclosure on series tables.
 Faraday CageSetup, 2017 Setup The Faraday Cage is available in two types of configurations. Cage for mounting to a full perimeter enclosure on 63-500 series tables. Cage with a base plate for use on a
DOE 2017 APPROVED & REGISTERED. Installation Manual _Rev1
 DOE 2017 APPROVED & REGISTE Installation Manual 082018_Rev1 6200 Porter Road, Sarasota, FL 34240 800.237.3940 941-371.8110 - fax www.styleline.com Table of Content: Parts & Tools Needed for Installation...
CAELI THERMOSTATIC SHOWER PANEL
 SKU(s): 300280 CAELI THERMOSTATIC SHOWER PANEL BEFORE YOU BEGIN We recommend consulting a professional if you are unfamiliar with installing plumbing fixtures. Signature Hardware accepts no liability for
Assembly Instructions
 Selling Station Assembly Instructions View from above without top A B C D Rounded finished corners on A & D Square unfinished 3-sides on B & C Selling Station Components (2) 2' x 6' Side s Have a channel
2 ADULTS REQUIRED FOR ASSEMBLING
 2 ADULTS REQUIRED FOR ASSEMBLING If you have any questions regarding assembly or if you are missing parts, do not return this item to Retailer Store Please call our customer service number and have your
RBP-1215B-RX DODGE RAM QUAD CAB RX3
 RBP-1215B-RX3 2002-2017 DODGE RAM 15-3500 QUAD CAB RX3 Passenger side RX-3 Side Step Drill Template Passenger side rear Modular Bracket (6) L Support Brackets Driver side rear Modular Bracket Driver side
Whalen Furniture Mfg. Factory No. 5 Page # 1
 If you have any questions regarding assembly or if you are missing parts, do not return this item to Sam s Wholesale Club Please call our customer service number and have your instructions and parts list
4 BAY Low Profile WALL MOUNT CABINET
 D1/347 SSEMLY INSTRUCTIONS 4 Y Low Profile WLL MOUNT CINET TIP HZRD WRNING! Cabinet must be affixed to wall. For use to prevent tipping in compliance with capacity of cabinet specified. Use with heavier
K9 KIT INSTALLATION INSTRUCTIONS CROWN VIC KK-K9-F7-K
 K9 KIT INSTALLATION INSTRUCTIONS 1998-2011 CROWN VIC KK-K9-F7-K TOOLS REQUIRED: Power Drill (Cordless preferable) Drill Bit Set Standard Wrench and Socket Set Metric Socket Set Screwdriver Set Torx Bit
Installation Instructions
 Installation Instructions Follow these simple instructions to install your OneDayCab! IMPORTANT: Unpack and check shipment for damage. Verify color, size and parts before demolition. Installation of interiors
(2) 25mm x 20mm x 5mm Adhesive Backed Foam Pads. 100mm x 50mm x 1.0mm Adhesive Backed Foam. (2) Spacer Plates. Passenger/Right Side Frame Mounting
 25mm x 20mm x 5mm Adhesive Backed Foam Pads. 100mm x 50mm x 1.0mm Adhesive Backed Foam. (2) Spacer Plates. Passenger/Right Side Frame Mounting") PARTS LIST: 1 Grille Guard 10 12mm Lock Washers 1 Driver/Left Frame Mounting 16 12mm x 32mm OD x 3mm Flat Washers 1 Passenger/Right Frame Mounting 8 12mm Hex Nuts 1 Driver/Left Side Top Support 2 10-1.50mm
PARTS LIST: 1 Grille Guard 10 12mm Lock Washers 1 Driver/Left Frame Mounting 16 12mm x 32mm OD x 3mm Flat Washers 1 Passenger/Right Frame Mounting 8 12mm Hex Nuts 1 Driver/Left Side Top Support 2 10-1.50mm
SpeedCell Installation Instructions
 SpeedCell Installation Instructions ***Installation typically requires two people*** Required Tools 1 2 3 (3a) 5 6 7 7(a) 8(a) 8(b) 8(c) 1. Philips Screw Driver 2. Crescent Wrench 3. 3/8 Socket Wrench
ASSEMBLY INSTRUCTIONS FOR SL500A AND SL500AL
 ASSEMBLY INSTRUCTIONS FOR SL500A AND SL500AL January 2013 The SL500A is a square upright glass cabinet with a single hinged lockable door. It has five adjustable shelves plus the base. It also has an optional
INSTRUCTIONS FOR: 2 DOOR WALL CABINET. MODEL No: AP02WC
 INSTRUCTIONS FOR: 2 DOOR WALL CABINET MODEL No: AP02WC Thank you for purchasing a Sealey product. Manufactured to a high standard, this product will, if used according to these instructions, and properly
SpeedCell Installation Instructions
 SpeedCell Installation Instructions ***Installation typically requires two people*** Required Tools 1 2 3 (3a) 4 5 6 7 7(a) 8(a) 8(b) 8(c) KEY 1. Philips Screw Driver 2. Crescent Wrench 3. 3/8 Socket Wrench
INSTALLATION MANUAL. All Recessed Wall-Mount Modules Front-Loading, Rear-Loading, Parcel-Only, Collection Box, Trash/Recycling Bin
 INSTALLATION MANUAL All Recessed Wall-Mount Modules Front-Loading, Rear-Loading, Parcel-Only, Collection Box, Trash/Recycling Bin TABLE OF CONTENTS GENERAL INFORMATION AND ADVISORIES 3 USPS INSTALLATION
K9 KIT INSTALLATION INSTRUCTIONS CROWN VIC with Fire Suppression System Model KK-K9-F7-K-FS
 K9 KIT INSTALLATION INSTRUCTIONS 2005-2011 CROWN VIC with Fire Suppression System Model KK-K9-F7-K-FS TOOLS REQUIRED: Power Drill (Cordless preferable) Drill Bit Set Standard Wrench and Socket Set Metric
INSTALLATION INSTRUCTIONS
 TEL:1-866-XANATOS INSTALLATION INSTRUCTIONS FOR 2017-2018 NISSAN TITAN (EXCLUDES TITAN XD MODELS) PART#AB-NI20 PARTS LIST: 1 Bull Bar 2 8mm Nylon Lock Nuts 1 Driver/Left Side Bull Bar Bracket 2 8-1.25mm
Worktop INDEX eight Capacity Unpacking
 Pro.0 Series Warning: Excessive weight hazard! Use two or more people to move, assemble or install cabinets and locker to avoid back injury. Do not leave children unattended near cabinets. High risk of
Standard Shelving Installation Instructions
 Standard Shelving Installation Instructions 99-18880-I001_B Copyright 2011 by ALL rights reserved. Information in this document is subject to change without notice. Companies, names and data used in examples
ADULT ASSEMBLY REQUIRED
 ADULT ASSEMBLY REQUIRED If you have any questions regarding assembly or if you are missing parts, do not return this item to the Retailer Store Please call our customer service number and have your instructions
K.D. LOCKER ASSEMBLY INSTRUCTIONS
 K.D. Locker Assembly Instructions PN 0860 K.D. LOCKER Updated /05 ASSEMBLY INSTRUCTIONS These Instructions Cover 3 Types of Lockers: VANGUARD, GUARDIAN AND INVINCIBLE II Contents General Instructions 1
XHD Bull Bar w/ Dual Row LED Light Bar (10-17 Jeep JK)
") XHD Bull Bar w/ Dual Row LED Light Bar (10-17 Jeep JK) PARTS LIST: 1 Driver/Left Side Bull Bar Upright 8 10-1.5mm Hex Nuts 1 Side Bull Bar Upright 4 10-1.5mm Nylon Lock Nuts 1 Top Cross Bar 2 Light Bar
XHD Bull Bar w/ Dual Row LED Light Bar (10-17 Jeep JK) PARTS LIST: 1 Driver/Left Side Bull Bar Upright 8 10-1.5mm Hex Nuts 1 Side Bull Bar Upright 4 10-1.5mm Nylon Lock Nuts 1 Top Cross Bar 2 Light Bar
CONTENTS TOOL LIST U P S I D E I N N O V A T I O N S, L L C RAMP AND STEP SYSTEM ASSEMBLY INSTRUCTIONS. Revised: June 2013
 U P S I D E I N N O V A T I O N S, L L C RAMP AND STEP SYSTEM ASSEMBLY INSTRUCTIONS TOOL LIST Required Tools: - Reciprocating Saw with Metal Cutting Blade - Drill - 7/16 Drill Bit for Metal Drilling -
Installation Instructions
 Contents Page General Information and Installer Tips.......... 2 Panels & Posts............................. 3 Enclosure Description..................... 4 Hinge Door Hardware................... 4-5 Step-by-Step
TOOLS REQUIRED FOR ASSEMBLY. Rubber Mallet or Plastic Tip Hammer PARTS REQUIRED FOR ASSEMBLY OF SINGLE ENTRY STARTER.
 TOOLS REQUIRED FOR ASSEMBLY Rubber Mallet or Plastic Tip Hammer Top Cover Support PARTS REQUIRED FOR ASSEMBLY OF SINGLE ENTRY STARTER Back Stop Divider Closed 'L' Upright Slotted Reinforcement Support
INSTALL INSTRUCTIONS WELCOME TO THE NEWAGE PERFORMANCE CABINETRY SERIES NEWAGE STEEL WELDED CABINETRY
 NEWAGE STEEL WELDED CABINETRY WELCOME TO THE NEWAGE PERFORMANCE CABINETRY SERIES ALL CABINETS MUST BE MOUNTED TO STUDS ON A SECURE WALL, AS PER THESE INSTRUCTIONS. FAILURE TO DO SO MAY RESULT IN SERIOUS
K.D. DEFIANT II LOCKER ASSEMBLY INSTRUCTIONS
 K.D. DEFIANT II LOCKER ASSEMBLY INSTRUCTIONS These Instructions Cover GUARDIAN DEFIANT AND INVINCIBLE II DEFIANT SINGLE POINT LATCH LOCKERS CONTENTS General Instructions 1 Maj Locker Components Hardware
Melamine Plastic Laminate. Toilet Partition Installation Manual
 Melamine Plastic Laminate Toilet Partition Installation Manual PHONE: FAX: 1-866-317-2786 ATTENTION DO NOT MIX FASTENER PACKS EACH FASTENER PACK HAS THE NECESSARY BOLTS, BARRELS AND SCREWS TO INSTALL THE
Elliptical Unpacking and Installation Instructions
 Elliptical Unpacking and Installation Instructions Use these instructions for the following Ellipticals: ClubStride 5100-LE Receiving When the carrier delivers your order, verify that the number of items
INSTALLATION INSTRUCTIONS
 TOOLS REQUIRED: Level Square Phillips Screw Driver Slot Screw Driver Pliers Clamp PARTS PROVIDED: Frame Installations Screws. 4 per door. (#8 x 1-3/4 ) Sex Bolt. 4 per frame joint. Torque Lever 2 Shelf
Installation Manual for Metal Emperor Lockers
 P a g e 1 Table of Contents Page General Notes and Tools Required 2-3 Assemble Shelves with Coat Hooks/Coat Rods 4 Fastening Chart 5 Knock Down Locker Assembly (Banks of Three) 6-12 Appendix A: Dress End
ALUMINUM POLE VAULT STANDARDS SPECIFICATIONS
 SPECIFICATIONS Specifications: All aluminum construction for superior corrosion resistance. Dual height scales provide English and Metric measurements ranging from 7' to 8'. Wide stance base for improved
WireCrafters, LLC. General Information
 WireCrafters, LLC. General Information 6208 Strawberry Lane 502/363-6691 www.wirecrafters.com Louisville, Kentucky 40214 502/361-3857 FAX 1-800-626-1816 The following General Installation Instructions
Shelf Converter Drawer System
 Shelf Converter Drawer System Installation and Use Instructions IF THIS PRODUCT IS INSTALLED IN A UNIT THAT DOES NOT MEET THE MINIMUM SYSTEM REQUIREMENTS, INJURY COULD RESULT. (SEE PAGE 2) Shelf Converter
TYGER GUARD. Parts List BEFORE INSTALLATION WARNING TG-GD6C /5
 TYGER GUARD TM BEFORE INSTALLATION READ INSTRUCTIONS CAREFULLY BEFORE STARTING INSTALLATION. REMOVE CONTENTS FROM BOX AND VERIFY ALL PARTS ARE PRESENT. ASSISTANCE IS RECOMMENDED. FAILURE TO IDENTIFY DAMAGE
PORTA~TRACE. GAGNE, INC. 41 Commercial Dr. Johnson City, New York Phone: Fax: ASSEMBLY INSTRUCTIONS
 PORTA~TRACE GAGNE, INC. 41 Commercial Dr. Johnson City, New York 13790 Phone: 1-607-729-3366 Fax: 1-607-729-7644 ASSEMBLY INSTRUCTIONS PORTA~TRACE MODEL 2436T LIGHT TABLE PORTA~TRACE MODEL 3648T LIGHT
BLEACHER ASSEMBLY INSTRUCTIONS
 CROWDPLEASER BLEACHER ASSEMBLY INSTRUCTIONS NOTE: These instructions are generic to all 2 row through 10 row bleachers. The drawings in this instruction sheet generally show assembly for a 21 foot, six
EmagiKit. Privacy Pod Plus. Quiet. Easy. Affordable. INSTRUCTIONS ASSEMBLY
 EmagiKit Privacy Pod Plus Quiet. Easy. Affordable. INSTRUCTIONS ASSEMBLY DIMENSIONS AND COMPONENTS 47 47 Ceiling Unit 2-B 2-L 2-R Glass Door Corner Trim Door Handle 90 Adjustable Height Work Surface 1-B
Assembled Ez2 Positioning/Operating Instructions
 Assembled Ez2 Positioning/Operating Instructions Step 1: Remove packaging material from unit. Report any damage to trucking company as soon as possible. Strap Unit Hand Truck Step 2: Remove unit from skid.
Install Instructions. NewAge Steel Welded Tall Locker
 Kit Contains Full Width Adjustable Steel Shelves (4) Height-Adjustable Steel Leveling Legs (4) Aluminum Door Trim (2) 2.5 x ¼ Cabinet Mounting Lag Bolts (4) Large Zinc Plated Mounting Washers (4) 5/8 x
High Density Sports Storage
 Owner s Manual High Density Sports Storage CONTENTS Safety...........................................2 General......................................2 Installation...................................2 Usage.......................................2
ADULT ASSEMBLY REQUIRED DUE TO THE PRESENCE OF SMALL PARTS, SHARP POINTS, SHARP EDGES
 ADULT ASSEMBLY REQUIRED DUE TO THE PRESENCE OF SMALL PARTS, SHARP POINTS, SHARP EDGES If you have any questions regarding assembly or if you are missing parts, do not return this item to the Sam s Wholesale
A. Top Unit 1 Pc. For assembly see instructions in carton:
 88 5005 9441 Kitchen Island IMPRTANT NTE Carefully remove all the parts from the carton and put them individually on a soft cloth to prevent scratches or other damage occurring to the parts. We have taken
INSTALLATION GUIDE. C20-FTL STRAIGHT PARTITION Transit Partition ( Perforated Window, No Access, Steel )
") INSTALLATION GUIDE C20-FTL STRAIGHT PARTITION Transit Partition ( Perforated Window, No Access, Steel ) QUICK START GUIDE Phase 1 - Assembly q 1.1 Setup... q 1.2 Partition Assembly... 3-5 5-6 Phase 2 -
INSTALLATION GUIDE C20-FTL STRAIGHT PARTITION Transit Partition ( Perforated Window, No Access, Steel ) QUICK START GUIDE Phase 1 - Assembly q 1.1 Setup... q 1.2 Partition Assembly... 3-5 5-6 Phase 2 -
Therma-Tru Door Gallery Setup Instructions Swing Unit with Hardware Kit - Hardware Part # MADGSWU15 (Swing Unit) Part # MADGHKSU10 (Hardware Kit)
 Part # MADGHKSU10 (Hardware Kit)") Swing Unit with Hardware Kit - Hardware Tools Included: 4mm Allen Wrench, 6mm Allen Wrench, 8mm T-Handle Allen Wrench (1) 3/4" Drill Bit, (1) 7/32" Drill Bit and Hole Template Guide Tools Required: Phillips
Swing Unit with Hardware Kit - Hardware Tools Included: 4mm Allen Wrench, 6mm Allen Wrench, 8mm T-Handle Allen Wrench (1) 3/4" Drill Bit, (1) 7/32" Drill Bit and Hole Template Guide Tools Required: Phillips
Breathable Wall Light Traps & Blackout Fan & Shutter Kits
 Breathable Wall Light Traps & Blackout Fan & Shutter Kits 2017 Growers Supply All Rights Reserved. Reproduction is prohibited without permission. Maintain controlled airflow without sacrificing blackout
INSTALLATION INSTRUCTIONS FOR FRONT CASTING DECK RAIL Ranger
 INSTALLATION INSTRUCTIONS FOR FRONT CASTING DECK RAIL Ranger TOOLS REQUIRED FOR INSTALLATION: Drill motor, (1) 5/16 inch drill bit, (1) 13/64 drill bit, (1) 3/16 inch hex wrench (1) 3/32 inch hex wrench.
30 wide track Adjustable Tire Rack
 30 wide track Adjustable Tire Rack MODEL # SRTRB Patent Pending 1 Installation Support Please Do Not Return This Product To The Store! 1-877-717-RACK (7225) info@strongracks.com If there are any missing
INSTALLATION GUIDE. C20-FTM STRAIGHT PARTITION Transit Partition ( Perforated Window, No Access, Steel )
") INSTALLATION GUIDE C20-FTM STRAIGHT PARTITION Transit Partition ( Perforated Window, No Access, Steel ) QUICK START GUIDE Phase 1 - Assembly q 1.1 Setup... q 1.1.1 Unpack components; compare with the bill
INSTALLATION GUIDE C20-FTM STRAIGHT PARTITION Transit Partition ( Perforated Window, No Access, Steel ) QUICK START GUIDE Phase 1 - Assembly q 1.1 Setup... q 1.1.1 Unpack components; compare with the bill
TP4463. ASSeMBly INSTruCTIONS FLAT PANEL TV MOUNTING SYSTEM OPTION 1 OPTION 2 OPTION 3
 TP63 FLAT PANEL TV MOUNTING SYSTEM OPTION 1 OPTION 2 OPTION 3 Flat Panel TV Stand Stand with TV Mounting System Stand with Wall Mount ASSeMBly INSTruCTIONS for your safety, please follow these precautions:!
INSTALLATION GUIDE. C30-NL STRAIGHT PARTITION Nissan NV ( Swing Door, Steel )
") INSTALLATION GUIDE C30-NL STRAIGHT PARTITION Nissan NV ( Swing Door, Steel ) QUICK START GUIDE Phase 1 - Assembly q 1.1 Setup... q 1.2 Partition assembly... 3 to 4 5 Phase 2 - Installation q 2.1 Tips on
INSTALLATION GUIDE C30-NL STRAIGHT PARTITION Nissan NV ( Swing Door, Steel ) QUICK START GUIDE Phase 1 - Assembly q 1.1 Setup... q 1.2 Partition assembly... 3 to 4 5 Phase 2 - Installation q 2.1 Tips on
Installation Instructions
 by Plato Woodwork Installation Instructions Plato Woodwork, Inc. 200 Third Street SW P.O. Box 98 Plato, MN 55370 www.platowoodwork.com 800.328.5924 SECTION GUIDE GETTING STARTED PAGE # Installation Methods...
Bollard CartMagnet Standard Open Unit INSTALLATION INSTRUCTIONS
 INSTALLATION INSTRUCTIONS Questions? Call McCue Customer Care at 800.800.8503 mccue.com The following installation instructions are provided for guidance only. The seller assumes no liability regarding
Performance 2.0 Series
 Performance. Series Warning: Excessive weight hazard! Warning: Excessive weight hazard! Use two or more people to move, assemble, or install cabinets and locker to avoid back injury. Do not leave children
Installation Guide 406TH
 Installation Guide 406TH (High Roof Shown) Kargo Master Rancho Cordova, CA 95742 800-343-7486 CustomerService@KargoMaster.com DATE: Installation Instructions 406TH *PLEASE READ ALL INSTRUCTIONS AND WARNINGS
Installation Instructions
 Installation Instructions Optima LED 8 Double-Sided StretchLite Perimeter Lit Graphic Display Line Voltage Connector Optima LED DS5 (Double-sided StretchLite Graphic Display) with Graphics Corner Bracket
Side DuraRac Installation Instructions
 Side DuraRac Installation Instructions Ford Transit Low Roof 130 /148 WB Frame Kit Part #: CRC 22-1010-002 V1.0.08.10.18 IMPORTANT INSTALLATION STEPS ARE DENOTED USING A STOP SIGN. THESE STEPS MUST BE
INSTALLATION INSTRUCTIONS
 INSTALLATION INSTRUCTIONS LAMINATED P LASTIC TOILET PArTITIONS 1540 ClassicSeries with Options IMPORTANT: Storage and Handling Information on last page. For faster, easier installation, please review these
Assembly Instructions. Important!
 Play Action Spiral Tube Slide Assembly Instructions Important! Intended for residential use by children ages 2 to 10, only on properly installed PlayStar playsets. Before use refer to complete safety guidelines
EUROLINE CLASSIC SOLID SURFACE Installation Instructions
 EUROLINE ASSIC SOLID SURFACE Installation Instructions 12/01/15 EUROLINE ASSIC SOLID SURFACE Installation Instructions Before you begin, please note the following considerations: Safety First! Please use
https://www.wallbedsbywilding.com/wallbed-installation-studio-series/
 For Wallbed models: KING SIZE INSTRUCTION BOOKLET #C1 Watch step by step installation instructions at: https://www.wallbedsbywilding.com/wallbed-installation-studio-series/ WARNING! ALL MURPHY/WALLBED
MobileTrak5 Installation Instructions
 MobileTrak5 Installation Instructions PLEASE OPEN ALL BOXES & CHECK TO MAKE SURE YOU HAVE ALL PIECES REQUIRED READ ALL INSTRUCTIONS BEFORE STARTING Tools Required for Assembly 7/16, 1/2 Wrench Phillips
Thanks for shopping with Improvements! Deluxe 10 Closet Organizer (12 deep) Item #461609
 Item #461609") Thanks for shopping with Improvements! Deluxe 10 Closet Organizer (12 deep) Item #461609 To order, call 1-800-642-2112 West Chester, OH 45069 0114 If you have questions regarding this product, call 1-800-642-2112
Thanks for shopping with Improvements! Deluxe 10 Closet Organizer (12 deep) Item #461609 To order, call 1-800-642-2112 West Chester, OH 45069 0114 If you have questions regarding this product, call 1-800-642-2112
Colonial Classic Bar
 88 5528 991 Colonial Classic Bar IMPORTANT NOTE Carefully remove all the parts from the carton and put them individually on a soft cloth to prevent scratches or other damages occuring to the wood parts.
INSTALLATION GUIDE. C20-NH STRAIGHT PARTITION Nissan NV ( Perforated Window, No Access, Steel )
") INSTALLATION GUIDE C20-NH STRAIGHT PARTITION Nissan NV ( Perforated Window, No Access, Steel ) QUICK START GUIDE Phase 1 - Assembly q 1.1 Setup... q 1.1.1 Unpack components; compare with the bill of materials...
INSTALLATION GUIDE C20-NH STRAIGHT PARTITION Nissan NV ( Perforated Window, No Access, Steel ) QUICK START GUIDE Phase 1 - Assembly q 1.1 Setup... q 1.1.1 Unpack components; compare with the bill of materials...
 For Wallbed models: KING SIZE INSTRUCTION BOOKLET #C1 Watch step by step installation instructions at: https://www.wallbedsbywilding.com/wallbed-installation-studio-series/ WARNING! ALL MURPHY/WALLBED
INSTRUCTION BOOKLET #C21. For Wallbed models: KING SIZE
 For Wallbed models: KING SIZE INSTRUCTION BOOKLET #C1 WARNING! ALL MURPHY/WALLBED SYSTEMS CONTAIN STORED ENERGY. FAILURE TO USE AND FOLLOW THESE INSTRUCTIONS DURING THE INSTALLATION PROCESS COULD RESULT
EUROLINE CLASSIC PHENOLIC / EVERGREEN. Installation Instructions. Installation Instructions.
 EUROLINE ASSIC PHENOLIC / EVERGREEN EUROLINE ASSIC PHENOLIC / EVERGREEN Before you begin, please note the following considerations: Safety First! Please use proper safety gear when performing any installation.
Parts Included: Tools Required: Canvas Office Landscape Interiors Off Module 90 Connector Kit Installation and Disassembly for Recycling Instructions
 Y Parts Included: Canvas Office Landscape Interiors Off Module 90 Connector Kit Installation and Disassembly for Recycling Instructions FT127.A N Shim A Light Seal B Foam Light Seal C G H Double-Face Tape
VYTEX PREMIUM SLIDING GLASS DOOR. Table of Contents. Precautions and Safety 2. Tools Required...3. Inspect and Prepare Door...4
 VYTEX PREMIUM SLIDING GLASS DOOR Table of Contents Precautions and Safety 2 Tools Required...3 Inspect and Prepare Door...4 Hardware and Parts Check List....4 Master Frame Assembly 5 Master Frame Installation..7
PRINCESS SINGLE BED WITH TRUNDLE
 PRINCESS SINGLE BED WITH TRUNDLE If you have any questions regarding assembly or if you are missing parts, do not return this item to Sam s Wholesale Club Please call our customer service number and have
Contour Hanger ASSEMBLY INSTRUCTIONS
 Contour Hanger ASSEMBLY INSTRUCTIONS CONTOUR HANGER Recommended Tools Drill with 1/8, 1/4, and 3/8 Drill Bits, 1-1/8 Forstner Bit or 1-1/8 Spade Bit, and Phillips Bit 9/16 and 5/8 Combination Wrench Socket
Contractors Rack Assembly and Installation Instructions
 Part # 18601 & 16601 Contractors Rack Assembly and Installation Instructions 4751 Littlejohn St. Unit A, Baldwin Park, CA 91706 Page 1 of 12 11/13/08 Thank you for purchasing the Paramount Restyling Contractors
Industrial Hanger ASSEMBLY INSTRUCTIONS
 Industrial Hanger ASSEMBLY INSTRUCTIONS INDUSTRIAL HANGER Recommended Tools Drill with 1/8, 1/4, and 3/8 Drill Bits, 1-1/8 Forstner Bit or 1-1/8 Spade Bit, and Phillips Bit 9/16 and 5/8 Combination Wrench
Qwik-Fence Installation Instructions
 Qwik-Fence Installation Instructions 1 Tools Required The following installation instructions should be used as a guide for installing Folding Guard Qwik-Fence Partitions. Good common sense and appropriate
Tuscany 32" x 79" Open Bookcase
 Tuscany 32" x 79" Open Bookcase ADULT ASSEMBLY REQUIRED DUE TO THE PRESENCE OF SMALL PARTS, SHARP POINTS, SHARP EDGES If you have any questions regarding assembly or if you are missing parts, do not return
FOLDING DOOR INSTRUCTIONS
 FOLDING DOOR INSTRUCTIONS Please read these instructions carefully and follow them step by step to insure a smooth installation. Most importantly DO NOT open hardware boxes and mix hardware up. Hardware
INSTALLATION GUIDE. C30-NH STRAIGHT PARTITION Nissan NV ( Swing Door, Steel )
") INSTALLATION GUIDE C30-NH STRAIGHT PARTITION Nissan NV ( Swing Door, Steel ) QUICK START GUIDE Phase 1 - Assembly q 1.1 Setup... q 1.2 Partition assembly... 3 to 4 5 to 6 Phase 2 - Installation q 2.1 Tips
INSTALLATION GUIDE C30-NH STRAIGHT PARTITION Nissan NV ( Swing Door, Steel ) QUICK START GUIDE Phase 1 - Assembly q 1.1 Setup... q 1.2 Partition assembly... 3 to 4 5 to 6 Phase 2 - Installation q 2.1 Tips
Parts list. Model:10400
 Manufacturing, Inc. Instruction sheet -- VTI Flat panel TV cart with cabinet Model number: 10400 Congratulations for having chosen this excellent VTI product. To assure your complete satisfaction, this
Assembly Instructions. Important!
 Play Action Spiral Tube Slide Assembly Instructions Important! Intended for residential use by children ages 2 to 10, only on properly installed PlayStar playsets. Before use refer to complete safety guidelines