INSTALLATION INSTRUCTIONS - NSF WALK-IN COOLER/FREEZER Wall-Mounted Shelving System - No Blocking
|
|
|
- Shawn Norris
- 5 years ago
- Views:
Transcription
1 The components included with this shipment comprise a fully-adjustable, heavy-duty cantilever shelving system. Installed properly, they ll provide decades of superior value in your walk-in cooler or freezer. If you have questions during your install just call us using the information below. For more information on our shelving systems, visit walkincooler-shelving.com or e-zshelving.com. INTRO


2 FOUR MAJOR COMPONENTS UPRIGHTS CEILING BRACKETS SHELVING BRACKETS SHELVES COMPONENTS COMPONENTS
3 RECOMMENDED TOOLS Shelving system hardware includes: 3/8 bolt and nut (9/16 head) with washer #10 x 1/2 Phillips sheet metal screws Recommended tools: Tape measure Erasable marker Torque wrench or standard-length 3/8 drive ratchet Standard 9/16 wrench 9/16 socket Nail set, ice pick, or awl - max. 3/32 diameter Phillips head screwdriver Laser level or standard level. A laser level will reduce installation time on long shelving runs. TOOLS TOOLS
4 sketch 1 installation sequence IF YOUR SHELVING RUN(S) BORDERS ON A WALL, START AT THE CORNER AND WORK OUTWARD. When installing an L configuration, start at the corner. Mount the uprights, then the brackets and shelves of the first run. Base the location of the 2nd run on the depth of the 1st. When installing a U configuration, start at the corners and work outwards. Mount the uprights, then the brackets and shelves of the side runs. Then center the middle run. Unloaded E-Z shelves will not appear level where they meet in a corner. That s normal. E-Z s shelving brackets are designed with a slight uplift from back to front, to compensate for deflection under load. installation sequence


5 STEP 1 ATTACH CEILING BRACKETS A. Locate the 6 ceiling brackets, clamp halves, and bracket attachment hardware. B. Slide the heel of the ceiling brackets into the top of the upright channels, placing the top of the bracket flush with the top of the uprights. C. 3/8 BOLT Sandwich the bracket between two clamp halves, placing the NUT bulge of the clamps around the upright channel. Put the bolt through the left side of the assembly, placing the nut on the right, and hand-tighten with a wrench or standard-length 3/8 drive ratchet with a 9/16 socket. If using a torque wrench, foot-pounds of torque is recommended. DO NOT use power tools. Over-tightening causes component deformation. CLAMP HALF CEILING BRACKET CLAMP HALF See Sketch 2 for another view of the ceiling bracket assembly. WASHER ATTACH CEILING BRACKETS

6 sketch 2 ceiling bracket assembly THE CEILING BRACKET AND UPRIGHT SHOULD FIT SNUGLY INTO THE 90 ANGLE OF THE CEILING AND WALL. CEILING BRACKET WASHER BOLT CEILING/WALL JUNCTION NUT CLAMP HALF CLAMP HALF UPRIGHT ceiling bracket assembly

7 STEP 2 MOUNT FIRST UPRIGHT A. Proper mounting of uprights is crucial to system function and comprises 80% of install. Please read carefully. B. Locate the #10 x 1/2 Phillips pan head sheet metal attachment screws. C. Review Sketch 1. Locate one of the upright/ceiling bracket combos you assembled with a top flange that turns away from the wall where you ll be starting your installation. MAKING A PILOT HOLE. SEE THE NEXT PAGE FOR AN IMAGE OF UPRIGHT/CEILING BRACKET PLACEMENT. D. Place it plumb and flush to the walk-in ceiling. If starting in a corner maintain.5 between the edge of the upright and the wall. Please note that the upright doesn t need to extend to the floor. E. While keeping the upright at a 90 vertical, use the existing holes in the upright to mark the location of pilot holes for the sheet metal screws. F. The thickness and material of the walk-in walls will determine the diameter needed for the pilot holes, but generally they should never be greater than 3/32. Punch a few pilot holes into your guide marks at mid-height of the walk-in wall, then read the next page before continuing. MOUNT FIRST UPRIGHT


8 STEP 2 CONT. MOUNT FIRST UPRIGHT H. Using a screwdriver, begin attaching the upright, turning the sheet metal screws into the guide holes you made at mid-height on the wall. The screws should cut threads into the metal skin of the walk-in as you turn. DO NOT STRIP THE HOLES. NO POWER TOOLS. THE TOP OF THE UPRIGHT EXPERIENCES THE MOST STRAIN. SECURE TOP ATTACHMENT IS CRUCIAL TO SYSTEM PERFORMANCE. UPRIGHT AND CEILING BRACKET ARE PLUMB AND FLUSH TO CEILING. I. Repeat the process of punching pilot holes and handturning the sheet metal screws into them. Start with the bottom holes to get a feel for it before moving to the top. It s crucial that the screws cut threads as they enter the holes..5 BETWEEN EDGE OF UPRIGHT AND WALL. MAKE SURE THE SHEET METAL SCREWS BITE INTO THE WALK-IN SKIN AS YOU TURN THEM. HAND TOOLS ONLY MOUNT FIRST UPRIGHT cont.

9 sketch 3 wall/ceiling mount WALK-IN CEILING Set upright flush to the walk-in ceiling. Use the upright as a template for your sheet metal screw pilot holes. This drawing demonstrates the correct method of attaching uprights and ceiling brackets to the metal skins of walk-ins. Pilot holes should be less than 3/32, but size will vary based on wall thickness and material. Sheet metal screws to be hand-tightened only. Make sure you feel them cutting thread as they enter the metal skin. wall/ceiling mount
10 sketch 4 ceiling bracket side view FOAMED WALK-IN CEILING CEILING BRACKET #10 x 1/2 SHEET METAL SCREWS (4) FOAMED WALK-IN WALL CLAMP HALF UPRIGHT ceiling bracket side view

11 STEP 3 MOUNT REMAINING UPRIGHTS A. Mount the remaining upright/ceiling bracket assemblies in the same manner detailed in Step 2. B. Consult your shelving system layout sketch for the mounting location of the remaining uprights. C. Shelf length determines the centerline to centerline distance between uprights. In other words, in a finished system the edges of the shelves will be flush with the centerlines of the uprights. MOUNT REMAINING UPRIGHTS


12 STEP 4 MOUNT CEILING BRACKETS A. Mount ceiling brackets to the walk-in ceiling using the same punching and fastening method used to mount uprights to the wall - punch pilot holes of less than 3/32, and hand-tighten the #10 x 1/2 sheet metal screws, assuring they cut a thread as they enter the metal skin of the walk-in. DO NOT STRIP THE HOLES. MOUNT CEILING BRACKETS


13 STEP 5 ATTACH SHELF BRACKETS A. See the illustration below. Identify the brackets designed for the right end, left end and interior of the system. B. Attach shelf brackets to uprights in the same manner as ceiling brackets, using the included hardware and a 3/8 drive ratchet with a 9/16 socket. Approximately foot-pounds of torque should be applied to tighten the clamp halves around each upright and bracket. A STANDARD LEVEL WORKS FINE, BUT USE A LASER LEVEL ON LONG RUNS. INTERIOR LEFT END RIGHT END ATTACH SHELF BRACKETS
14 STEP 6 ATTACH SHELVES Attach Here Attach Here Shelf Edges Meet Here Attach Here Attach Here Attach Here Attach Here Attach Here A. Locate shelf-attachment hardware, including wing nuts and #8-32 x 3/8 carriage bolts. B. Shelf lengths may vary. Consult your shelving system layout sketch to attach shelves in their proper locations. C. Single brackets have two attachment points on the top flange. Double brackets have one attachment point on the right-rear of the top flange, and two attachment points on the bull nose, one for each end of the adjoining shelves. ATTACH SHELVES
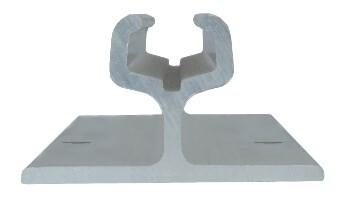
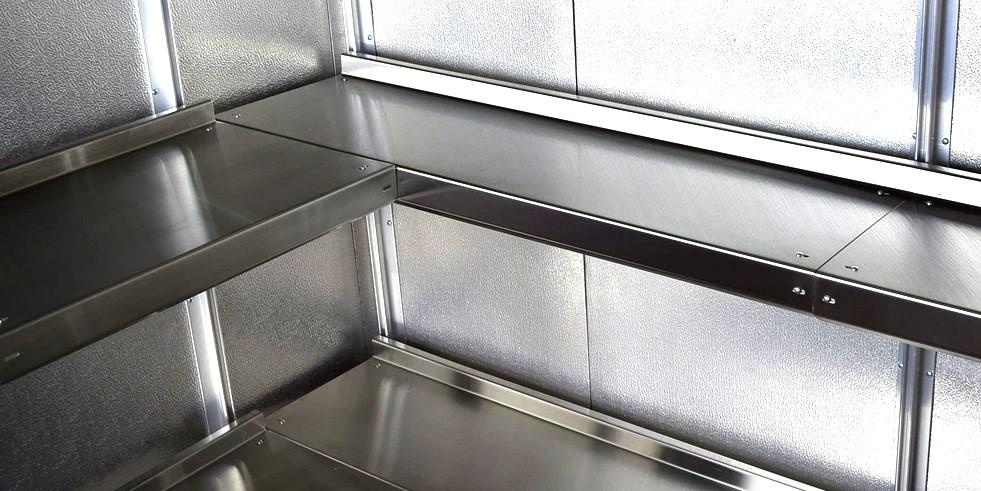
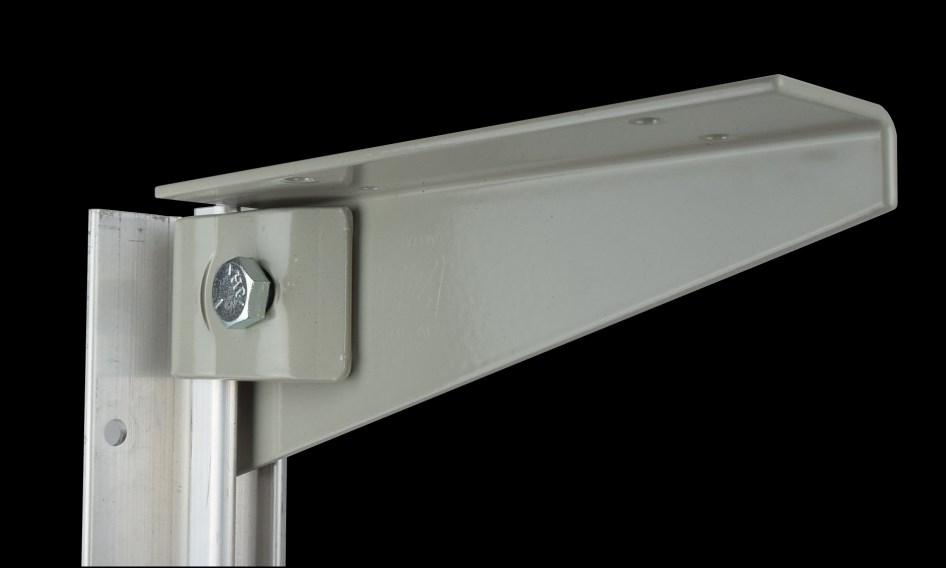
Linear Hook- on Worksurfaces
 Linear Hook- on Worksurfaces Linear Hook-On Worksurfaces come in three depths and seven lengths. Different worksurfaces have different reqirements for installation that are outlined below. 27 inch deep
INSTALLATION INSTRUCTIONS INS T A L L A TIO N INS T R U C TIO N S THE MAVERICK HANGER R H
 INS T A L L A TIO N INS T R U C TIO N S THE MAVERICK HANGER 10.6.2016 PARTS INSTALLATION SPECIFICATIONS AND TOOLS INSTRUCTIONS 2-1/4" 2-7/8 11-3/8" 1/4" 2-1/8 PARTS INSTALLATION AND INSTRUCTIONS TOOLS
WAREHOUSE HANGER INSTALLATION INSTRUCTIONS R H INS T A L L A TIO N INS T R U C TIO N S
 INS T A L L A TIO N INS T R U C TIO N S WAREHOUSE HANGER NOTE: Due to the size and weight of the Warehouse Hanger it is recommended that this Hanger be installed on 3 4 or wider doors. 10.11.2016 2-3/16"
INS T A L L A TIO N INS T R U C TIO N S HORSESHOE W/ BAR HANGER
 INS T A L L A TIO N INS T R U C TIO N S HORSESHOE W/ BAR HANGER 6-1/2" 5" 2-7/16" 3-7/16" Ø2-7/8" 4-7/8" 11" 2" 3/16" 1/2" HORSESHOE W/ BAR S P ECIFICATIONS PARTS AND TOOLS Tools Needed Tape Measure Pencil
Heavy-Duty Bypass Track System
 Heavy-Duty Bypass Track System Please Note: This track system must be installed with the screws going into a solid surface such as studs or a header. Due to the spacing of the holes on these Brackets,
Medium HoneyBadger Chase Rack Installation Instructions
 PREPARATION Medium HoneyBadger Chase Rack Installation Instructions 1. Disconnect the negative terminal on the battery. Park the vehicle on level ground and set the emergency brake. 2. We recommend reading
INSTALLATION INSTRUCTIONS INS T A L L A TIO N INS T R U C TIO N S ROD IRON SCROLL HANGER R H
 INS T A L L A TIO N INS T R U C TIO N S ROD IRON SCROLL HANGER 10.5.2016 2-1- 3/16" 11/16" 8" 8 O 2-7/8 Ø2-7/8" 3-1/2 3-1/2" 12-9/16 12-9/16" PLEASE NOTE: These instructions are specific to a particular
LAN Locker Adjustable Shelves
 Adjustable Shelves LAN LOCKER ADJUSTABLE SHELVES * Adjustable Shelves are available for LAN LOCKER widths: 24, 30, 48, 60, and 72. * When installing more than one Adjustable Shelf, it is recommended that
Installation Instruction
 Tools Needed for Assembly Stud finder (for wood stud wall) Pencil Mark Electric drill Wood Stud Wall Installation Step 1. Locate the Wood Studs Installation Instruction Drill bit (for wood stud wall) Masonry
Vir Stil Console Lavatory INSTALLATION INSTRUCTIONS
 THANK YOU FOR CHOOSING KALLISTA We appreciate your commitment to Kallista quality products. Please take a moment to review this manual before you install your Kallista product. If you encounter any installation
Extra Wide Heavy Duty Plastic Lockers Series Locker Installation Instructions
 Locker Installation Instructions Thank you for selecting Extra Wide Heavy Duty Plastic Lockers. We are confident that the quality and construction of the lockers will prove to be a good investment. These
Installation Instructions
 CHEVY / GMC 24K Industry Standard Rail Heavy Duty Custom Mounting Kit #2226 Gross Trailer Weight (Maximum)...24,000 lbs. Vertical Load Weight (Max. Pin Weight)...6,000 lbs. SYSTEM TOW CAPACITY Please note,
Trak-Slider Instructions
 Trak-Slider Instructions 1/4-20 x 3/4" Hex Head Bolt 1/4-20 Flanged Hex Nut Gusset 1/4-20 x 1/2" Allen Cap Screw 1/4-20 Nylock Nut Rivet 1/4-20 x 3/8" Pan Head Phillips Machine Screw 1/4 USS Flat Washer
Parts Included: Tools Required: Canvas Office Landscape Interiors Off Module 90 Connector Kit Installation and Disassembly for Recycling Instructions
 Y Parts Included: Canvas Office Landscape Interiors Off Module 90 Connector Kit Installation and Disassembly for Recycling Instructions FT127.A N Shim A Light Seal B Foam Light Seal C G H Double-Face Tape
Removing the Z-Axis lead screw
 Page 1 of 8 TITLE: Sabre Z-Axis Lead Screw Replacement Procedure Gerber FastFact #: 5048 Supplied by: Gerber Hardware Support Last Modified: June 14, 2007 Summary: Tools used: The following procedure explains
M10 x 75mm Sockethead Cap Screws. 5mm Fender Washer (12) Included - (8) Required. #10 x 2.5" PH Wood Screws. (30) Included - (24) Required
 Included - (8) Required. #10 x 2.5 PH Wood Screws. (30) Included - (24) Required") Door System Unit - Hardware Tools Included: (2) 2mm Allen Wrenches, (2) 3mm Allen Wrenches, (2) 4mm Allen Wrenches, (2) 6mm Allen Wrenches, and (1) 8mm T-Handle Allen Wrench Tools Required: Phillips Screwdriver,
Door System Unit - Hardware Tools Included: (2) 2mm Allen Wrenches, (2) 3mm Allen Wrenches, (2) 4mm Allen Wrenches, (2) 6mm Allen Wrenches, and (1) 8mm T-Handle Allen Wrench Tools Required: Phillips Screwdriver,
Shelf Converter Drawer System
 Shelf Converter Drawer System Installation and Use Instructions IF THIS PRODUCT IS INSTALLED IN A UNIT THAT DOES NOT MEET THE MINIMUM SYSTEM REQUIREMENTS, INJURY COULD RESULT. (SEE PAGE 2) Shelf Converter
Workbench Instructions for Assembly
 Workbench Instructions for Assembly FlexWorks is a trademark of Lista International Corporation. Making Workspace Work is a trademark of Lista International Corporation. Document Number: MD002A3 Print
Locker Pedestal Installation Instructions
 Locker Pedestal Installation Instructions LK-PED-INST-0314r1 Parts List Single Pedestal Back to Back Pedestal Horizontal Support Tube TS-169 Post Flange TS-190 Post Cap Fasteners Provided: #8 x ¾ round
MONKEY BARS OVERHEAD RACK INSTALLATION
 MONKEY BARS OVERHEAD RACK INSTALLATION Thank you for purchasing the New Monkey Bars Overhead storage rack. The most innovative overhead rack on the market WARNING THE PROPER INSTALLATION OF THIS STORAGE
Assembly and installation help
 Assembly and installation help A supplement to the directions The Purpose of this tutorial is to expand (not replace) upon the directions that come with the system and to help provide shortcuts, the first
Workbench Instructions for Assembly
 Workbench Instructions for Assembly Technical Electronic Workstations and Industrial Workbenches Includes: Cabinets Privacy Panels Stringers Bottom Shelves Table of Contents Tools Required for Assembly...
CHEVY SuperBracket Mounting Kit #0826
 CHEVY SuperBracket Mounting Kit #0826 #1200 SuperGlide (16K) #0800 SuperGlide (20.5K) Gross Trailer Weight (Maximum) Vertical Load Weight (Max. Pin Weight) 16,000 lbs. 4,000 lbs. Gross Trailer Weight (Maximum)
Assembly Instructions. Table of Contents
 HQ Little Foot Assembly Instructions Back of Handi Quilter, Inc. 501 North 400 West North Salt Lake, UT 84054 1-877-697-8458 Front of 2015 Handi Quilter, Inc. www.handiquilter.com Printed in the United
LOFT DOOR HANGER BARN DOORS & HARDWARE. Hardware Installation Instructions. Page
 LOFT DOOR HANGER Page 1 Specifications 2 7/16" 3/8" 1-1/2 1-3/4 Ø3 3 7/8" 11-1/16 Page 2 Parts and Tools Tools Needed Tape Measure Pencil Drill with 1/8, 1/4 and 3/8 bits, 1 spade bit and Phillips bit
ATLANTIS RAIL Contact Information
 ATLANTIS RAIL Contact Information Customer Service (800) 541-6829 (508) 732-9191 Spectrum System Installation Instructions Atlantis Rail s Spectrum System is an easy to install, universal cable railing
Assembly Instructions Nevins Phone Booth
 Assembly Instructions Nevins Phone Booth Included Hardware Tools Required supplied by installer Drill & Bit Bolt A - (16) 1/4-20 x 1-1/2 hex head Bolt B - (20) 1/4-20 x 2-1/2 phillips head Screw 1 - (24)
KWIK-KIT KK-S INSTALLATION INSTRUCTION PACKAGE
 KWIK-KIT KK-S-120-02 INSTALLATION INSTRUCTION PACKAGE INSTALLATION INSTRUCTIONS HAVIS KWIK-KIT KK-S-120-02 2002-2007 DODGE/FREIGHTLINER SPRINTER VAN PLEASE READ COMPLETE INSTRUCTIONS PRIOR TO INSTALLATION
K9 KIT INSTALLATION INSTRUCTIONS CROWN VIC with Fire Suppression System Model KK-K9-F7-K-FS
 K9 KIT INSTALLATION INSTRUCTIONS 2005-2011 CROWN VIC with Fire Suppression System Model KK-K9-F7-K-FS TOOLS REQUIRED: Power Drill (Cordless preferable) Drill Bit Set Standard Wrench and Socket Set Metric
LPR System Installation instructions
 Toll LPR System Installation instructions 1 General Information The following installation instructions should be used as a guide for installing Folding Guard LPR System. Good common sense and appropriate
MobileTrak5 Installation Instructions
 MobileTrak5 Installation Instructions PLEASE OPEN ALL BOXES & CHECK TO MAKE SURE YOU HAVE ALL PIECES REQUIRED READ ALL INSTRUCTIONS BEFORE STARTING Tools Required for Assembly 7/16, 1/2 Wrench Phillips
Installation Instructions
 CHEVY / GMC 20K Industry Standard Rail Custom Mounting Kit #2724 Gross Trailer Weight (Maximum)...20,000 lbs. Vertical Load Weight (Max. Pin Weight)...5,000 lbs. SYSTEM TOW CAPACITY Please note, in order
Assembly Instructions Above Worksurface Riser Shelf Systems and Back / End Stops
 Assembly Instructions Above Riser Shelf Systems and Back / End Stops Back Stops and End Stops Adjustable Riser Shelves Instrument Riser Shelves Stationary Riser Shelves IMPORTANT PLEASE READ THESE INSTRUCTIONS
CONTENTS TOOL LIST U P S I D E I N N O V A T I O N S, L L C RAMP AND STEP SYSTEM ASSEMBLY INSTRUCTIONS. Revised: June 2013
 U P S I D E I N N O V A T I O N S, L L C RAMP AND STEP SYSTEM ASSEMBLY INSTRUCTIONS TOOL LIST Required Tools: - Reciprocating Saw with Metal Cutting Blade - Drill - 7/16 Drill Bit for Metal Drilling -
Franklin Mills Stackable Movable Lateral Instructions
 Franklin Mills Stackable Movable Lateral Instructions Table of Contents: Table of contents...1 Tools Required...2 Stationary Shelving Assembly...3-7 Mobile Shelving Assembly...8-16 Rail Assembly...8-11
PROFILE Flat Panel Console System Installation Manual
 PROFILE Flat Panel Console System Installation Manual Table of Contents Page Introduction... 2 Important Safety Information...3, 4 Installation Overview... 4, 5, 6 Single Sided/Single Unit... 7 Double
INS T A L L A TIO N INS T R U C TIO N S. Ceiling Mount Track System
 Ceiling Mount Track System 10.26.2016 Specifications Ceiling Post: Unassembled 2-7/8 Assembled 1-11/16 7/8 7-9/16 5-7/8 3/8 2 Tubes 1/2 2-3/8 5 Parts and Tools Tools Needed Tape Measure Pencil Drill with
ROCKWELL 4-IN-1 DOOR. Two Panel Door. Half X Door. Z Combination Door. Double X Door
 ROCKWE 4-IN-1 DOOR Two Panel Door Half X Door Double X Door Z Combination Door Choose between four door styles with this Door Kit. Our versatile Rockwell Door Kit is very easy to assemble. All materials
Bulkhead Model Number and
 Bulkhead Model Number 96141-3-01 and 96142-3-01 Installing your ProMaster bulkhead is very clear cut following these instructions. Before cutting or drilling in the floor, verify the location of you gas
Melamine Plastic Laminate. Toilet Partition Installation Manual
 Melamine Plastic Laminate Toilet Partition Installation Manual PHONE: FAX: 1-866-317-2786 ATTENTION DO NOT MIX FASTENER PACKS EACH FASTENER PACK HAS THE NECESSARY BOLTS, BARRELS AND SCREWS TO INSTALL THE
Side Katerack Installation Instructions
 Side Katerack Installation Instructions Ram ProMaster City 2015+ Frame Kit Part #: CRC 28-1000-001 V1.0.12.06.18 IMPORTANT INSTALLATION STEPS ARE DENOTED USING A STOP SIGN. THESE STEPS MUST BE PERFORMED
Topo Freestanding Applications - Private Office
 4 3 2 Topo Freestanding Applications - Private Office Combo Wrench If you have a problem, question, or request, call your local dealer, or Coalesse at 1.800.627.6770 Or visit our website: www.coalesse.com
Rear Katerack Installation Instructions
 Rear Katerack Installation Instructions Ram Promaster City 2015+ Frame Kit Part #: CRC 26-1000-001 V1.0.12.04.18 IMPORTANT INSTALLATION STEPS ARE DENOTED USING A STOP SIGN. THESE STEPS MUST BE PERFORMED
INSTALLATION INSTRUCTIONS VENETIAN 84" SLIDING SHOWER DOOR SYSTEM (180º INSTALLATION)
") INSTALLATION INSTRUCTIONS VENETIAN 84" SLIDING SHOWER DO SYSTEM (180º INSTALLATION) 28539 Industry Drive, Valencia, CA 91355 Toll Free Phone: (877) 728-3874 Toll Free Fax: (888) 440-9567 Phone: (661) 775-1675
INSTALLATION INSTRUCTIONS VENETIAN 84" SLIDING SHOWER DO SYSTEM (180º INSTALLATION) 28539 Industry Drive, Valencia, CA 91355 Toll Free Phone: (877) 728-3874 Toll Free Fax: (888) 440-9567 Phone: (661) 775-1675
Adjustable Wall Mount and Adjustable Mobile Stand for the PolyVision PJ920 Ultra-Short Throw Projector. Installation Guide
 Adjustable Wall Mount and Adjustable Mobile Stand for the PolyVision PJ920 Ultra-Short Throw Projector Installation Guide Part number 2002553-001 Rev A 2011 PolyVision Corporation All rights reserved Table
Assembly Instructions for Model: VMPR1
 Assembly Instructions for Model: VMPR1 Thank you for choosing a Sanus Systems Model: VMPR1 ceiling mount. The VMPR1 ceiling mount provides a unique, simplified method of ceiling mounting inverted LC/LP
Pickup Box Utility Rack Package Installation (Instruction ID: )
") 017 Chevrolet Colorado Pickup - WD (VIN S) Canyon, Colorado Accessory Installation Manual N America Document ID: 3966961 Pickup Box Utility Rack Package Installation (Instruction ID:3144879) Installation
017 Chevrolet Colorado Pickup - WD (VIN S) Canyon, Colorado Accessory Installation Manual N America Document ID: 3966961 Pickup Box Utility Rack Package Installation (Instruction ID:3144879) Installation
Assembly Instructions
 Selling Station Assembly Instructions View from above without top A B C D Rounded finished corners on A & D Square unfinished 3-sides on B & C Selling Station Components (2) 2' x 6' Side s Have a channel
FIXED PANEL SLIDER QCI5241
 INSTALLATION INSTRUCTIONS FIXED PANEL SLIDER QCI5241 FRAMELESS PANEL / DOOR / PANEL FRAMELESS DOOR / PANEL QCI5241 REV. 0 Page 1 Certified 06/16/2016 Parts List *Quantities may vary QCI5241 REV. 0 Page
Side DuraRac Installation Instructions
 Side DuraRac Installation Instructions Ford Transit Low Roof 130 /148 WB Frame Kit Part #: CRC 22-1010-002 V1.0.08.10.18 IMPORTANT INSTALLATION STEPS ARE DENOTED USING A STOP SIGN. THESE STEPS MUST BE
INSTALLATION INSTRUCTIONS
 1 INSTALLATION INSTRUCTIONS Prior to Assembling and Installing: 1) Field Check and verify that all components of the structure required for installation are in place per the approved shop drawings. Report
ēno one Adjustable Wall Mount and Adjustable Mobile Stand Installation Guide
 Installation Guide Part number 2002105-001 Rev B 2011 PolyVision Corporation All rights reserved Table of contents Overview... 3 Important considerations... 3 Adjustable Wall Mount considerations... 3
Katerack Wagon Shelving System
 Ford Transit Connect Assembly Installation Instructions Sheet 1 of 14 BEFORE YOU START! IMPORTANT INSTALLATION STEPS ARE DENOTED USING A STOP SIGN. THESE STEPS MUST BE PERFORMED IN THE SPECIFIED ORDER
Equilibrium. Conference Table. Installation Instruction. Revision B 11/07/16
 Equilibrium Conference Table Installation Instruction Revision B 11/07/16 Equilibrium End User Agreement Enwork Equilibrium table bases must be installed directly onto a four inch minimum thickness concrete
Qwik-Fence Installation Instructions
 Qwik-Fence Installation Instructions 1 Tools Required The following installation instructions should be used as a guide for installing Folding Guard Qwik-Fence Partitions. Good common sense and appropriate
FORD #2228. Gross Trailer Weight (Maximum)...24,000 lbs. Vertical Load Weight (Max. Pin Weight)...6,000 lbs. SYSTEM TOW CAPACITY
...24,000 lbs. Vertical Load Weight (Max. Pin Weight)...6,000 lbs. SYSTEM TOW CAPACITY") FORD 24K Industry Standard Rail Heavy Duty Custom Mounting Kit #2228 Gross Trailer Weight (Maximum)...24,000 lbs. Vertical Load Weight (Max. Pin Weight)...6,000 lbs. SYSTEM TOW CAPACITY Please note, in
FORD 24K Industry Standard Rail Heavy Duty Custom Mounting Kit #2228 Gross Trailer Weight (Maximum)...24,000 lbs. Vertical Load Weight (Max. Pin Weight)...6,000 lbs. SYSTEM TOW CAPACITY Please note, in
WORKSURFACE ASSEMBLY
 WORKSURFACE ASSEMBLY Notes: Worksurfaces should be installed last. This provides easy access to Core/Walls. For Double Sided configurations, repeat the following sequences for the opposite side of the
Model POA-CHB-XL50. Assembly and Installation Manual. Projector Bracket. Contents. Be sure to consult with a qualified installation specialist
 Assembly and Installation Manual Projector Bracket Model POA-CHB-XL50 Be sure to consult with a qualified installation specialist This bracket is specifically for use with our projector. Be especially
Assembly Instructions
 InTandem Table System November 20 InTandem Table System - Worksurface #4 x/" 4 wood screw power beam Tools Provided T-0 Extended Torx Driver T-25 Torx Driver Additional Tools Required Soft protective
Therma-Tru Door Gallery Setup Instructions Swing Unit with Hardware Kit - Hardware Part # MADGSWU15 (Swing Unit) Part # MADGHKSU10 (Hardware Kit)
 Part # MADGHKSU10 (Hardware Kit)") Swing Unit with Hardware Kit - Hardware Tools Included: 4mm Allen Wrench, 6mm Allen Wrench, 8mm T-Handle Allen Wrench (1) 3/4" Drill Bit, (1) 7/32" Drill Bit and Hole Template Guide Tools Required: Phillips
Swing Unit with Hardware Kit - Hardware Tools Included: 4mm Allen Wrench, 6mm Allen Wrench, 8mm T-Handle Allen Wrench (1) 3/4" Drill Bit, (1) 7/32" Drill Bit and Hole Template Guide Tools Required: Phillips
TechBench Installation Manual
 Manual Table of Contents TechBench Overview....2 Bench Assembly Linear,36 (914,4mm) Wide 96 (2438,4mm) Wide 3,4,5,6,7 Bench Assembly Linear,24 (609,6mm) Wide 30 (762mm) Wide..8,9 Bench Assembly Corner
Wallbeds Northwest ENDURA CABINET PLANS AND INSTRUCTIONS
 Thank you for purchasing your Wall Bed from Wallbeds Northwest. If you have purchased a complete "Endura DIY Kit," then much of the work is already done for you. Please skip to assembly instructions. Note
P a r k c o n s o l e s i n k a s s e m b l y i n s t r u c t i o n s
 P a r k c o n s o l e s i n k a s s e m b l y i n s t r u c t i o n s Before You Begin: Professional installation by two-person crew is required for this fixture. Install water supply and drain piping
Assembly Instructions Music Library System
 Assembly Instructions Music Library System 7-Shelf Unit is shown. 6-Shelf Unit assembly is the same except where noted. Contents Important User Information...........................2 General...2 Manufacturer...2
F l a t S c r e e n A R M S I n s t a l l a t i o n
 ITEM NUMBERS (1) #TOACAORG16 (2) #TOACAORG20 (3) #TOACATRP24 (4) #TOACATRP30 (5) #TOACATRPDS (6) #TOACATRPSS TOOLS REQUIRED (1) 3/8 Wrench (not provided) (2) Phillips head screwdriver (not provided) (1)
INSTALLATION INSTRUCTIONS
 INSTALLATION INSTRUCTIONS SOLID PHENOLIC TOILET PARTITIONS 1080 DuraLineSeries Class-A Fire Rated Includes Institutional Hardware Option.67 IMPORTANT: Storage and Handling Information on last page. Review
Installation Instructions
 CHEVY / GMC 20K Industry Standard Rail Custom Mounting Kit #2724 Gross Trailer Weight (Maximum)...20,000 lbs. Vertical Load Weight (Max. Pin Weight)...5,000 lbs. SYSTEM TOW CAPACITY Please note, in order
BioPrism Solid Surface
 Please read all instructions before installing products. These instructions are intended for use with InPro s standard toilet partitions, which include 58 high doors and wall panels, when deviating from
Installation Instructions - Model V4JSD 1
 Installation Instructions - Model V4JSD 1 Support Assemblies: Parts list: (Note see enclosed cut sheet for quantities and dimensional information) A vertical structural member (1 ½ x 1 ½ modular frame)
Independent Containment System (ICS)
") Installing the Independent Containment System (ICS) Complete these instructions to install the Independent Containment System (ICS). Prerequisites This installation requires a team of at least two people.
Installing the Independent Containment System (ICS) Complete these instructions to install the Independent Containment System (ICS). Prerequisites This installation requires a team of at least two people.
STEP 1 STEP 2 LEVELER KIT OPTION MOBILE CASTER KIT OPTION
 B SERIES INDUSTRIAL BENCHES TOOLS REQUIRED FOR ASSEMBLY Socket set, Open end wrench set, Cordless drill with 3/8" socket bit (Magnetic recommended). BEFORE ASSEMBLY Read through the assembly instructions
K9 KIT INSTALLATION INSTRUCTIONS CROWN VIC KK-K9-F7-K
 K9 KIT INSTALLATION INSTRUCTIONS 1998-2011 CROWN VIC KK-K9-F7-K TOOLS REQUIRED: Power Drill (Cordless preferable) Drill Bit Set Standard Wrench and Socket Set Metric Socket Set Screwdriver Set Torx Bit
Installation Manual ZGuard Mounting Options
 Installation Manual ZGuard Mounting Options Above-Counter Heavy-Duty Flange (EZ-Span) (Entire EZ-Span unit not shown) Lift EZ-Span unit up until bottom of 1.5" diameter post clears internal heavy duty
Top Mount Ultra Modern Hanger
 Top Mount Ultra Modern Hanger ASSEMBLY INSTRUCTIONS TOP MOUNT ULTRA MODERN HANGER Recommended Tools Level Tape Measure Pencil Drill with 1/8, and 1/4, Drill Bits and Phillips Bit Socket Wrench with 9/16
Closet System Installation Manual
 Closet System Manual Thank you For choosing our Custom Closet Collection to fit all your needs Closets come fully assembled to make your project an enjoyable and satisfying experience. With quality Custom
IDR assembly instructions:
 IDR assembly instructions: Required Tools: 2 X 12mm Open End Wrench 14mm open end wrench #2 Phillips Head Screw Driver (Drill with adjustable torque clutch recommended) 8mm nut driver (Supplied in IDR-AK)
Installation Instructions
 FORD 20K Industry Standard Rail Custom Mounting Kit #2738 Gross Trailer Weight (Maximum)...20,000 lbs. Vertical Load Weight (Max. Pin Weight)...5,000 lbs. SYSTEM TOW CAPACITY Please note, in order to determine
Installation Instructions
 Contents Page General Information and Installer Tips.......... 2 Panels & Posts............................. 3 Enclosure Description..................... 4 Hinge Door Hardware................... 4-5 Step-by-Step
ROCKWELL. Two Panel Door. Half X Door. Double X Door. Z Combination Door
 ROCKWELL 4 in 1 DOOR Choose between four door styles with this Door Kit. Our versatile Rockwell Door Kit is very easy to assemble. All materials and hardware needed to assemble any of the four styles are
WireCrafters, LLC. General Information
 WireCrafters, LLC. General Information 6208 Strawberry Lane 502/363-6691 www.wirecrafters.com Louisville, Kentucky 40214 502/361-3857 FAX 1-800-626-1816 The following General Installation Instructions
Oval Vinyl Gazebo. Assembly Manual
 Oval Vinyl Gazebo Assembly Manual Gazebo Assembly Thank you for your purchase of this Gazebo. This manual is designed to simplify the assembly process, however we strongly recommend having an experienced
TYPHOON ASSEMBLY AND INSTALLATION INSTRUCTIONS
 TYPHOON ASSEMBLY AND INSTALLATION INSTRUCTIONS CORPORATE HEADQUARTERS WESTERN SALES AND MANUFACTURING PLANT P.O. Box 400 1017 SW Berg Parkway Canby, Oregon 97013 Phone: (503) 266-2231 Fax: (503) 266-4334
Frameless Inline Door QCI5254
 INSTALLATION INSTRUCTIONS Frameless Inline Door QCI5254 FRAMELESS DOOR / PANEL QCI5254 REV. 0 Page 1 Cer fied 06/16/2016 Parts List with wall mount hinges *Quanes may vary QCI5254 REV. 0 Page 2 Cer fied
Worktop INDEX eight Capacity Unpacking
 Pro.0 Series Warning: Excessive weight hazard! Use two or more people to move, assemble or install cabinets and locker to avoid back injury. Do not leave children unattended near cabinets. High risk of
6 Foot/ 1800mm Aisle Width Net-Contain Aisle Containment for N-Type and S-Type Cabinets
 6 Foot/ 1800mm Aisle Width Net-Contain Aisle Containment for N-Type and S-Type Cabinets Panduit Corp. 2016 INSTALLATION INSTRUCTIONS Page 1 of 36 Component Guide for Doors Dual Sliding Containment Door
3/4 Rear DuraRac Installation Instructions
 3/4 Rear DuraRac Installation Instructions Ford Transit Low Roof 130 WB Frame Kit Part #: CRC 27-1010-001 V1.0.09.28.18 IMPORTANT INSTALLATION STEPS ARE DENOTED USING A STOP SIGN. THESE STEPS MUST BE PERFORMED
#4 Phillips Driver Bit 1/8, 4mm, 5.5mm & 8mm (5/16 ) Allen Wrench. Safety Glasses
 Allen Wrench. Safety Glasses") ATLANTIS RAIL Contact Information: Atlantis Rail Systems 70 Armstrong Road 3900 Civic Center Drive Plymouth, MA 02360 North Las Vegas, NV 89030 (800) 541-6829 or (508) 732-9191 (508) 732-9798 www.atlantisrail.com
ATLANTIS RAIL Contact Information: Atlantis Rail Systems 70 Armstrong Road 3900 Civic Center Drive Plymouth, MA 02360 North Las Vegas, NV 89030 (800) 541-6829 or (508) 732-9191 (508) 732-9798 www.atlantisrail.com
INSTALLATION INSTRUCTIONS
 INSTALLATION INSTRUCTIONS HIGH PRESSUE LAMINATE (HPL) TOILET PARTITIONS 1030 TrimLineSeries 1040 DesignerSeries Includes continuous hardware option.65. IMPORTANT: Storage and Handling Information on last
Top Closure Kit Accessory for Music Library System
 Assembly Instructions Top Closure Kit Accessory for Music Library System Contents Required Tools.....................................2 Installation Requirements............................2 Fasteners -
Showpiece Cabinet Integrated Stand For 32" - 52" LCD HDTV
 Showpiece Cabinet Integrated Stand For 32" - 52" LCD HDTV Installation and Assembly Instructions 2009 Incredible Technologies Inc. Version 0109 Showpiece Cabinet Integrated Stand for 32" - 52" LCD HDTV
ZAPF PANEL SYSTEM ASSEMBLY INSTRUCTIONS. It is recommended that the components be installed in the sequence of this assembly manual.
 ZAPF PANEL SYSTEM It is recommended that the components be installed in the sequence of this assembly manual. ASSEMBLY INSTRUCTIONS OFFICE FURNITURE FOR THE INFORMATION AGE Table of Contents INSTALLATION
TOOLS REQUIRED FOR ASSEMBLY. Rubber Mallet or Plastic Tip Hammer PARTS REQUIRED FOR ASSEMBLY OF SINGLE ENTRY STARTER.
 TOOLS REQUIRED FOR ASSEMBLY Rubber Mallet or Plastic Tip Hammer Top Cover Support PARTS REQUIRED FOR ASSEMBLY OF SINGLE ENTRY STARTER Back Stop Divider Closed 'L' Upright Slotted Reinforcement Support
BOOKCASE WARNING. Illustration 1
 Illustration 1 Lower Back Panel Upper Back Panel Cam Connector Illustration 2 Left end Illustration 3 Cam Bolt Adjustable Shelf Left end Left End Panel Bottom/ Center Shelf Connector Cover Right End Panel
Cabinet Storage Products
 Assembly Instructions Storage Products (UltraStor, Acoustis, Adjustable Shelf, Cover Panels, Closure Panels) Wood Compartment Doors Full Wood Door Compartment Grille Doors Full Grille Door No Doors Contents
Assembly Instructions. Important!
 Play Action Spiral Tube Slide Assembly Instructions Important! Intended for residential use by children ages 2 to 10, only on properly installed PlayStar playsets. Before use refer to complete safety guidelines
AUTOMATIC ADVANCE MANUAL
 AUTOMATIC ADVANCE MANUAL AVL Looms, Inc. 3851 Morrow Lane, Suite #9 Chico, CA 95928-8305 530 893-4915 530 893-1372 fax # info@avlusa.com www.avlusa.com Copyright 2009 TABLE OF CONTENTS Page # I. Parts.........................
Equilibrium Credenza
 Equilibrium Credenza Cantilevered base & Tapered Credenza Installation Instruction EI0006 Revision A 8/20/18 Equilibrium End User Agreement Enwork Equilibrium credenza bases must be installed directly
Copyright Black Box Corporation. All rights reserved Park Drive Lawrence, PA Fax
 Copyright 2003. Black Box Corporation. All rights reserved. 1000 Park Drive Lawrence, PA 15055-1018 724-746-5500 Fax 724-746-0746 JULY 2003 RM3010A RM315-R2 RM323-R2 RM329 RM451 RM457 RM3020A RM316 RM324-R2
JK FRONT FENDER FLARE INSTALLATION INSTRUCTIONS
 JK FRONT FENDER FLARE INSTALLATION INSTRUCTIONS TOOLS NEEDED 3/16 Allen Wrench 1/2 Socket or wrench 10mm Socket Flat head screwdriver HARDWARE 5/16 x 3/4 button heads (14) 5/16 x 1 button heads (8) 5/16
Assembly Instructions Nevins Phone Booth
 Assembly Instructions Nevins Phone Booth Included Hardware Tools Required supplied by installer Drill & Bit Socket Wrench Bolt A - (16) 1/4-20 x 1-1/2 hex head Bolt B - (20) 1/4-20 x 2-1/4 phillips head