Instructions: GSC 60 Flatcar Kit with or without bulkheads Tangent Part Number: and /2016
|
|
|
- Jessica Flynn
- 5 years ago
- Views:
Transcription

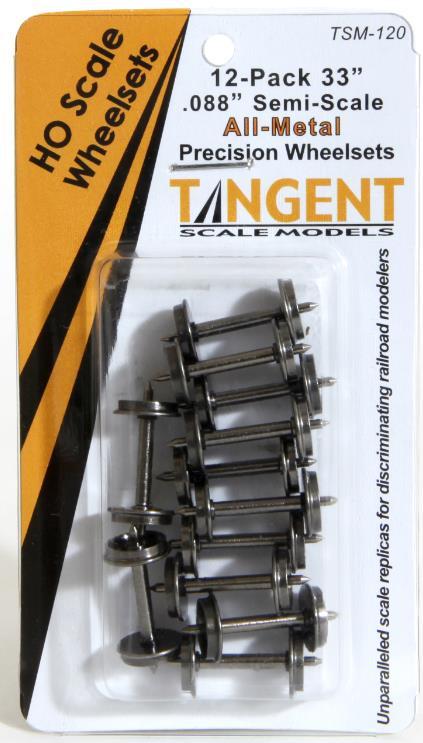
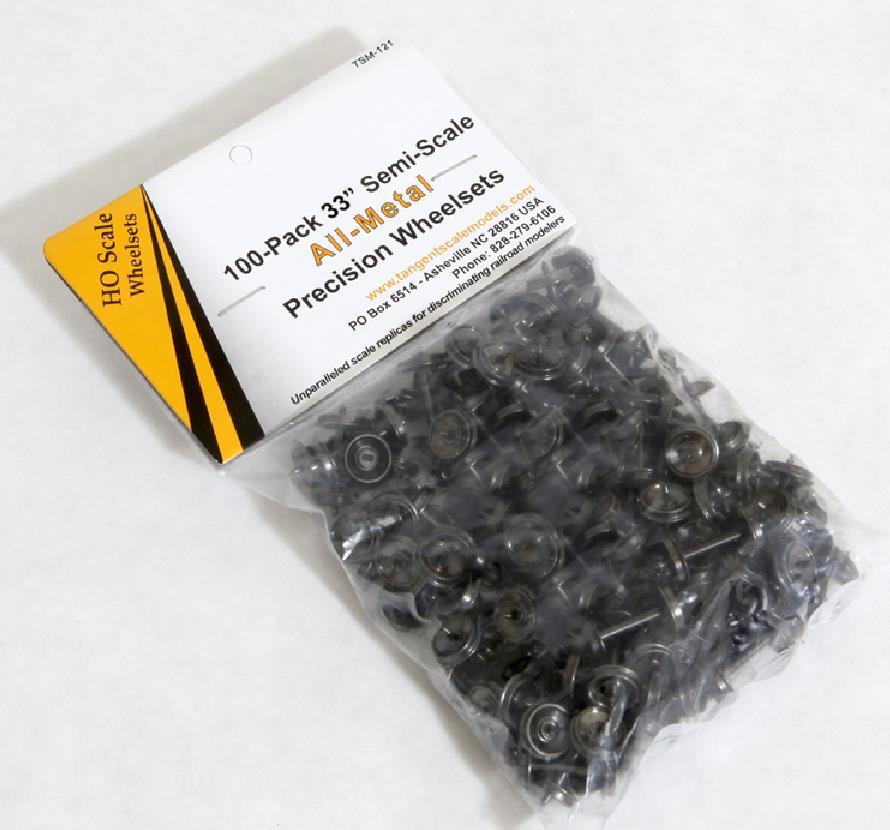
1 Instructions: GSC 60 Flatcar Kit with or without bulkheads Tangent Part Number: and /2016 Thank you for purchasing the Tangent Scale Models GSC 60 Flatcar Kit! A few quick notes before starting: Instructions have many large images: Because some model builders are visually oriented, while others prefer written instructions, we have included both text and photos within these instructions. As you can see, many of the images are rather large, to aid in your model building. There are more images at the end: If you want to see more views of a completed model as a reference for your building, scroll to the end of this document. This is another advantage of a digital download over a printed instruction sheet. Modeling from computer screen is ideal: If possible we recommend modeling from your monitor. You can then enlarge particular images as you see fit, and you save ink and paper at the same time. There are several ways to complete your kit: While there are multiple sequence steps possible to build this car, we believe the sequence included here yields the best results. Prototype photos: While you likely have your own sources of prototype photos, please recall that we include a prototype photo on our website for each RTR scheme that Tangent releases. You can use these as references in addition to your own sources. We want feedback: If you find something missing from our text instructions, or an error within these instructions, please let us know by submitting a comment to us on our website or sending an to support@tangentscalemodels.com Thank you! This kit is meant for adults: While we applaud bringing younger modelers into our hobby, this model includes many small parts, some of which are sharp and/or delicate. Therefore, this kit is recommended for those 14 years of age and older. We offer semi-scale wheels separately: We offer semi-scale wheels separately in 12 or 100 axle packs in either 33 or 36 diameters - to fit all of our trucks and those from other brands!
2

3 Overview of this kit s contents: Below you will find a photo with corresponding descriptions for each part in our kit. Please note that this kit includes many EXTRA parts that will not be needed for your assembly; we have included all parts to build any era of kit, with the exception of the body shell which is era specific Standalone parts included: Part 1 Flatcar Body #1 Part 2 Flatcar Body #2 Part 3 Flatcar Deck Part 4 Car Weights (2) Part sprues included: #5 Sprues contains the bulkhead end frame parts with end supports (2) #6 Sprues contains the bulkhead face plate parts with end supports (2) #7 Sprues contains end supports and brakewheel housing and brakewheel housing backplate for bulkhead (2) #8 Sprues contains air hose, coupler box lids (cushion and non-cushion box), cushion draft gear spring apparatus (and unfilled stirrup step parts to be ignored)(2) #9 Sprues contains the coupler box parts (cushion and non-cushion box) (2) #10 Sprue contains the stirrup steps #11 Sprues contains the bolster part (2) #12 Sprue contains flatcar decking pieces #13 Sprue contains brakewheels and other brake parts #14 Sprue contains flatcar decking pieces Parts bags included:
4 #15 Bag contains the brake beams that apply to our 70-ton Barber S-2 trucks #16 Bag contains all wire and etched parts #17 Bag contains the smallest formed weight with holes in it for brake parts #18 Bag contains the pins that hold the truck screws and bolster in place #19 Bag contains 3 possible truck sideframe pairs, plus one set of CNC-machined wheelsets Parts needed/recommended: Couplers. The coupler boxes for this car are designed for Kadee whisker short shank couplers - #153. Tools needed/recommended: Liquid styrene cement for plastic to plastic bonds (Tamiya green bottle, Testors Liquid Styrene Cement are two example products) CA-type cement or cyanpoxy for wire to plastic joins (sold in hobby shops, or in hardware store as super glue under various brands in the small squeeze tubes) best applied with a piece of scrap wire Hobby knives - #11 and #17 are ideal A #79 drill bit in a pin vise would be helpful but is not required Small Phillips head screwdrivers Tweezers PREAMBLE THINGS YOU SHOULD KNOW This kit is NOT recommended for children aged 14 and under. Small parts: there are many very small parts included in this kit. The assembly sequence requires you to have access to multiple parts at a time, so we recommend a clean and open work surface so that you can keep all of the parts in the open and accessible. Kit variations: You can build a bulkhead or a non-bulkhead version of this car with this kit. This instruction sheet will describe the process of building both the bulkhead and non-bulkhead versions of the car. The steps are pretty much exactly the same until the bulkhead is assembled and installed, other than the brakewheel and the end deck inserts. Let s get started! Underframe Assembly: 1. Clean carbody flash. The first step is to clean up any flash that is on the carbody. There are small holes in each of the stake pockets and they have a little flash that can be easily removed with a sharp hobby knife. After you remove all flash, you can begin assembly by either working on the underframe or the carbody. 2. Locate the smallest of the three weights. Starting with the smallest weight, you ll notice that the weight has holes.


5 The holes are used to position the brake gear as well as orient it into the underframe. With the weight on your work surface, position it so that the holes are toward the top right. Using CA, glue the triple valve in the top right most hole with the holes in the triple valve facing toward you. Next, install the cylinder assembly into the two large holes to the left of the triple valve and feed the air lines into the two bottom holes of the triple valve. Do not glue just yet. Lastly, install the cylinder assembly feeding the air line into the top most hole in the triple valve. You can now glue all three lines in place in the triple valve. 3. Install the weight into the carbody. Take the carbody and orient it with the B end of the car toward the left and the car right side up. The B end has two extra holes for the brake gear attachment. From this point forward, all orientation will be made assuming that the B end of the car is toward the left. Take the small weight and flip it over with the cylinder pointing toward the B end (left). There is a small locating pin in the center cavity of the


6 underframe that will index the weight into position. Install the weight securing it with CA. 4. Install the two larger weights. Take one of the larger weights and orient it so that the larger hole is toward the right and top. This will allow it to sit into the frame over the locating pins. Secure it in place with CA. Orient the last weight the same way and glue in place. 5. Locate the brake levers. There is a long one and a short one. The short one goes toward the A end of the car and the long one goes toward the B end. They are glued into mounting holes in the weights. Flip the car over and orient it so that the B end is toward the left. Shorten the mounting pins on the brake levers to ensure that they will fit flush with weight when installed. Glue in place. It takes a bit of maneuvering to get them in place, but be patient and they will fit in easily.


7 6. Install the wire brake rigging. Before installing the brake rigging, take a moment to open the holes in the brake levers with a #79 drill bit. This will make the installation of the wire parts a bit easier. There are 6 long pieces of wire that are used for the brake rigging. Some have several bends in them, making it so that each one has a specific place that it will fit. Refer to the photos for installation. The wires need to be fed through the stringers and inserted into the holes in the brake levers. 7. Install the brake release levers. There are two small L-shaped wires that are used for the brake release levers, one long and one short. If you look at the side sill of the car, you will notice that on both sides there are two small holes. With the side of the car that has the triple valve facing you, insert the shorter of the two wires into the left hand hole. Secure it from the inside with CA.


8 Turn the car around and install the longer wire in the small right hand hole and secure from the inside with CA. 8. Install the bolster parts. Glue the bolster parts in place. This part is identical so it does not matter which end is which. 9. Install the draft gear. There are two different draft gears to choose from, cushioned and non-cushioned.


9 Refer to prototype photos to determine which you will install on the car. Install the box and cover using the screws provided, but do not install the couplers until after the car is painted. On the cushioned version (pictured below), there is a coupler spring that goes on the box cover. Orient it so that it is pointing toward the coupler, but do not glue in place to allow removal of the box lid to install the coupler after painting. Glue in place after couplers are installed. This completes the assembly of the underframe. CARBODY ASSEMBLY 10. Install the corner grab irons. Locate the 8 small grabirons that will be located in the 4 corners of the car. Insert and glue in place with CA.


10 11. Install the stirrup steps. Next, remove the stirrups from the sprues very carefully as these are very fragile parts. Glue in place. 12. Install the flat car decking. You will notice that the deck consists of several pieces: the main deck, 4 small square inserts, and two small rectangular ones There are also two small rectangular plates that get glued in the small recesses in the four corners of the car that are just inboard of the corner stake pockets. For the non-bulkhead version, you will use the wood versions of the small inserts. For the bulkhead version, use the steel version. Secure all deck pieces to the carbody using CA.


11 13. Install the cut bar brackets and cut bar levers. There are two versions of cut lever brackets and cut levers, one for the non-cushion version and one for the cushion version. Choose the one appropriate for your version and glue in place referring to the photos for orientation. Insert the version of cut lever appropriate for your car and tack in place since it needs to be removable for coupler installation after painting.
12


13 14. If you are building the non-bulkhead version, install the brakewheel parts. Refer to the photos for orientation of these parts and glue in place. The small round part will be fed over the brake staff after it is inserted into the parts glued to the carbody. When this is complete, glue the brakewheel in place. 15. Install the air hoses.

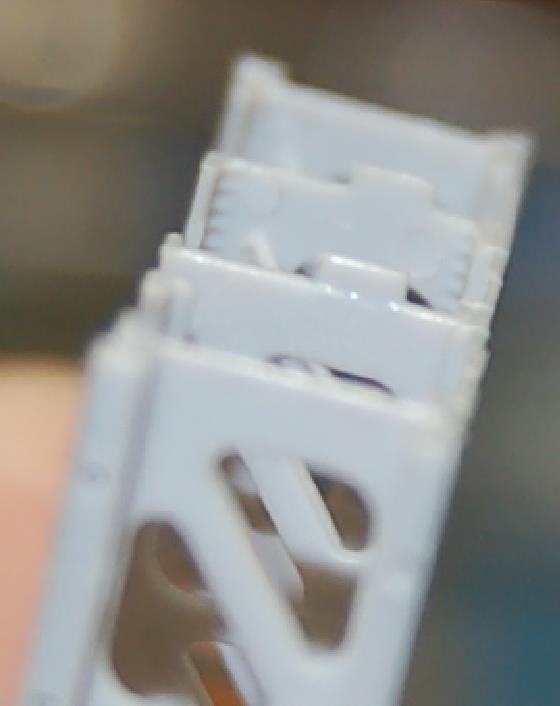
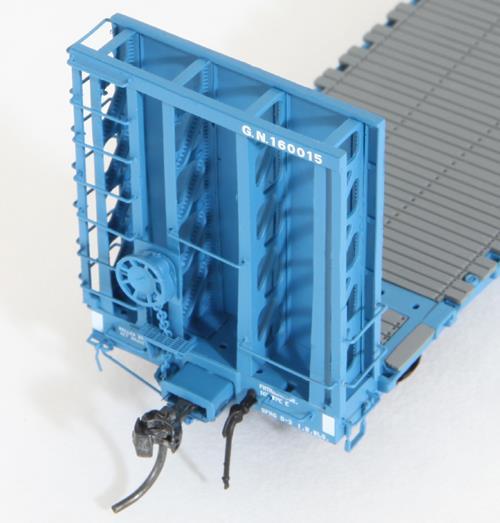
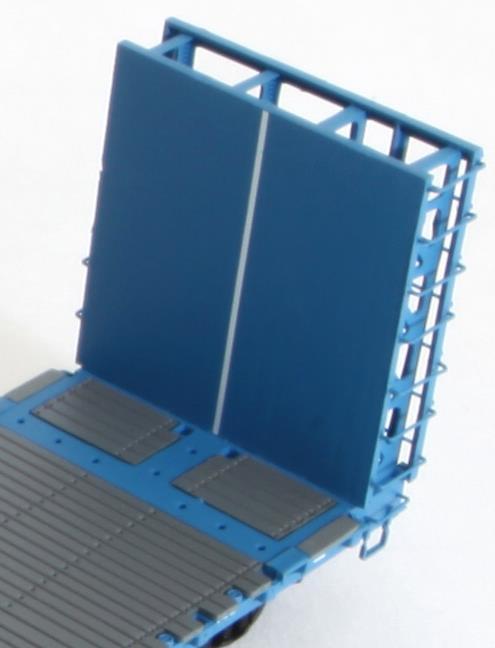
14 This completes the non-bulkhead version of the flatcar! Next steps: painting, decaling, weathering, and coupler installation. BULKHEAD ASSEMBLY The bulkhead upright support parts have specific positions on each end of the car, so please pay close attention to which parts you place where. 16. Locate the bulkhead face plate. You will notice that on the back side is has locating ribs that are slightly tapered bottom to top to aid in positioning of the bulkhead supports. We will start with the B end bulkhead. 17. Orientation of bulkhead parts. To start with, the general layout of the supports are as follows; the two outermost supports have small tabs at the bottom that face outward toward the car sides. The second from the left has 3 locating holes for the brakewheel support plate. The third one has two locating holes for the grabirons. 18. Glue the uprights to the face plate. Locate all of these parts and glue in place on the bulkhead faceplate. When complete it should look like this. Make sure when these parts are secured that they are perpendicular to ensure everything will fit when assembled.


15 19. De-sprue and install the outer support frame. It has small slots at the top that aid in locating its position. Apply glue to the slots and glue to the vertical supports. You will position the bottom of the frame in the next step. At the bottom corners of the support frame there are small tabs that will lay over the tabs on the vertical supports. Position and glue in place. 20. Glue the bulkhead assembly into place. Using the locating tabs of the bulkhead and the slots on the deck, glue the bulkhead assembly in place making sure it sits flush with the deck and the vertical supports are flush to the end sill.

16

17 21. Complete the A end bulkhead assembly. The A end bulkhead assembly uses one different vertical support than the B end. The second one from the left only has one locating hole for a grab iron. So looking left to right you will have supports that have no holes, one hole, two holes and one hole. The outermost have tabs the same as the B end.

18 Glue in place, and install the outer frame and install on deck as you did on the other end of the car. 22. Install the bulkhead grab irons. There are two types of grab left over, and they are for the vertical ladders on the corners or for the outer frame of the bulkhead. They can only fit in one spot so it s fairly easy to figure out. Glue all grabirons in place with CA.


19 23. Glue the brakewheel housing backplate to the B end of the car.

20 24. Glue the chain to the brakewheel housing. Locate the brakewheel housing and glue the end of the chain in the back cavity with CA.

21 25. Mount the housing to the backplate (see photo below). 26. Install the brake platform support. Locate the brake platform support and position it as shown. Glue in place.


22 27. Add the chain guide. Position it so that it angles downward. You may need to enlarge the hole slightly to allow the chain to fit through.


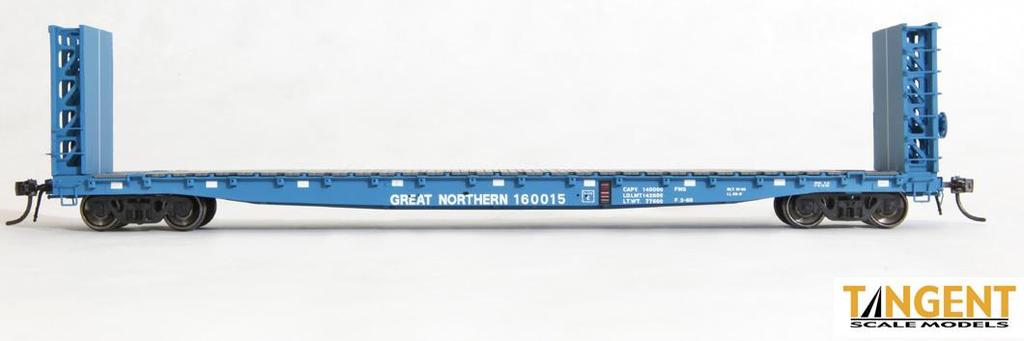
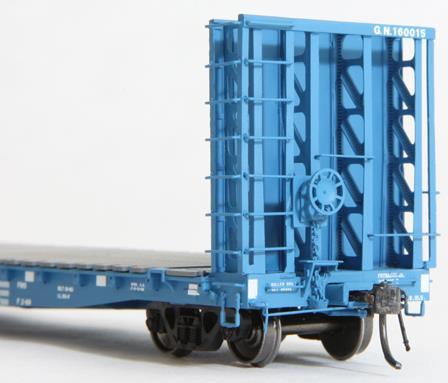
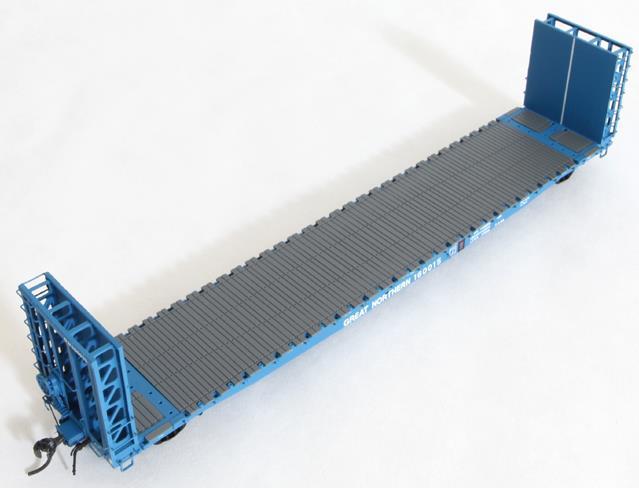
23 Feed chain through the notch in the brake platform support and through the chain guide. Pull the excess chain length under the end sill and secure with CA. 30. Glue the brake platform to the support with CA. 31. Glue the brakewheel in place. This concludes the construction phase for the bulkhead version of the GSC 60 Flat car. FINISHING UP: 1. Paint the car. Refer to prototype photos for the exact car color you need. And don t forget to mask the couplers so they will not get sticky from the paint. This concludes the assembly of your kit. We hope you have enjoyed building our GSC 60 Flat car kit, and we thank you for your support of Tangent Scale Models! Your hardearned dollars allow us to continue to bring you more models in the future. Want to share your creation with the world? Please feel free to upload an image of your customized Tangent model to: More images of finished cars are on the following pages.
24
25
26
27


28
Instructions: Bethlehem 70 ton Riveted Gondola Kit
 Instructions: Bethlehem 70 ton Riveted Gondola Kit Kit number 10900 01 Steel Floor or 10900 02 Wood Floor 8/2012 Parts included in this kit: 95004 01 Plastic Part Body Shell (either steel or wood floor
Instructions: PS-2CD 4000 Model Kit Revised 7/2008
 Instructions: PS-2CD 4000 Model Kit Revised 7/2008 Plastic Parts included: Body shell Parts Sprue #1 Roof, trainline, gravity outlet gates, and centersill/endsill pieces Parts Sprue #2 Underframe bolster
40 & 50 Foot PS-1 Box Car Assembly Instructions
 40 & 50 Foot PS-1 Box Car Instructions Push the #2100 coupler/stirrup assembly onto the ends of the metal floor. Slide them into the slots and slightly lift the ends (wings), then press firmly on the front
PS 5077 cu. ft. Boxcar with EOC device. 1:29 scale resin craftsman kit. by Burl Rice
 PS 5077 cu. ft. Boxcar with EOC device 1:29 scale resin craftsman kit by Burl Rice www.burlrice.com Bill of materials (not included): Thick/medium viscosity CA PL adhesive, or Gorilla Glue Heavy Duty Construction
1. Underframe/Tank Bottom
 1. Underframe/Tank Bottom The construction process for the Class X tank cars is a little different as there is no true underframe. Instead we will use the tank bottom as part of the underframe, attaching
DIY MODELS THRALL 5-UNIT ARTICULATED WELL CAR W. Canyon Creek Dr. Maricopa, AZ
 THRALL 5-UNIT ARTICULATED WELL CAR DIY MODELS 44609 W. Canyon Creek Dr. Maricopa, AZ 85139-5019 DIMENSIONS Length End Units 56 2-5/16 Width (Inside Well at Bottom) 8-1 3/4 Length, Inter. Units 50 13-3/4
20 ORE CAR INSTRUCTIONS. Kit )rv \M TAURUS PRODUCTS P.0. BOX 6534 ORANGECA m WeWWW. Dronerty efi N456 Inc.
rv \M TAURUS PRODUCTS P.0. BOX 6534 ORANGECA m WeWWW. Dronerty efi N456 Inc.") 20 ORE CAR Kit 3305 - INSTRUCTIONS TAURUS PRODUCTS )rv \M P.0. BOX 6534 ORANGECA. 92667 m WeWWW Dronerty efi N456 Inc. Thank you for selecting this TAURUS PRODUCTS kit. We sincerely hope that you will
20 ORE CAR Kit 3305 - INSTRUCTIONS TAURUS PRODUCTS )rv \M P.0. BOX 6534 ORANGECA. 92667 m WeWWW Dronerty efi N456 Inc. Thank you for selecting this TAURUS PRODUCTS kit. We sincerely hope that you will
VICTORIAN RAILWAYS GY WAGON
 C/- P.O. Rhyll, Victoria, 3923. VICTORIAN RAILWAYS GY WAGON Prototype Notes The GY wagon fleet was one of the largest single classes of goods vehicle in VR service and was primarily a bulk commodities
Precision Steel Car s 100 T Steel Coil Car
 Precision Steel Car s 100 T Steel Coil Car Precision Steel Car www.precisionsteelcar.com info@precisionsteelcar.com Paul Vernon: (513) 571-5739 Revised 4/30/2009 Contents of Kit Main Tube Side Frame 2
28 ft. Ventilated (Combination) Box Car
 Box Car") 28 ft. Ventilated (Combination) Box Car Introduction This laser cut wood kit is an HO scale model of a 28 ft. Ventilated (also known as a Combination) Box Car. The model is based on the Illinois Central
28 ft. Ventilated (Combination) Box Car Introduction This laser cut wood kit is an HO scale model of a 28 ft. Ventilated (also known as a Combination) Box Car. The model is based on the Illinois Central
Southern Pacific C-30-4/6 Bay Window Caboose N-Scale & HO-Scale
 Southern Pacific C-30-4/6 Bay Window Caboose N-Scale & HO-Scale Before Starting PREPARING BRASS The easiest way to remove the brass parts from the sheet they are produced on, is to use rail nippers. The
Peter Krause ABN
 Peter Krause ABN 25 736 637 163 T/as O-Aust Kits PO Box 743 ALBANY CREEK QLD 4035 AUSTRALIA Phone +61 (0)7 3298 6283 (7.00pm to 9.30pm ONLY) Facsimile +61 (0)7 3298 6287 (24 hours) Mobile 0419 680 584
Precision Steel Car s 40 Ft. Stock Car
 Precision Steel Car s 40 Ft. Stock Car Precision Steel Car Website: www.precisionsteelcar.com E-mail: info@precisionsteelcar.com Revised 12/3/2018 Paul Vernon: (513) 571-5739 PSC 40 ft. Stock Car Kit:
the wire, less is better. And make sure the bends on each truss wire are in line with the other. See the next photo.
 The following information and photographs are what I did to build the kit. Your methods and needs may differ from this which is fine. There is no right or wrong way if you are used to scratch building.
VICTORIAN RAILWAYS QR BOGIE OPEN WAGON
 C/- P.O. Rhyll, Victoria, 3923. VICTORIAN RAILWAYS QR BOGIE OPEN WAGON Prototype Notes QR number 1 was built at the VR Newport workshops in 1889, being the forerunner of a long lived and useful class of
C/- P.O. Rhyll, Victoria, 3923.
 C/- P.O. Rhyll, Victoria, 3923. FREIGHT AUSTRALIA VHGF BULK GRAIN HOPPER WAGON Prototype Notes: Tulloch Limited of Rhodes, N.S.W., constructed an initial batch of one hundred aluminium wheat hopper wagons
HOn3-118 Denver, Boulder & Western Box Car
 HOn3-118 Denver, Boulder & Western Box Car 30 32 35 29 28 34 Door and Track on End Opposite Brake Wheel ONLY 31 3 36 2 6 24 33 Deadwoods Center Line of Coupler 27 We would like to thank you for purchasing
After the glue dries, trim the trussrod ends with your cutting pliers
 The following information and photographs are what I did to build the kit. Your methods and needs may differ from this which is fine. There is no right or wrong way if you are used to scratch building.
CONCEPT MODELS INSTRUCTIONS FOR THE KASGRO KRL SPECIAL DEPRESSED CENTER FLAT CARS El Toro Way Stockton, CA 95210
 CONCEPT MODELS Web Address: http://www.con-sys.com Email: concept_models@con-sys.com 8810 El Toro Way Stockton, CA 95210 INSTRUCTIONS FOR THE KASGRO KRL 204000-2 SPECIAL DEPRESSED CENTER FLAT CARS 2 CONCEPT
Trim down the piece of casting being pointed to with the tip of the pencil in the first picture. It is only the 'inboard casting that needs to be
 1. File off the moulding pips from the wheel flanges. File the ends of the tube smooth and de-burr. Assemble the wheel sets with a drop of car engine oil on the axles. Glue the wheel sets into place. 2.
CA to each one. You may have to hold the end down while to glue sets or use an accelerator like I did.
 The following information and photographs are what I did to build the kit. Your methods and needs may differ from this which is fine. There is no right or wrong way if you are used to scratch building.
Instructions For Corrugated End Van
 Instructions For Corrugated End Van This kit contains the following items QTY ITEM QTY ITEM QTY ITEM 1 Floor 2 Van Ends 1 Roof 2 Van Sides 2 Sole Bars 4 Axle Boxes 4 Bearings 2 Coupling Hooks 2 Split Pins
Kit 6.00 ACF Type 27, Class ,000 Gallon Insulated Tank Cars
 Kit 6.00 ACF Type 27, Class 103 10,000 Gallon Insulated Tank Cars Introduction Warranty Thank you for your interest in Resin Car Works and this kit. Resin Car Works is not a business in the traditional
NSWGR Class SRC Refrigerated Wagon Kitset in 7mm Scale
 O-Aust Kits PO Box 743 ALBANY CREEK QLD 4035 AUSTRALIA Phone +61 (0)7 3298 6283 (7.00pm to 9.30pm ONLY) Facsimile +61 (0)7 3298 6287 (24 hours) Mobile 0419 680 584 Email pa_rl_krause@bigpond.com Web www.oaustkits.com.au
The Useless Machine. DIY Soldering Edition. Instruction Guide v0004
 The Useless Machine DIY Soldering Edition Instruction Guide v0004 TM For the best outcome, follow each step in order. We recommend reading this guide entirely before you get started. Tools required: Soldering
How to assemble the Reims Gueux Pit Centre Module #005
 How to assemble the Reims Gueux Pit Centre Module #005 We recommend quick drying super glue for our models. Just a few drops on the joining edges, press and hold them for a few seconds and the connection
SCHWERE PLATTFORMWAGON TYPE SSY 60TON
 TWS 5094 SCHWERE PLATTFORMWAGON TYPE SSY 60TON Congratulations on purchasing one of the finer aftermarket resin kits sets available. The photo below is of the completed kit. The Panther tank is not included
Please contact us at BLMAmodels.com for any spare part requests.
 BLMA Models 16623 Pear Blossom Ct. Whittier, California 90603 Phone: 562-712-7085 Ssales@blmamodels.com Cantilever Signal Bridge Instructions Thank you for purchasing this fine-scale model! This bridge
Hardee s Restaurant kit in HO scale
 Hardee s Restaurant kit in HO scale Parking lot base and cars not included This kit includes all building parts milled in white styrene plastic and laser cut white acrylic, clear acrylic window glazing,
Adding Buffers to the SEM Z van
 Adding Buffers to the SEM Z van Throughout the 1930s, 40s and early 50s the Victorian Railways carried out a program of conversion of rolling stock to auto couplers, with a particular emphasis on goods
O-Aust Kits. QR Class CLF Louvred Wagon Kitset in O Scale 1:48
 O-Aust Kits PO Box 743 ALBANY CREEK QLD 4035 AUSTRALIA Phone +61 (0)7 3298 6283 (7.00pm to 9.30pm ONLY) Facsimile +61 (0)7 3298 6287 (24 hours) Mobile 0419 680 584 Email pa_rl_krause@bigpond.com Web www.oaustkits.com.au
You can print these instructions by downloading the PDF here: Boxcar Assembly PDF
 The following information and photographs are what I did to build the kit. Your methods and needs may differ from this which is fine. There is no right or wrong way if you are used to scratch building.
After the glue dries, trim the trussrod ends with your cutting pliers.
 The following information and photographs are what I did to build the kit. Your methods and needs may differ from this which is fine. There is no right or wrong way if you are used to scratch building.
CONCEPT MODELS UTLX 80006,80020 CRYOGENIC TANK CAR KIT INSTRUCTIONS Sheep Ranch Rd. Mountain Ranch, CA 95246
 CONCEPT MODELS Web Address: http://www.con-sys.com Email: concept_models@con-sys.com 8331 Sheep Ranch Rd. Mountain Ranch, CA 95246 UTLX 80006,80020 CRYOGENIC TANK CAR KIT INSTRUCTIONS 2 CONCEPT MODELS
STAGE PAGE. 6 The left front door interior The right front wheel The right front seat back The right front wheel 37
 Pack 2 STAGE PAGE 6 The left front door interior 25 7 The right front wheel 29 8 The right front seat back 33 9 The right front wheel 37 10 The right front door 41 11 The right front door window 45 12
Continue gluing the remaining top parts ensuring the angled piece is glued well. Set aside and let dry. See photo below
 Radiator rev 1.1 The SE5a s radiator is one of the most recognized radiators in WW1. It is one of the components that defines the SE5a. The original SE5a has seen multiple radiator designs used during
Taco Bell Restaurant kit in HO scale
 Taco Bell Restaurant kit in HO scale Parking lot base and cars not included This kit includes all building parts milled in white styrene plastic, clear window glazing, Plastruct tile roofing, and logo
Scratch Build a Water Tower
 Here s some Prototype details Photos Courtesy of Rodney Doster Water Spout and Discharge Pipe Tank Bands Here s some more Prototype details Photos Courtesy of Rodney Doster Weather Vane as a Finial Using
Bates 1/8 scale B-26. Parts List. Instructions
 Bates 1/8 scale B-26 Vacuform Pieces Swivel Ball 1 Cockpit Floor 1 Ball 2 Cockpit Back Wall 2 Two Flanges 3 Dash 3 Seven 0-64 x 1/4 Bolts 4 Dash Hood 4 Seven 0-64 Nuts 5 Center Console 6 Pilot Seat Fire
CONCEPT MODELS INSTRUCTIONS FOR PRODUCT 60,000 GALLON TANK CAR El Toro Way Stockton, CA 95210
 CONCEPT MODELS Web Address: http://www.con-sys.com Email: concept_models@con-sys.com 8810 El Toro Way Stockton, CA 95210 INSTRUCTIONS FOR PRODUCT 60,000 GALLON TANK CAR 2 CONCEPT MODELS PARTS GATX/UTLX
Lima XPT/HST Re-Powering Conversion
 Lima XPT/HST Re-Powering Conversion Please read through these instructions before beginning the conversion process. Non-Powered Bogie The front non-powered bogie is the starting point for this conversion.
Scratchbuild A Backwoods Water Tank Part V - Making the Frost Box and Hanging the Water Spout
 Scratchbuild A Backwoods Water Tank Part V - Making the Frost Box and Hanging the Water Spout By Dwight Ennis In this section, we're going to make the Frost Box, and we'll build the Spout Hanger Assembly
EXTREME LOAD no. TWO
 1602 - EXTREME LOAD no. TWO Kit Features: 22' 4 " x 14' x 3'-6 Oversize Load 49mm (1.9") actual height Bolt Head Details Welded Load Mounting Fins Painting Handles Tools Required: Hobby Knife Tweezers
Darjeeling Coach 4-Wheel First/Second Class
 Darjeeling Coach 4-Wheel First/Second Class Introduction This kit was designed in 16mm scale from early Darjeeling drawings and photographs. It uses brass castings available from Brandbright. The instructions
Super Sky Surfer 2000 Assembly Instructions
 Super Sky Surfer 2000 Assembly Instructions Note: Plug and Play version of the Sky Surfer comes with fuselage pre-glued and motor/servos installed. If you wish to route antennas or wires through the tail,
BRF-022 YGH SEALION. Building Instructions
 Tel 07747 018544 www.prmrp.com BRF-022 YGH SEALION Building Instructions SCALE MODEL PRODUCT FOR ADULT MODELLERS ONLY. WHITE METAL CONTAINS LEAD WASH HANDS AFTER USE. MAY CONTAIN SMALL PARTS. ETCHED BRASS
How to assemble the Reims Gueux Pit End Modules #005
 How to assemble the Reims Gueux Pit End Modules #005 Depending on which kit you have purchased you will either have a pair of end sections, some centre sections or both. We will describe building of the
STANDARD CANOPY WORK REPORT B-1
 STANDARD CANOPY WORK REPORT B-1 No. Check Parts / Tools Qty _ Canopy Lock 1 [ ] 6E2-3 Canopy Hinge Block 1 2 [ ] 6E4-5 Canopy Side Frame 2 2 [ ] 6E2-1 Canopy Lock Assembly 1L + 1R 3 [ ] 6E2-4 Rear Lock
Fidelity & Guaranty Building
 Fidelity & Guaranty Building Instructions for Assembly of the Fidelity & Guaranty Building Kit Contents: 69 each laser cut acrylic parts. 1 each sheet of AC roof unit parts. 1 each sidewalk base. 4 each
Drawings of all parts have been included for ease of part identification.
 Acme Corporation Instructions for Assembly of the HO Scale Acme Corporation HO Kit Contents: 156 ea. white 1/16" laser cut acrylic part 10 ea. white 1/8" laser cut acrylic part 37 ea. adhesive-backed brick
Assembly Instructions for the ARHS Baldwin DR Babyface A and B units
 Assembly Instructions for the ARHS Baldwin DR-4-4-1500 Babyface A and B units The ARHS Baldwin DR-4-4-1500 Babyface A and B units have been a long time in coming. They were a group effort spanning some
Shell Gas Station & Convenience Store kit in HO scale
 Shell Gas Station & Convenience Store kit in HO scale Parking lot base and cars not included This kit includes all building parts and signs milled in white and black styrene plastic, clear window glazing,
Note - the nose ribs and are thinner than the main ribs. These nose ribs will use a thinner rib cap than the ribs. This is per design.
 Stabilizer rev 1.2 The SE5a stabilizer is the heartbeat of the tail and is recreated like the full scale version. All tail pieces depend on the stabilizer. It uses the steel fittings, pulleys, inspection
N Scale Concrete Coal Dock Instruction Manual
 N Scale Concrete Coal Dock Instruction Manual 1. General Overview This kit combines precision laser cut acrylic, photo etched brass and wood parts to make a highly detailed model of the Roberts and Schaefer
Modern Gas Station backdrop building kit in HO scale
 Modern Gas Station backdrop building kit in HO scale This kit includes all building parts, pumps, signs, and base milled in white styrene plastic, clear window glazing, Plastruct Ridgid Clay Tile roofing,
FUSELAGE CONSTRUCTION
 FUSELAGE CONSTRUCTION Note: prior to building and gluing on the work surface use protective covering on your building surface. (wax paper or clear wrap) Fit the laser cut Fuselage Front and Fuselage Rear
CONCEPT MODELS SP DOUBLE STACK CONTAINER CARS INSTRUCTIONS Sheep Ranch Rd. Mountain Ranch, CA Web Address:
 CONCEPT MODELS Web Address: http://www.con-sys.com 8331 Sheep Ranch Rd. Mountain Ranch, CA 95246 SP DOUBLE STACK CONTAINER CARS INSTRUCTIONS 2 CONCEPT MODELS PARTS Item No. PART NO. DESCRIPTION QTY. 1
Donaldson s Department Store
 Donaldson s Department Store Instructions for Assembly of Donaldson s Department Store Kit Contents: 80 each laser cut acrylic parts. 1 each sheet of canopy parts. 1 each sheet of AC roof unit parts. 1
Additional Parts List:
 THE TIME MACHINE Additional Parts List: In addition to the cast resin parts enclosed in this kit, there should also be a plastic bag containing the following items needed to complete your time machine
WARNING! ETCHED PARTS CONTAINED IN THIS KIT HAVE SHARP POINTS, EDGES AND CORNERS.
 MPD18 chassis build instructions K A (see below for details) J I G H L C D F E B M Parts list: Ident Quantity A Etched Nickel/Silver fret 1 B Wheel sets 2 C Worms 2 D Worm gears 2 E Shaft adapters 2 F
End tipping and runner wagons
 End tipping and runner wagons These wagons are based on, but not identical to, those used at the "Pike Brothers Tramway", also known as the "Furzebrook Railway". Exact replicas are difficult as photographic
GWR Fruit Van Diagram Y2 Manufactured by: WEP Models: 23 Wellington Court, Best Street, Cradley Heath, and WARLEY B64. Tel:
 GWR Fruit Van Diagram Y2 Manufactured by: WEP Models: 23 Wellington Court, Best Street, Cradley Heath, and WARLEY B64. Tel: 01384 566059. These were very long-lived vehicles, introduced in the 1890's and
UTLX Class X-3 10,000 Gallon Tank Car
 UTLX Class X-3 10,000 Gallon Tank Car UTLX Collection, courtesy of Steve Hile Introduction Thank you for your interest in Resin Car Works and this kit. Resin Car Works is not a business in the traditional
CONVERTING CAMBRIAN MODELS FOX BOGIES TO 45MM GAUGE AND SIERRA VALLEY STEEL WHEELS WITH BALL BEARINGS
 CONVERTING CAMBRIAN MODELS FOX BOGIES TO 45MM GAUGE AND SIERRA VALLEY STEEL WHEELS WITH BALL BEARINGS Parts list (photograph 1) 1 pair Cambrian Models Fox Bogies 4 x Sierra Valley gauge 1, 25mm diameter
Build the. Steam Locomotive. Pack 06
 Build the Steam Locomotive Pack 06 Build the Steam Locomotive Contents Step by step Stage 38: The boiler band Stage 39: Sand spreader pipe main cocks Stage 40: Building up the dome Stage 41: The sand spreader
CONCEPT MODELS INSTRUCTIONS FOR UP DC-10 WING CAR El Toro Way Stockton, CA Web Address:
 CONCEPT MODELS Web Address: http://www.con-sys.com 8810 El Toro Way Stockton, CA 95210 INSTRUCTIONS FOR UP DC-10 WING CAR 2 CONCEPT MODELS PARTS DC-10 WING CAR Item No. Part No. DESCRIPTION QTY. 1 2003-1
FINNEY7 4500G May17 SR 4500G TENDER. Fig 1. Original Appearance. Side raves Sanding gear Front water fillers TIA Water treatment system
 Fig 1. Original Appearance Side raves Sanding gear Front water fillers TIA Water treatment system 4500G - 3 Fig 2. Rebuilt Condition Cut down side raves with fire iron tunnels# TIA removed and replaced
The Universal Table Saw Sled
 The Universal Table Saw Sled Do Precision Work Even with Inexpensive Table Saws! Table saw blades always tend to move the wood while the cut is being made. This is why it's so difficult to get accurate
WW04 BR. 25 Ton Low-Mac
 1 WW04 BR. 25 Ton Low-Mac History. The Lowmac, code name for a low machine wagon was the most popular of all the special wagons built by BR, totalling 510 examples. These wagons were spread over fourteen
1:20.3-scale Tionesta Valley Nº 111 caboose
 Plan set #78 :20.3-scale Tionesta Valley Nº caboose by Ted Stinson Wiscasset, Maine This is a :20.3-scale caboose that closely follows the lines of the Tionesta Valley s Nº caboose. This is the first drawing
The Park Hotel Instructions for Assembly of N Scale Kit
 The Park Hotel Instructions for Assembly of N Scale Kit Kit Contents: 198 ea. Laser Cut Acrylic Parts, 2 ea. Chimney Parts Sheets, 1 ea.2".040 styrene rod, 5 ea. Sidewalk Parts, 14 ea. Cast Resin Dormers,
7/8n2 Scale Plantation Coach
 7/8n2 Scale Plantation Coach Introduction This small coach modeled in 7/8 n2 was inspired from a Hawaiian Railway Company plantation excursion car from the late 19 century. While not an exact replica,
Ziroli D-17 Beech Staggerwing
 Ziroli D-17 Beech Staggerwing Parts List Vacuform Parts: Miscellanous Pieces 1 Four Side Panels 1 3/16" Tube, 2" Long 2 Lower Dash - Back Dash 2 Felt, 12x24 3 Dash 3 Cordury 12x24 4 Dash Hood 4 Aluminum
SE5a Wing Panels rev 1.0
 SE5a Wing Panels rev 1.0 The top and bottom wings are different. They might look the same but the bottom wing has one less rib and some rib spacing difference. This is due to where the wooden interplane
MIDLAND RAILWAY JOHNSON 6-WHEEL 3,250g TENDER
 MIDLAND RAILWAY JOHNSON 6-WHEEL 3,250g TENDER These tenders were built in large numbers together with others of varying water capacity. During their life some were fitted with water pickup apparatus and
The Saint Paul Building
 The Saint Paul Building Instructions for Assembly of The Saint Paul Building. Kit Contents: 65 each laser cut acrylic parts. 1 each sheet of AC roof unit parts. 1 each sidewalk. 3 each Window Glass Templates,
The Fyfe Building Instructions for Assembly of the N scale kit.
 The Fyfe Building Instructions for Assembly of the N scale kit. Kit Contents: 150 each laser cut 1/16" acrylic parts. 6 each 020 adhesive backed part 6 each column caps 2 each decorative canopy 1 each.125"
(Build Instructions)
") (Build Instructions) Specifications * Wingspan: 58cm * Length: 50cm * Flying Weight: 59 grams * Channels: 3 (Rudder Elevator Throttle) * Suggested Receiver: 4Ch Micro * Motor: 8mm GearDrive * Prop: GWS
(Build Instructions) Specifications * Wingspan: 58cm * Length: 50cm * Flying Weight: 59 grams * Channels: 3 (Rudder Elevator Throttle) * Suggested Receiver: 4Ch Micro * Motor: 8mm GearDrive * Prop: GWS
Model Grandma and Grandpa s cozy cottage, a. Country Cottage Instructions HO Scale 1:87 WOODLAND SCENICS PF5186
 PF586 Country Cottage Instructions HO Scale :87 Model Grandma and Grandpa s cozy cottage, a young family s first home or give this vintage Victorian cottage the run-down look of an abandoned shack. This
SE5a Instrument Board part 2 - rev 1.1
 SE5a Instrument Board part 2 - rev 1.1 Fuel (Petrol) Valve This valve uses two circular name plates, eight brass screws, one black plastic base, copper wire and two black plastic risers. You can pick any
Southern Ry Wood Rack (1951 rebuild - Roman) (HO)
 (HO)") Page1 Wright Trak Models, LLC. P O Box 158 Clarkesville, GA 30523 Web: http://wrighttrak.com/ Fax: (888) 841-7092 Southern Ry. 40 6 Wood Rack (1951 rebuild - Roman) (HO) NOTE This HO kit was designed by
Page1 Wright Trak Models, LLC. P O Box 158 Clarkesville, GA 30523 Web: http://wrighttrak.com/ Fax: (888) 841-7092 Southern Ry. 40 6 Wood Rack (1951 rebuild - Roman) (HO) NOTE This HO kit was designed by
Nanton Grain Mill Assembly
 ( 1 ) Nanton Grain Mill Assembly Locate package for assembling storage building. These are cut from 1/8 masonite. Inspect and lightly sand edges where it will be bonded. Use white glue or CA glue to bond.
The Midtown Apartment Building
 The Midtown Apartment Building Instructions for Assembly of The Midtown Apartment Building. Kit Contents: 70 each laser cut acrylic parts. 3 each sidewalk parts. 3each Window Glass Templates, 3 each Window
Brassmasters
 Brassmasters www.brassmasters.co.uk Scale Models LONDON & NORTH EASTERN RAILWAY 4200 GALLON GROUP STANDARD TENDER KIT Designed by Martin Finney 4MM SCALE OO - EM - P4 INSTRUCTIONS AND PROTOTYPE NOTES PO
The Rubley Building Instructions for Assembly of the N scale kit. v1.1
 The Rubley Building Instructions for Assembly of the N scale kit. v1.1 Kit Contents: 197 ea. laser cut 1/16" acrylic parts. 1ea. adhesive backed.020 styrene part. 10 ea..060 x 1" styrene alignment pins.
Installation Instructions
 DODGE 16K Industry Standard Rail Custom Mounting Kit #2728 Gross Trailer Weight (Maximum)...16,000 lbs. Vertical Load Weight (Max. Pin Weight)...4,000 lbs. SYSTEM TOW CAPACITY Please note, in order to
Rural Shamrock Gas Station & Store kit in HO scale
 Rural Shamrock Gas Station & Store kit in HO scale Parking lot base and cars not included This kit includes all building parts and signs milled in white and black styrene plastic, clear window glazing
10x10 Trellis Pergola
 0x0 Trellis Pergola ASSEMBLY GUIDE Ver.0-7 Table of Contents PAGE Introduction & Overview...................................................... Pergola Materials Overview..............................................................
 Allied Tool is a freelance model of a small manufacturing company that grew from production in a home basement to a new building. Assume a gentleman starts assembling gauges in his basement and the business
Tools and Tips: ( 1 )
") Tools and Tips: As you build instructions will show in my many picture manual how to assemble. You can use your own methods as you desire, my results are very good. A smooth, flat work surface is very
Tools and Tips: As you build instructions will show in my many picture manual how to assemble. You can use your own methods as you desire, my results are very good. A smooth, flat work surface is very
The Park Hotel Instructions for Assembly
 The Park Hotel Instructions for Assembly Kit Contents: 280 ea. Laser Cut Acrylic Parts. 1 ea. 6" Plastic Coated Wire. 5 ea. Sidewalk Parts. 14 ea. Cast Resin Dormers. 12 ea. Window Glass Templates, 12
Heat up PE parts with lighter before use, brass will soften and become easy to bend and work with
 Diamond T 968 was a cargo truck based on a 4 ton 6x6 chassis, powered with a Hercules RXC six-cylinder gasoline engine and equipped with a five-speed overdrive transmission and a direct and under drive
Right On Replicas, LLC Step-by-Step Review * Panzer IV Tank 1:32 Scale Monogram Model Kit # Review
 Right On Replicas, LLC Step-by-Step Review 20150108* Panzer IV Tank 1:32 Scale Monogram Model Kit #85-7861 Review The Panzer tank was used throughout World War II and had several modifications during that
DAVENPORT DEPARTMENT STORE PF5214
 1:160 BUILDING KIT DAVENPORT DEPARTMENT STORE PF5214 Dress up your downtown scene with the classic Victorian architecture and large first-floor picture windows of the Davenport Department Store. Details
Building Rudy Kouhoupt s Walking-Beam Engine
 Building Rudy Kouhoupt s Walking-Beam Engine Some time ago I came across a copy of Rudy Kouhoupt s article: "Build this Walking-Beam Engine" (Popular Mechanics August 1969), and decided to try and make
INSTALLATION GUIDE 2009-CURRENT HUMMER H3T PRODUCT CODE:
 INSTALLATION GUIDE 2009-CURRENT HUMMER H3T PRODUCT CODE: 268 June 22, 2010 TOOLS NEEDED COMPONENTS INCLUDED P2 Tip 3/8" Drill Rubber Gasket(s) x 2 Bracket(s) x 2 1/2" Drill Bit Bulkhead Flange #2 Phillips
HARRISON S HARDWARE PF5891
 1:48 BUILDING KIT HARRISON S HARDWARE PF5891 Model the local hardware store where layout residents can find all they need to keep their homes in tip-top shape and workshops running smooth. The positive
EASY-IN POOL STEP SYSTEM NE132
 EASY-IN POOL STEP SYSTEM NE132 This instruction manual features multiple guides for the step unit components. 7939 EASY POOL STEP (NE113) FOR USE WITH: EASY-IN POOL STEP (NE126) 6492 PARTS & HARDWARE FOR
Building Tips This model can be built using the following types of adhesives:
 Page 1 Building Tips This model can be built using the following types of adhesives: Epoxy (with or without microballons) Odorless cyanoacrylate (CA) with accelerator UHU Creativ for Styrofoam (or UHU
*Patent Pending. *Trademarked. Series II. Glass Conversion Kit. (888) One-Products (888)
 One-Products (888)") *Patent Pending *Trademarked Series II Glass Conversion Kit www.onepieceproducts.com (888) One-Products (888) 663-7763 Installation Manual Full One Piece Door Glass Conversion Kit Series II 1967-1972 Chevy
*Patent Pending *Trademarked Series II Glass Conversion Kit www.onepieceproducts.com (888) One-Products (888) 663-7763 Installation Manual Full One Piece Door Glass Conversion Kit Series II 1967-1972 Chevy