BRF-022 YGH SEALION. Building Instructions
|
|
|
- Giles Clarke
- 6 years ago
- Views:
Transcription

1 Tel BRF-022 YGH SEALION Building Instructions SCALE MODEL PRODUCT FOR ADULT MODELLERS ONLY. WHITE METAL CONTAINS LEAD WASH HANDS AFTER USE. MAY CONTAIN SMALL PARTS. ETCHED BRASS HAS FUNCTIONAL SHARP EDGES - HANDLE WITH EXTREME CARE 1
2 Thank you for purchasing this kit. This instruction pack should provide a guide for building this model, given some experience of soldering and the basics of etched kit construction. Please read all the pack before starting to build. Drawings and photos are essential for builders to acquaint themselves with the prototype they wish to model. I find that there are various website that provide excellent pictures of the real thing to help you complete the kit. For builders of modern image in 7mm, consider joining MIGO+1, the Modern Image Gauge 0 & 1 Organisation. For more details check out the website Transfers are available from Fox Transfers 2
3 Suggestion of tools that maybe required and general kit assembly Preparation Before any parts are cut from the etched frets, push through any rivet holes from the back of the fret. These are represented by half etched holes on the rear of the fret. The same also applies to pre-formed loco. Forming the Etched Parts When forming the etches, unless otherwise instructed, the fold lines are on the inside. A pair of bending bars are ideal for this job or a vice, (without serrated jaws), would suffice. Soldering The key word for a successfully soldered joint is cleanliness. If the parts to be joined together are clean metal surfaces and are well coated in a good flux and providing the soldering iron tip has sufficient heat, a perfect joint which is also very strong will result. A good strong joint can be achieved with glues but it is not easy to rework. A soldered joint can be easily undone, altered, corrected etc. by just re applying some flux and heat from the soldering iron. The flux transfers the heat from the tip to the metal surfaces to be joined and stops oxidization at the joint. I allow the multi-core solder to stay molten on the joint and, when the iron is taken away, will cool to form a solid metal joint. When undertaking any kind of soldering always hold the parts to be joined together securely and comfortably. You will learn with experience how long to hold the iron on and in turn how much pain your fingers can endure. The use of small clamps such as hair clips, mini G clamps, (not rubber bands!), a small vice, various pliers etc. will make life easier. A simple jig soldered together out of scrap metal or made from wood may also help for holding parts you find awkward to hold. 3
4 You can use the various temperature range solders to your advantage during building. Multi-core for larger pieces will give you the main structure. A solder called Carrs 145 or 177 solder is used to apply the finer etches and laminates. Finally white metal solder, Carrs 70 Red Label, is used to fix the castings on. Remember to take care not to apply too much heat near laminates or casting you have already joined as you may disturb them. Cleaning Up When assembly is finished, all excess solder should be cleaned from the model. Files, small wire brushes, fibre pens and Wet & Dry paper are all useful aids when performing this task. On your model there are joints between etches and castings that may require some filling. Car body fillers such as Isopon are ideal, (avoid flexible/elastic fillers). When any solder or filler has been cleaned up the body should be washed in warm soapy water to remove any grease or flux that would prevent paint from adhering. Some washing up liquids leave a film on models, so it is recommended that Cillit Bang is used as a second wash. This removes all films, grease etc. Plastic window boxes sold in the big DIY stores make an ideal size container for washing your models. Rinse the model in clean water and leave to dry naturally over night. Keeping the body square Always build on a level surface. The last you thing you want is for your model to derail or wobble. Use a piece of 7mm Glass the squarest material you can get. This will ensure that you stand every chance of building a square model. 4
5 Tools A soldering iron with range of bits from large to very fine, for example a Weller temperature controlled iron (60 watt) Multi core solder, Carrs Green Label flux aids the running of the solder#18-24 Steel rule Folding bars such as those sold by M&M Models Range of Swiss files Medium cut bench knife such as Stanley Knife or short bladed scissors for cutting out etches. Evo Stick/Super Glue and Epoxy Good quality side cutters Fine pliers and duck billed pliers Mini drill and a good range of drills Right lets get started!!!!!!!! 5

6 Note 3. Fold the top of the ballast shoot at a 90 degree angle into the body (IE the fold line is on the underside) Note 4. Fold out the two shoot sides at a 90 degree angle Note 5. Fold the base of the shot to an angle that allows it to side on the underside of the two sides folded in Note 4. Solder All joint lines accordingly and repeat on the second body side. Note 6. Fold the buffer beam at a 90 degree angle Note 7. MAIN BOBY CONSTRUCTION Repeat Twice This picture shows one of the two body sides face up and one end face down.. Note 1. Push through all the rivet detail before commencing any bending. Note 2. Fold the lip on the top of the body side at an angle of 90 degrees Fold the line indicated here on the underside to approximately 45 degrees. Don t worry about being to exact. You will get the right angle when you solder the end to the main body. Note 8. Fold this line indicated here on the underside to a 90 degree angle Note 9. Fold this line to a 45 degree angle Note 10. Fold this line to a 90 degree angle to form the lip to match the body side lip. 6

7 Side Struts Note 1. Fold up the 14 side struts so they look the finished article in note 2. Proceed to solder these to the body sides feeding the small tag at the arrow tip in note 2 into the body side slots for the middle three. Secure the remaining for each side by resting the tag on the under side of the body. The long part of each strut will sit in the half etched line on the body side and offer up to the top lip. 7

8 Note 1. Fit the shoot centre piece using the slot provided Note 2. Fold and fit the L-shape brackets in the slots provided. This can be done before you begin to assemble the body and solder the end piece in place. This will give you the correct angle for your ends as detailed earlier. 8

9 L Shape Brackets referred to above 9
 Fold down the four tabs each end indicated. The two end sections will sit on these. Once you are happy solder the body together as indicated.")
10 Note 1 Fold the remaining tabs on the ends. These simulate a girder running under the body. Note 2. On the second end there are one additional tab that folds up to take the Air Distribution Cylinder. Final (although this picture does not show it) Fold down the four tabs each end indicated. The two end sections will sit on these. Once you are happy solder the body together as indicated. This is what the end result should look like. Be careful to make sure the body is square throughout this process!!!! You will make reap the rewards at the end Trust me! 10

11 Note 1. Fold the bogie stretcher Note 2. Drill and secure the top hat bearings in the bogie sides. I normally secure with a drop of super glue. Repeat for the second bogie. 11

12 This is the finished article. 12

13 Note 1. Fix the nut provides to the inside of the bogie mount box as indicated. Note 2. Fold up the box. When complete, solder them in place on the underside of the body. The shorter of the two sides will sit flat on the underside of the end section offering up to the two girder sections which were referred to earlier. The longer on the two sides will then join to the angle section of the end. Note that the section of this side with the three holes can now bend bent accurately to mirror the angle of the surface that it is being solder on. Make sure that the centre of the nut is central to the body. 13
14 The end of the wagons start to get a bit busy now, so I have tried to make the instructions as simple as possible. Note 1. Fold the bracket as indicated in the line drawing given below. This will for the bracket that supports the door opening wheels and rods. Note 2, Fold the bracket as indicated in the line drawing below, making reference to the fact that the part marked with Note 3. Bends back on itself and around the front. Before fitting solder tack the large air tank to the inside of the cross girder that is to be fitted to the end with the Air Brake Cylinder and the small air tank to the end with the Vacuum Cylinders. Proceed to fit the two brackets in place using the next two pages of pictures to help you. Finally Laminate and fit the buffer beam etch on each end of the wagon 14

15 15

16 16

17 Note 1. Fit the end hand rails Note 2. Fit the Distribution Valve Note 3. Fit the end handrail stantions and finish off with brass wire You may wish to use wire to replicate the pipework to and from the cylinders. The layout of this can be used by looking at the last series of pictures and remains the modelers choice. 17
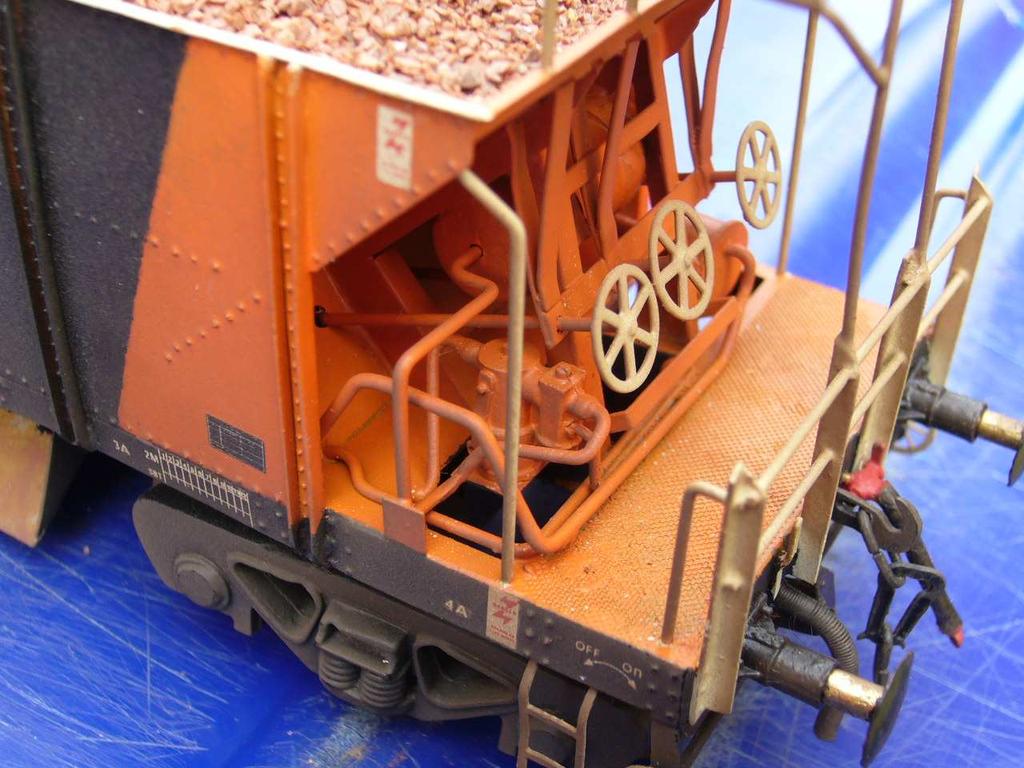
18 Note 1. Fit the large Air Cylinder using the bracket provided. Not the difference in the two cylinders. Note 2. Fit the smaller of the two cylinders Connect these two cylinders using the etched piston link for the larger cylinder and the cast unit for the smaller cylinder. You will then find two V- shaped etched pieces that solder to the bodyside to support a length of brass wire that runs the width of the wagon passing through the two holes of the piston links. You may wish to use wire to replicate the pipework to and from the cylinders. The layout of this can be used by looking at the last series of pictures and remains the modeler s choice. Fit all handrails as per End 1. 18

19 Finishing Off with Variant one of the safety canopy Note 1 Fabricate and fit the safety canopy with the brass square provided. Fill in the hole in this with a square of brass mesh provided. Use brass wire for the supports. Note 2 Fold and fit the brake rod bracket to the back of the buffer beam at end no.1 Note 3 Fit the brackets and wheels on each side, linking with a piece of brass wire. Note 4. Fit the steps and bend so that the bogies are able to turn. Note 5 Fit the makers plate Note 6 Fit the load consist clip. 19

20 This is the second variant of the safety canopy that is not covered by this kit, but easy to fabric with some off cuts of brass, a little more wire and mesh. 20

21 You may wish to add an interior to your kit. This can be done in plastic card using the templates below. 21

22 22
BRF-020 Type YCV Turbot Spoil Wagon. Building Instructions
 Tel 07747 018544 www.prmrp.com BRF-020 Type YCV Turbot Spoil Wagon Building Instructions SCALE MODEL PRODUCT FOR ADULT MODELLERS ONLY. WHITE METAL CONTAINS LEAD WASH HANDS AFTER USE. MAY CONTAIN SMALL
BRF-014 Type SPA Steel Plate Wagon. Building Instructions
 Tel 07747 018544 www.prmrp.com BRF-014 Type SPA Steel Plate Wagon Building Instructions SCALE MODEL PRODUCT FOR ADULT MODELLERS ONLY. WHITE METAL CONTAINS LEAD WASH HANDS AFTER USE. MAY CONTAIN SMALL PARTS.
7mm/0Gauge BRF 025 ZUV SHARK Plough Brake. Building Instructions
 Tel 07807 225801 www.prmrp.com 7mm/0Gauge BRF 025 ZUV SHARK Plough Brake Building Instructions SCALE MODEL PRODUCT FOR ADULT MODELLERS ONLY. WHITE METAL CONTAINS LEAD WASH HANDS AFTER USE. MAY CONTAIN
BRF-012 Type OTA Timber Wagon. Building Instructions
 Tel 07747 018544 www.prmrp.com BRF-012 Type OTA Timber Wagon Building Instructions SCALE MODEL PRODUCT FOR ADULT MODELLERS ONLY. WHITE METAL CONTAINS LEAD WASH HANDS AFTER USE. MAY CONTAIN SMALL PARTS.
Building Instructions
 Peter Besant Tel 07807225801 prmrp@fsmail.net www.prmrp.com Building Instructions 7mm/0Gauge BRL-067 Class 67 SCALE MODEL PRODUCT FOR ADULT MODELLERS ONLY. WHITE METAL CONTAINS LEAD - WASH HANDS AFTER
Peter Krause ABN
 Peter Krause ABN 25 736 637 163 T/as O-Aust Kits PO Box 743 ALBANY CREEK QLD 4035 AUSTRALIA Phone +61 (0)7 3298 6283 (7.00pm to 9.30pm ONLY) Facsimile +61 (0)7 3298 6287 (24 hours) Mobile 0419 680 584
Billy Body Kit HBK5 CHECKLIST. Modular Locomotive System Instruction Manual for HBK5 Billy Body Kit. Checked
 Billy Body Kit HBK5 CHECKLIST 1 Cab body panel (folded). 1 Cab floor. 1 Cab front panel. 1 Roof. 1 Body tank support. 2 Boiler bands with M2 Long Steel Screws & Nuts fitted. 1 Brass dome. 1 Cast brass
Trim down the piece of casting being pointed to with the tip of the pencil in the first picture. It is only the 'inboard casting that needs to be
 1. File off the moulding pips from the wheel flanges. File the ends of the tube smooth and de-burr. Assemble the wheel sets with a drop of car engine oil on the axles. Glue the wheel sets into place. 2.
Modular Locomotive System Instruction Manual for HBK22 Fowler Body Kit
 Modular Locomotive System Instruction Manual for HBK22 Fowler Body Kit Roundhouse Engineering Co. Ltd. Units 6-10 Churchill Business Park. Churchill Road, Wheatley. Doncaster. DN1 2TF. England. Tel. 01302
O-Aust Kits. QR Class CLF Louvred Wagon Kitset in O Scale 1:48
 O-Aust Kits PO Box 743 ALBANY CREEK QLD 4035 AUSTRALIA Phone +61 (0)7 3298 6283 (7.00pm to 9.30pm ONLY) Facsimile +61 (0)7 3298 6287 (24 hours) Mobile 0419 680 584 Email pa_rl_krause@bigpond.com Web www.oaustkits.com.au
NSWGR Class SRC Refrigerated Wagon Kitset in 7mm Scale
 O-Aust Kits PO Box 743 ALBANY CREEK QLD 4035 AUSTRALIA Phone +61 (0)7 3298 6283 (7.00pm to 9.30pm ONLY) Facsimile +61 (0)7 3298 6287 (24 hours) Mobile 0419 680 584 Email pa_rl_krause@bigpond.com Web www.oaustkits.com.au
VICTORIAN RAILWAYS QR BOGIE OPEN WAGON
 C/- P.O. Rhyll, Victoria, 3923. VICTORIAN RAILWAYS QR BOGIE OPEN WAGON Prototype Notes QR number 1 was built at the VR Newport workshops in 1889, being the forerunner of a long lived and useful class of
WW04 BR. 25 Ton Low-Mac
 1 WW04 BR. 25 Ton Low-Mac History. The Lowmac, code name for a low machine wagon was the most popular of all the special wagons built by BR, totalling 510 examples. These wagons were spread over fourteen
SM21D SJA conversion for Bachmann MEA wagon.
 The preparation of the etch is straightforward. Bends can be made using ordinary pliers and hand pressure. They do not require the use of bending jigs such as hold and fold. 90 0 folds have the half etch
Captain Baxter, 3D Print instructions
 Captain Baxter, 3D Print instructions Baxter prototype printed by Shapeways and a home 3D printer Thank you for purchasing the Captain Baxter 3D print, this will instruct you on how to put this model together,
FINNEY7 4500G May17 SR 4500G TENDER. Fig 1. Original Appearance. Side raves Sanding gear Front water fillers TIA Water treatment system
 Fig 1. Original Appearance Side raves Sanding gear Front water fillers TIA Water treatment system 4500G - 3 Fig 2. Rebuilt Condition Cut down side raves with fire iron tunnels# TIA removed and replaced
Lima XPT/HST Re-Powering Conversion
 Lima XPT/HST Re-Powering Conversion Please read through these instructions before beginning the conversion process. Non-Powered Bogie The front non-powered bogie is the starting point for this conversion.
10' Building Instructions for kit CC25 Caledonian Railway 20 Ton Brake Van
 Jim Smellie Mar. 1995 10' Building Instructions for kit CC25 Caledonian Railway 20 Ton Brake Van 20 TONS 3 5360 0 Caley Coaches Ltd CC25 Building Instructions Section 1 Prototype Notes A batch of 40 of
Palatine Models. The Palatine Models Alex Jackson Turner Bending Jig. Introduction
 Palatine Models The Palatine Models Alex Jackson Turner Bending Jig Introduction This jig was designed by Graham Turner and written about in the book Alex Jackson The Man and the Coupling by Dave Booth,
Photo-Etch Demonstration Notes. Presented at the AMPS Central SC August 11, 2011 Meeting
 The basic steps in using PE up-date sets: Photo-Etch Demonstration Notes Presented at the AMPS Central SC August 11, 2011 Meeting 1. Plan Use 2. Cut Part from Fret / Clean up Burrs 3. Bend / Form Part
Furness Railway Wagon Co. Glasgow & South Western Railway/LMS/BR ton Box Van Steel Under-Frame
 Furness Railway Wagon Co. Glasgow & South Western Railway/LMS/BR 1920 10ton Box Van Steel Under-Frame Wheels, paint and transfers required to complete. Please note that to aid the folding of the various
SCHWERE PLATTFORMWAGON TYPE SSY 60TON
 TWS 5094 SCHWERE PLATTFORMWAGON TYPE SSY 60TON Congratulations on purchasing one of the finer aftermarket resin kits sets available. The photo below is of the completed kit. The Panther tank is not included
Brassmasters
 Brassmasters www.brassmasters.co.uk Scale Models LONDON & NORTH EASTERN RAILWAY 4200 GALLON GROUP STANDARD TENDER KIT Designed by Martin Finney 4MM SCALE OO - EM - P4 INSTRUCTIONS AND PROTOTYPE NOTES PO
Swift assembly guide
 Swift assembly guide Download the assembly guide at www.scihighmodels.com/swift.pdf Sample kit shown with aluminium bells (available with the Deluxe kit) Shown here without main tanks Version 10/12/2010
WARNING! ETCHED PARTS CONTAINED IN THIS KIT HAVE SHARP POINTS, EDGES AND CORNERS.
 MPD18 chassis build instructions K A (see below for details) J I G H L C D F E B M Parts list: Ident Quantity A Etched Nickel/Silver fret 1 B Wheel sets 2 C Worms 2 D Worm gears 2 E Shaft adapters 2 F
Tool Wagon Assembly Instructions
 Tool Wagon Assembly Instructions Adhesives Wood to wood joints are best done with a PVA wood glue but a good quality, slow acting (beware of instant grab ) cyanoacrylate super glue can be used if preferred.
6043 DESIGN AND TECHNOLOGY
 UNIVERSITY OF CAMBRIDGE INTERNATIONAL EXAMINATIONS GCE Ordinary Level www.xtremepapers.com MARK SCHEME for the October/November 2008 question paper 6043 DESIGN AND TECHNOLOGY 6043/01 Paper 1 (Technology),
GWR Fruit Van Diagram Y2 Manufactured by: WEP Models: 23 Wellington Court, Best Street, Cradley Heath, and WARLEY B64. Tel:
 GWR Fruit Van Diagram Y2 Manufactured by: WEP Models: 23 Wellington Court, Best Street, Cradley Heath, and WARLEY B64. Tel: 01384 566059. These were very long-lived vehicles, introduced in the 1890's and
FINNEY7 SR 5500G TENDER IN ORIGINAL CONDITION
 IN ORIGINAL CONDITION Fig 1. Original Appearance Side raves Sanding gear TIA Water treatment system 5500G - 3 5500G TENDER IN REBUILT CONDITION Fig 2. Rebuilt Condition Cut down side raves with fire iron
1. Underframe/Tank Bottom
 1. Underframe/Tank Bottom The construction process for the Class X tank cars is a little different as there is no true underframe. Instead we will use the tank bottom as part of the underframe, attaching
MIDLAND RAILWAY JOHNSON 6-WHEEL 3,250g TENDER
 MIDLAND RAILWAY JOHNSON 6-WHEEL 3,250g TENDER These tenders were built in large numbers together with others of varying water capacity. During their life some were fitted with water pickup apparatus and
Please contact us at BLMAmodels.com for any spare part requests.
 BLMA Models 16623 Pear Blossom Ct. Whittier, California 90603 Phone: 562-712-7085 Ssales@blmamodels.com Cantilever Signal Bridge Instructions Thank you for purchasing this fine-scale model! This bridge
Woodchip Loader All Scales
 Woodchip Loader All Scales Before Starting PREPARING BRASS The easiest way to remove the brass parts from the sheet they are produced on, is to use rail nippers. The brass is soft and won't affect their
Claymore Kits NBR/LNER 2500 Gallon Tender For Class J36
 Claymore Kits NBR/LNER 2500 Gallon Tender For Class J36 Connoisseur Models, 1 Newton Cottages, Nr Weobley, Herefordshire, HR4 8QX, Telephone 01544 318263, Proprietor Jim McGeown Page 1, Digital scan of
NSWGR Z12 CLASS LOCOMOTIVE AND TENDER KIT
 Australian Railway Kits ABN: 27 416 246 418 Incorporating Main West Models Manufacturers, Wholesalers and Retailers of Quality Australian Model Railways PO Box 252 Warwick, Queensland, 4370 Australia Phone/Fax:
1909 Santos Dumont Demoiselle
 Historic Wings 1:72 Metal Kit of the Copyright unknown 1909 Santos Dumont Demoiselle History, Notes and Assembly Instructions History Alberto Santos-Dumont was born in Brazil on July 20, 1873, the young
Scratch Built: Live Steam Garratt
 Scratch Built: Live Steam Garratt BY Bill Allen Woodside, CA. USA (Live Steam/Topic: Garratt build photos) (Live Steam/Topic: Garratt Photos Boiler & Cab Construction) (Live Steam/Topic: Tools & Gizmos
VICTORIAN RAILWAYS GY WAGON
 C/- P.O. Rhyll, Victoria, 3923. VICTORIAN RAILWAYS GY WAGON Prototype Notes The GY wagon fleet was one of the largest single classes of goods vehicle in VR service and was primarily a bulk commodities
Shay Cab - Floor & Roof
 Shay Cab - Floor & Roof Nelson Riedel Nelson@NelsonsLocomotive.com Initial: 1/20/04 Last Revised: 06/06/2004 Cab Floor: A cab floor was made at the same time as the tender floor. I was unhappy with some
Rumney Models 4mm Scale BR Grampus Detailing
 Rumney Models 4mm Scale BR Grampus Detailing Notes This set of instructions covers Rumney Models kit B.109. This set of etches is designed to provide new baskets and detailing for the Parkside Dundas BR
Instructions: GSC 60 Flatcar Kit with or without bulkheads Tangent Part Number: and /2016
 Instructions: GSC 60 Flatcar Kit with or without bulkheads Tangent Part Number: 11000-01 and 11000-02 5/2016 Thank you for purchasing the Tangent Scale Models GSC 60 Flatcar Kit! A few quick notes before
1949 to 1954 Chevrolet Dual Master Cylinder Conversion
 1949 to 1954 Chevrolet Dual Master Cylinder Conversion This document is a one stop shop to getting your brake system updated on your old Chevy. Whether you re going with a disc conversion or just sticking
Converting a Bachmann Class 45 model to 45133
 Converting a Bachmann Class 45 model to 45133 Bachmann have yet to produce an accurate OO gauge model of a Class 45/1. The 45/1s that have been produced were let down by the presence of steam heat details
Southern Pacific C-30-4/6 Bay Window Caboose N-Scale & HO-Scale
 Southern Pacific C-30-4/6 Bay Window Caboose N-Scale & HO-Scale Before Starting PREPARING BRASS The easiest way to remove the brass parts from the sheet they are produced on, is to use rail nippers. The
Instructions: Bethlehem 70 ton Riveted Gondola Kit
 Instructions: Bethlehem 70 ton Riveted Gondola Kit Kit number 10900 01 Steel Floor or 10900 02 Wood Floor 8/2012 Parts included in this kit: 95004 01 Plastic Part Body Shell (either steel or wood floor
Tips on Assembly If you are new to etched kits these tips will help you with general assembly of not just this kit but also other etched kits.
 1 RT Models NGLK004 4mm scale, 009 gauge Harrogate Gas works Peckett 0-6-0ST History The prototype was built in 1944 by Peckett and Sons of Bristol for the Harrogate gasworks. The locomotive was built
Building Rudy Kouhoupt s Walking-Beam Engine
 Building Rudy Kouhoupt s Walking-Beam Engine Some time ago I came across a copy of Rudy Kouhoupt s article: "Build this Walking-Beam Engine" (Popular Mechanics August 1969), and decided to try and make
CA to each one. You may have to hold the end down while to glue sets or use an accelerator like I did.
 The following information and photographs are what I did to build the kit. Your methods and needs may differ from this which is fine. There is no right or wrong way if you are used to scratch building.
End tipping and runner wagons
 End tipping and runner wagons These wagons are based on, but not identical to, those used at the "Pike Brothers Tramway", also known as the "Furzebrook Railway". Exact replicas are difficult as photographic
Rumney Models GWR & SR 20T Tunny Wagon Chassis Instructions
 Rumney Models GWR & SR 20T Tunny Wagon Chassis Instructions Notes This set of instructions covers the Rumney Models GWR & SR 20T Tunny wagon chassis kit B.35. It is designed to provide an accurate underframe
London & North Eastern Railway Radial Tank, Class F5
 London & North Eastern Railway 2-4-2 Radial Tank, Class F5 Prototype. This class was originally built by the GER from 1903. They were initially the mainstay of the London suburban service but later worked
NGLK005 4mm scale, 009 gauge Statfold Barn Rly Peckett 0-6-0ST
 1 RT Models NGLK005 4mm scale, 009 gauge Statfold Barn Rly Peckett 0-6-0ST History The prototype was built in 1944 by Peckett and Sons of Bristol for the Harrogate gasworks. The locomotive was built with
4. Instrument Panel Support
 Instrument Panel installation for serial numbers 52 to current Section Objective: Installation of the instrument panel pod. Installation of all the accessories including; vents gas strut supports, engine
Design and Technology Resistant materials Key words and definitions
 Design and Technology Resistant materials Key words and definitions Word Acrylic Definition a type of thermoplastic, which is hard and can be transparent. Used to make shop signs. Perspex is a trade/brand
Tools and Tips: ( 1 )
") Tools and Tips: As you build instructions will show in my many picture manual how to assemble. You can use your own methods as you desire, my results are very good. A smooth, flat work surface is very
Tools and Tips: As you build instructions will show in my many picture manual how to assemble. You can use your own methods as you desire, my results are very good. A smooth, flat work surface is very
Instructions For Corrugated End Van
 Instructions For Corrugated End Van This kit contains the following items QTY ITEM QTY ITEM QTY ITEM 1 Floor 2 Van Ends 1 Roof 2 Van Sides 2 Sole Bars 4 Axle Boxes 4 Bearings 2 Coupling Hooks 2 Split Pins
Assembly Instructions 10 X 10 Aluminum Roof Support
 Assembly Instructions 10 X 10 Aluminum Roof Support Aluminum Roof Support Bolt Package 16-5/16 X 2 ¼ SS Bolt 24-5/16 X 1 SS Bolt 40-5/16 SS Nylon Lock Nuts 16-5/16 SS Flat Washers 28-4 ½ Wood Screws 36-1
Tools and Tips: ( 1 )
") Tools and Tips: As you build instructions will show in my many picture manual how to assemble. You can use your own methods as you desire, my results are very good. A smooth, flat work surface is very
Tools and Tips: As you build instructions will show in my many picture manual how to assemble. You can use your own methods as you desire, my results are very good. A smooth, flat work surface is very
CONSTRUCTION. Signal base.
 This booklet is put together purely to explain how we have constructed signals using our range of signal components which in themselves were produced at the behest of Graham Warburton Signalling Guru of
the wire, less is better. And make sure the bends on each truss wire are in line with the other. See the next photo.
 The following information and photographs are what I did to build the kit. Your methods and needs may differ from this which is fine. There is no right or wrong way if you are used to scratch building.
V twin cylinder steam engine
 V twin cylinder steam engine I got inspired to make this V twin steam engine after reading R. Griffinn s build articles in ME 4396. It is based on Stuart s V-twin double-acting oscillator, but since I
G. Building the Cab, Cab Roof and Cab Boiler Extension Page 14 and Backhead.
 G. Building the Cab, Cab Roof and Cab Boiler Extension Page 14 and Backhead. Cab. In order to ensure that the cab and tender would actually look right, as what often appears on a drawing is not always
LNER IMP P Agricultural Implement Wagon
 - 0 Gauge - LNER IMP P Agricultural Implement Wagon PROTOTYPE. Seventeen of these wagons were built by the NER in 1916 for the transportation of farm machinery, tractors and small portable engines. These
PS 5077 cu. ft. Boxcar with EOC device. 1:29 scale resin craftsman kit. by Burl Rice
 PS 5077 cu. ft. Boxcar with EOC device 1:29 scale resin craftsman kit by Burl Rice www.burlrice.com Bill of materials (not included): Thick/medium viscosity CA PL adhesive, or Gorilla Glue Heavy Duty Construction
EDM Models. Styrene Floor San Juan Trucks [2]
![EDM Models. Styrene Floor San Juan Trucks [2]](/thumbs/86/94093855.jpg "EDM Models. Styrene Floor San Juan Trucks [2]") EDM Models 19 Briar Avenue Acomb York Y026 5BX Introduction Thanks for buying this kit. This small range of tender kits started life as aids to scratch building modified tenders to go with Bachmann Moguls
EDM Models 19 Briar Avenue Acomb York Y026 5BX Introduction Thanks for buying this kit. This small range of tender kits started life as aids to scratch building modified tenders to go with Bachmann Moguls
VICTORIAN RAILWAYS QB WELL WAGON
 C/- P.O. Rhyll, Victoria, 3923. VICTORIAN RAILWAYS QB WELL WAGON Prototype Notes QB1 was constructed at the VR Newport workshops in 1902. That was the sole representative of the class until a construction
Instructions for Assembly of 9ft WB Wooden Underframe Kit
 Instructions for Assembly of 9ft WB Wooden Underframe Kit Prototype Notes Suitable Prototypes PO RCH 1923 7-plank minerals PO 8-plank minerals PO RCH 1923 5-plank merchandise LMS wooden mineral LMS wooden
Assembly Instructions 10 X 10 Aluminum Frame Building
 Assembly Instructions 10 X 10 Aluminum Frame Building 27 97 9 8 47 36 74 52 10 10 X 10 Square Building W/ Dome Includes: The Steel Entry Door with a Dead Bolt Lock assembly and Aluminum Door Frame. Metal
Pump Assembly. Lloyd Matthews September 2013
 Pump Assembly Lloyd Matthews September 2013 Before proceeding with this part of the build, the author recommends that Pt. No 227 1 mm diameter Brass Wire Figure H1, is replaced with 0.8 mm straight brass
CONCEPT MODELS INSTRUCTIONS FOR PRODUCT 60,000 GALLON TANK CAR El Toro Way Stockton, CA 95210
 CONCEPT MODELS Web Address: http://www.con-sys.com Email: concept_models@con-sys.com 8810 El Toro Way Stockton, CA 95210 INSTRUCTIONS FOR PRODUCT 60,000 GALLON TANK CAR 2 CONCEPT MODELS PARTS GATX/UTLX
Build the. Steam Locomotive. Pack 06
 Build the Steam Locomotive Pack 06 Build the Steam Locomotive Contents Step by step Stage 38: The boiler band Stage 39: Sand spreader pipe main cocks Stage 40: Building up the dome Stage 41: The sand spreader
CONNOISSEUR MODELS LMS FOWLER 4F 3500 GALLON TENDER
 CONNOISSEUR MODELS LMS FOWLER 4F 3500 GALLON TENDER This kit has been designed to provide a set of quality components that will allow the modeller, who has basic kit building skills, to build an 0 gauge
Plastic Welding Experiences
 Plastic Welding Experiences In the past I have advocated plastic solvent welding with ABS solvent to rejoin ABS plastic parts without repainting. Solvent is inexpensive but it does takes considerable time
AUTO STABILIZING AND LEVELLING SYSTEM
 Installation Manual Make sure the caravan is parked in a safe place. Make sure the caravan brake is on. Remove all 4 corner steady legs from the caravan. Remove the corner steady legs by removing the 3
Instructions: PS-2CD 4000 Model Kit Revised 7/2008
 Instructions: PS-2CD 4000 Model Kit Revised 7/2008 Plastic Parts included: Body shell Parts Sprue #1 Roof, trainline, gravity outlet gates, and centersill/endsill pieces Parts Sprue #2 Underframe bolster
N Scale Concrete Coal Dock Instruction Manual
 N Scale Concrete Coal Dock Instruction Manual 1. General Overview This kit combines precision laser cut acrylic, photo etched brass and wood parts to make a highly detailed model of the Roberts and Schaefer
Darjeeling Coach 4-Wheel First/Second Class
 Darjeeling Coach 4-Wheel First/Second Class Introduction This kit was designed in 16mm scale from early Darjeeling drawings and photographs. It uses brass castings available from Brandbright. The instructions
20 ORE CAR INSTRUCTIONS. Kit )rv \M TAURUS PRODUCTS P.0. BOX 6534 ORANGECA m WeWWW. Dronerty efi N456 Inc.
rv \M TAURUS PRODUCTS P.0. BOX 6534 ORANGECA m WeWWW. Dronerty efi N456 Inc.") 20 ORE CAR Kit 3305 - INSTRUCTIONS TAURUS PRODUCTS )rv \M P.0. BOX 6534 ORANGECA. 92667 m WeWWW Dronerty efi N456 Inc. Thank you for selecting this TAURUS PRODUCTS kit. We sincerely hope that you will
20 ORE CAR Kit 3305 - INSTRUCTIONS TAURUS PRODUCTS )rv \M P.0. BOX 6534 ORANGECA. 92667 m WeWWW Dronerty efi N456 Inc. Thank you for selecting this TAURUS PRODUCTS kit. We sincerely hope that you will
Turkey Football Panel
 Turkey Football Panel PROJECT TITLE: Turkey Football Turkey Football Panel A Stained Glass Project DESIGNED BY: Jeanne Baruth for Diamond Tech SKILL LEVEL: (Adult 1-5 1 being the easiest, 5 being difficult)
STEAM AND THINGS 16MM SCALE VR NBC ETCHED BRASS KIT CONSTRUCTION
 STEAM AND THINGS 16MM SCALE VR NBC ETCHED BRASS KIT CONSTRUCTION SUPPLEMENTARY NOTES Some additional tools are recommended: Due to the thickness of the brass and the long lengths an 18 bending brake is
Detailing kit for Bachmann LNWR/LMS G and Tender. Instructions. Additional components available separately:
 Brassmasters Scale Models www.brassmasters.co.uk Detailing kit for Bachmann LNWR/LMS G2 0-8-0 and Tender Instructions Additional components available separately: 3-piece early pattern coupling rods Jointed
CONCEPT MODELS INSTRUCTIONS FOR THE KASGRO KRL SPECIAL DEPRESSED CENTER FLAT CARS El Toro Way Stockton, CA 95210
 CONCEPT MODELS Web Address: http://www.con-sys.com Email: concept_models@con-sys.com 8810 El Toro Way Stockton, CA 95210 INSTRUCTIONS FOR THE KASGRO KRL 204000-2 SPECIAL DEPRESSED CENTER FLAT CARS 2 CONCEPT
Building Easitrac Turnouts
 Building Easitrac Turnouts This material is part of the forthcoming 2MM Track Handbook. As it is likely to be several months before the Handbook is published the committee felt that in view of the current
Rumney Models BR 20T Grampus Wagon Chassis Instructions
 Rumney Models BR 20T Grampus Wagon Chassis Instructions Notes This set of instructions covers the Rumney Models BR 20T Grampus wagon chassis kit B.34. It is designed to provide an accurate unfitted underframe
GWR Macaw B Bogie Bolster. Building a Diagram J4 with moveable bolster pins, complete with all chains from a Conniosseur kit.
 GWR Macaw B Bogie Bolster. Building a Diagram J4 with moveable bolster pins, complete with all chains from a Conniosseur kit. Jim M c Geown s kit for the Macaw, designed to build a vehicle that covers
40 & 50 Foot PS-1 Box Car Assembly Instructions
 40 & 50 Foot PS-1 Box Car Instructions Push the #2100 coupler/stirrup assembly onto the ends of the metal floor. Slide them into the slots and slightly lift the ends (wings), then press firmly on the front
CONVERTING CAMBRIAN MODELS FOX BOGIES TO 45MM GAUGE AND SIERRA VALLEY STEEL WHEELS WITH BALL BEARINGS
 CONVERTING CAMBRIAN MODELS FOX BOGIES TO 45MM GAUGE AND SIERRA VALLEY STEEL WHEELS WITH BALL BEARINGS Parts list (photograph 1) 1 pair Cambrian Models Fox Bogies 4 x Sierra Valley gauge 1, 25mm diameter
Introduction: The model should be assembled following the sequence of the stages of construction described in these instructions.
 Victoria Bestell-Nr. 3082/00 Introduction: The model should be assembled following the sequence of the stages of construction described in these instructions. The laser-cut components are individually
1910 Bristol Boxkite
 Historic Wings 1:72 Metal Kit of the Copyright unknown 1910 Bristol Boxkite History, Notes and Assembly Instructions History The Bristol Boxkite was an improved version of the early Henri Farman biplane,
Legacy Magnet Pen Kit
 Description: The Magnet pen model is a variation of the Slimline pen and considered one of the most basic pen kits and is a great starter kit for those new to pen turning. Sometimes called the Refrigerator
Installation for Full Size Polaris Ranger Crew Doors
 Installation for Full Size Polaris Ranger Crew Doors Order of Installation: Heater Doors Wiper on to Windshield Windshield Top & Back Panel Note: Most of the steps in these instructions need to be repeated
General Purpose Flat Wagon
 General Purpose Flat Wagon This is a freelance model of a flat wagon used by any number of railways for transporting large and awkward loads. The kit includes optional load securing rings and a pair of
1909 Bleriot XI La Manche
 Historic Wings 1:72 Metal Kit of the 1909 Bleriot XI La Manche History, Notes and Assembly Instructions History Louis Blériot (1 July 1872 2 August 1936) was a French aviator, inventor and engineer. In
GWR Glass Wagon - Coral 'A' Diagram D2
 GWR Glass Wagon - Coral 'A' Diagram D2 Manufactured by: WEP Models, 30 Milcote Road, Bearwood, SMETHWICK, B76 5BN Telephone; 0121 429 4086 (after 7pm) An unusual, and rare, prototype What's in the Box?
Part 2 Section 2 POINTWORK
 Part 2 Section 2 POINTWORK Issued November 2001 2.4 Basic turnout construction For those modellers who wish to build their own turnouts, there is a range of construction materials and methods to choose
Steel-Cylinder Slidevalve Steam Engine
 Steel-Cylinder Slidevalve Steam Engine By Thor Hansen After making a single cylinder slide valve engine with a rectangular Cast Iron cylinder I decided to try and make a similar engine with a cylinder
Continue gluing the remaining top parts ensuring the angled piece is glued well. Set aside and let dry. See photo below
 Radiator rev 1.1 The SE5a s radiator is one of the most recognized radiators in WW1. It is one of the components that defines the SE5a. The original SE5a has seen multiple radiator designs used during
Additional Parts List:
 THE TIME MACHINE Additional Parts List: In addition to the cast resin parts enclosed in this kit, there should also be a plastic bag containing the following items needed to complete your time machine
Explorer Wiring Kit (assembled)
") Explorer Wiring Kit (assembled) For Vintage, Firestorm & Standard Series Please Read All Instructions Before Beginning. Tools you will need: Soldering Iron (35 watt preferably) Solder Wet Sponge Wire Clippers
Explorer Wiring Kit (assembled) For Vintage, Firestorm & Standard Series Please Read All Instructions Before Beginning. Tools you will need: Soldering Iron (35 watt preferably) Solder Wet Sponge Wire Clippers
SE5a Instrument Board part 2 - rev 1.1
 SE5a Instrument Board part 2 - rev 1.1 Fuel (Petrol) Valve This valve uses two circular name plates, eight brass screws, one black plastic base, copper wire and two black plastic risers. You can pick any