Adding Buffers to the SEM Z van
|
|
|
- Diane Ellis
- 5 years ago
- Views:
Transcription


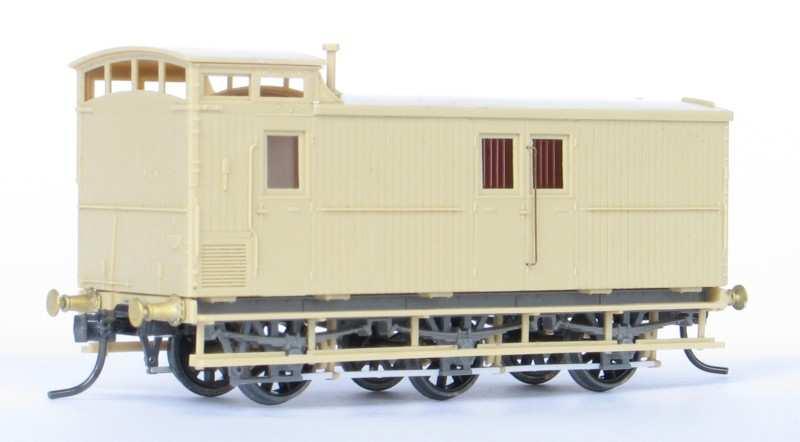
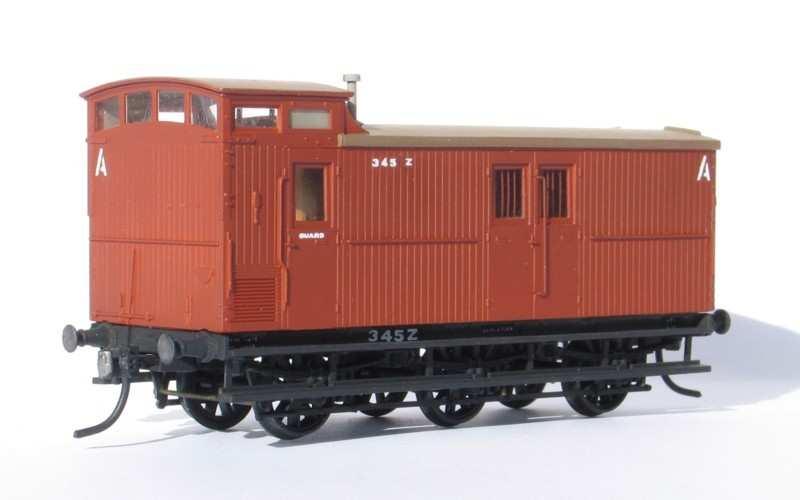
1 Adding Buffers to the SEM Z van Throughout the 1930s, 40s and early 50s the Victorian Railways carried out a program of conversion of rolling stock to auto couplers, with a particular emphasis on goods rolling stock. By 1957 this program was deemed to be complete, buffers were removed from the goods vehicle fleet and shunter s steps were bolted to the left hand end of the headstocks. For whatever reason, the fleet of Z vans escaped this program of buffer removal and it was not until long travel draft gear was fitted to an individual Z van, being recoded ZL in the process, that the buffers were removed. Most of the remaining Z vans that were not converted to ZL were withdrawn and scrapped by the mid 1960s. Because they were fitted with dual automatic and screw couplings, the ZP vans retained their buffers for their entire lives, being recoded as ZD in the mid 1970s. All of this means that any Z or ZP vans operating on a model railway set in the 1950s up to the mid 1960s should either be fitted with buffers, or be coded as ZL. It should also be borne in mind that the first Z vans to be converted to ZL were the four wheelers and it was not until the early 60s that significant numbers of six wheel ZL vans appeared. Fortunately it is not too difficult to fit buffers to the Z van kit and suitable investment cast brass buffers are also available. Most Z vans used the standard buffers with a tapered housing, but six wheel vans numbered were fitted with IZ buffers when built in Because the underframe of the finished model needs to be painted black, whereas the body is either wagon red for a Z van or passenger car red for a ZP, painting is simplified if the headstocks are separated from the ends. The first step is to use a sharp knife to score across the groove between the headstocks and the body on each end moulding, including a cut through the uncoupling lever and the air pipe moulded on the cupola end. Bend the headstocks away from the end and back again and the headstocks should snap off from the end. The break is not quite as clean as when polystyrene sheet is cut by this method, but a couple of passes with a large file soon removes any stray rags. Put the corresponding parts back together on a flat surface and check that they fit together neatly, with the same small gap between the end and the headstock that the moulding started with. The headstocks feature moulded relief that represents the holes where the buffers were once attached, so it is a simple matter to use the central mark in each pattern to drill, by hand, 1.0mm holes for the buffers. If building a ZP, which was fitted with locomotive buffers, or a van fitted with IZ buffers, the holes will need to be 2.0mm, to suit the larger spigot on the back of these castings.


2 The underframe is assembled as for a standard kit, although leave the side steps off until later, as they are rather fragile. Once the cement has hardened, rub each end of underframe over the sanding board that was used to remove the draft from the top edges of the side sills. This will ensure that the ends of the side sills are flush with the ends of the floor. Also assemble the sides and ends of the body, to form an open box. If the model is to be fitted with standard tapered buffers or locomotive buffers, cement a small piece of square polystyrene strip to the floor in the area where the couplers will be attached. Once these two sub-assemblies are completed, place the body on the underframe, with the body located by the brackets projecting from the edges of the floor. Make sure the body is orientated the correct way around and offer up the appropriate headstock beneath each end. When the detail on the headstocks lines up with that on the body, apply a small amount of solvent cement behind each headstock to attach it to the floor moulding. Now remove the body, so there is no possibility of accidentally attaching the body to the underframe. Once the cement has hardened, cut each buffer casting from its sprue, so there is just a short spigot remaining behind each casting, which will locate in the holes drilled in the headstocks. Attach the buffer castings with super-glue or contact cement. Because the flange at the base of each buffer projects above the headstocks, a small crescent shaped divot needs to be cut in each end at each buffer location with a 4mm chainsaw file. Each crescent should be about three boards wide and centred under the fourth board from each corner, but check the fit of the body against the underframe as work progresses. To attach the body to the underframe I followed the approach used by Graeme Brown on his four wheeled van, described in the August 2000 AMRM. Cement a piece of 1.5mm polystyrene sheet, 10mm x 30.5mm, inside each end of the body, spaced 0.8mm up from the base of the sides.


3 The buffers aren t sprung, so each coupler will need to be spaced out from the face of the headstocks, to allow the models to operate on curves down to about 60cm radius. For the Z van with standard wagon buffers glue a piece of x Evergreen strip behind the lip on the top of the Kadee No58 coupler box. For a ZP use x strip. This step will not be necessary if using IZ buffers. Cement the couplers to the underframe. Once the cement has hardened, use a 2.0mm drill to drill through the central hole in the coupler draft gear box and through the floor. Now position the body on top of the underframe and use the 2.0mm drill to mark the position of the holes in the underside of the pieces of polystyrene glued in the body earlier. Drill 1.6mm holes on these marks and tap the holes M2. The body can be secured to the underframe with M2 x 8mm screws.

4 The rest of the construction is as per a standard Z van.
5
VICTORIAN RAILWAYS QR BOGIE OPEN WAGON
 C/- P.O. Rhyll, Victoria, 3923. VICTORIAN RAILWAYS QR BOGIE OPEN WAGON Prototype Notes QR number 1 was built at the VR Newport workshops in 1889, being the forerunner of a long lived and useful class of
VICTORIAN RAILWAYS GY WAGON
 C/- P.O. Rhyll, Victoria, 3923. VICTORIAN RAILWAYS GY WAGON Prototype Notes The GY wagon fleet was one of the largest single classes of goods vehicle in VR service and was primarily a bulk commodities
1. Underframe/Tank Bottom
 1. Underframe/Tank Bottom The construction process for the Class X tank cars is a little different as there is no true underframe. Instead we will use the tank bottom as part of the underframe, attaching
HOn3-118 Denver, Boulder & Western Box Car
 HOn3-118 Denver, Boulder & Western Box Car 30 32 35 29 28 34 Door and Track on End Opposite Brake Wheel ONLY 31 3 36 2 6 24 33 Deadwoods Center Line of Coupler 27 We would like to thank you for purchasing
Furness Railway Wagon Co. Glasgow & South Western Railway/LMS/BR ton Box Van Steel Under-Frame
 Furness Railway Wagon Co. Glasgow & South Western Railway/LMS/BR 1920 10ton Box Van Steel Under-Frame Wheels, paint and transfers required to complete. Please note that to aid the folding of the various
Instructions: Bethlehem 70 ton Riveted Gondola Kit
 Instructions: Bethlehem 70 ton Riveted Gondola Kit Kit number 10900 01 Steel Floor or 10900 02 Wood Floor 8/2012 Parts included in this kit: 95004 01 Plastic Part Body Shell (either steel or wood floor
VICTORIAN RAILWAYS QB WELL WAGON
 C/- P.O. Rhyll, Victoria, 3923. VICTORIAN RAILWAYS QB WELL WAGON Prototype Notes QB1 was constructed at the VR Newport workshops in 1902. That was the sole representative of the class until a construction
Instructions: GSC 60 Flatcar Kit with or without bulkheads Tangent Part Number: and /2016
 Instructions: GSC 60 Flatcar Kit with or without bulkheads Tangent Part Number: 11000-01 and 11000-02 5/2016 Thank you for purchasing the Tangent Scale Models GSC 60 Flatcar Kit! A few quick notes before
40 & 50 Foot PS-1 Box Car Assembly Instructions
 40 & 50 Foot PS-1 Box Car Instructions Push the #2100 coupler/stirrup assembly onto the ends of the metal floor. Slide them into the slots and slightly lift the ends (wings), then press firmly on the front
Instructions: PS-2CD 4000 Model Kit Revised 7/2008
 Instructions: PS-2CD 4000 Model Kit Revised 7/2008 Plastic Parts included: Body shell Parts Sprue #1 Roof, trainline, gravity outlet gates, and centersill/endsill pieces Parts Sprue #2 Underframe bolster
Instructions For Corrugated End Van
 Instructions For Corrugated End Van This kit contains the following items QTY ITEM QTY ITEM QTY ITEM 1 Floor 2 Van Ends 1 Roof 2 Van Sides 2 Sole Bars 4 Axle Boxes 4 Bearings 2 Coupling Hooks 2 Split Pins
Peter Krause ABN
 Peter Krause ABN 25 736 637 163 T/as O-Aust Kits PO Box 743 ALBANY CREEK QLD 4035 AUSTRALIA Phone +61 (0)7 3298 6283 (7.00pm to 9.30pm ONLY) Facsimile +61 (0)7 3298 6287 (24 hours) Mobile 0419 680 584
Trim down the piece of casting being pointed to with the tip of the pencil in the first picture. It is only the 'inboard casting that needs to be
 1. File off the moulding pips from the wheel flanges. File the ends of the tube smooth and de-burr. Assemble the wheel sets with a drop of car engine oil on the axles. Glue the wheel sets into place. 2.
Tool Wagon Assembly Instructions
 Tool Wagon Assembly Instructions Adhesives Wood to wood joints are best done with a PVA wood glue but a good quality, slow acting (beware of instant grab ) cyanoacrylate super glue can be used if preferred.
20 ORE CAR INSTRUCTIONS. Kit )rv \M TAURUS PRODUCTS P.0. BOX 6534 ORANGECA m WeWWW. Dronerty efi N456 Inc.
rv \M TAURUS PRODUCTS P.0. BOX 6534 ORANGECA m WeWWW. Dronerty efi N456 Inc.") 20 ORE CAR Kit 3305 - INSTRUCTIONS TAURUS PRODUCTS )rv \M P.0. BOX 6534 ORANGECA. 92667 m WeWWW Dronerty efi N456 Inc. Thank you for selecting this TAURUS PRODUCTS kit. We sincerely hope that you will
20 ORE CAR Kit 3305 - INSTRUCTIONS TAURUS PRODUCTS )rv \M P.0. BOX 6534 ORANGECA. 92667 m WeWWW Dronerty efi N456 Inc. Thank you for selecting this TAURUS PRODUCTS kit. We sincerely hope that you will
PS 5077 cu. ft. Boxcar with EOC device. 1:29 scale resin craftsman kit. by Burl Rice
 PS 5077 cu. ft. Boxcar with EOC device 1:29 scale resin craftsman kit by Burl Rice www.burlrice.com Bill of materials (not included): Thick/medium viscosity CA PL adhesive, or Gorilla Glue Heavy Duty Construction
C/- P.O. Rhyll, Victoria, 3923.
 C/- P.O. Rhyll, Victoria, 3923. FREIGHT AUSTRALIA VHGF BULK GRAIN HOPPER WAGON Prototype Notes: Tulloch Limited of Rhodes, N.S.W., constructed an initial batch of one hundred aluminium wheat hopper wagons
DIY MODELS THRALL 5-UNIT ARTICULATED WELL CAR W. Canyon Creek Dr. Maricopa, AZ
 THRALL 5-UNIT ARTICULATED WELL CAR DIY MODELS 44609 W. Canyon Creek Dr. Maricopa, AZ 85139-5019 DIMENSIONS Length End Units 56 2-5/16 Width (Inside Well at Bottom) 8-1 3/4 Length, Inter. Units 50 13-3/4
NSWGR Class SRC Refrigerated Wagon Kitset in 7mm Scale
 O-Aust Kits PO Box 743 ALBANY CREEK QLD 4035 AUSTRALIA Phone +61 (0)7 3298 6283 (7.00pm to 9.30pm ONLY) Facsimile +61 (0)7 3298 6287 (24 hours) Mobile 0419 680 584 Email pa_rl_krause@bigpond.com Web www.oaustkits.com.au
GWR Macaw B Bogie Bolster. Building a Diagram J4 with moveable bolster pins, complete with all chains from a Conniosseur kit.
 GWR Macaw B Bogie Bolster. Building a Diagram J4 with moveable bolster pins, complete with all chains from a Conniosseur kit. Jim M c Geown s kit for the Macaw, designed to build a vehicle that covers
CONVERTING CAMBRIAN MODELS FOX BOGIES TO 45MM GAUGE AND SIERRA VALLEY STEEL WHEELS WITH BALL BEARINGS
 CONVERTING CAMBRIAN MODELS FOX BOGIES TO 45MM GAUGE AND SIERRA VALLEY STEEL WHEELS WITH BALL BEARINGS Parts list (photograph 1) 1 pair Cambrian Models Fox Bogies 4 x Sierra Valley gauge 1, 25mm diameter
the wire, less is better. And make sure the bends on each truss wire are in line with the other. See the next photo.
 The following information and photographs are what I did to build the kit. Your methods and needs may differ from this which is fine. There is no right or wrong way if you are used to scratch building.
CA to each one. You may have to hold the end down while to glue sets or use an accelerator like I did.
 The following information and photographs are what I did to build the kit. Your methods and needs may differ from this which is fine. There is no right or wrong way if you are used to scratch building.
CONCEPT MODELS INSTRUCTIONS FOR THE KASGRO KRL SPECIAL DEPRESSED CENTER FLAT CARS El Toro Way Stockton, CA 95210
 CONCEPT MODELS Web Address: http://www.con-sys.com Email: concept_models@con-sys.com 8810 El Toro Way Stockton, CA 95210 INSTRUCTIONS FOR THE KASGRO KRL 204000-2 SPECIAL DEPRESSED CENTER FLAT CARS 2 CONCEPT
Class Car Electric Multiple Unit
 Class 310 4-Car Electric Multiple Unit The Class 310 first appeared in 1965, working outer-suburban services from London Euston to Birmingham, as well as local services around the West Midlands. These
SM21D SJA conversion for Bachmann MEA wagon.
 The preparation of the etch is straightforward. Bends can be made using ordinary pliers and hand pressure. They do not require the use of bending jigs such as hold and fold. 90 0 folds have the half etch
Modular Locomotive System Instruction Manual for HBK22 Fowler Body Kit
 Modular Locomotive System Instruction Manual for HBK22 Fowler Body Kit Roundhouse Engineering Co. Ltd. Units 6-10 Churchill Business Park. Churchill Road, Wheatley. Doncaster. DN1 2TF. England. Tel. 01302
Billy Body Kit HBK5 CHECKLIST. Modular Locomotive System Instruction Manual for HBK5 Billy Body Kit. Checked
 Billy Body Kit HBK5 CHECKLIST 1 Cab body panel (folded). 1 Cab floor. 1 Cab front panel. 1 Roof. 1 Body tank support. 2 Boiler bands with M2 Long Steel Screws & Nuts fitted. 1 Brass dome. 1 Cast brass
10" E-Series D-Series - Pair. kit includes (14) (4) (4) It is strongly recommended that this product be installed by a professional.
 (4) (4) It is strongly recommended that this product be installed by a professional.") 2014 GMC 1500 grille installation instructions 10" E-Series D-Series - Pair kit includes (14) (14) (4) 5 /16-18x 5 /8 Button Socket 5 /16-18 Low Profile Nylock Nut M6-1.0x30mm Button Head Socket (14) (4)
2014 GMC 1500 grille installation instructions 10" E-Series D-Series - Pair kit includes (14) (14) (4) 5 /16-18x 5 /8 Button Socket 5 /16-18 Low Profile Nylock Nut M6-1.0x30mm Button Head Socket (14) (4)
28 ft. Ventilated (Combination) Box Car
 Box Car") 28 ft. Ventilated (Combination) Box Car Introduction This laser cut wood kit is an HO scale model of a 28 ft. Ventilated (also known as a Combination) Box Car. The model is based on the Illinois Central
28 ft. Ventilated (Combination) Box Car Introduction This laser cut wood kit is an HO scale model of a 28 ft. Ventilated (also known as a Combination) Box Car. The model is based on the Illinois Central
NISSAN NV200 CHEVY CITY EXPRESS WALL LINER KIT INSTALLATION INSTRUCTIONS
 NISSAN NV200 CHEVY CITY EXPRESS WALL LINER KIT INSTALLATION INSTRUCTIONS NOTES: 1. Before commencing, remove all wall liners and D Rings already installed in the vehicle. 2. Consult layout PDF and compare
End tipping and runner wagons
 End tipping and runner wagons These wagons are based on, but not identical to, those used at the "Pike Brothers Tramway", also known as the "Furzebrook Railway". Exact replicas are difficult as photographic
O-Aust Kits. QR Class CLF Louvred Wagon Kitset in O Scale 1:48
 O-Aust Kits PO Box 743 ALBANY CREEK QLD 4035 AUSTRALIA Phone +61 (0)7 3298 6283 (7.00pm to 9.30pm ONLY) Facsimile +61 (0)7 3298 6287 (24 hours) Mobile 0419 680 584 Email pa_rl_krause@bigpond.com Web www.oaustkits.com.au
CONCEPT MODELS SP DOUBLE STACK CONTAINER CARS INSTRUCTIONS Sheep Ranch Rd. Mountain Ranch, CA Web Address:
 CONCEPT MODELS Web Address: http://www.con-sys.com 8331 Sheep Ranch Rd. Mountain Ranch, CA 95246 SP DOUBLE STACK CONTAINER CARS INSTRUCTIONS 2 CONCEPT MODELS PARTS Item No. PART NO. DESCRIPTION QTY. 1
Ford Ranger / Bronco II Set Part # Rev B 5-04
 Ford Ranger / Bronco II Set Part # 21008 Rev B 5-04 Step 1: Prior to Installation: A) Fit: Verify the fit of the flares to vehicle. (Some filing, sanding, or cutting may be necessary to ensure proper fit).
EXTREME LOAD no. TWO
 1602 - EXTREME LOAD no. TWO Kit Features: 22' 4 " x 14' x 3'-6 Oversize Load 49mm (1.9") actual height Bolt Head Details Welded Load Mounting Fins Painting Handles Tools Required: Hobby Knife Tweezers
Installing Body Mounted Kadee Couplers on LGB Housecars
 Installing Body Mounted Kadee Couplers on LGB Housecars Steven C. Seitel Before (left) and after (right) This easy conversion replaces the stock hook and loop couplers on the LGB housecars with Kadee knuckle
1:20.3-scale Tionesta Valley Nº 111 caboose
 Plan set #78 :20.3-scale Tionesta Valley Nº caboose by Ted Stinson Wiscasset, Maine This is a :20.3-scale caboose that closely follows the lines of the Tionesta Valley s Nº caboose. This is the first drawing
WW04 BR. 25 Ton Low-Mac
 1 WW04 BR. 25 Ton Low-Mac History. The Lowmac, code name for a low machine wagon was the most popular of all the special wagons built by BR, totalling 510 examples. These wagons were spread over fourteen
Lima XPT/HST Re-Powering Conversion
 Lima XPT/HST Re-Powering Conversion Please read through these instructions before beginning the conversion process. Non-Powered Bogie The front non-powered bogie is the starting point for this conversion.
Baltimore & Ohio I-1 Caboose
 Baltimore & Ohio I-1 Caboose S Scale Kit 4051 (wide platform) B&O Class I-1 Cabooses The class I-1 cabooses were the first 8-wheel system standard cabooses produced on the Baltimore & Ohio Railroad. The
Set Part # Rev
 Set Part # 21007 Rev-3 06-06-11 Step 1: Prior to Installation: A) Bushwacker only approves installing the flares according to these written instructions with the hardware provided. WARNING: Failure to
4832A Installation Sheet Part List
 4832A Installation Sheet Part List (1) 4016A-43-003 Qty 1- (2) 4016A-43-002 Qty 1- (3) 4016A-43-001 Qty 2- (4) 4016A-10-005 Qty 1- (5) 4016A-43-004L Qty 1- Mounting Bolt Kit (A) (K) Qty 2 - Qty 6 - M10
SCHWERE PLATTFORMWAGON TYPE SSY 60TON
 TWS 5094 SCHWERE PLATTFORMWAGON TYPE SSY 60TON Congratulations on purchasing one of the finer aftermarket resin kits sets available. The photo below is of the completed kit. The Panther tank is not included
-1- Coach Instructions.
 -1- Coach Instructions. Insert the bogie pivot pins through the bottom of the coach body ensuring the dimples fit into the recesses. Glue the.06 x.25 short strips each side of the pivot head, bridge the
Brassmasters
 Brassmasters www.brassmasters.co.uk Scale Models LONDON & NORTH EASTERN RAILWAY 4200 GALLON GROUP STANDARD TENDER KIT Designed by Martin Finney 4MM SCALE OO - EM - P4 INSTRUCTIONS AND PROTOTYPE NOTES PO
Elastic-powered Bus : Assembly Instructions
 Elastic-powered Bus : Assembly Instructions Assembly Instructions 1. Carefully cut out the parts. 2. Fold along the dotted lines, making mountain or valley folds as indicated. 3. Attach the glue spots
General Purpose Flat Wagon
 General Purpose Flat Wagon This is a freelance model of a flat wagon used by any number of railways for transporting large and awkward loads. The kit includes optional load securing rings and a pair of
GWR Fruit Van Diagram Y2 Manufactured by: WEP Models: 23 Wellington Court, Best Street, Cradley Heath, and WARLEY B64. Tel:
 GWR Fruit Van Diagram Y2 Manufactured by: WEP Models: 23 Wellington Court, Best Street, Cradley Heath, and WARLEY B64. Tel: 01384 566059. These were very long-lived vehicles, introduced in the 1890's and
Installing your SHOE KEEL
 Installing your SHOE KEEL The shoe keel is there solely to protect the bottom of the hull. On a windy day, it will offer some resistance to a side or quartering wind and will help to avoid being blown
FINNEY7 4500G May17 SR 4500G TENDER. Fig 1. Original Appearance. Side raves Sanding gear Front water fillers TIA Water treatment system
 Fig 1. Original Appearance Side raves Sanding gear Front water fillers TIA Water treatment system 4500G - 3 Fig 2. Rebuilt Condition Cut down side raves with fire iron tunnels# TIA removed and replaced
Bolt-On Fender Flares Nissan Titan XD (16-ON) Important: Please read instructions entirely before installing this product.
 Important: Please read instructions entirely before installing this product.") Important: Please read instructions entirely before installing this product. Hardware Included QTY Hardware Included QTY Bolt Kit Included Extrusion 30.5ft (Bolt-On look flare only) QTY U CLIP.6mm 6 Nuts
Important: Please read instructions entirely before installing this product. Hardware Included QTY Hardware Included QTY Bolt Kit Included Extrusion 30.5ft (Bolt-On look flare only) QTY U CLIP.6mm 6 Nuts
CONCEPT MODELS UTLX 80006,80020 CRYOGENIC TANK CAR KIT INSTRUCTIONS Sheep Ranch Rd. Mountain Ranch, CA 95246
 CONCEPT MODELS Web Address: http://www.con-sys.com Email: concept_models@con-sys.com 8331 Sheep Ranch Rd. Mountain Ranch, CA 95246 UTLX 80006,80020 CRYOGENIC TANK CAR KIT INSTRUCTIONS 2 CONCEPT MODELS
Midland Railway, Midland Scottish Joint Stock, Midland & Great Northern Joint Railway LMS & LNER. Clayton 31ft 6-wheel arc roof carriages
 Midland Railway, Midland Scottish Joint Stock, Midland & Great Northern Joint Railway LMS & LNER Clayton 31ft 6-wheel arc roof carriages Introduction These notes apply to all five MR Clayton 6-wheel carriages
WPS crew Doors Installation instructions
 WPS-132-133 crew Doors Installation instructions ORDER OF INSTALLATION FOR A COMPLETE ENCLOSURE OF A CREW WPS (Weather Protection System) IS AS FOLLOWS: 1. Heater 2. Rear Thresholds - Right Hand & Left
SER-Kits ASSEMBLY INSTRUCTIONS SER/LBSCR HORSEBOX WITHOUT GROOM S COMPARTMENT HB42
 SER-Kits ASSEMBLY INSTRUCTIONS SER/LBSCR 1842-1905 HORSEBOX WITHOUT GROOM S COMPARTMENT HB42 PLEASE READ BEFORE STARTING THE KIT INTRODUCTION SER-Kits passenger stock kits use high quality resin that withstands
NSWGR Z12 CLASS LOCOMOTIVE AND TENDER KIT
 Australian Railway Kits ABN: 27 416 246 418 Incorporating Main West Models Manufacturers, Wholesalers and Retailers of Quality Australian Model Railways PO Box 252 Warwick, Queensland, 4370 Australia Phone/Fax:
G. Building the Cab, Cab Roof and Cab Boiler Extension Page 14 and Backhead.
 G. Building the Cab, Cab Roof and Cab Boiler Extension Page 14 and Backhead. Cab. In order to ensure that the cab and tender would actually look right, as what often appears on a drawing is not always
SER/SE&CR/SR VAN - ASSEMBLY INSTRUCTIONS
 SER/SE&CR/SR VAN - ASSEMBLY INSTRUCTIONS PLEASE READ BEFORE STARTING THE KIT INTRODUCTION I produced the moulds for this kit in order to speed up my own model-making. Since there are hardly any kits for
Class Car Electric Multiple Unit
 Class 312 4-Car Electric Multiple Unit The Class 312 4-car EMU first appeared in 1975, intended for outer-suburban services on Eastern and London Midland Region Lines. Three batches were produced: Class
Kit 6.00 ACF Type 27, Class ,000 Gallon Insulated Tank Cars
 Kit 6.00 ACF Type 27, Class 103 10,000 Gallon Insulated Tank Cars Introduction Warranty Thank you for your interest in Resin Car Works and this kit. Resin Car Works is not a business in the traditional
This is a modified, 1:22.5 scale, SR&RL
 Build a :22.5-scale SR&RL caboose by Ted Stinson Wiscasset, Maine Plan set #95A This is a modified, :22.5 scale, SR&RL caboose. It closely follows the lines of the Nº 556 SR&RL caboose. However, the model
North London Railway (NLR) Ballast Wagon
 Ballast Wagon") North London Railway (NLR) Ballast Wagon Laser cut kit Gauge 3 (13.5mm scale) Adhesive, buffers, wheels, couplings not included Diagram3d: www.diag3d.com Page 1 Contents Chassis Parts This kit contains
North London Railway (NLR) Ballast Wagon Laser cut kit Gauge 3 (13.5mm scale) Adhesive, buffers, wheels, couplings not included Diagram3d: www.diag3d.com Page 1 Contents Chassis Parts This kit contains
GENERAL INSTRUCTIONS. Woodland Scenics PO BOX 98, LINN CREEK, MO woodlandscenics.com PREPARE PLASTIC PARTS PREPARE METAL CASTINGS
 #40700 Popa Weelie's Saloon INSTRUCTIONS CAUTION: Cutting tools recommended. Use with care. This item is not a Children s Product and is not intended for use by Children. Conforms to Health Requirements
Rumney Models 4mm Scale BR Grampus Detailing
 Rumney Models 4mm Scale BR Grampus Detailing Notes This set of instructions covers Rumney Models kit B.109. This set of etches is designed to provide new baskets and detailing for the Parkside Dundas BR
Heat up PE parts with lighter before use, brass will soften and become easy to bend and work with
 Diamond T 968 was a cargo truck based on a 4 ton 6x6 chassis, powered with a Hercules RXC six-cylinder gasoline engine and equipped with a five-speed overdrive transmission and a direct and under drive
7mm/0Gauge BRF 025 ZUV SHARK Plough Brake. Building Instructions
 Tel 07807 225801 www.prmrp.com 7mm/0Gauge BRF 025 ZUV SHARK Plough Brake Building Instructions SCALE MODEL PRODUCT FOR ADULT MODELLERS ONLY. WHITE METAL CONTAINS LEAD WASH HANDS AFTER USE. MAY CONTAIN
CUT OUT FLARES INSTALLATION INSTRUCTIONS FOR 20017, 20018, F100-F150 F250-F350 P.U. & BRONCO CUT OUTS
 20017 04/22/03 REV-A CUT OUT FLARES INSTALLATION INSTRUCTIONS FOR 20017, 20018, F100-F150 F250-F350 P.U. & BRONCO CUT OUTS Tools Required for Installation: (A) 3/16 Drill Bit (B) Pop-Rivet Gun (C) Air
Cobra X Q Construction Tips Construction: Bel y pan
 Cobra X Q Construction Tips : The white plastic in this kit is high impact styrene. It can be painted with most types of coatings if light coats are applied this is necessary due to the thickness of the
Kits SE #1.1 and SE #1.2 GATX Type 30 Class 103 8,000 Gallon Tank Car
 Kits SE #1.1 and SE #1.2 GATX Type 30 Class 103 8,000 Gallon Tank Car Introduction Thank you for your interest in Resin Car Works and this kit. Resin Car Works is not a business in the traditional sense.
COMPLIMENTARY WOODWORKING PLAN
 COMPLIMENTARY WOODWORKING PLAN COFFEE TABLE PLAN This downloadable plan is copyrighted. Please do not share or redistribute this plan in any way. It has been paid for on your behalf by JET Tools, a division
Assembly Instructions 10 X 10 Aluminum Roof Support
 Assembly Instructions 10 X 10 Aluminum Roof Support Aluminum Roof Support Bolt Package 16-5/16 X 2 ¼ SS Bolt 24-5/16 X 1 SS Bolt 40-5/16 SS Nylon Lock Nuts 16-5/16 SS Flat Washers 28-4 ½ Wood Screws 36-1
STEP 1 : DESTROYER FRONT BUMPER INSTALL GATHER YOUR TOOLS AND LAY OUT YOUR PARTS... *shorty bumper to show hardware* Tools Required:
 DESTROYER FRONT BUMPER INSTALL JL STEP 1 : GATHER YOUR TOOLS AND LAY OUT YOUR PARTS... Tools Required: - Utility knife - 11/16 Deep socket - Ratchet - 11/16 Crescent wrench - Ratchet Extension - 1/4 socket
MIDLAND RAILWAY JOHNSON 6-WHEEL 3,250g TENDER
 MIDLAND RAILWAY JOHNSON 6-WHEEL 3,250g TENDER These tenders were built in large numbers together with others of varying water capacity. During their life some were fitted with water pickup apparatus and
V twin cylinder steam engine
 V twin cylinder steam engine I got inspired to make this V twin steam engine after reading R. Griffinn s build articles in ME 4396. It is based on Stuart s V-twin double-acting oscillator, but since I
If by chance a part is missing or broken please contact us indicating the kit name and part description and we will send you a replacement.
 Six Stall Roundhouse Instructions for Assembly of the HO Scale Six Stall Roundhouse Roundhouse Kit Contents: 18ea. Roof Pieces 12 ea. 1/16" Parts Sheets 9ea. 1/8" Parts Sheets 12ea. Floor Pieces 1ea. 1/4"
Bowser drive assembly.
 Bowser drive assembly. Since the late 90s the Bowser drive has become the de-facto drive for repowering HO trolley cars. While other available drives fit certain situations the Bowser seems to be the first
BRF-012 Type OTA Timber Wagon. Building Instructions
 Tel 07747 018544 www.prmrp.com BRF-012 Type OTA Timber Wagon Building Instructions SCALE MODEL PRODUCT FOR ADULT MODELLERS ONLY. WHITE METAL CONTAINS LEAD WASH HANDS AFTER USE. MAY CONTAIN SMALL PARTS.
Nigel Lawton mm or 16.5mm gauge O-14 or O HP WDLR Simplex Locomotive Kit
 Nigel Lawton 009 14mm or 16.5mm gauge O-14 or O-16.5 20HP WDLR Simplex Locomotive Kit This is a model of the War Department Light Railways 20HP Simplex petrol-mechanical locomotive which were used to supply
Slicing Jig For Pen Inlays
 Slicing Jig For Pen Inlays By Randall Smith (randyrls) May 2008 This article has been downloaded from the library of the International Association of Penturners. www.penturners.org You are welcome to reproduce
D E S I G N A N D M A N U F A C T U R E : C O U R S E M A T E R I A L
 UNIT D E S I G N A N D M A N U F A C T U R E : C O U R S E M A T E R I A L metalwork processes Screw Threads The screw thread is a very important detail in engineering. It is used to hold parts together.
WARNING! ETCHED PARTS CONTAINED IN THIS KIT HAVE SHARP POINTS, EDGES AND CORNERS.
 MPD18 chassis build instructions K A (see below for details) J I G H L C D F E B M Parts list: Ident Quantity A Etched Nickel/Silver fret 1 B Wheel sets 2 C Worms 2 D Worm gears 2 E Shaft adapters 2 F
Installation Guide 406TH
 Installation Guide 406TH (High Roof Shown) Kargo Master Rancho Cordova, CA 95742 800-343-7486 CustomerService@KargoMaster.com DATE: Installation Instructions 406TH *PLEASE READ ALL INSTRUCTIONS AND WARNINGS
Swift assembly guide
 Swift assembly guide Download the assembly guide at www.scihighmodels.com/swift.pdf Sample kit shown with aluminium bells (available with the Deluxe kit) Shown here without main tanks Version 10/12/2010
The Rubley Building Instructions for Assembly of the N scale kit. v1.1
 The Rubley Building Instructions for Assembly of the N scale kit. v1.1 Kit Contents: 197 ea. laser cut 1/16" acrylic parts. 1ea. adhesive backed.020 styrene part. 10 ea..060 x 1" styrene alignment pins.
Shay Cab - Floor & Roof
 Shay Cab - Floor & Roof Nelson Riedel Nelson@NelsonsLocomotive.com Initial: 1/20/04 Last Revised: 06/06/2004 Cab Floor: A cab floor was made at the same time as the tender floor. I was unhappy with some
Assembly Instructions 10 X 10 Aluminum Frame Building
 Assembly Instructions 10 X 10 Aluminum Frame Building 27 97 9 8 47 36 74 52 10 10 X 10 Square Building W/ Dome Includes: The Steel Entry Door with a Dead Bolt Lock assembly and Aluminum Door Frame. Metal
 Building Tip TIP 1: Painting Metal You may want to superdetail your loco before painting. We suggest that you do not paint your loco until it is thoroughly track tested as disassembly and handling generally
DIY Kalimba Thumb Piano
 DIY Kalimba Thumb Piano By Caleb Schepart of nykalimba.com This DIY Kalimba Thumb Piano build is made using materials, tools, and supplies that are commonly found at a home improvement center, or at a
PRO Brake Operating Instructions
 PRO Brake Operating Instructions Tapco Products Company P R O 9 a n d P R O B r a k e s PRO Brake System PRO Cut Off Gauge Simplifies cutting. PRO Cut-Off Quickly, safely, and easily makes factory quality
10' Building Instructions for kit CC25 Caledonian Railway 20 Ton Brake Van
 Jim Smellie Mar. 1995 10' Building Instructions for kit CC25 Caledonian Railway 20 Ton Brake Van 20 TONS 3 5360 0 Caley Coaches Ltd CC25 Building Instructions Section 1 Prototype Notes A batch of 40 of
Shed Assembly Instructions
 Shed Kit Contents The shed kit includes all the parts needed to assemble your shed except for tools and fasteners such as screws and nails. The various pieces are pre-cut and many are marked to indicate
The IntoPlay build. This section will show how to fill the components into the case halves, and also the case base, which will look like this:
 The IntoPlay build Ok, I presume you have read the sections about cutting the holes in the case front, speaker holes and spray painting, modding components, preparing the case, etc. So far, the guides
CONCEPT MODELS INSTRUCTIONS FOR UP DC-10 WING CAR El Toro Way Stockton, CA Web Address:
 CONCEPT MODELS Web Address: http://www.con-sys.com 8810 El Toro Way Stockton, CA 95210 INSTRUCTIONS FOR UP DC-10 WING CAR 2 CONCEPT MODELS PARTS DC-10 WING CAR Item No. Part No. DESCRIPTION QTY. 1 2003-1
LEGENDS RETRACTABLE DOOR SCREENS
 LEGENDS RETRACTABLE DOOR SCREENS MAGNETIC LATCHING DESIGN SYSTEM 42 I N S T A L L A T I O N I N S T R U C T I O N S 1 MOUNTING OPTIONS Recess : Mount the Screen Cassette using Recess Mounting Clips Recess
Rubber Grommet, 36 pcs. 3/4 Screw, 10 pcs. Nut, 10 pcs
 Jeep Cherokee ZJ Set Part #10916-07 Rev-2 03-11-10 THESE INSTRUCTIONS INVOLVE CUTTING THE FENDERS OF THE VEHICLE. IT IS IMPORTANT TO READ ALL INSTRUCTIONS PRIOR TO THE CUTTING AND INSTALLATION OF THESE
TITGEMEYER Tf1673GB(0517)1. GETO City Body Kit with a self-supporting base and without a base Assembly Instructions
1. GETO City Body Kit with a self-supporting base and without a base Assembly Instructions") TITGEMEYER Tf1673GB(0517)1 with a self-supporting base and without a base All rights reserved. The technical data quoted in this catalogue, performance descrip - tions, recommendations and instructions
TITGEMEYER Tf1673GB(0517)1 with a self-supporting base and without a base All rights reserved. The technical data quoted in this catalogue, performance descrip - tions, recommendations and instructions
Building Instructions
 Peter Besant Tel 07807225801 prmrp@fsmail.net www.prmrp.com Building Instructions 7mm/0Gauge BRL-067 Class 67 SCALE MODEL PRODUCT FOR ADULT MODELLERS ONLY. WHITE METAL CONTAINS LEAD - WASH HANDS AFTER
How to assemble the Reims Gueux Pit Centre Module #005
 How to assemble the Reims Gueux Pit Centre Module #005 We recommend quick drying super glue for our models. Just a few drops on the joining edges, press and hold them for a few seconds and the connection
CLUB-SPORT ROLL BAR: Volkswagen Mk4 Golf
 HPA Motorsports Inc. 604-888-7274 www.hpamotorsport.com CLUB-SPORT ROLL BAR: Volkswagen Mk4 Golf Congratulations on the purchase of your Club-Sport Roll Bar from HPA Motorsports! The engineering elements