MEMO. Assembly Manual. Warranty. Notice: Adult Supervision Required. No.3841
|
|
|
- Hubert Howard
- 6 years ago
- Views:
Transcription
 Warranty This kit is guaranteed to be free from defects in material and workmanship at the date of purchase. It does not cover any damage caused by use or modification.")

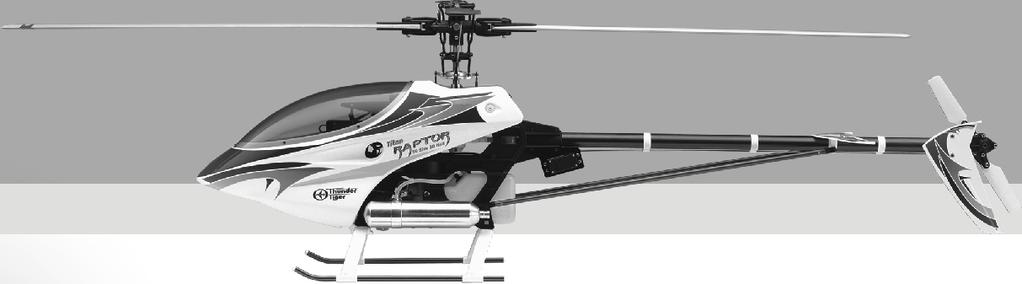
1 MEMO Assembly Manual No.3841 Specifications: Fuselage Length 54.6 (1387mm) Fuselage Width 15.7 (400mm) Fuselage Height 17.8 (452mm) Full Equipped Weight 8.5lbs (3860g) Warranty This kit is guaranteed to be free from defects in material and workmanship at the date of purchase. It does not cover any damage caused by use or modification. The warranty does not extend beyond the product itself and is limited only to the original cost of the kit. By the act of building this user-assembled kit, the user accepts all resulting in liability for damage caused by the final product. If the buyer is not prepared to accept this liability, it can be returned new and unused to the place of purchase for a refund. Notice: Adult Supervision Required This is not a toy. Assembly and flying of this product requires adult supervision. Read through this book completely and become familiar with the assembly and flight of this Ecureuil. Inspect all parts for completeness and damage. Browse for customer service if you encounter any problems JK6028


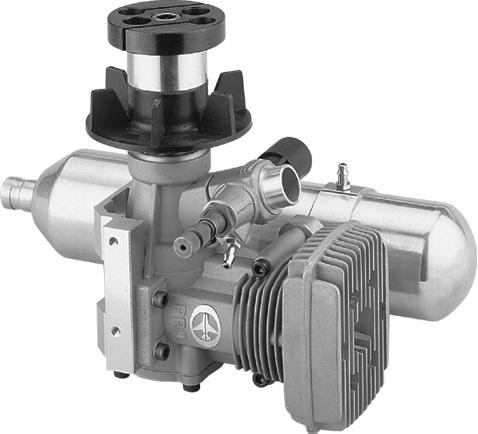
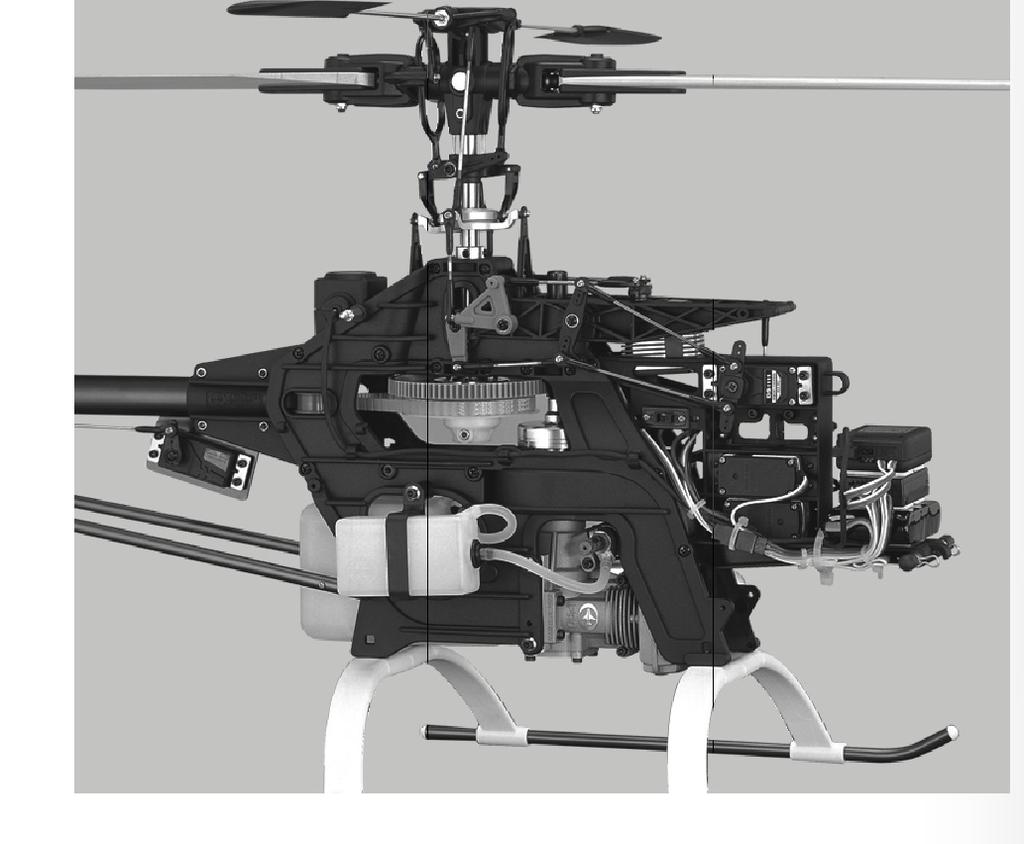
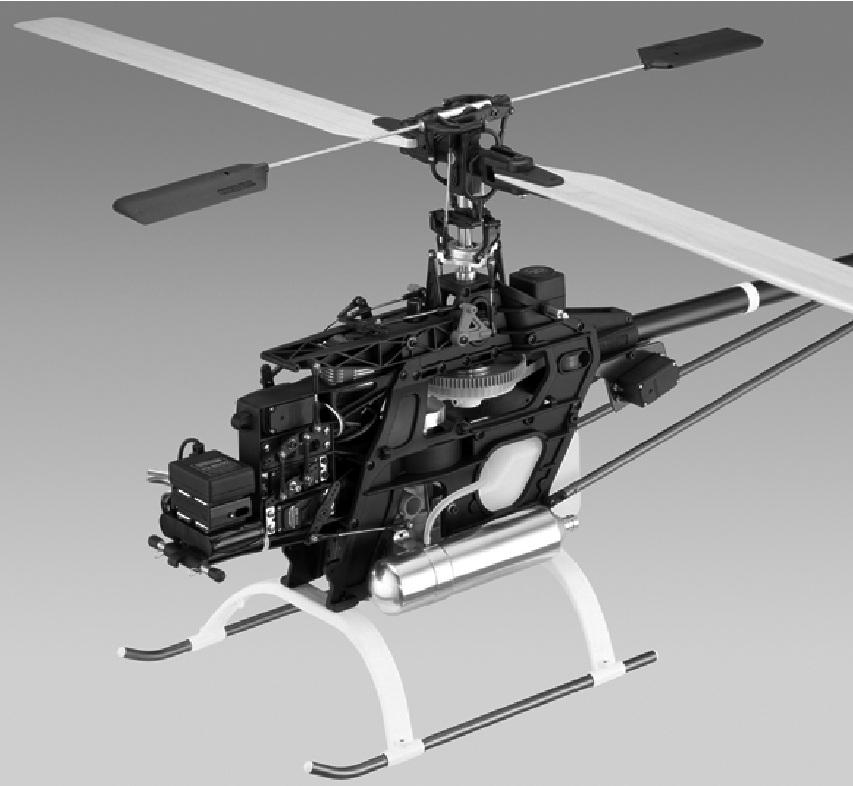
2 INTRODUCTION Congratulations on the purchase of our finest scale heli fuselage to date. This famous Ecureuil fits Thunder Tiger Raptor 50, the light fuselage comes factory pre-painted with all necessary hardware. It is very easy to assemble and only takes you few hours of enjoyable installation to put this scale body on your helicopter. This replica Ecureuil is just like a real thing, hovering this Ecureuil that will definitely make you stand out on the flying field. PRE-ASSEMBLY NOTES Before beginning the assembly read the instructions thoroughly to give an understanding of the sequence of steps and a general awareness of the recommended assembly procedures. By following these instructions carefully and referring to the corresponding pictures, the assembly of your model will be both enjoyable and rewarding. The result will be a well built, easy to assemble scale model, which you will be proud to display. This Ecureuil is designed for intermediate to advanced pilots, and this manual assumes a basic knowledge of R/C model construction. BEFORE YOUR ASSEMBLY 1. Before you start to assemble this fuselage on your helicopter, we suggest you to first fine tune your helicopter in the air. 2. Double-check all screws, then secure and Loctite all the loose screws. 3. The instruction manual is written for Raptor 50, if user should choose to install it on other branded helicopters, we would suggest you to study the manual thoroughly and see how it installed on a Raptor 50. Before you begin, check the entire contents of your kit against the parts list and photos to make sure that no parts are missing or damaged. This will also help you to become familiar with each component of your model. If you find that any of the parts are either missing or damaged, please contact your local Thunder Tiger authorized distributors for replacements. Neither your dealer nor Thunder Tiger authorized distributor can accept kits for return if construction has begun. Trial fit each part before gluing it in place. Make sure you are using the correct part and that it fits well before assembling. TABLE OF CONTENTS Introduction...2 Recommended Tools & Materials...3 Item You May Need...3 Parts Drawings Parts Check List...6 Assembly MEMO...16 RECOMMENDED TOOLS & MATERIALS Adhesives: Instant setting Cyanoacrylate adhesive (thin CA) Slow setting Cyanoacrylate adhesive (thick CA) 10 Minute Epoxy (fast)20~30 Minute Epoxy(slow) You will need two types of adhesives for the Ecureuil Epoxy and Instant (cyanoacrylate) adhesives. We recommend that you purchase both 5-minute and 30- minute epoxy to cut down on assembly time, but you can get by with only 30-minute epoxy if time is not important. You will also need a small bottle of both "Thick" and "Thin" instant CA adhesive. ITEMS YOU MAY NEED No.AT6078 Remote Glow Plug Extension Wire No Precision Fueler Valve R/C System: 6 Channel Heli radio req'd GYRO system req'd ITEM YOU MAY NEED Tools: Model Knife, 1/2" MASK Tape, Small & Medium Screwdrivers, Scissors, Long nose Pliers, Drill and Drill Bits (1/32",1/16",1/8", 5/64"), 150 Grid Sand Paper, Rat Tail and half- round file, Fine Felt Tip Pen & Soft Lead Pencil, Reamer, Hex Wrenches. Model assembly can be much easier if the proper tools are used. Therefore, we have included in our checklist to the left, a complete listing of all the tools we used to assemble our prototype models. No.1114,No.1114-Y Exhaust Diverter,10MM No cell 3600mAh Battery Helicopter: Raptor 50 Titan Suggested 2 TTR Raptor 50 Titan 3
3 PARTS DRAWINGS PARTS DRAWINGS PV6039 Fuselage PV6041 Decoration Set Wiper (2) Wiper Strut (2) Wiper Mount (2) H/F Antenna (4) 2.3x12mm Washer Wood Screw (1) Front Fuselage (1) Rear Fuselage (1) L/F Antenna (2) Pitot Tube (2) Handlebar (4) LED (1) Retaining Collar (18) 2x8mm 3x23mm Wood Screw (16) Socket Screw (2) Rubber Band (2) Horizontal Tail (1) Tail Skid (1) M2 Nut (2) 2x6mm Screw (2) Exhaust Pipe (2) Battery Tray (1) Doubler (16) Tail Transmission Case Cover (1) PV6042 Foam Retainer PV6043 Retaining Set PV6040 Windshield Tail Boom Foam Retainer (1) Plastic Tube(1) Post (2) Silicon Grommet (2) 3x10mm Washer Screw (2) PV6044 Landing Skid Front Windshield (1) Front Window L/1,R/1 Step Ladder (1) Skid Pipe Step Bar 3x4mm End Cap (2) Skid Joiner (4) Retainer (1) Foam Tape (8) Setscrew (10) M3 Locknut (5) Sunroof L/1,R/1 Rear Window L/1,R/1 3x14mm Socket Screw (2) 3x30mm Socket Screw (2) 3x15mm Self-tapping Screw (4) 3x20mm Self-tapping Screw (4) 2x5mm Wood Screw (1) 3x15mm Screw (1) Front Mounting Rear Mounting Strip (2) Strip (L/1,R/1) Skid Adaptor (F,2) Skid Adaptor (R,2) Step Bar (1) Bottom Window L/1,R/1 Front Lower Window L/1,R/1 Air Inlet L/1,R/1 2x5mm Wood Screw (52) Brace A (1) Brace B (1) Skid Pipe (2) 4 5

 Rear Fuselage (1) Horizontal Tail (1) Tail Transmission Case Cover (1) Exhaust Pipe (2) Battery Tray (1) Plywood (16)")
 Front Lower Window (L/1,R/1) Air Inlet (L/1,R/1) 2x5mm Wood Screw (52) Decoration Set Wiper (2) Wiper Strut (2) Wiper Mount (2) Retaining")
 Tail Skid (1) 2x6mm Screw (2) M2 Nut (2) Foam Retainer Tail Boom Foam Retainer (1) Plastic Tube (1) Retaining Set Post (2) Silicon")
 Skid Joiner (4) Foam Tape (8) Step Bar Retainer (1) Step Bar (1) Brace A (1) Brace B (1) Skid Pipe (2) M3 Locknut (5) 3x4mm Setscrew (10)")


4 PARTS CHECK LIST 1. Test flight your Raptor before the assembly. Once done the testing and adjusting your Raptor, remove the canopy, landing skid, tail fins, boom supports and tail rotor assembly. 4.Same way to secure the rear skid adaptor in place with 3x14mm socket screw and M3 locknut. Kit Contents Fuselage Front Fuselage (1) Rear Fuselage (1) Horizontal Tail (1) Tail Transmission Case Cover (1) Exhaust Pipe (2) Battery Tray (1) Plywood (16) Rudder Band (2) 2x8mm Wood Screw (16) 3x23mm Socket Screw (2) Windshield Front windshield (1) Front Window (L/1,R/1) Sunroof (L/1,R/1) Rear Window (L/1,R/1) Bottom Window (L/1,R/1) Front Lower Window (L/1,R/1) Air Inlet (L/1,R/1) 2x5mm Wood Screw (52) Decoration Set Wiper (2) Wiper Strut (2) Wiper Mount (2) Retaining Collar (18) L/F Antenna (2) Pitot Tube (2) Handlebar (4) LED (1) H/F Antenna (4) 2.3X12mm Washer Wood Screw (1) Tail Skid (1) 2x6mm Screw (2) M2 Nut (2) Foam Retainer Tail Boom Foam Retainer (1) Plastic Tube (1) Retaining Set Post (2) Silicon Grommet (2) 3x10mm Washer Wood Screw (2) Landing Skid Step Ladder (1) Skid Pipe End Cap (2) Skid Adaptor (F,2) Skid Adaptor (F,2) Front Mounting Strip (2) Rear Mounting Strip (L/1,R/1) Skid Joiner (4) Foam Tape (8) Step Bar Retainer (1) Step Bar (1) Brace A (1) Brace B (1) Skid Pipe (2) M3 Locknut (5) 3x4mm Setscrew (10) 2x5mm Wood Screw (1) 3x15mm Screw (1) 3x15mm Self-Tapping Screw (4) 3x20mm Self-Tapping Screw (4) 3x14mm Socket Screw (2) 3x30mm Socket Screw (2) 2.Replace the new body posts 3. Locate the front skid adaptor then secure the front skid adaptor in place with 3x30mm socket screw and M3 locknut. 5. Temporally assemble the landing skid as shown. Remember to install the bar retainer on left front brace. Install the foot step at right skid front end with 3x4mm set screw. Install the foot bar at left skid front end with 3x15mm screw and M3 locknut. Adjust the bar retainer so the foot bar is parallel with the skid then secure the bar retainer with 3x4mm setscrew. Insert the skid cap at the rear end of skid. 6. Let Raptor sit on the landing skid. Before you secure the joiners make sure the skids and joiners are adjusted properly. Secure the joint in place with 3x4mm setscrews. Hint: Do not over-tighten the setscrews on the joiner. 6 7

 hole at the bottom fin then secure the tail skid")
 hole at the center bottom line about 115mm(4 1/2 ) in front of the bottom")


 holes for antennas at position as photos shown.")


 to the end of boom. 17.")


5 7. Remove the Raptor mechanism then drill a 1.5mm pilot hole on foot bar. Do not drill through the foot bar. Next secure the bar with 2x5mm wood screw. 10. Epoxy the exhaust pipe in the fuselage as shown. 13. To install the tail skid in place, first drill 2mm(5/64 ) hole at the bottom fin then secure the tail skid with 2.3x 12mm wood screw. Next drill another 2mm( 5/64 ) hole at the center bottom line about 115mm(4 1/2 ) in front of the bottom fin. Apply epoxy to glue the front end of tail skid in place. 16. Before securing the Raptor in place, attach the foam tape to the contact area of the skid adaptors. This is to protect the contact area. 8. Locate and trim the molded marks for the engine cooling openings at the bottom of the fuselage. Enlarge the eight pre-drilled pilot holes to 3mm in diameter. 11. Drill 2mm (5/64 ) holes for antennas at position as photos shown. Install the antenna and use the retaining collar to secure the antenna in place. Apply CA on the collar to prevent it from loose. 14. Unthread the ball link and install the sponge on the tail boom section where the plastic tube for the sponge insertion. CA the tube in the sponge but be careful not to apply any glue inside the plastic tube and make sure the pushrod can move freely. Thread the ball link back to pushrod at the original position. Glue the sponge on tail boom but make sure the sponge will tight-fit in the fuselage. If Raptor 50 Titan is used then the position of sponge is about 70mm(2-3/4 ) to the end of boom. 17. Attach the landing skid in place then secure with mounting strip. Note there are three kind of the mounting strips. Two for from front skid brace and marked F. For rear skid brace, one for right marked R-R, the rest one is for left side. Secure the mounting strip in place with the selftapping screws. 3x15mm is for the front and 3x20mm is for the rear. 9. Apply foam tape at the mounting area of the landing skid. 12. Drill the hole on the molded dot. Next enlarge the hole at about 8mm in diameter. Insert the silicon grommet in the hole. 15. Place the Raptor into the fuselage, the post should be located near a molded dot on fuselage. Insert the tail boom into the fuselage and the skid adaptors sit in place, make sure the sponge is tightly fit in the tail and secure the tail boom firmly. Check the pushrod movement is freely without binding and adjust it if necessary. It is not necessary to glue sponge in the fuselage in case you had to remove the heli from fuselage. 18. Secure the fuselage with 3x10mm washer selftapping screw. 8 9


 and drill an exit hole at the bottom of the fuselage as shown.")

, sunroof (3 marks each), front side window (4 marks")
 holes then secure the windows in place.")


 pilot hole on case and fuselage.")
6 25. Cut the LED legs and glue the LED on the Fin for scale look. 19. You may need to install the remote glow plug extension wire (No.AT6078) for easy igniting as well as the precision fueler valve (No.1115) for easy fueling. 22. Same to the other side, trim away the fuselage where you may use tool to secure the locknut. 28. Drill two holes for handle bar one is 5/64 (2mm) and the other is 1/32 (1mm). Secure the handle bar in place with the retaining collar. Apply CA to prevent it from loose. Do the same way at the other side. 20. Install a diverter(no.1114 or 1114-Y) and drill an exit hole at the bottom of the fuselage as shown. You may extend the diverter to fuselage exhaust pipe to obtain a more scale-like look. 23. Trim the FRP case cover as shown to avoid any contact with the transmission case. 26. Trim windshield, sunroof and windows then trial fit in place. Carefully make drill marks on windshield (6 marks), sunroof (3 marks each), front side window (4 marks each), front lower window(4 marks each) and bottom window(3 marks each). Drill 1/16 (1.5mm) holes then secure the windows in place. Apply tiny Loctite or CA for each screw to prevent from loose. You may skip the installation rear side windows as it is easier for you in case of tuning engine or adjustment and it also gets better cooling. 29. Locate a laser-cut plywood then assemble the battery tray as shown. Firmly secure the battery tray with epoxy inside the front fuselage at the very front end. 21. Install the tail transmission case and tail rotor, remember to replace 3x23mm Socket Screws as indicated. You may need to trim the fuselage for easy installation of the ball link in place and clear out the space for tail pitch control lever. 24. Glue the plywood doublers at four corners inside the fuselage. Place the cover in position then drill 1.5mm(1/16 ) pilot hole on case and fuselage. Next Secure the cover in place with 2x8mm wood screws. 27. Install the fittings as shown includes wiper, pitot tube, antenna. Drill 2mm hole and use the retaining collar to hold the fitting in place. After adjusting the fitting properly, apply tiny CA on the collar to prevent it loosed. For wiper, secure the strut on the wiper mount with 2x6mm screw and M2 nut. Apply Loctite on the screw to prevent it from loose. 30. Suggest to use 4-cell 3600mAh NiMH battery (No.2890) for balance and longer flight time. Secure the battery in place with rubber band as shown


 pilot holes, next remove the front fuselage then epoxy the small")


7 31. Locate the vacuum formed decoration and place it as shown. Drill four 1/16" (1.5mm) mounting holes and secure it with four 2x5mm wood screws. 34. Trail fit the front fuselage to the rear fuselage. Decide the mounting holes then make marks on the fuselage. First drill 1.5mm(1/16 ) pilot holes, next remove the front fuselage then epoxy the small plywood doublers inside the rear fuselage where you drilled. Use the hole as the guide then drill again on these doublers. Before you secure the front fuselage, get an extension cord to connect battery and switch harness Finally secure the front fuselage in place with 2x8mm wood screws. Test Flight 1. When hovering your Ecureuil, try to keep rotor speed at approximately 1600~1700 RPM. 2. Check the helicopter and fuselage to see if any screw loosened after each flight. 3. Trim the elevator when switch on the Idle for speed flight if necessary. 32. Locate and trim the molded cutting line at tail of side fuselage for the horizontal tail. Trial fit the horizontal tail in the fuselage and make sure it is centered then secure the tail with epoxy 33. Route the antenna to the tail and drill 2mm(5/64 ) hole at the center bottom fuselage then tape it along the tail as shown. Reproduction authorized by 12 13


8 No
MEMO. Assembly Manual. Hughes 530 MD Scale Fiberglass Fuselage (TTR3837) Warranty
 Warranty") MEMO Assembly Manual Specifications: Fuselage Length (less rotor): 49" (1245mm) Fueslage Width (less rotor): 18.75"(475mm) Full Equipped Weight: 7.7 lbs (3500g) Hughes 530 MD Scale Fiberglass Fuselage
MEMO Assembly Manual Specifications: Fuselage Length (less rotor): 49" (1245mm) Fueslage Width (less rotor): 18.75"(475mm) Full Equipped Weight: 7.7 lbs (3500g) Hughes 530 MD Scale Fiberglass Fuselage
RYAN STA SAFETY PRECAUTIONS. "Sport Scale E-Power ARF" For Intermediate and Advanced Fliers. This radio control model is not a toy!
 RYAN STA "Sport Scale E-Power ARF" For Intermediate and Advanced Fliers. SAFETY PRECAUTIONS This radio control model is not a toy! First-time builders should seek advice from people with model building
25mm EPP SU31. Instruction Manual. Specifications
 25mm EPP SU31 Instruction Manual Specifications Wingspan: 39.4in (1000mm) Length: 42in (1070mm) Wing Area: 448sq in (28.9sq dm) Flying Weight: Approx. 1.5lb (650-710g) Dear Customer, www.valuehobby.com/su31-epp.html
Instruction Manual. Specification:
 Instruction Manual H I G Specification: Wingspan: 133 cm (52.3 inches) Length : 104 cm (40.9 inches) Weight : 1830gr Engine : 25-32 two stroke Radio : 4 channel - 4 servo H W I N G KIT CONTENTS: We have
Instruction Manual book
 Instruction Manual book ITEM CODE BH53. SPECIFICATION Wingspan : 1,250mm 49.21 in. Length : 930mm 36.61in. Weight : 1.1kg 2.42 Lbs. Parts listing required (not included). Battery: 3 CELLS-LI-POLY-11.1V-2,500
LANDING GEAR. 1. Fit landing gear into slots on bottom of fuselage.
 LANDING GEAR 1. Fit landing gear into slots on bottom of fuselage. 4. Use channel-lock pliers to press blind nuts into position (note: drilled hole should be slightly smaller than shaft of blind nut for
Corvus Racer CC
 Corvus Racer 540 35CC Item No:L-G035008 Specifications Wing Span Length Wing Area Flying Weight Glow Gasoline Electric Radio mm mm 1200sq in (77.4sqdm) 9.9-12lbs(4.5-5.5kg) 91-1.20(2C) 1.10-1.40(4C) 20-40cc
Assembly Manual / Airframe 65 Vyper SAFETY in Assembly SAFETY in Flying
 1 Assembly Manual / Airframe 65 Vyper Thank you for purchasing this 3DHobbyShop ARF RC aircraft. If you have any issues, questions, concerns or problems during assembly, please contact our tech department
Edge 540 V3 35CC. Scheme A. Item No:L G Specifications. Flying Weight
 Edge 540 V3 35CC Item No:L G035016 Specifications Wing Span Length Wing Area Flying Weight Glow Gasoline Electric Radio Description 76 (1930mm) 74 (1879mm) 1200sq in(77.4sqdm) 9.9 12lbs(4.5 5.5kg) 91 1.20(2C)
Assembly Manual PARTS DRAWING
 PARTS DRAWING AS670 Set Float () Assembly Manual AS670 Water Rudder Set AS67 Mounting Bracket Set Plug().x3mm Rivet().6x8mm Wood Screw() Plug w/rudder Bush () Rudder Shaft() Steering Arm() Water Rudder()
FORZA 700 SPEED Supplemental manual
 The FORZA 700 has evolved into a Speed Monster. The finely honed form minimizes air resistance, and the forward tilting rotor head helps transform all available power into speed. Fly beyond limits with
INSTRUCTION MANUAL BOOK.
 INSTRUCTION MANUAL BOOK. SPECIFICATION Wingspan : 164 cm 64.57in. Length : 135 cm 53.15 in. Weight : 3.3kg 7.26 lbs. Servo : 7 servos. Radio : 4 channels. Engine : 61 cu.in-2 stroke. 91 cu.in-4 stroke.
Specifications. Before commencing assembly, please read these instructions thoroughly.
 INSTRUCTION MANUAL Before commencing assembly, please read these instructions thoroughly. Specifications Wing Span: 8.5 in / 30 mm Wing Area: 330 sq in /.3 sq dm Flying Weight: 6 oz / 70 g Fuselage Length:
MECOA EZ-4061 Trainer
 MECOA EZ-4061 Trainer EZ-4061 is a newly designed, Almost Ready to Fly kit. It is an extremely easy to control trainer with strong construction and excellent aerodynamic performance. This is a great choice
Corvus Racer Colour schemes. AeroPlus RC Copyright 2013 All Rights Reserved
 Corvus Racer 540 59 Item No:A E050003 Specifications WING SPAN: 59"(1500mm) LENGTH: 54.1"(1374mm) WING AREA: 654sq.in.(42.2sq.dm.) FLYING WEIGHT: 4.6 5.3lbs(2000 2300g) Electric:Brushless outrunner 8Oz.
High performance 90mm fiberglass jet
 High performance 90mm fiberglass jet Assembly manual For intermediate and advanced fliers only! Specs Wingspan: 1255mm Fuselage length: 1250mm Flying weight: 2600-3000g Wing area: 22.6 dm² Wing loading:
FUSELAGE CONSTRUCTION
 FUSELAGE CONSTRUCTION Note: prior to building and gluing on the work surface use protective covering on your building surface. (wax paper or clear wrap) Fit the laser cut Fuselage Front and Fuselage Rear
Instruction Manual. Item No: AL001
 Instruction Manual Item No: AL001 Specifications: Wingspan: 2037mm (80.2 in) Length: 1677mm (66 in) Wing Area: 65.5dm2 (1015.3 sq in) Flying Weight: 7.6kg (16.7 lbs) Engine(not incl.): 45-50cc Gas Radio(not
CARL GOLDBERG PRODUCTS, LTD.
 Eagle 400 WARNING A radio-controlled model is not a toy and is not intended for persons under 16 years old. Keep this kit out of the reach of younger children, as it contains parts that could be dangerous.
1/6 PA-25 PAWNEE. *Specifications are subject to change without notice.*
 1/6 PA-25 PAWNEE INSTRUCTION MANUAL [ A335 Kit ] Wing Span : 72 in / 1830 mm Wing Area : 736 sq in / 47.5 sq dm Flying Weight : 6.6 lbs / 3000 g Fuselage Length : 48 in / 1220 mm Requires : "Glow Power"
Citabria Pro. Aerobatic Parkflyer. by Joel Dirnberger
 Citabria Pro Aerobatic Parkflyer by Joel Dirnberger Revision C: December 21, 2004 Citabria Pro Building Instructions Length: Wingspan: Wing Area: Flying Weight: Wing Loading: Functions: Specifications:
Extra 330LT CC. 2 Colour schemes H-G120001A ORACOVER FERRARI RED # ORACOVER WITH # ORACOVER BLACK # ORACOVER SILVER #
 Extra 330LT 85-125CC Item No:A-G120001 Specs: WING SPAN: LENGTH: WING AREA: FLYING WEIGHT: ENGINE: RADIO: Description Covering Material Carbon Fibre: 111 (2833mm) 100" (2530mm) 2139sq in (138sq dm) 25.3-28lbs
C-180 Builder s Manual
 C-180 Builder s Manual. May 20, 2002 Last revised July 11, 2002 Copyright! 2002 Douglas Binder, Mountain Models www.mountainmodels.com sales@mountainmodels.com (719) 630-3186 1 Required Equipment! Xacto
105" TIGER MOTH ARF INSTRUCTION MANUAL VERSION 1.0
 105" TIGER MOTH ARF INSTRUCTION MANUAL VERSION 1.0 Step 1. Installation of the aileron servos 1) Mount aileron servo to servo mounting blocks with servo s screws. Install servo mounting plate with screws.
STEP 1 STEP 2 STEP 3. Page 2
 INSTRUCTION MANUAL Congratulations on your purchase of the Bullet ARTF - the first Almost Ready to Fly version of this classic lowwinger. Based on the original and timeless Bullet design, the new Ripmax
Ryan STA Sport Scale Model Aircraft Assembly and Instruction Manual
 Ryan STA Sport Scale Model Aircraft Assembly and Instruction Manual Warning: This radio controlled model is not a toy. It requires skill to fly and is not recommended for the novice pilot. It should not
SZD-10 bis CZAPLA ASSEMBLY MANUAL IN PICTURES
 1 RUDDER Plan and parts: 2 Assembly steps: Photo above: glue together rudder spar, ribs and trailing edge. Clamp spar to a flat surface (chipboard on the photo) and make sure the straight aligment of the
PROCTOR. Instruction Manual Book 95% ALMOST READY TO FLY. Item code: BH154. SPECIFICATION ALL BALSA - PLY WOOD CONSTRUCTION. COVERED WITH ORACOVER
 Instruction Manual Book PROCTOR Item code: BH154. ALL BALSA - PLY WOOD CONSTRUCTION. COVERED WITH ORACOVER 95% ALMOST READY TO FLY SPECIFICATION Wingspan: 1,360 mm (53.54 in). Length: 1,480 mm(58.27 in).
Taylorcraft Indoor / Cul-De-Sac Flyer
 Taylorcraft Indoor / Cul-De-Sac Flyer Taylocraft Specifications Wingspan: 28.0 in. Wing Area: 117 sq. in. Weight (Ready to Fly): 3.0 3.1 oz. Wing Loading: 3.7 3.8 oz. / sq. ft. LIABILITY RELEASE In that
TIGER SHARK-40 ARF ASSEMBLY MANUAL
 TIGER SHARK-40 ARF ASSEMBLY MANUAL Kangke Industrial USA, Inc. 65 East Jefryn Blvd. Deer Park NY 11729 http://www.kangkeusa.com E-mail: info@kangkeusa.com Tel: 1-877-203-2377 Fax: 1-631-274-3296 Congratulations!
FAIREY ALBACORE. Instruction Manual Book. Glow and EP. Item code: BH % ALMOST READY TO FLY SPECIFICATION:
 Instruction Manual Book. FAIREY ALBACORE ALL BALSA - PLY WOOD CONSTRUCTION. COVERED IN A HEAT-SHRINK FILM WITH PRINTED. Glow and EP 95% ALMOST READY TO FLY SPECIFICATION: - Wingspan: 1,693mm (66.65in).
RESolution V2 Manual
 RESolution V2 Manual Note for the German Manual: Yellow Bottle thick CA Pink Bottle Med CA Blue tube 5 minute Epoxy Green tube 90 Minute Epoxy Construction of the Fuselage Step 1: Cover the plan with a
Admas A500. Specification:
 Admas A500 Specification: Length :07 mm(8.7") Wing Span :00 mm(9.5") Wing Area :8.8 sq. dm 5.5 sq. ft Wing Loading :3 g/sq. dm 53.7 oz/sq. ft Flying Weight :8 kg(7.lbs) Radio :ch &3 servos Engine : -cycle
FOKKER D.VII 1:7.4. No.EP-46K. MTH HOBBY PRODUCTS INDUSTRIAL CO., LTD. MTH HOBBY 2015
 No.EP-46K FOKKER D.VII 1:7.4 MTH HOBBY PRODUCTS INDUSTRIAL CO., LTD. www.mth.com.tw mthhobby@mth.com.tw MTH HOBBY 2015 SPECIFICATION: Wing span: 1200mm Wing area: 41 dm Length: 990mm Weight: 1400g, including
MXS R 30CC. Item No:L G Specifications. 67 1/2"(1720mm) (2C) (4C) 26 35cc gas DLE 30/35RA MLD35 JC30Evo.
 (2C) (4C) 26 35cc gas DLE 30/35RA MLD35 JC30Evo.") MXS R 30CC Item No:L G030008 Specifications Wing Span Length Wing Area Flying Weight Glow Gasoline Electric Radio Description Covering Material Carbon Fibre : 75"(1915mm) 67 1/2"(1720mm) 1023sq in(66sq
MXS R 30CC Item No:L G030008 Specifications Wing Span Length Wing Area Flying Weight Glow Gasoline Electric Radio Description Covering Material Carbon Fibre : 75"(1915mm) 67 1/2"(1720mm) 1023sq in(66sq
TWEETY 25 INSTRUCTION MANUAL. Almost Ready to Fly Nitro/Electric Aerobat FEATURES SPECIFICATIONS
 TWEETY 25 Almost Ready to Fly Nitro/Electric Aerobat INSTRUCTION MANUAL SPECIFICATIONS FEATURES WINGSPAN: 45.7 (1160mm) LENGTH: 38.6 (980mm) WING AREA: 370 sq in(24 sq dm) FLYING WEIGHT: Approx. 3.3 lbs
EXTRA 330SC 60CC. Item No:H G Specifications cc gas DA50,DA60, DLE55, DLE60(twin), 3W55. Description
, 3W55. Description") EXTRA 330SC 60CC Item No:H G060011 Specifications Wing Span Length Wing Area Flying Weight Gasoline Radio Description Carbon Fibre : 92" (2347mm) 84 1/2 " (2060mm) 1526.8 sq in(98.5sq dm) 16 17lbs(7300
EXTRA 330SC 60CC Item No:H G060011 Specifications Wing Span Length Wing Area Flying Weight Gasoline Radio Description Carbon Fibre : 92" (2347mm) 84 1/2 " (2060mm) 1526.8 sq in(98.5sq dm) 16 17lbs(7300
Aviator Trainer40 ARF Instruction Manual Specifications
 Aviator Trainer40 ARF Instruction Manual Specifications Wingspan: 65.0 in (1650 mm) Length: 53.1 in (1350 mm) Wing Area: 729sq in (47.0 sq dm) Flying Weight: 5.3 lbs (2400g) Dear Customer, Congratulations
Stream NXT - assembly instructions
 Stream NXT - assembly instructions Recommended settings CG (measured from root leading edge): Speed/launch camber (+down, near the wing root): Cruise camber (+down, near the wing root): Thermal camber
BOOMERANG TORUS. Aerobatic Sport Jet for 20 to 34 lbs (P80 to P160) thrust turbines.
 thrust turbines.") BOOMERANG TORUS Aerobatic Sport Jet for 20 to 3 lbs (P80 to P160) thrust turbines. Specifications: Span... 83" (2209mm.) Span with Wingtip Tanks 90" (2286mm.) Length...87" (2108mm.) Weight 29 Lbs.(13.15
BOOMERANG TORUS Aerobatic Sport Jet for 20 to 3 lbs (P80 to P160) thrust turbines. Specifications: Span... 83" (2209mm.) Span with Wingtip Tanks 90" (2286mm.) Length...87" (2108mm.) Weight 29 Lbs.(13.15
FLITZEBOGEN-2 Assembly instructions
 FLITZEBOGEN-2 Assembly instructions Trim the end of the fuselage to the length of 925mm from the nose. Be careful to avoid splitting the carbon fibers. Sand the base of the stab mount in preparation for
Note - the nose ribs and are thinner than the main ribs. These nose ribs will use a thinner rib cap than the ribs. This is per design.
 Stabilizer rev 1.2 The SE5a stabilizer is the heartbeat of the tail and is recreated like the full scale version. All tail pieces depend on the stabilizer. It uses the steel fittings, pulleys, inspection
43in EPP Acrocub Instruction Manual
 43in EPP Acrocub Instruction Manual Specifications Wingspan: 43.3in (1100mm) Length: 41.3in (1050mm) Flying Weight: Approx. 1.5lb (670g) Dear Customer, Congratulations on your purchase of 43in EPP Acrocub
WE GET PEOPLE FLYING AT-6
 TM WE GET PEOPLE FLYING AT-6 Texan.60 ARF ASSEMBLY MANUAL Specifications Wingspan:... 67.5 in (1714mm) Length:... 48 in (1219mm) Wing Area:... 706 sq in (45.54 sq dm) Weight:... 7 8.5 lb (3.17 3.85 kg)
SE5a Instrument Board part 2 - rev 1.1
 SE5a Instrument Board part 2 - rev 1.1 Fuel (Petrol) Valve This valve uses two circular name plates, eight brass screws, one black plastic base, copper wire and two black plastic risers. You can pick any
PERCIVAL P-56 PROVOST
 Instruction Manual Book. PERCIVAL P-56 PROVOST OLEO STRUTS LANDING GEAR. ALL BALSA - PLY WOOD CONSTRUCTION. COVERED WITH ORACOVER Glow and EP 95% ALMOST READY TO FLY SPECIFICATION: - Wingspan: 1,644mm
Specifications Wingspan: 80-1/8" Wing Area: 850 sq. in. Weight (Approx.): lbs. Recommended Engines: Cycle.45-.
: lbs. Recommended Engines: Cycle.45-.") TM WE GET PEOPLE FLYING ASSEMBLY MANUAL Specifications Wingspan: 80-1/8" Wing Area: 850 sq. in. Weight (Approx.): 6.5-7.0 lbs. Recommended Engines:.40-.46 2-Cycle.45-.60 4-Cycle Raising the Standard of
TM WE GET PEOPLE FLYING ASSEMBLY MANUAL Specifications Wingspan: 80-1/8" Wing Area: 850 sq. in. Weight (Approx.): 6.5-7.0 lbs. Recommended Engines:.40-.46 2-Cycle.45-.60 4-Cycle Raising the Standard of
CALLAS THERMOSTATIC SHOWER SET
 SKU(s): 925945 CALLAS THERMOSTATIC SHOWER SET BEFORE YOU BEGIN We recommend consulting a professional if you are unfamiliar with installing plumbing fixtures. Signature Hardware accepts no liability for
Aure. Radio required : 3 channels, 4 servos airplane radio. Specifications. * Specifications are subject to change without notice.
 A L M O S T- R E A D Y- T O - F LY Aure INSTRUCTION MANUAL Radio required : 3 channels, 4 servos airplane radio Specifications Wing Span Wing Area Flying Weight Fuselage Length 81.5 in / 2070mm 572.0 sq
JTM 90mm EDF Viper Jet Installation Manual
 JTM 90mm EDF Viper Jet Installation Manual Provided by ERJets www.erjets.com 1 Disclaimer: Welcome onboard! This radio controlled jet is not a toy. It has the capability of flying in high speed and therefore
Super Sky Surfer 2000 Assembly Instructions
 Super Sky Surfer 2000 Assembly Instructions Note: Plug and Play version of the Sky Surfer comes with fuselage pre-glued and motor/servos installed. If you wish to route antennas or wires through the tail,
INSTRUCTION MANUAL WARRANTY
 INSTRUCTION MANUAL WARRANTY Great Planes Model Manufacturing Co. guarantees this kit to be free from defects in both material and workmanship at the date of purchase. This warranty does not cover any component
BUCKER BU 131 JUNGMANN ALL BALSA - PLY WOOD CONSTRUCTION. COVERED WITH ORACOVER
 Instruction Manual Book. BUCKER BU 131 JUNGMANN ALL BALSA - PLY WOOD CONSTRUCTION. COVERED WITH ORACOVER Glow and EP 95% ALMOST READY TO FLY SPECIFICATION: - Wingspan: 1,850 mm (72.83 in). Length: 1,660
Stearman PT-17 KIT WARRANTY
 Stearman PT-17 KIT # K-306 Assembly Instructions Version 2 02-17-16 Designed by Tom Herr WARRANTY Sig Manufacturing Co, Inc. guarantees this kit to be free from defects in both material and workmanship
ASSEMBLY MANUAL CONTENTS. Specifications
 ASSEMBLY MANUAL Specifications Length : 986mm / 38.82in Height : 321mm / 12.64in Width (Landing strut) : 158mm / 6.22in Flying Weight : 2,300g / 5.07lb or more Main Rotor Dia. : 1,142mm / 44.96in Tail
This pictorial document contains assembly recommendations including some fit and finish details that will be helpful when building this airplane
 This pictorial document contains assembly recommendations including some fit and finish details that will be helpful when building this airplane Problems found with this kit and a flight performance review
Spitfire Mk.IX ARF. Electric retract system. TopRCModel-USA.com
 Electric retract system Thank you very much for purchasing our TRCM optional electric retract set, all our products were passed strict QC before they shipped out to the customers. In order to avoid probably
FUJI FA-200 AERO SUBARU
 FUJI FA-200 AERO SUBARU SEMI SCALE SPORT MODEL AERO SUBARU Assembly and Operations Manual Please review this manual throughly Before assembling or Operating The AERO SUBARU Semi scale sport model We ve
INSTRUCTION MANUAL. Suitable for Electric or I.C. Engine Power
 INSTRUCTION MANUAL Suitable for Electric or I.C. Engine Power Congratulations on the purchase of your Irvine Tutor 40 II Radio Control Model Aircraft. Please take some time to carefully read these instructions
10" E-Series D-Series - Pair. kit includes (14) (4) (4) It is strongly recommended that this product be installed by a professional.
 (4) (4) It is strongly recommended that this product be installed by a professional.") 2014 GMC 1500 grille installation instructions 10" E-Series D-Series - Pair kit includes (14) (14) (4) 5 /16-18x 5 /8 Button Socket 5 /16-18 Low Profile Nylock Nut M6-1.0x30mm Button Head Socket (14) (4)
2014 GMC 1500 grille installation instructions 10" E-Series D-Series - Pair kit includes (14) (14) (4) 5 /16-18x 5 /8 Button Socket 5 /16-18 Low Profile Nylock Nut M6-1.0x30mm Button Head Socket (14) (4)
94 Yak 54 ARF WARNING
 94 Yak 54 ARF WARNING A radio-controlled model is not a toy and is not intended for persons under 16 years old. Keep this kit out of the reach of younger children, as it contains parts that could be dangerous.
Instruction Manual book
 Instruction Manual book ITEM CODE: BH50. SPECIFICATION Wingspan : 1,600 mm 62.99 in. Length : 1,230 mm 48.43 in. Weight : 2.5 kg 5.5 Lbs. Radio : 06 channels. Servo : 07 servos. Electric Motor : ( 02pcs
LANIER - Double Trouble - INSTRUCTIONS. Tail 1 T1 ¼ Balsa 1 T2 ¼ Balsa 2 T3 ¼ Balsa 1 T4 ¼ Balsa 1 T5 ¼ Balsa 1 T6 ¼ Balsa 2 J1 ¼ Balsa 2 J2 Lite ply
 Tail 1 T1 ¼ Balsa 1 T2 ¼ Balsa 2 T3 ¼ Balsa 1 T4 ¼ Balsa 1 T5 ¼ Balsa 1 T6 ¼ Balsa 2 J1 ¼ Balsa 2 J2 Lite ply Other Parts 2 Aluminum Gear 1 3/32 Music wire tail skid 2 Elevator and J-plane joiner wire
Assembly Instructions STINGER
 STINGER 120 ARF Important Information: Please inspect the plane before beginning to assemble to make sure you are happy with it. After assembly has begun you cannot return the kit. If you find a problem
INCLUDED IN THIS KIT: SPECIFICATION: NEEDED BUILDING TOOLS: REQUIRED EQUIPMENT:
 Please review this entire manual before beginning assembly. By doing so it will help you better understand each step as you progress in the actual building of your kit, and you will do a better job in
Cheeper Assembly instruction
 1. Equipment, materials and tools for assembly.......2 2. Assembly.....3 3. Setting of the model.....11 1. Equipment, materials and tools for assembly 1 Wing; 2 Fuselage; 3 Stabilizer; 4 Fin; 5 Dowel for
CARL GOLDBERG PRODUCTS, LTD.
 Chipmunk 400 WARNING A radio-controlled model is not a toy and is not intended for persons under 16 years old. Keep this kit out of the reach of younger children, as it contains parts that could be dangerous.
28in Super EVA Foam. F-22 Raptor Kit. Specifications. Wingspan: 27.5in (700mm) Length: 38.3in (975mm) Flying Weight: Approx. 1.
 Length: 38.3in (975mm) Flying Weight: Approx. 1.") 28in Super EVA Foam F-22 Raptor Kit Specifications Wingspan: 27.5in (700mm) Length: 38.3in (975mm) Flying Weight: Approx. 1.2lbs (530g) Dear Customer, Congratulations on your purchase of 28in F22 Raptor
28in Super EVA Foam F-22 Raptor Kit Specifications Wingspan: 27.5in (700mm) Length: 38.3in (975mm) Flying Weight: Approx. 1.2lbs (530g) Dear Customer, Congratulations on your purchase of 28in F22 Raptor
Parts Identification
 We are excited to introduce the Model Aero Aqua Sport. This is an excellent sport flyer, equally at home flying from grass fields, water, or even snow! The unique V-tail gives the Aqua Sport a distinctive
Warbird Series Zero - 32 Assembly Manual
 Warbird Series Zero - 32 Assembly Manual Specifications Wing Span: 32 inches Wing Area: 210 in 2 Fuselage Length: 26 inches Weight (ready to fly): 11 to 13 oz. Wing Loading: 7.5 to 8.9 oz/ft 2 Designed
Sbach 1,2m 3D/aerobatic EPP model Building instructions
 Sbach 1,2m 3D/aerobatic EPP model Building instructions Please refer to the Diagram sheet Diagrams A, B Press 2 carbon strips (1x3x1000 mm) into the grooves in the sides of the fuselage central part (the
NOORDUYN NORSEMAN. Instruction Manual Book 95% ALMOST READY TO FLY. Item code: BH157. SPECIFICATION
 Instruction Manual Book Item code: BH157. NOORDUYN NORSEMAN ALL BALSA - PLY WOOD CONSTRUCTION. COVERED WITH ORACOVER. 95% ALMOST READY TO FLY SPECIFICATION - Wingspan: 1840 mm (72.44 in). - Length: 1180
Desk/Wall-Mount Rack
 Desk/Wall-Mount Rack Patent(s) Pending Installation Instructions Post P/N: 119-1752 119-1781 119-1782 119-4014 Frame P/N: 119-1591 119-1754 119-1755 Kit Contents (2) Frames (4) Posts Assembly Hardware
INSTRUCTION MANUAL. Specifications. Wing Area Flying Weight Fuselage Length. 28 oz / 800 g 30.0 in / 760 mm
 ALMOST-READY-TO-FLY INSTRUCTION MANUAL Requires : -channel radio w/ micro servos, Outrunner Motor w/ Propeller Adaptor 0A Brushless ESC, 3 cells 11.1V 100 mah Li - Po battery & charger. Wing Span Wing
ONASSIS SHOWER SET INSTALLATION
 SKU(s): 925939 BEFORE YOU BEGIN We recommend consulting a professional if you are unfamiliar with installing plumbing fixtures. Signature Hardware accepts no liability for any damage to the plumbing, floor,
2COOL 2COOL.indd :24:34
 2COOL 2COOL.indd 1 17.9.2004 12:24:34 2COOL Dear customer, congratulations on the purchase of the 2Cool model. Before you begin, please read carefully the building instructions and make sure that you understand
87 Extra 330 ARF WARNING
 87 Extra 330 ARF WARNING A radio-controlled model is not a toy and is not intended for persons under 16 years old. Keep this kit out of the reach of younger children, as it contains parts that could be
ASSEMBLY INSTRUCTIONS JK270
 TOOLS REQUIRED: One knife to open packaging Two ½ wrench or socket (metric 13) One 9/16 wrench or socket (metric 14) One #2 Philips (+) screwdriver NOTE: All bolts are 9/16 (metric 14) and nuts are ½ (metric
SPUNKY ASSEMBLY MANUAL
 SPUNKY ASSEMBLY MANUAL Please read the tips section at the back of this manual regarding the use of laser cut parts. The proper removal and preparation of these parts is important. When laser cut, some
RADIO CONTROL MODEL / RC FLUGMODELL INSTRUCTION MANUAL
 RADIO CONTROL MODEL / RC FLUGMODELL INSTRUCTION MANUAL SPECIFITIONS Wingspan...57.5 in. / 146cm Length...50 in. / 127cm Engine...46 2T /.70 4T or Electric equivalent. Radio...4 ~ 6 channel Almost ready
(Build Instructions)
") (Build Instructions) Specifications * Wingspan: 58cm * Length: 50cm * Flying Weight: 59 grams * Channels: 3 (Rudder Elevator Throttle) * Suggested Receiver: 4Ch Micro * Motor: 8mm GearDrive * Prop: GWS
(Build Instructions) Specifications * Wingspan: 58cm * Length: 50cm * Flying Weight: 59 grams * Channels: 3 (Rudder Elevator Throttle) * Suggested Receiver: 4Ch Micro * Motor: 8mm GearDrive * Prop: GWS
67 Edge 540 ARF WARNING
 67 Edge 540 ARF INSTRUCTIONS WARNING A radio-controlled model is not a toy and is not intended for persons under 16 years old. Keep this kit out of the reach of younger children, as it contains parts that
ULS Cherokee. Ultra Low Speed aircraft for indoor RC flying. Zippkits. Specifications: Required to complete:
 Zippkits ULS Cherokee Ultra Low Speed aircraft for indoor RC flying. Specifications: Span- 28 inches Wing Area- 151 Sq/In Wing Loading- 3.0 ounces/ft Weight- 3.5 ounces RTF Build time- 1-2 Hours Radio-
THE APOGEE A 100-INCH AMA DURATION SAILPLANE FROM DYNAFLITE
 THE APOGEE A 100-INCH AMA DURATION SAILPLANE FROM DYNAFLITE Apogee is the intermediate sailplane designed to be competitive in AMA duration contests. Effective spoilers, rudder and full flying stabilizer
VT-ALLROUNDER V4 1500MM CORO 3/4 Channel Trainer Airplane
 Congratulations on your purchase of the VT- AllRounder 1500MM Trainer Airplane Kit.. Hope these build instructions help you complete the build. Though the build itself doesn't take much time, just be sure
installation guide 1 GUIDE#: pwb-assault-001
 assault WAKEBOARD tower installation guide INSTALLATION SUPPORT 1 important information This Aerial wakeboard tower fits motor boats with 76-108 inch wide beam widths. This measurement is taken from the
Fw-190 D9(50cc) INSTRUCTION MANUAL SAFETY PRECAUTIONS. Specification:
 INSTRUCTION MANUAL SAFETY PRECAUTIONS. Specification:") Fw-90 D9(50cc) Specification: Length: 00mm(8.5 ) Wing span: 093mm(8.5 ) Wing area: 77.79sq.dm(8.sq.ft) Wing loading: g/sq.dm(0oz/sq.ft) Flying weight: 9.5kg(0.9 bs) Radio: ch & 8servos Engine: 50cc gasoline
Fw-90 D9(50cc) Specification: Length: 00mm(8.5 ) Wing span: 093mm(8.5 ) Wing area: 77.79sq.dm(8.sq.ft) Wing loading: g/sq.dm(0oz/sq.ft) Flying weight: 9.5kg(0.9 bs) Radio: ch & 8servos Engine: 50cc gasoline
MercurE Mini Old Timer Electric Model
 MercurE Mini Old Timer Electric Model MercurE Specifications Wingspan: 31.6 in. Length: 20.6 in. Wing Area: 153 sq. in. Weight (Ready to Fly): 4.9 to 5.4 oz. Wing Loading: 4.6 5.1 oz. / sq. ft. Version
FOKKER D-VII INSTRUCTION MANUAL SAFETY PRECAUTIONS. Specification:
 FOKKER D-VII Specification: Length Wing Span Wing Area :97 mm(55") :77 mm(70") :9sq.dm 9.sq.ft Wing Loading :59.g/sq.dm.9oz/sq.ft Flying Weight :.5kg(lbs) Radio Engine: :ch & 5servos :cc-cc INSTRUCTION
JUNKERS JU87- B2 STUKA
 Instruction Manual Book Item code: BH169. JUNKERS JU87- B2 STUKA OLEO STRUTS LANDING GEAR. ALL BALSA - PLY WOOD CONSTRUCTION. COVERED IN A HEAT-SHRINK FILM WITH PRINTED. 95% ALMOST READY TO FLY SPECIFICATION:
Specifications. Before commencing assembly, please read these instructions thoroughly. INSTRUCTION MANUAL
 INSTRUCTION MANUAL Before commencing assembly, please read these instructions thoroughly. Specifications Wing Span: 50 in / 170 mm Wing Area: 484 sq in / 31. sq dm Flying Weight: 3.5 lbs / 1600 g Fuselage
Pilatus PC-9 INSTRUCTION MANUAL SAFETY PRECAUTIONS. Specification:
 Pilatus PC-9 Specification: Length: Wing span: Wing area: Wing loading: Flying weight: Radio: Engine: 9mm(7 ) 0mm(0 ) sq.dm(.9sq.ft) 0.g/sq.dm(.9oz/sq.ft).kg(7.bs) ch & servos 0 -cycle 0cc gasoline engine
F - 4u Corsair (50cc)
") F - u Corsair (50cc) Specification: Length: 73(.3") Wing span: 0mm(5") Wing area: 7.00sq.dm(9.39sq.ft) Wing loading: 35.g/sq.dm(.5oz/sq.ft) Flying weight:.kg(.0lbs) Radio: ch & 0servos Engine: 50cc gasoline
F - u Corsair (50cc) Specification: Length: 73(.3") Wing span: 0mm(5") Wing area: 7.00sq.dm(9.39sq.ft) Wing loading: 35.g/sq.dm(.5oz/sq.ft) Flying weight:.kg(.0lbs) Radio: ch & 0servos Engine: 50cc gasoline
LIGHT BEAM ANTENNA MaxRange Antenna Series Assembly Instructions MaxRange Plus Digital / High Definition Television Antennas
 LIGHT BEAM ANTENNA MaxRange Antenna Series Assembly Instructions MaxRange Plus Digital / High Definition Television Antennas Assembly Instructions 1 MaxRange Plus Antenna These instructions will lead you
Hand-made Almost Ready to Fly R/C Model Aircraft ASSEMBLY MANUAL
 Hand-made Almost Ready to Fly R/C Model Aircraft ASSEMBLY MANUAL Specifications Wingspan -----------------------.148 cm--------------- 58.3 in. Wing area ----------------------- 3474sq. cm ---- 538.4sq
P-47D Thunderbolt. Two wheel retract system Make sure to assemble retracts as instructed below. 3-way pressure inlet INSTRUCTION MANUAL
 70 Adjustment. 7 The centre of the Gravity. Side View AILERON FLAP 0mm 0mm P-7D Thunderbolt AILERON FLAP 0mm 3mm Two wheel retract system Make sure to assemble retracts as instructed below. 3-way pressure
Assembly Instructions. Stinger 120. Almost Ready to Fly
 Stinger 120 Almost Ready to Fly Important Information: Please inspect the plane before beginning to assemble to make sure you are happy with it. After assembly has begun you cannot return the kit. If you
INCLUDED IN THIS KIT: SPECIFICATION: NEEDED BUILDING TOOLS: REQUIRED EQUIPMENT:
 Please review this entire manual before beginning assembly. By doing so it will help you better understand each step as you progress in the actual building of your kit, and you will do a better job in
Central New York Rocket Team Challenge 2018 Rocket Assembly Instructions
 Central New York Rocket Team Challenge 2018 Rocket Assembly Instructions Note: These instructions vary from those provided by the manufacturer of the rocket kits. There is also considerable varying discussion
SebArt professional line
 SebArt professional line Wind S 110 ARF ASSEMBLY MANUAL The new Wind S 110 ARF was designed by Italy aerobatic pilot, Sebastiano Silvestri. This professional ARTF kit is the result of Sebastiano s 20 years