Assembly Instructions
|
|
|
- Michael Boone
- 5 years ago
- Views:
Transcription


1 V Assembly Instructions (W x D x H) 1.89m x 1.62m x 1.80m Product Name: Miami Swing Pressure Treated products should not be treated with any other products for the first month. PLEASE KEEP THIS INSTRUCTION Zest4Leisure option 1 sales@zest4leisure.co.uk
2 Miami Swing Assembly Instructions Requires 2 person assembly. PLASTIC STRAPPING ON CANOPY SLATS IS TO REMAIN FIXED AND SHOULD NOT BE REMOVED BY THE CUSTOMER Tools required: Corded / Cordless Drill, Pozi-drive Bit / Screwdriver, Socket Set, Hammer. 3mm Drill Bit, required in order for you to drill all screw holes before construction. Miami Swing Pack List Item Description Quantity A1 Front Leg 2 A2 Back Leg (with additional bolt hole for canopy) 2 B Beam 1 C Horizontal Short Brace 2 D Horizontal Long Brace 2 E Diagonal Brace 2 F Seat Back 1 G Seat 1 H Armrest Support 2 J Armrest 2 K Shelf 2 L Canopy Slats 1 M Slats Support 2 N Centre Batten 1 Fixings 30mm Screws 16 60mm Screws mm Screws 2 45mm Bolts, washers & nuts 6 100mm Bolts, washers & nuts mm Eye Bolts & small karabiner, washers & nuts 4 140mm Bolts, washers & nuts 2 150mm Eye Bolts & large karabiner, washers & nuts 2 110mm Bolts, washers & nuts 2 90mm Bolts, washer & nuts 4 80mm Bolts washer & nuts 2 700mm Chain 2 900mm Chain 2

3 Miami Swing Assembly Instructions Requires 2 person assembly. PLASTIC STRAPPING ON CANOPY SLATS IS TO REMAIN FIXED AND SHOULD NOT BE REMOVED BY THE CUSTOMER Tools required: Corded / Cordless Drill, Pozi-drive Bit / Screwdriver, Socket Set, Hammer. 3mm Drill Bit, required in order for you to drill all screw holes before construction.
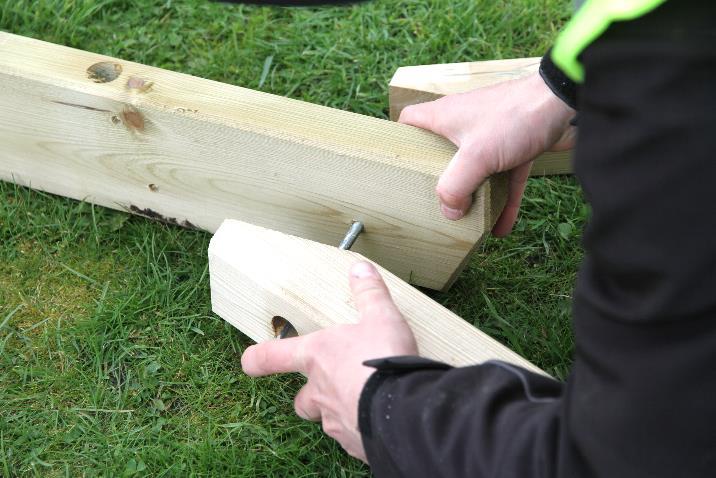
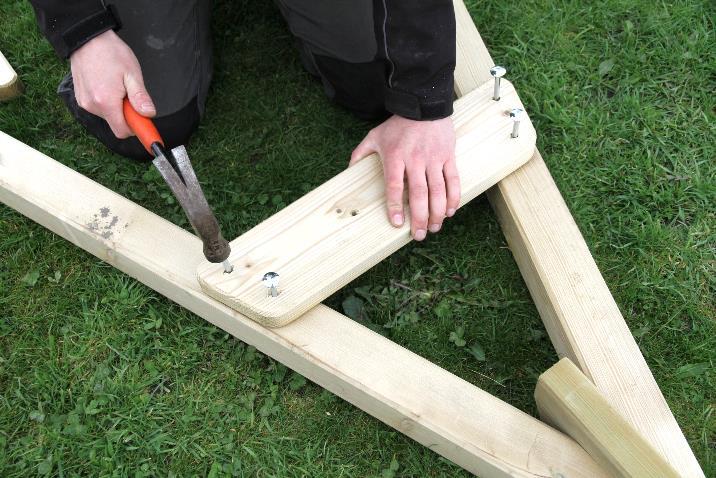
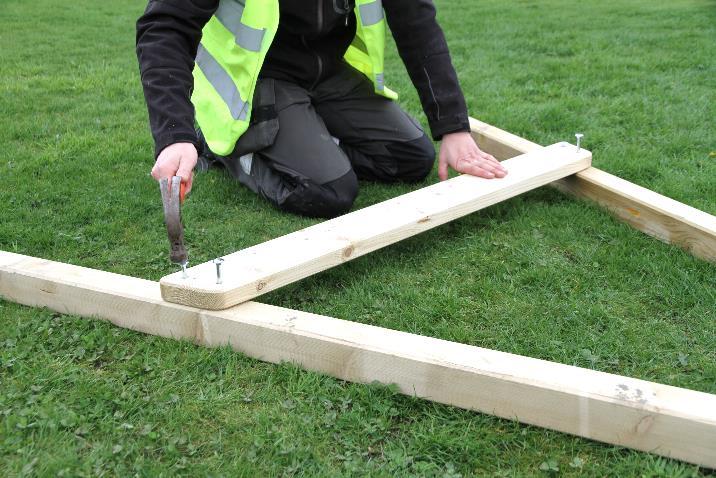
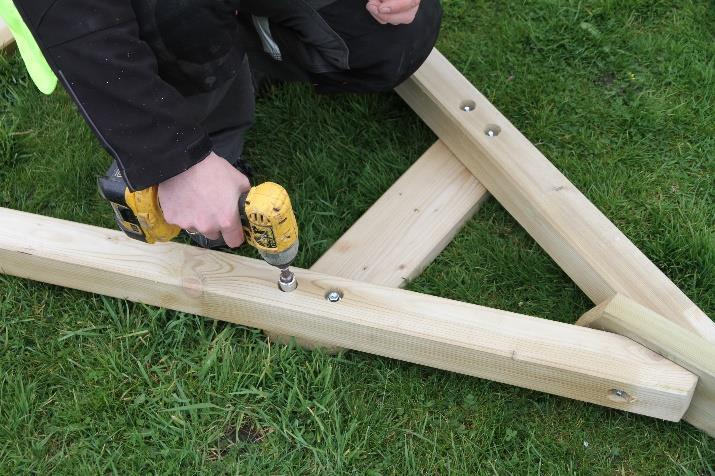
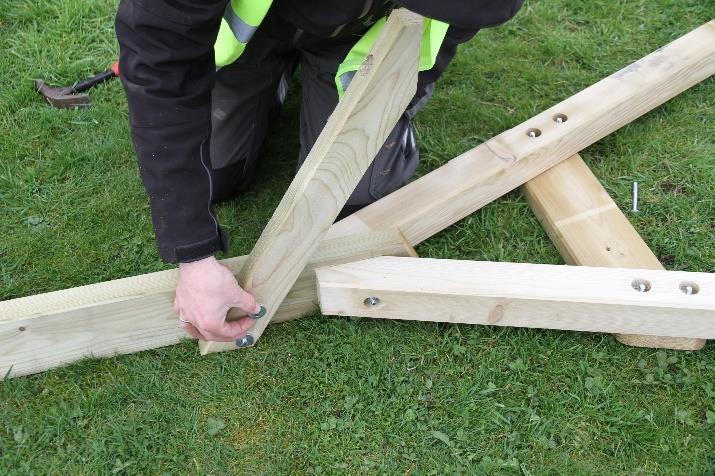
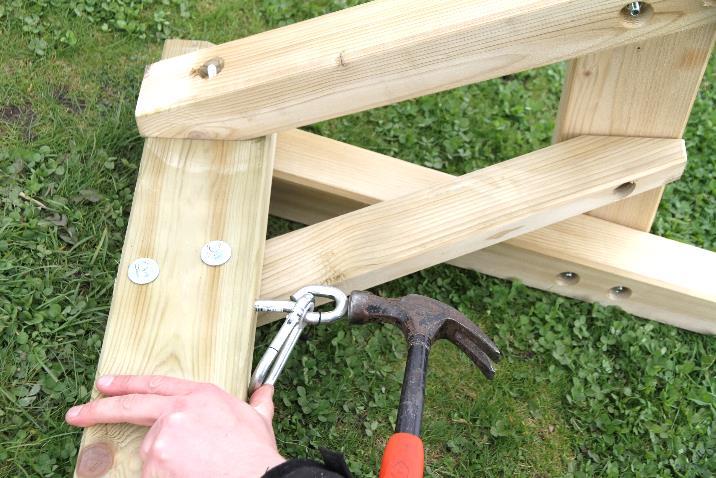
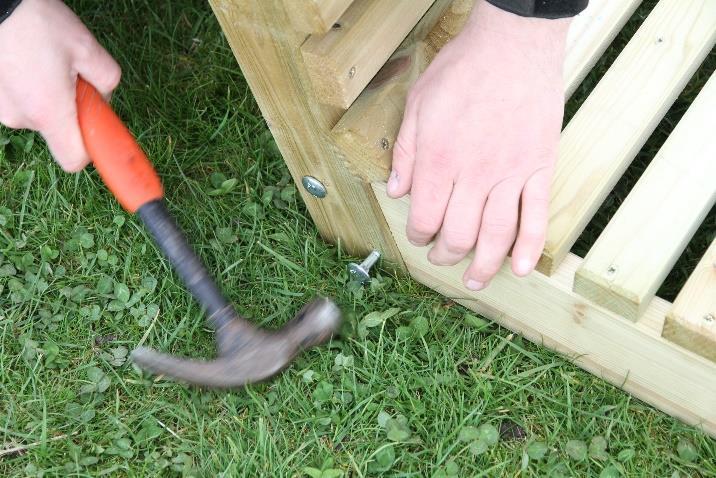
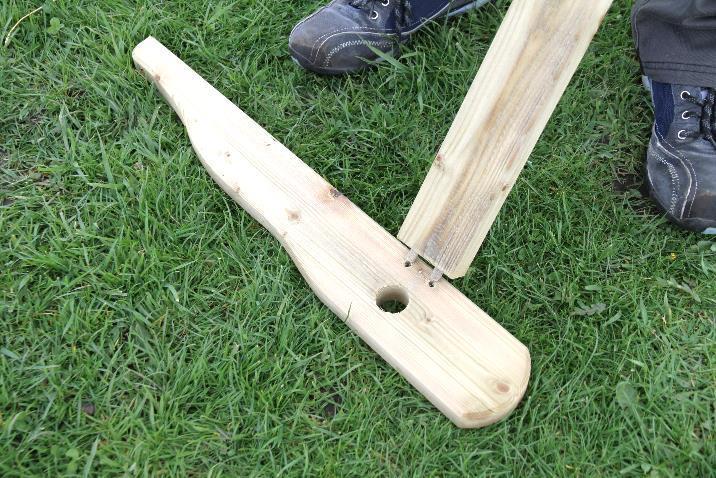
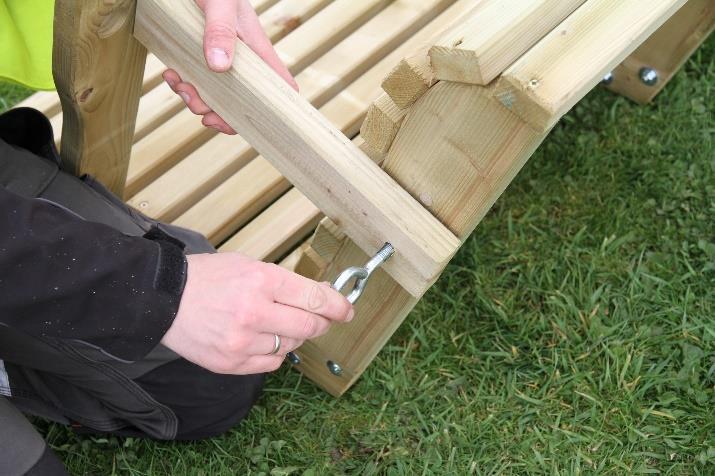
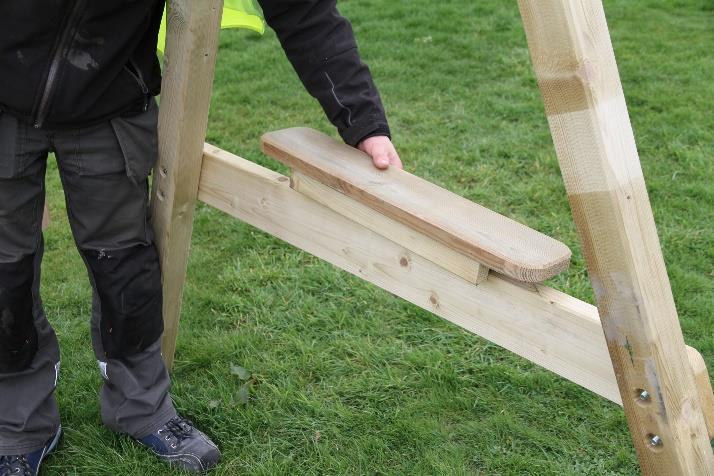
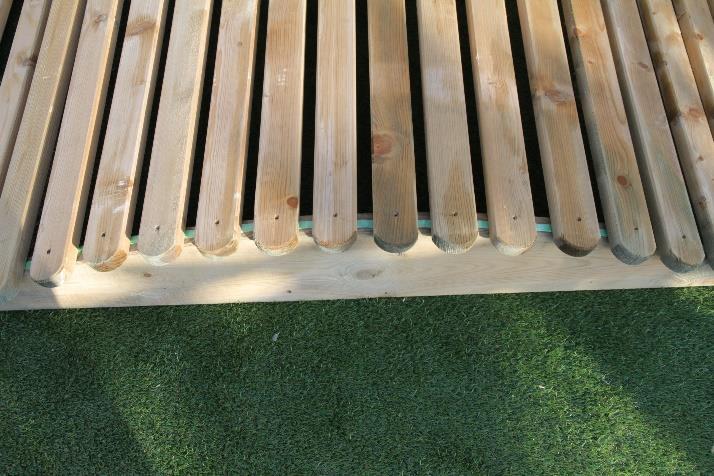
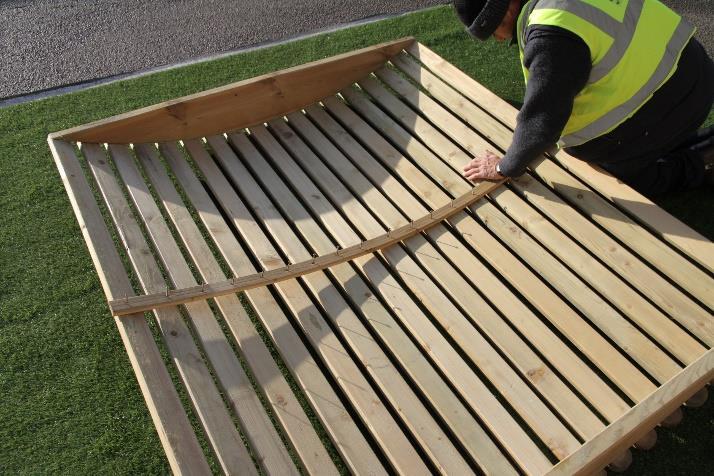
4 Please take a few moments to check all pack contents listed. Requires 2 person assembly. PLASTIC STRAPPING ON CANOPY SLATS IS TO REMAIN FIXED AND SHOULD NOT BE REMOVED BY THE CUSTOMER Tools required: Corded / Cordless Drill, Pozi-drive Bit / Screwdriver, Socket Set, Hammer. 3mm Drill Bit, required in order for you to drill all screw holes before construction. 1. Position 1no Front Leg A1 and 1no Back Leg A2 either side of Beam B (Fig.1a), align bolt holes and attach using 1no 150mm Bolt, washer & nut (Fig.1b). Do not fully tighten at this stage. Repeat procedure for the remaining 1no Front Leg A1 and 1no Back Leg A2 at the other end of Beam B. 2. Position Horizontal Short Brace C (Fig.2a) and Horizontal Long Brace D (Fig.2b) onto Legs, align bolt holes and insert 8no 100mm Bolts 4no per horizontal brace. Repeat procedure for the remaining braces and Legs. 3. Turn over the Legs/Beam Assembly (Fig.3a), attach washers and nuts and fully tighten (Fig.3b). 4. Attach Diagonal Brace E to Beam B using 2no 90mm Bolts, washers & nuts and fully tighten (Fig.4a). Raise Leg Assembly, align Diagonal Brace E & Horizontal Short Brace C bolt holes and fix in position using 1no 80mm Bolt, washer & nut (Fig.4b). Fully tighten all nuts at this stage. Repeat procedure with the remaining Diagonal Brace E at the other end of Beam B (Fig.4c). 5. Insert 2no 150mm Eye Bolts into the Beam B (Fig.5) and secure using washers and nuts. 6. Locate half lap joints of Seat Back F into half lap joints of Seat G and fix in position using 6no 45mm Bolts, washers & nuts 2no per joint (Fig.6b) 7. Locate the Armrest Support H dowels into the Armrest J holes (Fig.7a) and fix in position using 1no 60mm Screw (Fig.7b). Repeat procedure for the remaining Armrest Support H and Armrest J. 8. Attach Armrest Assembly to Seat Assembly using 2no 115mm Eye Bolts as shown in Figs 8a & 8b. Repeat procedure for the remaining Arm Assembly. 9. Hook 1no Short Chain & 1no Long Chain onto Large Karabiner ensuring Short Chain is at the back (Fig.9a). Repeat procedure for remaining chains. Attach Short Chain to the back of the Seat Assembly (Fig.9b) and Long Chain to the front of the Seat Assembly (Fig.9c) using 2no Small Karabiners. Repeat procedure for remaining Chains. 10. Locate Shelves K onto Long Braces D (Fig.10). 11. Place Canopy Slats L onto Slats Supports M (Fig.11a) ensuring an overhang of 45mm. Fix into position using 32no 60mm Screws 2no per slat (Fig.11b). 12. With the Canopy assembly inverted, Position the Centre Batten N centrally, predrill screw holes and attach using 16no 30mm Screws, 1no per canopy slat (Fig.12). 13. Position Canopy Assembly over Swing Assembly ensuring Back Legs A2 bolt holes and Slats Supports L bolt holes are aligned. Insert 2no 110mm Bolts 1no per Back Leg A2 and attach washers and nuts. Fix Slats Supports M to Front Legs A1 using 2no 100mm Screws 1no per Front Leg A1. Miami Swing is now complete.


5 1a 1b 2a 2b 3a 3b 4a 4b


6 4c 5 6a 6b 7a 7b 8a 8b


7 9a 9b 9c 10 11a 11b All screw holes to be predrilled.
Assembly Instructions
 V2-05.16 Assembly Instructions (W x D x H): 2.20m x 2.20m x 2.49m Product Name: Brighton Corner Arbour Pressure Treated products should not be treated with any other products for the first month. PLEASE
Assembly Instructions
 V2-02.15 Assembly Instructions (W x D x H) 1.44m x 0.66m x 2.23m Product Name: Cheltenham Arbour with Storage Box Pressure Treated products should not be treated with any other products for the first month.
Assembly Instructions
 V3-03.17 Assembly Instructions (W x D x H) 1.97m x 0.63m x 2.06m Product Name: Hampshire Arbour with Storage Box Pressure Treated products should not be treated with any other products for the first month.
(Toll Free); 8am-5pm Pacific Time, Monday-Friday. Assembly instructions for: CHAIR SWING SETS
; 8am-5pm Pacific Time, Monday-Friday. Assembly instructions for: CHAIR SWING SETS") 866.332.2403 (Toll Free); 8am-5pm Pacific Time, Monday-Friday Assembly instructions for: CHAIR SWING SETS CONTENT OF BOXES QUANTITY DESCRIPTION DRAWING 2 Posts 2 Swing bases 1 Roof support 4 Diagonal knee
866.332.2403 (Toll Free); 8am-5pm Pacific Time, Monday-Friday Assembly instructions for: CHAIR SWING SETS CONTENT OF BOXES QUANTITY DESCRIPTION DRAWING 2 Posts 2 Swing bases 1 Roof support 4 Diagonal knee
Locker Pedestal Installation Instructions
 Locker Pedestal Installation Instructions LK-PED-INST-0314r1 Parts List Single Pedestal Back to Back Pedestal Horizontal Support Tube TS-169 Post Flange TS-190 Post Cap Fasteners Provided: #8 x ¾ round
O-Sullivan King 4 Poster Bed O-Sullivan Queen 4 Poster Bed Parts and Hardware List
 Parts and Hardware List A. Left Headboard Post 1 pc B. Right Headboard Post 1 pc C. Left Footboard Post 1 pc D. Right Footboard Post 1 pc E. Headboard Panel 1 pc F. Footboard Rail 1 pc. Spindles 4 pcs
v1.0 ASSEMBLY GUIDE Mia Wide Bookcase
 v1.0 ASSEMBLY GUIDE Mia Wide Bookcase Components Upon unpacking your bookcase from it s delivery box, you should have the pieces shown. Follow the steps on the next pages to assemble your new bookcase.
ASSEMBLY GUIDE. Mia Narrow Bookcase
 ASSEMBLY GUIDE Mia Narrow Bookcase Components: Upon unpacking your bookcase from it s delivery box, you should have the pieces shown. Follow the steps on the next pages to assemble your new bookcase. Step
K-Emily Twin Nkl Canopy Bed K-Emily Twin Pink Canopy Bed K-Emily Purple Twin Canopy Bed
 Parts and Hardware List A. Headboard 1 pc B. Footboard 1 pc C. Side Rails 2 pcs D. Support Slats 3 pcs E. Leg Supports 3 pcs F. Long Canopy Rails 2 pcs G. Short Canopy Rails 2 pcs H. Long Posts 2 pcs I.
Assembly Instructions for: JEAN S ULTIMATE SWING SETS
 Assembly Instructions for: JEAN S ULTIMATE SWING SETS Thank you for purchasing Forever Redwood patio furniture. Forever Redwood is built by Old-Growth Again Restoration Forestry (OGA). OGA is dedicated
ASSEMBLY INSTRUCTIONS ROUND DINING TABLE
 ROUND DINING TABLE ASSEMBLY REQUIREMENTS: 2-Person Assembly 45 Minutes Assembly Time Per Chair (Approximate) Tools Required: (Not Provided) Phillips Screwdriver Thank you for purchasing our product! Please
Greenhouse Assembly Instructions
 Greenhouse Assembly Instructions Our Help Line provides support and advice to customers of Summer Garden Buildings after ordering. For advice before you buy you can phone us free 7 days a week on 0800
#916 CLASSIC 16 GUN CABINET ASSEMBLY INSTRUCTIONS
 Thank you for purchasing this quality product. A list of PARTS and INSTRUCTIONS is included to assist you. Unpack and identify all parts included on the Parts List and Hardware List. If parts are missing,
L.L.Bean. Platform Bed
 L.L.Bean Platform Bed Thank you for purchasing our Platform Bed. Assembly of this product requires a Phillips head and a flat head screwdriver. We have found it helpful to have a second person present
Assembly Aid. One of the packages contains the required bolts, washers and nuts for final assembly
 Assembly Aid Open the box and arrange the pieces similar to what you see here. Assembly instructions as well as the list of tools required for assembly are also in the box. One of the packages contains
BIFOLD FUTON FRAME TRINITY ARM. Seat Rails and Slats x 1. *Note: Use 4pc of 100mm Bolts and 4pc of 60mm Bolts to attach the arms to the Stretchers.
 1A Parts in this box. 2pc with extra holes 2pc with extra holes & plastic stoppers Arms x 2 Back Rails and Slats x 1 Full Size: Slat Supports x 6 3pc are longer for the Back deck Back Side Rails x 2 Seat
L.L.Bean. Wooden Slat Bed
 L.L.Bean Wooden Slat Bed Thank you for purchasing our Slat Bed. Assembly of this product requires A Phillips head screwdriver. We have found it helpful to have a second person present in at least one step
Gardman Lean-to Greenhouse Assembly Instructions
 Page 1 Gardman Lean-to Greenhouse Assembly Instructions Our Help Line provides support and advice to customers of Summer Garden Buildings after ordering. For advice before you buy you can phone us free
BOOKCASE WARNING. Illustration 1
 Illustration 1 Lower Back Panel Upper Back Panel Cam Connector Illustration 2 Left end Illustration 3 Cam Bolt Adjustable Shelf Left end Left End Panel Bottom/ Center Shelf Connector Cover Right End Panel
WK9 WORKTOP KIT Assembly Guide
 WK9 WORKTOP KIT Assembly Guide Tools and supplies needed for assembly: Cordless drill with #2 Phillips bit 5/16" drill bit #2 Phillips screwdriver Bubble level Sharp felt tip marker 3/8" and 7/16" wrenches
Copyright 2010, by Walker Edison Furniture Co., LLC. All rights reserved.
 General Assembly Guidelines I. Insure that all parts and hardware are available before beginning assembly. II. III. IV. Follow each step carefully to insure the proper assembly of this product. Two people
GlideRite Retractable Cover System For Hot Spot Spas (SE & SLX only)
") List of Contents Quantity Description 12 #10 x 1 ½ Flat Head Phillips Screw (see pg. 2) 2 #10 x ½ Pan Head Phillips Screw (see pg. 2) 8 ¼ x 2 ½ Lag Bolt (see pg. 2) 7 ¼ 20 x 5 / 8 Hex Head Bolt (see pg.
List of Contents Quantity Description 12 #10 x 1 ½ Flat Head Phillips Screw (see pg. 2) 2 #10 x ½ Pan Head Phillips Screw (see pg. 2) 8 ¼ x 2 ½ Lag Bolt (see pg. 2) 7 ¼ 20 x 5 / 8 Hex Head Bolt (see pg.
6' Wide Premium Greenhouse Benches
 6' Wide Premium Greenhouse Benches Premium Greenhouse Bench with Rolling Top 2015 FarmTek All Rights Reserved. Reproduction is prohibited without permission. STK# DIMENSIONS 112416R6X08 6' W x 3' H x 8'
v1.0 ASSEMBLY GUIDE Edgar Tall Chest of Drawers
 v1.0 ASSEMBLY GUIDE Edgar Tall Chest of Drawers Components Upon unpacking your tall chest of drawers from it s delivery box, you should have the separate pieces shown below. Follow the steps on the next
Octagon Vinyl Gazebo Assembly Instructions
 Octagon Vinyl Gazebo Assembly Instructions For 10 & 12 Models Toll Free: 866.768.8465 Hours: 9-5 Monday-Friday EST www.homeplacestructures.com Package ships as shown revised 04/29/09 Vinyl Gazebo Assembly
GlideRite Retractable Cover System For HotSpring & Tiger River Spas (except Classic & pre-2000 Landmark Spas)
") List of Contents Quantity Description 12 #10 x 1 ½ Flat Head Phillips Screw (see pg. 2) 2 #10 x ½ Pan Head Phillips Screw (see pg. 2) 8 ¼ x 2 ½ Lag Bolt (see pg. 2) 7 ¼ 20 x 5 / 8 Hex Head Bolt (see pg.
List of Contents Quantity Description 12 #10 x 1 ½ Flat Head Phillips Screw (see pg. 2) 2 #10 x ½ Pan Head Phillips Screw (see pg. 2) 8 ¼ x 2 ½ Lag Bolt (see pg. 2) 7 ¼ 20 x 5 / 8 Hex Head Bolt (see pg.
ASSEMBLY INSTRUCTIONS JK270
 TOOLS REQUIRED: One knife to open packaging Two ½ wrench or socket (metric 13) One 9/16 wrench or socket (metric 14) One #2 Philips (+) screwdriver NOTE: All bolts are 9/16 (metric 14) and nuts are ½ (metric
How to Build A Porch Swing
 How to Build A Porch Swing SUPPLIES USED Tape measure Drill 2.5" Wood Screws 1.5" Wood Screws 2" Finishing nails Hammer (or nail gun if you're lucky) Sand paper/ Electric sander Exterior paint Safety glasses
1531 Fort Add On **!!IMPORTANT-PLEASE READ!!**
 1531 Fort Add On **!!IMPORTANT-PLEASE READ!!** This Add-On kit will require you to deviate from the main instruction manual. Please follow the outline below so that you will know what steps to be aware
Wellington Wallbed 700 Series Assembly Instructions
 Wellington Wallbed 700 Series Assembly Instructions 1. Read all instructions before proceeding. Not following instructions may result in personal harm or damage to the furniture. 2. 2 people are required
LCD LIFT Flat Panel Display System Installation Manual. Table of Contents
 LCD LIFT Flat Panel Display System Installation Manual Table of Contents Page Installation Overview... 2 Trim Ring Installation... 3 LCD Lift Installation....4 Actuator Switch Installation.5 Top Plate
KEATING BED. Date: 02-Apr-15 Page 1 of 7 Rev:
 KEATING E ate: 02-Apr-5 www.williams-sonoma.com Page of 7 Important Safety Instructions: Please read all instructions carefully before assembling. For your safety, assembly by two or more adults is strongly
Strata. urniture. Mission Rim Instructions. Parts in the Arm Box: Parts in the Body Box:
 1A Watch our assembly videos at www.strataf.com/videos.html Parts in the Arm Box: Arm - Outside View Arm - Inside View Corbels x 4 1B Parts in the Body Box: Back Deck x 1 Seat Deck x 1 with the Feet attached
6' Wide Premium Greenhouse Benches
 6' Wide Premium Greenhouse Benches Premium Greenhouse Bench with Stationary Top 2015 FarmTek All Rights Reserved. Reproduction is prohibited without permission. STK# DIMENSIONS 112416S6X08 6' W x 3' H
Boat Lift Canopy Frame Assembly Instructions
 Patriot Docks Boat Lift Canopy Frame Assembly Instructions Helpful Tips: Assembling and installing the canopy frame and cover is a two person job. Additional help makes installation easier and is recommended.
(TOLL FREE); 7am 7pm Pacific Time, Monday-Saturday ASSEMBLY INSTRUCTIONS FOR THE RORY S GIANT PLAYGROUND SWING SET
; 7am 7pm Pacific Time, Monday-Saturday ASSEMBLY INSTRUCTIONS FOR THE RORY S GIANT PLAYGROUND SWING SET") 866.33.403 (TOLL FREE); 7am 7pm Pacific Time, Monday-Saturday ASSEMBLY INSTRUCTIONS FOR THE RORY S GIANT PLAYGROUND SWING SET Qty. 1 4 3 Description Frame Legs Lower Main Support Main Structural Timber
866.33.403 (TOLL FREE); 7am 7pm Pacific Time, Monday-Saturday ASSEMBLY INSTRUCTIONS FOR THE RORY S GIANT PLAYGROUND SWING SET Qty. 1 4 3 Description Frame Legs Lower Main Support Main Structural Timber
WILSHIRE BED. Bed Assembly Instructions. Page 1of 5. LIFESTYLE SOLUTIONS The Fusion Of Function And Comfort With Style
 WILSHIRE BED Bed Assembly Instructions. Shorter Canopy Rail Left & Right Head Board Posts Longer Canopy Rail Head Board Panel Metal Pin Slat Support Left & Right Foot Board Posts Slats Foot Board Panel
ASSEMBLY INSTRUCTIONS
 ASSEMBLY INSTRUCTIONS ATTENTION: THIS PRODUCT IS NOT FOR COMMERCIAL USE INTENDED FOR RESIDENTIAL USE ONLY. RTSV Use the correct bolts as indicated. Do not tighten any of the bolts until the swing is completely
Assembly Instructions
 Selling Station Assembly Instructions View from above without top A B C D Rounded finished corners on A & D Square unfinished 3-sides on B & C Selling Station Components (2) 2' x 6' Side s Have a channel
INSTALL LOAD BED TRACKS
 Universal LOAD BED TRAY & Load BArs TRBU001 / KRLBUNI1 INSTALL TIME: 2.5 Hours READ ME FIRST: Thank you for purchasing a Front Runner Slimline II Load Bed Rack or Load Bar Kit. Your Kit will contain the
MITCHELL WREATH RINGS NO-HAMMER ASSEMBLY INSTRUCTIONS
 MITCHELL WREATH RINGS NO-HAMMER ASSEMBLY INSTRUCTIONS METAL STAND WITH WOOD STAND WITH PAGE 2 OF 10 MASTER PARTS LIST HEAD ASSEMBLY LINKAGE ASSEMBLY HOOK LEVER ASSEMBLY FOOT PEDAL ASSEMBLY ALL FASTENERS
Assembly Instructions Eggstreme Chicken Coops
 Assembly Instructions Eggstreme Chicken Coops Tools Needed Drill/Driver #2 screwdriver bit Pliers Scissors or wire cutter 3/4 wrench Parts List PO Box 1340 Henderson, TX 75653 800-527-1459 To insure a
Version 1.0 TWO PEOPLE LEAN. Bookcase 5 Shelf. REQUIRED
 Version 1.0 TWO PEOPLE LEAN Bookcase 5 Shelf REQUIRED www.fantasticfurniture.com.au Enjoy Your purchase from Australia s Best Value Furniture Store www.fantasticfurniture.com.au PAGE 2 Assembly checklist
; Outside the US: am-7pm Pacific Time, Monday-Saturday. Assembly Instructions for: JHOOLA SWING SETS
 866.332.2403; Outside the US: 619.600.5630 7am-7pm Pacific Time, Monday-Saturday Assembly Instructions for: JHOOLA SWING SETS Thank you for purchasing Forever Redwood patio furniture. Forever Redwood is
x2 1/4 (6mm) Floor Anchor
 Floor Anchor") INSTALLATION GUIDE Main Components x1 Rail x5 Wall Spacer x2 Anti-jump Block x2 Straight Strap x1 Right Stopper x1 Left Stopper x5 5/16 (8mm x 60mm) Carriage Bolt x5 5/16 (8mm x25mm) Anchor x5 5/16 (8mm
INSTALLATION GUIDE Main Components x1 Rail x5 Wall Spacer x2 Anti-jump Block x2 Straight Strap x1 Right Stopper x1 Left Stopper x5 5/16 (8mm x 60mm) Carriage Bolt x5 5/16 (8mm x25mm) Anchor x5 5/16 (8mm
Double Beam Freestanding Pergola Installation Guide
 Double Beam Freestanding Pergola Installation Guide Patent Pending. Copyright 2011 USAVinyl, LLC - All Rights Reserved The information contained in these instructions are proprietary to USAVinyl, LLC and
Austin Standing Seam Awning Assembly and Installation Instructions. Assembly Instructions
 Austin Standing Seam Awning Assembly and Installation Instructions Be sure to use safety glasses when assembling and installing the awning. Some metal parts may have sharp edges. Use work gloves to handle
Storage Cabinets 9000 Series Assembly Instructions
 Storage Cabinets 9000 Series Assembly Instructions Thank you for selecting Salsbury s storage cabinets. We are confident that the quality and construction of the cabinets will prove to be a good investment.
ASSEMBLY INSTRUCTIONS
 ASSEMBLY INSTRUCTIONS ATTENTION: THIS PRODUCT IS NOT FOR COMMERCIAL USE INTENDED FOR RESIDENTIAL USE ONLY. RUSF-WM Use the correct bolts as indicated. Do not tighten any of the bolts until is completely
Assembly Instruction. 9,2 m² Grillkota
 Assembly Instruction 9,2 m² Grillkota Dear customers, Thank you for purchasing our product. We recommend that you read these instructions before installation and make the necessary preparations for building.
Free Standing Frame and Canopy
 Patriot Docks Free Standing Frame and Canopy Required Tools: Cordless Drill, 3/8 drill bit, 17mm wrench, 18mm wrench, 6mm hex key (included), 8mm hex key (included) Helpful Tips: Assembling and installing
Octagon Greenhouse Manual
 Tools Needed: -Cordless Drill (12V or higher) -#2 Square Drive Bit -Hammer -6 Step Ladder -Tape Measure -Utility knife w/ blade & hook blade -Speed Square -5/16 Wood Drill bit Little Cottage Co. PO Box
BARN DOOR HARDWARE KIT
 INSTALLATION GUIDE Main Components x1 Rail x5 Wall Spacer x2 Anti-jump Block x2 Bent Strap x1 Right Stopper x1 Left Stopper x5 5/16 (8mm x 60mm) Carriage Bolt x5 5/16 (8mm x25mm) Anchor x5 5/16 (8mm x
HZ1032A0TX/ HZ1032B0TX Shadowbox Wine/Bar Cabinet Assembly Instructions
 HZ0A0TX/ HZ0B0TX Shadowbox Wine/Bar Cabinet Assembly Instructions For assistance with assembly contact: Southern Enterprises Inc. Customer Service -800--509 service@seidal.com www.seidal.com Due to weight,
Strata. urniture. Addison Instructions. Parts in the Arm Box: Parts in the Body Box: Watch our assembly videos at
 1A Watch our assembly videos at www.strataf.com/videos.html Parts in the Arm Box: Arm - Outside View Arm - Inside View Corbels x 4 1B Parts in the Body Box: Back Deck x 1 Seat Deck x 1 Back Panel x 1 with
White Black Espresso Corner Desk Assembly Instructions
 White Black Espresso Corner Desk Assembly Instructions Page 1 White / Black / Espresso Corner Desk Parts List Please check packaging for all parts and hardware before discarding. Unpack and lay parts on
Vigilant Cigar Humidor Vault. Assembly Instructions
 Vigilant Cigar Humidor Vault Assembly Instructions Models: 1000, 1500, and 2000 Congratulations! You have purchased a superior cigar humidor. These humidors have been specifically designed to properly
Bridgeport All Wood Assembly Instructions STOP! Please read the following important information!
 Revision 6/01/2004 Bridgeport All Wood Assembly Instructions STOP! Please read the following important information! For questions on assembly or parts, DO NOT RETURN product to the store. Contact the experts
Assembly Instructions
 10' and 12' Octagon Cedar Gazebo Assembly Instructions Toll Free: 866.768.8465 Hours: 9-5 Monday-Friday EST www.homeplacestructures.com Package ships as shown revised 06/20/09 Cedar Gazebo Assembly Instructions
END FRAMES. End frames built using pressure treated 2x4 (1 1/2" x 3 1/2") 36" 34" 7/16" pilot hole. 5 1/2" x 1/2" lag bolt 8" wheel 23"
 36 34 7/16 pilot hole. 5 1/2 x 1/2 lag bolt 8 wheel 23") END FRAMES End frames built using pressure treated 2x4 (1 1/2" x 3 1/2") 23" 17 1/2" (B) (B) Measure from the bottom of your stone to 1" below the lip to get your measurement. 17 1/2"(B) 36" 34" 1/2" flat
END FRAMES End frames built using pressure treated 2x4 (1 1/2" x 3 1/2") 23" 17 1/2" (B) (B) Measure from the bottom of your stone to 1" below the lip to get your measurement. 17 1/2"(B) 36" 34" 1/2" flat
ASSEMBLY INSTRUCTIONS 10 X14 HIGGINS HARDTOP GAZEBO ITEM# L-GZ212PST-4
 3811110 ASSEMBLY INSTRUCTIONS 10 X14 HIGGINS HARDTOP GAZEBO ITEM# L-GZ212PST-4 Parts List Square pole A 4 Round pole B 4 Short arch bar C 4 Long arch bar D 6 Long beam 1 E1 2 Long beam 2 E2 2 Long beam
ASSEMBLY INSTRUCTIONS
 ASSEMBLY INSTRUCTIONS ATTENTION: THIS PRODUCT IS NOT FOR COMMERCIAL USE INTENDED FOR RESIDENTIAL USE ONLY. RUS67 Use the correct bolts as indicated. Do not tighten any of the bolts until is completely
Octagon Vinyl Gazebo Assembly Instructions For 10 & 12 Models
 Octagon Vinyl Gazebo Assembly Instructions For 10 & 12 Models Toll Free: 866.768.8465 Hours: 9-5 Monday-Friday EST www.homeplacestructures.com Package ships as shown revised 04/29/09 Vinyl Gazebo Assembly
ASSEMBLY INSTRUCTIONS
 ASSEMBLY INSTRUCTIONS ATTENTION: THIS PRODUCT IS NOT FOR COMMERCIAL USE INTENDED FOR RESIDENTIAL USE ONLY. RUSH!!! Do not discard of any of the packaging until you have checked that you have all of the
INSTRUCTION MANUAL MANUAL DE INSTRUCCIONES
 INSTRUCTION MANUAL MANUAL DE INSTRUCCIONES Model Number/ No. de Modelo: WDB101 CLOTHES DRYER STACKING BRACKET CAUTION: BEFORE USE, PLEASE READ AND FOLLOW ALL SAFETY RULES AND OPERATING INSTRUCTIONS. Avanti
CONTINUED. TABLE TOPS: 1. Sort one 2x6x8 piece from your lumber. 2. Measure and mark two 48 pieces from each, then cut.
 # Materials: Quantity Each: Total Quantity: x4x8 7 x6x8 1 TIPS FOR SUCCESSFUL PREP WORK: Before starting, carefully read through the entire instruction sheet. Refer to the material list to the left and
Assembly Instructions
 Assembly Instructions T Tinwell picnic bench Before you commence the assembly process we recommend that you read these instructions thoroughly beforehand to familiarise yourself with the assembly process
x2 1/4 (6mm) Floor Anchor
 Floor Anchor") Main Components x1 Rail x5 Wall Spacer x2 Anti-jump Block x2 Bent Strap x1 Right Stopper x1 Left Stopper x5 5/16 (8mm x 60mm) Carriage Bolt x5 5/16 (8mm x25mm) Anchor x5 5/16 (8mm x 90mm) Wall Screw x2
Main Components x1 Rail x5 Wall Spacer x2 Anti-jump Block x2 Bent Strap x1 Right Stopper x1 Left Stopper x5 5/16 (8mm x 60mm) Carriage Bolt x5 5/16 (8mm x25mm) Anchor x5 5/16 (8mm x 90mm) Wall Screw x2
Constable Oak Extension Dining Table
 Constable Oak Extension Dining Table Assembly Instructions - Please keep for future reference 176/0325 Dimensions Width - 160/ 200cm Depth - 90cm Height - 75cm Important - Please read these instructions
#27541 Mobile Laptop. Charging Station. Assembly Instructions
 1 #27541 Mobile Laptop Charging Station Assembly Instructions #27541 Mobile Laptop Charging Station Part Drawing Description Qty Part Drawing Description Qty Hardware List P-1 Left Leg Welded 1 EA A Phil
Side Mount INSTRUCTION BOOKLET #C122 BED STYLE: PARK CITY
 Side Mount BED STYLE: PARK CITY INSTRUCTION BOOKLET #C1 WARNING! ALL MURPHY/WALLBED SYSTEMS CONTAIN STORED ENERGY. FAILURE TO USE AND FOLLOW THESE INSTRUCTIONS DURING THE INSTALLATION PROCESS COULD RESULT
(Toll Free); 7am-7pm Pacific Time, Monday-Saturday. Assembly instructions for: MARISSA S ADVENTURE LOFTS
; 7am-7pm Pacific Time, Monday-Saturday. Assembly instructions for: MARISSA S ADVENTURE LOFTS") 866.332.2403 (Toll Free); 7am-7pm Pacific Time, Monday-Saturday Assembly instructions for: MARISSA S ADVENTURE LOFTS Thank you for purchasing Forever Redwood patio furniture. Forever Redwood is built by
866.332.2403 (Toll Free); 7am-7pm Pacific Time, Monday-Saturday Assembly instructions for: MARISSA S ADVENTURE LOFTS Thank you for purchasing Forever Redwood patio furniture. Forever Redwood is built by
Parts List. U-DS92ST Ashley Creative Center With Padded Stool Assembly Instructions. [15] - Plastic Thick Washer (2 - pieces) [22] - Wrench (1 piece)
![Parts List. U-DS92ST Ashley Creative Center With Padded Stool Assembly Instructions. [15] - Plastic Thick Washer (2 - pieces) [22] - Wrench (1 piece)](/thumbs/82/86598067.jpg "Parts List. U-DS92ST Ashley Creative Center With Padded Stool Assembly Instructions. [15] - Plastic Thick Washer (2 - pieces) [22] - Wrench (1 piece)") [1] - 23.5 x 35.5 Top [8] - Drawer Support Rods Parts List [15] - Plastic Thick Washer (2 - pieces) [22] - Wrench [2] - Upper Base left End (1 pieces) [9] - Media Supports (1 pieces) [16] - loor Guides
[1] - 23.5 x 35.5 Top [8] - Drawer Support Rods Parts List [15] - Plastic Thick Washer (2 - pieces) [22] - Wrench [2] - Upper Base left End (1 pieces) [9] - Media Supports (1 pieces) [16] - loor Guides
 INSTRUCTION BOOKLET #C10 Watch step by step installation instructions at: https://www.wallbedsbywilding.com/wallbed-installation-studio-series/ WARNING! ALL MURPHY/WALLBED SYSTEMS CONTAIN STORED ENERGY.
Medium Pro Table Top Stand
 Medium Pro Table Top Stand Build Manual Thank you for purchasing a Foam-Flite model airplane stand. Your Foam-Flite stand was designed by modelers just like you looking for an economical and versatile
#27541 Mobile Laptop Charging Station
 1 #27541 Mobile Laptop Charging Station Assembly Instructions #27541 Mobile Laptop Charging Station Part Drawing Description Qty Part Drawing Description Qty Hardware List P-1 Left Leg Welded 1 EA A Phil
BD101K / BD101K INSTALLATION GUIDE BARN DOOR HARDWARE TOP OF DOOR STRAP KIT
 Common Components x1 Right Stopper x1 Left Stopper x2 Top of Door Strap x2 Anti-jump Block x2 #8 (4.2mm x 25mm) Floor Screws x2 1/4 (6mm) Floor Anchor x1 Internal Floor-Mounted Door Guide BD850-BR/MB/SS
ASSEMBLY INSTRUCTIONS
 ASSEMBLY INSTRUCTIONS ITEM No. :Quilty/ 3 A helpful Assembly Video can be found on www.arrowcabinets.com in the Video Section under Quilty Incorrect Correct The turning direction of attaching The arrow
Tennyson Fireplace. FA8545ARTX- Classic Espresso. Assembly Instructions
 Tennyson Fireplace FA8545ARTX- Classic Espresso Assembly Instructions For assistance with assembly contact: Southern Enterprises Inc. Customer Service 1-800-633-5096 service@seidal.com www.seidal.com 1
9. Weld a cross brace between the H frame and the A frame on each side. 10. Remove all the bracing and blocks, now you have I frame to work off.
 Foam target butts 1. Determine what butts you wish to install we used 4 different types not the best idea as we had to make 2 different size frames 2. Find the wheels you wish to use I prefer large wheels
TV/Media Stand- Mission Oak Finish. Assembly Instructions
 TV/Media Stand- Mission Oak Finish Assembly Instructions TV/Media Stand Parts List Please review all parts and hardware before disposing of any packaging. Call Customer Service if missing hardware. Before
Strata. urniture. Adriana Instructions. Parts in the Arm Box: Parts in the Body Box: Watch our assembly videos at
 1A Watch our assembly videos at www.strataf.com/videos Parts in the Arm Box: Arm - Outside View Arm - Inside View 1B Parts in the Body Box: Back Deck x 1 Seat Deck x 1 with the Feet attached Back Panel
Queen Wingback Bed King Wingback Bed
 Parts and Hardware List A. Side Rails with Attachment Hooks 2 pcs B. Foot Rail 1 pc C. Head Rail 1 pc D. Center Support Slat 1 pc E. Leg Supports 3 pcs F. Support Slats 4 pcs G. Flat Washers 8 pcs H. Lock
https://www.wallbedsbywilding.com/wallbed-installation-studio-series/
 For Wallbed models: KING SIZE INSTRUCTION BOOKLET #C1 Watch step by step installation instructions at: https://www.wallbedsbywilding.com/wallbed-installation-studio-series/ WARNING! ALL MURPHY/WALLBED
Installation Instruction
 Tools Needed for Assembly Stud finder (for wood stud wall) Pencil Mark Electric drill Wood Stud Wall Installation Step 1. Locate the Wood Studs Installation Instruction Drill bit (for wood stud wall) Masonry
Elite Home-Attached Greenhouse
 Elite Home-Attached Greenhouse Photo may show a greenhouse of a different length. Elite Home-Attached Greenhouse Use these instructions for the following greenhouses: #104711 #104713 #104715 2007 ClearSpan
(Toll Free); 7am-7pm Pacific Time, Monday-Saturday. Assembly Instructions for: RORY S BIG PLAYGROUND SWING SETS
; 7am-7pm Pacific Time, Monday-Saturday. Assembly Instructions for: RORY S BIG PLAYGROUND SWING SETS") 866.332.2403 (Toll Free); 7am-7pm Pacific Time, Monday-Saturday Assembly Instructions for: RORY S BIG PLAYGROUND SWING SETS Thank you for purchasing Forever Redwood patio furniture. Forever Redwood is
866.332.2403 (Toll Free); 7am-7pm Pacific Time, Monday-Saturday Assembly Instructions for: RORY S BIG PLAYGROUND SWING SETS Thank you for purchasing Forever Redwood patio furniture. Forever Redwood is
INSTRUCTION BOOKLET #C21. For Wallbed models: KING SIZE
 For Wallbed models: KING SIZE INSTRUCTION BOOKLET #C1 WARNING! ALL MURPHY/WALLBED SYSTEMS CONTAIN STORED ENERGY. FAILURE TO USE AND FOLLOW THESE INSTRUCTIONS DURING THE INSTALLATION PROCESS COULD RESULT
Riverside. Windhaven Queen Storage Bed Assembly Instructions
 Queen Storage Bed Page 1 of 7 2 pcs. 4 pcs. 4 pcs. 4 pcs. 2 pcs. 5/0 Queen Storage Bed 50773 -- 5/0 Storage Footboard w/platform Note: The 50773 Storage Footboard can be used with the 50770 Panel Headboard
Assembly Instructions
 Assembly Instructions Frame Models Lotz (10000), Madison (2644), Vancouver (2710), Boston (2715), San Juan (2717), Marlowe (2719), Arlington (2722), Monticello (2730), Avalon (2750) & Tucson (2770) Tel:
User Instructions Multiline Otter Scoreboard Caddy Assembly
 List of parts: User Instructions Multiline Otter Scoreboard Caddy Assembly Single Caddy Double Caddy 1 1 Base assembly with attached wheels 2 4 1 1 2 4 4 8 10 20 12 Uprights (60 or 74 aluminum extrusion)
 INSTRUCTION BOOKLET #C0 Watch step by step installation instructions at: https://www.wallbedsbywilding.com/wallbed-installation-studio-series/ WARNING! ALL MURPHY/WALLBED SYSTEMS CONTAIN STORED ENERGY.
Vibe Buffet Assembly Instructions
 ssembly Instructions Thank you for your purchase. Please follow the instructions below for correct assembly. bolt bolt locking dowel long x nut x x0 screw x8 x H I J K small screw x4 V W safety strap x
 For Wallbed models: KING SIZE INSTRUCTION BOOKLET #C1 Watch step by step installation instructions at: https://www.wallbedsbywilding.com/wallbed-installation-studio-series/ WARNING! ALL MURPHY/WALLBED
Jenny Legs Assembly Instructions
 Jenny Legs Assembly Instructions R EXTENDED PHILLIPS BIT MM ALLEN WRENCH 6MM HEX DRIVE /" 007 Steelcase Inc. Grand Rapids, MI 90 U.S.A. Printed in U.S.A. Page of 6 88000 Rev F Jenny Club Instructions:
INSTRUCTION BOOKLET #C20
 INSTRUCTION BOOKLET #C0 WARNING! ALL MURPHY/WALLBED SYSTEMS CONTAIN STORED ENERGY. FAILURE TO USE AND FOLLOW THESE INSTRUCTIONS DURING THE INSTALLATION PROCESS COULD RESULT IN SEVERE PERSONAL INJURY TO
Installation Instructions
 Installation Instructions Ceiling Mount Bracket for DLP Based Projectors (for High Ceilings) Model No. ET-PKD100H Contents Important Safety Notice.................. 2 For DLP Based Projector: PT-D10000
Opus Base Unit Assembly
 Opus Base Unit Assembly 5/16" NOTE: All cam locks need to be rechecked to confirm they are tight before installation. Gaps could result if not completely tightened and effect assembly. 2 Foot Scrap Board
Riverside. Oakmont Queen Storage Bed Assembly Instructions
 Queen Storage Bed Page 1 of 7 8 pcs. 8 pcs. 1 pc. 1 pc. 8 pcs. 8 pcs. 8 pcs. 8 pcs. 1 pc. 1 pc. 20270 --5/0 Sleigh Headboard 20274 --5/0-6/6 Bed Rails 20273 -- 5/0 Storage Footboard, Panels, Slats Queen
The Mind Project s Iris 1 Robotic Arm. Packing List Assembly instructions
 The Mind Project s Iris 1 Robotic Arm Packing List Assembly instructions Packing list Below you will find pictures and descriptions of each part. It may be helpful to take each piece out of the bag and