Assembly Instructions
|
|
|
- Merryl Greer
- 5 years ago
- Views:
Transcription


1 V Assembly Instructions (W x D x H) 1.44m x 0.66m x 2.23m Product Name: Cheltenham Arbour with Storage Box Pressure Treated products should not be treated with any other products for the first month. PLEASE KEEP THIS INSTRUCTION Zest4Leisure option 1 sales@zest4leisure.co.uk


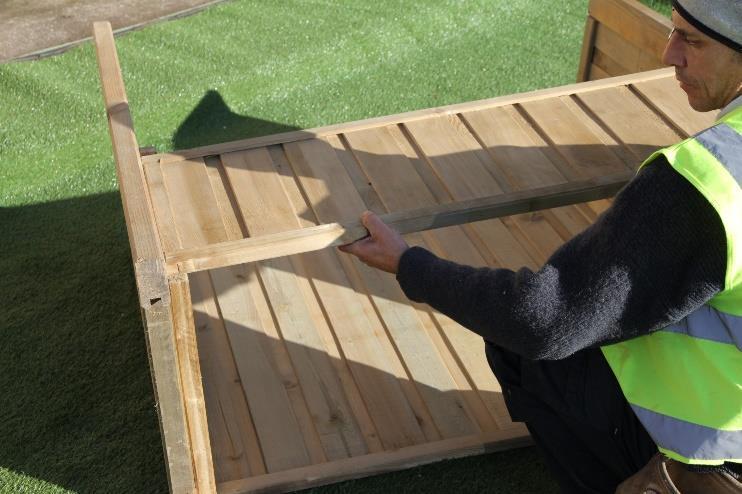
2 Cheltenham Arbour Assembly Instructions Requires 2 person assembly. All screw holes to be pre-drilled. Tools required: Corded / Cordless Drill, Pozi-drive Bit / Screwdriver, 3mm Drill Bit. Cheltenham Arbour Pack List Item Description Quantity A Side Panel 2 B Back Panel (May come in 2 sections) 1 C Front Panel 1 D Floor Panel 1 E Hinged Seat Assembly 1 F Seat Back Rest 1 G Trellis Back Panel 1 H Middle Back Panel 1 J Fascia Board 4 K Roof Panel 2 L Ridge Capping 1 M Pointed Finial 2 Fixings 40mm Screws 15 50mm Screws 14 60mm Screws 28
3 Please take a few moments to check all pack contents listed. Please contact Zest4Leisure directly if any of the pack contents are damaged or missing. Contact telephone: option 1 or sales@zest4leisure.co.uk Assembly requires 2 persons. All screw holes to be pre-drilled. Tools required: Corded/Cordless Drill, Pozi-drive Bit/Screwdriver, 3mm Drill Bit. 1. Set out Side Panels A and Back Panel B as shown in Fig.1a (MAY COME IN 2 SECTIONS) and fix together using 6no 60mm Screws 3no per side (Fig.1b) 2. Place Front Panel (C) between the Side Panels A (Fig.2a) and fix in position using 4no 60mm Screws 2no per side (Fig.2b). 3. Locate Floor Panel D on to the floor support battens (Fig.3a) and fix to the floor battens using 4no 60mm Screws 2no per side. 4. Position the Seas Hinged Assembly E on to the seat support battens (Fig.4a) and fix to the seat support battens using 4no 60mm Screws 2no per side of rear section of the Hinged Seat Assembly E (Fig.4b). 5. Position Seat Back Rest F between the Side Panels A (Fig.5a). Attach to the Hinged Seat Assembly E using 2no 60mm Screws 1no per side (Fig.5a) and to the Side Panels A using 2no 60mm Screws 1no per side (Fig.5b) 6. Attach Trellis Back Panel G to the Middle Back Panel H using 2no 40mm Screws 1no per side (Fig.6a). Attach trellis and middle back panel assembly to the Back Panel B using 3no 40mm Screws 1no per corner and 1no in the middle (Fig.6b). 7. Fix together 2no Fascia Boards J using 1no 60mm Screw. Repeat process for the remaining 2no Fascia Boards J. Set the Roof Panels K as shown in Figs. 7b & 7c ensuring the outermost corners of the Roof Panels K are flush to the top edges of Fascia Boards J (Figs.7b & 7c). Attach Fascia Boards J to Roof Panels K using 12no 50mm Screws 3 per Fascia Board J (Fig.7d). 8. Place roof assembly on to Side Panels A (Fig.8a) and fix to the Side Panels A through Fascia Boards J using 4no 60mm Screws 1no per Fascia Board. Further attach the roof assembly to the Trellis Back Panel G through the Fascia Boards J using 2no 50mm Screws 1no per rear Fascia Board J. 9. Attach the Ridge Capping L to the top of Roof Panels K using 6no 40mm Screws 3no per panel (Fig.9). 10. Position and attach centrally, 2no Pointed Finials M to the Fascia Boards J (front and back) using 4no 40mm screws 2no per finial (Fig.10) Cheltenham Arbour is now complete.


4 1a 1b 2a 2b 3a 3b 4a 4b


5 5a 5b 6a 6b 7a 7b 7c 7d


6 8a 8b 8c 9 10
Assembly Instructions
 V2-05.16 Assembly Instructions (W x D x H): 2.20m x 2.20m x 2.49m Product Name: Brighton Corner Arbour Pressure Treated products should not be treated with any other products for the first month. PLEASE
Assembly Instructions
 V3-03.17 Assembly Instructions (W x D x H) 1.97m x 0.63m x 2.06m Product Name: Hampshire Arbour with Storage Box Pressure Treated products should not be treated with any other products for the first month.
Assembly Instructions
 V4-10.15 Assembly Instructions (W x D x H) 1.89m x 1.62m x 1.80m Product Name: Miami Swing Pressure Treated products should not be treated with any other products for the first month. PLEASE KEEP THIS
INSTRUCTIONS FOR ASSEMBLY 2355mm x 3125mm Workshop
 Manufacturer of Christie Glasshouses and Sheds INSTRUCTIONS FOR ASSEMBLY 2355mm x 3125mm Workshop 1 Thomas Burns Street, Dunedin Phone (03) 477 7909 www.allans.co.nz Congratulations on your purchase of
INSTRUCTIONS FOR ASSEMBLY 2355mm x 4665mm Workshop
 Manufacturer of Christie Glasshouses and Sheds INSTRUCTIONS FOR ASSEMBLY 2355mm x 4665mm Workshop 1 Thomas Burns Street, Dunedin Phone (03) 477 7909 www.allans.co.nz Congratulations on your purchase of
4x6 Barn/Gable Coop With Wheels
 4x6 Barn/Gable Coop With Wheels Tools Needed: -Cordless Drill (12V or higher) -#2 Square Drive Bit -Hammer -Tape Measure -Speed Square Little Cottage Co. PO Box 455 Berlin, OH 44610 330-893-4212 www.cottagekits.com
Classic Saltbox Manual
 Tools Needed: -Cordless Drill (12V or higher) -#2 Square Drive Bit -Hammer -6 Step Ladder -Tape Measure -Utility knife w/ blade & hook blade -Speed Square -5/16 Wood Drill bit Little Cottage Co. PO Box
Jabiru Installation instructions
 Page 1 of 5 s Step Description 1 Mark out centre line of the installation 2 Align centre line of installation with the centre line of the "Front Panel Cut out" template. Align "FLOOR" on template with
Precut Workshop & Gable Manual
 Tools Needed: -Cordless Drill (12V or higher) -#2 Square Drive Bit -Hammer -6 Step Ladder -Tape Measure -Square utility knife w/ blade & hook blade -Speed Square Little Cottage Co. PO Box 455 Berlin, OH
10x12 Victorian Manual
 Tools Needed: -Cordless Drill (12V or higher) -#2 Square Drive Bit -Hammer -6 Step Ladder -Tape Measure -Square utility knife w/ blade & hook blade -Speed Square Little Cottage Co. PO Box 455 Berlin, OH
Hard wearing and durable Quick and easy to install Fully adjustable for batten gauges of mm
 INSTALLATION GUIDE Watch the installation VIDEO arielplastics.com Hard wearing and durable Quick and easy to install Fully adjustable for batten gauges of 260-350mm www.arielplastics.com Coroverge is a
Gambrel Barn with Overhang Manual
 Tools Needed: -Cordless Drill (12V or higher) -#2 Square Drive Bit -Hammer -6 Step Ladder -Tape Measure -Square utility knife w/ blade & hook blade -Speed Square Little Cottage Co. PO Box 455 Berlin, OH
Assembly Book. Northwood Deluxe. 14'x10' Revised on August 28, 2015
 Assembly Book Revised on August 28, 2015 Northwood Deluxe 14'x10' Manufactured by Reynolds Building Systems, Inc. 205 Arlington Drive Greenville, PA 16125 724-646-3775 This manual is copyrighted. Under
4x4 Barn/Gable Coop with Run Manual
 Manual Tools Needed: -Cordless Drill (12V or higher) -#2 Square Drive Bit -Hammer -Tape Measure -Speed Square Little Cottage Co. PO Box 455 Berlin, OH 44610 330-893-4212 www.cottagekits.com 2008-2009 Little
Assembly Book. Northwood Deluxe. 10'x10' Revised on May 20, 2014
 Assembly Book Revised on May 20, 2014 Northwood Deluxe 10'x10' Manufactured by Reynolds Building Systems, Inc. 205 Arlington Drive Greenville, PA 16125 724-646-3775 This manual is copyrighted. Under the
Gambrel Barn Construction Manual 8x8 through 16x24 Units
 Gambrel Barn Construction Manual 8x8 through 16x24 Units Tools Needed: Cordless drill (12V or higher) #2 square drive bit Hammer 6 step ladder Tape measure Square utility knife w/ blade & hook blade Little
Best Barns. the Cypress R 10' x 16' Assembly Book. revised February 19, 2016
 Best Barns Assembly Book revised February 19, 2016 the Cypress R 10' x 16' Manufactured by Reynolds Building Systems, Inc. 205 Arlington Drive Greenville, PA 16125 724-646-3775 This manual is copyrighted.
FREEDOM 2 PORTABLE RESTROOM ASSEMBLY INSTRUCTION
 FREEDOM 2 PORTABLE RESTROOM ASSEMBLY INSTRUCTION 2530 Xenium Lane North, Minneapolis, MN 55441 Telephone: 763-553-1900 Fax: 763-553-1905 800-328-3332 / www.satelliteindustries.com PN 14579/REV. X 9/06
Best Barns. 10' x 12' the Cypress R. Assembly Book. revised September 29, 2016
 Best Barns Assembly Book revised September 29, 2016 the Cypress R 10' x 12' Manufactured by Reynolds Building Systems, Inc. 205 Arlington Drive - Greenville, PA 16125 This manual is copyrighted. Under
Potting Store Assembly Instructions
 Before assembly We recommend that time is taken to read the instructions before starting assembly, then follow the easy step by step guide. The instruction sheet is only a guide to the assembly. Certain
Best Barns. 10' x 12' the Elm R. Assembly Book. revised September 29, 2016
 Best Barns Assembly Book revised September 29, 2016 the Elm R 10' x 12' Manufactured by Reynolds Building Systems, Inc. 205 Arlington Drive - Greenville, PA 16125 This manual is copyrighted. Under the
Manufactured by Reynolds Building Systems, Inc.
 up EZ Sheds Assembly Book the Ashbury January 19, 2008 8' x 12' Manufactured by Reynolds Building Systems, Inc. 205 Arlington Drive Greenville, PA 16125 724-646-3775 This manual is copyrighted. Under the
Best Barns. 10' x 16' the Elm R. Assembly Book. revised September 29, 2016
 Best Barns Assembly Book revised September 29, 2016 the Elm R 10' x 16' Manufactured by Reynolds Building Systems, Inc. 205 Arlington Drive - Greenville, PA 16125 This manual is copyrighted. Under the
TRASH CAN & FIREWOOD STORAGE UNIT
 TRASH CAN & FIREWOOD STORAGE UNIT Project Plan #853 Sheet 1 of 5 Taking out the trash and chopping firewood can be two chores no one really enjoys. And most people don t want the sight of trash cans and
Assembly Instructions
 Assembly Instructions T Tinwell picnic bench Before you commence the assembly process we recommend that you read these instructions thoroughly beforehand to familiarise yourself with the assembly process
CAUTION: Before opening the crate place it flat on its side (not up right as show in the photo) Hardware included for assembling your gazebo:
 Hardware included for assembling your gazebo:") Octagon Wood Gazebo Kit Contents Hardware included for assembling your gazebo: 5/16" Lag Bolts Use to fasten post to floor 2 1/2" screws Use to fasten joist together fasten posts to outside joist fasten
Octagon Wood Gazebo Kit Contents Hardware included for assembling your gazebo: 5/16" Lag Bolts Use to fasten post to floor 2 1/2" screws Use to fasten joist together fasten posts to outside joist fasten
Precut Value Shed Manual Gambrel Barn
 Tools Needed: -Cordless Drill (12V or higher) -#2 Square Drive Bit -Hammer -6 Step Ladder -Tape Measure -Square utility knife w/ blade & hook blade -Speed Square Little Cottage Co. PO Box 455 Berlin, OH
Best Barns USA. the Danbury - R 8' x 12' Assembly Book. Revised September 30, 2016
 Best Barns USA Assembly Book Revised September 30, 2016 the Danbury - R 8' x 12' Manufactured by Reynolds Building Systems, Inc. 205 Arlington Drive Greenville, PA 16125 724-646-3775 This manual is copyrighted.
Best Barns USA. the Danbury 8' x 12' Assembly Book. Revised February 17, 2017
 Best Barns USA Assembly Book Revised February 17, 2017 the Danbury 8' x 12' Manufactured by Reynolds Building Systems, Inc. 205 Arlington Drive, Greenville, PA 16125 This manual is copyrighted. Under the
WARNING. Not suitable for children under 36 months Contents
 For domestic and family use only Children of any age should not be left to play unsupervised Retain Instructions for future reference WARNING. Not suitable for children under 36 months Contents Length
Best Barns USA. Regency Deluxe. 8' x 12' Assembly Book. revised February 15, 2017
 Best Barns USA Assembly Book revised February 15, 2017 Regency Deluxe 8' x 12' Manufactured by Reynolds Building Systems, Inc. 205 Arlington Drive, Greenville, PA 16125 This manual is copyrighted. Under
Cold Frame Instructions
 1 05/13 Cold Frame Instructions Thank you for purchasing your new Alton cold frame. We recommend you familiarise yourself with the instructions and read all safety information before you commence assembly.
Ultra Fast Delivery SGL Toilet Cubicle Pack Fitting Instructions
 Ultra Fast Delivery SGL Toilet Cubicle Pack Fitting Instructions This instructional booklet should be read in full prior to undertaking any work. If in doubt please call Commercial Washrooms on 01202 650900,
Garden. Newland picnic bench. Package contents. Tools required ASSEMBLY INSTRUCTIONS
 Garden Furniture Direct T: 03333 448 121 ASSEMBLY INSTRUCTIONS Newland picnic bench Before you commence the assembly process we recommend that you read these instructions thoroughly beforehand to familiarise
Assembly Instruction. 9,2 m² Grillkota
 Assembly Instruction 9,2 m² Grillkota Dear customers, Thank you for purchasing our product. We recommend that you read these instructions before installation and make the necessary preparations for building.
Best Barns USA Assembly Book Revised November 3, 2016
 Best Barns USA Assembly Book Revised November 3, 2016 the Aspen II 12' x 8' Manufactured by Reynolds Building Systems, Inc. 205 Arlington Drive, Greenville, PA 16125 This manual is copyrighted. Under the
Assembly Instructions
 Assembly Instructions T Tinwell picnic bench Before you commence the assembly process we recommend that you read these instructions thoroughly beforehand to familiarise yourself with the assembly process
Metro Series Sauna. installation instructions
 Metro Series Sauna installation instructions Please immediately check for any hidden damage that may have occurred in shipping. If any damage is found you must notify the delivering carrier within seven
Blackout Instructions. 4 R-Series Fascia Installation Outside Mount
 Blackout Instructions 4 R-Series Fascia Installation Outside Mount 1 Components Needed page 3 Tools Needed page 4 System Diagram page 5 Instructions Step 1: Install Brackets. Page 6 Step 2: Mount Back
Best Barns USA Assembly Book
 Best Barns USA Assembly Book Revised September 19, 2017 the Woodville 10' x 12' Manufactured by Reynolds Building Systems, Inc. 205 Arlington Drive Greenville, PA 16125 This manual is copyrighted. Under
STORAGE SHED. Storage Shed Project Plan #854 Sheet 1 of Riverside Dr., Suite 212 Metairie, LA SouthernPine.com SouthernPineDecks.
 STORAGE SHED Project Plan #854 Sheet 1 of 6 Enjoying your backyard can be relaxing, but it can also get crowded. There s lawn furniture, gardening tools and supplies, camping gear, maybe even pool equipment.
2.4 x 1.8 (8 x 6 ) Premier Shiplap Modular Shed Assembly Instructions
 Premier Shiplap Modular Shed Assembly Instructions") 2.4 x 1.8 (8 x 6 ) Premier Shiplap Modular Shed Assembly Instructions English SS197C Before assembly We recommend that time is taken to read the instructions before starting assembly, then follow the easy
2.4 x 1.8 (8 x 6 ) Premier Shiplap Modular Shed Assembly Instructions English SS197C Before assembly We recommend that time is taken to read the instructions before starting assembly, then follow the easy
INTRODUCTION Tools Required Laminate Washroom Products... 4 DUCT PANELS Fixing the Frame: Fixing the Shadow Panels...
 Contents INTRODUCTION... 2 Tools Required... 3 Laminate Washroom Products... 4 DUCT PANELS... 4 Fixing the Frame:... 5 Fixing the Shadow Panels... 9 Fitting the Duct Panels:... 10 WASHSTATIONS... 15 Fixing
Best Barns USA Assembly Book
 Best Barns USA Assembly Book Revised February 17, 2015 the Meadowbrook-R 12' x 10' Manufactured by Reynolds Building Systems, Inc. 205 Arlington Drive Greenville, PA 16125 724-646-3775 This manual is copyrighted.
Best Barns USA Assembly Book
 Best Barns USA Assembly Book Revised October 11, 2018 the Woodville 10' x 16' Manufactured by Reynolds Building Systems, Inc. 205 Arlington Drive Greenville, PA 16125 This manual is copyrighted. Under
Best Barns USA Assembly Book
 Best Barns USA Assembly Book Revised September 19, 2016 the Meadowbrook-R 12' x 10' Manufactured by Reynolds Building Systems, Inc. 205 Arlington Drive Greenville, PA 16125 724-646-3775 This manual is
Best Barns USA Assembly Book
 Best Barns USA Assembly Book Revised September 19, 2016 the Meadowbrook-R 16' x 10' Manufactured by Reynolds Building Systems, Inc. 205 Arlington Drive Greenville, PA 16125 724-646-3775 This manual is
Assembly Book. the Fairview. Building Size 12'x12' Revised July 25, 2012
 Assembly Book Revised July 25, 2012 the Fairview Building Size 12'x12' Manufactured by Reynolds Building Systems, Inc. 205 Arlington Drive Greenville, PA 16125 724-646-3775 This manual is copyrighted.
Assembly Book. 10' x 12' the Cambridge II. revised June 13, 2014
 Assembly Book revised June 13, 2014 the Cambridge II 10' x 12' Manufactured by Reynolds Building Systems, Inc. 205 Arlington Drive Greenville, PA 16125 724-646-3775 This manual is copyrighted. Under the
10x12 Cape Cod Manual
 Tools Needed: -Cordless Drill (12V or higher) -#2 Square Drive Bit -Hammer -6 Step Ladder -Tape Measure -Square utility knife w/ blade & hook blade -Speed Square Little Cottage Co. PO Box 455 Berlin, OH
SLIDING DOOR SYSTEMS: INSTALLATION INSTRUCTIONS SLANTED DOOR GUIDE
 SLIDING DOOR SYSTEMS: INSTALLATION INSTRUCTIONS SLANTED DOOR GUIDE Version 3 (Up to date, january 2011) manufacturing assembly easy medium difficult subjekt to technical changes CONTENTS General / tools_page
INSTRUCTIONS High Tech II Unit Assembly
 INSTRUCTIONS High Tech II Unit Assembly The following instruction is a guideline, illustrating suggested methods, assembly sequence, and tool selection. Actual assembly may vary by each situation. Careful
Wine Rack Assembly Instructions. Ten Column Display Rack
 Wine Rack Assembly Instructions Ten Column Display Rack Congratulations! You have purchased the finest wine racking available anywhere. Properly assembled, these Vigilant wine racks will outlast even your
Corner Potting Store Assembly Instructions
 Corner Potting Store Assembly Instructions English SS225E Before assembly We recommend that time is taken to read the instructions before starting assembly, then follow the easy step by step guide. The
Five Column Half Height Rack Base Rack. (Shown with Tabletop)
") Five Column Half Height Rack Base Rack (Shown with Tabletop) Congratulations! You have purchased the finest wine racking available anywhere. Properly assembled, these Vigilant wine racks will outlast even
Five Column Half Height Rack Base Rack (Shown with Tabletop) Congratulations! You have purchased the finest wine racking available anywhere. Properly assembled, these Vigilant wine racks will outlast even
SIMPLER BETTER FASTER
 SIMPLER BETTER FASTER 1. FITTING RING BEAMS DETAILS Always work anti-clockwise viewed from outside the roof. Each bar should be sequentially numbered, i.e. 1, 2, 3. Select the ring beam, position the left
Best Barns USA Assembly Book
 Best Barns USA Assembly Book Revised November 27, 2013 the Easton - R 12'x 20' Manufactured by Reynolds Building Systems, Inc. 205 Arlington Drive Greenville, PA 16125 724-646-3775 This manual is copyrighted.
French Door W/Cut-Out (Outside Mount L-Frame-Single Panel)
") NORMAN SHUTTERS INSTALLATION INSTRUCTIONS French Door W/Cut-Out (Outside Mount L-Frame-Single Panel) Getting Started Recommended Tools: Nail Gun or Cordless Drill, Tape Measure, Torpedo Level, Box Knife,
NORMAN SHUTTERS INSTALLATION INSTRUCTIONS French Door W/Cut-Out (Outside Mount L-Frame-Single Panel) Getting Started Recommended Tools: Nail Gun or Cordless Drill, Tape Measure, Torpedo Level, Box Knife,
STOP! Call Us First! DO NOT RETURN TO STORE.
 16575 STOP! Call Us First! DO NOT RETURN TO STORE. For immediate help with assembly or product information call our toll free number: 1-800-844-9273 or email: customerservice@backyardproductsllc.com Our
Playaway Swiss Cottage Assembly Instructions
 Playaway Swiss Cottage Assembly Instructions English SS288C IMPORTANT SAFETY INFORMATION Adult assembly is required. Checks and maintenance needs to be carried out on the main parts (fixings etc.) at regular
Extension Standard building 03/15
 Extension Standard building 03/15 8 Wide Evolution Extension Assembly Instructions Contents: Introduction Base Preparation Overview Base Assembly Side Assembly Front Assembly Extension Installation Rear
Assembly of Corner Arbour
 BUILT AROUND OUR REPUTATION PLEASE NOTE Wood is a natural product and is therefore prone to changes in appearance, including some warping, movement and splitting, particularly during unusual climatic conditions
Triple Wheelie Bin Chest Instructions
 Triple Wheelie Bin Chest Instructions Please read the instructions carefully before assembling this product and check pieces and fixings using the list below. Parts list: 1 x Left Panel 3 x Back Panel
Oriental Pagoda Assembly Instructions
 Oriental Pagoda Assembly Instructions English SS136A Before assembly We recommend that time is taken to read the instructions before starting assembly, then follow the easy step by step guide. The instruction
Star Barn Manual. Tools Needed:
 Tools Needed: -Cordless Drill (12V or higher) -#2 Square Drive Bit -Hammer -6 Step Ladder -Tape Measure -Square utility knife w/ blade & hook blade -Speed Square Little Cottage Co. PO Box 455 Berlin, OH
Assembly Book. 10' x 16' the Cambridge II. revised July 15, 2014
 Assembly Book revised July 15, 2014 the Cambridge II 10' x 16' Manufactured by Reynolds Building Systems, Inc. 205 Arlington Drive Greenville, PA 16125 724-646-3775 This manual is copyrighted. Under the
PATIO INSTALLATION MANUAL
 PATIO INSTALLATION MANUAL A few minutes spent reviewing the following instructions will help insure quick and proper assembly. The Patio Sauna Kit will arrive on a stretchwrapped pallet including pre-built
How to make a Wendy house Part One: The Floor and the Frame
 How to make a Wendy house Part One: The Floor and the Frame The Wendy House. This wendy house is basically a playhouse with a few feminine touches added. A wendy house can give children hours of enjoyment.
Charlbury 6' x 6 Summer House
 SHARP KNIFE FOR ROOFING FELT IMPORTANT, RETAIN FOR FUTURE REFERENCE. -READ CAREFULLY POZI DRIVE SCREWDRIVER Check all parts prior to assembly. This building is pressure treated to ensure longevity of all
Octagon Greenhouse Manual
 Tools Needed: -Cordless Drill (12V or higher) -#2 Square Drive Bit -Hammer -6 Step Ladder -Tape Measure -Utility knife w/ blade & hook blade -Speed Square -5/16 Wood Drill bit Little Cottage Co. PO Box
Getting Started. Recommended Tools: Nail Gun or Drill, Tape Measure, Torpedo Level, Box knife, Countersink Drill Bit, #2 Phillips Head Drill Tip.
 NORMAN SHUTTERS INSTALLATION INSTRUCTIONS BI-FOLD TRACK Getting Started Recommended Tools: Nail Gun or Drill, Tape Measure, Torpedo Level, Box knife, Countersink Drill Bit, #2 Phillips Head Drill Tip.
Cedarbrook Sauna + Steam Family owned and operated since 1971
 Cedarbrook Sauna + Steam Family owned and operated since 1971 We build cedar saunas, kits, sauna doors, accessories for commercial saunas & residential sauna rooms AND we have the expertise to fit you
Extension Standard building 10/14
 Standard building Extension 10/14 8 Wide Victorian Cedar Greenhouse Extension Assembly Instructions Contents: Introduction Base Preparation Overview Base Assembly Side Assembly Frame Assembly Door Installation
Octagon Vinyl Gazebo Assembly Instructions For 10 & 12 Models
 Octagon Vinyl Gazebo Assembly Instructions For 10 & 12 Models Toll Free: 866.768.8465 Hours: 9-5 Monday-Friday EST www.homeplacestructures.com Package ships as shown revised 04/29/09 Vinyl Gazebo Assembly
McCue Bumper Installation Instructions
 McCue Bumper Installation Instructions McCue 8" Bumper Tools Required: Saw with 10-12" blade Tape measure Flat head screwdriver Phillips screw driver Pencil or chalk line Drill with Philips driver bit
N/A. General Instructions 14/01/2014. For Assistance Please Contact Customer Care on Overlap Cladding. Solid Sheet Roof.
 General Instructions 14/01/2014 Please retain product label and instructions for future reference N/A Overlap Cladding Shiplap Cladding Fixed Windows Opening Windows No Windows Solid Sheet Floor T&G Floor
HOW TO: BUILD A RAISED-BED GARDEN
 HOW TO: BUILD A RAISED-BED GARDEN one of the remaining uprights between each pair of corner connectors, drill 3/16-inch holes through the uprights, and drive 2-1/2-inch deck screws. WHAT YOU NEED Forty
Best Barns USA Assembly Book
 Best Barns USA Assembly Book Revised November 20, 2013 the Easton - R 12'x 16' Manufactured by Reynolds Building Systems, Inc. 205 Arlington Drive Greenville, PA 16125 724-646-3775 This manual is copyrighted.
Assembly Book. the Brandon Building Size 12' x 20' Revised September 13, 2017
 Assembly Book Revised September 13, 2017 the Brandon Building Size 12' x 20' Manufactured by Reynolds Building Systems, Inc. 205 Arlington Drive Greenville, PA 16125 This manual is copyrighted. Under the
Firehouse Manual. Tools Needed:
 Tools Needed: -Cordless Drill (12V or higher) -#2 Square Drive Bit -Hammer -6 Step Ladder -Tape Measure -Square utility knife w/ blade & hook blade -Speed Square Little Cottage Co. PO Box 455 Berlin, OH
STOP! Call Us First! DO NOT RETURN TO STORE.
 16632 STOP! Call Us First! DO NOT RETURN TO STORE. For immediate help with assembly or product information call our toll free number: 1-800-844-9273 or email: customerservice@backyardproductsllc.com Our
Full Height Diamond bin. Package Contents
 Page 1 Package Contents *Please verify that you have the correct number of parts before proceeding. Depending on the model you purchased, your bundle should contain the following: tools for assembly Required
WaterWell Synthetic Skirting for Aluminum Coping Supplemental Guide Page 1 of 9
 Page 1 of 9 Parts List Parts supplied by EPI (_) Sections of Insulated Skirting Panels (number depends on size of pool and sides of pool to be skirted) (_) 4 Wood Screws (number depends on size of pool
Best Barns USA Assembly Book
 Best Barns USA Assembly Book Revised September 12, 2017 the Easton 12'x 16' Manufactured by Reynolds Building Systems, Inc. 205 Arlington Drive - Greenville, PA 16125 This manual is copyrighted. Under
Roof Lantern. Installation Guide. Scan to view the installation guide on your mobile or tablet
 Roof Lantern Installation Guide Scan to view the installation guide on your mobile or tablet TOOLS REQUIRED Cordless Screwdriver 5mm Hex Bit (Supplied) Soft Mallet Wire Cutters Sealant PACKAGING CONTENTS
Level, Pliers, 3/8" Electric Drill, Carpenters Square, Tape Measure, Metal Hack Saw, Silicone Caulking, Screw Drivers (Regular & Phillips)
") Delta Door Canopy Installation Instructions Recommended Tools: Before You Begin: Level, Pliers, 3/8" Electric Drill, Carpenters Square, Tape Measure, Metal Hack Saw, Silicone Caulking, Screw Drivers (Regular
Delta Door Canopy Installation Instructions Recommended Tools: Before You Begin: Level, Pliers, 3/8" Electric Drill, Carpenters Square, Tape Measure, Metal Hack Saw, Silicone Caulking, Screw Drivers (Regular
Manchester Vinyl Picket Gate with Posts (42 Wide x 42 Tall)
") ASSEMBLY INSTRUCTIONS Manchester Vinyl Picket Gate with Posts (4 Wide x 4 Tall) /4 in / in 4 in 6 in 45 /8 in 4 in 8 in 4 / in Gate Opening in Ground 49 / in Outside Posts This Gate is designed to be integrated
ASSEMBLY INSTRUCTIONS Manchester Vinyl Picket Gate with Posts (4 Wide x 4 Tall) /4 in / in 4 in 6 in 45 /8 in 4 in 8 in 4 / in Gate Opening in Ground 49 / in Outside Posts This Gate is designed to be integrated
Extra Wide Designer Lockers Series Installation Instructions
 Extra Wide Designer Lockers 20000 Series Thank you for selecting the 20000 Series Extra Wide Designer Lockers. We are confident that the quality and construction of the lockers will prove to be a good
Assembly Book. the Brandon. Building Size 12'x12' or 12'x16' Revised September 13, 2017
 Assembly Book Revised September 13, 2017 the Brandon Building Size 12'x12' or 12'x16' Manufactured by Reynolds Building Systems, Inc. 205 Arlington Drive Greenville, PA 16125 This manual is copyrighted.
Octagon Vinyl Gazebo Assembly Instructions
 Octagon Vinyl Gazebo Assembly Instructions For 10 & 12 Models Toll Free: 866.768.8465 Hours: 9-5 Monday-Friday EST www.homeplacestructures.com Package ships as shown revised 04/29/09 Vinyl Gazebo Assembly
Assembly guide. Before you start...check the pack and make sure all the components and fixings are included see. Tools required (Not Supplied)
") M FITT-054 Issue - Issue Assembly guide Soft close 800 LH Pull & Swing Corner Unit Component parts Tools required (Not Supplied) B S O T Spirit level Cross Head Screwdriver Tape measure E&F J P* Allen
M FITT-054 Issue - Issue Assembly guide Soft close 800 LH Pull & Swing Corner Unit Component parts Tools required (Not Supplied) B S O T Spirit level Cross Head Screwdriver Tape measure E&F J P* Allen
IMPULSE G2/PULSE STATIC BRIDGE & RETURN MODULE. Drill. Desk Connecting. Outside by fastening the supplied wood screws from the HK-67 kit through the
 PART # 1608990 STATIC BRIDGE & RETURN MODULE 1. This sheet covers the steps to install a static bridge or return module with the FX no hinged access panel back option to a height adjustable freestanding
Blokes Shed INSTALLATION INSTRUCTIONS Custom Design & Build. Nationwide Delivery
 Blokes Shed 10 Year Guarantee On Sanders workmanship Made in NZ Using NZ timber supplies 40+ Years Experience In business since 1975 Professional Install Available NZ wide Nationwide Delivery Available
SLAT WALL INSTALLATION GUIDE
 Versatile Building Products, Inc. 245 Carl Karcher Way, Anaheim CA. 92801 www.garagecoatings.com 714-829-2600 SLAT WALL INSTALLATION GUIDE TOOLS REQUIRED 1. Impact cordless driver / drill + spare battery
Installation Instructions
 Installation Instructions Alcove Enclosure Before Installation please check that your shower enclosure system is undamaged Please read these instructions carefully March 2015 TOOLS REQUIRED Electric or
N/A. General Instructions 14/01/2014. For Assistance Please Contact Customer Care on Overlap Cladding. Solid Sheet Roof.
 General Instructions 4/0/204 Please retain product label and instructions for future reference N/A Overlap Cladding Shiplap Cladding Fixed Windows Opening Windows No Windows Solid Sheet Floor T&G Floor
Oval Vinyl Gazebo. Assembly Manual
 Oval Vinyl Gazebo Assembly Manual Gazebo Assembly Thank you for your purchase of this Gazebo. This manual is designed to simplify the assembly process, however we strongly recommend having an experienced
S H E D A S S E M B L Y I N S T R U C T I O N S
 T I T A N R A N G E S H E D A S S E M B L Y I N S T R U C T I O N S 6 X 4ft = 190 x 150 cm 6 X 6ft = 190 x 190 cm 6 X 8ft = 190 x 255 cm COMPONENT LIST Component illustrations are given as a visual guide
gabriel ash essential range
 gabriel ash essential range Dear Customer, Please read ALL these instructions before assembly. The assembly of your new Essential greenhouse requires no technical knowledge. However it is important that
BUILDING THE BASIC SHED. Step A: Build the Foundation & Floor Frame
 BUILDING THE BASIC SHED Step A: Build the Foundation & Floor Frame 1. Excavate the building site and add a 4" layer of compactible gravel. If desired, add an extension to the base for the optional wood