Assembly Instructions
|
|
|
- Frank Chapman
- 6 years ago
- Views:
Transcription


1 V Assembly Instructions (W x D x H) 1.97m x 0.63m x 2.06m Product Name: Hampshire Arbour with Storage Box Pressure Treated products should not be treated with any other products for the first month. PLEASE KEEP THIS INSTRUCTION Zest4Leisure option 1 sales@zest4leisure.co.uk

2 Hampshire Arbour Assembly Instructions Requires 2 person assembly. All screw holes to be pre-drilled. Tools required: Corded / Cordless Drill, Pozi-drive Bit / Screwdriver, 3mm Drill Bit required in order for you to drill all screw holes before construction. Hampshire Arbour Pack List Item Description Quantity A 1700mm x 595mm Side Panel 2 B 1500mm x 600mm Back Panel 2 C 1500mm x 390mm Front Panel 1 D 1500mm x 490mm Floor Panel 1 E 1494mm x 580mm Hinged Seat Assembly 1 F 1500mm x 450mm Seat Back Rest 1 G 1500mm x 450mm Trellis Back Panel 1 H 1095mm x 100mm Fascia Board 4 J 1000mm x 600mm Roof Panel 2 K 170mm x 90mm Pointed Finial 2 L 600mm x 90mm Ridge Capping 1 Fixings 35mm Screws 26 60mm Screws 26
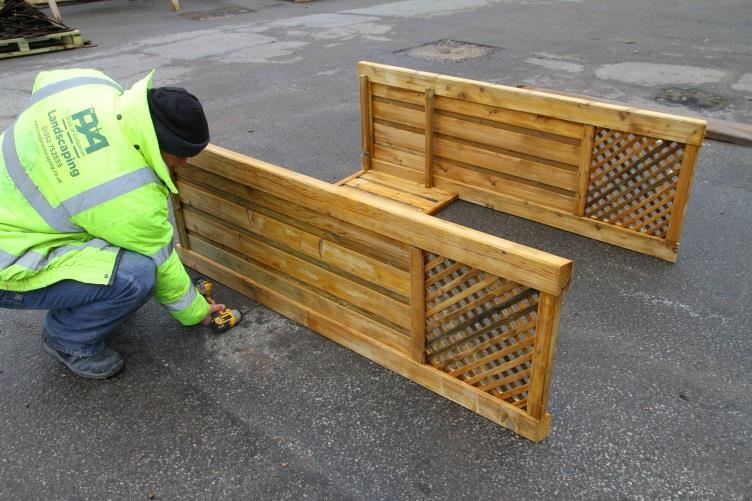
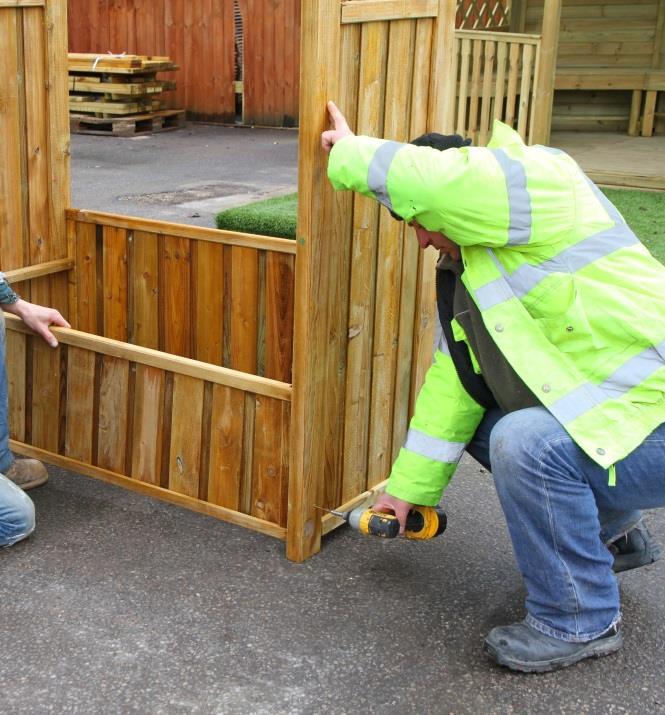
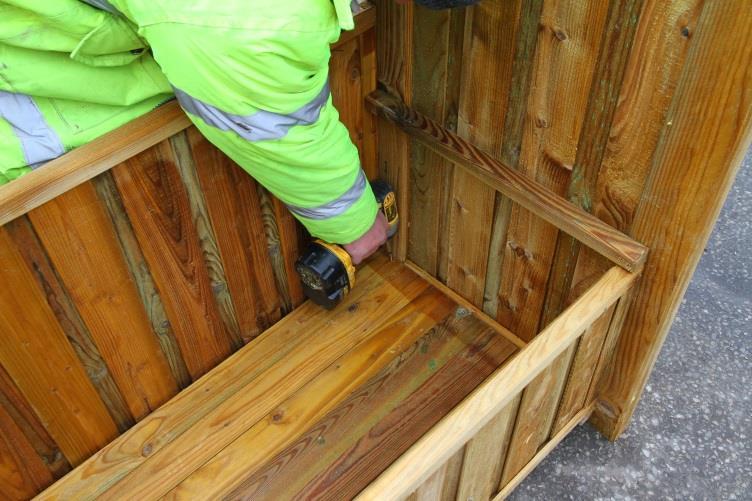
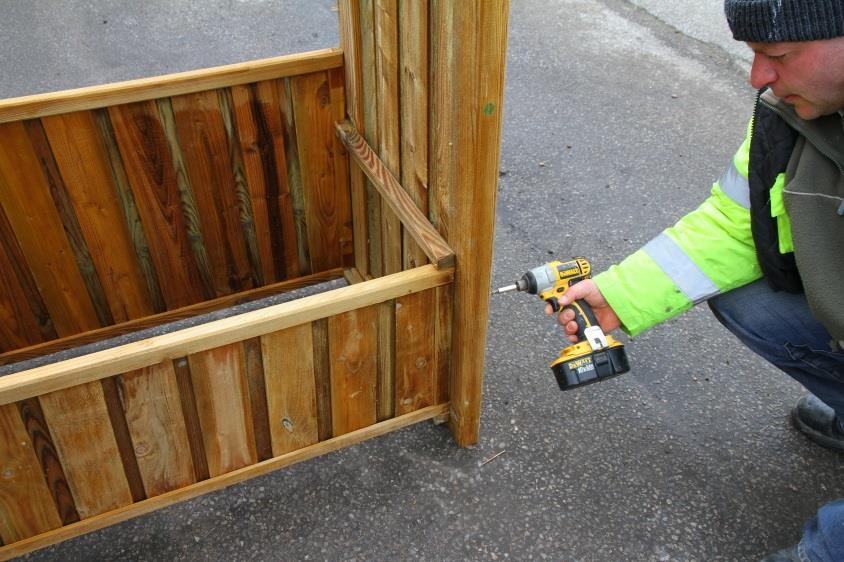
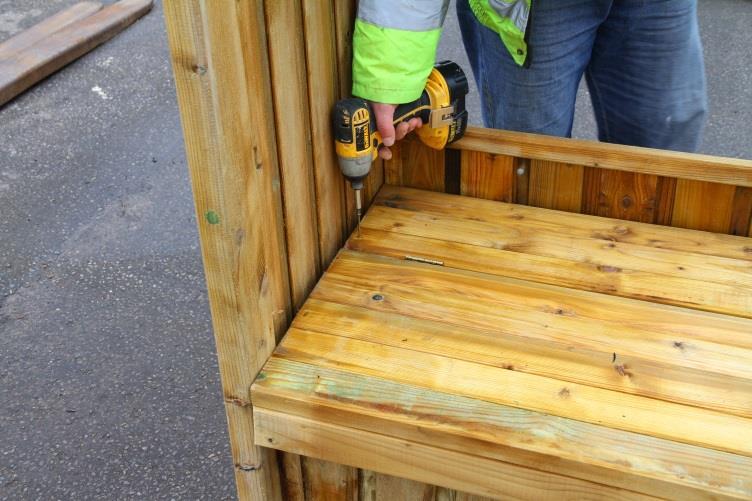
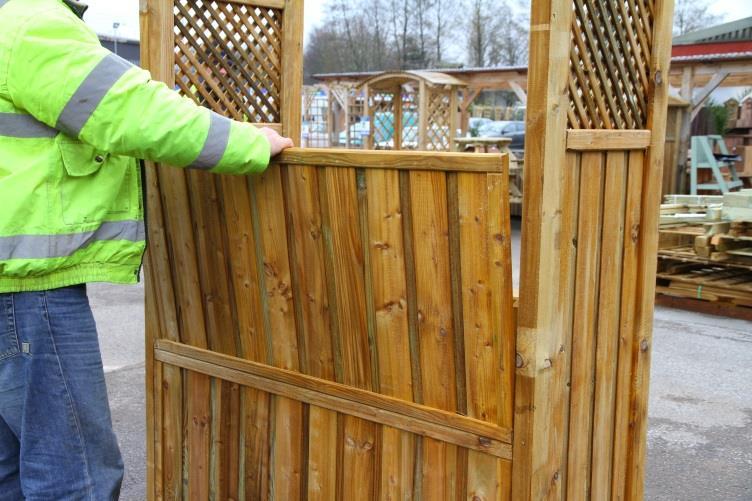
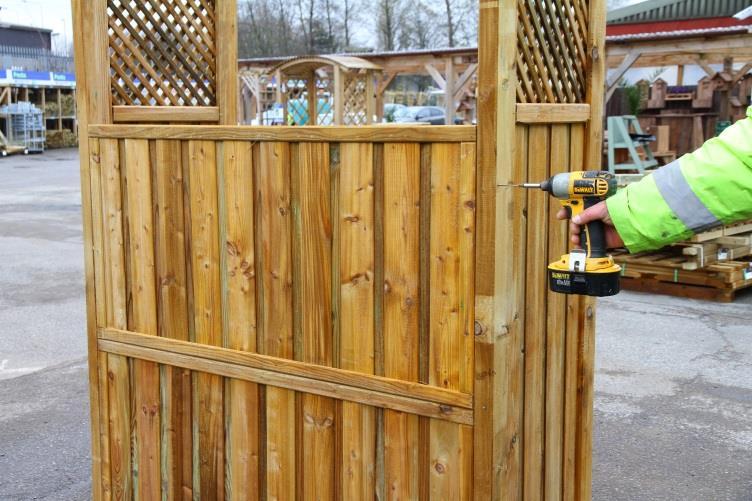
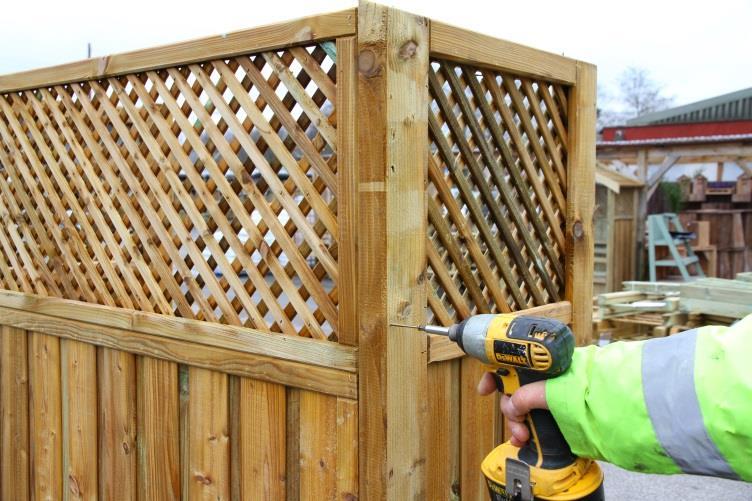
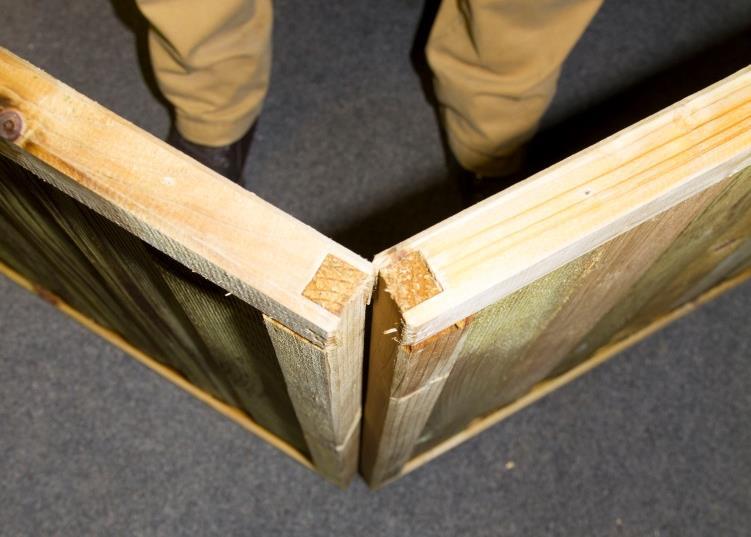
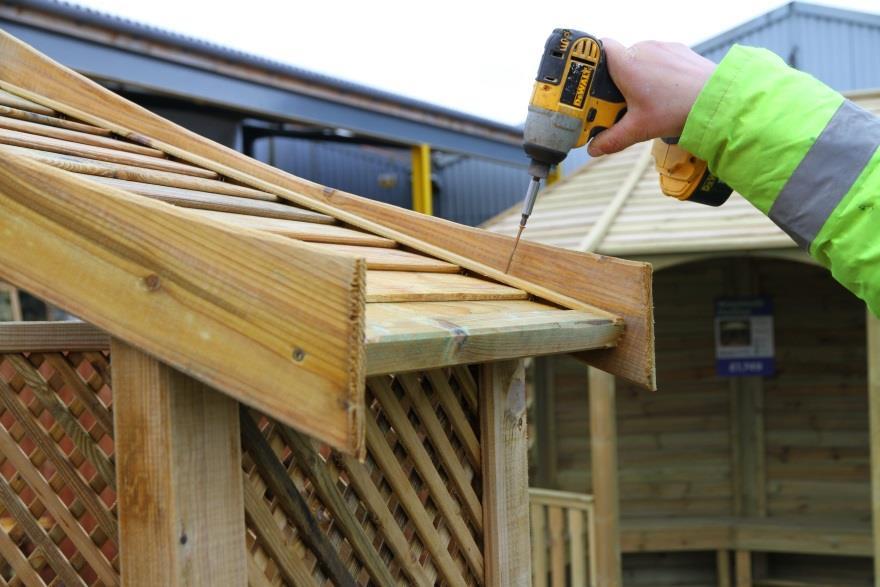
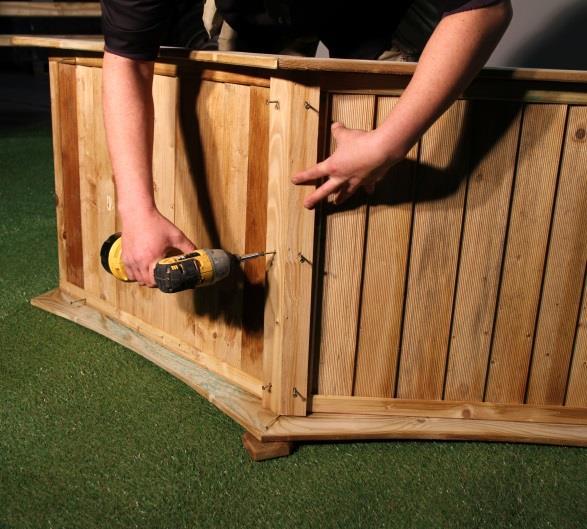
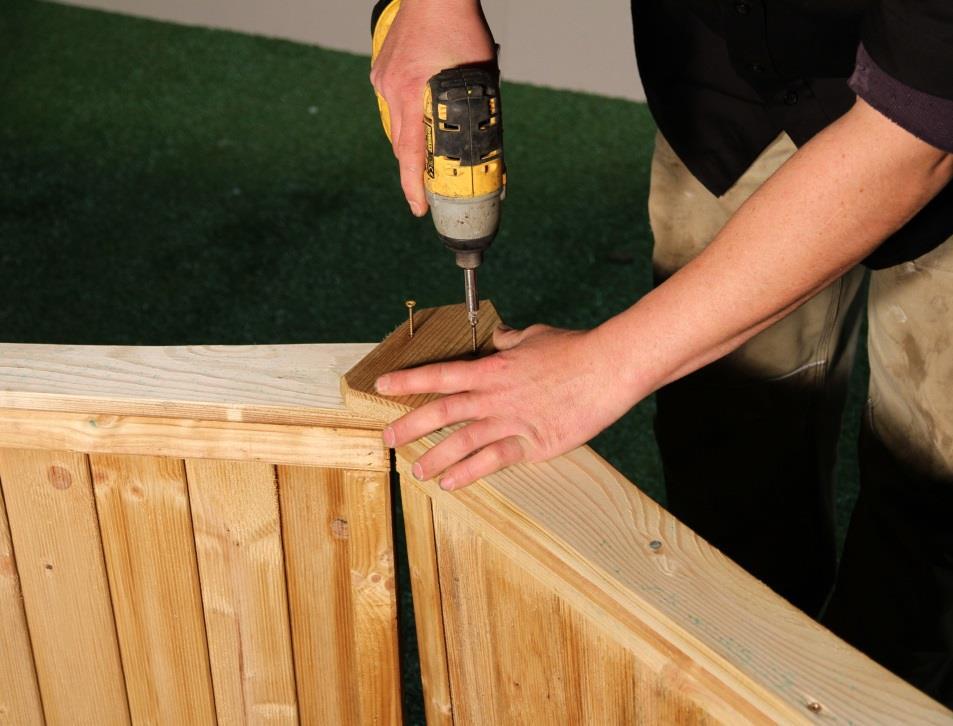
3 Please take a few moments to check all pack contents listed. Assembly requires 2 persons. Tools required: Corded/Cordless Drill, Pozi-drive Bit/Screwdriver, 3mm Drill Bit required in order for you to drill all screw holes before construction. 1. Set out side panels (A) and one of the back panels (B) as shown in Pic.1. The seat & floor support battens (pre fitted to side panels), should locate on the uppermost face of the back panel. The bottom edge of back panel (B) should be aligned with the underside of the floor support batten on side panels (A). 2. Using 4no 60mm screws (2no screws per side panel), fix side panels (A) and back panel (B) in position (See Pic.2). 3. Carefully lift the assembly into vertical position. Place front panel (C) between the side panels and locate between the floor support battens and the seat support battens. Prior to fixing, ensure that the front face of panel (C) remains flush with the ends of the floor & seat support battens (See Pics.3a & 3b). Using 4no 60mm screws (2no screws per side panel), secure front panel (C) in position. 4. Locate floor panel (D) on to the floor support battens (See Pic.4). Please ensure that the floor panel locates fully to the rear corners. Drill 2no holes (3mm drill bit), to both ends of floor panel (D), and fix to the floor support battens using 4no 35mm screws ( 2no screws per end - See Pic.4). 5. Position the hinged seat assembly (E) on to the seat support battens with the larger of the hinged sections towards the front. Ensuring that the rear edges of seat assembly (E) contact the back panel (B), fix the seat assembly to the seat support battens using 4no 60mm screws (2no screws per end) (See Pic.5). 6. Position seat back rest (F) between the side panels. The top of the seat back rest should be positioned parallel with, and 35mm in, from the rearmost face of side panels. The base of seat back rest should locate on the smaller, rear portion of the hinged seat assembly. Attach the seat back assembly to the side panels using 2no 60mm screws (1no screw per side - See Pic.6). 7. Position the remaining back panel (B) between the side panels as shown in Pic.7a & 7b. Insert 4no 60mm screws (2no screws per side) and fix. 8. Position trellis back panel (G) between the side panels and fix using 4no 60mm screws as shown in Pic.8a & 8b (2no screws per side). 9. Set out roof panels (J) as shown in Pic.9, so that the panel edges contact along their entire length at the ridge. NB the roof panels (J) must be orientated so that the cladding boards overlap lower adjoining boards (i.e. like roof tiles), to assist with rainwater dispersal to the low point of the roof. 10. Attach fascia boards (H) to roof panels (J) as shown in Pic.10 using 3no 35mm screws per board. Drill 3no holes in each of the fascia boards (H). The straight edge of the fascia board should be flush with the underside of the roof panel. The ridge end of the fascia board should be flush with the roof panel, with the fascia board extending beyond the roof panel (approx 30mm) at the low end. 11. Position and attach centrally, 2no pointed finials (K) to the fascia board / roof panels using 4no 35mm screws (2no screws per finial). See Pic Position ridge capping (L) centrally over join in roof assembly and fix using 6no 35mm screws. (See Pic.12). 13. Lift and centralise the roof assembly on to side panels. The roof should overhang the side panels by approximately 130mm (Horizontal measure from outer face of side panel to end of fascia board). See Pic Drill 4no pilot holes in the roof panel assembly directly above the side panels, and secure using 4no 60mm screws. SeePic.14. Hampshire Arbour is now complete.

4 a. 3b


5 6. 7a. 7b. 8a. 8b. 9.

6
Assembly Instructions
 V2-02.15 Assembly Instructions (W x D x H) 1.44m x 0.66m x 2.23m Product Name: Cheltenham Arbour with Storage Box Pressure Treated products should not be treated with any other products for the first month.
Assembly Instructions
 V2-05.16 Assembly Instructions (W x D x H): 2.20m x 2.20m x 2.49m Product Name: Brighton Corner Arbour Pressure Treated products should not be treated with any other products for the first month. PLEASE
Assembly Instructions
 V4-10.15 Assembly Instructions (W x D x H) 1.89m x 1.62m x 1.80m Product Name: Miami Swing Pressure Treated products should not be treated with any other products for the first month. PLEASE KEEP THIS
Potting Store Assembly Instructions
 Before assembly We recommend that time is taken to read the instructions before starting assembly, then follow the easy step by step guide. The instruction sheet is only a guide to the assembly. Certain
Gambrel Barn Construction Manual 8x8 through 16x24 Units
 Gambrel Barn Construction Manual 8x8 through 16x24 Units Tools Needed: Cordless drill (12V or higher) #2 square drive bit Hammer 6 step ladder Tape measure Square utility knife w/ blade & hook blade Little
Corner Potting Store Assembly Instructions
 Corner Potting Store Assembly Instructions English SS225E Before assembly We recommend that time is taken to read the instructions before starting assembly, then follow the easy step by step guide. The
INSTRUCTIONS FOR ASSEMBLY 2355mm x 3125mm Workshop
 Manufacturer of Christie Glasshouses and Sheds INSTRUCTIONS FOR ASSEMBLY 2355mm x 3125mm Workshop 1 Thomas Burns Street, Dunedin Phone (03) 477 7909 www.allans.co.nz Congratulations on your purchase of
INSTRUCTIONS FOR ASSEMBLY 2355mm x 4665mm Workshop
 Manufacturer of Christie Glasshouses and Sheds INSTRUCTIONS FOR ASSEMBLY 2355mm x 4665mm Workshop 1 Thomas Burns Street, Dunedin Phone (03) 477 7909 www.allans.co.nz Congratulations on your purchase of
4x6 Barn/Gable Coop With Wheels
 4x6 Barn/Gable Coop With Wheels Tools Needed: -Cordless Drill (12V or higher) -#2 Square Drive Bit -Hammer -Tape Measure -Speed Square Little Cottage Co. PO Box 455 Berlin, OH 44610 330-893-4212 www.cottagekits.com
The Vienna Trellis. Tools You Will Need. General Information
 A S S E M B LY I N S T R U C T I O N S www.newenglandarbors.com 8.7 in 9 in 6 in in Please read through before starting assembly. in 9 in IMPORTANT: CHECK THE INSIDE OF YOUR POSTS FOR ALL MATERIALS. Check
8x12 SpaceMaker Garden Shed Assembly Manual
 8x12 SpaceMaker Garden Shed Assembly Manual Version #6 Revised June / 2007 Thank you for purchasing a 8x12 SpaceMaker Garden Shed. Please take the time to identify all the parts prior to assembly. Safety
REGENCY TIMBER BUILDINGS
 REGENCY TIMBER BUILDINGS TEL 01948 830460 UNIT 22 PENLEY IND EST, PENLEY.WREXHAM. LL13 0LQ 1 Garage fitting instructions Tools needed handsaw, hammer, Stanley knife with hook blade, tape measure, battery
Jabiru Installation instructions
 Page 1 of 5 s Step Description 1 Mark out centre line of the installation 2 Align centre line of installation with the centre line of the "Front Panel Cut out" template. Align "FLOOR" on template with
PATIO INSTALLATION MANUAL
 PATIO INSTALLATION MANUAL A few minutes spent reviewing the following instructions will help insure quick and proper assembly. The Patio Sauna Kit will arrive on a stretchwrapped pallet including pre-built
Classic Saltbox Manual
 Tools Needed: -Cordless Drill (12V or higher) -#2 Square Drive Bit -Hammer -6 Step Ladder -Tape Measure -Utility knife w/ blade & hook blade -Speed Square -5/16 Wood Drill bit Little Cottage Co. PO Box
Metro Series Sauna. installation instructions
 Metro Series Sauna installation instructions Please immediately check for any hidden damage that may have occurred in shipping. If any damage is found you must notify the delivering carrier within seven
Assembly guide. Before you start...check the pack and make sure all the components and fixings are included see. Tools required (Not Supplied)
") M FITT-054 Issue - Issue Assembly guide Soft close 800 LH Pull & Swing Corner Unit Component parts Tools required (Not Supplied) B S O T Spirit level Cross Head Screwdriver Tape measure E&F J P* Allen
M FITT-054 Issue - Issue Assembly guide Soft close 800 LH Pull & Swing Corner Unit Component parts Tools required (Not Supplied) B S O T Spirit level Cross Head Screwdriver Tape measure E&F J P* Allen
DUTCH GABLE FREESTANDING CARPORT
 DUTCH GABLE FREESTANDING CARPORT STRATCO OUTBACK ASSEMBLY INSTRUCTIONS. Your complete guide to building a FREESTANDING Outback DUTCH GABLE CARPORT BEFORE YOU START Carefully read these instructions. If
Log cabins. Pentagon log cabin models ASSEMBLY INSTRUCTIONS. Recommended tools Cordless screwdriver
 ASSEMBLY INSTRUCTIONS Log cabins Pentagon log cabin models Recommended tools Cordless screwdriver Spirit level Screw clamp Pliers Tape measure Hammer Generally two persons are required for the assembly;
How-To-build guide Garden shed
 How-To-build guide Garden shed What you can build using this guide This guide will show you how to build a re-locatable garden shed. Before you begin building Contact your local territorial authority to
WaterWell Synthetic Skirting for Aluminum Coping Supplemental Guide Page 1 of 9
 Page 1 of 9 Parts List Parts supplied by EPI (_) Sections of Insulated Skirting Panels (number depends on size of pool and sides of pool to be skirted) (_) 4 Wood Screws (number depends on size of pool
Curium 19H Installation Instructions & Parts List
 Curium 19H Installation Instructions & Parts List Illustration Curium 19H Right Hand Page 1 of 15 01/07/2016 Revision 2.1 IMPORTANT This shower screen / enclosure must be installed by suitably qualified
Assembly Instruction. 9,2 m² Grillkota
 Assembly Instruction 9,2 m² Grillkota Dear customers, Thank you for purchasing our product. We recommend that you read these instructions before installation and make the necessary preparations for building.
Playaway Swiss Cottage Assembly Instructions
 Playaway Swiss Cottage Assembly Instructions English SS288C IMPORTANT SAFETY INFORMATION Adult assembly is required. Checks and maintenance needs to be carried out on the main parts (fixings etc.) at regular
Intex Engineered Pergola System Installation Instructions. NOTE: See Appendix for Foundation Requirements
 Intex Engineered Pergola System Installation Instructions NOTE: See Appendix for Foundation Requirements Pergola Installation, Freestanding (If pergola will be attached-to-structure, skip to page 3) 1.
NEPAL Installation procedure
 PART DESCRIPTION 1.- Door handle (1pc) 2.- Long tight bar (1pc) 3.- Short tight bar (1pc) 4.- Support block-lower (2pcs) 5.- Wall jamb cap (2pcs) 6.- Tight bar support (2 pcs) 7.- Acrilic base (1pc) 8.-
Ultra Fast Delivery SGL Toilet Cubicle Pack Fitting Instructions
 Ultra Fast Delivery SGL Toilet Cubicle Pack Fitting Instructions This instructional booklet should be read in full prior to undertaking any work. If in doubt please call Commercial Washrooms on 01202 650900,
INTRODUCTION Tools Required Laminate Washroom Products... 4 DUCT PANELS Fixing the Frame: Fixing the Shadow Panels...
 Contents INTRODUCTION... 2 Tools Required... 3 Laminate Washroom Products... 4 DUCT PANELS... 4 Fixing the Frame:... 5 Fixing the Shadow Panels... 9 Fitting the Duct Panels:... 10 WASHSTATIONS... 15 Fixing
Greenhouse Assembly Instructions
 Greenhouse Assembly Instructions Our Help Line provides support and advice to customers of Summer Garden Buildings after ordering. For advice before you buy you can phone us free 7 days a week on 0800
Dry Toilet, Version 2.0 June 17, 2015
 Dry Toilet, Version 2.0 June 17, 2015 Concrete Base When forming the concrete base, make sure it is same or slightly larger dimensions than the wooden base described below. The urine drain pipe is accommodated
WARNING. Not suitable for children under 36 months Contents
 For domestic and family use only Children of any age should not be left to play unsupervised Retain Instructions for future reference WARNING. Not suitable for children under 36 months Contents Length
General Instructions 03WES0808-V1. Please retain product label and instructions for future reference
 General Instructions Please retain product label and instructions for future reference 03WES0808-V1 x2 All building s should be erected by two adults Winter = High Moisture = Expansion Summer = Low Moisture
SLIDING DOOR SYSTEMS: INSTALLATION INSTRUCTIONS SLANTED DOOR GUIDE
 SLIDING DOOR SYSTEMS: INSTALLATION INSTRUCTIONS SLANTED DOOR GUIDE Version 3 (Up to date, january 2011) manufacturing assembly easy medium difficult subjekt to technical changes CONTENTS General / tools_page
TREX TRANSCEND RAILING
 RAILING NOTES:» RAILINGS ARE DESIGNED TO BE INSTALLED OVER THE DECKING FRAME OR ON INSIDE OF RIM JOIST. NOTCHING OF PRESSURE-TREATED POSTS OR POSTS INSTALLED ON OUTSIDE OF RIM JOIST IS NOT ALLOWED.» All
PV SLATE ROOF INSTALLATION GUIDE
 The PV Slate roof tile is designed to integrate into a roof clad with either natural or imitation slates. Initial Roof Batten Layout. The roof should be battened using 50x25mm batten at a spacing of 270mm.
Kawasaki Teryx 750 Cab Kit* Caution: Before using this product, read this manual and follow all Safety Instructions.
 Owner s Manual Model: Kawasaki Teryx 750 Kawasaki Teryx 750 Cab Kit* Caution: Before using this product, read this manual and follow all Safety Instructions. Safety Instructions Cab Kit Contents Hardware
ALL SEASON PATIO COVER
 ALL SEASON PATIO COVER 61 Where the All Season Patio Cover is to be attached to the home, create a level line showing where the top of the mounting rail is to be located. Install each section with the
Hard wearing and durable Quick and easy to install Fully adjustable for batten gauges of mm
 INSTALLATION GUIDE Watch the installation VIDEO arielplastics.com Hard wearing and durable Quick and easy to install Fully adjustable for batten gauges of 260-350mm www.arielplastics.com Coroverge is a
12x8 Cabana Garden Shed Assembly Manual
 12x8 Cabana Garden Shed Assembly Manual Revision #15 Feb 13th, 2015 Thank you for purchasing our 12x8 Cabana Garden Shed. Please take the time to identify all the parts prior to assembly. Safety Points
How to make a Wendy house Part One: The Floor and the Frame
 How to make a Wendy house Part One: The Floor and the Frame The Wendy House. This wendy house is basically a playhouse with a few feminine touches added. A wendy house can give children hours of enjoyment.
TREX ENHANCE RAILING (Also Applies to Trex Select Railing) Installation Instructions
 Installation Instructions") TREX ENHANCE RAILING (Also Applies to Trex Select Railing) NOTE: All Enhance Railing lengths are manufactured at CLEAR SPAN dimensions (spanning between space of posts): 7" for 6' clear span. Note that
TREX ENHANCE RAILING (Also Applies to Trex Select Railing) NOTE: All Enhance Railing lengths are manufactured at CLEAR SPAN dimensions (spanning between space of posts): 7" for 6' clear span. Note that
FRAMELESS DOOR / PANEL WITH WALL MOUNT HINGES QCI5274
 FRAMELESS DOOR / PANEL WITH WALL MOUNT HINGES QCI5274 QCI0274 QCI5274 REV. Rev. 1 0 Page Page 1 1 Date Certified: Certified 06/16/2016 10/01/10 Parts List with wall mount hinges ITEM NO. Part # DESCRIPTION
INSTRUCTIONS High Tech II Unit Assembly
 INSTRUCTIONS High Tech II Unit Assembly The following instruction is a guideline, illustrating suggested methods, assembly sequence, and tool selection. Actual assembly may vary by each situation. Careful
9x6 Cabana Assembly Manual
 9x6 Cabana Assembly Manual Version #10 June 8, 2010 Thank you for purchasing a 9x6 Cabana. Please take the time to identify all the parts prior to assembly. Note, The General Assembly Manual illustrates
ROOF FRAMING INFORMATION BATTEN INSTALLATION CORONA SHAKE INSTALLATION ACCESSORY INSTALLATION ESTIMATING DATA GENERAL INFORMATION
 ROOF FRAMING INFORMATION BATTEN INSTALLATION CORONA SHAKE INSTALLATION ACCESSORY INSTALLATION ESTIMATING DATA GENERAL INFORMATION ROOF FRAMING INFORMATION It is the responsibility or roofers, building
A-935 RODA WALL MOUNT HINGES
 INSTALLATION INSTRUCTIONS A-935 RODA WALL MOUNT HINGES NEED INSTALLATION HELP? Call 1-800-45-BASCO (452-2726) Monday - Friday 8:00 A.M. - 4:30 P.M. Eastern Time FRAMELESS DOOR / PANEL CELESTA QCI0274 REV.
Gardman Lean-to Greenhouse Assembly Instructions
 Page 1 Gardman Lean-to Greenhouse Assembly Instructions Our Help Line provides support and advice to customers of Summer Garden Buildings after ordering. For advice before you buy you can phone us free
Gambrel Barn with Overhang Manual
 Tools Needed: -Cordless Drill (12V or higher) -#2 Square Drive Bit -Hammer -6 Step Ladder -Tape Measure -Square utility knife w/ blade & hook blade -Speed Square Little Cottage Co. PO Box 455 Berlin, OH
MISCELLANEOUS CABINET REPAIRS
 MISCELLANEOUS CABINET REPAIRS 167 168 NOTES MISCELLANEOUS CABINET REPAIRS Cabinet Panel Repairs 175 SIDE PANEL REPLACEMENT - GDM SERIES INSTALLATION INSTRUCTIONS Tools Required 1/8" drill Rivet Tool Silicone
Bathroom Installation Guide
 Bathroom Installation Guide Please read instructions carefully and check products before starting. Products should be fitted/installed by an experienced and competent fitter, failure to do so may invalidate
EZ Shed. Tool eeded ST MER SER I E
 00 EZ Shed PLEASE READ ALL INSTRUCTIONS AND HELPFUL HINTS CAREFULLY BEFORE CONSTRUCTION Tool eeded ST MER SER I E 203 591-9032 - 30-5 30 INSTRUCTIONS 1. Separate and stack all parts included in kit. STUD
Shed Assembly Instructions
 Shed Kit Contents The shed kit includes all the parts needed to assemble your shed except for tools and fasteners such as screws and nails. The various pieces are pre-cut and many are marked to indicate
CONTINUED. TABLE TOPS: 1. Sort one 2x6x8 piece from your lumber. 2. Measure and mark two 48 pieces from each, then cut.
 # Materials: Quantity Each: Total Quantity: x4x8 7 x6x8 1 TIPS FOR SUCCESSFUL PREP WORK: Before starting, carefully read through the entire instruction sheet. Refer to the material list to the left and
Wine Rack Assembly Instructions. Ten Column Display Rack
 Wine Rack Assembly Instructions Ten Column Display Rack Congratulations! You have purchased the finest wine racking available anywhere. Properly assembled, these Vigilant wine racks will outlast even your
Cold Frame Instructions
 1 05/13 Cold Frame Instructions Thank you for purchasing your new Alton cold frame. We recommend you familiarise yourself with the instructions and read all safety information before you commence assembly.
Manchester Vinyl Picket Gate with Posts (42 Wide x 42 Tall)
") ASSEMBLY INSTRUCTIONS Manchester Vinyl Picket Gate with Posts (4 Wide x 4 Tall) /4 in / in 4 in 6 in 45 /8 in 4 in 8 in 4 / in Gate Opening in Ground 49 / in Outside Posts This Gate is designed to be integrated
ASSEMBLY INSTRUCTIONS Manchester Vinyl Picket Gate with Posts (4 Wide x 4 Tall) /4 in / in 4 in 6 in 45 /8 in 4 in 8 in 4 / in Gate Opening in Ground 49 / in Outside Posts This Gate is designed to be integrated
LCD LIFT Flat Panel Display System Installation Manual. Table of Contents
 LCD LIFT Flat Panel Display System Installation Manual Table of Contents Page Installation Overview... 2 Trim Ring Installation... 3 LCD Lift Installation....4 Actuator Switch Installation.5 Top Plate
Five Column Half Height Rack Base Rack. (Shown with Tabletop)
") Five Column Half Height Rack Base Rack (Shown with Tabletop) Congratulations! You have purchased the finest wine racking available anywhere. Properly assembled, these Vigilant wine racks will outlast even
Five Column Half Height Rack Base Rack (Shown with Tabletop) Congratulations! You have purchased the finest wine racking available anywhere. Properly assembled, these Vigilant wine racks will outlast even
ASSEMBLY INSTRUCTIONS GG77. BASE SIZE: 2.190m x 2.020m
 ASSEMBLY INSTRUCTIONS GG77 BASE SIZE: 2.190m x 2.020m CONGRATULATIONS ON PURCHASING A DURATUF GUARDIAN SHED. BEFORE YOU BEGIN THE ASSEMBLY PLEASE NOTE SOME IMPORTANT POINTS: BEFORE YOU START: Read all
8x4 SpaceSaver Garden Shed Assembly Manual
 8x4 SpaceSaver Garden Shed Assembly Manual Revision #8 July 5, 2010 Thank you for purchasing an 8x4 SpaceSaver Garden Shed. Please take the time to identify all the parts prior to assembly. Safety Points
8x12 Santa Rosa Assembly Manual
 8x12 Santa Rosa Assembly Manual Version #10 Revised June 17, 2009 Thank you for purchasing an 8x12 Santa Rosa Garden Shed from Outdoor Living Today. Please take the time to identify all the parts prior
LAWN AND GARDEN GREENHOUSE
 MODELS# OG0AL8-BKE OGAL-8 OGrow Walk-in ' x 8' LAWN AND GARDEN GREENHOUSE With Heavy Duty Aluminium Frame MANUAL VERSION # Grow r! e h t e g To Let's Thank you for purchasing the OGROW greenhouse Follow
Xenon 05 Installation Instructions & Parts List
 Xenon 05 Installation Instructions & Parts List Illustration Xenon 05, H1 Handle Left Hand: Open Out 26/05/2016 Revision 2.1 Page 1 of 19 IMPORTANT This shower screen / enclosure must be installed by suitably
Sandtoft installation guides
 a The Sandtoft Multiverge system has been specially designed to suit most single lap large format concrete and clay roof tiles (suits batten gauges from 280 to 345mm). The system is extremely quick and
E N G L I S H GARDEN SHED. Assembly Instructions. Suitable for Models WITH VARYING DEPTHS
 GARDEN SHED Assembly Instructions Suitable for Models 6' Wide 8' Wide 0' Wide WITH VARYING DEPTHS GI0003 November 0 INSTALLATION ADVICE It's Not That Difficult! The construction of your shed isn't as complicated
8x12 SpaceMaker Garden Shed Assembly Manual Revision #20 June 27th, 2017
 8x12 SpaceMaker Garden Shed Assembly Manual Revision #20 June 27th, 2017 Thank you for purchasing our 8x12 SpaceMaker Garden Shed. Please take the time to identify all the parts prior to assembly. Safety
Frameless Inline Door With Return QCI5263
 INSTALLATION INSTRUCTIONS Frameless Inline Door With Return QCI5263 WALL MOUNT HINGES FRAMELESS DOOR / PANEL / RETURN PANEL QCI5263 REV. 0 Page 1 Certified 06/17/2016 Parts List with wall mount hinges
N/A. General Instructions 14/01/2014. For Assistance Please Contact Customer Care on Overlap Cladding. Solid Sheet Roof.
 General Instructions 14/01/2014 Please retain product label and instructions for future reference N/A Overlap Cladding Shiplap Cladding Fixed Windows Opening Windows No Windows Solid Sheet Floor T&G Floor
Double Frameless Swing Door QCI5247
 INSTALLATION INSTRUCTIONS Double Frameless Swing Door QCI5247 WALL MOUNT HINGES QCI5247 REV. 0 Page 1 Certified 06/16/2016 Parts List with wall mount hinges *Quantities may vary **Quantities double where
IMPULSE G2/PULSE STATIC BRIDGE & RETURN MODULE. Drill. Desk Connecting. Outside by fastening the supplied wood screws from the HK-67 kit through the
 PART # 1608990 STATIC BRIDGE & RETURN MODULE 1. This sheet covers the steps to install a static bridge or return module with the FX no hinged access panel back option to a height adjustable freestanding
Blackout Instructions. 4 R-Series Fascia Installation Outside Mount
 Blackout Instructions 4 R-Series Fascia Installation Outside Mount 1 Components Needed page 3 Tools Needed page 4 System Diagram page 5 Instructions Step 1: Install Brackets. Page 6 Step 2: Mount Back
WPS crew Doors Installation instructions
 WPS-132-133 crew Doors Installation instructions ORDER OF INSTALLATION FOR A COMPLETE ENCLOSURE OF A CREW WPS (Weather Protection System) IS AS FOLLOWS: 1. Heater 2. Rear Thresholds - Right Hand & Left
TOOLS REQUIRED: HARDWARE INCLUDED: 13MM FLAT WRENCH FOR LEVELING THE STRUCTURE RATCHET WITH 5MM HEX BIT FOR CORNER SCREWS ON TOP TRAVERSE BEAMS
 1 TOOLS REQUIRED: RATCHET WITH 5MM HEX BIT FOR CORNER SCREWS ON TOP TRAVERSE BEAMS 13MM FLAT WRENCH FOR LEVELING THE STRUCTURE RUBBER MALLET FOR INSERTING PANELS 8MM HEX BIT WITH EXTENSION FOR HEX BOLT
The Camden Privacy Screen
 ASSEMBLY INSTRUCTIONS The Camden Privacy Screen 0 5/8 in (66 cm) 7 / in (8 cm) 6 / in (6.5 cm) 90 in (9 cm) Post 66 in (68 cm) 78 in (98 cm) Please read through before starting assembly. IMPORTANT: CHECK
NEW equinox INSTALLATION GUIDE Issue
 NEW equinox INSTALLATION GUIDE Issue 2 CONTENTS 1. Preparing the ring beam 2 2. Installing the framework 3 3. How to install structural support posts 7 4. Insulation and waterproofing 8 5. Tile application:
Sauna & Steam. Traditional Sauna Installation Instruction Manual
 Traditional Sauna Installation Instruction Manual Oceanic Ltd, Pountney Street, Wolverhampton, WV2 4HX Phone: 01902 450 550 sales@oceanic-saunas.co.uk www.oceanic-saunas.co.uk Contents 1.Introduction................................................
Frameless Heavy Glass Door with Wall Mount Hinges
 INSTALLATION INSTRUCTIONS Frameless Heavy Glass Door with Wall Mount Hinges QCI-5245 QCI5245 REV. 0 Page 1 Certified 06/16/16 Frameless Door with Wall Mount Hinges ITEM NUMBER DESCRIPTION QUANTITY 1 DOOR
77.5 degrees REAR CHANNEL PLYWOOD TEMPLATE
 77.5 degrees REAR CHANNEL PLYWOOD TEMPLATE Ref. 6-B-14 Make following template: Vertical distance = 300mm Layout dimensions shown in the bottom right table on drawing 6-B-14 Top and bottom are square to
N/A. General Instructions 14/01/2014. For Assistance Please Contact Customer Care on Overlap Cladding. Solid Sheet Roof.
 General Instructions 4/0/204 Please retain product label and instructions for future reference N/A Overlap Cladding Shiplap Cladding Fixed Windows Opening Windows No Windows Solid Sheet Floor T&G Floor
CAUTION: Before opening the crate place it flat on its side (not up right as show in the photo) Hardware included for assembling your gazebo:
 Hardware included for assembling your gazebo:") Octagon Wood Gazebo Kit Contents Hardware included for assembling your gazebo: 5/16" Lag Bolts Use to fasten post to floor 2 1/2" screws Use to fasten joist together fasten posts to outside joist fasten
Octagon Wood Gazebo Kit Contents Hardware included for assembling your gazebo: 5/16" Lag Bolts Use to fasten post to floor 2 1/2" screws Use to fasten joist together fasten posts to outside joist fasten
I. Architectural drawings. Pod 4x3 LTH (34)
") I. Architectural drawings Pod 4x3 LTH (34) 1 I.1. Building plan: 2 II. Assembly guide step by step 1. STEP (tools & care) To assemble the building you will need the following tools: 3 2. STEP Before erecting
I. Architectural drawings Pod 4x3 LTH (34) 1 I.1. Building plan: 2 II. Assembly guide step by step 1. STEP (tools & care) To assemble the building you will need the following tools: 3 2. STEP Before erecting
8x8 Sunshed Garden Shed Assembly Manual Revision #9 June 11th, 2012
 8x8 Sunshed Garden Shed Assembly Manual Revision #9 June 11th, 2012 Thank you for purchasing an 8x8 SunShed Garden Shed from Outdoor Living Today. Please take the time to identify all the parts prior to
SteelChief Installation Instructions for pre-assembled panel form sheds GABLE ROOF
 SteelChief Installation Instructions for pre-assembled panel form sheds GABLE ROOF Please read fully before commencing work...any queries will be promptly answered, contact theboss@steelchief.com.aui MPORTANT
Curium 19.4H Installation Instructions & Parts List
 Curium 19.4H Installation Instructions & Parts List Illustration Curium 19.4H Right Hand Page 1 of 21 30/06/2016 Revision 1.0 IMPORTANT This shower screen / enclosure must be installed by suitably qualified
S H E D A S S E M B L Y I N S T R U C T I O N S
 T I T A N R A N G E S H E D A S S E M B L Y I N S T R U C T I O N S 8 X 10 ft Approx = 2550 x 3140 cm COMPONENT LIST Component illustrations are given as a visual guide only and are not in proportion PART
How to build a Ram for Challenge E: Twist-O-Rama
 How to build a Ram for Challenge E: Twist-O-Rama Notes The Ram is like the Structure Tester it is not Interference for a Team Manager or other non-team members to build it. Construction time is approximately
ASSEMBLY INSTRUCTIONS SS2520. BASE SIZE: 2.520m x 2.020m
 ASSEMBLY INSTRUCTIONS SS50 BASE SIZE:.50m x.00m CONGRATULATIONS ON PURCHASING A SMART STORE SHED. BEFORE YOU BEGIN THE ASSEMBLY PLEASE NOTE SOME IMPORTANT POINTS: BEFORE YOU START: Read all instructions
Shingle Installation Guide
 Installation Guide Roof Framing Information Installation Installation Accessory Installation Estimating Data General Information Roof Framing Information It is the responsibility or roofers, building contractors
Frameless Inline Door QCI5254
 INSTALLATION INSTRUCTIONS Frameless Inline Door QCI5254 FRAMELESS DOOR / PANEL QCI5254 REV. 0 Page 1 Cer fied 06/16/2016 Parts List with wall mount hinges *Quanes may vary QCI5254 REV. 0 Page 2 Cer fied
STAKS. Crossover Casegoods ASSEMBLY INSTRUCTIONS
 STAKS Crossover Casegoods ASSEMBLY INSTRUCTIONS Installation Sequence 1. Wall Panels a. Connector Kit Part Identification 3 b. T - 3 Panel Connection Preparation 4 c. X Panel Connection Preparation 5 d.
 SUPREME WALL GARDEN ASSEMBLY INSTRUCTIONS 24/08/16 www.hallsgreenhouses.com Please refer to website for the most up to date instructions. SAFETY WARNING 1. Always wear protective glasses, shoes, gloves
Installation Guide Simplicity Alfresco. V1.9 Lu070318
 0333 305 5272 www.canoports.co.uk Installation Guide Simplicity Alfresco V1.9 Lu070318 Tools Required Below is a list of tools that you will require to install your the Simplicity Alfresco System. Cordless
Frameless Door QCI5284
 Frameless Door QCI5284 F AB GLASS AND MIRROR www.fabglassandmirror.com Call: +1 888-474-2221 Fax: (614)-334-4919 Office Timing: 8:30-18:00 EST info@fabglassandmirror.com INSTALLATION INSTRUCTIONS Frameless
Gallium 03 Installation Instructions & Parts List
 Gallium 03 Installation Instructions & Parts List Illustration Gallium 03, H1 Handle Left Hand: Open Out 04/05/2016 Revision 1.1 Page 1 of 19 IMPORTANT This shower screen / enclosure must be installed
Grand Garden Chalet 6X3 Assembly Manual
 Revision #8 November 1, 2009 Grand Garden Chalet 6X3 Assembly Manual Thank you for purchasing a Grand Garden Chalet. Please take the time to identify all the parts prior to assembly. Please use Safety
SLIDING DOOR for CORNER installation ONLY - this door closes to side panel -
 by KUDOS INSTALLATION INSTRUCTIONS SLIDING DOOR for CORNER installation ONLY - this door closes to side panel - Please read these instructions throughout before installing as incorrect fitting will invalidate
WHEN DISASSEMBLING TIGHTEN ALL KNOBS TO PREVENT LOSS DURING SHIPPING 2008
 Cae Lynne - General Layout Step 1 Page 1 of 8 Cae Lynne - Backwall Assembly Step 1 Part Number 1 2 3A 3 4 Description Left w/ A10 Clamps Attached Middle Upper Curved Vertical w/ A10 Clamps Attached Upper
Triple Wheelie Bin Chest Instructions
 Triple Wheelie Bin Chest Instructions Please read the instructions carefully before assembling this product and check pieces and fixings using the list below. Parts list: 1 x Left Panel 3 x Back Panel
Garden Chalet 4X2 Assembly Manual
 Revision #6 April 12th, 2010 Garden Chalet 4X2 Assembly Manual Thank you for purchasing a 4x2 Garden Chalet. Please take the time to identify all the parts prior to assembly. Please use Safety Eyewear
12x12 SunShed Garden Shed
 12x12 SunShed Garden Shed Revision #9 August 21, 2010 Thank you for purchasing a 12x12 SunShed Garden Shed from Outdoor Living Today. Please take the time to identify all the parts prior to assembly. Safety