1/2a Control Line Trainer Engine: Cox Black Window.049
|
|
|
- Reynold Ball
- 5 years ago
- Views:
Transcription

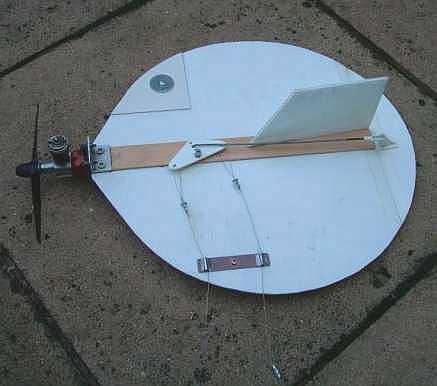
1 Designed by Bill Osborne & Peter Justin Drawn by Heman Lee 1/2a Control Line Trainer Engine: Cox Black Window.049 This model airplane is made from foam-board that can be purchased at any art-supply store or Target for less than $3 a sheet. For today's youths, it is very rewarding to be able to build their own model and make their first solo flight. Bill makes all of the components for our class from surplus materials. Engines mounts, bell-cranks, control horn are all made from scratch in his home shop. Not only does he supplies these airplanes to our class, he has built hundreds of these for the kids in his own community for free. This model is a great trainer because it is almost indestructible when crashing on grass and easy to build. With minor modifications it can even do basic aerobatics, such as loops. 1


2 Parts List 1 Foam-Board 3/16" 1 Lead-out Guide 1 Plywood 1/16 X 1 1/4 X 12 or Paint Stick 8 Washers for 2-56 screws 1 Plywood 1/16 X 1 1/4 X 9 or Paint Stick 7 Screws 2-56 x 3/4 1 Balsa 1/8 X 5 1/16 X 3 9 Nuts T-Angle Motor Mount 1 Control Horn 1 Lead Weight 1/4 oz 1 Bell-crank & Spacer X 9" Pushrod Wire 1 Cox Black Widow.049 engine with Cox 6 X 3 propeller. Tools Needed Titebond or Elmer Yellow Wood Glue Model airplane dope (clear and color) Xacto Knife No. 1 or Hobby Knife Sand Paper or fine Ruler and Triangle Pliers with wire cutter C-Clamps and some heavy weights (Brick or frying pan) Electric or Cordless Drill 2
.")

3 Building Instructions Step 1 - Outline the Platter. 1. Make a 12" diameter circle on the foam-board. To do this, tack a string to the middel of the circle and tie a felt pen 6" from the center. This will allow you to draw a perfect 12" diameter circle. 2. Measure a distance between 1 to 1-1/2" for the engine mount. (1/2" for Norvel or Stunt version). If you are using the Norvel BigMig Startup with the integrated tank, you can just make it perfectly round. 3. Draw a horizontal line about 1-1/4" for the width of the engine. 4. Make a straight line from the left edge of the engine mount to the left tangent of the circle. 5. Do the same for the right side. 6. Now you have the basic outline of the Platter. Cut the foam according to the outline you just made.. The platter is an 12" diameter plate with an 1-1/2" nose. You can vary this distance down to 1/2" if you want to make it do stunts. The one shown, is a trainer. Mark the center of the Platter using a ruler. Draw and straight line down the center. Mark the center of both top and bottom plywood doublers. Step 2 - Doubler. Glue the plywood longer doublers to the top and the shorter piece on the bottom. Make sure the doublers are exactly in the center on both side. Use a clamp or heavy object to clamp down the doublers and let it dry over night. Apply glue to both doublers and sandwich it to the foamboad. Rub it back and forth a few time. Pull off and apply more glue. Let it tack on for 5 minutes before putting it back on and clamping it down. Alternative: 3/32" softply or go to you local hardware or paint store and ask for 2 paint mixing stick. You can use these as doubler. Just cut one down to 11" or small depending on which version you decide toe build, and the other bottom doubler to 9". 3
 Fill all of the exposed foam edge with Titebond or Elmers glue because most paints will actack the foam. Sealing the foam will prevent this.")

. Put the first strip of tape on top.")

4 Step 3 - Fill Edges Use the flat edge of a scissors to crimp the edge of the foam to create a slight taper airfoil. (Optional) Fill all of the exposed foam edge with Titebond or Elmers glue because most paints will actack the foam. Sealing the foam will prevent this. Step 4 - The Elevator (Update) The elevator controls the model up and down movement. Use Scotch's Crystal Clear or packing tape as a hinge, to join the elevator to the main body. Angle the elevator about 30 degree down while applying the tape. Repeat the same step on the other side. Alternative: Use tradition cloth hinges for even dental floss. For better control, balsa wood can be use to make the elevator. (Update - A Better Way To Hinge) This is a better way to apply the hinge. Fist, bevel the elevator with a 45 degree cut. If you are using foam board, apply glue to the exposed foam area the seal it. Place the elevator next to the Platter, but try to leave a small gap (1/32"). Put the first strip of tape on top. Turn the Platter over and using a butter knife to insert the tape into the gap so that is touch the other tape. Carefully work out the tape from the gap. Step 5 - The Rudder. The rudder can be made from any shape you desire. You can use the same foam board material or 3/32" to 1/8" balsa wood. If you decide to make the rudder from balsa, sand the rudder smooth starting with 220 to round and taper all of the edges and finish with 400 grit sand paper. Glue the rudder to the top double of the platter. Set the back of the rudder with an offset about 3/8" to1/2" from 4


5 the center line. Step 6 - Painting Because this is a gas powered model, it must be painted a fuel proof paint. You can use almost any type of paint, although model airplane dope is the best. If you cannot get dope, Rustoleum brand paint will give you enough fuel proofing. Epoxy or Urethane type paints are very fuel proof but don't apply too heavy a coat. You should not use more that 2 coats on this model. One good coat should do it. If you want a smoother job on the rudder section, apply a few coat of clear dope and sand it smooth before applying the final color coat. Also, make sure that all exposed foam edges are sealed completely with glue. Step 7 - Control Horn and Pushrod. Install the control horn first. Use a 2-56 X ½" bolt and nut to hold it in place. Bolt on control horn with 1 washer on the bottom. Blind nut may be substituted for bolt and washer combination. Blind Nut Make the Pushrod from 1/16" X 8-1/2" piece of steel music wire. Make a Z or J-bend and one end. Install the Control Horn and attach the pushrod to it. Make a bend 90 degree up at about 1/4" and position the bellcrank in a neutral position. This will determine the hole for the bellcrank so that the elevator in the neutral position. Custom made control horn can be cut from an aluminum sheet. 5


6 Step 8 - Bellcrank. Drill the hole for the bell-crank and install it according to the instructions diagram. Install lead-out assembly. Make lead-out wires from scrap.015 or.018 cable or music wire. Option: You can purchase 1/2A Nylon Bellcrank and Horn set from Brodak or Carl Goldberg. They usually come with wood screws for mounting the bellcrank and horn. For the bellcrank, throw them out and mount using 2-56 X 3/4" machine screw. Use 1 blind nut on the bottom if you screw if from the top. Bill's scratch built bellcrank 6


7 Step 9 - Leadout Guide. Mount the center of the Lead-out Guide 8" from the back end of the Platter. The Lead-out guide is made from soldering 2 short pieces of brass tubing to a strip of galvanize steel. This make a very strong Lead-out Guide. Bill's bullet-proof leadouts You can use a strip of scrap plastic or 1/16" plywood for the guides. Make a slot into the foam-board and glue it into the slot. Step 10- Leadout Wire. Leadouts can be made from stranded steel cable. Use copper or aluminum tubing for the crimps. Another method is to wrap the end with copper wire. Here is an alternate method of making the leadouts from a solid steel wire rather than using the crimp and sleeve method for stranded steel cable. You can make a leadout wire from.025 music wire. Do the same on the bellcrank end and connector end. 7
.")


8 Step 11 - Engine Mount. Install engine mount made from one aluminum T-bar or 2 L-bar using 2 or 3 screws and blind nut, or use Alternate Built-up Motor Mount Offset Weight Mount engine and check the CG (Center of Gravity). Install the weight offset on the outboard wing at the C.G. (Center of Gravity) point. Approximately 1/4 oz. should do it or just glue 2 pennies to the bottom of the outboard wing. If you look at the bottom of the Platter with the engine at 12:00, the pennies whould be at about 10:00 11:00. Important: The Platter will fly more stable if you add a little positive incidence which is the relationship of the engine thrust line to the wing. To do this, simply angle motor mount 2-3 degress down by adding a washer to each of the top two bolts. Also, DO NOT over tighten the screws to the foamboard sandwich. Over compressing the foamboard will weaken the doublers. Step 12 - Flying. First time flyers should fly the Platter on 25' to 30' lines. Once you have mastered it, you can lengthen it to 30' or 35'. I recommend a Cox 6 X 3 propeller. Use a Sig or Cox 1/2A Control Handle. Connect the "UP Elevator" line to the top of the handle, and the "DOWN Elevator" line to the bottom. The Platter must be hand launched gently. Don't fling it like a freezbie. Use about a 20 degree loft, pointed outward and release. Have fun flying! 8
9 9
JAMISON SPECIAL. Building Guide
 JAMISON SPECIAL Building Guide WING Mark then drill holes for wing jig rods. Slide Ribs onto jig rods Mark the rib positions on 1/16 x 1 trailing edge, 1/4 x 1/4 leading edge & 1/4 x 1/4 spars Pin ribs
C-180 Builder s Manual
 C-180 Builder s Manual. May 20, 2002 Last revised July 11, 2002 Copyright! 2002 Douglas Binder, Mountain Models www.mountainmodels.com sales@mountainmodels.com (719) 630-3186 1 Required Equipment! Xacto
LANDING GEAR. 1. Fit landing gear into slots on bottom of fuselage.
 LANDING GEAR 1. Fit landing gear into slots on bottom of fuselage. 4. Use channel-lock pliers to press blind nuts into position (note: drilled hole should be slightly smaller than shaft of blind nut for
(Build Instructions)
") (Build Instructions) Specifications * Wingspan: 58cm * Length: 50cm * Flying Weight: 59 grams * Channels: 3 (Rudder Elevator Throttle) * Suggested Receiver: 4Ch Micro * Motor: 8mm GearDrive * Prop: GWS
(Build Instructions) Specifications * Wingspan: 58cm * Length: 50cm * Flying Weight: 59 grams * Channels: 3 (Rudder Elevator Throttle) * Suggested Receiver: 4Ch Micro * Motor: 8mm GearDrive * Prop: GWS
Citabria Pro. Aerobatic Parkflyer. by Joel Dirnberger
 Citabria Pro Aerobatic Parkflyer by Joel Dirnberger Revision C: December 21, 2004 Citabria Pro Building Instructions Length: Wingspan: Wing Area: Flying Weight: Wing Loading: Functions: Specifications:
Building Tips This model can be built using the following types of adhesives:
 Page 1 Building Tips This model can be built using the following types of adhesives: Epoxy (with or without microballons) Odorless cyanoacrylate (CA) with accelerator UHU Creativ for Styrofoam (or UHU
RESolution V2 Manual
 RESolution V2 Manual Note for the German Manual: Yellow Bottle thick CA Pink Bottle Med CA Blue tube 5 minute Epoxy Green tube 90 Minute Epoxy Construction of the Fuselage Step 1: Cover the plan with a
Instruction Manual. Specification:
 Instruction Manual H I G Specification: Wingspan: 133 cm (52.3 inches) Length : 104 cm (40.9 inches) Weight : 1830gr Engine : 25-32 two stroke Radio : 4 channel - 4 servo H W I N G KIT CONTENTS: We have
FUSELAGE CONSTRUCTION
 FUSELAGE CONSTRUCTION Note: prior to building and gluing on the work surface use protective covering on your building surface. (wax paper or clear wrap) Fit the laser cut Fuselage Front and Fuselage Rear
INSTRUCTION MANUAL BOOK.
 INSTRUCTION MANUAL BOOK. SPECIFICATION Wingspan : 164 cm 64.57in. Length : 135 cm 53.15 in. Weight : 3.3kg 7.26 lbs. Servo : 7 servos. Radio : 4 channels. Engine : 61 cu.in-2 stroke. 91 cu.in-4 stroke.
Plastic Trainer-19. I have tried to only use materials available from the big box building centers like Home Depot, Rona (Canada) and Lowe s.
 and Lowe s.") Plastic Trainer-19 I have tried to only use materials available from the big box building centers like Home Depot, Rona (Canada) and Lowe s. The picture above shows the prototypes with an original Cox
Plastic Trainer-19 I have tried to only use materials available from the big box building centers like Home Depot, Rona (Canada) and Lowe s. The picture above shows the prototypes with an original Cox
INCLUDED IN THIS KIT: SPECIFICATION: NEEDED BUILDING TOOLS: REQUIRED EQUIPMENT:
 Please review this entire manual before beginning assembly. By doing so it will help you better understand each step as you progress in the actual building of your kit, and you will do a better job in
PITTS S2S CONSTRUCTION
 PITTS S2S CONSTRUCTION FUSELAGE CONSTRUCTION 1) Place the right fuselage side over the plan and mark the former positions. Place the left side over the right side and mark the former positions. Glue F1
Aerospace Speciality Products
 Specifications:! Length: 18.75"/47.6 cm! Diameter: 0.98"/24.9 mm! Weight: 1.5 oz/44 gm! Streamer Recovery! Recommended Engines:!! A8-3; B4-4; B6-4; C6-5! Skill Level: Beginner This is a model rocket kit
ULS Cherokee. Ultra Low Speed aircraft for indoor RC flying. Zippkits. Specifications: Required to complete:
 Zippkits ULS Cherokee Ultra Low Speed aircraft for indoor RC flying. Specifications: Span- 28 inches Wing Area- 151 Sq/In Wing Loading- 3.0 ounces/ft Weight- 3.5 ounces RTF Build time- 1-2 Hours Radio-
F-16 Falcon 70mm EDF
 F-16 Falcon 70mm EDF Instruction manual Specifications: Winspan: 640 mm Length: 990 mm Weight: 900-1100 gram Ducted fans 70mm x 1 Required tools and components:. 4 ch. Computer Radio system w/ 2 servos.
Combat plane for Open B Lanier R/C Inc. P.O. Box 458 Oakwood, GA Phone Fax copyright 2003 Lanier R/C
 Combat plane for Open B Lanier R/C Inc. P.O. Box 458 Oakwood, GA. 30566 Phone 770 532 6401 Fax 770 532 2163 copyright 2003 Lanier R/C Important information: Please inspect the plane before beginning to
Instruction Manual book
 Instruction Manual book ITEM CODE BH53. SPECIFICATION Wingspan : 1,250mm 49.21 in. Length : 930mm 36.61in. Weight : 1.1kg 2.42 Lbs. Parts listing required (not included). Battery: 3 CELLS-LI-POLY-11.1V-2,500
FLITZEBOGEN-2 Assembly instructions
 FLITZEBOGEN-2 Assembly instructions Trim the end of the fuselage to the length of 925mm from the nose. Be careful to avoid splitting the carbon fibers. Sand the base of the stab mount in preparation for
Assembly Manual / Airframe 65 Vyper SAFETY in Assembly SAFETY in Flying
 1 Assembly Manual / Airframe 65 Vyper Thank you for purchasing this 3DHobbyShop ARF RC aircraft. If you have any issues, questions, concerns or problems during assembly, please contact our tech department
Eva. Extremely Versatile Airframe
 Eva Extremely Versatile Airframe Eva Specifications Length: 32 Weight (without battery): ~12oz. Revision History Date Revision Notes/Comments 6/3/05 Document initial creation. Thank you for purchasing
Magpie. Foam Trainer. Magpie Specifications
 Magpie Foam Trainer Magpie Specifications Length: 34in. Wingspan (SF): 46in. Wing Area (SF): 414in 2 Wingspan (SP): 40in. Wing Area (SP): 360in 2 Weight (without battery): 12oz. Thank you for purchasing
Corvus Racer CC
 Corvus Racer 540 35CC Item No:L-G035008 Specifications Wing Span Length Wing Area Flying Weight Glow Gasoline Electric Radio mm mm 1200sq in (77.4sqdm) 9.9-12lbs(4.5-5.5kg) 91-1.20(2C) 1.10-1.40(4C) 20-40cc
SGTalon s Enterprise-A Foamie Build Guide. SGTalon s. Enterprise. Enterprise--A. Assembly Instructions
 SGTalon s Enterprise SGTalon s Enterprise--A Enterprise Assembly Instructions Page 1 4-13-2013 SGTalon s Enterprise *******Recommended Hardware******** 2.6oz 250w Motor and Speed Control with 8x6 prop
Sbach 1,2m 3D/aerobatic EPP model Building instructions
 Sbach 1,2m 3D/aerobatic EPP model Building instructions Please refer to the Diagram sheet Diagrams A, B Press 2 carbon strips (1x3x1000 mm) into the grooves in the sides of the fuselage central part (the
I hope you enjoy the Spirit as much as I have. Scott DeTray Model Aero
 We are excited to introduce the Model Aero Spirit. Inspired by the magnificent Northrop Grumman B-2 Spirit Stealth Bomber, the Spirit is a great flyer, on land or water. It tracks like an arrow and is
HIGH-END TECHNOLOGY. Electric ducted fan Starfighter
 HIGH-END TECHNOLOGY RC Electric ducted fan Starfighter First we want to thank and congratulate you with your decision in buying one of our Kits. The Starfighter puts together very easily so there is not
Instruction Manual book
 Instruction Manual book ITEM CODE: BH50. SPECIFICATION Wingspan : 1,600 mm 62.99 in. Length : 1,230 mm 48.43 in. Weight : 2.5 kg 5.5 Lbs. Radio : 06 channels. Servo : 07 servos. Electric Motor : ( 02pcs
AT channel 6 servos
 Wing Span: Wing Area: Fuselage Length: Flying weight: Power system: Radio: 60.7in/1540mm 561 sq in/36.3 sq dm 44.1in/1120mm 6.9 Ibs/ 3100g 46(2C0/71(4C) 5 channel 6 servos AT6-46 INSTALLING AILERONS Begin
Switchback Sport Builder s Manual
 Switchback Sport Builder s Manual Thank you for purchasing the Switchback Sport. The Switchback Sport has been designed for the novice to intermediate pilot who wants a plane with good performance that
Parts Identification
 We are excited to introduce the Model Aero Aqua Sport. This is an excellent sport flyer, equally at home flying from grass fields, water, or even snow! The unique V-tail gives the Aqua Sport a distinctive
Thank you for your purchase of the Lee Ulinger, FoamtanaS, Yak-55, or Extra 330 3D Depron foam, Aerobatic airplane.
 Thank you for your purchase of the Lee Ulinger, FoamtanaS, Yak-55, or Extra 330 3D Depron foam, Aerobatic airplane. Tools you will need to build Recommended additional items: #11 hobby knife Motor: Hacker
EXTRA 330SC 60CC. Item No:H G Specifications cc gas DA50,DA60, DLE55, DLE60(twin), 3W55. Description
, 3W55. Description") EXTRA 330SC 60CC Item No:H G060011 Specifications Wing Span Length Wing Area Flying Weight Gasoline Radio Description Carbon Fibre : 92" (2347mm) 84 1/2 " (2060mm) 1526.8 sq in(98.5sq dm) 16 17lbs(7300
EXTRA 330SC 60CC Item No:H G060011 Specifications Wing Span Length Wing Area Flying Weight Gasoline Radio Description Carbon Fibre : 92" (2347mm) 84 1/2 " (2060mm) 1526.8 sq in(98.5sq dm) 16 17lbs(7300
E-AERO EPP PITTS KIT From BP HOBBIES. Parts Included in kit
 E-AERO EPP PITTS KIT From BP HOBBIES Parts Included in kit Thank you for purchasing the BP Hobbies/E-aero EPP Pitts. Please take the time to read through the instruction manual before beginning the build.
Dandy Sport Builder s Manual
 Dandy Sport Builder s Manual Thank you for purchasing the Dandy Sport. The Dandy Sport has been designed as an easy to build aileron trainer. Take your time and enjoy building this plane. Specifications:
Max Launch Abort System Prod. No *Kevlar is a registered trademark of Dupont
 Flying Model Parts List Max Launch Abort System Prod. No. 3014 A 11820 - Body Tube 3.5 Diam x 5.5" Long B 11824 - Orange Capsule Base Shoulder Ring C 16032 - Laser-cut Ring motor mount rear D 16033 - Laser-cut
Edge 540 V3 35CC. Scheme A. Item No:L G Specifications. Flying Weight
 Edge 540 V3 35CC Item No:L G035016 Specifications Wing Span Length Wing Area Flying Weight Glow Gasoline Electric Radio Description 76 (1930mm) 74 (1879mm) 1200sq in(77.4sqdm) 9.9 12lbs(4.5 5.5kg) 91 1.20(2C)
MECOA EZ-4061 Trainer
 MECOA EZ-4061 Trainer EZ-4061 is a newly designed, Almost Ready to Fly kit. It is an extremely easy to control trainer with strong construction and excellent aerodynamic performance. This is a great choice
Sig Mfg. Co., Inc South Front Street...Montezuma, Iowa 50171
 Sig Mfg. Co., Inc...401-7 South Front Street...Montezuma, Iowa 50171 Introduction The SEALANE takes off and lands on water just as easy as the Sig Kadet LT40 does on solid ground. Gentle, graceful, sure
Taylorcraft Indoor / Cul-De-Sac Flyer
 Taylorcraft Indoor / Cul-De-Sac Flyer Taylocraft Specifications Wingspan: 28.0 in. Wing Area: 117 sq. in. Weight (Ready to Fly): 3.0 3.1 oz. Wing Loading: 3.7 3.8 oz. / sq. ft. LIABILITY RELEASE In that
Corvus Racer Colour schemes. AeroPlus RC Copyright 2013 All Rights Reserved
 Corvus Racer 540 59 Item No:A E050003 Specifications WING SPAN: 59"(1500mm) LENGTH: 54.1"(1374mm) WING AREA: 654sq.in.(42.2sq.dm.) FLYING WEIGHT: 4.6 5.3lbs(2000 2300g) Electric:Brushless outrunner 8Oz.
Pfalz E1 48. R/C Scale Model Instructions CONTACT INFORMATION. The Pfalz E1 was designed by M.K. Bengtson Prototype by Jack Richardson
 Pfalz E1 48 Pfalz E1 48 R/C Scale Model Instructions CONTACT INFORMATION The Pfalz E1 was designed by M.K. Bengtson Prototype by Jack Richardson Manufactured and Distributed by: Bengtson Company e mail:
ParkJet Builder s Manual
 ParkJet Builder s Manual Thank you for purchasing the ParkJet. The ParkJet is a profile ducted fan airplane that can be flown in a larger park. The ParkJet was initially designed by Scott Stoops and modified
Pfalz E1 Monoplane 48 EZ Build Version
 Pfalz E1 Monoplane 48 EZ BUILD Pfalz E1 Monoplane 48 EZ Build Version R/C Scale Model Instructions CONTACT INFORMATION Designed by M.K. Bengtson Prototype by Robert Hoffman Manufactured and Distributed
96 WING SPAN SPITFIRE (COPYRIGHT PROTECTED 2014) ALL RIGHTS RESERVED
 ALL RIGHTS RESERVED") 96 WING SPAN SPITFIRE (COPYRIGHT PROTECTED 2014) ALL RIGHTS RESERVED GENERAL INSTRUCTIONS Should you elect to use the recommended Door Skin, which is 1/8 mahogany plywood measuring 36 x 88. Have it cut
96 WING SPAN SPITFIRE (COPYRIGHT PROTECTED 2014) ALL RIGHTS RESERVED GENERAL INSTRUCTIONS Should you elect to use the recommended Door Skin, which is 1/8 mahogany plywood measuring 36 x 88. Have it cut
Note - the nose ribs and are thinner than the main ribs. These nose ribs will use a thinner rib cap than the ribs. This is per design.
 Stabilizer rev 1.2 The SE5a stabilizer is the heartbeat of the tail and is recreated like the full scale version. All tail pieces depend on the stabilizer. It uses the steel fittings, pulleys, inspection
Warbird Series Zero - 32 Assembly Manual
 Warbird Series Zero - 32 Assembly Manual Specifications Wing Span: 32 inches Wing Area: 210 in 2 Fuselage Length: 26 inches Weight (ready to fly): 11 to 13 oz. Wing Loading: 7.5 to 8.9 oz/ft 2 Designed
62 AJ Acuity Assembly Instructions
 62 AJ Acuity Assembly Instructions Congratulations The all-new AJ Aircraft Acuity was designed to give you all of the precision flight abilities of expensive composite aircraft, in a more traditional balsa
INCLUDED IN THIS KIT: SPECIFICATION: NEEDED BUILDING TOOLS: REQUIRED EQUIPMENT:
 Please review this entire manual before beginning assembly. By doing so it will help you better understand each step as you progress in the actual building of your kit, and you will do a better job in
Combat Foamie. An electric powered model made from sheet foam for full contact combat matches. Designed by. Plan by Paul Bradley. Jerry W.
 Combat Foamie An electric powered model made from sheet foam for full contact combat matches Designed by Jerry W. Hagood Plan by Paul Bradley July 2010 Combat Foamie Top View 22.9 CG is 7.3 back from nose
30% Edge 540T Almost Ready to Fly
 Lanier R/C 30% Edge 540T Almost Ready to Fly WARNING! THIS IS NOT A TOY! THIS IS NOT A BEGINNERS AIRPLANE This R/C kit and the model you will build from it is not a toy! It is capable of serious bodily
Millennium RC presents The New and Improved (now even easier to build and cover!) SSX X-Trainer Build Kit
 SSX X-Trainer Build Kit") Millennium RC presents The New and Improved (now even easier to build and cover!) SSX X-Trainer Build Kit Wing span: Approx. 42 Wing Area: 504 sq. in. Wing Loading: 6.71 oz/ sq. ft. Introduction: The Slow
Millennium RC presents The New and Improved (now even easier to build and cover!) SSX X-Trainer Build Kit Wing span: Approx. 42 Wing Area: 504 sq. in. Wing Loading: 6.71 oz/ sq. ft. Introduction: The Slow
RSM DISTRIBUTION Presents
 RSM DISTRIBUTION Presents MOSQUITO By Jack Sheeks Photo _ Jack Sheeks Semi Scale Twin Stunter Wing Span: 58" Length: 37-3/4 Area: 579 sq. in. Engine: Two.35 -.40 www.rsmdistribution.com Call (951) 678
Build and fly this exact scale 43-in. control-line version of the popular Cessna private plane.
 Seeing double? Clever photography gives that illusion but actually it s only the model 140 in the foreground. Author Stahl (right) does fly both the job he is holding and his real Cessna 14 pictured in
34" PELICAN by CRASH TEST HOBBY
 34" PELICAN by CRASH TEST HOBBY The Pelican is a 34" trainer that can level its own wings and put its nose on the horizon once trimmed and balanced. It can handle more wind than most EZ flying planes in
LANIER Dominator INSTRUCTIONS
 ADDITIONAL EQUIPMENT NEEDED TO COMPLETE YOUR DOMINATOR 500 General 3.2 to 4.2 Size two stroke R/C engine, muffler, and engine mount Gas or glow fuel line Minimum of 4 channel radio set required (4-5) 70
SwitchBack Senior. SwitchBack Senior Specifications
 SwitchBack Senior SwitchBack Senior Specifications Wingspan: 55.4 in. Length: 41 in. Wing Area: 597 sq. in. Weight (Ready to Fly): 34 to 37 oz. Wing Loading: 8.2 to 8.9 oz. / sq. ft. Version 1.05, March
Revolution 3D-mini ARF
 Revolution 3D-mini ARF 1 Included Hardware 4 Dubro Micro Control Horns #DUB848 2.32 x 18" Linkage Wire (Music Wire) 1 1.5 x 1.25 x 1/8 Balsa Ply (for motor mount) 1 5" piece of Velcro (Optional recommended,
TIGER SHARK-40 ARF ASSEMBLY MANUAL
 TIGER SHARK-40 ARF ASSEMBLY MANUAL Kangke Industrial USA, Inc. 65 East Jefryn Blvd. Deer Park NY 11729 http://www.kangkeusa.com E-mail: info@kangkeusa.com Tel: 1-877-203-2377 Fax: 1-631-274-3296 Congratulations!
Falke Build Instructions
 A totally unofficial translation of the Falke Build Instructions The Falke (falcon) mini DLG is produced and marketed by Modellbau Thiele, Germany (www.modellbau-thiele.de), email webmaster@modellbau-thiele.de.
MXS R 30CC. Item No:L G Specifications. 67 1/2"(1720mm) (2C) (4C) 26 35cc gas DLE 30/35RA MLD35 JC30Evo.
 (2C) (4C) 26 35cc gas DLE 30/35RA MLD35 JC30Evo.") MXS R 30CC Item No:L G030008 Specifications Wing Span Length Wing Area Flying Weight Glow Gasoline Electric Radio Description Covering Material Carbon Fibre : 75"(1915mm) 67 1/2"(1720mm) 1023sq in(66sq
MXS R 30CC Item No:L G030008 Specifications Wing Span Length Wing Area Flying Weight Glow Gasoline Electric Radio Description Covering Material Carbon Fibre : 75"(1915mm) 67 1/2"(1720mm) 1023sq in(66sq
HIGH-END TECHNOLOGY. Electric ducted fan rafale
 HIGH-END TECHNOLOGY RC Electric ducted fan rafale First we want to thank and congratulate you with your decision in buying one of our Kits. The Rafale puts together very easily so there is not much explanation
Building Instructions P-51 BF109
 Building Instructions P-51 BF109 Sport model for.015 engines. Legal for SSC Warbird Lanier R/C Inc. P. O. Box 458 Oakwood, Ga. 30566 Copyright 2004 Lanier R/C Inc. Important information: Please inspect
TWEETY 25 INSTRUCTION MANUAL. Almost Ready to Fly Nitro/Electric Aerobat FEATURES SPECIFICATIONS
 TWEETY 25 Almost Ready to Fly Nitro/Electric Aerobat INSTRUCTION MANUAL SPECIFICATIONS FEATURES WINGSPAN: 45.7 (1160mm) LENGTH: 38.6 (980mm) WING AREA: 370 sq in(24 sq dm) FLYING WEIGHT: Approx. 3.3 lbs
Stream NXT - assembly instructions
 Stream NXT - assembly instructions Recommended settings CG (measured from root leading edge): Speed/launch camber (+down, near the wing root): Cruise camber (+down, near the wing root): Thermal camber
Your kit contains the following parts. Please check your kit for any missing or damaged parts before starting construction.
 Your kit contains the following parts Please check your kit for any missing or damaged parts before starting construction COMPLETE KIT PARTS LIST 1 Plan Sheet #1 1 Plan Sheet #2 2 Decal Sheet 2 White Tissue
Magpie AP. Aerial Photography Airplane
 Magpie AP Aerial Photography Airplane Magpie Specifications Length: 36in. Wingspan: 54in. Wing Area: 486in 2 Weight (without battery): 19 oz. Thank you for purchasing the Magpie AP. This model is an elevator/rudder
Instruction Manual. Item No: AL001
 Instruction Manual Item No: AL001 Specifications: Wingspan: 2037mm (80.2 in) Length: 1677mm (66 in) Wing Area: 65.5dm2 (1015.3 sq in) Flying Weight: 7.6kg (16.7 lbs) Engine(not incl.): 45-50cc Gas Radio(not
Fokker Dr1 Master Instructions
 Fokker Dr1 Master Instructions Rev 1 Congratulations on your new project. This Dr1 kit is the finest to date. The construction of the plane is similar and exactly like the original. Take your time and
Specifications Wingspan: 43cm Flying Weight: 33 grams (with battery) Channels: 3 Suggested Receiver: 4Ch Micro Motor: 7mm Brushed Geardrive
 Channels: 3 Suggested Receiver: 4Ch Micro Motor: 7mm Brushed Geardrive") Specifications Wingspan: 43cm Flying Weight: 33 grams (with battery) Channels: 3 Suggested Receiver: 4Ch Micro Motor: 7mm Brushed Geardrive Airframe Kit (Included Contents) * Airframe Parts Sheets (Depron)
Specifications Wingspan: 43cm Flying Weight: 33 grams (with battery) Channels: 3 Suggested Receiver: 4Ch Micro Motor: 7mm Brushed Geardrive Airframe Kit (Included Contents) * Airframe Parts Sheets (Depron)
Central New York Rocket Team Challenge 2018 Rocket Assembly Instructions
 Central New York Rocket Team Challenge 2018 Rocket Assembly Instructions Note: These instructions vary from those provided by the manufacturer of the rocket kits. There is also considerable varying discussion
THE APOGEE A 100-INCH AMA DURATION SAILPLANE FROM DYNAFLITE
 THE APOGEE A 100-INCH AMA DURATION SAILPLANE FROM DYNAFLITE Apogee is the intermediate sailplane designed to be competitive in AMA duration contests. Effective spoilers, rudder and full flying stabilizer
STEP 1 STEP 2 STEP 3. Page 2
 INSTRUCTION MANUAL Congratulations on your purchase of the Bullet ARTF - the first Almost Ready to Fly version of this classic lowwinger. Based on the original and timeless Bullet design, the new Ripmax
LANIER - Double Trouble - INSTRUCTIONS. Tail 1 T1 ¼ Balsa 1 T2 ¼ Balsa 2 T3 ¼ Balsa 1 T4 ¼ Balsa 1 T5 ¼ Balsa 1 T6 ¼ Balsa 2 J1 ¼ Balsa 2 J2 Lite ply
 Tail 1 T1 ¼ Balsa 1 T2 ¼ Balsa 2 T3 ¼ Balsa 1 T4 ¼ Balsa 1 T5 ¼ Balsa 1 T6 ¼ Balsa 2 J1 ¼ Balsa 2 J2 Lite ply Other Parts 2 Aluminum Gear 1 3/32 Music wire tail skid 2 Elevator and J-plane joiner wire
Hobby Lobby Zip Supplementary instructions Please refer to the included drawings while using these assembly instructions
 Materials needed: 15 or 30 minute epoxy Medium CA Masking tape Scotch tape Servo Tape Wax paper Tools Needed: Pencil or marker Flat building surface Hobby knife or razor blade 7/64" or 3mm drill bit 3/16"
Specifications. Before commencing assembly, please read these instructions thoroughly.
 INSTRUCTION MANUAL Before commencing assembly, please read these instructions thoroughly. Specifications Wing Span: 8.5 in / 30 mm Wing Area: 330 sq in /.3 sq dm Flying Weight: 6 oz / 70 g Fuselage Length:
INCLUDED IN THIS KIT: SPECIFICATION: NEEDED BUILDING TOOLS: REQUIRED EQUIPMENT:
 Please review this entire manual before beginning assembly. By doing so it will help you better understand each step as you progress in the actual building of your kit, and you will do a better job in
Designed in 2005 by Bernard Burton. Assembly manual Bernard Burton DRAFT 1
 Designed in 2005 by Bernard Burton Assembly manual 2005 - Bernard Burton DRAFT 1 The plans can be requested via this link http://www.gundersonaerodesign.com/m12plansreq.htm The laser kit is available here
Pfalz E1 36. R/C Scale Model Instructions CONTACT INFORMATION. The Pfalz E1 was designed by M.K. Bengtson Prototype by Ian Easton
 Pfalz E1 36 Pfalz E1 36 R/C Scale Model Instructions CONTACT INFORMATION The Pfalz E1 was designed by M.K. Bengtson Prototype by Ian Easton Manufactured and Distributed by: Bengtson Company e mail: sales@aerodromerc.com
Assembly Instructions. Stinger 120. Almost Ready to Fly
 Stinger 120 Almost Ready to Fly Important Information: Please inspect the plane before beginning to assemble to make sure you are happy with it. After assembly has begun you cannot return the kit. If you
High performance 90mm fiberglass jet
 High performance 90mm fiberglass jet Assembly manual For intermediate and advanced fliers only! Specs Wingspan: 1255mm Fuselage length: 1250mm Flying weight: 2600-3000g Wing area: 22.6 dm² Wing loading:
A S S E M B L Y M A N U A L
 A S S E M B L Y M A N U A L Kit features. Ready-made minimal assembly & finishing required. Ready-covered covering. Photo-illustrated step-by-step Assembly Manual. Specifications Wingspan --------------------------
Hot Stik ARF WARNING. Copyright 2005 Carl Goldberg Products LTD CARL GOLDBERG PRODUCTS, LTD.
 Hot Stik ARF INSTRUCTIONS WARNING A radio-controlled model is not a toy and is not intended for persons under 16 years old. Keep this kit out of the reach of younger children, as it contains parts that
Ryan STA Sport Scale Model Aircraft Assembly and Instruction Manual
 Ryan STA Sport Scale Model Aircraft Assembly and Instruction Manual Warning: This radio controlled model is not a toy. It requires skill to fly and is not recommended for the novice pilot. It should not
RFS Class II Rocket Assembly Instructions
 RFS Class II Rocket Assembly Instructions Instructions by: Loc Precision Photos by: Great Lakes Space Port Sheboygan Education Foundation, Inc. Welcome and thank you for joining the Rockets for Schools
1/6 PA-25 PAWNEE. *Specifications are subject to change without notice.*
 1/6 PA-25 PAWNEE INSTRUCTION MANUAL [ A335 Kit ] Wing Span : 72 in / 1830 mm Wing Area : 736 sq in / 47.5 sq dm Flying Weight : 6.6 lbs / 3000 g Fuselage Length : 48 in / 1220 mm Requires : "Glow Power"
Please read and understand all instructions before building!
 The X-Calibur kit contains all the parts necessary* to build a flying high power rocket: (1) Pre-slotted main airframe (1) Payload airframe (1) Airframe coupler tube (1) Coupler bulkplate (1) Coupler hardware
LANIER - Ultimate Pitts - INSTRUCTIONS. Additional Parts Required. (12) 4-40 blind nuts (Dubro #606)
 4-40 blind nuts (Dubro #606)") Additional Parts Required (4) or more channel radio with 7-8 servos..91-2.2 two stroke or 1.20-1.84 four stroke engine Appropriate Master Airscrew prop and Hayes mount for your engine. 3 Tru-Turn spinner
Additional Parts Required (4) or more channel radio with 7-8 servos..91-2.2 two stroke or 1.20-1.84 four stroke engine Appropriate Master Airscrew prop and Hayes mount for your engine. 3 Tru-Turn spinner
CARL GOLDBERG PRODUCTS, LTD.
 Pitts Monster Aerobatic flying just doesn't get any better than this Pitts ARF. The classic lines of a biplane coupled with the radial cowl, add excitement to the maneuvers you love, knife edge, split
Please read and understand all instructions before building!
 D-Region Tomahawk The D-Region Tomahawk kit contains all the parts necessary* to build a flying high power rocket: (1) Pre-slotted main airframe (1) Payload airframe (1) Airframe coupler tube (1) Coupler
Cover the wing trailing edge and the aileron leading edge with strapping tape as shown.
 Cover the wing trailing edge and the aileron leading edge with strapping tape as shown. The aileron hinges are done using strapping tape on the top and bottom surfaces of the ailerons as shown. Make sure
Stearman PT-17 KIT WARRANTY
 Stearman PT-17 KIT # K-306 Assembly Instructions Version 2 02-17-16 Designed by Tom Herr WARRANTY Sig Manufacturing Co, Inc. guarantees this kit to be free from defects in both material and workmanship
STRATOSPHERE CONTEST MODEL
 STRATOSPHERE CONTEST MODEL A Super-Duration Fuselage Plane With Extremely High Power-Weight Ratio It Has Made a Flight of Thirty- Five Minutes Construction of the light hut strong frame work is simple
Instructions SPA3D Building Instructions/Essay Design and instructions by Dean "Tattoo" Tuinstra Simple Cheap Fun-Fly 3D design Engine (GMS.4
 Instructions SPA3D Building Instructions/Essay Design and instructions by Dean "Tattoo" Tuinstra Simple Cheap Fun-Fly 3D design Engine--.46-.47 (GMS.47 used on prototype) Wingspan--36" Length--36" (length
CARL GOLDBERG PRODUCTS, LTD.
 Eagle 400 WARNING A radio-controlled model is not a toy and is not intended for persons under 16 years old. Keep this kit out of the reach of younger children, as it contains parts that could be dangerous.
This pictorial document contains assembly recommendations including some fit and finish details that will be helpful when building this airplane
 This pictorial document contains assembly recommendations including some fit and finish details that will be helpful when building this airplane Problems found with this kit and a flight performance review
The BIPE NX Assembly Manual
 The BIPE NX Assembly Manual Specifications Wing Span: 34 inches Wing Area: 550 in 2 Fuselage Length: 36 inches Weight (ready to fly): 20 to 24 oz. Wing Loading: 5.2 to 6.3 oz/ft 2 Designed by Jim Vigani
56 & 60 AJ Laser 230z Assembly Instructions
 56 & 60 AJ Laser 230z Assembly Instructions Congratulations Whether you're looking to go out and go 3d huckin' or lay down a smooth-as-butter precision flight, the 56 or 60 Laser 230z is for you! The wings
Introducing The Cloud Models Westland Whirlwind
 Produced by Cloud Models,Deopham Road,Morley,Wymondham, Norfolk,NR18 9AA E-mail sales@cloudmodels.com web site cloudmodels.com Introducing The Cloud Models Westland Whirlwind By Tricks Thank you for purchasing
INSTRUCTION MANUAL. Suitable for Electric or I.C. Engine Power
 INSTRUCTION MANUAL Suitable for Electric or I.C. Engine Power Congratulations on the purchase of your Irvine Tutor 40 II Radio Control Model Aircraft. Please take some time to carefully read these instructions