AlphaBot Assembly Diagram
|
|
|
- Amice Freeman
- 5 years ago
- Views:
Transcription

1 AlphaBot Assembly Diagram
 and (F) to install the encoder")
2 Part 1:AlphaBot baseboard assembly 1 Fix the motors onto the AlphaBot baseboard with the brackets, and then use (C) and (F) to install the encoder disks.


3 2 Fix the Infrared sensors with (G) and (H). Install the Infrared sensors and Photo sensor to the AlphaBot baseboard; the Infrared sensors should be fixed with (K), while Photo sensor can be inserted into the AlphaBot baseboard directly without any screw for fixing. Connect a XH2.54 4cm 4Pin cable to the Infrared sensor, and tie a XH2.54 4cm 3Pin cable to the Photo sensor.

4
")

5 3 Tie a XH2.54 4cm 7Pin cable to the Tracker sensor, and fix (D) with (B). And then, connect the XH2.54 4cm 7Pin cable described above to the AlphaBot baseboard, and fix the Tracker senor to the AlphaBot baseboard with (B).
 and (J), and install (L) and (B) onto the two holes in the front of the steering gear.")
 to fix it.")
6 Part 2: Ultrasonic Unit Assembly 4 Fix the steering gear board onto the SG90 steering gear with (I) and (J), and install (L) and (B) onto the two holes in the front of the steering gear. Fix the two-way rocker arm to the Pinboard with (E), and then install the Pinboard to the SG90 steering gear and use the screw (1.) to fix it. Finally, insert the ultrasonic sensor to the Pinboard.
, place it into the stand (g.), and fix it with the screw (5.")
7 Part 3: Camera Pan&Tilt Assembly 5 Place the steering gear in the middle of the stands (f.) and (g.) and fix it with the screw (7.). Please make sure the rotor on the steering gear is installed in a correct direction. Cut out a little bit of the arm on the rocket arm (c.), place it into the stand (g.), and fix it with the screw (5.) Then, cut out a bit of each arm on the cross-shape rocket arm, and place it into the base, and fix it with the screw (5.) on the back side of the base.

8
 and fix the installation with a screw (1.). Fix another steering gear into the stand (e.")
, and fix them with the screw (1.). Connect a same direction 25Pin FFC cable to the Raspberry Pi camera,")
9 Insert the steering gear describe above to cross-shape rocket arm (b.) in the stand (d.) and fix the installation with a screw (1.). Fix another steering gear into the stand (e.), and fix it with two screws (7.). Install the stand (e.) and steering gear to the stands (f.) and (g.), and fix them with the screw (1.). Connect a same direction 25Pin FFC cable to the Raspberry Pi camera, and clamp the camera on the top of the stand (e.).

s and six (B)s to the Acrylic")
10 Part 4: Acrylic Baseboard Assembly 6 Fix the universal roller wheel to the Acrylic baseboard with two (G)s and four (K)s. Fix six (A)s and six (B)s to the Acrylic baseboard.
, and connect a XH2.")

11 Part 5: Vehicle installation 7 Arduino kit Insert the Arduino board into the AlphaBot baseboard. Fix the completed ultrasonic unit to the AlphaBot baseboard with (B), and connect a XH cm 4Pin cable to the ultrasonic Pinboard. (Connect the steering gear to the S1 interface with the cables, in which the black line is to the brown port, the red line to the red port, and the yellow line to the yellow port.)

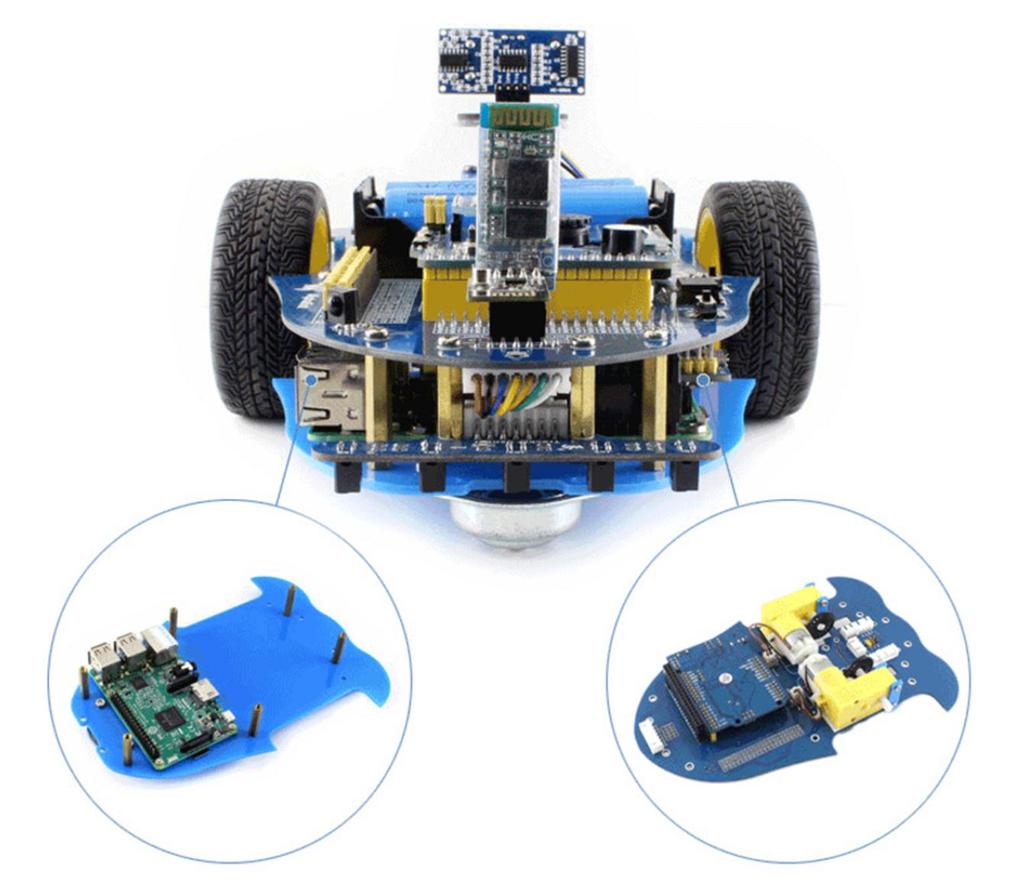
12 Install the Acrylic baseboard to the front side of the AlphaBot baseboard with (B), and fix the wheels to the car. For Bluetooth kit, you can also link to Accessory Shield and Dual-mode Bluetooth.

13
 is a pad; place it between the raspberrp Pi to the Acrylic baseboard.")
. Pass the camera cable through the flat cable hole and connect it to the Raspberry Pi board.")
14 8 Raspberry Pi kit Fix the raspberrp Pi to the Acrylic baseboard with (H), (I) and (J). (H) is a pad; place it between the raspberrp Pi to the Acrylic baseboard. Install the camera pad&tilt unit to the front end of the AlphaBot baseboard, and fix it with (6.) and (4.). Pass the camera cable through the flat cable hole and connect it to the Raspberry Pi board. Fix the Acrylic baseboard to the AlphaBot baseboard with (B).

15 Finally, fix the wheels to the car. In additional, Arduino and raspberry Pi can work together at a same time in a same car via serial communication.
16
Fabscan100 Assembly instructions v.1.00
 Fabscan100 Assembly instructions v.1.00 Figure 1: The Fabscan100. Content: List of material 2 Assembly group 1: Turning Table 3 Assembly group 2: Camera/Laser Bracket 8 Assembly group 3: Housing 12 Final
In order to do this project you should review the following concepts:
 Catapult In order to do this project you should review the following concepts: Catapult 18 Rope Lego Band Rubber Band Catapult: Arm Catapult: Arm Catapult: Arm Leave the other end of the rubber band loose
Nebraska 4-H Robotics and GPS/GIS and SPIRIT Robotics Projects
 Name: Club or School: Robots Knowledge Survey (Pre) Multiple Choice: For each of the following questions, circle the letter of the answer that best answers the question. 1. A robot must be in order to
25-200H. 12 Planer / Jointer. with Helical Cutterhead. Parts List.
 25-200H 12 Planer / Jointer with Helical Cutterhead 4001824 Parts List www.rikontools.com CABINET ASSEMBLY PARTS EXPLOSION & PARTS LIST KEY NO. DESCRIPTION KEY NO. DESCRIPTION 1 Pan Head Screw M6x12 P25-200H-1
How to Build the Robotics++ V2 Robot. Last Edited Nov
 How to Build the Robotics++ V2 Robot Last Edited Nov. 15-2014 www.roboticscity.com 1 Completed Robotics++ V2 Robot. More views of completed robot can be found at the end of this instructions manual The
INSTALLATION MANUAL REAR PARKING ASSIST SENSORS
 MITSUBISHI MOTORS GENUINE ACCESSORIES PART NUMBER MZ380456EX APPLICABLE MODEL LANCER SEDAN INSTALLATION MANUAL REAR PARKING ASSIST SENSORS Thank you for purchasing MITSUBISHI genuine * REAR PARKING ASSIST
Ohbot. Eyes turn. servo. Eyelids open. servo. Head tilt. servo Eyes tilt. servo. Mouth open servo. Head turn servo
 Making Instructions Ohbot Ohbot has six servo motors. The servos allow each part of the face to be positioned precisely. Eyelids open servo Eyes tilt servo Eyes turn servo Head tilt servo Mouth open servo
Heacent 3D printer assembly manual. Prusa i3
 Heacent 3D printer assembly manual Prusa i3 Y-axis assembly 1. Y axis motor section: Find the belowing parts bag, Y-axis motor Assembled parts are separated as shown below, note that the motor between
SPARE PARTS LIST MODEL NO. LB1200F PAGE 1 ITEM PART NO. DESCRIPTION QTY NOTE
 PAGE 1 001 JM21000018 HEX.SOCKET HEAD SCREW M5X12 4 002 JM21000019 SPRING WASHER 5 4 003 JM21000020 FLAT WASHER 5 4 004 JM21000021 UP COVER COMPLETE 1 005 JM21000025 MICRO SWITCH FIX PANEL A 1 006 JM21000026
Kossel Rev B Build Guide V1.0
 Kossel Rev B Build Guide V1.0 1 Table of Contents: Step 1: BASE ASSEMBLY Gathering parts: Building the Corners and Base: Step 2: UPPER ASSEMBLY Building Upper: Step 3: VERTICAL RAIL INSTALLATION Building
Quick Start Guide. Contents
 1 Quick Start Guide Contents Powering on the Machine Login/Password Entry Jaw Set Up High Security Cut by Code High Security Jaw Set Up Edge Cut Cut by Code Edge Cut Cut by Decode Cutter Replacement Tracer
MAKEBLOCK MUSIC ROBOT KIT V2.0
 MAKEBLOCK MUSIC ROBOT KIT V2.0 Catalog Music Robot Kit V2.0 Introduction... 1 1 What is Music Robot Kit V2.0?... 1 1.1 Mechanical part... 1 1.2 Electronic part... 1 1.3 Software part... 1 2 Music Robot
BMW E90 Android Touch Screen Radio Installation Instructions
 BMW E90 Android Touch Screen Radio Installation Instructions Enjoy your new Android Radio from Bremmen Parts, we appreciate your business. Vibrant Touch Display This radio features a responsive 9 touch
Making Instructions Version 2.1 for Raspberry Pi
 Making Instructions Version 2.1 for Raspberry Pi Ohbot Ltd. 2017 About Ohbot has seven motors. Each connects to the Ohbrain circuit board and this connects to a computer using a cable. Ohbot software allows
Installation Tutorial
 Installation Tutorial 1. Remove the finger parts, if the film, tear off the surface of the film, the number of parts were 1 4 4 5 5 2. First assemble the big finger parts, use M2X3 screws, M2X6 copper
MODEL NO.: MI / 42100
 MODEL NO.: MI-50 / 00 MODEL NO.: MI-50 BOX 1 OF 6 ROUTER LIFT PARTS BREAKDOWN Router Lift Assembly 6 5 2 2 1 5 5 8 12 11 2 26 27 0 12 26 27 27 22 22 27 19 A 5 26 12 26 22 25 25 7 18 18 15 15 7 9 1 17 2
Sole Fitness E95 Elliptical Trainer TurnKey Delivery and Setup Training
 Sole Fitness E95 Elliptical Trainer TurnKey Delivery and Setup Training Delivery Requirements Ground delivery Inside delivery to customer-specified location Unpack and assemble machine, and remove packing
Tin Lizzie 18 Assembly Instructions
 Tin Lizzie 18 Assembly Instructions Revision: 07/29/16 Table of Contents Aides 3 Before You Begin 5 Aides 5 Tools 6 Perfect Stitch Parts 2 12 Modify the Machine 12 Prepare Drill Templates 12 Front Display
Hubble GOTO Installation Instruction (1.3, 04/30/2014)
") Hubble GOTO Installation Instruction (1.3, 04/30/2014) 1. Preparation... 1 1.1 Tools required... 1 1.2 AZ GOTO Drive Parts List...1 1.3 ALT GOTO Drive Parts List... 1 2. The Azimuth motor drive installation...2
Hubble GOTO Installation Instruction (1.3, 04/30/2014) 1. Preparation... 1 1.1 Tools required... 1 1.2 AZ GOTO Drive Parts List...1 1.3 ALT GOTO Drive Parts List... 1 2. The Azimuth motor drive installation...2
Retro Fit Gearbox Mount. Assembly Instructions. Assembly Instructions. Before You Start. General Information. Manual No M
 Retro Fit Gearbox Mount Assembly Instructions Treker 4400NT & 4400ST Series Before You Start Assembly Instructions Manual No. 700-372M! When you see this symbol, the subsequent instructions and warnings
BMW E39/E53 Android Touch Screen Radio Installation Instructions
 BMW E9/E5 Android Touch Screen Radio Installation Instructions Enjoy your new Android Radio from Bremmen Parts, we appreciate your business. Vibrant Touch Display This radio features a responsive 9 touch
Content Components... 1 i. Acrylic Plates... 1 ii. Mechanical Fasteners... 3 iii. Electrical Components... 4 Introduction... 5 Getting Started... 6 Ar
 About r Preface r is a technology company focused on Raspberry Pi and Arduino open source community development. Committed to the promotion of open source culture, we strive to bring the fun of electronics
PoeBot Building Instructions CCISD. Upper Gripper. Lower Gripper/ Spatula. PoeBot Instructions PLTW. Clear Creek ISD
 Upper Gripper Lower Gripper/ Spatula PoeBot Instructions PLTW Clear Creek ISD 1. Chasis Construction (Split Group with half starting Step 1 and half starting Step 13.) Note: These flat bearings are offset
DF-LT V2.0 Users Manual
 DF-LT V2.0 Users Manual SKU: SEN0016 Page 1 Cautions! A. DO NOT POWER the module before reading this manual. Any incorrect connection of the sensor may cause it permanent damage. B. This product DO NOT
Preface. If you have any TECHNICAL questions, add a topic under FORUM section on our website and we'll reply as soon as possible.
 Preface About SunFounder SunFounder is a technology company focused on Raspberry Pi and Arduino open source community development. Committed to the promotion of open source culture, we strive to bring
Note: Parts without part numbers are for reference only and cannot be purchased individually.
 Parts Ordering Replacement Parts To order parts or reach our service department, call 1-800-274-6848 between 7:30am and 5:30pm (CST), Monday through Friday. Having the Model Number and Serial Number of
LaserBot. SKU: Weight: 4.48 Kilogram
 LaserBot SKU: 90105 Weight: 4.48 Kilogram LaserBot LaserBot is a desktop laser engraver developed on Makeblock's open-source platform. Equipped with 1.6W 445nm high power solid-state lasers, and cooperating
BombiniBot Parts and Assembly
 BombiniBot Parts and Assembly Copyright 05 mindsensors.com / Parts Loose Parts: Part Quantity Tire Motor Mount 4-Wire Encoder Cable Encoder Wheel Velcro Strip Top Chasis Plate Bottom Chasis Plate Battery
KAKU R2 Education Robot
 1 / 1 KAKU R2 Education Robot Rev 1.1 Rev Changes Date Remark Rev1.0 Instruction book Release 2015/5/4 -- 2 / 2 1.Product overview KAKU education Robot platform is a geared to the needs of all ages Robot
Grove - Infrared Temperature Sensor
 Grove - Infrared Temperature Sensor Introduction 3.3V 5.0V Analog The Infrared temperature sensor is a non-contact temperature measure model. It is composed of 116 elements of thermocouple in series on
For Experimenters and Educators
 For Experimenters and Educators ARobot (pronounced "A robot") is a computer controlled mobile robot designed for Experimenters and Educators. Ages 14 and up (younger with help) can enjoy unlimited experimentation
 488 PARTS LIST 1 3 SCREWS FOR NO. 2 2 FLYWHEEL CAP 3 FLYWHEEL 4 END NUT FOR NO. 10 5 BALL BEARING FOR NO. 3 (1 st ) 6 BALLBEARING FOR NO. 3 (2nd) 7A CLUTCH RACE KEY 7B CLUTCH RACE 7C CLUTCH SPRING 7D 7
N. 15th Street, Middlesboro, KY FLIP TARP DUMP BODY INSTALLATION INSTRUCTIONS
 1-800-248-7717 1002 N. 15th Street, Middlesboro, KY 40965 FLIP TARP DUMP BODY INSTALLATION INSTRUCTIONS Congratulations on your purchase of a Mountain Flip Tarp Dump Body tarping system. With tarping systems
EDGE2 DUAL MONITOR ARM
 EDGE2 DUAL MONITOR ARM EDGE2 Rev A 2/17 Model EDGE2-SLV Model EDGE2-BLK Model EDGE2-WHT ASSEMBLY AND ADJUSTMENT EDGE2 DUAL MONITOR ARM PARTS AND TOOLS PLEASE REVIEW these instructions before beginning
SERVICE PARTS LIST PAGE 1 OF 6 BASE ASSEMBLY SPECIFY CATALOG NO. AND SERIAL NO. WHEN ORDERING PARTS 12" SLIDING COMPOUND MITER SAW
 PAGE 1 OF 6 BASE ASSEMBLY 00 0 CATALOG NO. EXAMPLE: SPECIFY CATALOG NO. AND NO. WHEN ORDERING PARTS 6955-20 1 02-80-0050 Thrust Bearing (1) 2 05-80-0510 M5 x 12mm Flat Head T-20 Screw (5) 3 05-81-0135
VEX Robotics Platform and ROBOTC Software. Introduction
 VEX Robotics Platform and ROBOTC Software Introduction VEX Robotics Platform: Testbed for Learning Programming VEX Structure Subsystem VEX Structure Subsystem forms the base of every robot Contains square
INSTALLATION INSTRUCTIONS
 INSTALLATION INSTRUCTIONS PARTS REQUIRED Single QuickStand Lite Parts A (1) Lower Arm A B C D B (1) Upper Arm C (1) Base D (1) Base Plate E (1) M8 Dynamic Arm Long F (1) Clamp Bracket G H (1) VESA Plate
Parts list. 10 Oct SVP Worldwide - All rights reserved.
 Parts list 2016 SVP Worldwide - All rights reserved. 10 Oct 2016 A 13 2 1 68003741 Cover CSU Cpl 2 68000014 Keyboard Cpl Sewing Head 3 68002540 Pile Seal 4 411966803 Screw PT 3x12 FZB 5 411966828 Screw
Coolant Tank Screen Leg Idle End Lockwasher 64 B-015B Leg Drive End Machine Screw 1/4-20 x 3/4 Round Head
 Always give model number, serial number and part number when ordering repair parts. BED, COOLANT & DASH POT PARTS LIST (Cont'd.) REF NO. PART NUMBER DESCRIPTION 19 B-077 Vise Slide Block 20 B-045 Vise
Model LS1018 Parts List A = Standard Equipment 〇 = Circuit Diagram
 LS1018 7-14 103 104 105 106 97 99 100 110 109 63 85 96 200 107 90 2 199 108 37 89 91 92 93 94 31 74 75 73 140 70 121 15 254 255 113 215 236 116 114 115 196 258 195 118 197 119 259 117 203 253 67 95 112
BX2173 Installation Instructions Ford Focus (including the 2.3L engine) 2003 Ford Focus SVT
 2003 Ford Focus SVT") BX2173 Installation Instructions 2000-04 Ford Focus (including the 2.3L engine) 2003 Ford Focus SVT Serial No. The front fascia, coolant line bracket and anti-pollution devices are removed for baseplate
BX2173 Installation Instructions 2000-04 Ford Focus (including the 2.3L engine) 2003 Ford Focus SVT Serial No. The front fascia, coolant line bracket and anti-pollution devices are removed for baseplate
Please read BOTH these Installation Instructions and the General Instructions prior to installing or operating this equipment.
 Attachment Tab Height: 16-1/2 Serial Number Attachment Tab Width: 18 Please read BOTH these and the General Instructions prior to installing or operating this equipment. 1. Blue Ox towing products and
Assembly locations. Document feeder assembly. Printer door. assembly. Upper guide. assembly. Control panel assembly. Feed assembly
 Assembly locations Document feeder assembly Printer door assembly Upper guide assembly Control panel assembly Feed assembly Electrical components Figure 83. Assembly locations EN Assembly locations 205
ES# ECS MKV R32 Dead Pedal Kit Installation Instructions
 ECS MKV R32 Dead Pedal Kit ES#261054 Proper service and repair procedures are vital to the safe, reliable operation of all motor vehicles as well as the personal safety of those performing the repairs.
Parts Catalog. S-Series Slicer Smart Manual SG13. Model:
 , 07 99507 ECN 065 Parts Catalog S-Series Slicer Smart Manual Model: SG SG 0/0/07 Rev. G IMPORTANT! TO EXPEDITE SHIPMENT OF PARTS, ALWAYS SPECIFY MODEL, REV, PART NUMBER, AND SERIAL NUMBER OF UNIT. GLOBE
SS1062, SS10621 & SS10621E Free Standing PWC & Fishing Boat Hoist SS1062 SS10621 SS10621E
 SS1062, SS10621 & SS10621E Free Standing PWC & Fishing Boat Hoist SS1062 SS10621 SS10621E Midwest Industries, Inc. Page 1 Ida Grove, IA 51445 800.859.3028 www.shorestation.com 0003231 REV A 1/25/05 Bundles
ORTOP Modular Robot v3.0 Arm Assembly
 Base Plate Assembly Parts Needed: Arm Assembly BAG 1 2 Socket Head Cap Screw, 1-1/4" 2 Socket Head Cap Screw, 1/2" 2 Button Head Cap Screw, 3/8" 6 Nuts 1 Gear Hub Spacer 1 Flat Building Plate 1 Single
The Robot Builder's Shield for Arduino
 The Robot Builder's Shield for Arduino by Ro-Bot-X Designs Introduction. The Robot Builder's Shield for Arduino was especially designed to make building robots with Arduino easy. The built in dual motors
PARTS LIST COMMANDER 20 VAC-TRAC COMMANDER 27 VAC-TRAC FH 541V
 PARTS LIST COMMANDER 20 VAC-TRAC COMMANDER 27 VAC-TRAC FH 541V UPPER ASSEMBLY 101 6190481 THROTTLE CABLE FOR MODELS WITH ADDITIONAL CHOKE CABLE 1 101 6190751 THROTTLE CABLE FOR MODELS WITH OUT ADDITIONAL
1. Line Follower Placing the Line Follower Electrical Wiring of Line Follower Source Code Example and Testing...
 CONTENTS 1. Line Follower... 2 1.1 Placing the Line Follower... 2 1.2 Electrical Wiring of Line Follower... 3 1.3 Source Code Example and Testing... 4 2. CMPS11 Compass... 5 2.1 Placing the Compass on
LISTA DE REFACCION MODELO LS1018L PAGINA 1. Pos. NUMERO DESCRIPCION Cant. NOTA
 PAGINA 1 001 JM23100006 CROSS HEAD SCREW M5X20 2 002 JM23100007 FLAT WASHER 5 2 003 JM23100008 PAD 4 004 JM23100009 LOCKNUT M10 1 005 JM23100010 FLAT WASHER 10 2 006 JM23100300 BASE COMPLETE 1 INC. 7 007
6000#, 4000# Wall-Mounted Type (Horizontal Shaft)
") 1/6 Wall-mounted CYCLO DRIVE are grouped into right wall type and left wall-mounting type as seen from the output shaft side. Top Bottom Left Wall-Mounted Type Right Wall-Mounted Type 1. Right-Wall Mounted
1/6 Wall-mounted CYCLO DRIVE are grouped into right wall type and left wall-mounting type as seen from the output shaft side. Top Bottom Left Wall-Mounted Type Right Wall-Mounted Type 1. Right-Wall Mounted
MOTORIZED STANDARD SHADE WITH CABLES Installation Instructions
 Tools Needed Drill Measuring Tape Pencil 2 Level Plumb Line ¼ Masonry Drill Bit Hammer Linesmans Pliers Cable Cutters Phillips & Flat-Head Screw Driver 11/32 Socket or Open End Wrench 5/32 Allen Wrench
Hopper and Drive Components
 January, 07 Lit. No. 7586, Rev. 00 Hopper and Drive Components Model SP-00- & SP-5- Low-Profile Tailgate Spreader Parts List This manual is for SnowEx SP-00- & SP-5- tailgate spreaders with serial numbers
EPPA2-KIT DUAL MONITOR ARM CONVERSION
 EPPA2-KIT DUAL MONITOR ARM CONVERSION EPPA2-KIT Rev A 10/17 Model EPPA2-KIT-XXX ASSEMBLY AND ADJUSTMENT EPPA2-KIT PARTS AND TOOLS PLEASE REVIEW these instructions before beginning the assembly and adjustment
Devastator Tank Mobile Platform with Edison SKU:ROB0125
 Devastator Tank Mobile Platform with Edison SKU:ROB0125 From Robot Wiki Contents 1 Introduction 2 Tutorial 2.1 Chapter 2: Run! Devastator! 2.2 Chapter 3: Expansion Modules 2.3 Chapter 4: Build The Devastator
Electric Handpiece System Installation Guide
 Electric Handpiece System Installation Guide CONTENTS Unpacking... 1 Standard Handpiece Tubing Removal... 1 Electric Handpiece Components Installation 2 Electric Handpiece Tubing Connection... 3 Electric
Preface. If you have any TECHNICAL questions, add a topic under FORUM section on our website and we'll reply as soon as possible.
 Preface About is a technology company focused on Raspberry Pi and Arduino open source community development. Committed to the promotion of open source culture, we strive to bring the fun of electronics
Daily Maintenance. 2. Insert bobbin cases in to rotary hooks. Make sure bobbin thread is not over 2 inches long. Close bobbin case covers.
 Rotary hook 1. Open bobbin case covers and remove bobbin cases. Use brush to remove lint build up in and around rotary hooks. Compressed air may also be used. Daily Maintenance Cle aning Oiling Rotary
TS4001. Model # 10 inch Table Saw addendum SETUP & OPERATION MANUAL
 SETUP & OPERATION MANUAL Features Powerful 13 amp motor Cast aluminum work table Riving knife Anti-kickback pawls Includes: 10 in. 24 tooth tungsten carbide tipped saw blade Rip fence Miter gauge Push
Parts List. 6 HV Ult. Version 1.0/2013
 Parts List 6 HV Ult Version 1.0/2013 Copyright @Compass Model 2013 As we continue to improve our products, this part list may not reflect all recent product amendments. For more information, please refer
CarveWright Woodworking System Assembly Guide and Parts List
 CarveWright Woodworking System Assembly Guide and Parts List Patented 2005 Note: Parts in this document are not necessarily available for purchase. Some parts are available only through factory repair.
Cable Tray Kit: - Cable Tray - Cable Tray Cover - Power Block Support (x2) Top Support Kit: (x2) - 2 Top Supports. Quantities are per bench
 Top Support Kit: (x2) - 2 Top Supports. Quantities are per bench") Parts Included (per back to back bench) Column Kit: (x2) - 1 LH & 1 RH Column - Control Box - Hand Switch Cable Tray Kit: - Cable Tray - Cable Tray Cover - Power Block Support (x2) Depth Support Kit: -
Parts Included (per back to back bench) Column Kit: (x2) - 1 LH & 1 RH Column - Control Box - Hand Switch Cable Tray Kit: - Cable Tray - Cable Tray Cover - Power Block Support (x2) Depth Support Kit: -
CATALOG OF REPLACEMENT PARTS
 The Choice of Experience CATALOG OF REPLACEMENT PARTS MODELS 909A 919A 909E 919E 909M 919M SLICERS EFFECTIVE MARCH 2009 - 2 - Table of Contents 5 ELECTRICAL COMPONENTS (909A & 919A) 7 ELECTRICAL COMPONENTS
Parts list MRACH SVP Worldwide - All rights reserved.
 Parts list 0 SVP Worldwide - All rights reserved. 0 MRACH 0 A 9 8 0 9 8 0 0 0 8 9 980 THREAD GUIDE CPL. 90 REEL PIN 0 PLATE SPRING 980 SCREW 0*0 FZB KOMBITORX 0 THREAD REEL PIN 00 COVER THREAD KNIFE CPL.
CM-1258Y-SD Concrete Mixer
 Form No. 3421-382 Rev A CM-1258Y-SD Concrete Mixer Model No. 68011 Serial No. 402000000 and Up Register at www.toro.com. Original Instructions (EN) *3421-382* A Ordering Replacement Parts To order replacement
GS030. Crane Slew-Angle Wireless Measurement Sensor. Features. Application
 Features Crane Slew-Angle Wireless Measurement Sensor Resolution of 0.1 Accuracy: typical: 0.5 over 360 Range: 0 to 360 Rugged water proof enclosure IP66 Potted electronics for increased water protection
This guide contains everything you need to set up and operate all three. Inspira Imperial Quilting Frame Assembly...2
 Congratulations on the purchase of your Husqvarna Viking Mega Quilter 18x8, Inspira Imperial Quilting Frame, and QBOT by Inspira! This guide contains everything you need to set up and operate all three.
Main Drive Components
 Pipe and Bolt Threading Machine Main Drive Components 0 0 Rear Centering Head Centering Jaw Set Spiral Pins () 00 Centering Scroll Retaining Ring 0 Rear Bearing 0 Oil Ball Valve () # - x / Screw Motor
ASSEMBLY AND ADJUSTMENT
 EPPA MONITOR ARM EPPA Rev A 10/17 Model EPPA-XXX ASSEMBLY AND ADJUSTMENT EPPA MONITOR ARM PARTS AND TOOLS PLEASE REVIEW these instructions before beginning the assembly and adjustment procedures. Check
ECO Work Guide for Applying Canadian New Bill
 ECO Work Guide for Applying Canadian New Bill - Table of Contents -. Work Guide (2K CDU) ----------- 2. Work Guide 2(K CDU) ----------- 2 Work Guidance for New Bill of Canada 0 0 . ECO Work Guide for Applying
HQ Precision-Glide Track Upgrade 2 Extension Kit for HQ Studio Frame Part# QF09750
 HQ Precision-Glide Track Upgrade 2 Extension Kit for HQ Studio Frame Part# QF09750 Important Note: Upgrading the track system on the HQ Studio Frame requires the use of this 2 Extension Kit (Part #QF09750),
LEGO 2D Planar Manipulator (with zero offset between Z1 and Z2 axes of rotation)
") LEGO 2D Planar Manipulator (with zero offset between Z1 and Z2 axes of rotation) Uses some parts not found in NXT Mindstorms Kit 9797 e.g. 2 nd Turntable, 1x12 plates, and 15100: Pin-hole Friction Peg.
LEGO 2D Planar Manipulator (with zero offset between Z1 and Z2 axes of rotation) Uses some parts not found in NXT Mindstorms Kit 9797 e.g. 2 nd Turntable, 1x12 plates, and 15100: Pin-hole Friction Peg.
411 West Congress St., Maple Lake, MN Toll Free
 411 West Congress St., Maple Lake, MN 55358 Toll Free 877-466-8837 www.wavearmor.net Post Attachments (22926 & 21951) to Wave Port - Assembly Instructions: Attach any post attachments to a Wave Port while
BOLT ON LONG TRAVEL FOR E-Z-GO
 INSTALLATION INSTRUCTIONS BOLT ON LONG TRAVEL FOR E-Z-GO 1994 2000 Model E-7-04 E-7-06 TABLE OF CONTENTS Progressive Supension Kit... 2 Kit Contents...3-4 Disassembly...5-10 Frame Assembly...11-14 Frame
A servo is an electric motor that takes in a pulse width modulated signal that controls direction and speed. A servo has three leads:
 Project 4: Arduino Servos Part 1 Description: A servo is an electric motor that takes in a pulse width modulated signal that controls direction and speed. A servo has three leads: a. Red: Current b. Black:
Megamark Arduino Library Documentation
 Megamark Arduino Library Documentation The Choitek Megamark is an advanced full-size multipurpose mobile manipulator robotics platform for students, artists, educators and researchers alike. In our mission
MODEL 1703E THE CHAMBERLAIN ARM TM INSTALLATION INSTRUCTIONS To be used in conjunction with the Lift-Master Garage Door Operator Owner's Manual
 MODEL 1703E THE CHAMBERLAIN ARM TM INSTALLATION INSTRUCTIONS To be used in conjunction with the Lift-Master Garage Operator Owner's Before you begin, please read this ENTIRE instruction manual. One- Piece
WELDING POSITIONER PARTS BREAKDOWN DRAWING GP-200
 WELDING POSITIONER PARTS BREAKDOWN 10 DRAWING GP-200 1 GP-200-001 FRAME 1 2 GK-160-012 5/16"-18UNC x 5/8" CARRIAGE BOLT 6 3 GK-136-055 5/16"Ø LOCK WASHER 6 4 GK-109-052 5/16"-18UNC HEX NUT 10 5 GP-200-002
Model LS0815F Parts List A = Standard Equipment 〇 = Circuit Diagram
 LS0815F 4-14 1 3 4 6 32 7 47 48 42 44 41 43 11 10 16 14 15 8 9 24 20 19 22 17 21 18 13 23 27 26 29 33 31 35 34 36 86 87 89 90 93 105 104 107 108 109 110 111 101 100 63 83 84 69 67 65 72 79 80 81 85 77
AUTO STABILIZING AND LEVELLING SYSTEM
 Installation Manual Make sure the caravan is parked in a safe place. Make sure the caravan brake is on. Remove all 4 corner steady legs from the caravan. Remove the corner steady legs by removing the 3
WARNING Mercedes Smart for two CDI Installation Instructions BX1990. Serial Number
 Please read BOTH these and the General Instructions before attempting to install or operate this equipment. 1. Blue Ox towing products and accessories are intended to be installed by Blue Ox Dealers who
Copyright Black Box Corporation. All rights reserved Park Drive Lawrence, PA Fax
 Copyright 2004. Black Box Corporation. All rights reserved. 1000 Park Drive Lawrence, PA 15055-1018 724-746-5500 Fax 724-746-0746 JANUARY 2004 RF500A RF507A RF514A RF521A RF501A RF508A RF515A RF522A RF502A
Video Wall Installation Instructions 2W X 3H, 3W X 3H
 Video Wall Installation Instructions 2W X 3H, 3W X 3H www.microndisplaysolutions.com Table of Contents Important Safety Instructions... 3 Configuration... 4 Package Contents, included and optional items...
INSTALLATION INSTRUCTIONS
 INSTALLATION INSTRUCTIONS Accessory ROOF RACK (BLACK) P/N 08L02-STX-210B Application 2013 MDX Publications No. BII 13434 Issue Date JULY 2012 PARTS LIST Right side rail Right center stay Left side rail
Door window. Front door window, assembly overview
 64-50 Door window Front door window, assembly overview 1 - Window channel Pushed onto flange 2 - Door window Removing Page 64-52 Adjusting Page 64-53 3 - Door 4 - Outer window channel Pushed onto flange
E4-WM5-Y525A00 MOUNTING INSTRUCTION
 RAM 2500/3500 4WD B8 5100 (Dual Steering Damper Kit) The installation of these steering dampers must be performed only by experienced and qualified personnel. Read and follow the installation instructions
EXCERPT FROM THE Jobsite saw OWNERS MANUAL
 Table and Fence Table and Fence Parts List 0 0 0 0 0 0 0 0 Table JSS-00 Fence Roller Pin (mm x mm) JSS-0 Rear Lock Down Screw for Insert JSS-00 0 mm O-Ring JSS-00 Extension Wing JSS-00 Fence Roller Wheel
ASSEMBLY AND ADJUSTMENT
 EDGE MONITOR ARM EDGE Rev A 2/17 Model EDGE-SLV Model EDGE-BLK Model EDGE-WHT ASSEMBLY AND ADJUSTMENT EDGE MONITOR ARM PARTS AND TOOLS PLEASE REVIEW these instructions before beginning the assembly and
Replacing the Reciprocator on the SWF Compact Series Machine (601C and 1201C)
") Follow the instructions below to replace the reciprocator in the SWF Compact series machines. The tools required can be found in the tool kit that came with the machine. Preparation 1. First, place the
Follow the instructions below to replace the reciprocator in the SWF Compact series machines. The tools required can be found in the tool kit that came with the machine. Preparation 1. First, place the
EMS-2025scl 230v. Sliding Compound Mitre Saw Fig.1. Revision Date 26/01/2006
 Fig.1 Fig.2 701 inc 2,702,703,704 1 Base 93 089100102700 Space washer Base Assembly Parts (A) 30.23 94 Screw, for base, 45 152 Miter scale label, 2 089100102002 Rubber feet 0.10 702 Pivot Shaft & Screw
Gota cassette. Version 1.10 Sun Protection AVZ 3G.1
 Version 1.10 Sun Protection AVZ G.1 G.2 Sun Protection AVZ Version 1.10 Part number Description Paint finish Length in m 1 4211 772-090 Alu wall bracket 140 mm Mill finish 4211 772-008 Idem RAL 705 light
Legacy Woodworking Machinery a division of Phantom Engineering. The Legacy CNC. Assembly Manual
 Legacy Woodworking Machinery a division of Phantom Engineering The Legacy CNC Assembly Manual New Orientation of the Legacy Step one: Re-orientation of the machine Remove the X-axis screw and supports.
INSTALLATION INSTRUCTIONS
 INSTALLATION INSTRUCTIONS Accessory WELL P/N 08P21-STX-200A Application 2011 MDX Publications No. BII 43668 Issue Date AUG 2010 PARTS LIST Left front fender trim Bracket A-L Left front bumper trim Bracket
Hopper and Drive Components
 February, 07 Lit. No. 770, Rev. 0 Hopper and Drive Components Model TS-00- & TS-00-EG- Low-Profile Tailgate Spreader Parts List This manual is for TurfEx TS-00- & TS-00-EG- tailgate spreaders with serial
Please read BOTH these Installation Instructions and the General Instructions prior to installing or operating this equipment.
 Attachment Tab Height: 13 Attachment Tab Width: 24 Please read BOTH these and the General Instructions prior to installing or operating this equipment. Serial Number 1. Blue Ox towing products and accessories
The Wheels Module The Seats Module Integrate the seats and Wheels modules Ferris Wheel base Build the Gear System...
 Alternate Motorization Kit The Wheels Module... 2 The Seats Module... 3 Integrate the seats and Wheels modules... 4 Ferris Wheel base... 5 Build the Gear System... 7 Ferris Wheel Final Integration!!!...
00278 R1 AXLE, FOR 1-1/8" FREE WHEEL HUBS
 00 ACTUATOR VALVE, O-RING PORTS 00 C-CLIP, /" 00 SPRING, VALVE SPOOL RETURN 00 COLLAR, / ID 00 WASHER, / USS, ZINC 00 HH CAP SCREW, /- NC X -/ G ZINC 0 FITTING, 0-- 00 O-RING, - FITTING 000-BO RELIEF VALVE,
Lead Screw Upgrade. How to upgrade your ROBO R1 to the new Lead Screw Upgrade Pack. Written By: Harrison Team RoBo 3D
 Lead Screw Upgrade How to upgrade your ROBO R1 to the new Lead Screw Upgrade Pack. Written By: Harrison Team RoBo 3D 2017 guide.robo3d.com Page 1 of 14 Step 1 Lead Screw Upgrade Begin by powering off and
THE ARDUINO ENGINEERING KIT INFORMATION GUIDE ARDUINO.CC/EDUCATION
 THE ARDUINO ENGINEERING KIT INFORMATION GUIDE ARDUINO.CC/EDUCATION Includes 1-year individual user license of: In collaboration with: INSPIRING TEACHING & EMPOWERING TABLE OF CONTENTS ARDUINO EDUCATION