This guide contains everything you need to set up and operate all three. Inspira Imperial Quilting Frame Assembly...2
|
|
|
- Morris Owens
- 6 years ago
- Views:
Transcription

1 Congratulations on the purchase of your Husqvarna Viking Mega Quilter 18x8, Inspira Imperial Quilting Frame, and QBOT by Inspira! This guide contains everything you need to set up and operate all three. Table of Contents Page Inspira Imperial Quilting Frame Assembly...2 Attaching the Mega Quilter 18x8 encoders to the Inspira Imperial Frame...18 Installing the QBOT drive assemblies on your Inspira Imperial Frame...25 Installing your Mega Quilter 18x8 on the Inspira Imperial Frame...33 Installing the QBOT wiring harness on the Mega Quilter 18x Final Preparation of your Husqvarna Viking Mega Quilter 18x Checking for the Latest QBOT Firmware Version...41 QBOT Parameters and Settings for the Mega Quilter 18x Loading fabric and more on your Inspira Imperial Frame...45 Setting up your Mega Quilter 18x8 for Stitching...50 Turning on your Mega Quilter 18x8 and QBOT...57 QBOT Test with the Mega Quilter 18x8 to Verify the Installation...57 Quilting with your QBOT...61 Additional Information for your Husqvarna Viking Mega Quilter 18x
2 2
3 Inspira Imperial Quilting Frame Assembly 3
4 4
5 5
6 6
7 7
8 8

9 9
10 10
11 11
12 12

13 13
14 14
15 15
16 16

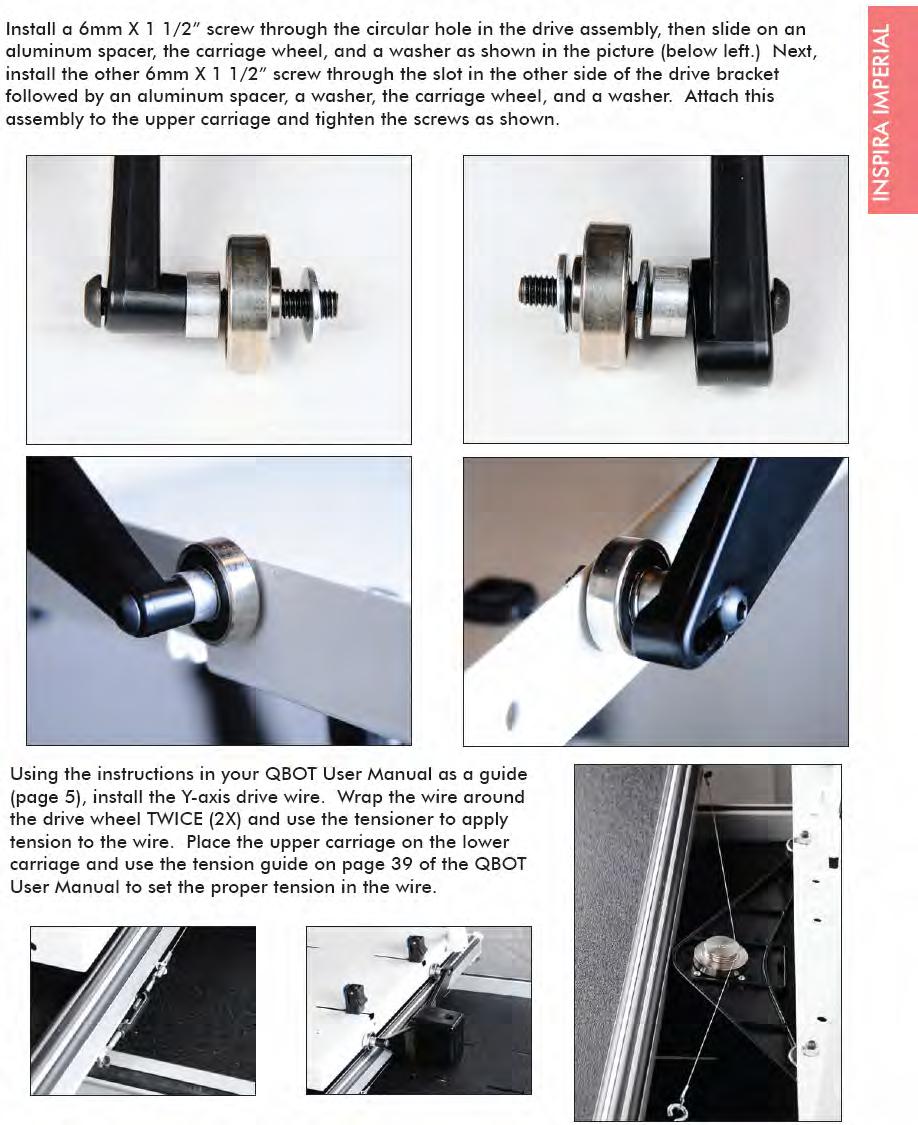
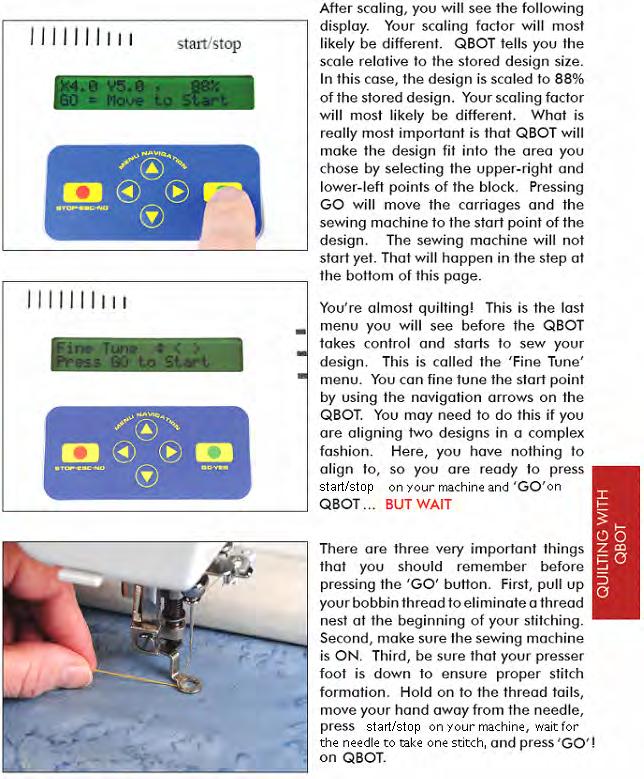
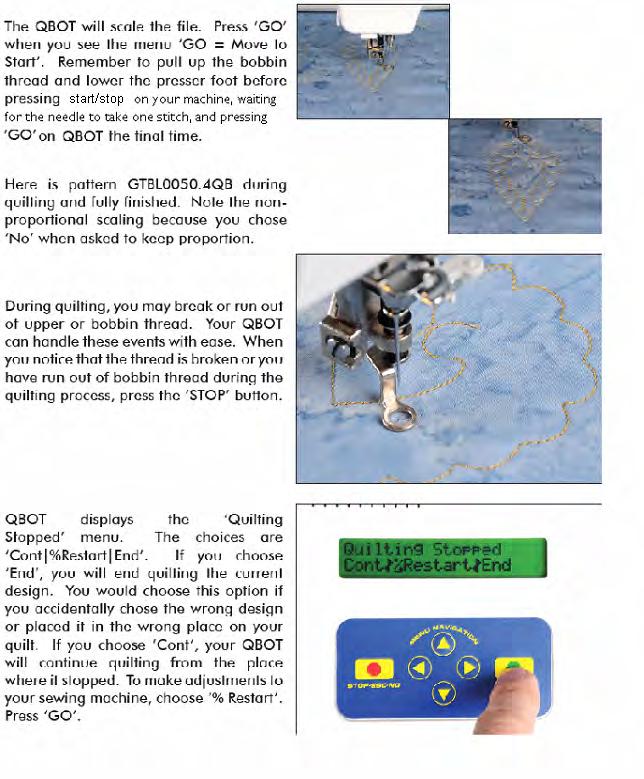
 to achieve a perfectly regulated stitch length.")

17 Attaching your Husqvarna Viking Mega Quilter 18x8 encoders to the Inspira Imperial Quilting Frame The Mega Quilter 18x8 includes a stitch regulator that works like the Quilter s Cruise Control, so you will not need a Quilter s Cruise Control with the Mega Quilter 18x8. Encoders attached to the frame carriages will sense the movement of the machine. A wire will connect the encoders to the machine to let the needle know to go up and down at the right speed (fast or slow) to achieve a perfectly regulated stitch length. A. Attaching the Lower Carriage Encoder You will need the following tools and parts to install the first encoder on the Lower Carriage. The parts come with the Mega Quilter 18x8: 4 mm Allen wrench Open-end adjustable wrench Long bolt Wheel (This is on the lower carriage. You will be removing it & replacing it in the directions to follow.) Washers (3) Encoder Encoder brass ring insert Nut (This is on the lower carriage. You will be removing it & replacing it in the directions to follow.) Lower Carriage 17


18 Turn your lower carriage upside down. You will be placing one encoder on the lower carriage. The bolt and wheel will be removed. The bolt will be replaced with a longer bolt. The wheel will be assembled back on the longer bolt along with the encoder and parts as described below. Using your Allen wrench and the open-end adjustable wrench, remove the bolt holding the wheel. Save the nut. We will use it on the longer bolt to hold the encoder and wheel in place. Notice that there is a right and a left side to the wheel. The right side, as pictured, will be placed against the metal wall of the carriage in the following steps. 18


19 Insert the brass ring inside the hole of the encoder arm. Place the long bolt through the hole on the carriage (where the shorter bolt was removed). Place the wheel on the bolt (keeping the right side pictured above next to the metal wall of the carriage). Place two flat washers on the bolt. Place the encoder on the bolt. The brass ring should be inside the hole on the plastic arm of the encoder. Notice the position of the encoder. The ridged wheel on the end of the encoder should line up with the wheel on the bolt. Place another washer on the bolt, followed by the nut. Tighten the nut. Viewing the Encoder through the Hole in the Lower Carriage 19

 these may be clear,")
20 The encoder attaches to the wheel with the longer screw You have completed the installation of the lower carriage encoder. B. Attaching the Upper Carriage Encoder You will need the following parts to install the encoder on the Upper Carriage: Nut Nylon spacers (2) these may be clear, black, or mixed. Encoder Shoulder bolt 20
 (This will also be on the same side of the carriage as the QBOT Y-axis drive assembly you may not have attached this yet.) Two of these holes are close together.")

21 There are three holes between the two single wheels on one side of the upper carriage. (The other side of the carriage has double wheels.) (This will also be on the same side of the carriage as the QBOT Y-axis drive assembly you may not have attached this yet.) Two of these holes are close together. Of the two holes that are close together, you will be placing an encoder in the hole closest to the wheel. Turn your upper carriage upside down. Place the encoder on the shoulder bolt. Add the two nylon spacers to the shoulder bolt. Place the shoulder bolt through the outside wall of the upper carriage. Attach and tighten the nut on the inside wall of the upper carriage. 21
 Although it is difficult to see in this picture, the encoder does not touch the QBOT drive assembly. This is a close-up view of the encoder on the upper carriage.")
 Notice that the ridged wheel of the encoder is riding along the black track of the frame. There should be no debris of any kind on the encoder wheel or the black track of the frame.")
22 This is a picture of the upper carriage with the encoder and QBOT drive assembly attached. (The QBOT drive assembly will be attached after the encoders.) Although it is difficult to see in this picture, the encoder does not touch the QBOT drive assembly. This is a close-up view of the encoder on the upper carriage. The encoder is lying away from the wheel assembly and towards the front of the carriage. (The QBOT drive assembly is also pictured. It will be attached after the encoders.) Notice that the ridged wheel of the encoder is riding along the black track of the frame. There should be no debris of any kind on the encoder wheel or the black track of the frame. The wheel should turn smoothly as it rides along the track on the frame. 22


23 C. Attaching the Encoder Wire You will need the following items for this part of the installation: The upper carriage with encoder installed The lower carriage with encoder installed One encoder wire (included with your Mega Quilter 18x8) Close-up of fully inserted wire It is best to use tweezers to attach the encoder wires to the encoder. The wires should be tightly seated in the slot of the encoder. Note that the flat edge of the white piece goes toward the arm of the encoder. The ridged edge of the white piece (visible in the photo) goes away from the arm of the encoder. The upper carriage encoder with wire connected is pictured. The ridged wheel of the encoder is seated on the black track of the frame. 23

24 The lower carriage encoder with the encoder wire connected is pictured. The ridged wheel of the encoder is seated on the black track of the frame. The encoder wire comes up through the opening in the carriage. Before installing your Husqvarna Viking Mega Quilter 18x8 on the Inspira Imperial Frame, it is time to begin the installation of your QBOT. The encoder wire end that attaches to your machine will remain loose at this time. 24

25 25
26 26

27 27

28 Installing the QBOT drive assemblies on your Inspira Imperial Frame You will need some additional parts and hardware (in addition to the parts and hardware that come with QBOT) to install QBOT on the Inspira Imperial Quilting Frame with the Mega Quilter 18x8: Part # Frame Adapter Kit for QBOT. This includes additional hardware (washers, spacers, etc.) to install QBOT on the Inspira Imperial Frame. Part # QBOT 3 & 8 Wire Kit. This is needed if you are setting up your frame at either the 3 or 8 width. Part # Wiring Harness QBOT 18x8. This longer wiring harness also omits the Quilter s Cruise Control cords that are not needed for the Mega Quilter 18x8. 28

29 29
30 30
31 31
32 32


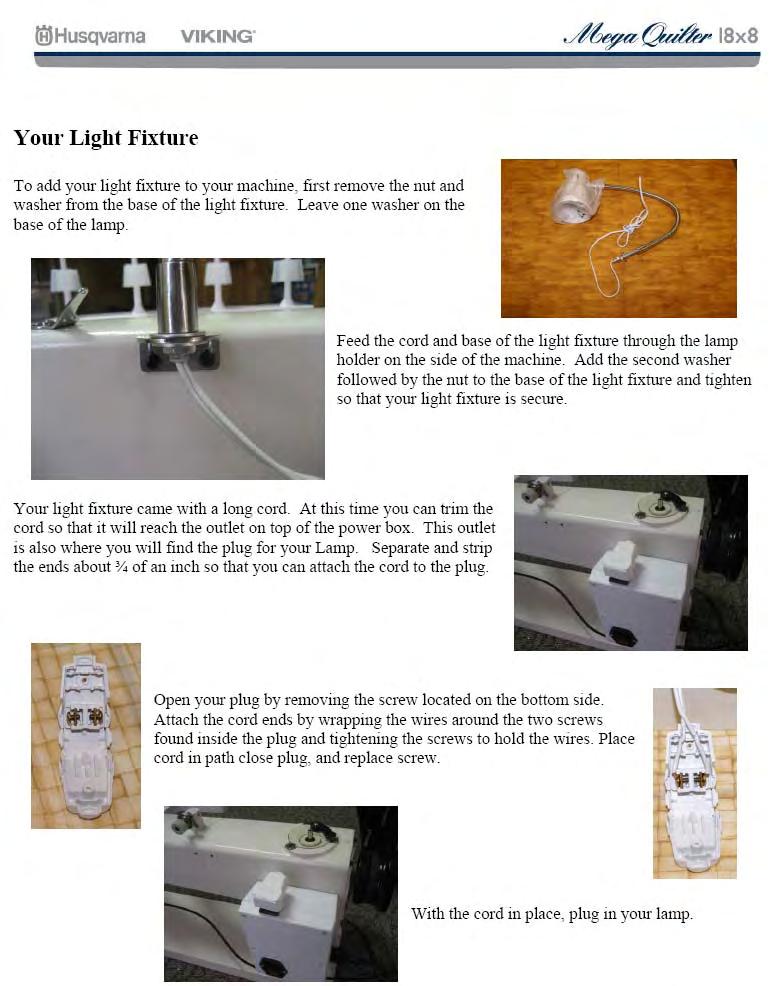
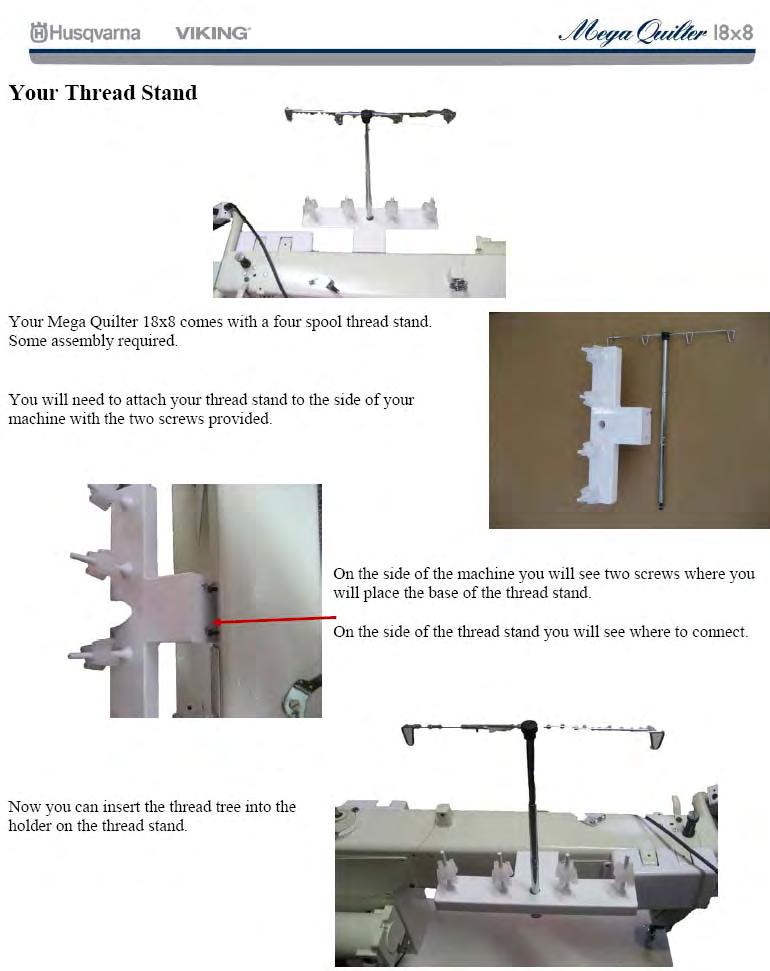
33 Installing your Husqvarna Viking Mega Quilter 18x8 on the Inspira Imperial Frame Place the non-slip pad on the upper carriage. Watching to make sure that your encoder wires are out of the way, center your Husqvarna Viking Mega Quilter 18x8 on the upper carriage (on top of the pad). It should be centered front to back and side to side. With your machine turned off, it is time to connect the encoder wire. Be careful not to bend the pins when connecting the wire to the machine. The next three pages will guide you through the following steps: Install the light fixture on your Mega Quilter 18x8. Install the four spool thread rack on your Mega Quilter 18x8. Install the front handles of your Mega Quilter 18x8. This photo shows all of the above attached along with the QBOT wiring harness. Your QBOT wiring harness is not attached yet. 33
34 34
35 35

36 Set the Controller dials for both the left and right handle to the 3 o clock position as a starting point. It is now time to complete the QBOT installation on your Husqvarna Viking Mega Quilter 18x8. 36


37 Installing the QBOT Wiring Harness on the Mega Quilter 18x8 Part No NOTE: The wiring harness that came in your QBOT box fits the original Mega Quilter; it will not be used for the Mega Quilter 18x8. Make sure you have the Mega Quilter 18x8 wiring harness, Part No , which is longer and different. Remove the upper screw from the front handle mount on the Mega Quilter 18x8. Use the screw that comes with the wiring harness to secure the QBOT mounting bracket (Figure 1). Next, tilt QBOT so that you can read the display clearly. 37


38 TIP: If you are setting up your frame for the 5 foot width, you might find it helpful to use sticky back hook and loop tape to attach your QBOT power supply to your machine. If you are setting up a 10 foot frame, this would take too much cord, and you would not be able to reach across your frame. 38


39 Apply strain relief pads to your Mega Quilter 18x8 as pictured to tidy your wires. The bobbin winder will remain functional by avoiding this area. Note: Fabric has not been loaded on your quilt frame yet. The Y-axis wire has been placed between the machine base and the carriage clamp. 39


40 Final Preparation of your Husqvarna Viking Mega Quilter 18x8 Remove the protective cover over the needle at this time. Oil your Husqvarna Viking Mega Quilter 18x8 following the instructions below. 40

41 Check To Make Sure You Have the Latest QBOT Firmware Version 41

42 42
. There are also settings that need to be changed in QBOT because you will be using it with the Mega Quilter 18x8.")
43 QBOT Parameters and Settings for the Mega Quilter 18x8 You must change two parameters in QBOT because you have installed it on the new Inspira Imperial Frame (the X Axis Direction and the Y Axis Direction ). There are also settings that need to be changed in QBOT because you will be using it with the Mega Quilter 18x8. These parameters and settings customize the way QBOT operates for your machine and frame. The correct parameters and settings for operating QBOT on the Inspira Imperial Frame with the Mega Quilter 18x8 are on the following page. Instructions to change the parameters and settings on QBOT are also included. NOTE: Parameters and settings will need to be changed each time you update QBOT with a new firmware version. QBOT Parameters and Settings Inspira Imperial Frame and Mega Quilter 18x8 43

44 Changing the Parameters and Settings in QBOT Congratulations! You have completed the assembly of your Inspira Imperial Quilting Frame, Mega Quilter 18x8 encoders, and QBOT. It is time to install your fabric, setup your Mega Quilter 18x8 for stitching, and do a test to make sure everything has been installed correctly. (You ll notice that you still have Bungee Clamps leftover. These will be assembled in conjunction with your fabric installation). 44

45 Loading Fabric on the Inspira Imperial Quilting Frame Repeat going into the setup section of QBOT for each parameter or setting. When all parameters and settings have been changed, press STOP to return to the Quilt/Record/Options menu. Cycle the power for QBOT by turning the power off and then back on again. 45
46 46
47 47
48 48

49 49


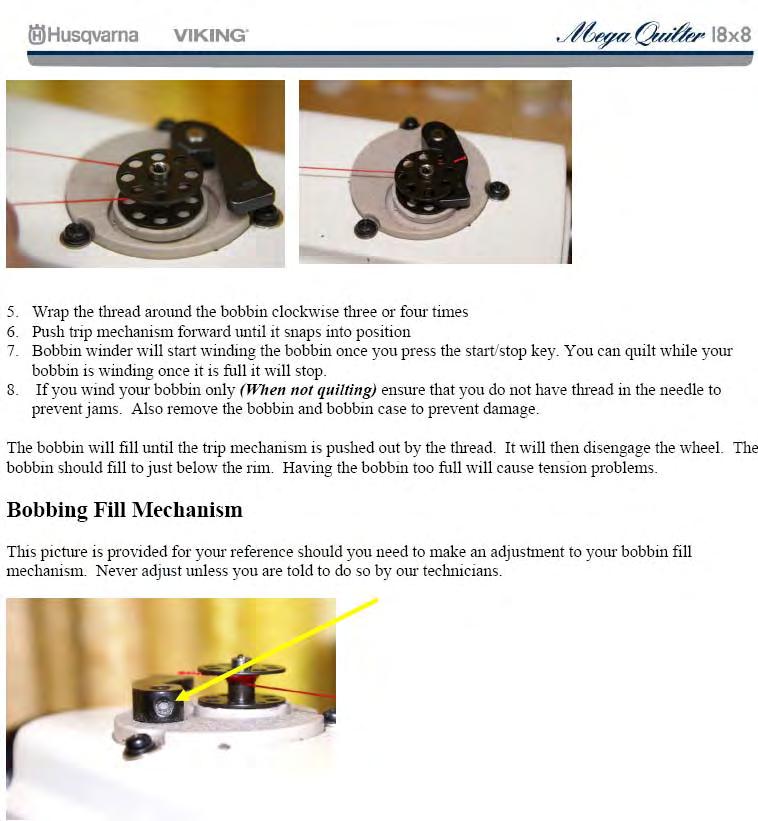
50 Setting up your Mega Quilter 18x8 for Stitching The next few pages review bobbin winding and threading your sewing machine. Wind and insert a bobbin and thread your sewing machine following these instructions. Set the Stitches per Inch and Speed settings on the handle Control Units at the 3 o clock position. 50
51 51
52 52
53 53
54 54
55 55
56 56

57 Turning On Your Mega Quilter 18x8 and QBOT To engage Auto Stitch on your Mega Quilter 18x8, press and hold the Auto Stitch button on the left handle of your Mega Quilter 18x8. Continue pressing the Auto Stitch button with your left hand, while you use your right hand to turn the power on your Mega Quilter 18x8. Continue pressing the Auto Stitch button. Listen to hear a sequence of beeps. The final (third) beep will sound continuously until you release the Auto Stitch button. QBOT may be powered on either before or after you turn on your Mega Quilter 18x8. QBOT Test with the Mega Quilter 18x8 The next two pages will guide you through a test to make sure that QBOT and the encoders on your Mega Quilter 18x8 have been installed correctly. 57

58 58
59 59
60 If the QBOT Test does NOT move in the correct direction (clockwise, starting in the lower left-hand corner), here are three things to check: Make sure the drive wires are wrapped around the drive assembly drive wheels correctly. The wire on the upper carriage should wrap around the TOP of the drive wheel. The wire on the lower carriage should wrap around the BOTTOM of the drive wheel. Make sure the QBOT parameters and settings have been changed for the Inspira Imperial Frame and Husqvarna Viking Mega Quilter 18x8 (see page 43). Make sure the X and Y-axis cables are plugged in correctly If your test moved in the correct direction, your QBOT has been installed correctly. If your test moved in the correct direction, but you have questions about the stitching, here are three things to check: Make sure you turned on your Mega Quilter 18x8 following the instructions on the top of page 57 so that Auto Stitch is engaged. Make sure you started stitching the test following the instructions starting on the bottom of page 57. You want to start the needle moving before starting QBOT. The encoders will normally starting moving the needle as they sense movement of the carriage. The reason you are starting the needle before QBOT begins moving the carriage is so that you do not miss the first few stitches of your design. You want to start QBOT immediately after the needle starts moving; otherwise, the encoders will recognize that the carriage is not moving and they will automatically stop the needle. Move the carriage while looking at the encoders to make sure the encoder wheels are turning. If one set of encoders is not turning and running on the track smoothly, the stitches will not look good in that direction. If your stitches are too short, turn the dial on the left controller to the left. If your stitches are too long, turn the dial on the left controller to the right. The dial is sensitive to slight changes. Additional instructions for stitching with your QBOT and operating your Husqvarna Viking Mega Quilter 18x8 are on the remaining pages. Enjoy! 60

61 61
62 62
63 63
64 64

65 65

66 66
67 67
68 68

69 69

70 70
71 71
72 Additional Information for your Husqvarna Viking Mega Quilter 18x8 72
73 73
74 74
75 75
76 76
Continuum Frame Assembly Instructions
 Continuum Frame Assembly Instructions Copyright January 1, 2017 Jim M. Bagley, GraceWood, Inc (Reproduction Prohibited) Version 2.2 Table of Contents Continuum Frame Table of Contents... i Warranty...ii
The Queen Quilter Professional Quilters Kit Frame
 The Queen Quilter Professional Quilters Kit Frame Assembly Instructions Table of Contents: Before you begin......................... Pg. 2 Wood parts............................. Pg. 3 Hardware..............................
Part No. INSTALLING THE DRIVE SYSTEM TIN LIZZIE 18
 Part No. In addition to the hardware kit that you received with the QBOT, you will need the hardware in this kit to complete the installation on your frame. The hardware kit for the Tin Lizzie 18 frame
Q-Zone Hoop-Frame. Assembly Instructions. Copyright July 11, 2018 Grace Company (Reproduction Prohibited) Version 1.8
 Version 1.8") Q-Zone Hoop-Frame Assembly Instructions Copyright July 11, 2018 Grace Company (Reproduction Prohibited) Version 1.8 Table of Contents Table of Contents... i Warranty... ii Parts List Box 1...iii Box 2...
Q-Zone Hoop-Frame Assembly Instructions Copyright July 11, 2018 Grace Company (Reproduction Prohibited) Version 1.8 Table of Contents Table of Contents... i Warranty... ii Parts List Box 1...iii Box 2...
Dream Fabric Frame Assembly Instructions
 Dream Fabric Frame Assembly Instructions Copyright May 01, 2015 Jim M. Bagley, GraceWood, Inc (Reproduction Prohibited) Version 1 Table Of Contents Parts List 3 Step 1: Table Set Up 6 Step 2: Install the
INSTALLING THE DRIVE SYSTEM
 FIGURE 1. Bracket Installation on FRONT of carriage FIGURE 2. X-Axis Bracket Installed FIGURE 3. X-Axis Drive Assembly Installed The first step in installing the drive assemblies is to remove the sewing
The Phoenix. Professional Quilting Frame. Copyright January 1, 2016 Jim M. Bagley, GraceWood, Inc (Reproduction Prohibited) Version 2.
 Version 2.") The Phoenix Professional Quilting Frame Copyright January 1, 2016 Jim M. Bagley, GraceWood, Inc (Reproduction Prohibited) Version 2.1 1 The Phoenix Professional Quilting Frame Parts List Box 1...3 Box
The Phoenix Professional Quilting Frame Copyright January 1, 2016 Jim M. Bagley, GraceWood, Inc (Reproduction Prohibited) Version 2.1 1 The Phoenix Professional Quilting Frame Parts List Box 1...3 Box
Dream Fabric Frame Assembly Instructions
 Dream Fabric Frame Assembly Instructions Copyright January 1, 2016 Jim M. Bagley, GraceWood, Inc (Reproduction Prohibited) Version 2.4 Table Of Contents Parts List 3 Step 1: Table Set Up 6 Step 2: Install
HQ Precision-Glide Track Upgrade 2 Extension Kit for HQ Studio Frame Part# QF09750
 HQ Precision-Glide Track Upgrade 2 Extension Kit for HQ Studio Frame Part# QF09750 Important Note: Upgrading the track system on the HQ Studio Frame requires the use of this 2 Extension Kit (Part #QF09750),
Depending on the size you ordered you will have either 5 Foot sections which will build the 10 Foot frame or 6 Foot sections which will build the 12
 XL Quilting Frame 1 Depending on the size you ordered you will have either 5 Foot sections which will build the 10 Foot frame or 6 Foot sections which will build the 12 Foot frame Printed 2 June 2014 Updated
Copyright December 17, 2018 Grace Company (Reproduction Prohibited) Version 3.4
 Version 3.4") Copyright December 17, 2018 Grace Company (Reproduction Prohibited) Version 3.4 IMPORTANT SAFETY INSTRUCTIONS When using an electrical machine, basic safety precautions should always be followed, including
Copyright December 17, 2018 Grace Company (Reproduction Prohibited) Version 3.4 IMPORTANT SAFETY INSTRUCTIONS When using an electrical machine, basic safety precautions should always be followed, including
Machine Quilting Frame assembly, and instruction manual
 Machine Quilting Frame assembly, and instruction manual Table of Contents Parts List................. Pg. 2 Step 1 - Legs............... Pg. 4 Step 2 - Lower Leg Brace....... Pg. 5 Step 3 - Frame Ends..........
Installing the Quilter s Cruise Control TM. Cruising with the Quilter s Cruise Control TM
 TM User s Manual This user s manual is for the Quilter s Cruise Control TM with Optical Encoders, and will help you install your unit on your short-arm quilting frame system properly. Installing the Quilter
HQ Pole Upgrade Kit for HQ Adjustable Table and HQ QuilTable Assembly Instructions 1
 HQ Pole Upgrade Kit for HQ Adjustable Table and HQ QuilTable Assembly Instructions QF09775 The pole upgrade kit can be used with or without the QF09700 HQ Precison-Glide track upgrade kit. What s Included
Inspira Quilt Frame and Mega Quilter FAQ s
 Inspira Quilt Frame and Mega Quilter FAQ s Mega Quilter: What is the Mega Quilter? The Husqvarna Viking Mega Quilter is a semi-industrial sewing machine designed for the home sewer and quilter and the
2015 Current Ford F150/Raptor Adaptive Cruise Control Module Relocation Bracket Installation Instructions
 2015 Current Ford F150/Raptor Adaptive Cruise Control Module Relocation Bracket Installation Instructions PREPARATION 1. Disconnect the negative terminal on the battery. Park the vehicle on level ground
M2 Assembly. M2 Sub-Assemblies mm Belt Sub-Assembly mm Belt Sub-Assembly Spider Sub-Assembly... 4
 M2 Assembly Table of Contents M2 Sub-Assemblies... 3 630mm Belt Sub-Assembly... 3 702mm Belt Sub-Assembly... 3 Spider Sub-Assembly... 4 Idler Bolt Sub-Assembly... 8 Y Motor Sub-Assembly... 9 X Motor Sub-Assembly...
Basic steps to time the Gammill quilting machine s rotary sewing hook
 Basic steps to time the Gammill quilting machine s rotary sewing hook 1.) Turn the machine off and unplug it. 2.) With the needle bar in the raised position, remove the bobbin and bobbin case. 3.) Remove
The Mini Pinni Quilting Frame
 The Mini Pinni Quilting Frame Copyright September 2007 Jim M. Bagley, GraceWood, Inc (Reproduction Prohibited) Print Date 10-16-07 1 The Mini Pinni Quilting Frame By The Grace Company Part List Parts List
ABM International, Inc.
 ABM International, Inc. Lightning Stitch required 1 1.0: Parts List head and motor assembly (Qty. 1) Reel stand (Qty. 1) Needle bar frame clamp (Qty. 1) Motor drive (Qty. 1) 2 Cable harness with bracket
Juki Quilting Frame. Assembly and Use Instruction Manual. Max Overall Dimensions: Length Crib: King: Tall: Wide: 42
 Juki Quilting Frame Assembly and Use Instruction Manual Max Overall Dimensions: Length Crib: 63 1 4 King: 128 1 4 Tall: 45 3 4-51 3 4 Wide: 42 Copyright January, 2015 Version 9.6 (Page 1) Contents Parts
ADDICTIVE DESERT DESIGNS
 Preparation: Disconnect the negative battery terminal. Park the vehicle on level ground and set the emergency brake. We recommend reading through the installation instructions in whole before performing
Electric Skein Winder
 Electric Skein Winder Assembly and Use Package Contents 1 - Triangular Body (w/ motor) 1 - Cross Arm 1 - Left Foot (w/ yarn guide) 1 - Right Foot 1 - Adjustable Finger (w/ yarn clip) 3 - Adjustable Fingers
MAIN PARTS
 MAIN PARTS 7 8 9 10 11 12 13 1 2 3 17 4 5 6 01 02 03 04 05 12 23 34 45 56 13 24 35 46 57 14 25 36 47 58 15 16 26 27 37 38 48 49 59 60 06 07 08 09 10 17 18 28 29 39 40 50 51 61 62 19 30 41 52 63 20 21 31
INSTALLING THE DRIVE SYSTEM
 In addition to the hardware kit that you received with the QBOT, you will need the hardware in this kit to complete the installation on your frame. The hardware kit for the NewJoy frame includes: (5) 1/4
ABM International, Inc. Navigator Assembly Manual
 ABM International, Inc. 1 1.0: Parts List Tablet (Qty. 1) Tablet mount (Qty. 1) NOTE: Mount may appear and operate different then image below Control Box (Qty. 1) Motor Power Supply (Qty. 1) 2 X-axis motor
S-85SCH
 4411-4423-4432-4443-4452 5511-5523-5532-5554 44S-85SCH Service Manual 104 73 14-26 2014-02-24 CONTENTS 1. Names of principal parts...2 2. Removing methods of external parts 2-1 Sewing table...3 2-2 Face
BMW R1100/R1150GS Instructions for Mounting Medium or Large Pack Rack and Micatech Top Case with Mount Kit
 BMW R1100/R1150GS Instructions for Mounting Medium or Large Pack Rack and Micatech Top Case with Mount Kit Thank you for purchasing the Micatech Pack Rack and Top Case, with R1100/1150GS mount kit. Please
INSTALLATION LS MODEL
 INSTALLATION LS MODEL Page 2 TABLE OF CONTENTS Section 1: Included parts... pg 4 Section 2: Installing the Shirley Stitcher II on Quilt Frame.. pg 5 Section 3: Connecting Shirley Stitcher II to Tin Lizzie
Understanding the Controls
 Understanding the Controls Your new Millennium or Freedom SR machine uses simple controls and has handy features to make your quilting more fun and enjoyable. The charts below give you a quick overview
Table of Contents. Placing your machine on the carriage...3. Remove the packing attached to your machine...3. Light Fixture...4. Your Thread Stand...
 Owner s Manual Table of Contents Placing your machine on the carriage...3 Remove the packing attached to your machine...3 Light Fixture...4 Your Thread Stand...5 Belt guard...6 Attaching your handle bars
STOP! READ THIS FIRST
 STOP! READ THIS FIRST 1 Getting Started With Your Meistergram Embroidery System (the quick guide) Thank you for choosing Pantograms for your embroidery system provider. We encourage you to read the following
ADDICTIVE DESERT DESIGNS
 Preparation: Disconnect the negative battery terminal. Park the vehicle on level ground and set the emergency brake. We recommend reading through the installation instructions in whole before performing
The Mind Project s Iris 1 Robotic Arm. Assembly instructions Step 1
 The Mind Project s Iris 1 Robotic Arm Assembly instructions Step 1 Packing list Below you will find pictures and descriptions of each part. It may be helpful to take each piece out of the bag and place
Sewing Machine 911 with Claudia Miller
 Sewing Machine 9 JAMMED MACHINE MACHINE IS NOT STITCHING Threads are too long and get caught in the bobbin holder Machine is dirty Bobbin thread was not drawn up through the machine Threads are stuck when
MACHINE QUILTING FRAME
 MACHINE QUILTING FRAME YOU WILL NEED TO PURCHASE: 5 pieces of 1-1/4 thin wall metal conduit (EMT) cut to your preferred length for the rollers. (Maximum 120 ) DETERMINING YOUR ROLLER LENGTH: Determine
HQ Hideaway. Installation and Operation Version 2.2, April 2015 Part # QT40100
 HQ Hideaway Installation and Operation Version 2.2, April 2015 Part # QT40100 Copyright 2015 Handi Quilter, Inc. All rights reserved. Printed in the U.S.A. Table of Contents Page Overview 3 To install
SAFETY MAINTENANCE THE LONG ARM MACHINE
 SAFETY MAINTENANCE THE LONG ARM MACHINE Quilting Machine Usage Guidelines All general safety guidelines apply to this piece of equipment Befoaoe Use: Use only attachments recommended by the manufacturer
3,500/4,500lb. Vertical Cable Feighner Lift
 3,500/4,500lb. Vertical Cable Feighner Lift CAUTION - PUT SAFETY FIRST 1. Before attempting to install or operate this lift, study and fully understand the proper operating procedures and safety precautions
Introduction. Rocky Mountain Westy Swing Away Carrier Kit Installation Instructions
 Rocky Mountain Westy Swing Away Carrier Kit Installation Instructions Introduction Thank you for purchasing the Rocky Mountain Westy Swing Away Carrier Kit. We pride ourselves in the products we develop
HQ Studio Frame Two-Foot Section Assembly Instructions From Twelve-Foot to Ten-Foot
 HQ Studio Frame Two-Foot Section Assembly Instructions From Twelve-Foot to Ten-Foot HQ Studio Frame Two-Foot Includes: Includes one (1) two-foot table frame with plastic top, two (2) two-foot track supports,
HQ Studio2 Frame. Assembly Instructions. Table of Contents. What s Included
 HQ Studio2 Frame Assembly Instructions UPDATED NOVEMBER 2017 Table of Contents Parts List... page 2 Hardware List.... page 3 HQ Studio Frame Box Contents...page 4 Step 1- Frame Side Assembly... page 5
HQ Studio2 Frame. Assembly Instructions. Table of Contents. What s Included
 HQ Studio2 Frame Assembly Instructions UPDATED June 2018 Table of Contents Parts List... page 2 Hardware List.... page 3 HQ Studio Frame Box Contents...page 4 Step 1: Frame Side Assembly... page 5 Step
The Mind Project s Iris 1 Robotic Arm. Packing List Assembly instructions
 The Mind Project s Iris 1 Robotic Arm Packing List Assembly instructions Packing list Below you will find pictures and descriptions of each part. It may be helpful to take each piece out of the bag and
WOLF PUP LOOM TM & WOLF PUP LT LOOM TM
 WOLF PUP LOOM TM & WOLF PUP LT LOOM TM Assembly Instructions FL3000 FL3006 FL3009 WOLF PUP WOLF PUP LT Find out more at schachtspindle.com Schacht Spindle Company 6101 Ben Place Boulder, CO 80301 p. 303.442.3212
STOP! READ THIS FIRST
 STOP! READ THIS FIRST Page 1 of 37 Getting Started With Your Pantograms GS1501 Embroidery Machine (the quick guide) Thank you for choosing Pantograms for your embroidery system provider. We encourage you
PRS X-Axis E-Chain Installation For Tools with a 12 Z-Axis
 888-680-4466 ShopBotTools.com PRS X-Axis E-Chain Installation For Tools with a 12 Z-Axis This kit is compatible with PRS Shopbots that have an X-axis cutting area of 96 to 144. It is not immediately compatible
Table of Contents. Warranty...3. Attaching your square tubing...4. Your Light Fixture...5. Your Thread Stand...6. Attaching your Laser Light...
 Owner s Manual Table of Contents Warranty...3 Attaching your square tubing...4 Your Light Fixture...5 Your Thread Stand...6 Attaching your Laser Light...7 What is the Tension Release Lever?...7 Needle
Replacing the Reciprocator on the SWF Compact Series Machine (601C and 1201C)
") Follow the instructions below to replace the reciprocator in the SWF Compact series machines. The tools required can be found in the tool kit that came with the machine. Preparation 1. First, place the
Follow the instructions below to replace the reciprocator in the SWF Compact series machines. The tools required can be found in the tool kit that came with the machine. Preparation 1. First, place the
SERVICE MANUAL AND PARTSLIST
 SERVICE MANUAL AND PARTSLIST Next 20 CONTENTS WHAT TO DO WHEN... 1~3 SERVICE ACCESS FACE COVER... 4 TOP COVER... 4 BASE COVER... 5 REAR COVER... 6 FRONT COVER... 7 MECHANICAL ADJUSTMENT NEEDLE THREAD TENSION...
The Bowflex Revolution XP Home Gym Assembly Instructions. P/N: Rev ( /0 )
") P/N: 001-7057 Rev ( /0 ) The Bowflex Revolution XP Home Gym Assembly Instructions 2 Table of Contents Before You Start... 2 Tools You Will Need / Hardware Contents... 3 Box Contents... 6 Assembling Your
P/N: 001-7057 Rev ( /0 ) The Bowflex Revolution XP Home Gym Assembly Instructions 2 Table of Contents Before You Start... 2 Tools You Will Need / Hardware Contents... 3 Box Contents... 6 Assembling Your
Welcome...3. Warranty...4. Attaching your Thread Stand...5. Attaching your Lamp...6
 OWNERS MANUAL Table of Contents Welcome....3 Warranty....4 Attaching your Thread Stand....5 Attaching your Lamp....6 Connecting your Ansley to your Carriage and Controls on the Handles....7 What is the
Assembly Instructions. Copyright May 01, 2013 Jim M. Bagley, GraceWood, Inc (Reproduction Prohibited)
") Assembly Instructions Copyright May 01, 2013 Jim M. Bagley, GraceWood, Inc (Reproduction Prohibited) Table of Contents Part List Part List... 3 Assembly Steps Step 1-Foot Assembly... 5 Step 2-Leg Assembly...
Assembly Instructions Copyright May 01, 2013 Jim M. Bagley, GraceWood, Inc (Reproduction Prohibited) Table of Contents Part List Part List... 3 Assembly Steps Step 1-Foot Assembly... 5 Step 2-Leg Assembly...
Top Innovations, Inc. Innovative Products to Make Your Life Easier. Model SP-402 Owner s Manual
 Top Innovations, Inc. Innovative Products to Make Your Life Easier Model SP-402 Owner s Manual THIS IS NOT A TOY! Adult supervision recommended Item contains sharp functional points and small parts Machine
WARNING!! DO NOT LIFT DOORS UP WHEN THE HOOD IS OPEN. THE DOORS WILL HIT THE HOOD!
 WARNING!! DO NOT LIFT DOORS UP WHEN THE HOOD IS OPEN. THE DOORS WILL HIT THE HOOD! THIS KIT INCLUDES: 4 M8-1.25X30MM BOLTS WITH WASHERS 12 M8-1.25X40MM BOLTS WITH WASHERS 2 SHOULDER BOLTS WITH RIGHT AND
Version LiTen Up Technologies, Inc. reserves the right to update this manual. A current electronic version of this manual can be found at:
 Thank You Thank you for purchasing a QBOT - you have made an excellent choice. The QBOT will provide hours of troublefree automated quilting. Whether you are new to quilting or an experienced quilter,
Instruction Guide 4A90L
 Instruction Guide 4A90L Kargo Master Rancho Cordova, CA 95742 800-343-7486 CustomerService@KargoMaster.com DATE: *PLEASE READ ALL INSTRUCTIONS AND WARNINGS PRIOR TO ASSEMBLING, INSTALLING, AND USING THIS
TROLLA LEAVY 97 CM Lawn sweeper
 TROLLA LEAVY 97 CM Lawn sweeper Artikel nr.: 1008 EN Operating manual 014/1 Dear Customer, Congratulations on your new Trolla product. We hope you will enjoy it. Checkout with your new Trolla product may
LEG CURL IP-S1315 INSTALLATION INSTRUCTIONS
 LEG CURL IP-S35 INSTALLATION INSTRUCTIONS Copyright 2009. Star Trac by Unisen, Inc. All rights reserved, including those to reproduce this book or parts thereof in any form without first obtaining written
Installation Instruction
 Tools Needed for Assembly Stud finder (for wood stud wall) Pencil Mark Electric drill Wood Stud Wall Installation Step 1. Locate the Wood Studs Installation Instruction Drill bit (for wood stud wall) Masonry
Owner s Manual For Sit Down
 Owner s Manual For Sit Down Feb 2015 Table of Contents Warranty...3 Your Light Fixture...4 Attaching the Belt Guard...4 Your Thread Stand...5 Control panel...6 Needle position...7 Speed Setting...8 What
This Folding Shelf Kit will work in conjunction with our Swing Away Carrier Kit allowing you add additional exterior storage space to your Vanagon.
 Rocky Mountain Westy Folding Shelf Kit Assembly & Installation Instructions Introduction Thank you for purchasing the Rocky Mountain Westy Folding Shelf Kit. We pride ourselves in the products we develop
Heavy Duty Ceiling Tilt Mount Installation Manual
 HD-CTM-5580 Heavy Duty Ceiling Tilt Mount Installation Manual *This Installation requires a minimum of two people. For your safety: Read the complete instruction manual before starting an installation
SS1062, SS10621 & SS10621E Free Standing PWC & Fishing Boat Hoist SS1062 SS10621 SS10621E
 SS1062, SS10621 & SS10621E Free Standing PWC & Fishing Boat Hoist SS1062 SS10621 SS10621E Midwest Industries, Inc. Page 1 Ida Grove, IA 51445 800.859.3028 www.shorestation.com 0003231 REV A 1/25/05 Bundles
Brother Industries, Ltd. Nagoya, Japan
 4. 2001. This service manual has been compiled for explaining repair procedures of the MODEL XL-6562, XL6452, XR- 46. This was produced based on up-to-date product specifications at the time of issue,
Assembly Instructions. Table of Contents
 HQ Little Foot Assembly Instructions Back of Handi Quilter, Inc. 501 North 400 West North Salt Lake, UT 84054 1-877-697-8458 Front of 2015 Handi Quilter, Inc. www.handiquilter.com Printed in the United
for HQ 18 Avanté HQ Studio Frame
 HQ Studio Frame for HQ 18 Avanté Assembly Instructions Table of Contents Parts List page 2 Hardware List page 3 HQ Studio Frame Box Contents page 4 Step 1- Frame Side Assembly page 5 Step 2- Table Assembly
Side Winder R o u t e r L i f t.
 Woodpeckers PRECISION WOODWORKING TOOLS Side Winder R o u t e r L i f t. INSTALLATION INSTRUCTIONS The wrench handle must be pointing left in order to fully insert or remove it. Lift Wrench Once fully
BABY WOLF LOOM. Assembly Instructions for Knocked-Down Looms
 BABY WOLF LOOM Assembly Instructions for Knocked-Down Looms BEFORE YOU BEGIN Please read through the directions before beginning to assemble your loom. Unpack the loom parts carefully. Do not throw away
TIPS & TROUBLESHOOTING
 Achieving good stitch quality 5450 North W Street Pensacola FL 32505 850-433-1414 www.martellinotions.com TIPS & TROUBLESHOOTING Understanding how your long arm machine makes a stitch will help you make
7878 K940. Checkpoint Antenna. Kit Instructions. Issue B
 7878 K940 Checkpoint Antenna Kit Instructions Issue B Revision Record Issue Date Remarks A July 7, 2009 First issue B Nov2013 Revised the Checkpoint installation procedures for 7878 and 7874 scanners Added
O-Sullivan King 4 Poster Bed O-Sullivan Queen 4 Poster Bed Parts and Hardware List
 Parts and Hardware List A. Left Headboard Post 1 pc B. Right Headboard Post 1 pc C. Left Footboard Post 1 pc D. Right Footboard Post 1 pc E. Headboard Panel 1 pc F. Footboard Rail 1 pc. Spindles 4 pcs
OWNER S MANUAL. Safety. Please read this owner s manual before use and keep it at hand for reference. Warranty
 Please read this owner s manual before use and keep it at hand for reference. OWNER S MANUAL Safety Important safety instructions for using the INCRA Miter5000 Before using the INCRA Miter5000, read and
Medium HoneyBadger Chase Rack Installation Instructions
 PREPARATION Medium HoneyBadger Chase Rack Installation Instructions 1. Disconnect the negative terminal on the battery. Park the vehicle on level ground and set the emergency brake. 2. We recommend reading
CV1B Sliding Table Installation and Setup Guide
 CV1B Sliding Table Installation and Setup Guide Tech Mark, Inc 7901 Industry Drive North Little Rock, AR 72117 tel (501) 945-9393 fax (501) 945-0312 www.tech-mark.com email: info@tech-mark.com The CV1B
Lange Crank Hoist-a-top Assembly Instructions
 Lange Crank Hoist-a-top Assembly Instructions Installation Time: 1-4 Hours depending on skill level Tools Required: Cordless Drill Level Stud Finder Ratcheting wrench 9/16 socket or wrench 11/16 socket
Owner s Manual For Sit Down
 Owner s Manual For Sit Down Table of Contents Warranty...3 Attaching your square tubing...4 Your Light Fixture...5 Your Thread Stand...6 What is the Tension Release Lever?...7 How Do I Adjust the Height
FBX-PA-2AC. Third edition : April No
 FBX-PA-2AC Third edition : April 2006 No. 060058 INTRODUCTION Thank you very much for purchasing Kansai Special FBX series. Read and study this Instruction Manual carefully before you start any of the
FlexFrame - Storage Components and Skins
 FlexFrame - Storage Components and Skins 1/4 Square Drive Ball-Point Hex-Bit Socket 1/8 Short Hex, 1-1/2 Overall Length McMaster Part # 54075A44 Table of Contents Topic Page Storage Components 2 General
Installation instructions for FC14S Forward Controls for Shadow ACE and Aero 1100
 Installation instructions for FC14S Forward Controls for Shadow ACE and Aero 1100 It is highly recommended that you use a thread lock compound such as Loctite brand on all threads to keep them from vibrating
AR-15 Lower Receiver Assembly Instructions
 AR-15 Lower Receiver Assembly Instructions Tools There are a few tools that make it easier to put together these kits, but none of them are necessary. Minimum requirements include a hammer and punch to
Replacing the Reciprocator on an SWF Multi-head.
 Replacing the Reciprocator on an SWF Multi-head. Follow the instructions below to replace the reciprocator in the SWF multi-head machines. The tools required are found in the tool kit that came with the
CNC Router Parts PRO Machine Kit Cable Track Installation Instructions
 1 1 X CABLE TRACK TRAYS & BRACKETS The cable track on the side of the system is supported by a metal tray (or multiple trays for longer systems such as a PRO4896). These trays hang from brackets on the
USSC LLC 4 ONE LLC FIELD MODIFICATION INSTRUCTIONS
 1 OF 17 A 1. PURPOSE: Instructions for in field replacement of 9004 mechanical suspension top pan 2. SCOPE: 9004 mechanical suspension with legacy two point LX back frame and current LX back frame 3. PROCEDURE:
INSTALLATION GUIDE NS Double Clamp Ladder Rack NV200 / City Express ( Aluminum )
") INSTALLATION GUIDE 1530-NS Double Clamp Ladder Rack NV200 / City Express ( Aluminum ) QUICK START GUIDE Phase 1 - Assembly q 1.1 Setup... q 1.2 Ladder Rack Assembly... 3-5 5-13 Phase 2 - Installation q
INSTALLATION GUIDE 1530-NS Double Clamp Ladder Rack NV200 / City Express ( Aluminum ) QUICK START GUIDE Phase 1 - Assembly q 1.1 Setup... q 1.2 Ladder Rack Assembly... 3-5 5-13 Phase 2 - Installation q
S10C. Instructions. Version S10C-V1c
 S10C Instructions Version S10C-V1c To celebrate our fortieth anniversary, we have transformed the spinning wheel it all started with: the S10. The new S10 Concept spinning wheel makes it possible to customize
Allow 60 from door face
 Setbacks Allow 60 from door face TOOLS NEEDED Tape Measure Marker or Pencil Masonry Drill Bit 3/8 Hammer Drill Hammer Socket Wrenches and Wrench: 9/16, 1/2, 7/16, 1/4 drive socket wrench and 1/2 socket
INSTALLATION INSTRUCTIONS HEAVY DUTY TILT WALL MOUNT Model: PPH-2000
 INSTALLATION INSTRUCTIONS HEAVY DUTY TILT WALL MOUNT Model: PPH-2000 Specifications: Accomodates Akira and Orion 84" displays without interface bracket; accomodates other large flat panel displays with
MANUAL DE MONTAJE ASSEMBLY MANUAL AIREADOR DE PLUG AERATOR MODEL # AE-48T. Hardware & Parts Listing Assembly Instructions Maintenance Notes for
 ASSEMBLY MANUAL Hardware & Parts Listing Assembly Instructions Maintenance Notes for 48 PLUG AERATOR MANUAL DE MONTAJE Lista de piezas y tornillería Instrucciones de armado Notas de mantenimiento para
Assembly Instructions
 InTandem Table System November 20 InTandem Table System - Worksurface #4 x/" 4 wood screw power beam Tools Provided T-0 Extended Torx Driver T-25 Torx Driver Additional Tools Required Soft protective
Flat Panel Stand FPZ-655. for 32" to 55" Flat Panel Screens FEATURES. Reinforced universal adapter plate for a strong hold
 FPZ-655 Flat Panel Stand for 32" to 55" Flat Panel Screens For a viewing experience that really stands out, Peerless FPZ-655 Universal Flat Panel Stand for 32" 55" flat panel TVs provides a brilliant combination
Hubble GOTO Installation Instruction (1.3, 04/30/2014)
") Hubble GOTO Installation Instruction (1.3, 04/30/2014) 1. Preparation... 1 1.1 Tools required... 1 1.2 AZ GOTO Drive Parts List...1 1.3 ALT GOTO Drive Parts List... 1 2. The Azimuth motor drive installation...2
Hubble GOTO Installation Instruction (1.3, 04/30/2014) 1. Preparation... 1 1.1 Tools required... 1 1.2 AZ GOTO Drive Parts List...1 1.3 ALT GOTO Drive Parts List... 1 2. The Azimuth motor drive installation...2
INVENT3D Printer Kit Disassembly Instructions
 INVENT3D Printer Kit Disassembly Instructions Version 6 AST2 10/26/16 1 I. General Disassembly Instructions Use the case layer drawings to ensure that components are stored in the appropriate location
Pack Mount Instructions:
 Pack Mount Instructions: STEP 1 Mounting upright base to desired surface If mounting to a surface with an accessible backside (such as a thin walled container): Option 1 Discard the Round Mounting Disk
WOLF LOOM DOUBLE BACK BEAM
 WOLF LOOM DOUBLE BACK BEAM Assembly Instructions Find out more at schachtspindle.com Schacht Spindle Company 6101 Ben Place Boulder, CO 80301 p. 303.442.3212 f. 303.447.9273 2017 Schacht Spindle Company,
model tsa-sa48 Sliding Crosscut Table installation guide
 model tsa-sa48 Sliding Crosscut Table installation guide A Note About Color Variations Among Anodized Aluminum Components Congratulations on the purchase of this SawStop Sliding Crosscut Table. We at SawStop
Shapeoko XXL Assembly Guide
 Shapeoko XXL Assembly Guide 04/27/2016 XXL Packing LIst Item Qty Description Y-Carriage (left) 1 Y-Carriage (right) 1 X/Z Assembly 1 40 Rail 3 1 rail has mounting holes for controller Wasteboard Half 2
SEWING MACHINE For use with Janome HD 1000
 SEWING MACHINE For use with Janome HD 1000 YALE CENTER FOR ENGINEERING INNOVATION AND DESIGN Table of Contents p. 3-5... Winding the Bobbin p. 6-7... Threading the Bobbin p. 8-10... Threading the Needle
PARTS LIST MODEL DC4100
 MODEL DC0 0 0 MODEL DC 0 KEY 0 0 PARTS 00 000 00000 000 00 0000 00000 000 00 0000 000 00 000 00000 000 000 000 000 000 0 00000 0 0000 0 0000 000 0000 00 00000 0000 0 0000 00000 00 00 00000 00000 0000 DESCRIPTION
Four-Thread Safety Stitch
 Four-Thread Safety Stitch Four-Thread Safety Stitch This stitch is an alternative to the Five-Thread Safety Stitch. It offers the same type of Two-Thread Chainstitch. However the Three-Thread Overlock