Gable Greenhouse Instructions
|
|
|
- Estella Gibson
- 5 years ago
- Views:
Transcription

1 Gable Greenhouse Instructions Part 1; Build The Base Frame Photo below shows connector components in this basic 12x12 kit. Self Drilling tech screws are included with kit. This kit requires 16 gage or heavier 1 3/8 chain link fence top rail tubing. Here we are building a 12 x12 greenhouse frame however you can change the width and frame spacing to meet your own needs. Purchase enough 1 3/8 tubing to build the basic 12x12 shown in Carols video you will need: Cut list for 1 3/8 tubing required to build Basic 12x12 Gable Frame 5 ea. 1 3/8 tubing 144 inches long (2 end base rails, 3 purlins) 2 ea. 1 3/8 tubing 141 ¼ inches long (side base rails) 8 ea. 1 3/8 tubing 83 5/8 inches long (rafters) 4 ea. 1 3/8 tubing 78 inches long (cross strut brace on rafters) Extra tubing cut 8 side poles the length you want the sidewall height to be up to 72 max. Extra tubing required to frame up whatever size conventional door openings you choose. If you choose scissor door option you will need 4 ea. 10 ft long 1 emt tubing Begin by building the base frame. From the kit you will use four 3 way corners, four splicer s (if using un swaged tubes) and four Tee s. (one splicer is missing from photo but it is in the kit) 1
 Both the front and rear end base rail must be 144 long")


2 But first we need to mark the location of the tee s onto the 3 purlins (the 144 tubes) and 2 side base rails (the 141 ¼ tubes) Both the front and rear end base rail must be 144 long before installing them into the 3 way corners, it can be one joint 10 6 long factory joint, if the factory tubing has a small swaged end and they usually do then add a 21 ¼ pc onto the swaged end full joint in which case you will not need to use the supplied splicer s. The measurement of the added pc will be longer if using un swaged or tubing other that 10 6 factory length tubes. 2


3 The two side base rails must be 141 ¼ long before installing them into the 3 way corners, be sure to slide the tee s on first. Tee s should be tech screwed to side rail at 48 from each end of both side rails to create a 4 ft spacing. the 48 should be measured from the outside of the 3 way corners. Factory tubing lengths can vary, keep this in mind and cut tubes as needed to achievee the overall measurements of structure size. In any event the base rail frame for a 12x12 structure should measure 144 X 144 outside to outside after the four tee s and four 3 way corners are installed. 3


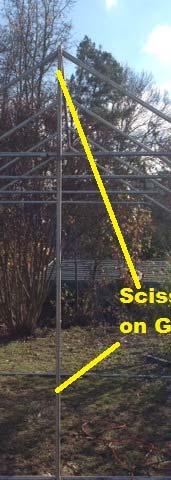
4 Part 2; Build The Four Gable Frames Photos show frame in vertical position for reference only. First build the two end wall frames. On level ground slide the two rafters into the peak connector and tech screw in place. now place the eve connectors on the ends of rafters, then slide the post into the opposite end of the eve connector. Tech screw the eve connector to the rafters and post. Using the angle brace connectors slide the connectors into the ends of the 78 tube and tech screw them in place. Position the clamps so they are the same distance down each rafter and tighten them securely. Then build the second end frame the same. 4


5 Now Build the two interior frames. Build two interior frames exactly like the end wall frames inserting the post into the eve and screwing the eve to the rafter not to the post on thesee two interior frame set s. We are using the post to keep the connectors lined up, remove the post from these two frame set only, and set aside for later. Part 3; Install The Three Purlin s Lay the three 144 purlins along side one of the side rails on the ground. You already marked the threee purlins to match the two tee s on the side rail. Next stand the two interior frame sets up four feet apart. 5


6 Then push each of the three purlins throughh the peak and two side eve connectors. Position the frame sets on the marks on the purlin then secure with tech screw. Part 4; 6


 These two")
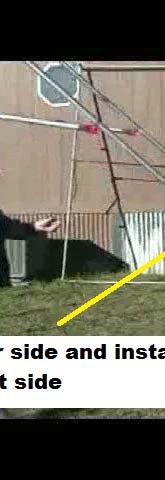
7 Part 4; Installing The End Frames Install the two end frames (first two frames you built) These two frames have the post installed. 7


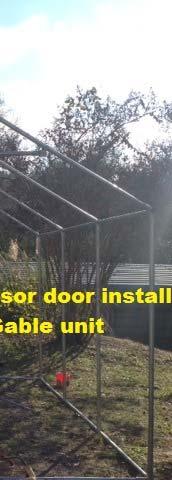


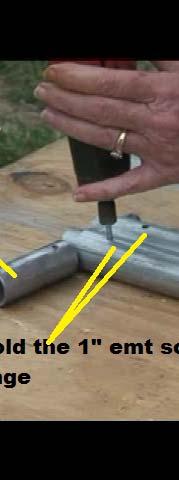


8 Part 5; Door Openings 8


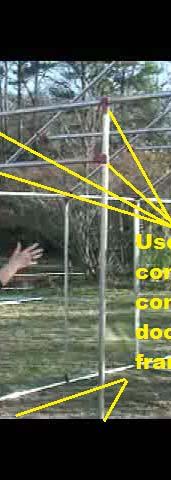
9 Corner braces Plastic can be attached in a number of ways. We use the #13 G snap clamps to secure the poly covering. We recommend you watch Carols video on building this gable unit and the separate video on installing poly on her modified gothic greenhouse. Snap clamps are used in the same manner regardless of frame shape or design. you will find thesee videos on our websitee at or to see how this is done. Or call me at if you need more assistance. 9
16 ft. Wide Mono Gothic
 16 ft. Wide Mono Gothic Fig. 1 All couplers & connections are tech screwed together Peak connector D Purlin goes here Slide C downward following curveture of B swaged ends Cut C even With Bottom of B F
The Compound Gothic Design
 The Compound Gothic Design You are building the Template Hoop, after it is completed all tubing can be precut and remaining hoops assembled on top of this template hoop, one at a time. Don t build and
Coro Character PVC Frame Instructions:
 Coro Character PVC Frame Instructions: In this tutorial we will show you how to make a basic light weight frame for your Coro character. Then we will show you how to add on to your frame to help you either
All Contents Copyrighted 2009 L.C.G.S. Unauthorized use will not be allowed Using the RC-4 Hoop Bender
 All Contents Copyrighted 2009 L.C.G.S. Unauthorized use will not be allowed Using the RC-4 Hoop Bender We have designed the RC-4 Bending Tool specifically for producing row cover hoops in the 4 ft. wide
Inventers and pioneers of these amazing Greenhouse bending tools, or Phone
 All Contents Copyrighted 2016 L.C.G.S. Unauthorized use will not be allowed General Informaation These Instructions Are Used For The Following Bender Models. The bending steps remain the same regardless
E-Z GROW HOBBY GREENHOUSE. I n s t r u c t i o n M a n u a l & D i s c l a i m e r s
 E-Z GROW HOBBY GREENHOUSE I n s t r u c t i o n M a n u a l & D i s c l a i m e r s Contractors/Installers Note: This manual is the property of the customer. Please leave it in the possession of the customer.
Low/High Tunnel Greenhouse Plans
 Low/High Tunnel Greenhouse Plans Tools Needed (See the complete list of Greenhouse Tools) Hacksaw or Reciprocating Saw Socket Wrench, Adjustable Wrench or Nut Drivers Electric Drill with Drill Bits Sledge
Ledgewood Farm greenhouse. construction
 Ledgewood Farm greenhouse How do I Start? construction to I m Finished! Post layout The string will be 7 above the ground and the posts will be driven until the proper drill hole is at the string. Spacing
Purlin Installation. Step 1: Start at one end and work your way down the tunnel. Step 2: Lay out a measuring tape between the ground posts
 Purlin Installation Materials: Purlin pieces, cross-connector clamps, drill, ¼ selftapping screws, hack saw, measuring tape, plumb bob, marker, duct tape Step 1: Start at one end and work your way down
ClearSpan Majestic Greenhouse Film Roof with Roll-up Sides
 ClearSpan Majestic Greenhouse Film Roof with Roll-up Sides 28' Wide Photo may show a different but similar model. 2009 ClearSpan All Rights Reserved. Reproduction is prohibited without permission. STK#
Assembly Instructions
 Selling Station Assembly Instructions View from above without top A B C D Rounded finished corners on A & D Square unfinished 3-sides on B & C Selling Station Components (2) 2' x 6' Side s Have a channel
ClearSpan Majestic Greenhouse Film Roof with Polycarbonate Sides
 ClearSpan Majestic Greenhouse Film Roof with Polycarbonate Sides 84' Wide Photo may show a different but similar model. 2016 ClearSpan All Rights Reserved. Reproduction is prohibited without permission.
ClearSpan Majestic Greenhouse Film Roof with Roll-up Sides
 ClearSpan Majestic Greenhouse Film Roof with Roll-up Sides 56' Wide Photo may show a different but similar model. 2009 ClearSpan All Rights Reserved. Reproduction is prohibited without permission. STK#
Clopay Models 835/837 Sliding Door System Installation Guide
 Clopay Models 835/837 Sliding Door System Installation Guide The aim of this instruction is to guide you through the process of construction and fitting of Sliding Doors. Due to the number of sizes available
MONKEY BARS OVERHEAD RACK INSTALLATION
 MONKEY BARS OVERHEAD RACK INSTALLATION Thank you for purchasing the New Monkey Bars Overhead storage rack. The most innovative overhead rack on the market WARNING THE PROPER INSTALLATION OF THIS STORAGE
BSM, GSM & GSS. Joint Kit Instruction. (Modified for IMPACT) (NSF Certified) Curved Glass Fresh Meat Delicatessen and Seafood Merchandisers
 (NSF Certified) Curved Glass Fresh Meat Delicatessen and Seafood Merchandisers") BSM, GSM & GSS Joint Kit Instruction (Modified for IMPACT) (NSF Certified) Curved Glass Fresh Meat Delicatessen and Seafood Merchandisers February, 1999 JOINT ASSEMBLY PARTS LIST Item Quantity Description
BSM, GSM & GSS Joint Kit Instruction (Modified for IMPACT) (NSF Certified) Curved Glass Fresh Meat Delicatessen and Seafood Merchandisers February, 1999 JOINT ASSEMBLY PARTS LIST Item Quantity Description
General Guidelines:
 ASSEMBLY INSTRUCTIONS Congratulations on your new Patriot Dock purchase. This manual contains instructions to assemble basic dock configurations for use at typical residential shoreline application. Please
GROWING BETTER THROUGH DESIGN. 6ft Lean-To LEAN-TO. Assembly Instructions 04/02
 GROWING BETTER THROUGH DESIGN 6ft Lean-To LEAN-TO Assembly Instructions 04/02 6ft Lean-To Greenhouse Base Plan Introduction/Tools/Contents / / Contents This is a copy of our Lean-To greenhouse base plan.
GrowSpan Gothic Cold Frames
 GrowSpan Gothic Cold Frames Photo may show a different but similar model. 2016 Growers Supply All Rights Reserved. Reproduction is prohibited without permission. STK# DIMENSIONS 106342 30' W x 12' H x
FIND THE DETAILED INSTRUCTIONS FOR YOUR SPECIFIC BENDER SIZE, HOWEVER PLEASE READ ALL OF THE GENERAL INSTRUCTIONS BEFORE PROCEEDING
 All Contents Copyrighted 2007 L.C.G.S. Unauthorized use will not be allowed Inventers and pioneers of these amazing Greenhouse bending tools, Instructions For All of Our DY and C Series Hoop Benders, C
Country Cabin. Assembly Manual. HomePlace Structures
 Country Cabin Assembly Manual Country Cabin Assembly Manual revised 3/20/10 Dear Customer, Thank you for your purchase of our Country Cabin. The craftsmanship and detail in this building is unmatched.
Assembly Instructions. Table of Contents
 HQ Little Foot Assembly Instructions Back of Handi Quilter, Inc. 501 North 400 West North Salt Lake, UT 84054 1-877-697-8458 Front of 2015 Handi Quilter, Inc. www.handiquilter.com Printed in the United
Open Up Your View With CABLE SYSTEMS
 Open Up Your View With CABLE SYSTEMS PRESENTED BY CROWN HERITAGE Our Cable Multiple options to accomodate any deck or stair design Marine Grade 316 stainless steel Swaging is the term used for attaching
15'x10'x6' Enclosure - Dog Run Assembly Instruction
 15'x10'x6' Enclosure - Dog Run Assembly Instruction Part One: Components for Dog Run 1. Door Panel: 1 pcs 2. Side Panels : 9 pcs 3. Gate Latch: 1 pcs 4. Clamp : 20pcs Optional Parts List 5. A- Frame Roof
MODULAR HIGH TUNNEL INSTALLATION GUIDE
 9615 Grandview Rd. Kansas City, MO 64137 Version: 15 JAN -2015 Sustainable Agriculture Solutions MODULAR HIGH TUNNEL INSTALLATION GUIDE (816) 444-7330 SmallFarmTools.com Thank you for purchasing a Modular
HQ Studio Frame Two-Foot Section Assembly Instructions From Twelve-Foot to Ten-Foot
 HQ Studio Frame Two-Foot Section Assembly Instructions From Twelve-Foot to Ten-Foot HQ Studio Frame Two-Foot Includes: Includes one (1) two-foot table frame with plastic top, two (2) two-foot track supports,
WeatherShield Daddy Long Legs Canopy
 WeatherShield Daddy Long Legs Canopy Photo may show a different but similar model. 2010 ClearSpan All Rights Reserved. Reproduction is prohibited without permission. Revision date: 06.210 STK# 1220RV10W10
GrowSpan Round Premium Corrugated Greenhouses
 GrowSpan Round Premium Corrugated Greenhouses Photo may show a different but similar model. 2018 Growers Supply All Rights Reserved. Reproduction is prohibited without permission. STK# DIMENSIONS 104933
Storage Master. Shed Row. Poly Buildings
 Storage Master Shed Row Poly Buildings Instructions Manual Building #104598 2005 ClearSpan All rights reserved. Reproduction prohibited without permission. Rev: 24 February 2005 2 PARTS IDENTIFICATION
Moo-Tel Small Animal Hut
 Moo-Tel Small Animal Hut Photo may show a different but similar model. 2010 ClearSpan All Rights Reserved. Reproduction is prohibited without permission. STK# DIMENSIONS 104602 4 6" W x 4' 10" H x 8 2"
ClearSpan Economy Round Style High Tunnel
 ClearSpan Economy Round Style High Tunnel Photo may show a different but similar model. 2012 ClearSpan All Rights Reserved. Reproduction is prohibited without permission. Revision date: 0112 STK# PB01725R6
Extension Standard building 03/15
 Extension Standard building 03/15 8 Wide Evolution Extension Assembly Instructions Contents: Introduction Base Preparation Overview Base Assembly Side Assembly Front Assembly Extension Installation Rear
Installation Instructions - Model V4JSD 1
 Installation Instructions - Model V4JSD 1 Support Assemblies: Parts list: (Note see enclosed cut sheet for quantities and dimensional information) A vertical structural member (1 ½ x 1 ½ modular frame)
Work Space Set-up. Slats will level the pipe during bending and help minimize twisting of the bow.
 Work Space Set-up Affix pipe bender to end of working surface Slats will level the pipe during bending and help minimize twisting of the bow. Make the slat height equal the distance from your work surface
How to Build a Fold- Down Greenhouse
 How to Build a Fold- Down Greenhouse This simple, inexpensive greenhouse folds down to protect your plants during early frosts and cold snaps, then can be raised up on warmer days. Made with PVC pipe and
GrowSpan Gothic HobbyPro Greenhouses
 GrowSpan Gothic HobbyPro Greenhouses Photo may show a different but similar model. 2016 Growers Supply All Rights Reserved. Reproduction is prohibited without permission. STK# DIMENSIONS 104889 16 W x
5'x10'x6' Enclosure-Dog Run Assembly Instruction
 5'x10'x6' Enclosure-Dog Run Assembly Instruction Part One: Components for Dog Run 1. Door Panel: 1 pcs 2. Side Panels : 5 pcs 3. Gate Latch: 1 pcs 4. Clamp : 12 pcs Optional Parts List 5. A- Frame Roof
ClearSpan Mini Grab Bag Shelters
 ClearSpan Mini Grab Bag Shelters Photo may show a different but similar model. Baseboard is not included. 2008 ClearSpan All Rights Reserved. Reproduction is prohibited without permission. STK# DIMENSIONS
6m x 12m CREST INSTRUCTIONS
 WARNING READ INSTRUCTIONS CAREFULLY BEFORE USE Recommended procedure below. For safety reasons it is recommended that four persons set up any marquee. Ensure area is free from any sharp objects & overhead
#11179 Wellington ARBOR
 #11179 Wellington ARBOR Assembly INSTRUCTIONS TOOLS NEEDED Tape Measure Variable Speed Drill with #2 Phillips Bit (recommended) or Phillips Screwdriver Hammer or Mallet ARBOR SIDE PANEL ASSEMBLY (Refer
ClearSpan Mini Grab Bag Shelters
 ClearSpan Mini Grab Bag Shelters Photo may show a different but similar model. Baseboard is not included. 2008 ClearSpan All Rights Reserved. Reproduction is prohibited without permission. STK# DIMENSIONS
Side "A" Stake here. Side "C" Side "D" Side "B" Here Shirley and I are setting up a 10 X 16 ground work.
 Choosing the Location It is always best to locate your greenhouse so that it can receive maximum sunlight at all times of the year especially in winter months. If Possible orient the long side towards
Pergola Installation Instructions
 Pergola Installation Instructions TOOLS REQUIRED HAMMER DRILL 1/2 MASONRY BIT PENCIL DRILL 3/16 DRILL BIT LEVEL SQUARE LADDER WRATCHET & SOCKETS RUBBER MALLET 2 TAPE MEASURE Column/Post Placement Table
50 W ide. Future Trac G able E nd. Installation Instructions AIGE
 G able E nd W ide TopTec Products, LLC 7601 Highway 221 Moore, SC 29369 Phone: (800) 845-2830 Fax: (800) 921-77 e-mail: sales@toptecproducts.com www.toptecproducts.com AIGE 2003915 General Information
ClearSpan Mini Cold Frames
 ClearSpan Mini Cold Frames Photo may show a different but similar model. 2009 ClearSpan All Rights Reserved. Reproduction is prohibited without permission. STK# DIMENSIONS 105152 6' W x 5' H x 6' L 105153
GrowSpan Gothic Pro Greenhouses and Systems
 GrowSpan Gothic Pro Greenhouses and Systems Photo may show a different but similar model. 2016 Growers Supply All Rights Reserved. Reproduction is prohibited without permission. STK# DIMENSIONS 106314
The Nantucket Legacy Arbor
 ASSEMBLY INSTRUCTIONS 0. in 9 in 0. in 68 in 7 in in *Nantucket Legacy with Trim Kit Shown Above. Please read through before starting assembly. in 60 in 0 in 8 in IMPORTANT: CHECK THE INSIDE OF YOUR POSTS
Version 2016_1.1 VICTORIAN ASSEMBLY INSTRUCTIONS. Victorian Vi-23, 34, 36
 Version 2016_1.1 VICTORIAN ASSEMBLY INSTRUCTIONS Victorian Vi-23, 34, 36 PRODUCT INFORMATION Dear customer, Thank you for buying a high-quality aluminium greenhouse. REMARKS The drawings in these instructions
GrowSpan Gothic Pro Greenhouses and Systems
 GrowSpan Gothic Pro Greenhouses and Systems Photo may show a different but similar model. 2017 Growers Supply All Rights Reserved. Reproduction is prohibited without permission. STK# DIMENSIONS 106306
Greenhouse Assembly Instructions
 Greenhouse Assembly Instructions Our Help Line provides support and advice to customers of Summer Garden Buildings after ordering. For advice before you buy you can phone us free 7 days a week on 0800
Walk-in Greenhouse. Assembly instructions. 8x6. 8x8. 8x10. 8x12. Model GH1399A Model GH1400A. Model GH1402A Model GH1403A. Model GH1405A Model GH1406A
 Assembly instructions 8x6 Model GH1399A Model GH1400A 8x8 Model GH1402A Model GH1403A 8x10 Model GH1405A Model GH1406A 8x12 Model GH1408A Model GH1409A Walk-in Greenhouse Statement Dear Customer! May we
GrowSpan Round Pro Greenhouses and Systems
 GrowSpan Round Pro Greenhouses and Systems Photo may show a different but similar model. 2018 Growers Supply All Rights Reserved. Reproduction is prohibited without permission. STK# DIMENSIONS 104836 14
Range height adjustable assembly
 Table of contents Digital handset operation 3 Height adjustable bench kit 4-5 Cable carrier 6 Ganging tray and ganging rail 7 Height adjustable return frame kit 8 Cable entry pole 9 24 and 30 d worksurfaces
ClearSpan End Frame Kit 30' Wide x 11' High
 ClearSpan End Frame Kit 30' Wide x 11' High Diagram shows the end frame kit for an end wall without a door. (Door and end panel are purchased separately.) Rafter and mounting feet shown in the above diagram
INSTALLATION INSTRUCTIONS
 NOTE: Bolts should remain hand tight until all bolts are installed. STEP 1 Installing the door base (both sides). 1. Locate the outer, roll cage, mounting bolt (passenger side is shown in the illustration).
GrowSpan Gothic Premium Greenhouses
 GrowSpan Gothic Premium Greenhouses Photo may show a different but similar model. 2016 Growers Supply All Rights Reserved. Reproduction is prohibited without permission. STK# DIMENSIONS 106209 16' W x
Assembly Instructions
 18' W x 10' H or 12' H Peak Style Frame Assembly Assembly Instructions Before you start: 2+ individuals recommended for assembly, approximate time 3 hours. Recommended tools: Power Drill, Safety Glasses,
Steel Roll Forming Plant. horse stalls. midwestmanufacturing.com. Front wall. Fax Effective 1 Oct 2014
 s LET MIDWEST HELP you Custom build your own STABLE system with these wall sections. partition section partition section partition section door Front wall wall section door Front wall 46 Fax 715-876-5564
8x12 SpaceMaker Garden Shed Assembly Manual
 8x12 SpaceMaker Garden Shed Assembly Manual Version #6 Revised June / 2007 Thank you for purchasing a 8x12 SpaceMaker Garden Shed. Please take the time to identify all the parts prior to assembly. Safety
Installation Instructions PREMIUM Replacement Top (Part # )
") 0 7-0 9 U n l i m i t e d ( 4 D o o r ) NOTE: Read entire instructions thoroughly before installing this product. It is recommended to install this Top when temperatures are above 70 degrees. The top can
0 7-0 9 U n l i m i t e d ( 4 D o o r ) NOTE: Read entire instructions thoroughly before installing this product. It is recommended to install this Top when temperatures are above 70 degrees. The top can
Assembly instructions. 6x4. Model GH1354A. 6x6. Model GH1357A. 6x8. Model GH1360A. 6x10. Walk-in Greenhouse. Model GH1363A
 ssembly instructions x Model GH x Model GH7 x8 Model GH0 x0 Model GH Walk-in Greenhouse Statement ear Customer! May we congratulate you on your new Greenhouse. We feel sure that by following the detailed
Auto Light Dep Greenhouse
 Humboldt Light Dep LLC Auto Light Dep Greenhouse Instruction Manual James Defenbaugh 16 Thank you for choosing Humboldt Light Dep for you Auto Light Dep Greenhouse needs. I have successfully built and
15 Ft. x 39 Ft. Hoop House Construction
 15 Ft. x 39 Ft. Hoop House Construction Hoop House 15 Ft. x 39 Ft. HOOP HOUSE The Hoop House, Cold Frame and High Tunnel can be basically the same structure with minor changes to the design. The Hoop House
Shed Assembly Instructions
 Shed Kit Contents The shed kit includes all the parts needed to assemble your shed except for tools and fasteners such as screws and nails. The various pieces are pre-cut and many are marked to indicate
GIRTS ON BACK OF BUILDING
 GIRTS ON BACK OF BUILDING ALL GIRTS ARE 1 1/2 SQUARE TUBE. GIRT LENGTHS FOR 12, 20, 24, AND 30 WIDE BUILDINGS: ON 12 WIDE BUILDINGS GIRTS ARE 67 3/4 LONG ON 20 WIDE BUILDINGS GIRTS ARE 56 3/4 LONG ON 24
Extrusions POLYLOCK ATTACHING EXTRUSIONS
 Extrusions POLYLOCK ATTACHING EXTRUSIONS ITEM # DESCRIPTION USES 1001 Aluminum Girt 16 lengths Used in metal end packages and sidewalls as horizontal members. Requires girt/baseboard splice (#1000). 1000
C70 Window Roller Repair Taken from: Heres the problem:
 C70 Window Roller Repair Taken from: http://www.volvospeed.com/vs_forum/topic/115086-how-to-c70-window-rollers-permanent-fix/ Heres the problem: This happened to two separate window assemblys on my c70
HAPPY CHICKEN TRACTOR
 HAPPY CHICKEN TRACTOR www.thelittlechickenfactory.com Consumer Assembly Instructions 2014 Six-foot unit Picture of six-foot unit shade/rain cover not shown NEW HANDLE INSERT INTO FRAME HOLES WHILE ASSEMBLING
Germ City Storage Box Inventory
 Germ City Storage Box Inventory 4 Wide connector bars 11 Thin connector bars (4 with Velcro on one side) 12 Channel parts (6 with extensions) 1 Black fabric exhibit cover 2 Black decorated burlap panels
6MM ALLEN KEY FOR ROOF CLIPS PHILLIPS HEAD BIT FOR SCREWS FOR DOOR FRAME SPIRIT/LASER LEVEL TO LEVEL THE UNIT
 1 TOOLS REQUIRED: MOVING CART/DOLLY FOR TRANSPORTING PANELS, ROOF, AND POSTS TWO 9 FT. STEP LADDERS FOR INSTALLING ROOF & PANELS MINI REVERSIBLE RATCHET 1/4 DRIVE FOR CORNER SCREWS ON TOP TRAVERSE BEAMS
13MM FLAT WRENCH FOR LEVELING THE GLIDES OF STRUCTURE 6MM ALLEN KEY FOR ROOF CLIPS PHILLIPS HEAD BIT FOR SCREWS FOR DOOR FRAME
 1 TOOLS REQUIRED: MOVING CART/DOLLY FOR TRANSPORTING PANELS, ROOF, AND POSTS TWO 9 FT. STEP LADDERS FOR INSTALLING ROOF & PANELS REVERSIBLE RATCHET 1/4 DRIVE FOR CORNER SCREWS ON TOP TRAVERSE BEAMS ALTERNATIVE
Shannon s CCR Spiral Tree
 Shannon s CCR Spiral Tree http://www.shannonclaus.com Disclaimer: I take no responsibility for design failures or injuries related to this design. This document is created for informational purposes only
POWER PET. Low-E Automatic Patio Pet Door Installation and Operating Instructions
 POWER PET Low-E Automatic Patio Pet Door Installation and Operating Instructions Power Pet, Regular Height, Patio Door Assembly Steps Estimated assembly time: Under 1 hour STEP 1: Assemble the tools you
How To Measure Your Finished Opening
 3000 Series Bifold Doors How To Measure Your Finished Opening MEASURE FROM RIGHT TO LEFT 2 PLACES (WIDTH) MEASURE FROM TOP TO BOTTOM 2 PLACES (HEIGHT) Tools Required for Assembly: Tools Needed: Phillips
Side "C" Stake here. Side "B" Here Shirley and I are setting up a 10 X 16 ground work.
 Choosing the Location It is always best to locate your greenhouse so that it can receive maximum sunlight at all times of the year especially in winter months. If Possible orient the long side towards
ClearSpan Super Moo-Tel Building 26' Wide
 ClearSpan Super Moo-Tel Building 26' Wide Photo may show a different but similar model. 2012 ClearSpan All Rights Reserved. Reproduction is prohibited without permission. STK# PB01500R3/R4 PB01510R3/R4
Instructions for Lighting an S Scale Caboose
 Instructions for Lighting an S Scale Caboose The S Scale Caboose lighting kit is adaptable for most caboose models of rolling stock including American Flyer (TM) and contains the same components as found
ClearSpan End Frame Kit 26' Wide x 12' High
 ClearSpan End Frame Kit 26' Wide x 12' High Diagram shows the end frame kit for an end wall without a door. (Door and end panel are purchased separately.) Rafter and struts shown in the above diagram are
Walk-in Greenhouse. Assembly instructions. 6x4. 6x6. 6x8. Model GH0490 Model GH0491 Model GH1040. Model GH0492 Model GH0493 Model GH1041
 ssembly instructions x4 Model GH0490 Model GH049 Model GH040 x Model GH049 Model GH049 Model GH04 x Model GH0494 Model GH049 Model GH04 Walk-in Greenhouse Statement Congratulations on purchasing your new
INSTALLING YOUR NEW SPRING LIFT ARM KIT
 INSTALLING YOUR NEW SPRING LIFT ARM KIT 1. Measure the distance that the roof is to be raised. [If your lift system is completely non-functional, you will need to calculate or estimate this distance as
Locker Pedestal Installation Instructions
 Locker Pedestal Installation Instructions LK-PED-INST-0314r1 Parts List Single Pedestal Back to Back Pedestal Horizontal Support Tube TS-169 Post Flange TS-190 Post Cap Fasteners Provided: #8 x ¾ round
Appendix B Framing Component Installation Last updated 5/27/2013
 Appendix B Framing Component Installation Last updated 5/27/2013 Apex Brace Installation Appendix B 1 Refer to apex connection detail on the engineering plans for the location of the apex brace. Refer
ClearSpan Grab Bag Canopy
 ClearSpan Grab Bag Canopy Photo may show a different but similar model. 2008 ClearSpan All Rights Reserved. Reproduction is prohibited without permission. STK# DIMENSIONS 104385 10 W x 20 L 1 YOU MUST
Hoop House Plans By Steve Robinson
 Hoop House Plans By Steve Robinson This Ebook is Shareware It is meant to be shared by farmers alike. I give you permission to share this EBook to as many people as you like. It can not be sold, but it
GroundControl. Follow instructions contained in this manual. Incorrect installation could result in serious injury or damage to property.
 GroundControl TM use supplied hardware Use only hardware supplied in your GroundControl kit or supplied by an authorized YAKIMA dealer. Use of unauthorized parts in the GroundControl system could result
GrowSpan Round Pro Greenhouses and Systems
 GrowSpan Round Pro Greenhouses and Systems Photo may show a different but similar model. 2018 Growers Supply All Rights Reserved. Reproduction is prohibited without permission. STK# DIMENSIONS 104857 26'
Rayport G Eco Ballasted
 Rayport G Eco Ballasted Dealer Kit Installation Guide Contents 1. Installer Notes..... P2 2. Parts List........ P3-6 3. Tool List.... P7 4. Assembly.... P8-16 www.aetenergy.com Supporting a Cleaner, Greener
BE CAREFUL Safety precautions should be taken when using tools, especially power tools. Please exercise caution.
 PLEASE NOTE: A VIDEO HAS BEEN LAUNCHED ON OUR WEBSITE KEYHOLEFARM.COM THAT OFFERS THE EASY WAY TO CONSTRUCT THE KEYHOLE GARDEN FRAME. IT IS UNDER THE MENU ITEM EXTRAS IN THE UPPER RIGHT-HAND CORNER AREA.
Flex Fence Instruction Manual
 The Safer Stronger Smarter Choice Flex Fence Instruction Manual Table of contents 2 3 4 4 5 5 6 7 8 10 10 11 11 12 13 13 15 18 18 19 20 22 Table of contents Supplies, tools and equipment Introduction Laying
User Instructions Multiline Otter Scoreboard Caddy Assembly
 List of parts: User Instructions Multiline Otter Scoreboard Caddy Assembly Single Caddy Double Caddy 1 1 Base assembly with attached wheels 2 4 1 1 2 4 4 8 10 20 12 Uprights (60 or 74 aluminum extrusion)
RANGE DIGITAL HANDSET OPERATION. 1. Panel. 2. Initialization Procedure. 3. Move Up & Down. 4. Set Memory Positions. 5. Move to the Memorized Positions
 INSTRUCTION SHEET #2577INS PART #1730534 DIGITAL HANDSET OPERATION OPERATION INSTRUCTIONS 1. Panel 1 Button: Preset 1 2 Button: Preset 2 3 Button: Preset 3 S Button: Select Display: Reads in 1 / 2 " Increments
Modular Shelter Breezeway Assembly Instructions
 Modular Shelter Breezeway Assembly Instructions Hardware Kit 76900188 THANK YOU FOR PURCHASING THIS PRODUCT Behlen Country has been in the business of providing quality products for more than 75 years.
Roll In W/L Dock PAGE 1
 Roll In W/L Dock PAGE 1 1 2 3/8 X 1 CARRIAGE BOLT SS 3/8 FLANGE NUT BRASS 3 4 1/2-13 X 1.25 SQ BOLT SS 1/2 SQ NUT BRASS 5 3/8-16 X 2.5" BOLT SS PAGE 2 6 7 BRACE BRKT SINGLE AXLE TUBE 8 9 3" AXLE WASHER
GrowSpan Gothic Pro Greenhouses and Systems
 GrowSpan Gothic Pro Greenhouses and Systems Photo may show a different but similar model. Film Cover with Film Roll-Up Side Panels 2016 Growers Supply All Rights Reserved. Reproduction is prohibited without
GrowSpan Gothic Pro Greenhouses and Systems
 GrowSpan Gothic Pro Greenhouses and Systems Photo may show a different but similar model. Full Polycarbonate Roof Cover and Ends 2016 Growers Supply All Rights Reserved. Reproduction is prohibited without
ClearSpan Attached-Style Awning
 ClearSpan Attached-Style Awning Photo may show a different but similar model. 2007 ClearSpan All Rights Reserved. Reproduction is prohibited without permission. Revision date: July 2007ldg STK# DIMENSIONS
WeatherShield Covered Walkway and Connect-A-Building
 WeatherShield Covered Walkway and Connect-A-Building Photo may show a different but similar model. 2014 ClearSpan All Rights Reserved. Reproduction is prohibited without permission. STK# DIMENSIONS 104303
W6 series greenhouse
 W series greenhouse ssembly instructions Model W0 Model W07 Model W0 Model W Model W Walk-in Greenhouse Statement Dear Customer! May we congratulate you on your new Greenhouse. We feel sure that by following
Tongue & Groove Cabinet Doors Copyright 2014 JaysCustomCreations.com
 Tongue & Groove Cabinet Doors Copyright 2014 JaysCustomCreations.com A tongue and groove cabinet door is made up of at least 5 pieces. Two horizontal rails (blue), two vertical styles (green), and one
ClearSpan Twist-of-the-Wrist Assembly Instructions
 ClearSpan Twist-of-the-Wrist Assembly Instructions Curved-Wall for Roll-Up Side Flat-Wall for Curtain Application 2008 ClearSpan All Rights Reserved. Reproduction is prohibited without permission. Revision