Ledgewood Farm greenhouse. construction
|
|
|
- Sheryl Mosley
- 6 years ago
- Views:
Transcription
1 Ledgewood Farm greenhouse How do I Start? construction to I m Finished!

2 Post layout The string will be 7 above the ground and the posts will be driven until the proper drill hole is at the string.


3 Spacing and driving posts Use the template to space the posts four feet apart and the large bolt to hammer the posts into the ground. Use a bar or drill to make a pilot hole for the post.


4 Level the two lines of posts Use a line level or laser to level the frame left to right so you have a level end wall. The frame can slope end to end over the length.

5 Squaring the greenhouse Using the table in the instructions and a tape measure square the two sides of one end and then square the other end. The tape must be the same height at all three points.

6 Squaring the greenhouse Check your measurements to make sure your frame is square before you pound all the posts.


7 Assemble the bows The three pieces of the bow are assembled on the ground, bolted with the 2-1/2 carriage bolts and then erected as a unit.


8 Assembling the 26,28, and 30 foot bows The cap piece slides inside the bow and is bolted with a 5/16x2-1/2 carriage bolt. The black mark helps line up the holes.


9 Erecting the 14,17, and 21 foot bows A pair of vise grips or clamp is attached to the bow at the black mark. When the bow is lowered into the post the clamp will stop the bow at the proper depth. A nail is used to hold the bow in place until the baseboard is attached.

10 Finish erecting the bows Compress the bow and slide the other side into the ground post until the clamp stops the bow. Use the nail to hold the bow in place.


11 Erecting the 26,28,and 30 foot bows The 3 hole insert connects to the bow with the hole that is farthest from the end of the insert. Do not use the end that has a hole 1 from the end. Connect using a 5/16x2-1/2 bolt. The tall 30 foot bow insert has 2 holes. One to connect the insert to the bow and one to connect the insert to the post.

12 26,28,and 30 foot bow connected to the post The insert slides into the post until the bow rests snug on top of the post. The holes in the insert and post should be aligned.


13 Installing purlins Install the lowest purlin on one side of the house. Start with the number 1 pipe from a bundle and bolt it in place. Then install number 2,3, and 4 etc.

14 Purlin joints A 2 bolt connects the purlin pieces together. The joints will be between bows.


15 Install remaining purlins The remaining purlins are installed from bottom to top. Always install the ridge pole last.


16 Corner brace installation Clamp the lower end of a corner brace to the second bow using a long clamp, then pivot the corner brace so the other end can be clamped to the fourth bow with another long clamp.


17 Finishing the corner braces Use 2 clamps and one bolt to connect the bow and the brace together at the intersection

18 Crossties (if you have them) The crosstie is connected to the bow with a brace band and bolt. Level the crossties by making the ends equal distance from the purlins on each side of the house.


19 Crosstie and drops Connect the drop to the crosstie using two small clamps. One attached to the ridge purlin and the other around the crosstie.

20 Adding the trusses to the crossties The end of the truss with the drill hole in the center attaches to the bow with a large brace band and the other end attaches to the crosstie with a small brace band.


21 Baseboard Mark the post so the baseboard is about 2 into the soil and the top of the board is straight the length of the house. Dig the soil out of the way so the top of the board will line up with the marks on the posts.


22 More baseboard Use a second layer or one wide plank. Connect the joints with pieces of board.

23 Hip board for roll-up sides Drill the bows and attach the hip board using the included bolts and nuts. Make sure to keep the hip parallel to the baseboard by using the dots on the bow.

24 Hip board and attaching poly This piece of wood helps with snow and rain shedding.


25 Starting the end walls Place a sill along the ground from side to side. Use banding to attach the sill to the bow and baseboard. Toenail the studs to the sill.


26 Metal banding to attach studs Attach the banding with one screw on the outside of the stud, then wrap the banding over the bow and attach the band to the top of the stud.

27 Finish the end wall You may use any material to finish the ends. Poly, clear structured sheets, boards, or plywood. I often use plywood as it is fast and durable.


28 How about doors? Any door size will work, I like two 4 by 8 doors for a large opening so a small tractor fits inside. A simple, yet secure latch is made from 5/16 inch steel rod and a block of wood.

29 Are you ready for the poly? Attach the poly at one end and roll it down the ridge pole. If you start with the roll centered on the ridge it is easy to keep it that way. If you aren t so brave, roll it out on the ground and pull it up over the frame using ropes. Make sure it ends up straight and square.


30 Here we go! It really isn t too scary! You have the roll, the long pipe and your most trusted to provide stability. Stop a couple of times to pull the roll tight and make sure it is centered. Did you tighten all of the bolts?

31 Cleats ready to attach The cleats should have screws already started so they can be installed quickly before the wind blows.


32 The poly should be pulled straight, square, and comfortably snug. Spread out the poly

33 Attaching the strapping Attach all of the strapping as fast as you can with a few screws and then go back and drive the rest. Make sure the screws pull the two boards together so the plastic can t slip.


34 It takes less than ten minutes to finish each side. Like this


35 Roll up side installation Attach the handle to the roll up pipe with a 2 bolt and nut. 2 1 Connect the sections of pipe with the #12x3/4 Tek screws. Keep them in numerical order.


36 Attach the poly to the roll up pipe Roll one wrap of poly around the pipe and put a clip onto the pipe. Be careful to keep the poly straight as you proceed the length of the house. The roll up will be perfect!

37 Make sure roll up is straight Pull down on the pipe to make sure the poly is wrapped tight. The roll up should be straight. If not, lower it and adjust the clips.


38 Drill holes for bolts or attach lag eyes Attach the bolts or eyes about midway between two bows. The bottom bolt will be about 3 below the top of the baseboard and the top bolt through the poly cleat. The ropes will be located every other bow, starting at the end bow.


39 Attaching the ropes Rope attached to the hip board bolt and to the baseboard

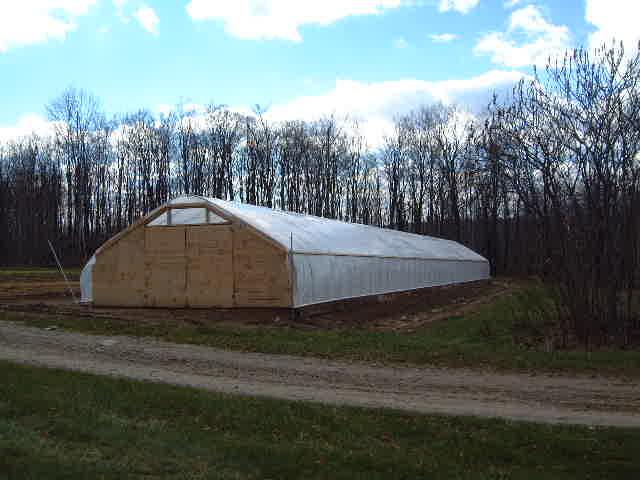
40 and we re finished!

41 Time to wake up!
Greenhouse Designs & Construction
 Greenhouse Designs & Construction 7 Most Common Greenhouse Designs 1. The lean-to greenhouse shares a wall with a building and relies on the building structure to provide some support for the greenhouse
MONKEY BARS OVERHEAD RACK INSTALLATION
 MONKEY BARS OVERHEAD RACK INSTALLATION Thank you for purchasing the New Monkey Bars Overhead storage rack. The most innovative overhead rack on the market WARNING THE PROPER INSTALLATION OF THIS STORAGE
Low/High Tunnel Greenhouse Plans
 Low/High Tunnel Greenhouse Plans Tools Needed (See the complete list of Greenhouse Tools) Hacksaw or Reciprocating Saw Socket Wrench, Adjustable Wrench or Nut Drivers Electric Drill with Drill Bits Sledge
Hoop House Plans By Steve Robinson
 Hoop House Plans By Steve Robinson This Ebook is Shareware It is meant to be shared by farmers alike. I give you permission to share this EBook to as many people as you like. It can not be sold, but it
Installation Instructions for Solar Snow Pad (SSP-T-3)
") Installation Instructions for Solar Snow Pad (SSP-T-3) Warning- Do not use this product on solar arrays where the calculated array snow loads exceed 50 pounds per square foot (psf). Most solar panels are
Installation Instructions for Solar Snow Pad (SSP-T-3) Warning- Do not use this product on solar arrays where the calculated array snow loads exceed 50 pounds per square foot (psf). Most solar panels are
Hoop House Construction Plans
 Kerr Center for Sustainable Agriculture (918) 647-9123 24456 Kerr Rd. Poteau, OK 74953-5215 Copyright 2017 Published Fall 2017 www.kerrcenter.com Hoop House Construction Plans This document explains how
AWNING / PATIO COVER INSTALLATION INSTRUCTIONS
 AWNING / PATIO COVER INSTALLATION INSTRUCTIONS Before You Begin Read the installation instructions thoroughly before beginning the installation procedure. Perspective In the Awning Instructions, Back means
Grade 8 Enriched Math Catapult Project 2012 Step by Step Instructions to building a catapult
 Grade 8 Enriched Math Catapult Project 2012 Step by Step Instructions to building a catapult Grade 8 Enriched Math Project INSTRUCTION SHEET FOR CATAPULT Procedures, materials and tools: below is a step-bystep
Greenhouse Construction Manual
 Greenhouse Construction Manual 30' Greenhouse Unit Manufactured By: CVS SUPPLY 2455 County Road 200 Dundee OH 44624 (Leave Message at 877-790-8269) SUMMARY OF CONTENTS GETTING STARTED Thank You! Materials
15 Ft. x 39 Ft. Hoop House Construction
 15 Ft. x 39 Ft. Hoop House Construction Hoop House 15 Ft. x 39 Ft. HOOP HOUSE The Hoop House, Cold Frame and High Tunnel can be basically the same structure with minor changes to the design. The Hoop House
ClearSpan Economy Round Style High Tunnel
 ClearSpan Economy Round Style High Tunnel Photo may show a different but similar model. 2012 ClearSpan All Rights Reserved. Reproduction is prohibited without permission. Revision date: 0112 STK# PB01725R6
Auto Light Dep Greenhouse
 Humboldt Light Dep LLC Auto Light Dep Greenhouse Instruction Manual James Defenbaugh 16 Thank you for choosing Humboldt Light Dep for you Auto Light Dep Greenhouse needs. I have successfully built and
Assembly Instructions
 18' W x 10' H or 12' H Peak Style Frame Assembly Assembly Instructions Before you start: 2+ individuals recommended for assembly, approximate time 3 hours. Recommended tools: Power Drill, Safety Glasses,
GrowSpan Gothic Cold Frames
 GrowSpan Gothic Cold Frames Photo may show a different but similar model. 2016 Growers Supply All Rights Reserved. Reproduction is prohibited without permission. STK# DIMENSIONS 106342 30' W x 12' H x
8 Ft Wide Enclosure Assembly Guide
 www.rmfiberglass.com 8 Ft Wide Enclosure Assembly Guide RM Products Ltd 1-800-363-0867 www.rmfiberglass.com Table of Contents 1. Parts and Tools List page 3 2. Hardware page 4 3. Maintenance page 5 4.
12, 14 & 16 Wide Enclosure Assembly Guide
 www.rmfiberglass.com 12, 14 & 16 Wide Enclosure Assembly Guide RM Products Ltd 1-800-363-0867 www.rmfiberglass.com Table of Contents 1. Handling and Storage page 3 to 5 2. Parts and Tools List page 7 3.
5'x10'x6' Enclosure-Dog Run Assembly Instruction
 5'x10'x6' Enclosure-Dog Run Assembly Instruction Part One: Components for Dog Run 1. Door Panel: 1 pcs 2. Side Panels : 5 pcs 3. Gate Latch: 1 pcs 4. Clamp : 12 pcs Optional Parts List 5. A- Frame Roof
INSTALLATION INSTRUCTIONS
 NOTE: Bolts should remain hand tight until all bolts are installed. STEP 1 Installing the door base (both sides). 1. Locate the outer, roll cage, mounting bolt (passenger side is shown in the illustration).
GrowSpan Round Cold Frames
 GrowSpan Round Cold Frames Photo may show a different but similar model. 2016 Growers Supply All Rights Reserved. Reproduction is prohibited without permission. STK# DIMENSIONS 103099 12' W x 8' H x 24'
GLOSSARY OF TERMS SECTION 8
 GLOSSARY OF TERMS SECTION 8 Anchor Bolt Angle Base Plate Bay Blocking CCB Centerline Chord Cladding Clip Closure Strip An A-307 steel bolt embedded in the concrete footing to anchor the base plate of the
12x12 Pavilion. Assembly Manual
 12x12 Pavilion Assembly Manual 12x12 Pavilion Assembly Manual Congratulations on purchasing your new Pavilion. Thank You for your purchase and Welcome to the YardCraft Famiy. This manual is designed to
Installation Instructions - Model V4JSD 1
 Installation Instructions - Model V4JSD 1 Support Assemblies: Parts list: (Note see enclosed cut sheet for quantities and dimensional information) A vertical structural member (1 ½ x 1 ½ modular frame)
Hardware and Components:
 Hardware and Components: (A) 5/16 x 2 Hex Bolt (B) 5/16 x 2-1/4 Hex Bolt (C) 5/16 x 2-1/2 Hex Bolt (D) 4X 5/16 x 3/4 Hex Bolt (E) 4X 5/16 x 1-1/4 Hex Bolt (F) 11X 5/16 Flat Washer (G) 12X 5/16 Nylock Nut
ClearSpan Pro Solar Star High Tunnels
 ClearSpan Pro Solar Star High Tunnels Photo may show a building of a different length. Frame is shown with a roll-up side option and customer-supplied baseboards. End wall is not included and requires
GrowSpan 42' Wide Series 500 Tall High Tunnels with Roll-Up Sides
 GrowSpan 42' Wide Series 500 Tall High Tunnels with Roll-Up Sides Photo may show a building of a different length and style. Frame shown includes drop-down sides and customersupplied baseboards. Actual
GrowSpan 30' Wide Series 500 Tall Greenhouses
 GrowSpan 30' Wide Series 500 Tall Greenhouses Photo may show a building of a different length and style. Frame shown includes optional roll-up sides and customer-supplied baseboards. Building shown is
ClearSpan Pro Solar Star High Tunnels
 ClearSpan Pro Solar Star High Tunnels Photo may show a building of a different length. Frame is shown with a roll-up side option and customer-supplied baseboards. End wall is not included and requires
GrowSpan Round Premium High Tunnels
 GrowSpan Round Premium High Tunnels Photo may show a different but similar model. 2016 Growers Supply All Rights Reserved. Reproduction is prohibited without permission. STK# PB01680R4 PB01690R4 DIMENSIONS
ClearSpan Pro Solar Star Greenhouses
 ClearSpan Pro Solar Star Greenhouses Double-Layer Greenhouse Film Photo may show a building of a different length. Frame is shown with a roll-up side option and customer-supplied baseboards. End wall is
2009 MODEL ASSEMBLY, INSTALLATION AND MAINTENANCE INSTRUCTIONS
 2009 MODEL ASSEMBLY, INSTALLATION AND MAINTENANCE INSTRUCTIONS It is important that these instructions are adhered to in their entirety. Please read the instructions fully before starting installation
HOUSE PARTS PACKED IN HOUSE BOX PARTS IN PLASTIC BAG (HARDWARE) PARTS IN SMALL PLASTIC BAG (FLOOR CLIPS) PARTS PACKED IN BUNDLE
 PARTS IN SMALL PLASTIC BAG (FLOOR CLIPS) PARTS PACKED IN BUNDLE") Check parts against this list before starting assembly. Refer to illustrations on pages 6 and 7 to view house parts. If any shortages are found, refer to Packing Slip for claim instructions. Item 3 5 6
Check parts against this list before starting assembly. Refer to illustrations on pages 6 and 7 to view house parts. If any shortages are found, refer to Packing Slip for claim instructions. Item 3 5 6
GrowSpan 24' Wide Series 500 Tall High Tunnels with Roll-Up Sides
 GrowSpan 24' Wide Series 500 Tall High Tunnels with Roll-Up Sides Photo may show a building of a different length and style. Frame shown includes roll-up sides and customer-supplied baseboards. Actual
SwingSafe Swing-Away Mailbox Support Diagram
 SwingSafe Swing-Away Mailbox Support Diagram Wood Mounting Plates Top Arm (B) Muffler Clamps (A) Carriage Bolts and Nuts Bottom Arm 4-Foot U-Channel Post USPS Recommended 42-44 Height Ground Slope Hex
Playground Assembly Instructions
 Before You Begin Playground Assembly Instructions Locate the playground set on firm, level ground. Assemble the playground on or close to its permanent location Two people are recommended to assemble the
E-Z GROW HOBBY GREENHOUSE. I n s t r u c t i o n M a n u a l & D i s c l a i m e r s
 E-Z GROW HOBBY GREENHOUSE I n s t r u c t i o n M a n u a l & D i s c l a i m e r s Contractors/Installers Note: This manual is the property of the customer. Please leave it in the possession of the customer.
1. Layout. Step 1. Step 2. Step 3. Fig. 1
 1-3/8 Panel Clamp Tools You Will Need: Tape Measure, Mason s String, Stakes, Hole Digger, Shovel, Level, Wheelbarrow, Wrenches or Adjustable Wrench, Hacksaw, Pliers, Cutting Pliers, Fence Stretcher and
15'x10'x6' Enclosure - Dog Run Assembly Instruction
 15'x10'x6' Enclosure - Dog Run Assembly Instruction Part One: Components for Dog Run 1. Door Panel: 1 pcs 2. Side Panels : 9 pcs 3. Gate Latch: 1 pcs 4. Clamp : 20pcs Optional Parts List 5. A- Frame Roof
Moo-Tel Calf Nurseries
 MOO-TEL CALF NUSEIES Moo-Tel Calf Nurseries Photo may show a different but similar model. 2008 ClearSpan All ights eserved. eproduction is prohibited without permission. evision date: 10.13.08 STK# DIMENSIONS
Hardware and Components:
 Hardware and Components: (A) 4X 5/16 x 1 Carriage Bolt (B) 2X 5/16 x 2-1/4 Carriage Bolt (C) 2X 5/16 x 3-1/4 Hex Bolt (D) 2X 5/16 x 3/4 Hex Bolt (E) 2X 5/16 x 1-1/4 Hex Bolt (F) 5/16 x 2-1/4 Hex Bolt (G)
Open shipping crate and separate all of the different parts. Over The Top Shelters LLC
 ASSEMBLY INSTRUCTIONS FOR MODEL SH122110GN and SH122110GY Open shipping crate and separate all of the different parts. Count each part and match up with parts list. Shortages or damaged parts should be
ClearSpan PolyMax Windbreak Wall
 ClearSpan PolyMax Windbreak Wall Photo may show a different but similar model. 2007 ClearSpan All Rights Reserved. Reproduction is prohibited without permission. Revision date: April 2007ldg STK# DIMENSIONS
Assembly Instructions
 8' x 6' x 6'6" Professional Growers Greenhouse Assembly Instructions Description Model # 8' x 6' x 6'6" Professional Growers Greenhouse PGG68 350351 Please read instructions COMPLETELY before assembly.
Side "A" Stake here. Side "C" Side "D" Side "B" Here Shirley and I are setting up a 10 X 16 ground work.
 Choosing the Location It is always best to locate your greenhouse so that it can receive maximum sunlight at all times of the year especially in winter months. If Possible orient the long side towards
Installation Manual for Metal Toilet Partitions Standard Series
 For Video instructions http://www.hadrian-inc.com/tech-data/installation/toilet-partitions.aspx P a g e 1 Table of Contents Page General Notes and Tools Required 3 STEP 1: Establish Floor Bracket Locations
ClearSpan Mini Grab Bag Shelters
 ClearSpan Mini Grab Bag Shelters Photo may show a different but similar model. Baseboard is not included. 2008 ClearSpan All Rights Reserved. Reproduction is prohibited without permission. STK# DIMENSIONS
PROTECT-A-POOL INGROUND REMOVABLE SAFETY FENCE
 PROTECT-A-POOL INGROUND REMOVABLE SAFETY FENCE I N S T A L L A T I O N I N S T R U C T I O N S INSTALLATION TOOLS The following tools are required for installation. Chalk Pencil Utility Knife Tape Measure
MODULAR HIGH TUNNEL INSTALLATION GUIDE
 9615 Grandview Rd. Kansas City, MO 64137 Version: 15 JAN -2015 Sustainable Agriculture Solutions MODULAR HIGH TUNNEL INSTALLATION GUIDE (816) 444-7330 SmallFarmTools.com Thank you for purchasing a Modular
ClearSpan PolyMax Windbreak Wall
 ClearSpan PolyMax Windbreak Wall Photo may show a different but similar model. 2007 ClearSpan All Rights Reserved. Reproduction is prohibited without permission. Revision date: February 2007ldg STK# DIMENSIONS
Parts list continues on Page 2 HOUSE PARTS PACKED IN HOUSE BOX PARTS IN SMALL PLASTIC BAG (HARDWARE) POST PARTS PACKED IN THIS BOX (LARGE PLASTIC BAG)
 POST PARTS PACKED IN THIS BOX (LARGE PLASTIC BAG)") Form 05-07 Instructions and Parts List MSS- Martin Safety System NOTES: () A complete system is packed in two boxes post box and house box. House box contains hardware for both post and house assembly.
Form 05-07 Instructions and Parts List MSS- Martin Safety System NOTES: () A complete system is packed in two boxes post box and house box. House box contains hardware for both post and house assembly.
NON-ELECTRIC DOG FENCES
 NON-ELECTRIC DOG FENCES Thank you! Thank you for ordering your non-electric dog fence kit from Pet Playgrounds. In less than a day you will have your very own personal dog park installed on your property.
Kwik-Lock. Installation Instructions. Attention Dealers: Please give this owners manual to the customer when the product is delivered.
 Serving the Truck & Trailer Industry Since 1944 Installation Instructions Attention Dealers: Please give this owners manual to the customer when the product is delivered. Call 800-535-9545 www.aeroindustries.com
π H-4408 ALUMINUM BLEACHERS 5-ROW x 15' PARTS uline.com TOOLS NEEDED
 π H-4408 1-800-295-5510 uline.com ALUMINUM BLEACHERS 5-ROW x 15' TOOLS NEEDED Square Tape Measure Rivet Gun 3/16" Drill Bit 1/2" Wrench Socket Wrench 1/2" Deep Well Socket #2 Phillips Bit Rubber Mallet
Classic Roll Tarp. Installation Instructions. Attention Dealers: Please give this owners manual to the customer when the product is delivered.
 Serving the Truck & Trailer Industry Since 1944 Classic Roll Tarp Attention Dealers: Please give this owners manual to the customer when the product is delivered. Call 800-535-9545 www.aeroindustries.com
Laminate Cabinet Installation Instructions
 Laminate Cabinet Installation Instructions www.easygaragestorage.com/installation How To Use These Instructions Thank you for your purchase! Please read each step of this manual thoroughly to ensure proper
SILVERBACK INSTALLATION MANUAL
 SILVERBACK INSTALLATION MANUAL R-SERIES SOLAR RACKS T OLL FREE 866-766-3727 WWW.ROOFSCREEN.COM Introduction... 2 The Silverback Solar Racking System... 2 This manual... 2 Application... 2 System Overview...
48 in. X 96 in. 500 Pound Capacity Motorized Overhead Storage Unit Installation Guide [OPTION B] MODEL # PRM4X8 Patent Pending
![48 in. X 96 in. 500 Pound Capacity Motorized Overhead Storage Unit Installation Guide [OPTION B] MODEL # PRM4X8 Patent Pending](/thumbs/81/83353561.jpg "48 in. X 96 in. 500 Pound Capacity Motorized Overhead Storage Unit Installation Guide [OPTION B] MODEL # PRM4X8 Patent Pending") 48 in. X 96 in. 500 Pound Capacity Motorized Overhead Storage Unit Installation Guide [OPTION B] MODEL # PRM4X8 Patent Pending 1 Table of Contents Table of Contents PAGES Installation Support 3 Safety
48 in. X 96 in. 500 Pound Capacity Motorized Overhead Storage Unit Installation Guide [OPTION B] MODEL # PRM4X8 Patent Pending 1 Table of Contents Table of Contents PAGES Installation Support 3 Safety
ASSIGNMENT 3. Textbook Assignment: 3-5. Which of the following types of hammers is used for driving and pulling nails?
 ASSIGNMENT 3 Textbook Assignment: "Clamps," "Jacks," Hammers, Mallets, and Mauls," "Screwdrivers," "Manual Drills," "Screw and Tap Extractors," "Wrenches," "Chisels," and "Punches," chapters 19 through
10' W x 8' H or 10' H Round Style Shelter Assembly Instructions
 10' W x 8' H or 10' H Round Style Shelter Assembly Instructions Description 10' x 8' x 8' Round Style Shelter - Gray 10' x 8' x 10' Round Style Shelter - Gray Recommended Tools Please read instructions
7 x 14 flybed tramp. VISIT LINK BELOW FOR INSTALL VIDEO
 in-ground installation instructions & user guide 7 x 14 flybed tramp VISIT LINK BELOW FOR INSTALL VIDEO https://www.maxairtrampolines.com/pages/support-information-videos Page 2 TABLE OF CONTENTS Materials,
NOTE: Top section pole (Q) is packed INSIDE bottom section pole (S)
 is packed INSIDE bottom section pole (S)") Form 0905-0 Instructions and Parts List TM- Mini Castle (modified) MARTIN SAFETY SYSTEM NOTES: () A complete system is packed in two boxes post box and house box. House box contains hardware for both post
Form 0905-0 Instructions and Parts List TM- Mini Castle (modified) MARTIN SAFETY SYSTEM NOTES: () A complete system is packed in two boxes post box and house box. House box contains hardware for both post
6' x 8' x 6'6" Quad-Vent Greenhouse-in-a-Box Assembly Instructions
 6' x 8' x 6'6" Quad-Vent Greenhouse-in-a-Box Assembly Instructions Description Model # 6' x 8' x 6'6" Quad-Vent Greenhouse-in-a-Box 70652 Recommended Tools Please read instructions COMPLETELY before assembly.
Gable Greenhouse Instructions
 Gable Greenhouse Instructions Part 1; Build The Base Frame Photo below shows connector components in this basic 12x12 kit. Self Drilling tech screws are included with kit. This kit requires 16 gage or
ALL SEASON PATIO COVER
 ALL SEASON PATIO COVER 61 Where the All Season Patio Cover is to be attached to the home, create a level line showing where the top of the mounting rail is to be located. Install each section with the
GrowSpan Round Pro Greenhouses and Systems
 GrowSpan Round Pro Greenhouses and Systems Photo may show a different but similar model. 2018 Growers Supply All Rights Reserved. Reproduction is prohibited without permission. STK# DIMENSIONS 104836 14
Moo-Tel Calf Hutch CLEARSPAN ANIMAL HOUSING W x 12 L W x 18 L W x 24 L
 Moo-Tel Calf Hutch Photo may show a different but similar model. 2008 ClearSpan All Rights Reserved. Reproduction is prohibited without permission. STK# DIMENSIONS 102852 14 W x 12 L 102853 14 W x 18 L
Roll In W/L Dock PAGE 1
 Roll In W/L Dock PAGE 1 1 2 3/8 X 1 CARRIAGE BOLT SS 3/8 FLANGE NUT BRASS 3 4 1/2-13 X 1.25 SQ BOLT SS 1/2 SQ NUT BRASS 5 3/8-16 X 2.5" BOLT SS PAGE 2 6 7 BRACE BRKT SINGLE AXLE TUBE 8 9 3" AXLE WASHER
CONSTRUCTION GUIDE 21ft Wide and 24ft Wide SHEEP HOUSE
 The Outside, Inside CONSTRUCTION GUIDE 21ft Wide and 24ft Wide SHEEP HOUSE Thank you for purchasing a Premier Sheep House. Please take the time to carefully read through this Construction Guide before
Chapter 23. Garage Construction
 Chapter 23. Garage Construction 23.1 ESTABLISHING CHALK LINES 23.2 MEASURING AND CUTTING WALL PLATES 23.3 MARKING WINDOW & DOOR LOCATIONS ON EXTERIOR WALL PLATES 23.4 MARKING STUDS ON EXTERIOR WALL PLATES
ClearSpan Open Garages
 ClearSpan Open Garages Photo may show a different but similar model. 2007 ClearSpan All Rights Reserved. Reproduction is prohibited without permission. STK# PB02910R4 DIMENSIONS 18' W x 16' H x 52' L YOU
14 x 14 super quad. VISIT LINK BELOW FOR INSTALL VIDEO
 in-ground installation instructions & user guide 14 x 14 super quad VISIT LINK BELOW FOR INSTALL VIDEO https://www.maxairtrampolines.com/pages/support-information-videos Page 2 TABLE OF CONTENTS Materials,
Garage-in-a-Box SUV/Truck 13' x 20' x 12' Peak Style Shelter Assembly Instructions
 Garage-in-a-Box SUV/Truck 13' x 20' x 12' Peak Style Shelter Assembly Instructions Description Model # Garage-in-a-Box SUV/Truck 13' x 20' x 12' - Green 62694 Recommended Tools Please read instructions
Classic Roll Tarp. Installation Instructions. Attention Dealers: Please give this owners manual to the customer when the product is delivered.
 Serving the Truck & Trailer Industry Since 1944 Classic Roll Tarp Attention Dealers: Please give this owners manual to the customer when the product is delivered. Call 800-535-9545 www.aeroindustries.com
GrowSpan Round Premium Corrugated Greenhouses
 GrowSpan Round Premium Corrugated Greenhouses Photo may show a different but similar model. 2018 Growers Supply All Rights Reserved. Reproduction is prohibited without permission. STK# DIMENSIONS 104933
INSTALLATION INSTRUCTIONS LS X 12-2 X 7 1/2 FRAME LOAFING SHED
 INSTALLATION INSTRUCTIONS LS-30 30 X 12-2 X 7 1/2 FRAME ACTUAL FRAME BASE SIZE: 30 X 12-2 LOAFING SHED Our unique assembly process quickly transforms the individual pieces into a finished structure that
WOLF LOOM DOUBLE BACK BEAM
 WOLF LOOM DOUBLE BACK BEAM Assembly Instructions Find out more at schachtspindle.com Schacht Spindle Company 6101 Ben Place Boulder, CO 80301 p. 303.442.3212 f. 303.447.9273 2017 Schacht Spindle Company,
50 W ide. Future Trac G able E nd. Installation Instructions AIGE
 G able E nd W ide TopTec Products, LLC 7601 Highway 221 Moore, SC 29369 Phone: (800) 845-2830 Fax: (800) 921-77 e-mail: sales@toptecproducts.com www.toptecproducts.com AIGE 2003915 General Information
METHOD STATEMENT FOR THE CONSTRUCTION OF LIGHTWEIGHT HALLS
 METHOD STATEMENT FOR THE CONSTRUCTION OF LIGHTWEIGHT HALLS General The exact position of the structure has to be established. Please note that the difference in height must not exceed 1.5% in longitudinal
PORTA-DOCK, INC. AP17 APD DS 4 X 16 T12 AW17 CPD DS 4 X 16 T12
 Page 1 of 7 PORTA-DOCK, INC. AP17 APD DS 4 X 16 T12 AW17 CPD DS 4 X 16 T12 *For Beige Decking Add the Letter B to Model* Thank you for purchasing out product! *Please read these instructions and follow
INS T A L L A TIO N INS T R U C TIO N S. Ceiling Mount Track System
 Ceiling Mount Track System 10.26.2016 Specifications Ceiling Post: Unassembled 2-7/8 Assembled 1-11/16 7/8 7-9/16 5-7/8 3/8 2 Tubes 1/2 2-3/8 5 Parts and Tools Tools Needed Tape Measure Pencil Drill with
Congratulations! Your dog is going to love you!
 DIY INSTRUCTIONS Congratulations! Your dog is going to love you! Thank you for ordering your non-electric dog fence kit from Pet Playgrounds. In less than a day you will have your very own personal dog
INSTALLATION INSTRUCTIONS CHAIN-LINK FENCE AND GATE
 INSTALLATION INSTRUCTIONS CHAIN-LINK FENCE AND GATE 1 BEFORE YOU START, IT S IMPORTANT TO CHECK......That fence footings do not exceed legally established property lines. If uncertain, refer to real estate
INSTALLATION INSTRUCTIONS SUBURBAN SERIES CARPORT 25 X 20 X 6 LENGTH CAN BE EXTENDED IN 4 1/2 INCREMENTS HEIGHT CAN BE EXTENDED IN 1 INCREMENTS
 INSTALLATION INSTRUCTIONS SUBURBAN SERIES CARPORT 25 X 20 X 6 LENGTH CAN BE EXTENDED IN 4 1/2 INCREMENTS HEIGHT CAN BE EXTENDED IN 1 INCREMENTS BASIC FRAME SIZES (NO EXTENSIONS): 25-1/2 X 18' x 6 EAVE
6a. Eight Steps to Chain-Link Fence Installation
 6a. Eight Steps to Chain-Link Fence Installation Before You Start You will need the following tools to install your chain-link fence: Post hole digger Wheelbarrow, shovel and hoe for mixing concrete Tape
22'W x 13'H Peak Style Shelter Frame Assembly Instructions
 22'W x 13'H Peak Style Shelter Frame Assembly Instructions Recommended Tools Please read instructions COMPLETELY before assembly. This shelter MUST be securely anchored. THIS IS A TEMPORARY STRUCTURE AND
10 x 12 home air pro. VISIT LINK BELOW FOR INSTALL VIDEO
 in-ground installation instructions & user guide 10 x 12 home air pro VISIT LINK BELOW FOR INSTALL VIDEO https://www.maxairtrampolines.com/pages/support-information-videos Page 2 TABLE OF CONTENTS Materials,
GrowSpan Gothic Pro Greenhouses and Systems
 GrowSpan Gothic Pro Greenhouses and Systems Photo may show a different but similar model. Film Cover with Film Roll-Up Side Panels 2016 Growers Supply All Rights Reserved. Reproduction is prohibited without
Extrusions POLYLOCK ATTACHING EXTRUSIONS
 Extrusions POLYLOCK ATTACHING EXTRUSIONS ITEM # DESCRIPTION USES 1001 Aluminum Girt 16 lengths Used in metal end packages and sidewalls as horizontal members. Requires girt/baseboard splice (#1000). 1000
Blokes Shed INSTALLATION INSTRUCTIONS Custom Design & Build. Nationwide Delivery
 Blokes Shed 10 Year Guarantee On Sanders workmanship Made in NZ Using NZ timber supplies 40+ Years Experience In business since 1975 Professional Install Available NZ wide Nationwide Delivery Available
ClearSpan 38' Wide Aircraft Hangar
 ClearSpan 38' Wide Aircraft Hangar Photo may show a model of a different length. 2008 ClearSpan All Rights Reserved. Reproduction is prohibited without permission. STK# DIMENSIONS 107556 38' W x 15' H
Clearview Railing System Installation Instructions
 Clearview Railing System Installation Instructions Disclaimer: AGS Stainless, Inc. has its Clearview Railing Systems designed by a professional engineer to meet the requirements of the latest national
Installation Manual. Solid Plastic Toilet Partitions. IN CANADA & AREAS OTHER THAN U.S.A.: IN THE U.S.A.:
 Installation Manual Solid Plastic Toilet Partitions Toilet Partitions & Lockers IN THE U.S.A.: Hadrian Inc., 7420 Clover Avenue, Mentor, OH 44060 Telephone: 440-942-9118 Fax: 440-942-9618 U.S. toll free
ClearSpan Super Moo-Tel Building 26' Wide
 ClearSpan Super Moo-Tel Building 26' Wide Photo may show a different but similar model. 2012 ClearSpan All Rights Reserved. Reproduction is prohibited without permission. STK# PB01500R3/R4 PB01510R3/R4
CONTENTS TOOL LIST U P S I D E I N N O V A T I O N S, L L C RAMP AND STEP SYSTEM ASSEMBLY INSTRUCTIONS. Revised: June 2013
 U P S I D E I N N O V A T I O N S, L L C RAMP AND STEP SYSTEM ASSEMBLY INSTRUCTIONS TOOL LIST Required Tools: - Reciprocating Saw with Metal Cutting Blade - Drill - 7/16 Drill Bit for Metal Drilling -
MOBILE POLE FOR A HAM RADIO ANTENNA By Cordell Vail KE7ZBQ
 MOBILE POLE FOR A HAM RADIO ANTENNA By Cordell Vail KE7ZBQ I wanted to build a mobile pole for my 2 meter J-pole Ham Radio antenna so I could take it with me anywhere I needed to go in an emergency. Here
Clopay Models 835/837 Sliding Door System Installation Guide
 Clopay Models 835/837 Sliding Door System Installation Guide The aim of this instruction is to guide you through the process of construction and fitting of Sliding Doors. Due to the number of sizes available
8' x 22' Cash Hut INSTALLATION INSTRUCTIONS
 PARTS IST J I G A A J I C F D E B B K H A A K H G A Posts w/ Feet (4pcs) J eft End Panels (Front & Back) [4'3"x7'8"] (2pcs) B 22' Peak Trusses (2pcs) K Right End Panels (Front & Back) C 8' Centre Truss
Sunhouse. Assembly Manual
 Sunhouse Assembly Manual Thank you for your purchase of this sunhouse. Sunhouse Assembly Manual This manual is designed to simplify the assembly process, however we recommend having an experienced carpenter
GrowSpan Gothic Pro Greenhouses and Systems
 GrowSpan Gothic Pro Greenhouses and Systems Photo may show a different but similar model. 2016 Growers Supply All Rights Reserved. Reproduction is prohibited without permission. STK# DIMENSIONS 106314
GrowSpan Gothic Pro Greenhouses and Systems
 GrowSpan Gothic Pro Greenhouses and Systems Photo may show a different but similar model. 2017 Growers Supply All Rights Reserved. Reproduction is prohibited without permission. STK# DIMENSIONS 106306
GrowSpan Gothic Premium Greenhouses
 GrowSpan Gothic Premium Greenhouses Photo may show a different but similar model. 2016 Growers Supply All Rights Reserved. Reproduction is prohibited without permission. STK# DIMENSIONS 106209 16' W x