Walk-in Greenhouse. Assembly instructions. 8x6. 8x8. 8x10. 8x12. Model GH1399A Model GH1400A. Model GH1402A Model GH1403A. Model GH1405A Model GH1406A
|
|
|
- Bryce Ryan
- 5 years ago
- Views:
Transcription


1 Assembly instructions 8x6 Model GH1399A Model GH1400A 8x8 Model GH1402A Model GH1403A 8x10 Model GH1405A Model GH1406A 8x12 Model GH1408A Model GH1409A Walk-in Greenhouse
2 Statement Dear Customer! May we congratulate you on your new Greenhouse. We feel sure that by following the detailed assembly instructions you will find as much pleasure in actually building the greenhouse as the time you will spend in your greenhouse in the future. The assembly instructions mainly consist of detailed illustrations and no specific technical knowledge is required for the assembly of the greenhouse. The house is packed in one carton and contains all of the sheets of polycarbonate, frames and fittings, excluding the base. All of the aluminum profiles are marked with a part number corresponding to the numbers given on the drawings and in the parts list. Nuts, bolts and fittings will be found in the relevant package. All of the rear gable section frames are in package No.1 All of the front gable section frames are in package No.2 All of the side wall section frames are in package No.3 All of the roof section frames are in packing No.4 All of the frames and components for the window are in package No.5 All of the frames and components for the door are in package No.6 The sheets of Polycarbonate are not marked with a part number, but the sizes appear in the overview. When fitting the Polycarbonate, the side with the opal film/text must turn outward. Accessories We offer a wide range of accessories which contribute to a better yield and make life easier for the gardener. A selection of the range is shown in the supplements to these instructions. Your dealer will be pleased to assist you with further information. Winter Protection In areas where snow might be expected we recommend the following in order to protect your greenhouse: 1.Support the ridge at the center of the greenhouse. 2.Remove larger snow loads. 3.Take precautions against snow dropping, for instance from a roof. Complaints We put severe demands on quality to secure that you get a faultless product. However, should a problem occur, we kindly ask you to contact the dealer from whom you have bought the greenhouse. For a quick service, you should specify the extent of the defect by means of the parts list in the assembly instructions. Please also note the model number which is stamped on the front page of these instructions. Insurance Not all insurance companies automatically cover greenhouses. We recommend you contact your insurance company to ensure that you are covered. Foundation It cannot be stressed enough that the creation of a secure level foundation is the most important first step. It is also crucial for the long term use and life of your greenhouse. Any uneveness in the foundation will make assembly troublesome. It may also cause stresses in the structure of the greenhouse frame. Resulting glazing cracks or doors and windows becoming stiff to open and close. Time taken now is well spent. Foundation could be in concrete, brick, or paving slabs all of which you will need to source, or ask our local fitters to provide. This could be across the entire floor area or just as footings around the outside. We recommend purchasing a Lacewing deluxe base which will add strength and support to your greenhouse.


3 Caution Remove approximately 2 inches of film from all sheet edges before installing. Remove all film immediately after the constructions is completed. The UV-protected side of the sheet is covered with opal white film and must face towards the sun. Please put on gloves to avoid cutting your hands. Dropping the frame may damage the structure and will no longer fit properly. Keep sharp instruments away from the polycarbonate sheets. Tips Read the instructions completely before starting to assemble. Construct the base first so that the greenhouse can be securely mounted when completed. Find someone to help you: This is not very heavy work so would suit most able-bodied people. Allow plenty of time: If you have never built a greenhouse before, it can take most of a day to carefully complete the construction. Lay out all the parts of the greenhouse and check that all of the parts are present before commencing construction. Lay on cloths or plastic sheets if there is any risk of scratching the parts. Assemble the greenhouse loosely where possible and tighten when all in place so that minor adjustments can be made. Note that some nuts will need to be tightened to keep them in place. Check the frame is square and using a spirit level to check that it is upright.


4 Base length Product Code Part No. width a2 m7 GH1399A GH1400A GH1402A GH1403A m Steel Base GH1405A GH1406A GH1408A GH1409A length Product Code Part No. width m5 a2 GH1399A GH1400A GH1402A GH1403A m Concrete GH1405A GH1406A GH1408A GH1409A Product Code Width X Length Y Product Code Width X Length Y GH1399A GH1400A GH1399A GH1400A / 4 GH1402A GH1403A GH1402A GH1403A GH1405A GH1406A GH1405A GH1406A / 5 GH1408A GH1409A GH1408A GH1409A / 5


5 Base The top left illustration on page 4 shows length and width marked with X and Y. Part no.m5 shows a bracket used to secure the inside base. Prior to the assembly of the greenhouse, you should have a 10 mm socket, 10 mm adjustable spanner, Philips screwdriver, spirit level and also a spray window cleaner.


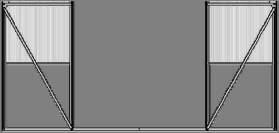
6 Polycarbonate sheet A C1 C1 B B I1 H1 I1 G1 p6 p6 p6 A E1 E1 A p6 B B A p6 F F F p6 p6 p6 D D p6 p6 p6 p6 Size GH1399A GH1402A GH1405A GH1408A GH1400AGH1403AGH1406AGH1409A A 610x1190/ B 610x C1 602x0/ D 610x E1 610x533/ p6 F 610x G1 610x H1 606x I1 610x p p6 This page shows the positioning of the polycarbonate panels for the front and rear gable as well as the roof and sides. It also indicates where the parts No.p6 is used. When fitting p6 consider using some window cleaner spray this will make the strips slide on with ease and rapidly dry out leaving no residue. No.p6 must be fitted on both ends of polycarbonate in advance before polycarbonate can be inserted into the aluminum frame. To convert the size of the panels from mm to inches, divide by 25.4.
7 The list of the section SectionPart No. Profile Size GH1399A GH1402A GH1405A GH1408A GH1400A GH1403A GH1406A GH1409A Section Part No. Profile Size GH1399A GH1402A GH1405A GH1408A GH1400A GH1403A GH1406A GH1409A R E A R R O O F F R O N T V E N T a1 M6x S I D E W A L L D O O R a2 M a3 M6x a4-4.2x a5-3.5x a6-3.5x a7-4x a8 M6x a9 M6x p p m m m m m n p p p p FLUFF
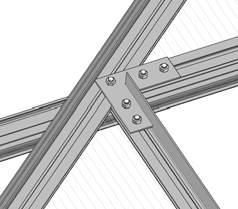
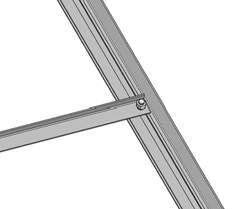
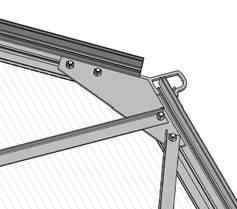
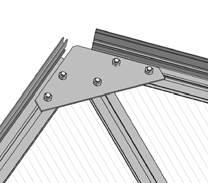
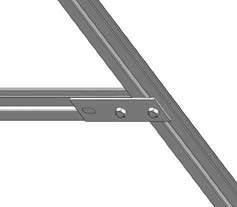
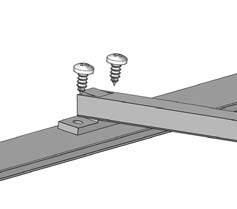
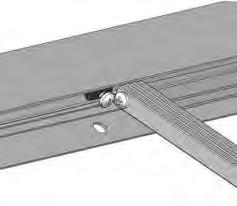
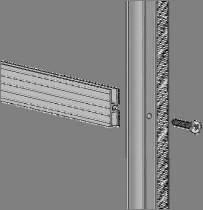
8 Rear Gable With this page, you will assemble the rear gable (back). It is far easier if you have an elevated surface such as big size of plywood on a sawhorses. If not, lay the aluminum profiles out on a hard surface as shown in the main illustration. Remember you are building from the inside with the outside facing down. Start with one of the A panels and build the aluminum around the polycarbonate panel. the polycarbonate side with the opal film/text must facing down. If you feel difficult, you could fix aluminum frame at first, then sliding A panels into aluminum frame channels from bottom, that will be easier. Square No.1 This is the left corner. The square headed bolt slides into the channel in part #161 and is locked into place with a nut on part #024. Square No.4 Part #p2 is the gray plastic spacer which gives the angle between parts #169 and #161. Please adjust #m2 in order to match #082 and #011 well. Don t forget to leave extra bolts in parts #041, #042 and #044, #049 for later use. #041 will share square head bolt #a1 with #082 or #011 and #024. #042 will share square head bolt #a1 with #082 or #011 and #024 also. #044 need 2 extra bolts #a1 for connecting #082 later. Do the same for the opposite end. Square No.7 Once plate #m2 is placed on bolts, attach part #082 and tighten. You may have to loosen the bolts holding plate #m2 when fitting the gutter in later. Do the same for the opposite end. Square No.9 If you cannot get part #m1 to fit into the bolts, spread the angle apart or push it together. It will fit. You may have to loosen the bolts holding plate #m1 when fitting the ridgepole in later. When finished with the back gable, stand it up out of the wind so it will not blow over.


9 Rear Gable Package No a1 a2 p1 p2 m1 m2 m3 mm M6x10 M6 GH p m E1 E1 049 m A A D D E1 169 E1 4 7 p6 p6 p6 p A D D A m2 p m2 p
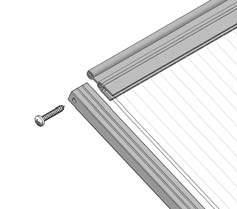
10 Front Gable This page refers to the front gable. It is similar to the rear gable with the exception of the door. It does not have a panel in the center where the door will eventually cover. All the steps are very much like the rear gable with a few exceptions. Square No.2&3 Make sure the vertical flange of part #131 & #132 is toward the center. Square No.7 The bolt #a3 is an extra long stainless bolt. Part #142 is below part #167 and #168. The bolt slides into part #142 and extends through parts #167 & #168. Adjust the #m4 before tightening the bolts on part #142. Once you have finished the front and rear gable, you will find the remaining assembly considerably easier.


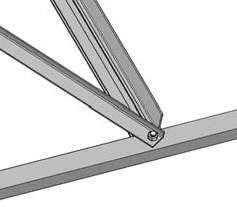
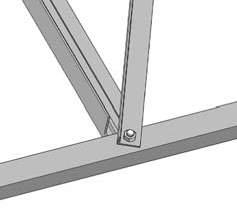


11 Front Gable Package No a1 a2 a3 p1 p2 m1 m2 m3 m4 p6 mm M6x10 M6 M6x GH a a3 167 m4 131 a1/a2 a3/a m m1 m A C C A A p2 m p2 m C1 C1 A p6 p6
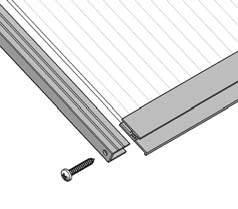
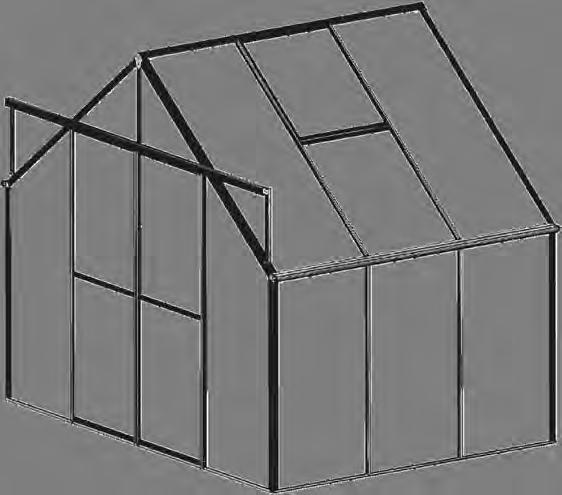
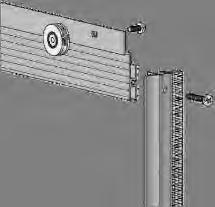
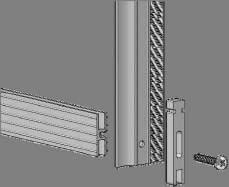
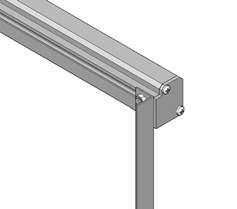
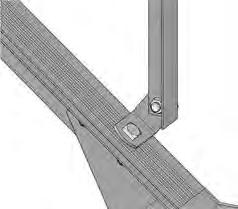
12 Side wall Now you are ready to assemble the sections of the greenhouse. Square No.1 You are now attaching the ridgepole #071 to the gables. This is where you may have to adjust the bolts in plate #m1 to fit the pole into the gable. Square No.2 This may also require some adjusting of the corner plates, however it will fit very precisely if done properly. If you find you cannot slide the part #061 in far enough for the bolt to fit the slot, it may be the corner plate blocking. Use a flat screwdriver to edge the corner plate away from part #161 in order to allow the part #061 to slide all the way in. Square No.3 This can be the most frustrating part of the assembly, or it can be one of the easiest. This is where you will use an open-end 10 mm wrench. Because of the tight corner, it is difficult to work with the nut driver. Once you have attached part side sill, front sill, rear sill beam or p6 to side corner bar part #161, slide the bolt with the nut partially on up side corner bar part #161. Bring the corner together and slide the bolt down into the slot. Tighten with the openend wrench. Square No.4 & No. 5 Make sure the trough of the part #061. You may have to have someone to help you while you assemble. Connect part #031 at the trough of the part #061 & Part #022 with bolt #a1 and nut a2. Do the same on the opposite side. Note: Please add extra bolt into #031 channel for eave cantilever #253 use in advance. Then slide the side panel F with p7 on both ends into the channel of part #031 and part #161, extend to the bottom of side sill beam part #022.


13 Side wall Package No a1 a2 p6 mm M6x10 M6 592 GH1399A GH1400A GH1402A GH1403A GH1405A GH1406A GH1408A GH1409A m1 061 m p7 p7 p7 F F F p7 F p7 p7 p7 F 022 p7
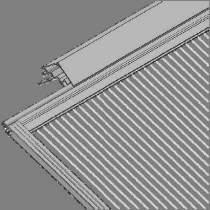
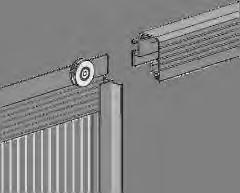
14 Roof Put window in place before inserting part #033. After window in place, don t forget inserting #p3 into the both sides of window through ridgepole #071 channel to fix window later. The part #033 Beside window with one more bolts #a1. for part #045 use later. Square No.1 & No.2 Insert two bolts into part #033, connect part #033 at the trough of the ridgepole #071 & part #061. Do the same on the opposite side. Very important: Bolts need to be slid into each roof bar #033 in advance, one for the ridge cantilever, one more bolt to attach the hanging basket rail #016,one more bolt is needed to attach the eave cantilever bracing between the roof and the side. Please note: At this stage you will need to insert an extra bolt into each bar either side of a vent opening. If you haven t already done so you need to decide now where your roof vents are positioned so that you can work out the number of bolts in each bar #033. Slide the roof panel #I1 & #G1 directly into the frame from the bottom. Square No.3 When the roof panel and side panel in place, use part #062 to cover part #061 with bolts #a8.


15 Roof Package No a1 a2 a8 1 mm M6x10 M6 M6x15 GH1399A GH1400A GH1402A GH1403A GH1405A GH1406A GH1408A GH1409A m I1 G1 I a8/a2 Downpipe kits is an optional extra and is not included in the price. P8 P0 P0 P8 P9 M0 P1 P0 P2 a11 a2 mm M6x25 M6 GH P9 M0 a11/a2
16 Window Square No.1 When mounting part #051 onto part #044,the left post should be directly in line with the center of the window. Square No.3 and 4 When assembling the window using screw #a5, it is essential to use a lubricant on the screws. A power screwdriver here is almost too much force, as it is easy to strip the heads. If possible turn the screws in by hand. Square No.5 The push rod should be mounted so the handle extends up. Square No.6 The completed window slide into the ridgepole which act as a self-hinge. Square No.8 Part #p3 is plastic barrel shaped piece that is used on either side of the window to keep it from moving side to side. The screw #a4 will expand the plastic and hold it firm.


17 Window Package No m3 a1 a2 a4 a5 a9 p3 mm M6x10 M6-4.2x x19 M6x10 - GH GH1399A GH1402A GH1405A GH1408A GH1400AGH1403AGH1406AGH1409A Window No m3 a1/a2 a1/a a H a5 a p3/a4 p1
18 Door Square No. 2 The roller #n1 was fixed on the part #271 with a7 screw. Square No.3 & 4 When assembling the door, use the same lubricant for the screws. Do not forget the plastic door glides for bottom when assembling the door. Square No.6 #142. Part #P5 is a stop so the door will not drop out the end of part Square No.7 Bolt #a3 is an extra long steel bolt designed to extend through part #167 & #168. Square No.7 Part #091 is a vertical post used at the end of part #142 to keep it level. Loosen #m4 to adjust the #142 in suitable place in order to keep door sliding space. Adjust #p4 to make door sliding smoothly. Your greenhouse should now be completed. Make sure you anchor it to the foundation as soon as you can. As it will catch the wind. If you have further questions or need help assembling your greenhouse. Please call your local dealer.


19 Door Package No p4 p5 m6 a1 a2 a3 a5 a6 a7 n1 FLUFF mm M6x10 M6 M6x16-3.5x19-3.5x25-4x GH FLUFF n1 a a6 B B a6 111 p4 a6 B 181 B p a1/a2 a5 091 a1/a2 m6 a3/a2
20 The list of parts Description GH1399A GH1402A GH1405A GH1408A GH1400AGH1403AGH1406AGH1409A 1 Rear gable Front gable Side wall Roof Vent Door Base connector Polycarbonate panels Tools Assembly Instruction
Walk-in Greenhouse. Assembly instructions. 6x4. 6x6. 6x8. Model GH0490 Model GH0491 Model GH1040. Model GH0492 Model GH0493 Model GH1041
 ssembly instructions x4 Model GH0490 Model GH049 Model GH040 x Model GH049 Model GH049 Model GH04 x Model GH0494 Model GH049 Model GH04 Walk-in Greenhouse Statement Congratulations on purchasing your new
W6 series greenhouse
 W series greenhouse ssembly instructions Model W0 Model W07 Model W0 Model W Model W Walk-in Greenhouse Statement Dear Customer! May we congratulate you on your new Greenhouse. We feel sure that by following
Assembly instructions. 6x4. Model GH1354A. 6x6. Model GH1357A. 6x8. Model GH1360A. 6x10. Walk-in Greenhouse. Model GH1363A
 ssembly instructions x Model GH x Model GH7 x8 Model GH0 x0 Model GH Walk-in Greenhouse Statement ear Customer! May we congratulate you on your new Greenhouse. We feel sure that by following the detailed
Walk-in Greenhouse. Assembly instructions A B. MODEL A (mm) B (mm) C (mm) / / 2. Hobby / / 16
 B (mm) C (mm) / / 2. Hobby / / 16") ssembly instructions C MODEL (mm) (mm) C (mm) Hobby Passion 689 8 9 7 / 8 3666 5 / 6 438 4 4 / 4 7 0 5 / 6 Walk-in Greenhouse Climapod ssembly Tips and Tricks Prior to the assembly of the greenhouse, you
ssembly instructions C MODEL (mm) (mm) C (mm) Hobby Passion 689 8 9 7 / 8 3666 5 / 6 438 4 4 / 4 7 0 5 / 6 Walk-in Greenhouse Climapod ssembly Tips and Tricks Prior to the assembly of the greenhouse, you
Greenhouse Assembly Instructions
 Greenhouse Assembly Instructions Our Help Line provides support and advice to customers of Summer Garden Buildings after ordering. For advice before you buy you can phone us free 7 days a week on 0800
Gardman Lean-to Greenhouse Assembly Instructions
 Page 1 Gardman Lean-to Greenhouse Assembly Instructions Our Help Line provides support and advice to customers of Summer Garden Buildings after ordering. For advice before you buy you can phone us free
LAWN AND GARDEN GREENHOUSE
 MODELS# OG0AL8-BKE OGAL-8 OGrow Walk-in ' x 8' LAWN AND GARDEN GREENHOUSE With Heavy Duty Aluminium Frame MANUAL VERSION # Grow r! e h t e g To Let's Thank you for purchasing the OGROW greenhouse Follow
LAWN AND GARDEN GREENHOUSE
 MODEL# OGAL-66 OGrow Walk-in 6' x ' LAWN AND GARDEN GREENHOUSE With Heavy Duty Aluminium Frame Let'sGrow Together! Thank you for purchasing the OGROW greenhouse Follow the assembly and safety instructions
Greenhouse 05 Assembly Instructions 6 x8, 6 x6 and 6 x4
 Greenhouse 05 Assembly Instructions 6 x8, 6 x6 and 6 x4 x1.93m) 6 Introduction Safety Precautions are required when assembling a greenhouse. The wearing of protective gloves and stout footwear is essential
8 X 8 Extension ASSEMBLY INSTRUCTIONS TO BE USED IN CONJUNCTION WITH 8 WIDE INSTRUCTUIONS ISSUE: 2
 8 X 8 Extension ASSEMBLY INSTRUCTIONS TO BE USED IN CONJUNCTION WITH 8 WIDE INSTRUCTUIONS ISSUE: 2 Dear Customer, Thank you for ordering your new HERCULES II greenhouse extension from us. We hope you find
Extension Standard building 03/15
 Extension Standard building 03/15 8 Wide Evolution Extension Assembly Instructions Contents: Introduction Base Preparation Overview Base Assembly Side Assembly Front Assembly Extension Installation Rear
 SUPREME WALL GARDEN ASSEMBLY INSTRUCTIONS 24/08/16 www.hallsgreenhouses.com Please refer to website for the most up to date instructions. SAFETY WARNING 1. Always wear protective glasses, shoes, gloves
S H E D A S S E M B L Y I N S T R U C T I O N S
 T I T A N R A N G E S H E D A S S E M B L Y I N S T R U C T I O N S 6 X 4ft = 190 x 150 cm 6 X 6ft = 190 x 190 cm 6 X 8ft = 190 x 255 cm COMPONENT LIST Component illustrations are given as a visual guide
Titan 79 EB Greenhouse Assembly Instructions
 Titan 9 EB Greenhouse Assembly Instructions Model Titan 9 EB Hunkin Garden Products Ltd sales@hunkin.co.nz www.hunkin.co.nz Ph 0800 8 Dear Customer! Thank you for purchasing one of our greenhouses. We
GRANDIO G R E E N H O U S E S. Model GRA-812BR-GR. 8x12 GRANDIO ELITE GREENHOUSE USER MANUAL
 GRANDIO G R E E N H O U S E S Model GRA-8BR-GR 8x GRANDIO ELITE GREENHOUSE USER MANUAL 03 Grandio Greenhouses, Backyard Living Source Inc. All rights reserved GRANDIO G R E E N H O U S E S IMPORTANT! PLEASE
S H E D A S S E M B L Y I N S T R U C T I O N S
 T I T A N R A N G E S H E D A S S E M B L Y I N S T R U C T I O N S 8 X 10 ft Approx = 2550 x 3140 cm COMPONENT LIST Component illustrations are given as a visual guide only and are not in proportion PART
E N G L I S H GARDEN SHED. Assembly Instructions. Suitable for Models WITH VARYING DEPTHS
 GARDEN SHED Assembly Instructions Suitable for Models 6' Wide 8' Wide 0' Wide WITH VARYING DEPTHS GI0003 November 0 INSTALLATION ADVICE It's Not That Difficult! The construction of your shed isn't as complicated
Version 2016_1.1 VICTORIAN ASSEMBLY INSTRUCTIONS. Victorian Vi-23, 34, 36
 Version 2016_1.1 VICTORIAN ASSEMBLY INSTRUCTIONS Victorian Vi-23, 34, 36 PRODUCT INFORMATION Dear customer, Thank you for buying a high-quality aluminium greenhouse. REMARKS The drawings in these instructions
GROWING BETTER THROUGH DESIGN. 6ft Lean-To LEAN-TO. Assembly Instructions 04/02
 GROWING BETTER THROUGH DESIGN 6ft Lean-To LEAN-TO Assembly Instructions 04/02 6ft Lean-To Greenhouse Base Plan Introduction/Tools/Contents / / Contents This is a copy of our Lean-To greenhouse base plan.
IMPORTANT!!! ASSEMBLY ASSEMBLY INSTRUCTIONS. (Internal Dimensions)
") ASSEMBLY ASSEMBLY INSTRUCTIONS (Internal Dimensions) Ent Spec Edition Ltr v-0- Overall dimensions including base: 7. L x 9 W x 0 H cms 97.5" L x 7" W x 8.7" H IMPORTANT!!! Please read these instructions
ASSEMBLY ASSEMBLY INSTRUCTIONS (Internal Dimensions) Ent Spec Edition Ltr v-0- Overall dimensions including base: 7. L x 9 W x 0 H cms 97.5" L x 7" W x 8.7" H IMPORTANT!!! Please read these instructions
12 Wide Evolution Cedar Partition Assembly Instructions
 06/13 12 Wide Evolution Cedar Partition Assembly Instructions Contents: Introduction Base Preparation Side Assembly Glazing Door Installation Frame Finishing Section - 1 2 3 4 5 Page 3 4 5-6 7 8-9 10-14
Zero Threshold TM. Hints and Tips Handbook. Birdlip. Burford. Blockley. Bourton
 Birdlip Burford Zero Threshold TM Hints and Tips Handbook Blockley www.edengreenhouses.com Bourton Customer Helpline: +44 (0)1242 676625 Mon Fri 9:00am 5:00pm mail@eden greenhouses.com EH 1.02 Dear Customer,
ASSEMBLY INSTRUCTIONS
 GARDEN SHED 6X5ft B/C 9400988362649 GARDEN SHED 6X7ft B/C 9400988362656 GARDEN SHED 6X9ft B/C 9400988362663 GARDEN SHED 6X1 B/C 9400988362670 111 ft ASSEMBLY INSTRUCTIONS Product specifications may change
Extension Standard building 10/14
 Standard building Extension 10/14 8 Wide Victorian Cedar Greenhouse Extension Assembly Instructions Contents: Introduction Base Preparation Overview Base Assembly Side Assembly Frame Assembly Door Installation
GRANDIO G R E E N H O U S E S. Model GRA-88-GR Shown In Image GREENHOUSE USER MANUAL
 GRANDIO G R E E N H O U S E S Model GRA-ASC-88 / GRANDIO 8X8 ASCENT Model -GR Shown In Image GREENHOUSE USER MANUAL 013 Grandio Greenhouses, Backyard Living Source Inc. All rights reserved August 1, 01
Clopay Models 835/837 Sliding Door System Installation Guide
 Clopay Models 835/837 Sliding Door System Installation Guide The aim of this instruction is to guide you through the process of construction and fitting of Sliding Doors. Due to the number of sizes available
8 x 10 GREENHOUSE. Visit our website at:
 8 x 10 GREENHOUSE With Two Vents 9390 Assembly Instructions Visit our website at: http://www.harborfreight.com Read this material before using this product. Failure to do so can result in serious injury.
8 Wide Evolution Cedar Partition Assembly Instructions
 09/13 8 Wide Evolution Cedar Partition Assembly Instructions Contents: Introduction Overview Base Preparation Partition Frame Assembly Glazing Door Installation Parts List Section - 1 2 3 4 5 Page 3 4
GRANDIO G R E E N H O U S E S GRANDIO ASCENT 8x12, 8x16, 8x20, 8x24 KIT MANUAL INCLUDES INSTRUCTIONS FOR BACK DOOR TRANSFORMATION
 GRANDIO G R E E N H O U S E S 05 GRANDIO ASCENT 8x, 8x6, 8x0, 8x4 KIT MANUAL INCLUDES INSTRUCTIONS FOR BACK DOOR TRANSFORMATION Grandio Ascent 8x4 Shown In Image GREENHOUSE USER MANUAL 03 Grandio Greenhouses,
WARNING Please refer to all safety notices in the greenhouse manual before assembling any of the sections
 Billy Oh Rosette Green House Assembly Hints and Tips WARNING Please refer to all safety notices in the greenhouse manual before assembling any of the sections TOP TIPS 1. These instructions are generic
Orion. English Garden VITAVIA 6' x 6'(3800) and 6' x 8' (5000) These revised instructions replace the original instructions provided in the kit.
 and 6' x 8' (5000) These revised instructions replace the original instructions provided in the kit.") 6' x 8' Orion English Garden VITAVIA 6' x 6'(3800) and 6' x 8' (000) These revised instructions replace the original instructions provided in the kit. 7979 State Route 36 Mount Vernon, WA 9873-369 Ph.
6' x 8' Orion English Garden VITAVIA 6' x 6'(3800) and 6' x 8' (000) These revised instructions replace the original instructions provided in the kit. 7979 State Route 36 Mount Vernon, WA 9873-369 Ph.
GRANDIO G R E E N H O U S E S GRANDIO ELITE 8x12, 8x16, 8x20, 8x24 KIT MANUAL INCLUDES INSTRUCTIONS FOR BACK DOOR TRANSFORMATION
 GRANDIO G R E E N H O U S E S 05 GRANDIO ELITE 8x, 8x6, 8x0, 8x4 KIT MANUAL INCLUDES INSTRUCTIONS FOR BACK DOOR TRANSFORMATION Grandio Elite 8x4 Shown In Image GREENHOUSE USER MANUAL 03 Grandio Greenhouses,
GRANDIO G R E E N H O U S E S GRANDIO ELITE 8x12, 8x16, 8x20, 8x24 KITS. Grandio Elite 8x24 Shown In Image GREENHOUSE USER MANUAL
 GRANDIO G R E E N H O U S E S 05 GRANDIO ELITE 8x, 8x6, 8x0, 8x4 KITS Grandio Elite 8x4 Shown In Image GREENHOUSE USER MANUAL 03 Grandio Greenhouses, Backyard Living Source Inc. All rights reserved 05
GRANDIO G R E E N H O U S E S 2016 GRANDIO ELEMENT WITH BASE KIT 6X4, 6X8 & 4 EXTENSION KIT MANUAL
 GRANDIO G R E E N H O U S E S 06 GRANDIO ELEMENT WITH BASE KIT 6X, 6X8 & EXTENSION KIT MANUAL Grandio Element 6x8 with Base Kit Shown In Image GREENHOUSE USER MANUAL 05 Grandio Greenhouses, Backyard Living
gabriel ash essential range
 gabriel ash essential range Dear Customer, Please read ALL these instructions before assembly. The assembly of your new Essential greenhouse requires no technical knowledge. However it is important that
A (mm) B (mm) A (mm) B (mm) 12 x x x ft extension. 8ft extension ft extension ft extension 3720
 B (mm) A (mm) B (mm) 12 x x x ft extension. 8ft extension ft extension ft extension 3720") NOMINAL SIZE A (mm) B (mm) NOMINAL SIZE A (mm) B (mm) 12 x 8 2632 6ft extension 1860 12 x 10 3824 3252 12 x 12 3872 8ft extension 2480 10ft extension 3100-12ft extension 3720 Thank you for purchasing your
NOMINAL SIZE A (mm) B (mm) NOMINAL SIZE A (mm) B (mm) 12 x 8 2632 6ft extension 1860 12 x 10 3824 3252 12 x 12 3872 8ft extension 2480 10ft extension 3100-12ft extension 3720 Thank you for purchasing your
GRANDIO G R E E N H O U S E S GRANDIO ASCENT 8x12, 8x16, 8x20, 8x24 KIT MANUAL INCLUDES INSTRUCTIONS FOR BACK DOOR TRANSFORMATION
 GRANDIO G R E E N H O U S E S 05 GRANDIO ASCENT 8x, 8x6, 8x0, 8x4 KIT MANUAL INCLUDES INSTRUCTIONS FOR BACK DOOR TRANSFORMATION Grandio Ascent 8x4 Shown In Image GREENHOUSE USER MANUAL 03 Grandio Greenhouses,
NOMINAL SIZE A (mm) B (mm)
 B (mm)") NOMINAL SIZE A (mm) B (mm) X 1990 X 8 198 210 X 10 3230 X 12 3850 Thank you for purchasing your new Robinsons greenhouse. We recommend you familiarise yourself with the instructions and read all safety
NOMINAL SIZE A (mm) B (mm) X 1990 X 8 198 210 X 10 3230 X 12 3850 Thank you for purchasing your new Robinsons greenhouse. We recommend you familiarise yourself with the instructions and read all safety
GRANDIO G R E E N H O U S E S. Model GRA-ELI88. 8x8 GRANDIO ELITE GREENHOUSE USER MANUAL
 GRANDIO G R E E N H O U S E S Model GRA-ELI88 8x8 GRANDIO ELITE GREENHOUSE USER MANUAL 03 Grandio Greenhouses, Backyard Living Source Inc. All rights reserved August, 0 Manual Edition GRANDIO G R E E N
NOMINAL SIZE. A (mm) B (mm) 8 X 6 8 X 8 8 X X
 B (mm) 8 X 6 8 X 8 8 X X") NOMINAL SIZE A (mm) B (mm) X 6 1990 X 259 2610 X 10 3230 X 12 350 Thank you for purchasing your new Robinsons greenhouse. We recommend you familiarise yourself with the instructions and read all safety
NOMINAL SIZE A (mm) B (mm) X 6 1990 X 259 2610 X 10 3230 X 12 350 Thank you for purchasing your new Robinsons greenhouse. We recommend you familiarise yourself with the instructions and read all safety
TRIMLINE CANOPY 10' x 20'
 TRIMLINE CANOPY 10' x 20' Instructions for Assembly Video instructions are available on our website! Go to: flourishdisplays.com/instructions or scan this code with your QR Code Reader App for a direct
SteelChief Installation Instructions for pre-assembled panel form sheds GABLE ROOF
 SteelChief Installation Instructions for pre-assembled panel form sheds GABLE ROOF Please read fully before commencing work...any queries will be promptly answered, contact theboss@steelchief.com.aui MPORTANT
GRANDIO GRANDIO ASCENT BACK WALL TRANSFORMATION KIT GRA-ASC-BD BACK WALL TRANSFORMATION USER MANUAL
 GRANDIO G R E E N H O U S E S GRANDIO ASCENT BACK WALL TRANSFORMATION KIT GRA-ASC-BD BACK WALL TRANSFORMATION USER MANUAL 2013 Grandio Greenhouses, Backyard Living Source Inc. All rights reserved August
GrowSpan Estate Pro I Greenhouse
 GrowSpan Estate Pro I Greenhouse Photo may show a different but similar model. 2016 Growers Supply All Rights Reserved. Reproduction is prohibited without permission. STK# DIMENSIONS 104564 11'-8" W x
Sunrise Deck Assembly Instructions for Kingston Left
 Sunrise Deck Assembly Instructions for Kingston Left It s easiest to build the deck frame first like it will be lying on its back and then after all 4 legs and horizontals are in place, tip the deck toward
Modular Shelter Breezeway Assembly Instructions
 Modular Shelter Breezeway Assembly Instructions Hardware Kit 76900188 THANK YOU FOR PURCHASING THIS PRODUCT Behlen Country has been in the business of providing quality products for more than 75 years.
3 D Printer Enclosure Assembly Instructions
 3 D Printer Enclosure Assembly Instructions Tools Required: 2.5 mm Allen wrench (included) Phillips screwdriver Adjustable Wrench Parts Included: Plexiglas Back with fan and filters installed (29.5 x 35.5
MODEL No: GSS3030G. Model No:...GSS3030G Overall Size (W x D X H*) x 3000 x 2100mm Roof Type:...Gable *Minimum Wall Height
 x 3000 x 2100mm Roof Type:...Gable *Minimum Wall Height") 1. SAFETY INSTRUCTIONS INSTRUCTIONS FOR: GALVANIZED STEEL SHED GREEN 3 x 3 x 2.1m MODEL No: GSS3030G Thank you for purchasing a Sealey product. Manufactured to a high standard, this product will, if used
1. SAFETY INSTRUCTIONS INSTRUCTIONS FOR: GALVANIZED STEEL SHED GREEN 3 x 3 x 2.1m MODEL No: GSS3030G Thank you for purchasing a Sealey product. Manufactured to a high standard, this product will, if used
GREENHOUSE 6'x8' ASSEMBLY INSTRUCTIONS. (Internal Dimensions) Overall Dimensions (Approx.) L 193 W 200 H cms 97.5" L 76" W 78.
 Overall Dimensions (Approx.) L 193 W 200 H cms 97.5 L 76 W 78.") ASSEMBLY INSTRUCTIONS GREENHOUSE 'x8' (Internal Dimensions) Overall Dimensions (Approx.) 7. L 9 W 00 H cms 97." L 7" W 78.8" H 0 IMPORTANT You must read these instructions carefully before you start to
ASSEMBLY INSTRUCTIONS GREENHOUSE 'x8' (Internal Dimensions) Overall Dimensions (Approx.) 7. L 9 W 00 H cms 97." L 7" W 78.8" H 0 IMPORTANT You must read these instructions carefully before you start to
GRANDIO G R E E N H O U S E S GRANDIO ASCENT ADDITIONAL ROOF VENT KIT FOR NEW AND EXISTING GREENHOUSE CUSTOMERS
 GRANDIO G R E E N H O U S E S GRANDIO ASCENT ADDITIONAL ROOF VENT KIT FOR NEW AND EXISTING GREENHOUSE CUSTOMERS (GRA-ASC-VENT) ASCENT ROOF VENT PACKING LIST GRAPHIC PART NAME SIZE/LOCATION QUANTITY GRAPHIC
Elite Home-Attached Greenhouse
 Elite Home-Attached Greenhouse Photo may show a greenhouse of a different length. Elite Home-Attached Greenhouse Use these instructions for the following greenhouses: #104711 #104713 #104715 2007 ClearSpan
Pantry IMPORTANT NOTE Carefully remove all the parts from the carton and put them individually on a soft cloth to prevent scratches or oth
 88 5076 691 Pantry IMPORTANT NOTE Carefully remove all the parts from the carton and put them individually on a soft cloth to prevent scratches or other damages occurring to the parts. We have taken great
A (mm) B (mm) A (mm) B (mm) 14 x x x ft extension. 8ft extension ft extension ft extension 3720
 B (mm) A (mm) B (mm) 14 x x x ft extension. 8ft extension ft extension ft extension 3720") NOMINAL SIZE A (mm) B (mm) NOMINAL SIZE A (mm) B (mm) 14 x 8 2610 6ft extension 1860 14 x 10 3230 4450 14 x 12 3850 8ft extension 2480 10ft extension 3100-12ft extension 3720 Thank you for purchasing your
NOMINAL SIZE A (mm) B (mm) NOMINAL SIZE A (mm) B (mm) 14 x 8 2610 6ft extension 1860 14 x 10 3230 4450 14 x 12 3850 8ft extension 2480 10ft extension 3100-12ft extension 3720 Thank you for purchasing your
C R O S S C O U N T R Y S E R I E S C U R V E D L E A N T O M O D E L G R E E N H O U S E I N S T R U C T I O N S
 Contents Foreword....................................................................... 2 User Notes..................................................................... 2 List of Drawings.................................................................
C. Side Panel 1 pc. B. Side Panel. 1 pc. J2. Shelf. 4 pcs. Adjustable Pin 24 pcs. (+1 extra) M3.5x16 Wood Screw 20 pcs. (+1 extra) 2 pcs.
 M3.5x16 Wood Screw 20 pcs. (+1 extra) 2 pcs.") IMPORTANT 20 05180 0307 Hutch Carefully remove all the parts from the carton and place them individually on a soft cloth to prevent scratches or other damage. Carefully and strictly follow these assembly
IMPORTANT 20 05180 0307 Hutch Carefully remove all the parts from the carton and place them individually on a soft cloth to prevent scratches or other damage. Carefully and strictly follow these assembly
JEEP JK ( 5 DOOR ) SLIMLINE II - FULL TRAY EXTREME RACK KIT
 SLIMLINE II - FULL TRAY EXTREME RACK KIT") JEEP JK ( 5 DOOR ) SLIMLINE II - FULL TRAY EXTREME RACK KIT FAJK001 / KRJW014T INSTALL TIME: 2.5 Hours NOTE: Your Jeep JK (5 Door) Extreme Roof Rack Kit consists of four boxes. (1) the Tray, (2) the Roll
JEEP JK ( 5 DOOR ) SLIMLINE II - FULL TRAY EXTREME RACK KIT FAJK001 / KRJW014T INSTALL TIME: 2.5 Hours NOTE: Your Jeep JK (5 Door) Extreme Roof Rack Kit consists of four boxes. (1) the Tray, (2) the Roll
Please Do Not Return This Product To The Store!
 MODEL NOS. T8512 TOURNAMENT SERIES 3 TABLE TENNIS TABLE OWNER'S MANUAL 1. Read this manual carefully before starting assembly. Read each step completely before beginning each step. 2. Some smaller parts
ASSEMBLY INSTRUCTIONS FOR STORETTE STA42
 ASSEMBLY INSTRUCTIONS FOR STORETTE STA42 A01 CAUTION: Some parts have sharp edges. Care must be taken when handling the various pieces to avoid a mishap. For safety sake, please read the safety information
INSTRUCTION SHEET U19
 U19 All Refrigerator and All Freezer Trim Kit Installation Product Line: U19 All Refrigerator and All Freezer Models Parts Included in Kit TRIMKITEZ1 (Part# 297333500): Single Trim Kit Components Single
NOMINAL SIZE A (mm) B (mm)
 B (mm)") NOMINAL SIZE A (mm) B (mm) x 2012 x 8 232 1972 x 10 3252 x 12 3872 Thank you for purchasing your new Robinsons greenhouse. We recommend you familiarise yourself with the instructions and read all safety
NOMINAL SIZE A (mm) B (mm) x 2012 x 8 232 1972 x 10 3252 x 12 3872 Thank you for purchasing your new Robinsons greenhouse. We recommend you familiarise yourself with the instructions and read all safety
GRANDIO G R E E N H O U S E S GRANDIO ASCENT 8x12, 8x16, 8x20, 8x24 KITS. Grandio Ascent 8x24 Shown In Image GREENHOUSE USER MANUAL
 GRANDIO G R E E N H O U S E S 05 GRANDIO ASCENT 8x, 8x6, 8x0, 8x4 KITS Grandio Ascent 8x4 Shown In Image GREENHOUSE USER MANUAL 03 Grandio Greenhouses, Backyard Living Source Inc. All rights reserved 05
Assembly Instructions 10 X 10 Aluminum Roof Support
 Assembly Instructions 10 X 10 Aluminum Roof Support Aluminum Roof Support Bolt Package 16-5/16 X 2 ¼ SS Bolt 24-5/16 X 1 SS Bolt 40-5/16 SS Nylon Lock Nuts 16-5/16 SS Flat Washers 28-4 ½ Wood Screws 36-1
gabriel ash essential range
 gabriel ash essential range to be used in conjunction with the online assembly video found at www.gabrielash.com Certified Installers if required Thomas Hearn 07540 618852 Matthew Honeyborne 07977 788242
8 Wide AMATEUR CEDAR GREENHOUSE
 8 Wide AMATEUR CEDAR GREENHOUSE ASSEMBLY INSTRUCTIONS Our Help Line provides support and advice to customers of Summer Greenhouses after ordering. For advice before you buy phone us free 7 days a week
Phone # La Jolla Doors. Block Frame Installation Manual Aluminum Frame with either Vinyl or Aluminum Panels
 Phone # 800-440-8785 www.lajolladoors.com La Jolla Doors Block Frame Installation Manual Aluminum Frame with either Vinyl or Aluminum Panels Thank you for choosing La Jolla Doors In this manual you will
English/French 06/04
 E000 PLEASE READ ASSEMBLY INSTRUCTIONS COMPLETELY BEFORE ASSEMBLING YOUR BUILDING CAUTION: Some parts have sharp edges. Care must be taken when handling the various pieces to avoid a mishap. For safety
GRANDIO G R E E N H O U S E S GRANDIO ELEMENT FLAT MOUNT GREENHOUSE KIT MANUAL FOR SIZES 6X4, 6X8 & 6X12
 GRANDIO G R E E N H O U S E S GRANDIO ELEMENT FLAT MOUNT GREENHOUSE KIT MANUAL FOR SIZES 6X, 6X8 & 6X Grandio Element 6x8 with Base Kit Shown In Image GREENHOUSE USER MANUAL 05 Grandio Greenhouses, Backyard
10 Wide AMATEUR CEDAR GREENHOUSE
 10 Wide AMATEUR CEDAR GREENHOUSE ASSEMBLY INSTRUCTIONS Our Help Line provides support and advice to customers of Summer Greenhouses after ordering. For advice before you buy phone us free 7 days a week
INSTALLATION INSTRUCTIONS
 INSTALLATION INSTRUCTIONS TOOLS REQUIRED Rechargeable, variable speed drill 3/8 diameter drill bit 3 Robertson bits #0, #1 and #2 Slot screwdriver Non marring hammer with 1 head Level Caulk or sealant
ASSEMBLY INSTRUCTIONS FOR "GA" MODULAR BUILDINGS ALL MODELS
 ASSEMBLY INSTRUCTIONS FOR "GA" MODULAR BUILDINGS ALL MODELS W01 CAUTION: Some parts have sharp edges. Care must be taken when handling the various pieces to avoid a mishap. For safety sake, please read
Before Assembling the Storage Wall
 Chapter 1 Assembling the Lista Storage Wall Lista provides two types of standard Storage Walls: B251 and B255. The design, construction, assembly, and quality are identical for both types, however, B251
6 5 Wide TRADITIONAL CEDAR GREENHOUSE
 6 5 Wide TRADITIONAL CEDAR GREENHOUSE ASSEMBLY INSTRUCTIONS PLEASE READ ALL INSTRUCTIONS BEFORE PROCEEDING 08/04 6 5 WIDE TRADITIONAL CEDAR GREENHOUSE Assembly Instructions Contents Page Introduction 3
Showpiece Cabinet Integrated Stand For 32" - 52" LCD HDTV
 Showpiece Cabinet Integrated Stand For 32" - 52" LCD HDTV Installation and Assembly Instructions 2009 Incredible Technologies Inc. Version 0109 Showpiece Cabinet Integrated Stand for 32" - 52" LCD HDTV
Sonoma Hardtop Gazebo 10 X 12. Owner s Manual
 Sonoma Hardtop Gazebo 10 X 12 Owner s Manual Congratulations on your purchase of our Sonoma Hardtop Gazebo. Our clear, easy to follow, step-by-step instructions will guide you through the assembly process
RH-412 STEEL DOORS INSTALLATION INSTRUCTIONS
 RH-412 STEEL DOORS INSTALLATION INSTRUCTIONS By following the steps outlined below, the assembly, installation and adjustment of the steel doors, will be a simple process. Let s start with the Driver Side.
THE HANDY GARDEN SHED. SNSD-E Owner s Manual
 THE HANDY GARDEN SHED SNSD-E Owner s Manual 1 BEFORE YOU START Owner s Manual Prior to installation, it is important that you contact your local government authority to determine if building approval is
10 Wide AMATEUR CEDAR GREENHOUSE
 10 Wide AMATEUR CEDAR GREENHOUSE ASSEMBLY INSTRUCTIONS PLEASE READ ALL INSTRUCTIONS BEFORE PROCEEDING 04/11 10 WIDE AMATEUR CEDAR GREENHOUSE Assembly Instructions Contents Page YOUR NEW GREENHOUSE Introduction
INSTRUCTIONS FOR: GALVANIZED STEEL SHED 3 x 3 x 2.1mtr. MODEL No: GSS3030
 INSTRUCTIONS FOR: GALVANIZED STEEL SHED 3 x 3 x 2.1mtr MODEL No: GSS3030 Thank you for purchasing a Sealey product. Manufactured to a high standard this product will, if used according to these instructions
INSTALLATION INSTRUCTIONS RH 412 STEEL DOORS
 By following the steps outlined below, the assembly, installation and adjustment of the steel doors, will be a simple process. Let s start with the Driver Side. Note: Having the hood open makes the job
Melamine Plastic Laminate. Toilet Partition Installation Manual
 Melamine Plastic Laminate Toilet Partition Installation Manual PHONE: FAX: 1-866-317-2786 ATTENTION DO NOT MIX FASTENER PACKS EACH FASTENER PACK HAS THE NECESSARY BOLTS, BARRELS AND SCREWS TO INSTALL THE
JEEP JK ( 3 DOOR ) SLIMLINE II - FULL TRAY EXTREME RACK KIT
 SLIMLINE II - FULL TRAY EXTREME RACK KIT") JEEP JK ( 3 DOOR ) SLIMLINE II - FULL TRAY EXTREME RACK KIT FAJK004 / KRJW016T INSTALL TIME: 2 Hours NOTE: Your Jeep JK (3 Door) Extreme Roof Rack Kit consists of four boxes. (1) the Tray, (2) the Roll
JEEP JK ( 3 DOOR ) SLIMLINE II - FULL TRAY EXTREME RACK KIT FAJK004 / KRJW016T INSTALL TIME: 2 Hours NOTE: Your Jeep JK (3 Door) Extreme Roof Rack Kit consists of four boxes. (1) the Tray, (2) the Roll
Shed Assembly Instructions
 Shed Kit Contents The shed kit includes all the parts needed to assemble your shed except for tools and fasteners such as screws and nails. The various pieces are pre-cut and many are marked to indicate
08+ KAWASAKI KLR PD NERF
 08+ KAWASAKI KLR PD NERF 0505-1299 Before you begin, place the bike on a hard level surface where you have room to work. Lay out the parts included in this kit and compare to the parts list on page 5 of
JEEP JK ( 5 DOOR ) SLIMLINE II - FULL TRAY EXTREME RACK KIT
 SLIMLINE II - FULL TRAY EXTREME RACK KIT") JEEP JK ( 5 DOOR ) SLIMLINE II - FULL TRAY EXTREME RACK KIT FAJK002 / KRJW014T INSTALL TIME: 5 Hours NOTE: Your Jeep JK (5 Door) Extreme Roof Rack Kit consists of four boxes. (1) the Tray, (2) the Roll
JEEP JK ( 5 DOOR ) SLIMLINE II - FULL TRAY EXTREME RACK KIT FAJK002 / KRJW014T INSTALL TIME: 5 Hours NOTE: Your Jeep JK (5 Door) Extreme Roof Rack Kit consists of four boxes. (1) the Tray, (2) the Roll
RUN-IN SHED INSTRUCTIONS
 RUN-IN SHED INSTRUCTIONS 14321 5th Line Nassagaweya, Rockwood, ON, N0B 2K0 Phone 519-856-9959 ~ Fax 519-856-4141 Toll Free 1-800-461-3362 ~ Email sales@systemhorse.com Website www.systemfence.com RUN-IN
ASSEMBLING YOUR L&L EASY-FIRE KILN
 TABLE OF CONTENTS TOOLS NEED FOR THE JOB............ 1 UNPACKING........................... 2 Inspect for visible damage.......................... 2 Remove Top from Carton........................... 2
6 Wide AMATEUR CEDAR GREENHOUSE
 6 Wide AMATEUR CEDAR GREENHOUSE ASSEMBLY INSTRUCTIONS PLEASE READ ALL INSTRUCTIONS BEFORE PROCEEDING 04/11 6 WIDE AMATEUR CEDAR GREENHOUSE Assembly Instructions Contents Page YOUR NEW GREENHOUSE Introduction
NOMINAL SIZE. A (mm) B (mm) 8 x 6. 8 x x x
 B (mm) 8 x 6. 8 x x x") NOMINAL SIZE A (mm) B (mm) x 6 2012 x 2632 2602 x 10 3252 x 12 372 Thank you for purchasing your new Robinsons greenhouse. We recommend you familiarise yourself with the instructions and read all safety
NOMINAL SIZE A (mm) B (mm) x 6 2012 x 2632 2602 x 10 3252 x 12 372 Thank you for purchasing your new Robinsons greenhouse. We recommend you familiarise yourself with the instructions and read all safety
GALVANIZED SHED GREEN 2.3 X 2.3 X 1.9m
 INSTRUCTIONS FOR: GALVANIZED SHED GREEN 2.3 X 2.3 X 1.9m MODEL NO: GSS2323G Thank you for purchasing a Sealey product. Manufactured to a high standard, this product will, if used according to these instructions,
NOMINAL SIZE A (mm) B (mm)
 B (mm)") NOMINAL SIZE A (mm) B (mm) 11 x 6 2012 11 x 8 2632 3536 11 x 10 3252 11 x 12 3872 Thank you for purchasing your new Robinsons greenhouse. We recommend you familiarise yourself with the instructions and
NOMINAL SIZE A (mm) B (mm) 11 x 6 2012 11 x 8 2632 3536 11 x 10 3252 11 x 12 3872 Thank you for purchasing your new Robinsons greenhouse. We recommend you familiarise yourself with the instructions and
INSTRUCTION BOOKLET #C21. For Wallbed models: KING SIZE
 For Wallbed models: KING SIZE INSTRUCTION BOOKLET #C1 WARNING! ALL MURPHY/WALLBED SYSTEMS CONTAIN STORED ENERGY. FAILURE TO USE AND FOLLOW THESE INSTRUCTIONS DURING THE INSTALLATION PROCESS COULD RESULT
Installation Guide Simplicity Alfresco. V1.9 Lu070318
 0333 305 5272 www.canoports.co.uk Installation Guide Simplicity Alfresco V1.9 Lu070318 Tools Required Below is a list of tools that you will require to install your the Simplicity Alfresco System. Cordless
Cold Frame Instructions
 1 05/13 Cold Frame Instructions Thank you for purchasing your new Alton cold frame. We recommend you familiarise yourself with the instructions and read all safety information before you commence assembly.
ShorePort PWC Lift Instructions " x 138" Sandstone ShorePort " x 138" White ShorePort " x 138" Tan ShorePort
 ShorePort PWC Lift Instructions 00-8" x 8" Sandstone ShorePort 009-8" x 8" White ShorePort 090-8" x 8" Tan ShorePort....... - PUT SAFETY FIRST To avoid the risk of personal injury or death, study and fully
User Instructions Multiline Otter Scoreboard Caddy Assembly
 List of parts: User Instructions Multiline Otter Scoreboard Caddy Assembly Single Caddy Double Caddy 1 1 Base assembly with attached wheels 2 4 1 1 2 4 4 8 10 20 12 Uprights (60 or 74 aluminum extrusion)
Step by Step Installation Instructions. Poly Shutters. Customer Service or visit us online at smithandnoble.com
 Step by Step Installation Instructions Poly Shutters Customer Service 800.248.8888 or visit us online at smithandnoble.com Thank you for purchasing from smith+noble. Your new window treatments have been
INSTRUCTION BOOKLET #C20
 INSTRUCTION BOOKLET #C0 WARNING! ALL MURPHY/WALLBED SYSTEMS CONTAIN STORED ENERGY. FAILURE TO USE AND FOLLOW THESE INSTRUCTIONS DURING THE INSTALLATION PROCESS COULD RESULT IN SEVERE PERSONAL INJURY TO
WPS crew Doors Installation instructions
 WPS-132-133 crew Doors Installation instructions ORDER OF INSTALLATION FOR A COMPLETE ENCLOSURE OF A CREW WPS (Weather Protection System) IS AS FOLLOWS: 1. Heater 2. Rear Thresholds - Right Hand & Left
Model No. EP84-A, EP84AR-A, P84L
 E000 Model No. EP84-A, EP84AR-A, P84L PLEASE READ ASSEMBLY INSTRUCTIONS COMPLETELY BEFORE ASSEMBLING YOUR BUILDING CAUTION: Some parts have sharp edges. Care must be taken when handling the various pieces
The Festival Assembly Instructions
 The Festival Assembly Instructions Toll Free: 866.768.8465 Hours: 9-5 Monday-Friday EST www.homeplacestructures.com Package ships as shown CONTACT INFORMATION: HomePlace Structures 301 Commerce Drive New