Celebrate the Season Gold Glitz Card. Tutorial 1 by Allison Okamitsu
|
|
|
- Logan Holt
- 5 years ago
- Views:
Transcription

1


2 Celebrate the Season Gold Glitz Card Tutorial 1 by Allison Okamitsu
3 Supplies You can order these products in Allison s Canadian Online Store. STAMPS & BUNDLES Tags & Trimmings Bundle - Includes Tags & Trimmings Stamp Set & Trim Your Stocking Thinlits Dies PAPER Whisper White Thick Cardstock, Whisper White and Basic Black Cardstock, Gold Glimmer Paper, Merry Music Specialty Designer Series Paper INK Basic Black Archival Ink ACCESSORIES Gold Mini Sequin Trim, Gold Metallic Thread, Basic Black Solid Baker s Twine, Embossing Paste, Gold Stampin Glitter ADHESIVES Fast Fuse/SNAIL, Dimensionals, Multipurpose Liquid Glue TOOLS Palette Knives, Pattern Party Decorative Masks, Big Shot, Stitched Shapes Framelits Measurements Metric Whisper White Thick Cardstock o 10.5cm x 29.7cm Whisper White Cardstock o 10cm x 14.4cm o 7.6cm x 7.6cm Basic Black Cardstock o 9.8cm x 14.2cm Gold Glimmer Paper o 6.4cm x 3.8cm Merry Music Specialty Designer Series Paper o 1.3cm x 15.3cm

4 Measurements - Imperial Whisper White Thick Cardstock o 4 ¼ x 11, scored at 5 ½ Whisper White Cardstock o 4 x 5 ¼ o 3 x 3 Basic Black Cardstock o 4 ⅛ x 5 ⅜ Gold Glimmer Paper o 2 ½ x 1 ½ Merry Music Specialty Designer Series Paper o ½ x 6 Instructions 1. Adhere Basic Black Cardstock to card front with Fast Fuse/SNAIL. 2. Using the brick mask from the Pattern Party Decorative Masks, apply a thin layer of Embossing Paste to the White Cardstock (4 x 5 ¼, 10cm x 14.4cm) using a Palette Knife. 3. Remove the mask from the cardstock and randomly sprinkle Gold Stampin Glitter onto the wet embossing paste. Allow to dry. 4. Stamp Celebrate the Season in Basic Black Archival Ink onto Whisper White Cardstock square. Die cut with largest circle in the Stitched Shapes Framelits. 5. Wind some of the Gold Metallic Thread behind the Whisper White Circle to create messy loops of thread. Adhere the thread to the circle with Dimensionals and then adhere the circle to the card front with the Dimensionals. 6. Fold the strip of Merry Music Specialty Designer Series Paper approximately every 1 to create a ruffled look and adhere to the circle with Fast Fuse/ SNAIL.


5 7. Add a strip of Gold Mini Sequin Trim onto the ruffled designer paper with Multipurpose Liquid Glue. 8. Using the Trim Your Stocking Thinlits Dies, die cut two bells from the Gold Glimmer Paper and adhere to your card front with Dimensionals. 9. Tie a small bow with Basic Black Solid Baker s Twine and adhere on top of the bells with Multipurpose Liquid Glue. Enjoy the tutorial. Any questions please ask. Allison Okamitsu Additional Photos


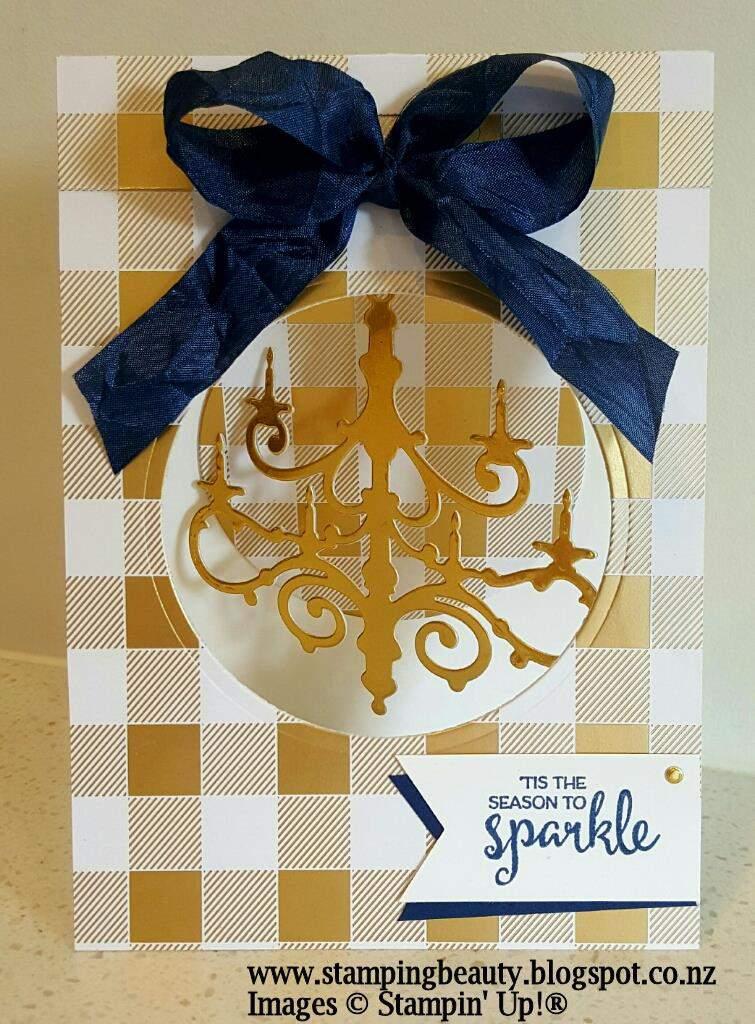

6 Season to Sparkle Chandelier Card
7 Supplies You can order these products in Angela s New Zealand Online Store. STAMPS & BUNDLES Season to Sparkle Bundle. PAPER Whisper White A4 Thick and Night of Navy Cardstock, Gold Foil Sheets and Year of Cheer Specialty Designer Series Paper. INK Night of Navy Classic Stampin Pad. ACCESSORIES Night of Navy 5/8 (1.6cm) Crinkled Seam Binding Ribbon. ADHESIVES Multipurpose Adhesive Sheets, Multipurpose Liquid Glue, Mini Glue Dots and Tear & Tape Adhesive. TOOLS Stampin Trimmer, Paper Snips, Big Shot, Chandelier Thinlits Dies, Layering Circle Framelits and Banner Triple Punch.
8 Measurements Metric Whisper White A4 Thick Cardstock o 10.5cm x 29.7cm, for base of card, scored at 14.9cm o 10cm x 14.4cm, for insert o 2.5cm x 6.5cm, for banner Night of Navy Cardstock o 2.5cm x 6.5cm, for banner Year of Cheer Designer Series Paper o 10.5 x 14.9cm for front of card Gold Foil Sheets o 2 x 9cm x 9cm, die cut 2 chandeliers Multipurpose Adhesive Sheets o 1 x 9cm x 9cm 40cm Night of Navy 5/8 (1.6cm) Crinkled Seam Binding Ribbon 6cm Gold Metallic Thread. Measurements - Imperial Whisper White A4 Thick Cardstock o 4¼ x 11, for base of card, scored at 5½ o 4 x 5¼, for insert o 1 x 2½, for banner Night of Navy Cardstock o 1 x 2½, for banner Year of Cheer Designer Series Paper o 4¼ x 5½, for front of card Gold Foil Sheets o 2 x 3½ x 3½, die cut 2 chandeliers Multipurpose Adhesive Sheets o 1 x 3½ x 3½ 16 Night of Navy 5/8 (1.6cm) Crinkled Seam Binding Ribbon 2½ Gold Metallic Thread.

 3.5cm/1¼ from the bottom and 1.2cm/½ from each side and cut using the Big Shot. 6.")
9 Instructions 1. Adhere the Year of Cheer Designer Series Paper to the front of the Whisper White card layer with Multipurpose Liquid Glue. Allow to dry. 2. Adhere the Multipurpose Adhesive Sheet to the back of one of the Gold Foil Sheets. 3. Cut the chandelier thinlit die out on each piece of foil. (Save the tiny circle that comes out of the hole at the top of the chandelier!) 4. Remove the adhesive sheet backing from the chandelier and carefully stick them together. 5. Place the outside edge of the largest circle framelit (7.3cm/⅞ ) 3.5cm/1¼ from the bottom and 1.2cm/½ from each side and cut using the Big Shot. 6. Thread a piece of Gold Metallic Thread through the hole at the top of the chandelier and knot at the top. 7. Line the chandelier up under the hole and using Tear & Tape Adhesive stick the thread to the inside back of the card. 8. Glue the insert into the card covering the thread. 9. Glue the circle cut from the front onto the insert make sure the pattern lines up! 10. Tie a bow and attach it to the top of the circle using a glue dot.
10 11. Stamp the sentiment in Night of Navy onto the Whisper White cardstock banner. 12. Glue gold dot (saved from cutting out the chandelier) to the banner. 13. Glue banners together at an angle and then glue to the front of the card. Enjoy the tutorial. Any questions please ask. Angela Meiritz-Reid


11 Dimensional card Tutorial 3 by Constanze Wirtz
12 Supplies You can order these products in Constanzes German Online Store: STAMPS & BUNDLES Carols of christmas Bundle PAPER Very Vanilla Thick Cardstock, Always Artichoke and Cherry Cobbler Cardstock INK Cherry Cobbler, Soft Suede and Crushed Curry Classic Stampin Pads ACCESSORIES - ADHESIVES Tombow Multi Glue, Mini Dimensionals TOOLS Stampin Trimmer, Big Shot, Circle Framelits, White Marker (non Stampin Up!) Measurements Metric Very Vanilla Thick Cardstock o 10,5 x 14,8cm, 2x Cherry Cobbler Cardstock o circa 8,5 x 8,5 cm Always Artichoke Cardstock o circa 8 x 8 cm
13 Measurements - Imperial Very Vanilla Thick Cardstock o 4 ¼ x 5 ½, 2x Cherry Cobbler Cardstock o circa 4,5 x 4,5 Powder Pink Cardstock o 4 x 4 Instructions 1. Cut two pieces of Very Vanilla Thick Cardstock 2. Score on each side 1cm and 2 cm from the side of the cardstock on both pieces of cardstock. Use a bonefolder to fold the cardstock. You should go up on the first scored line and down on the second one on both sides. 3. On one of the Cardstock pieces use the second biggest circle Framelits in the center of the card. This will be the cardfront. 4. Diecut the biggest scalloped circle out of Cherry Cobbler Cradstock and diecut with another circle inside with the second biggest circle framelit. You ll get a frame for the circle you have on your cardfront. Adhere with glue. 5. Stamp some of the small stars over the circle. 6. Diecut the trees. Stamp the little reindeer and diecut as well. Adhere the two trees with Mini Dimensionals and the single one directly on the card with glue. Add the reindeer with Mini Dimensionals as well. 7. Use a white marker on the diecut trees to fake some snow. 8. Stamp sentiment in the middle of your second piece of Very Vanilla Thick Cardstock. 9. Glue the front of the card to the back one on the sides (see photo)

14 Enjoy the tutorial. Any questions please ask. Constanze Wirtz Additional photo:


15 Extra Long Pillow Box Tutorial 4 by Erica Cerwin Supplies You can order these products in Erica s American Online Store.
16 STAMPS & BUNDLES Tags & Trimmings Bundle PAPER Whisper White and Real Red Cardstock, Vellum and Quilted Christmas DSP INK Basic Black ACCESSORIES 3/8 Basic Black Shimmer Ribbon, Silver Thread ADHESIVES Tear & Tape, Dimensionals TOOLS Big Shot, Trim Your Stocking Thinlits, 2 Circle Punch Measurements Metric Real Red Cardstock o 2.6 cm X 27 cm (2) folded in half lengthwise Quilted Christmas DSP o 10 cm X 15cm Whisper White o 5.7 cm X 1.9 cm o 5 cm square Vellum Cardstock o 2 Circle Measurements - Imperial Real Red Cardstock o 3 X 11 (2) folded in half lengthwise Quilted Christmas DSP o 4 X 6 Whisper White o 2 1/4 X 3/4 o 2 square Vellum Cardstock o 2 Circle

run through the Big Shot.")
17 ! Instructions 1. Cut two 3 X 11 pieces of Reap Red cardstock and fold in half. 2. Place the fold right inside the window on the Pillow Box Thinlit (the side that has the tab.)run through the Big Shot. Repeat with the second piece. 3. Cut off the long tabs from one of the pieces.!


18 ! 4. Place Tear and Tape on one of the long tabs and adhere behind the other piece. 5. Place Tear & Tape on the other long tab and fold over and behind the other piece to make a long tube.


19 ! 6. Warp the DSP around the center of the tube and adhere firmly. 7. Tie a pice of Basic Black Shimmer ribbon around the length and tie with a bow at the top of the DSP. 8. Punch a 2 Vellum Circle. Adhere with Dimensionals on either side of the ribbon. 9. Cut a Whisper White snowflake and adhere in the center of the circle with a Dimensional. 10. Mask the stamp so that you just ink the word celebrate in Basic Black ink. Remove the mask and stamp on Whisper White cardstock. Trim this piece to the length and height of the word. Cut a V on each end. 11. Wrap Silver Thread around three fingers about four or five times. Remove and adhere to the back of the sentiment piece. Adhere to the center of the snowflake. Enjoy the tutorial. Any questions please ask. Erica Cerwin


20 Christmas Pizza Box and Gift Card Tutorial 5 by Gail Davidson
21 Supplies You can order these products in Gail s Australian Online Store. STAMPS & BUNDLES Labels to Love stamp set PAPER Whisper White and Real Red Cardstock, Gold Glimmer Paper, Quilted Christmas 6" x 6" (15.2 x 15.2 cm) Designer Series Paper INK Real Red Classic Stampin Pad, VersaMark Ink Pad ACCESSORIES Mini Pizza Boxes, Year of Cheer Specialty Washi Tape, Real Red 1/8" (3.2 mm) Solid Ribbon, Gold Stampin Emboss Powder ADHESIVES SNAIL Adhesive, Stampin Dimensionals TOOLS Big Shot, Stampin Trimmer, Heat Tool, Paper Snips, Bone Folder, Everyday Label Punch, Ticket Tear Border Punch, Stitched Shapes Framelits, Layering Squares Framelits
22 Measurements Metric Whisper White Cardstock o Approx. 7cm x 7cm for pizza box label o Approx. 5cm x 5cm for gift card sentiment Real Red Cardstock o 7.6cm x 15.2cm for gift card Gold Glimmer Paper o Approx. 7cm x 7cm for gift card frame and trim for pizza box label Quilted Christmas Designer Series Paper o 8.5cm x 8.5 cm for top of pizza box o 2 x 8.5cm x 2.2cm for sides of pizza box o Approx. 7cm x 7cm for gift card front Year of Cheer Specialty Washi Tape o 62.4cm for top of pizza box and gift card front Real Red Solid Ribbon o Approx. 20cm Measurements - Imperial Whisper White Cardstock o Approx. 2-3/4 x 2-3/4 for pizza box label o Approx. 2 x 2 for gift card sentiment Real Red Cardstock o 3 x 6 for gift card Gold Glimmer Paper o Approx. 2-3/4 x 2-3/4 for gift card frame and trim for pizza box label Quilted Christmas Designer Series Paper o 3-3/8 x 3-3/8 for top of pizza box o 2 x 3-3/8 x 7/8 for sides of pizza box o Approx. 2-3/4 x 2-3/4 for gift card front Year of Cheer Specialty Washi Tape o 24-5/8 for top of pizza box and gift card front Real Red Solid Ribbon o Approx. 7-7/8

 and adhere to top and bottom of the label. 5.")
23 Instructions PIZZA BOX 1. Stamp the frame image in VersaMark ink on the larger Whisper White piece and gold heat emboss. 2. Stamp the Happy Christmas sentiment inside the frame in Real Red and punch using the Everyday Label Punch. 3. Stamp the Made with Love sentiment on the front of the pizza box in Real Red. Note: It s easier to determine where to stamp if you assemble the box first to make sure you don t stamp upside down J. 4. Using the Gold Glimmer Paper, punch 2 pieces using the Ticket Tear Border Punch (you may have to trim these a little) and adhere to top and bottom of the label. 5. Adhere the Designer Series Paper panels to the top and sides of the box. 6. Attach the washi tape as shown. Figure 1. Use the Ticket Tear Punch to punch accents for the pizza box sentiment label. 7. Adhere the ribbon to the back of the label and mount using dimensionals. Figure 2. Pizza box showing placement of Designer Series Paper and "Made with Love" image on the front.


24 GIFT CARD 8. Stamp the Ho Ho Ho image on the smaller Whisper White piece and die cut using the 2 nd smallest square die from the Stitched Shapes Framelits. 9. Die cut the remaining Gold Glimmer Paper using the 4 th largest scalloped die from the Layering Squares Framelits and then die cut the centre out using the 4 th smallest plain square die from the Layering Squares Framelits. 10. Die cut the Designer Series Paper using the largest square die from the Stitched Shapes Framelits. 11. Adhere the Designer Series Paper panel and the sentiment piece using SNAIL. 12. Adhere the Gold Glimmer Paper panel using dimensionals. 13. Attach washi tape as shown. Figure 3. Use Stitched Shapes Framelits for the Designer Series Paper and sentiment panels. Figure 4. Use Layering Squares Framelits for the Gold Glimmer panel on the gift card. Enjoy the tutorial. Any questions please ask. Gail Davidson


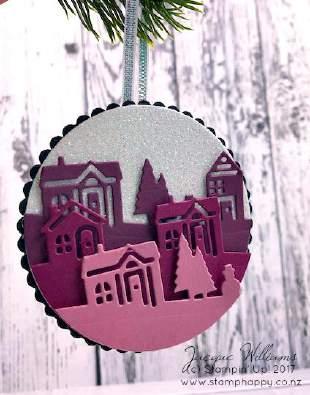

25 Ornament Card with Hearts Come Home
26 Supplies. STAMPS & BUNDLES Hearts Come Home Bundle PAPER Thick Whisper White Cardstock Basic Black and Basic Gray Cardstock Fresh Fig, Rich Razzleberry, and Sweet Sugarplum Cardstock Dazzling Diamonds Glitter Paper INK Basic Black Archival Ink Pad ACCESSORIES ¼ inch Silver Trim, Basic Rhinestones, magnets (non-su) ADHESIVES Tear & Tape, Standard and Mini Dimensionals TOOLS Softly Falling Embossing Folder, Layering Circles Framelits
27 Measurements Metric Basic Black o 12.7cm x 25.4cm Whisper White o 11.75cm x 11.75cm (2) Basic Gray o 12.1 cm x 12.1cm Scraps of Basic Black, Dazzling Diamonds, Rich Razzleberry, Fresh Fig, and Sweet Sugarplum for die cutting (8.9cm square approximately) Measurements Imperial Basic Black o 5 x 10 Whisper White o 4 5/8 x 4 5/8 (2) Basic Gray o 4 3/4 x 4 3/4 Scraps of Basic Black, Dazzling Diamonds Glitter Paper, Rich Razzleberry, Fresh Fig, and Sweet Sugarplum for die cutting (3 ½ square approximately) Instructions 1. Stamp the Whisper White card front using the Archival Black Ink in the lower right hand corner. Emboss using the Softly Falling folder preferably with the dots heavier at the top so as to not interfere with the sentiment too much. Fold the Basic Black card in half. 2. Ornament: Die cut the largest scallop circle out of Basic Black. Die cut the largest plain circle out of Dazzling Diamonds Glitter Paper, Fresh Fig, Sweet Sugarplum, and Rich Razzleberry cardstock. You should have five circles one with scallops and four plain circles.

28 3. Adhere the Dazzling Diamonds Glitter Paper to the Black Scallop Circle. Using the die with the smallest houses from the Hearts Come Home Bundle, die cut the Fresh Fig circle with the ground a little more than halfway up the circle. Die cut the Rich Razzleberry circle with the houses about ½ inch or so lower, moving the die to the right or the left so you get different parts of the die. And finally, die cut the Sweet Sugarplum with the images right near the bottom of the circle. 4. Adhere the three house layers to the Dazzling Diamonds circle using a generous amount of Dimensionals on the Rich Razzleberry and Sweet Sugarplum layers. Adhere about a 6 inch (15cm) loop to the back of the ornament for a hanger. You may wish to cut a second black circle to cover the ends of the ribbon. 5. Adhere the white front panel to the Basic Gray square. Using two very strong magnets, adhere one magnet to the back of the Basic Gray piece. Adhere the other magnet to the back of the ornament (one pair works, but you may wish to use two pairs of magnets). Adhere the Basic Gray panel to the card base using Dimensionals. Attach the ornament using the magnets.

29 6. Add three Rhinestones to the front of your project. Stamp and embellish the inside of your card and your envelope as desired. Enjoy the tutorial. Any questions please ask. Jacque Willams


30
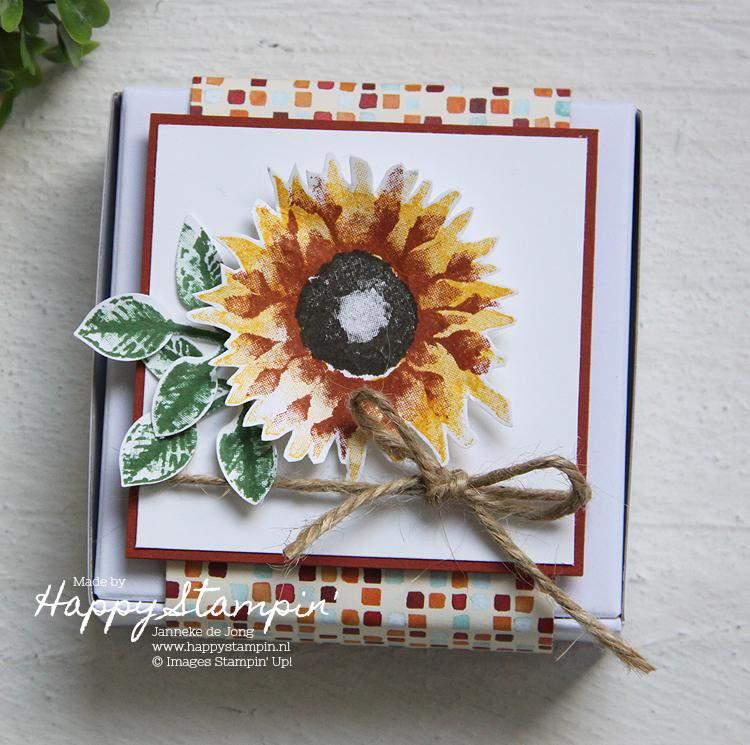
31 You can order these products in Janneke s Netherlands Online Store or by . STAMPS & BUNDLES Painted Harvest PAPER Whisper White, Cajun Craze and Painted Autumn design paper INK Crushed Curry, Cajun Craze, Garden Green and Early Espresso ACCESSORIES Mini Pizza Box, Leaf Punch and Jute Twine ADHESIVES Fast Fuse and Dimensionals TOOLS Paper Snips and Trimmer o Painted Autumn Design Paper 6.5 x 30.5 cm o Cajun Craze cardstock 8 x 8 cm o whisper White cardstock 7.6 x 7.6 cm o Whisper White for stamping on o Painted Autumn Design Paper 2 1/2" x 12" o Cajun Craze cardstock 3" x 3" o Whisper White cardstock 2 7/8" x 2 7/8" o Whisper white for stampin on
32 1. Fold your mini pizza box. 2. Wrap the DSP aound the box and close it with the Fast Fuse. 3. Glue your Whisper White on you Cajun Craze square. 4. Wrap the Jute Twine around it, and then glue it on your DSP with dimensionals. 5. Stamp the leaves with Garden Green (first I did the lines, and second the other stamp but stamped that first off on a piece of paper, so you get nuance in the leafs) on Whisper White cardstock and punch them out with the Leaf Punch. 6. Stamp your Sunflower with Crushed Curry. 7. Then with Cajun Craze. 8. In the heart you stamp with Early Espresso. 9. Add the leaves and Sunflower on your squares with dimensionals. Enjoy the tutorial. Any questions please ask.


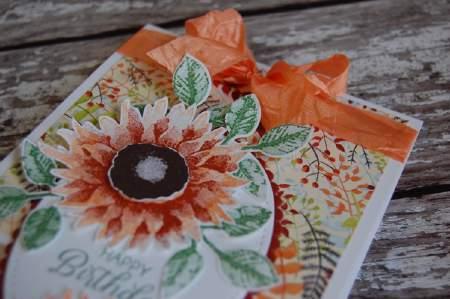
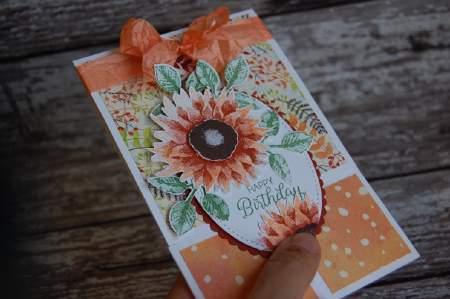
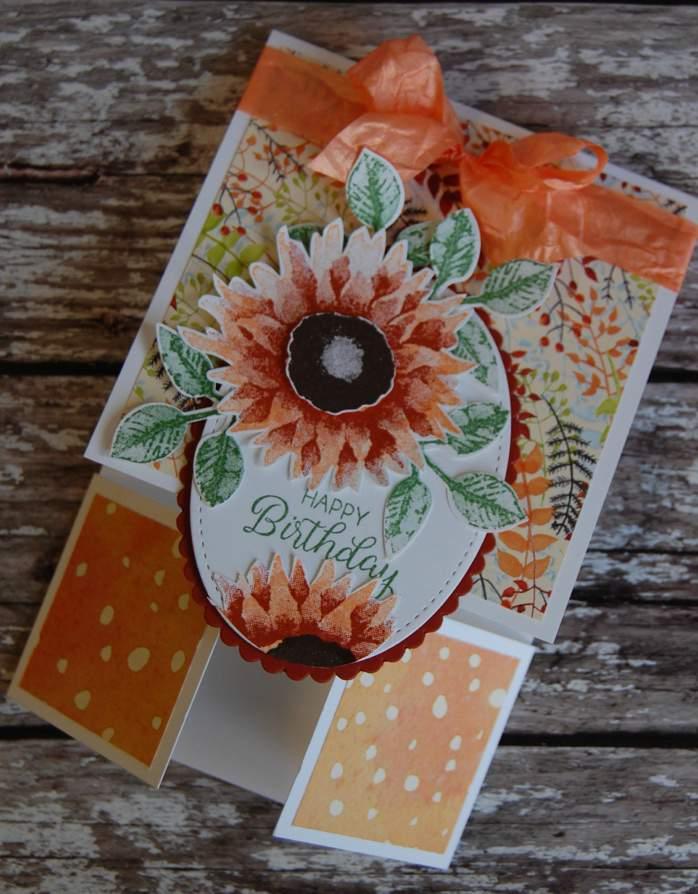
33 Painted Harvest Dutch Fold Card Tutorial 8 by Julie Kettlewell
34 Supplies You can order these products in Julie s UK Online Store. STAMPS & BUNDLES Painted Harvest Beautiful Bouquet PAPER Painted Autumn Cajun Craze, Standard Whisper White and Thick Whisper White card stock INK Peekaboo Peach, Cajun Craze, Garden Green, Early Espresso ACCESSORIES Peekaboo Peach Crinkled Seam Binding Ribbon ADHESIVES Stampin Dimensionals Multi Purpose Glue TOOLS Stitched Shape Framelits Layering Oval Dies Big Shot Leaf Punch Measurements Metric Thick Whisper White o 10.3cm x 26cm scored at 10.5cm Thick Whisper White o 20.8cm x 5cm scored at 5.2cm from each end Painted Harvest Paper o 9.8cm x 10cm and 2 pieces 4.5cm x 4.7cm


35 " Measurements - Imperial Thick Whisper White o 3 7/8 inches x 10 inches scored at 4 inches Thick Whisper White o 8 inches x 2 inches scored at 2 inches from each end Painted Harvest paper o 3 ¾ inches x 3 7/8 inches and 2 pieces 1 ¾ inches x 1 ¾ inches Instructions 1. Fold your Whisper White pieces as shown below 2. Adhere the long thin piece to the back of the main card making sure it is completely flush at the bottom.


36 3. Please note you may have to slice a tiny strip off the top folded over piece to make sure it doesn t catch on the bottom pieces 4. Stamp the more solid stamp of the sunflower on some scrap paper in Peekaboo Peach and then the accent in Cajun Craze and fussy cut out. Also stamp the centre in Early Espresso and cut out. 5. Die cut the largest oval from the Stitched Shapes Framelits in Whisper White and a Scallop Oval in Cajun Craze. Stamp the Happy Birthday from Beautiful Bouquet in Garden Green and repeat the steps for the sunflower above on the bottom edge of the oval, however these are stamped straight onto the oval rather than fussy cut! "

37 " 6. Adhere the pattern papers to the card blank, please note I have reversed the papers on this example. 7. Stamp 4 leaves in Garden Green and punch out with the Leaf Punch. Adhere these to the ovals and layer the fussy cut flower on top and then adhere this to your card, taking care not to add glue to the bottom of the oval as this overhangs the card blank. Enjoy the tutorial. Any questions please ask. Julie Kettlewell
38 Additional Photos:


39 Spooky Pencil Holder Tutorial 9 by Kimberly Van Diepen
40 Supplies You can order these products in Kimberly s American Online Store. STAMPS & BUNDLES Spooky Cat Bundle PAPER Fresh Fig, Very Vanilla, Tangerine Tango, Watercolor Paper, Spooky Night DSP INK Fresh Fig, Archival Basic Black, Tangerine Tango ACCESSORIES Vintage Crochet Trim, Delicate White Doilies ADHESIVES Fast Fuse, Stampin Dimensionals, Tear Tape TOOLS Big Shot, Cat Punch, 3/4 Circle Punch, Stitched Shapes Framelits, Aqua Painter, Stapler, Simply Scored Scoring Tool, Bone Folder, Paper Snips


41 Measurements Metric Fresh Fig o Very Vanilla o 9 cm x 14 cm- pencil box 7.6 cm x 7.6 cm- cat punch Watercolor Paper o 6.3 cm x 6.3 cm- circle die cut Tangerine Tango o 1 cm x 6.3 cm- greeting Spooky Night DSP o 1.3 cm x 15.4 cm- layer Measurements - Imperial Fresh Fig o Very Vanilla o 3-1/2 x 5-1/2 - pencil box 3 x 3 - cat punch Watercolor Paper o 2-1/2 x 2-1/2 - circle die cut Tangerine Tango o 3/8 x 2-1/2 - greeting Spooky Night DSP o 1/2 x 6 - layer
42 Instructions 1. Create pencil box using Fresh Fig cardstock by scoring cardstock using the Simply Scored Tool. Score cardstock at 1/2, 3/4, 2, and 2-1/4 (1.3 cm, 1.8 cm, 5.1 cm, 5.7 cm). Turn cardstock and score at 1/4 (.5 cm). Using snips, cut slits at the bottom of the cardstock to form box. Punch a 1/2 circle using the 3/4 circle punch. 2. Using Fresh Fig ink, stamp cat and mouse image randomly over the Fresh Fig cardstock. Create crisp score lines using a bone folder. Assemble box using Tear Tape. 3. Die cut Watercolor Paper using a circle die cut from the Stitched Shapes Framelits. Using Aqua Painter and Tangerine Tango ink, watercolor center of the die cut. Let dry. 4. Stamp cat image onto Very Vanilla cardstock using Archival Basic Black ink. Punch image out using Cat Punch. Stamp greeting onto Tangerine Tango cardstock using Archival Basic Black ink. Cut an angle onto one side of the cardstock. 5. Attach a piece of a Delicate White Doily to the Watercolor Paper using adhesive. Fold DSP in half. Cut an angle on the end of the DSP. Attach over the Delicate White Doily using a staple. Attach Cat image over DSP using adhesive. 6. Attach a 3 (7.6 cm) piece of Vintage Crochet Trim over Cat image. Attach Greeting banner slightly above Vintage Crochet Trim. Staple into place. Attach layers to the front of the pencil box using dimensionals. Enjoy the tutorial. Any questions please ask. Kimberly Van Diepen


43 Spooky Halloween Tutorial 10 by Lorri Heiling
44 Supplies You can order these products in Lorri s American Online Store. STAMPS & BUNDLES Spooky Cat PAPER Basic Black Cardstock, Very Vanilla Cardstock, Spooky Night Designer Series Paper INK Memento Black Ink, Cajun Craze Ink, Craft White Ink ACCESSORIES Seasonal Layers Thinlits, Woodland Embossing Folder, White Embossing Powder, Dauber ADHESIVES Snail, Dimensionals TOOLS Big Shot, Heat Tool
45 Measurements Metric Basic Black Cardstock o 20.3cm x 10.8cm, scored at 3.2cm, 6.4cm, 13.8cm and 17.1cm on the long side o Scraps Very Vanilla Cardstock o 13.3cm x 10.2cm Spooky Night Designer Series Paper o 1 of the moon squares Measurements - Imperial Basic Black Cardstock o 8 x 4 ¼, scored at 1 ¼, 2 ½, 5 ½ and 6 ¾ on the long side o Scraps Very Vanilla Cardstock o 5 ¼ x 4 Spooky Night Designer Series Paper o 1 of the moon squares
46 Instructions 1. Run the Basic Black cardstock through the Big Shot using the Woodland Embossing Folder just emboss the left and right panels and not the back panel. 2. Fold on score lines as shown above. 3. Trim one of the moon squares from the Designer Series Paper. 4. Stamp owl image onto it using Memento Black ink and adhere to back panel of card. 5. Stamp sentiment on back panel using White Craft Ink and emboss using White Embossing Powder using Heat Tool. 6. Using a Dauber and Cajun Craze ink, sponge some ink on top of the embossed sentiment. 7. Cut out a couple branches from the Seasonal Layers Thinlit using Basic Black cardstock. 8. Adhere the longer branch on the left panel only, or the card won t lie flat. Trim the 2 nd branch a bit smaller and adhere on the right flap only. Enjoy the tutorial! If you have any questions, please ask. Lorri Heiling


47 Chocolate Mug Tutorial by Tanja Kolar
48 Supplies You can order these products in Tanja s german online store: PAPER Crumb Cake, Pool Party, Chocolate Chip, and Whisper White Cardstock, Gold Glimmer Paper, Quilted Christmas Designer Series Paper ACCESSORIES Rhinestones, Pool Party ⅜ Shimmer Ribbon ADHESIVES Tombow Liquid Glue, Tear & Tape Adhesive, Glue Dots TOOLS Big Shot, Trim Your Stocking Thinlits Dies, Stitched Shapes Framelits, Everyday Label Punch, Stampin Trimmer, 2 ¼ Circle Punch, 2 Circle Punch Measurements Metric Crumb Cake Cardstock o o 29.7cm x 16cm (mug) 15cm x 1.5cm, scored at 1cm on both ends (mug handle) Quilted Christmas Designer Series Paper o (8) 3cm x 10.5cm Scraps of Chocolate Chip, Whisper White, Pool Party Cardstock and Gold Glimmer Paper for punching and die cutting. Measurements Imperial Crumb Cake Cardstock o o 6 ¼ x 11 (mug) 6 x ⅝, scored at ⅝ on both ends (mug handle) Quilted Christmas Designer Series Paper o (8) 1 x 4 Scraps of Chocolate Chip, Whisper White, Crumb Cake, Pool Party Cardstock and Gold Glimmer Paper for punching and die cutting.


49 Instructions 1. Score the largest piece of Crumb Cake Cardstock on long side at: Imperial: 1 ¼, 2 ½, 3 ¾, 5, 6 ¼, 7 ½, 8 ¾, 10 - the remaining tab is for the glue. Metric: 3.5 cm, 7 cm, 10.5 cm, 14 cm, 17.5 cm, 21 cm, 24.5 cm, 28 cm - the remaining tab is for the glue. Score the short side: 2 / 5 cm Cut the score lines in red, as shown in the picture. 2. Fold all the lines and add the Tear & Tape Adhesive as shown and adhere.


50 3. Place the mug with the top down on your work surface. Apply Tombow Multipurpose Liquid Glue and stick the bottom together as shown. 4. Punch a scrap of Crumb Cake Cardstock 2 times with the 2 ¼ Circle Punch. Adhere to the inside and outside of the bottom of the mug. 5. Cut two slots into one piece of the designer paper so you can adhere the tabs on the handle on the backside of the designer paper. 6. Adhere all pieces of designer paper to the outside of the mug to decorate. 7. To decorate the mug, punch Chocolate Chip Cardstock with Everyday Label Punch and cut in half. 8. Punch Gold Glimmer Paper with 2 Circle Punch and place the two pieces of the Chocolate Chip Everyday Label on each side and adhere. 9. Fold a loop of the Pool Party Shimmer Ribbon on top of the glimmer paper and adhere with Glue Dots. 10. Die cut scrap of Whisper White Cardstock with circle from Stitched Shapes Framelits and adhere on top of the ribbon. 11. Die cut a snowflake from Pool Party Cardstock and adhere to the middle of the white circle. 12. Add a rhinestone in the middle of the snowflake.

51 13. Adhere your decoration to your mug. Enjoy the tutorial. Any questions please ask. Tanja Kolar


52 Happy Halloween Treat Tutorial 12 by Wendy Cranford
53 Supplies You can order these products in Wendy s American Online Store. STAMPS & BUNDLES Gourd Goodness, Spooky Cat PAPER Spooky Night Designer Series Paper, Basic Black card stock, Whisper White card stock, Pumpkin Pie card stock, Basic Gray card stock INK Basic Black archival ink, Pumpkin Pie ink, Pumpkin Pie Reinker ACCESSORIES Basic Black metallic thread, Basic Black shimmery ribbon, Whisper White 3-1/8 x 3-1/8 envelope ADHESIVES Stampin Dimensionals, Snail Adhesive, Glue Dots TOOLS Stitched Shapes Framelits, Big Shot, Spooky Cat punch, Stampin Trimmer,
54 Measurements Metric Basic Black card bases x 4 o 15.2cm x 7.6cm, score at 7.6cm fold in half Whisper White card stock inserts o 7cm x 7cm Designer Series Papers o 7cm x 7cm Pumpkin Pie card stock on one of the card bases o 7.3cm x 7.3cm Designer Series Papers Belly Band for Pizza Box o 4.5cm x 30cm Measurements - Imperial Basic Black card bases x 4 o 3 x 6, score at 3, fold in half Whisper White card stock inserts o 2-3/4 x 2-3/4 Designer Series Papers o 2-3/4 x 2-3/4 Pumpkin Pie card stock on one of the card bases o 2-7/8 x 2-7/8 Designer Series Papers Belly Band for Pizza Box o 1-3/4 x 12

 and fill the rest with rubbing alcohol.")

55 Instructions 1. Cut all pieces. Each card base and each layer on the card is the same size. This makes it very simple to start. 2. Decorate each card with pumpkins, or cats or the owl from one of the stamp sets. 3. Stamp on each of the envelopes to decorate them. 4. Use a Stampin Spritzer to create the color for the pizza box. Use Pumpkin Pie reinker and put drops in the spritzer (approx drops) and fill the rest with rubbing alcohol. The alcohol makes the ink dry very quickly, almost instantly. TIP: Protect your work surface by using an old box to place your pizza box in before spritzing. 5. After all the cards and envelopes are decorated and in the box, add the belly band. 6. Loosely wrap the long piece of designer series paper around the box. Add the stitched shapes dies after stamping your sentiment. add metallic thread under the stamped oval. For added detail Enjoy the tutorial. Any questions please ask. Wendy Cranford
56
Connie Stewart (405)
") Thank you for being a PAPER PUMPKIN subscriber! I hope that you enjoy the fabulous projects that my fellow demonstrators and I have created for you this month. If I can answer any questions or help you
Thank you for being a PAPER PUMPKIN subscriber! I hope that you enjoy the fabulous projects that my fellow demonstrators and I have created for you this month. If I can answer any questions or help you
STAMPIN' DO SOMETHING CREATIVE PAGE. (8" x 6") (20.3 x 15.2 cm) SUPPLIES
 (20.3 x 15.2 cm) SUPPLIES") DO SOMETHING CREATIVE PAGE (8" x 6") (20.3 x 15.2 cm) Crafting Forever (Créativité toujours/kreiert mit Liebe) Stamp Set; Vellum and Whisper White Cardstock; Fresh Florals Designer Series Paper Stack;
DO SOMETHING CREATIVE PAGE (8" x 6") (20.3 x 15.2 cm) Crafting Forever (Créativité toujours/kreiert mit Liebe) Stamp Set; Vellum and Whisper White Cardstock; Fresh Florals Designer Series Paper Stack;
Snow Festival Ornament, Box, & Card Designed By: Regina Andari November 2012
 Snow Festival Ornament, Box, & Card Designed By: Regina Andari November 2012 This tutorial features Snow Festival Designer Series Paper (DSP) in a coordinating ensemble that includes a greeting card and
Holiday Decorative Plate Collection Designed By: Amy Storrie October 2013
 Holiday Decorative Plate Collection Designed By: Amy Storrie October 2013 You will love having this beautiful plate displayed in your home year round. Each of the eight inserts has a Velcro back so that
Item Description Page # Price Item # Balloon Adventures Stamp Set 50 Occ $
 Balloon Adventures Stamp Set 50 Occ $26.00 142823 Crushed Curry 8.5x11 Cardstock 170 $8.00 131199 Pacific Point 8.5x11 Cardstock 171 $8.00 111350 Party Animal DSP 5 Occ $11.00 142738 Pacific Point Classic
Autumn Theme Boxed Cards Set Designed By: Jen Arkfeld August 2013
 Autumn Theme Boxed Cards Set Designed By: Jen Arkfeld August 2013 I love to have cards that match the seasons. Who wants a spring themed birthday card when they have a birthday in October? In this project,
Peeking through the Window Mini Pizza Gift Boxes
 Peeking through the Window Mini Pizza Gift Boxes Supplies: Stamps: Santa's Suit (144827) Bundle: Santa's Suit Bundle (146060) Dies: Santa Builder Framelits (144681), Layering Squares Framelits (141708),
Mini Pizza Box Album. Part of the warmth of Christmas comes wrapped up in special memories. What are some of your treasured holiday moments?
 Holiday Helper 2017 Mini Pizza Box Album Part of the warmth of Christmas comes wrapped up in special memories. What are some of your treasured holiday moments? Many times we try to capture those memories
Creating with the Envelope Punch Board Designed By: Regina Andari April 2014
 Creating with the Envelope Punch Board Designed By: Regina Andari April 2014 The Envelope Punch Board is no longer a new tool, but there are plenty of new ways to create with it. Learn to make a fun camera-shaped
Candy Cane Lane Wreath
 Holiday Helper Candy Cane Lane Wreath Decorating your home for the holidays is a very special occasion. This rustic, country-style wreath will be the perfect addition to your entry way, or coupled with
Pizza Box Holiday Table Treats
 Pizza Box Holiday Table Treats One for the adults containing chocolates & one for the kids with a Tic-Tac-Toe Rolo game! By Sarah Wills www.sarahsinkspot.com All images copyright 1990-2017 Stampin Up!
HOME Décor Framed Art Tutorial
 HOME Décor Framed Art Tutorial This is a FREE tutorial. Thank you for visiting my blog and hopefully, for subscribing. I am happy to share tutorial this with you. You can use it for your own project or
Team Stamp It Tutorial
 Team Stamp It Tutorial Christmas Pines One Sheet Wonder November 2016 Stampin Up product used in this tutorial may be purchased thru me online at www.stampwithtami.com. Please let me know if you have any
DAPPER DENIM CARD (4-1/4 X 5-1/2 ) (11 X 14 CM) SUPPLIES
 (11 X 14 CM) SUPPLIES") DAPPER DENIM CARD (4-1/4 X 5-1/2 ) (11 X 14 CM) Layering Love (Bonne couche d amour/im Herzen) Stamp Set; Dapper Denim and Whisper White Cardstock; 2016 2018 In Color Designer Series Paper Stack; Silver
DAPPER DENIM CARD (4-1/4 X 5-1/2 ) (11 X 14 CM) Layering Love (Bonne couche d amour/im Herzen) Stamp Set; Dapper Denim and Whisper White Cardstock; 2016 2018 In Color Designer Series Paper Stack; Silver
Holiday Helper Let it Snow Wreath
 Holiday Helper 2017 Let it Snow Wreath Do you have a couple of handpainted ornaments made by your grandmother? How about a tree skirt sewn by your mother? Who doesn t have a few ornaments that you made
Scentsational Season Boxed Cards & Tags Designed By: Kris McIntosh December 2012
 Scentsational Season Boxed Cards & Tags Designed By: Kris McIntosh December 2012 One of my favorite projects to work on is a boxed set of cards and tags. I love the Scentsational Season stamp set with
Snowman Gift Box Tower Designed By: Amanda Corbet December 2011
 Snowman Gift Box Tower Designed By: Amanda Corbet December 2011 This adorable snowman gift box tower is the perfect way to shower someone special with gifts. Finished as shown this box is over 16 inches
Under The Tree Gift Giving Class This class has some fun quick projects that will feature the Under the Tree Specialty Paper, Clothespins and the
 Under The Tree Gift Giving Class This class has some fun quick projects that will feature the Under the Tree Specialty Paper, Clothespins and the Cherry Cobbler Ribbon. 1. This project features the Gift
Hershey s Nuggets Candy Holder (set of two) Holiday Helper
 Holiday Helper") Holiday Helper Hershey s Nuggets Candy Holder (set of two) These little candy holders might be small but they have a big impact! Each one holds two Hershey s Nuggets and would be a great gift to hand out
Holiday Helper Hershey s Nuggets Candy Holder (set of two) These little candy holders might be small but they have a big impact! Each one holds two Hershey s Nuggets and would be a great gift to hand out
3D Tabletop Snowman. By Debbie Henderson All images copyright Stampin Up!
 3D Tabletop Snowman By Debbie Henderson www.debbiesdesignsblog.blogspot.com All images copyright 1990-2018 Stampin Up! Stampin Up! Supplies Used: Stamps: Alpine Adventure (147742), At Home With You (143681)
Birthday Cake Explosion Box Gift Set Designed By: Amanda Corbet July 2013
 Birthday Cake Explosion Box Gift Set Designed By: Amanda Corbet July 2013 This beautiful gift set will have you all ready to give a fabulous birthday gift! The gift box is an explosion box that has a cute
Thank You Gift for Stampers Designed By: Regina Andari December 2013
 Thank You Gift for Stampers Designed By: Regina Andari December 2013 As a Stampin Up! Demonstrator, this is the time of year when I like to not only come up with a useful gift for my customers to thank
Vintage-Inspired Ornament Gift Set Designed By: Michelle Joy Wecksler November 2013
 Vintage-Inspired Ornament Gift Set Designed By: Michelle Joy Wecksler November 2013 This Ornament Gift Set is perfect for the upcoming Holiday Season! This set features a vintage-inspired ornament, a beautiful
Cupcake Box Gift Set Designed By: Amanda Corbet June 2012
 Cupcake Box Gift Set Designed By: Amanda Corbet June 2012 Do you need a really bright and fun gift to celebrate someone s birthday? Well this set has it all for you! There are instructions to create this
Love Impressions Hot Chocolate Holder Designed By: Jacque Craig February 2011
 Love Impressions Hot Chocolate Holder Designed By: Jacque Craig February 2011 Here s another form of chocolate that you can give to your loved ones for Valentine s Day or any time of the year to keep them
Glassine Bag Album. Materials
 Glassine Bag Album Images Copyright Stampin Up! Copyright Kimberly Van Diepen Materials Paper Chocolate Chip cardstock (4 3/8 x 5 ¾ (2), 4 x 6, ½ x 2 ¼ and scrap) Rose Red cardstock (4 3/8 x 5 ½, 4 x 6
Holiday Helper. Little Take Out Box
 Holiday Helper Little Take Out Box This little take-out box is great for hiding little treats, a pair of earrings or some cold hard cash! The stick slides out easily so the receiver and take a peek at
MINI TRAVEL ALBUM & SUITCASE COVER Designed By: Regina Andari July 2013
 MINI TRAVEL ALBUM & SUITCASE COVER Designed By: Regina Andari July 2013 A mini travel album is the perfect way to save photos and memorabilia from a special trip and to keep special notes and give a written
HALF CASE CARD & TAG KEEPER
 HALF CASE CARD & TAG KEEPER By Debbie Henderson All images copyright 1990-2017 Stampin Up! Stampin Up! Supplies Used: Stamps: Christmas Quilt Inks: Tranquil Tide, Blushing Bride, Pool Party, Whisper White
12" x 12" Page Protectors Catalog: 16-17, p Set of 12 pages
 12" x 12" Page Protectors 135296 - Set of 12 pages 15-17 Designer Series Paper Stack 138432 - Set of 40 sheets: 4 each of 2 double-sided designs in 5 colors Cucumber Crush, Delightful Dijon, Mint Macaron,
Mosaic Flip Flop Album Designed By: Christy Fulk June, 2013
 Mosaic Flip Flop Album Designed By: Christy Fulk June, 2013 This is such a fun album to make! There are eight 6 x 6 pages in this album, along with eight half page flaps. Everyone will love how the pages
Stampin Up product used in this tutorial may be purchased thru me online at Please let me know if you have any questions.
 Stamp It Tutorial Birthday Blooms February 2016 Stampin Up product used in this tutorial may be purchased thru me online at www.stampwithtami.com. Please let me know if you have any questions. Send your
OVEN TREAT BOX. By Sarah Wills All images copyright Stampin Up!
 OVEN TREAT BOX By Sarah Wills www.sarahsinkspot.com All images copyright 1990-2018 Stampin Up! Stampin Up! Supplies Used: Stamps: Apron of Love (145835) Die Cutting: Apron Builder Framelits (145661), Layering
Getting Ready for Santa Gift Set Designed By: Julie Beltramo November 2013
 Getting Ready for Santa Gift Set Designed By: Julie Beltramo November 2013 This gift set will make anyone excited to get ready for Santa! The Covered Notepad will help you keep track of who s been naughty
Christmas Jingle Simply Scrappin Album Designed By: Jacque Craig January 2010
 Christmas Jingle Simply Scrappin Album Designed By: Jacque Craig January 2010 Now that Christmas is over, you probably have a ton of great photos that you d like to scrapbook. If you haven t tried Stampin
Baroque Motifs Christmas Gift Set Designed By: Monika A Davis December 2011
 Baroque Motifs Christmas Gift Set Designed By: Monika A Davis December 2011 Make this quick and easy ornament that can hang on your tree or use as a pretty 3D gift tag. The matching mini gift bag and greeting
O Holy Night Boxed Set Designed By: Kris McIntosh November 2013
 O Holy Night Boxed Set Designed By: Kris McIntosh November 2013 I fell in love with this stamp set when I first saw it and knew that it would make a gorgeous set of Vintage style Christmas cards and Tags.
Feel Better Survival Kit & Greeting Card Designed By: Monika A Davis January 2014
 Feel Better Survival Kit & Greeting Card Designed By: Monika A Davis January 2014 Make this small Feel Better survival kit that holds a chap stick and a pack of tissue paper. This is the perfect little
Provided by Elizabeth Green. Holiday Helper. Tin of Tags Cards
 Holiday Helper Provided by Elizabeth Green Holiday Helper Tin of Tags Cards During the holiday season, you can find a little bit of everything - from joy, merriment, and holiday cheer to a kind of peace
Teacher s Pet Designed By: Heidi King August 2013
 Teacher s Pet Designed By: Heidi King August 2013 Want to make a great impression? Here is the perfect gift for the teacher you love! This ensemble has a can perfect for you to fill with cookies or candy.
Birthday Basics Party Pack Designed By: Anjii Rempel June 2013
 Birthday Basics Party Pack Designed By: Anjii Rempel June 2013 Perk up your party with a banner, mini-cupcake décor, Invitation and Thank You cards and goody bag stuffers! Instructions Step 1 Using Raspberry
Sketch #15. Instructions Megan Daves.
 Sketch #15 Instructions Megan Daves www.iteachstamping.com The Fine Print: Thank you so much for subscribing to Definitely Sketches. We respectfully request that you do not copy and distribute this document.
Time to Celebrate Acetate Pop-Up Card Tutorial
 Time to Celebrate Acetate Pop-Up Card Tutorial Wait til they see all those cupcakes popping up! Supplies Used: Stamp Set(s), Ink and Coloring Accessories: Cupcake Party by Stampin Up Coastal Cabana, Rich
By: Ronda Wade Project Life! Everyday Cards using the Hello Lovely Card kit and accessory pack.
 By: Ronda Wade Project Life! Everyday Cards using the Hello Lovely Card kit and accessory pack. This class is featuring the Hello Lovely Card kit and accessory pack for an awesome All Occasion card class.
Hearts A Plenty Trio
 Hearts A Plenty Trio By Heidi Tekunoff January 2013 This month's free tutorial features three cards using variations on Negative Space and lots of hearts as the focal point, along with the Hearts Collection
Vintage Birthday Ensemble Designed By: Carrie Rhoades May 2012
 Vintage Birthday Ensemble Designed By: Carrie Rhoades May 2012 Vintage and paper crafting are a hot combination right now, so why not incorporate that in to a birthday celebration? This ensemble is a great
Sprinkles on Top Shaker Card Tutorial
 Sprinkles on Top Shaker Card Tutorial For the cupcake lover in all of us. Supplies: Stamp Set(s), Ink & Coloring Accessories: Create-A-Cupcake & Remembering Your Birthday by Stampin Up Chocolate Chip Ink
Convention 2013 Opening Session Projects
 Convention 2013 Opening Session Projects 5 Projects demonstrated by Pam Morgan To watch Pam Morgan make the projects see the video here: http://youtu.be/r3swig96hnw Starting approximately at time mark
Celebrate Standing Pop-Up Card Tutorial
 Celebrate Standing Pop-Up Card Tutorial Impress people with a balloon that actually floats. Supplies Used: Stamp Set(s), Ink and Coloring Accessories: Celebrate Today by Stampin Up Cutting Files: Celebrate
VARIED VASES STAMP SET and IN COLOR DESIGNER SERIES PAPER
 VARIED VASES STAMP SET and 2018-2020 IN COLOR DESIGNER SERIES PAPER Blythe Klipple, StampingWithBlythe.com, http://www.stampingwithblythe.com Stampin Up! Online Store: www.blythestamps.stampinup.net I
Eggs-tra Special Easter Pop-Up Box
 Eggs-tra Special Easter Pop-Up Box Made by Joanne Cantrell; Independent Stampin Up Demonstrator Inspired by Mitosu All images 1990-2017 Stampin Up! Supplies: Stamp Sets: Basket Bunch (143186* OCC); Hardwood
Pick Your Poison: Haunted House Treat Box, Luminary, Charm Bracelet and Gift Tag Designed By: Kris Kilkenny September 2011
 Pick Your Poison: Haunted House Treat Box, Luminary, Charm Bracelet and Gift Tag Designed By: Kris Kilkenny September 2011 These Halloween projects make cute gifts for your best friend or that special
A Dozen Creative Gift Wrap Ideas
 A Dozen Creative Gift Wrap Ideas Karen Fontinelle Independent Stampin Up! Demonstrator www.karenstamps.com We all need to wrap a gift from time to time. In case you ve run out of wrapping paper or just
Birthday Calendar Desk Set Designed By: Glenda Calkins December 2011
 Birthday Calendar Desk Set Designed By: Glenda Calkins December 2011 This gorgeous Birthday Calendar Desk Set can be used for many years to come. When you open it up you will find a perpetual calendar
Cake Favor Box and Baby Shower Invitation Designed By: Leigha Rock July 2011
 Cake Favor Box and Baby Shower Invitation Designed By: Leigha Rock July 2011 These adorable little cake favor boxes are perfect for birthdays, weddings or baby showers. Fill them with treats or with a
February 2017 Card Class
 February 2017 Card Class www.rondawade.com All Rights Stampin Up! Stamps: Basket Bunch Paper: Basic Black, Daffodil Delight, Whisper White Ink: Basic Black, Old Olive, Daffodil Delight Embellishments:
Winter Lantern Designed By: Amanda Corbet January 2012
 Winter Lantern Designed By: Amanda Corbet January 2012 Do you know someone who loves snowflakes? Or just needs a little something to light up their day? This pretty winter lantern will add some sparkle
Light of the Season Shaker Tutorial
 Light of the Season Shaker Tutorial To its lucky recipient, this card will be the Star of the show! Supplies: Stamp Set(s), Ink & Coloring Accessories: Greeting & sentiment have been computer generated,
Sketch #2. Instructions Angie Kennedy Juda.
 Sketch #2 Instructions Angie Kennedy Juda www.mychicnscratch.com The Fine Print: Thank you so much for subscribing to Definitely Sketches. We respectfully request that you do not copy and distribute this
Accordion Memory Keeper Gift Set Designed By: Gayle Smith September 2013
 Accordion Memory Keeper Gift Set Designed By: Gayle Smith September 2013 This project is a perfect gift for a friend or loved one. It consist of an Accordion Memory Keeper, where you can personalize with
LUCKY Banner & Pot O Gold Designed By: Julie Beltramo March 2012
 LUCKY Banner & Pot O Gold Designed By: Julie Beltramo March 2012 Spread a little St. Patrick s Day cheer with this project! You can dress up your fireplace mantle or any shelf or wall in your home, with
Friends Never Fade Lotion Holder and Card Designed By: Michelle Ueligitone August 2010
 Friends Never Fade Lotion Holder and Card Designed By: Michelle Ueligitone August 2010 This adorable gift box/bag is perfect for a bottle of lotion or soap and it comes with a matching mini gift card.
Garden Goddess Mixed Media Binder Album
 Designed by ~ Annette Green Graphic 45 Supplies: 1 each Garden Goddess 8 x 8 Paper Pad 1 pack Garden Goddess Chipboard 1 pack Garden Goddess Tags & Pockets 1 each Mixed Medium Album Kraft 1 pack G45 Staples
Die & Punch Art Reindeer Ghirardelli Treat Holder
 Die & Punch Art Reindeer Ghirardelli Treat Holder By Debbie Henderson www.debbiesdesignsblog.blogspot.com All images copyright 1990-2018 Stampin Up! Stampin Up! Supplies Used: Stamps: Dashing Deer (147728,147731)
Sketch #18. Instructions Angie Kennedy Juda.
 Sketch #18 Instructions Angie Kennedy Juda www.mychicnscratch.com The Fine Print: Thank you so much for subscribing to Definitely Sketches. We respectfully request that you do not copy and distribute this
Googly Ghouls Halloween Ensemble Designed By: Laurie Zoellmer October 2012
 Googly Ghouls Halloween Ensemble Designed By: Laurie Zoellmer October 2012 Whether you decide to make one, two or all three of these projects, they are sure to be a hit this Halloween! This Halloween Ensemble
Gorgeous Grunge Card Set Designed By: Amanda Corbet September 2013
 Gorgeous Grunge Card Set Designed By: Amanda Corbet September 2013 Have you been wondering how you can use the Gorgeous Grunge stamp set? Not sure what exactly to do with it? Well then this project is
Clutch Purse Card Set Designed By: Christy Fulk May 2013
 Clutch Purse Card Set Designed By: Christy Fulk May 2013 Everyone needs cards, don t they? Well, here s a card set anyone would love to have! This card set includes six cards with coordinating envelopes.
Product Spotlight: Winter Frost Home Décor & Cards Tutorial
 Product Spotlight: Winter Frost Home Décor & Cards Tutorial This project is a sampler using the new Winter Frost DSP, and the Frosted Flourishes! Make these 9 3 X 3 cards into full size cards, scrapbook
Floral Purse Card Set Designed By: Christy Fulk February, 2014
 Floral Purse Card Set Designed By: Christy Fulk February, 2014 This project will give you a little Spring in the middle of this cold Winter. The set includes two different designed Thank You cards. The
Graduation Cards and Treats Designed By: Yapha Mason April 2014
 Graduation Cards and Treats Designed By: Yapha Mason April 2014 Get ready for graduation season with your choice of gift card holder, money (or check) holder, and fun fold graduation cap card. Includes
One Sheet Wonder. Chic n Scratch October 2015!1
 One Sheet Wonder Stamps: Oh What Fun 140386, Christmas Tagables 134623 Ink: Real Red 126949, Old Olive 126953 Card Stock: Old Olive 100702, Thick Whisper White 140272, Merry Moments DSP138450, Real Red
Perfect Blend Ensemble Designed By: Laurie Zoellmer August 2013
 Perfect Blend Ensemble Designed By: Laurie Zoellmer August 2013 Here s the perfect project to make for your coffee-lover friends who love coffee and chocolate! It would also be a fun class to offer your
Creativity Delivered 2017 AUTUMN/WINTER CATALOGUE
 Creativity Delivered 2017 AUTUMN/WINTER CATALOGUE Stampin Up!'s ready-to-assemble kits will help you along in your creative journey. Pick from project kits or all inclusive kits. Everything necessary to
Note: This supply list is an internal document, which is being provided, in English only, for demonstrator use as part of a Stampin Up!
 Note: This supply list is an internal document, which is being provided, in English only, for demonstrator use as part of a Stampin Up! research project. Because of this, it does not adhere to our normal
A Cute Christmas Gift Card Holder Designed By: Jacque Craig September 2010
 A Cute Christmas Gift Card Holder Designed By: Jacque Craig September 2010 This is an easy little gift card holder that you can make several of at one time, set aside, and later fill with a gift card and
Butterfly Gift Box Designed By: Amanda Corbet August 2012
 Butterfly Gift Box Designed By: Amanda Corbet August 2012 This is an extra special gift box that would be perfect for an extra special person! This butterfly shaped box is 8 wide, 6 tall, and 2-1/2 deep.
6 x 6 Mini Accordion Pocket Album Designed By: Debbie Naylor May 2010
 6 x 6 Mini Accordion Pocket Album Designed By: Debbie Naylor May 2010 Here is a 6 x 6 mini scrapbook album that is perfect for capturing memories of your children, grandchildren, or BFF s. When fully opened,
Paint the Town Easel Card Tutorial
 Paint the Town Easel Card Tutorial A colorful birthday card...quite literally. Supplies Used: Stamp Set(s) & Ink: Paint the Town by Penny Black Star Stamp-source unknown. Use any small star you have on
Foxy Friends July 2016
 Foxy Friends July 2016 Chic n Scratch 1 Measurements Pool Party: 8-1/2 x 5 1/2, 2 1/4 x 4 1/4, piece for die cut DSP: 4 x 5 1/4, 2 x 4 Whisper White: 4 x 5 1/4 piece for die cutting Chic n Scratch 2 1.
Designed by Gloria Stengel
 Designed by Gloria Stengel Graphic 45 Supplies: 2 sheets Cut Apart (#4501051) 2 sheets Flourish (#4501052) 1 pack Cardstock Tags and Pockets (#4501056) 2 Large Tags - Ivory (#4500849) 1 pack Washi Tape
Card kit project sheets
 Card kit project sheets Use these projects to host an OWH cardmaking party! You may also use them for make-and-takes or classes, just please credit OWH. 1 Cut papers as per sketch. 2 Cut backer to 5.5
Big on Birthdays Birthday Club 2017
 Big on Birthdays Birthday Club 2017 www.rondawade.com All Rights Stampin Up! Paper: Basic Black, Whisper White, Bermuda Bay, Glimmer Paper Assortment Ink: Bermuda Bay, Basic Black Embellishments: Stampin
Fang-tastic Cup Cake Decorating Kit Designed By: Michelle Ueligitone September 2010
 Fang-tastic Cup Cake Decorating Kit Designed By: Michelle Ueligitone September 2010 Here s a little basket filled with all the spooktacular items needed to decorate Halloween cupcakes. Instructions Step
Greetings Human Shaker Card Tutorial
 Greetings Human Shaker Card Tutorial A great card for a boy or a computer geek of any age. Supplies: Stamp Set(s), Ink & Coloring Accessories: Boys Will Be Boys & Sense of Time-gears from Stampin Up Greeting,
Graduation Picture Frame & Punch Art Page Designed By: Brenda Ballesteros June 2010
 Graduation Picture Frame & Punch Art Page Designed By: Brenda Ballesteros June 2010 This easel picture frame is a cute little way to display your favorite graduate s photo. Instructions All steps in this
Sketch #2. Instructions Megan Daves.
 Sketch #2 Instructions Megan Daves www.iteachstamping.com The Fine Print: Thank you so much for subscribing to Definitely Sketches. We respectfully request that you do not copy and distribute this document.
12 Days of Christmas Tree Countdown Designed By: Melissa Davies November 2012
 12 Days of Christmas Tree Countdown Designed By: Melissa Davies November 2012 Christmas is just around the corner! Get the little ones excited with a tree filled with candy and treats! Watch their excitement
Envelope Punch Board Techniques
 Envelope Punch Board Techniques Welcome! Construction workers and do-it-yourselfers aren t the only ones that need tools. Stampers and papercrafters love tools, too! The new Envelope Punch Board is a must
CARD # 1. Designed by Gloria Stengel. Place In Time - December Card Be Merry. Graphic 45 Supplies: Additional Supplies: Tools & Adhesive Instructions:
 Place In Time - December Card Be Merry CARD # 1 Designed by Gloria Stengel Graphic 45 Supplies: 218 sheets piece December of red Cut-Apart twine (#4500614) 18 sheet piece December of red Foundations sparkle
Fabulous Florets Trifold Card Holder Designed By: Wendy Weixler June 2011
 Fabulous Florets Trifold Card Holder Designed By: Wendy Weixler June 2011 This is a project that is a kind of pay-it-forward gift a trifold full of cards that the recipient could then give to someone else!
Candy Cane 12 Days of Christmas Designed By: Sonya Oshiro November 2010
 Candy Cane 12 Days of Christmas Designed By: Sonya Oshiro November 2010 Count down the days till Christmas with a sweet treat for each day or fill it with little notes of things to do! Instructions All
CLASS HANDOUT Emergency Birthday Card Kit (July 2013)
") CLASS HANDOUT Emergency Birthday Card Kit (July 2013) In this class you ll learn how to make a versatile kit that you can adapt for many occasions. The kit includes three cards and three tags and is housed
CLASS HANDOUT Emergency Birthday Card Kit (July 2013) In this class you ll learn how to make a versatile kit that you can adapt for many occasions. The kit includes three cards and three tags and is housed
Christmas Magic Merry Christmas Lantern
 Designed by ~ Annette Green Graphic 45 Supplies: 1 each Deep Rectangular Matchbook Box (4501520) 1 each Christmas Magic Collection Pack (4501735) 1 pack Christmas Magic Chipboard (4501737) 1 pack Metal
Greeting Card Set with Decorative Box Designed By: Monika A Davis November 2013
 Greeting Card Set with Decorative Box Designed By: Monika A Davis November 2013 Make this all occasion greeting card set with a matching decorative box to hold them. It is the perfect present for anyone.
Blissful Bread Pudding Recipe Page Designed By: Shelby Kahalekulu-Nakama March 2011
 Blissful Bread Pudding Recipe Page Designed By: Shelby Kahalekulu-Nakama March 2011 This bread pudding recipe is blissful and unique with its haupia topping. Instructions Step 1 Print recipe on an 8-1/2
Bridal Shower Ensemble Designed By: Leena Girsa March 2013
 Bridal Shower Ensemble Designed By: Leena Girsa March 2013 Spring brings showers not only wet ones, but bridal ones too! This ensemble takes care of the invitations, favors and coordinating Thank You cards
Exploding Teapot. - Roughly 2½" pieces of A4 cardstock to cut out teapot pieces
 Supplies Calypso Coral cardstock - Roughly 2½" pieces of A4 cardstock to cut out teapot pieces Whisper White cardstock - Roughly 2 pieces of A4 cardstock to cut linings and make the flower Pool Party cardstock
Birthday Card Organizer Designed By: Zeva Cho April 2010
 Birthday Card Organizer Designed By: Zeva Cho April 2010 This Birthday Card Organizer will help you organize your family members and friends birthdays. Each monthly file folder holds a calendar card for
ONE SHEET WONDER SUPPLIES FOR ALL CARDS
 ONE SHEET WONDER SUPPLIES FOR ALL CARDS Stamp: Something to Say Paper: Park Lane Designer Series Paper, Whisper White, Sahara Sand, Soft Suede Ink: Soft Suede Other: Daffodil Delight ¼ Cotton Ribbon, Whisper