Create a Creepy Face Photo Manipulation in Photoshop
|
|
|
- Sherilyn Woods
- 5 years ago
- Views:
Transcription
1 i TUTORIALS Create a Creepy Face Photo Manipulation in Photoshop by Alan Klim Advertisement In this tutorial we ll show you an easy way to create a nice creepy face effect using Photoshop. We strongly suggest using the photo from the tutorial assets. VIEWER DISCRETION IS ADVISED. Tutorial Details Program: Adobe Photoshop Version: CS5 Difficulty: Intermediate/Advanced Estimated Time of Completion:1 hour Tutorial Assets Man s face by Darkwater Blue paper texture by SolStock
2 Texture 109 by Frostbo Final Result

3 Step 1 Create a new file in Photoshop.

.")
4 Step 2 Paint the background black and place the photo on a new layer. Rasterize the photo and desaturate it a bit (Ctrl+U; Hue/Saturation). Step 3
 and pick #3c3939 as your foreground color.")
 again.")
5 Create a new layer and pick the Brush Tool (B). Select a simple Soft Round brush (size: around 50px) and pick #3c3939 as your foreground color. Paint some shadows around the eyes and then change the Blend Mode to Linear Burn and the Fill (or Opacity) to 50%. Step 4 Now we re going to create the stiches. So, create a new layer and pick the Brush Tool (B) again. From the brush list select a Chalk brush and hit F5. Apply these parametres.

6
7


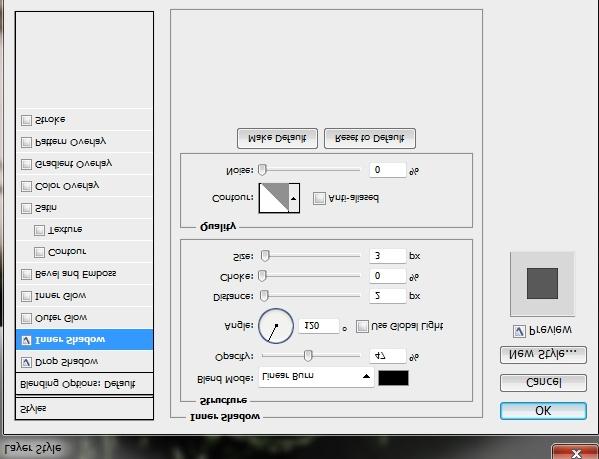
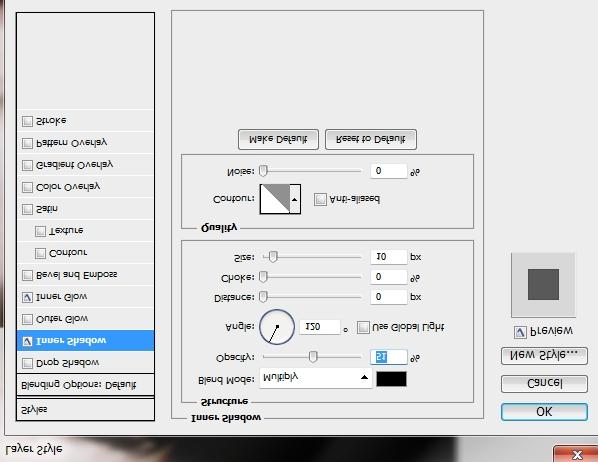
8 Change the color to #8f1313 and then draw some curved lines wherever you want to place your stiches. Change the Fill to 70% and add these styles.
9


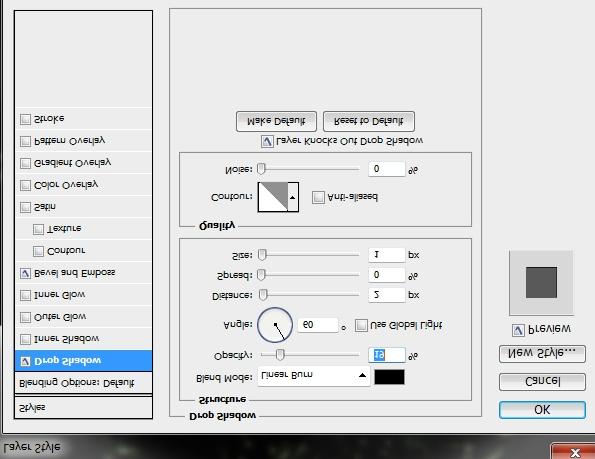
10 Step 5 Duplicate this layer and place the copy before your original stiches layer. Turn Fill to 0% and replace its styles with this one. Step 6 Create a new layer and pick a Hard Round brush. Set the size to 4-5px and change the color to #b Draw some dots around the stiches.

11 Change the Blend Mode to Linear Burn and the Fill to 20%. Then apply these styles.

12 Step 7 Create a new layer and change the color to #eae9e8. Change the size of your brush to 3 px and pick the Pen Tool (P). Set two anchor points on the holes you created in the previous step and apply a stroke path. Repeat this until all the holes are tied.


13 Then apply the following styles.

14

15 Step 8 Duplicate the original stiches layer (step 4), place it on top of the layers stack and turn its Fill to 0%. Clear the styles and add this one. Step 9 Group the layers created in Steps 4-8 and name the group Stiches 1. Repeat the process a couple of times to add some more stiches.

16 Step 10 On a new layer place the Blue paper texture and change its Blend Mode to Color Burn and the Fill to 47%.

17 Step 11 Create a new layer and paint it with #fdc689. Change the Blend Mode to Color Burn and Fill to 25%.
18 Step 12 Merge all the layers created so far (except from the background) and duplicate this new layer. On the copy go Image>Adjustments>Levels (Ctrl+L) and apply these parametres.
 coming out of his mouth using the Brush Tool (B) and the Smudge Tool.")
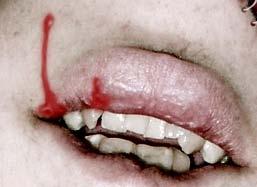
19 Then desaturate a bit the photo (about -20/30) and lower the Fill to 50% (Blend Mode: Normal). Ads Free Photo Editor Why Pay For Photo Editing Software. Try Full Version Of Gimp For Free! Step 13 On a new layer add some blood (color: #9e2120) coming out of his mouth using the Brush Tool (B) and the Smudge Tool. It may take you some time but eventually you ll make it. Then apply the following styles. NOTE: Add some highlights on a separate layer if you want.
20

21 Step 14 On a new layer place the Texture 109 and rasterize it. Scale it down a bit, so that the bright part covers the face. Then desaturate it (-100) and using the Levels panel increase the contrast a lot.

22 Change the Blend Mode to Color Burn, the Opacity to 75% and the Fill to 31%. Add a layer mask and paint black the selection shown on the image below (chalk brush, opacity: 30%, flow: 60-70%).

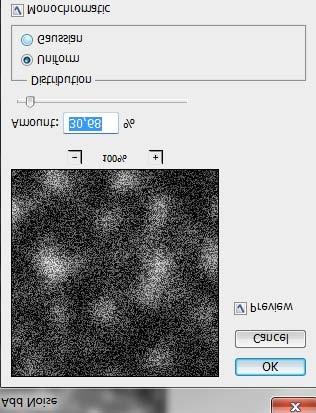
23 Step 15 Create a new layer and paint the canvas black. Then go Filter>Noise>Add Noise.

24 Next, go Filter>Pixelate>Pointillize. Now desaturate the layer (-100) and add this Gaussian Blur filter.

25 Change the Blend Mode to Overlay and the Fill to 44%. Step 16 Create a new layer and paint it with #5697af. Change the Blend Mode to Color and the Fill to 23%. Your photo should then look something like this.
26 Step 17

27 Merge all the layers created so far (except from the background) and resize the photo if you want. Change the name of this layer to face. Duplicate this new layer and go Filter>Stylize>Glowing Edges. Duplicate this layer and rename the copy to glowing edges color ; we ll use it later. Then desaturate the original glowing edges color layer (-100) and change the Blend Mode to Soft Light and Fill to 92%. Add a layer mask and hide any unwanted parts.
28 Step 18 Create a new layer and using a soft round Brush (B) paint some parts black to hide them (hair and any other unwanted parts).
 on top of the layers stack.")
29 Step 19 Place the glowing edges color layer created in Step 17 (not the desaturated) on top of the layers stack.then go Filter>Distort>Glass.
 from the desaturated glowing edges layer created in Step 17.")
 created in Step 17.")
30 Now change the Blend Mode to Subtract and lower Fill to something around 60-70%. Copy the mask (hold Alt and drag it) from the desaturated glowing edges layer created in Step 17. Step 20 Add some shadows inside the mouth using a soft round brush. Step 21 Duplicate the original layer (face) created in Step 17. Change your foreground color to #a60e0e and the background one to #ffffff (white). Then go Filter>Sketch>Photocopy.

31 Change the Blend Mode to Linear Burn and the Fill to 35%. Add a layer mask and erase some parts.
.")
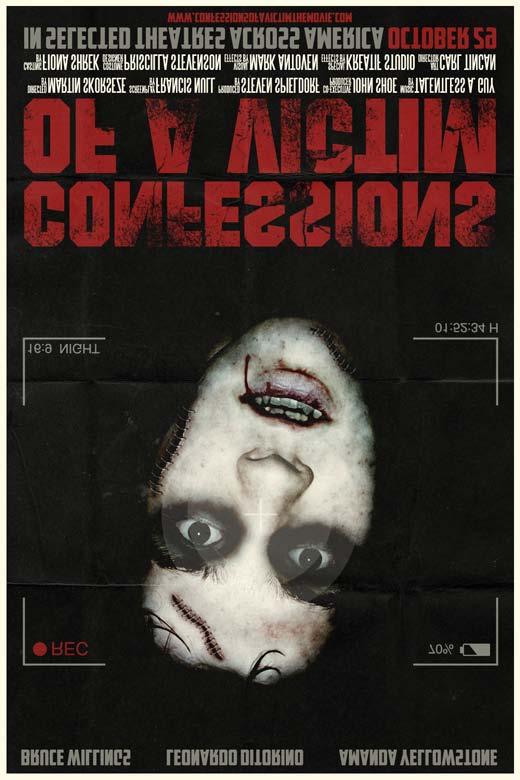
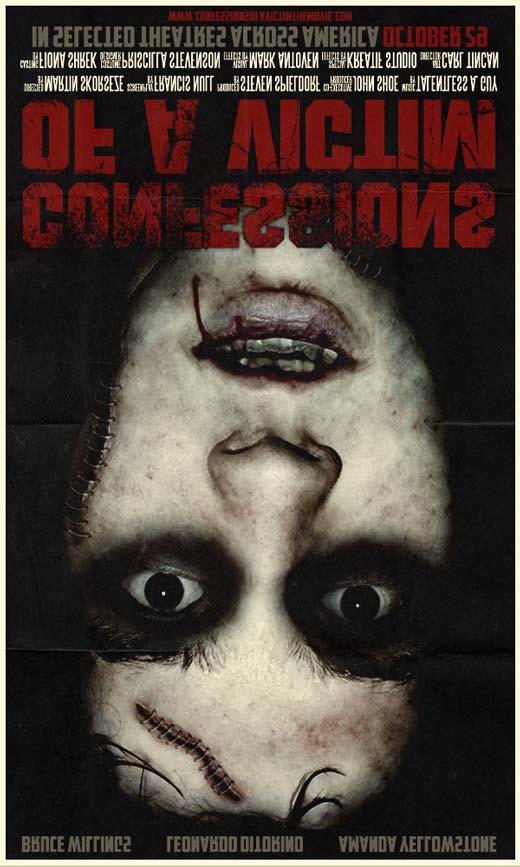
32 Conclusion That s it. Your creepy/severely injured/etc. etc. effect is now ready. Add any styles you want to make it look even better (you can turn this into a b-movie poster for instance). Check the variations for inspiration. We hope you enjoyed this tutorial. Variation
33
34 Ads
Create a Surreal Out of Bounds Photo Manipulation in Photoshop
 Create a Surreal Out of Bounds Photo Manipulation in Photoshop By: Loredana Papp In this tutorial we will combine several images of water, animals, and people to create a surreal out of bounds photo manipulation
'Photoshop'. "Realistic Eye Texture Painting" by Krishnamurti Martins Costa
 Level: intermediate Technique: digital painting Software: Adobe Photoshop 'Photoshop'. "Realistic Eye Texture Painting" by Krishnamurti Martins Costa Email: kris@antropus.com Web: http://www.antropus.com
Colorful Glowing Mask Photoshop Tutorial Photoshop TUTfactory The best Photoshop tutorials in one place
 Step 1: To start, create new canvas sized at 994 1312 pixels, and fill it with black. Next, create a new layer, and go to Filter->Render->Clouds. Duplicate this layer, and then merge the two layers. Set
Design a Halloween Pumpkin Wallpaper in Photoshop
 Design a Halloween Pumpkin Wallpaper in Photoshop By: Alvaro Guzman Halloween is near! So let's take a pumpkin image, carve it up, and light it for this coming holiday. You'll learn how to get this nice
Create a Beautiful Abstract Portrait in Photoshop - Psd Premium Tutorial
 Create a Beautiful Abstract Portrait in Photoshop - Psd Premium Tutorial By: Wojciech Pijecki In this tutorial we will combine several stock images to create an artistic, abstract portrait of a woman.
Using the Shoe Advertisement tutorial, create a shoe ad that is specifically designed to appeal to your assigned consumer.
 Lesson Instructions: Using the Shoe Advertisement tutorial, create a shoe ad that is specifically designed to appeal to your assigned consumer. Consider the specifications in the tutorial as the requests
Realistic Skin Smoothing
 TIP SHEET #7 Realistic Skin Smoothing I think it s fair to say when it comes to retouching techniques, the number of different ways to smooth skin is seemingly endless. From blurring techniques through
PHOTOSHOP & ILLUSTRATOR BOOTCAMP
 FALL 2014 - ELIZABETH LIN PHOTOSHOP & ILLUSTRATOR BOOTCAMP ILLUSTRATOR ALIGNMENT To access the alignment panel, go to Window -> Align. You should see a panel like the one below. This panel allows you to
HOW TO CREATE A SUPER SHINY PENCIL ICON
 HOW TO CREATE A SUPER SHINY PENCIL ICON Tutorial from http://psd.tutsplus.com/ Compiled by INTRODUCTION The Pencil is one of the visual metaphors most used to express creativity. In this tutorial,
Simple Surreal Landscape
 Simple Surreal Landscape By Kirin Knapp Use some easy photo manipulation skills to make a surreal landscape scene. Here are all of the images we re going to use. Open a new file and make it oversized so
Name the layer you rotated in step 3 Stripe and lower the opacity to 43%.
 Step 1 Open Photoshop and create a new file 1085 649 pixels. Fill the layer with a bright blue color (#0095db) by pressing Shift + F5. This will be the background for our pop art scene. Step 2 Let s create
photoshop filters kelly ludwig assistant professor
 photoshop filters kelly ludwig assistant professor sharpening images reducing noise correcting distortions in images practical filters There are over 100 filters that ship with Photoshop and they're all
EXTREME CONTRAST PHOTO EFFECT
 EXTREME CONTRAST PHOTO EFFECT In this Photoshop tutorial, we re going to learn how to use layers, layer blend modes, some noise, a little sharpening, and a simple adjustment layer to easily give a photo
Turning Photograph Into Cartoon-Style Picture. Digital Media I West High School Susan M. Raymond
 Turning Photograph Into Cartoon-Style Picture Digital Media I West High School Susan M. Raymond Part 1: Creating Outline Wondering how those guys on the internet turn photograph into a nice cartoon-style
Create a Magical Flaming Heart Illustration in Photoshop
 All Topics Free Tutorials Courses ebooks Pricing Sign In Free Account Advertisement Design & Illustration Categories Learning Guides PHOTO EFFECTS Create a Magical Flaming Heart Illustration in Photoshop
A quick note: We hope that you will find something from the Tips and Tricks that will add a little pizazz to your yearbook pages!
 A quick note: The following pages are tips and tricks for Basic Photoshop users. You may notice that some instructions indicate that non-awpc fonts were used, and that some colors were created using the
Here is a 100% zoom close up. Name in Popsicles
 Here is a 100% zoom close up Name in Popsicles Step 1 Let s start by creating a new Photoshop document. Mine is 2560 1440 pixels. Fill the background with a color of your choice (it s not important at
Photoshop Project 1: Create Vector Art
 Photoshop Project 1: Create Vector Art Duplicate and name layers Create new layers Show and hide layers Apply the desaturate adjustment Work with the Pen tool Work with shape layers Zoom in and out of
CURRICULUM MAP. Standards Content Skills Assessment E4. Evaluate the purpose and
 CURRICULUM MAP Course/ Subject: Graphic Design I Grade: 9-12 Month: September Enduring Understanding Technology is created, used and modified by humans. A technological world requires that humans develop
Creating Pastel Images and other effects in Photoshop
 Creating Pastel Images and other effects in Photoshop Martin Addison 2015 Creating pastel images Page 1 Martin Addison FRPS Using White Layers in Photoshop 1. Create a new empty Layer 2. Edit> Fill 3.
Cute Gooey Blob Photoshop Tutorial
 Download the PSD Cute 3D Character.zip 22.11 MB Download from Website (http://photoshoptutorials.ws/downloads/psd/cute 3D Character.zip) Cute Gooey Blob Photoshop Tutorial Step 1 Create a new document
METAL TEXT EFFECT. Step 1: Create A New Document. Step 2: Fill The Background With Black
 METAL TEXT EFFECT In this text effects tutorial, we ll learn how to easily create metal text, a popular effect widely used in video games and movie posters! It may seem like there s a lot of steps involved,
How to Create Spooky Halloween Typography in Photoshop
 Envato Elements: Unlimited templates, graphics, courses, ebooks, and now 300,000 photos! Only $29/month envato-tuts+ Sign Up Sign In Advertisement DESIGN & ILLUSTRATION > TEXT EFFECTS How to Create Spooky
How to Draw a Realistic iphone 4 with
 Home Freebies Submit Your Work Contact Us How to Draw a Realistic iphone 4 with Photoshop Jan 3 2011 By Mohammad Jeprie 34 Comments In this tutorial, we will draw a realistic-looking iphone 4 using Photoshop.
Digital Image Manipulation 2014
 Week 4 Advanced Type Techniques- create special effect type Step 1 Create a new 1024 x 768 px document. Set the document background color to light pink or follow my colour (#f8cece) Create the text using
prepared by Allison Hwang for T. Purdy 2011
 This tutorial shows you how to create a basic screen display on a product in Adobe Photoshop. Creating details, such as shadows and reflections, can help make your product more realistic and convincing
AGENDA :: MULTI- MEDIA TOOLS :: CLASS NOTES. :: Homework Critiques Best and Worst Websites. :: Photoshop Lesson 2 Things aren t what they seem
 CLASS :: 02 02.02 2018 AGENDA :: Homework Critiques Best and Worst Websites :: Photoshop Lesson 2 Things aren t what they seem I. PHOTO RETOUCHING: Before There Were Computers (Web Post) http://jmcolberg.com/weblog/2010/01/photoshop_before_there_were_computers_the_art_of_retouching_and_improving_negatives_and_prints/
This tutorial will show you how to change your images into a cool dirty grunge design, which could be used for posters, prints, CD covers, etc.
 This tutorial will show you how to change your images into a cool dirty grunge design, which could be used for posters, prints, CD covers, etc.today We ll be making this: STEP 1: Open a new document in
Tablet overrides: overrides current settings for opacity and size based on pen pressure.
 Photoshop 1 Painting Eye Dropper Tool Samples a color from an image source and makes it the foreground color. Brush Tool Paints brush strokes with anti-aliased (smooth) edges. Brush Presets Quickly access
Create a Dreamlike Photo Manipulation of an Emotional Girl with a Dramatic Lighting in Photoshop. By Andrea Garcia - February 12,
 Create a Dreamlike Photo Manipulation of an Emotional Girl with a Dramatic Lighting in Photoshop By Andrea Garcia - February 12, 2015 396 11 Create a Dreamlike Photo Manipulation of an Emotional Girl with
Adobe Photoshop The program: The Menus: Computer Graphics I- Final Review
 Computer Graphics I- Final Review The written portion of your final exam will be 25 multiple choice questions and one free response. Some parts of the exam will be related to examples, images and pictures.
AGENDA. :: Homework Critiques (5 minutes each) :: Photoshop Lesson 3. A-1 Gorgeous! [ COMPOSITE DEMO ] :: 7mins. I. SELECTIONS [ Common Law ]:
![AGENDA. :: Homework Critiques (5 minutes each) :: Photoshop Lesson 3. A-1 Gorgeous! [ COMPOSITE DEMO ] :: 7mins. I. SELECTIONS [ Common Law ]:](/thumbs/93/112781712.jpg "AGENDA. :: Homework Critiques (5 minutes each) :: Photoshop Lesson 3. A-1 Gorgeous! [ COMPOSITE DEMO ] :: 7mins. I. SELECTIONS [ Common Law ]:") CLASS :: 09.24 2018 AGENDA :: Homework Critiques (5 minutes each) A-1 Gorgeous! Upload A-1 Project to Student Folder :: Photoshop Lesson 3 [ COMPOSITE DEMO ] :: 7mins. I. SELECTIONS [ Common Law ]: a.
CLASS :: 09.24 2018 AGENDA :: Homework Critiques (5 minutes each) A-1 Gorgeous! Upload A-1 Project to Student Folder :: Photoshop Lesson 3 [ COMPOSITE DEMO ] :: 7mins. I. SELECTIONS [ Common Law ]: a.
Black (and White) Magic
 Magic") Black (and White) Magic Close your eyes, take a deep breath, and imagine a future where you no longer shoot both color and black and white images. Instead, you capture only color. Then, following the shoot,
Black (and White) Magic Close your eyes, take a deep breath, and imagine a future where you no longer shoot both color and black and white images. Instead, you capture only color. Then, following the shoot,
Texts and Resources: Assessments: Freefoto.com Group Photo Projects
 Effective Date: 2009-10 Name of Course: Digital Photography Grade Level: 9-12 Department: Industrial Technology and Engineering Length of Course: 30 cycles Instructional Time: 180 days Period Per Cycle:
In this Adobe Photoshop tutorial, we re going to look at a way to give a photo a more ghostly appearance.
 GHOSTING AN IMAGE In this Adobe Photoshop tutorial, we re going to look at a way to give a photo a more ghostly appearance. I m a fan of horror films, but I admit I m a bit shallow in that I usually just
How to Create Fake Shadows
 TIP SHEET #8 How to Create Fake Shadows As well as the colour, it s the shadows in a picture that help to give it mood and atmosphere so in this tutorial I want to show you how you can add in extra shadows.
Star Diffusion Tutorial
 Star Diffusion Tutorial Learn how to add a unique dreamy effect to your photos with this Star Diffusion Photoshop tutorial. This Photoshop effect creates diffusion in the shape of a four-point star and
HOW TO CREATE A DARK SURREAL ILLUSTRATION IN PHOTOSHOP
 HOW TO CREATE A DARK SURREAL ILLUSTRATION IN PHOTOSHOP Tutorial from http://psd.tutsplus.com/ Compiled by INTRODUCTION In this tutorial we are going to create a dark surreal illustration using
Glowing Surreal Planet Design. Final Image Preview
 Glowing Surreal Planet Design Final Image Preview. Step 1 First, go to the S:\ drive and locate the folder called Glowing Planet Design. Copy the City Skyline file and paste it in your Glowing Planet Design
Types of Mask. Layer masks
 Photoshop Layer Mask Features Non destructive (does not delete pixels) until applied Uses brush tool which is configurable Can be added to any layer (except Background unless double click to unlock) including
Winter Card.
 Winter Card Used images: http://www.cgtextures.com/texview.php?id=24321&phpsessid=95e8e8290894cc5194898 e16d1dddb4c http://www.cgtextures.com/texview.php?id=14285&phpsessid=95e8e8290894cc5194898 e16d1dddb4c
AGENDA :: MULTIMEDIA TOOLS :: CLASS NOTES. :: Homework Critiques (5-7 minutes each) :: Photoshop Lesson 3. A-1 Gorgeous! [ COMPOSITE DEMO ] :: 7mins.
![AGENDA :: MULTIMEDIA TOOLS :: CLASS NOTES. :: Homework Critiques (5-7 minutes each) :: Photoshop Lesson 3. A-1 Gorgeous! [ COMPOSITE DEMO ] :: 7mins.](/thumbs/86/93336476.jpg "AGENDA :: MULTIMEDIA TOOLS :: CLASS NOTES. :: Homework Critiques (5-7 minutes each) :: Photoshop Lesson 3. A-1 Gorgeous! [ COMPOSITE DEMO ] :: 7mins.") CLASS :: 03 02.10 2017 AGENDA :: Homework Critiques (5-7 minutes each) A-1 Gorgeous! Upload A-1 Project to Student Folder :: Photoshop Lesson 3 [ COMPOSITE DEMO ] :: 7mins. I. SELECTIONS [ Common Law ]:
CLASS :: 03 02.10 2017 AGENDA :: Homework Critiques (5-7 minutes each) A-1 Gorgeous! Upload A-1 Project to Student Folder :: Photoshop Lesson 3 [ COMPOSITE DEMO ] :: 7mins. I. SELECTIONS [ Common Law ]:
Tutorial Resources. Combine a Crocodile with a Car to Create an Exotic Crocomobile Photoshop Tutorials
 Tutorial Resources Crocodile1 SXC Crocodile2 charadestock Crocodile3 frostdragon64 Old car achatinastock Background SXC Bird rml-stock sign1 discordia-stock Sign2 ecathe Step 1 Open the background image
Contents: Bibliography:
 ( 2 ) Contents: Sizing an Image...4 RAW File Conversion...4 Selection Tools...5 Colour Range...5 Quick Mask...6 Extract Tool...7 Adding a Layer Style...7 Adjustment Layer...8 Adding a gradient to an Adjustment
Create a Cute Furry Vector Monster in Illustrator
 Create a Cute Furry Vector Monster in Illustrator Other labs from this author can be found at http://www.blog.spoongraphics.co.uk/tutorials/create-a-cute-furry-vector-monster-inillustrator Follow these
DAZ Productions - 3D Models, 3D Content, and 3D Software
 Página 1 de 26 Postwork made Easy Author: mizgriz Step 1: Preparing the image. Step 2: Get your glow on. Step 3: And now for something completely (not) different... Step 4: Hue and Saturate Step 5: About
Extreme Makeovers: Photoshop Retouching Techniques
 Extreme Makeovers: Table of Contents About the Workshop... 1 Workshop Objectives... 1 Getting Started... 1 Photoshop Workspace... 1 Retouching Tools... 2 General Steps... 2 Resolution and image size...
Painting with Pixels SETTING UP
 Painting with Pixels These notes have been prepared using Photoshop CC 2015.5.0, a Windows PC and a tablet such as Wacom Intuos. A tablet of some sort is virtually mandatory as the brush strokes are supposed
PHOTOSHOP TUTORIAL: DIGITAL DARKROOM TECHNIQUES
 PHOTOSHOP TUTORIAL: DIGITAL DARKROOM TECHNIQUES STEP BY STEP TRAINING Learn by doing step by step exercises. Includes downloadable class files that work on Mac & PC. EDITION 1 Copyright Info Published
2.11 CASTING LIGHT THROUGH A WINDOW
 2.11 CASTING LIGHT THROUGH A WINDOW Adding a light source to a photograph can increase the photograph s dramatic impact especially when the light is shining through a paned window. Actually setting up
Converse Chuck Taylor Shoes Photoshop Tutorial
 20 Converse Chuck Taylor Shoes Photoshop Tutorial Step 1 Create A New Document Create a New Document. The size of my canvas is 600px x 700px with a 72dpi resolution. Save as Chuck Taylor - Your Name. Step
Building - Image*After Bokeh - Regularjane Landscape 1 - Anders Bjerré Pedersen Landscape 2 - author Sundstrom(nickname)
") Click to enlarge the image. Used images: Download Moon shape(image created with the Photoshop tools) Icicles - Sergei Furtcev Cloud 1(Ruslan Olinchuk), Cloud 2(Image*After), Cloud 3(Sergei Perov) Stars
Click to enlarge the image. Used images: Download Moon shape(image created with the Photoshop tools) Icicles - Sergei Furtcev Cloud 1(Ruslan Olinchuk), Cloud 2(Image*After), Cloud 3(Sergei Perov) Stars
Central Photography [INSTAGRAM EFFECTS]
![Central Photography [INSTAGRAM EFFECTS]](/thumbs/96/129260346.jpg "Central Photography [INSTAGRAM EFFECTS]") 1 1. Open Photoshop. 2. Go to File/New (Ctrl+N). 3. Name your file. 4. Set the Width to 11 inches. 2 5. Set the Height to 8.5 inches. 6. Set your Resolution to 200 pixels/inch. 7. Set your Background Contents
1 1. Open Photoshop. 2. Go to File/New (Ctrl+N). 3. Name your file. 4. Set the Width to 11 inches. 2 5. Set the Height to 8.5 inches. 6. Set your Resolution to 200 pixels/inch. 7. Set your Background Contents
 http://blog.spoongraphics.co.uk/tutorials/how-to-intensify-your-landscape-photos-in-photoshop This post was originally published in 2011 THE TIPS AND TECHNIQUES EXPLAINED MAY BE OUTDATED. The post-processing
Create a Candy Cane. Create a new canvas with the size 8x10 inches at 300 pixel/inch. See image below Ctrl + N
 Create a Candy Cane The Basic Candy Cane Canvas and Shape 1. Create a new folder, name it Candy Cane your name. Create a new canvas with the size 8x10 inches at 300 pixel/inch. See image below Ctrl + N
1. Create a rough sketch
 1. Create a rough sketch Go to File>New (Cmd/Ctrl+N), name it Whale. Set Width to 230mm, Height to 310mm and Resolution to 300ppi. Click OK. Create a new layer (Shift+Cmd/Ctrl+N) and name it Sketch 1,
Realistic Earthly Planet Texture Tutorial
 Realistic Earthly Planet Texture Tutorial Table of Contents Introduction... 2 Method 1(Easy)... 3 Applying a Coast to the Texture... 8 Method 2 (Advanced)... 12 Creating Continent Map... 12 Adding Lakes...
Photoshop. Make a Spooky Halloween Pumpkin Text Effect in Photoshop - Photoshop tutorial PSDDude
 Photoshop October 4th,2017 1 2 Image size: 7 in wide x 3 in high 300 dpi Start with a simple black gradient background layer. Radial Gradiant, black to gray. Install the CREEPSVILLE font. Center and Type
Now we ve had a look at the basics of using layers, I thought we d have a look at a few ways that we can use them.
 Stone Creek Textiles stonecreektextiles.co.uk Layers Part 2 Now we ve had a look at the basics of using layers, I thought we d have a look at a few ways that we can use them. In Layers part 1 we had a
Create an Amazing Surreal-Style Treehouse in Photoshop Photoshop Tutorials
 Download the PSD Surreal Treehouse.zip 23.59 MB Download from Website Surreal Treehouse Photoshop Tutorial Tutorial Resources Tree Houses Thanks archetype, Deviantart Bonsai Tree Thanks fabemiko, Deviantart
prepared by Allison Hwang for T. Purdy 2011
 There are many ways to create material textures in Photoshop. In addition to using primarily the blending tool, you can also use filters to create textures. In this tutorial, the objective is to create
Undress a Giraffe in Photoshop
 Undress a Giraffe in Photoshop By: Alexandra Fomicheva Have you ever wanted to know what a Giraffe looks like without its spots? If so, this tutorial is for you, you pervert! Today, we will demonstrate
Browse: Home / Photoshop CS5 Digital Painting Tutorial Photoshop CS5 Digital Painting Tutorial
 Browse: Home / Photoshop CS5 Digital Painting Tutorial Photoshop CS5 Digital Painting Tutorial By Armand Niculescu on May 10, 2010 http://www.twin-pixels.com/photoshop-cs5-digital-painting-tutorial/ One
TV Aquarium. Create a new document. 8.5 x 11, 300 dpi. Save as TV Aquarium Your Name. Create TV shape. Use Pen
 Create a new document. 8.5 x 11, 300 dpi. Save as TV Aquarium Your Name. Create TV shape. Use Pen Tool, Convert Point Tool and Direct Selection Tool. We need side shapes to create patches of light and
DD IMAGES PHOTOSHOP TUTORIAL 13 USING MULTIPLE LEVELS ADJUSTMENT LAYERS, TO LIGHTEN, DARKEN OR ADJUST THE CONTRAST OF AN IMAGE
 Page1 DD IMAGES PHOTOSHOP TUTORIAL 13 USING MULTIPLE LEVELS ADJUSTMENT LAYERS, TO LIGHTEN, DARKEN OR ADJUST THE CONTRAST OF AN IMAGE This method involves the creation of 3 separate LEVELS Adjustment layers.
Animated Snowman. Image size: 11 w x 17 h 300 dpi
 Animated Snowman Image size: 11 w x 17 h 300 dpi Step 1 First of all, you ll need the texture on my website. Now open a new document. I usually work on really big documents because I can work on the details
Sharpening is an essential final step before output. But sometimes, you don t want to
 Sharpening is an essential final step before output. But sometimes, you don t want to sharpen your entire image equally. Skin tones, clouds, noisy areas - it s best to apply less sharpening to these areas,
Compositing. Compositing is the art of combining two or more distinct elements to create a sense of seamlessness or a feeling of belonging.
 Compositing Compositing is the art of combining two or more distinct elements to create a sense of seamlessness or a feeling of belonging. Selection Tools In the simplest terms, selections help us to cut
PhotoShop Elements. Lesson 6. Lesson 6 Objectives. Brief Look Into Creative Photoshop Elements. Lesson 6
 PhotoShop Elements Brief Look Into Creative Photoshop Elements Lesson 6 Lesson 6 Brief Look Into Creative Photoshop Elements Homework review. Creating a new art form. Following a recipe / learning technique.
ADD A REALISTIC WATER REFLECTION
 ADD A REALISTIC WATER REFLECTION In this Photoshop photo effects tutorial, we re going to learn how to easily add a realistic water reflection to any photo. It s a very easy effect to create and you can
How to Create a Curious Owl in Illustrator
 How to Create a Curious Owl in Illustrator Tutorial Details Program: Adobe Illustrator Difficulty: Intermediate Estimated Completion Time: 1.5 hours Take a look at what we're aiming for, an inquisitive
Reducing Noise in an image
 Reducing Noise in an image - Open the image in Photoshop. - Go to the Filter menu then click on Noise and then the Reduce Noise button. - Zoom in on the preview image in the Reduce Noise window, so that
PICTURE AS PAINT. Most magazine articles written. Creating a seamless, tileable texture in GIMP KNOW-HOW. Brightness. From Photo to Tile
 Creating a seamless, tileable texture in GIMP PICTURE AS PAINT Graphic artists often face the problem of turning a photograph into an image that will tile over a larger surface. This task is not as easy
HIGH KEY GLOW EFFECT IN PHOTOSHOP
 HIGH KEY GLOW EFFECT IN PHOTOSHOP In this Photoshop tutorial, we ll learn how to create a high key glow effect, which is a fancy way of saying we ll be applying a glow only to the highlights in an image.
Super Nova. 1. Create a Background. Photoshop Textures Assignment # 3
 Photoshop Textures Assignment # 3 Super Nova 1. Create a Background First, start by creating a new document, I ve used a document size of 400 x 400 pixels here, but you might want to use something much
ADD A SPARKLE TRAIL TO A PHOTO
 ADD A SPARKLE TRAIL TO A PHOTO In this Adobe Photoshop tutorial, we re going to learn how to add a sparkle trail to a photo, using a custom Photoshop brush we ll be creating. I got the idea for this tutorial
How to Create The Top 10 Design Trends of 2018
 Inspired by Philip VanDusen The techniques I m sharing in class were inspired by a great video called 15 Trends in Graphic Design for 2018 by Principal & COO of Verhall Brand Design, Philip VanDusen. This
How to Create Website Banners
 How to Create Website Banners In the following instructions you will be creating banners in Adobe Photoshop Elements 6.0, using different images and fonts. The instructions will consist of finding images,
Professional Photograph Restoration 50 Points
 Professional Photograph Restoration 50 Points In this tutorial, we'll take an in-depth look at restoring an old torn photograph. Restoring old family photos is something that you can do for your relatives
WORN, TORN PHOTO EDGES EFFECT
 Photo Effects: CC - Worn, Torn Photo Edges Effect WORN, TORN PHOTO EDGES EFFECT In this Photoshop tutorial, we ll learn how to take the normally sharp, straight edges of an image and make them look all
Quick Cut Outs with Photoshop Brushes
 TIP SHEET #10 Quick Cut Outs with Photoshop Brushes Compositing or rather, the process of selecting and cutting out assets from one picture and realistically adding them into another is an extremely common
Compiled by <<coldbing>> FIRE EFFECTS
 FIRE EFFECTS Compiled by Step 1 - New Document Make a new document. Fill it with black. Then make a new layer, and type out (or whatever) you want to set on fire in white. Step 2 - Windy Go
> color scheme painting
 > color scheme painting > objective(s): Students will create a highly accurate brush overlay painting of a closely cropped image of their eye using only colors within a specific selected color scheme,
Exploring Photoshop Tutorial
 Exploring Photoshop Tutorial Objective: In this tutorial we will create a poster composed of three distinct elements: a Bokeh, an image and title text. The Bokeh is an effect which is sometimes seen in
Photoshop Tutorial. Millbrae Camera Club 2008 August 21
 Photoshop Tutorial Millbrae Camera Club 2008 August 21 Introduction Tutorial For this session Speak up if: you have a question I m going too fast or too slow I m not speaking loudly enough you know a better
An Idiot's Guide to Photoshop. Part II Azamat Bohed E. TrueKolor.net
 An Idiot's Guide to Photoshop Part II Azamat Bohed E. TrueKolor.net Table of Contents 1.Introduction 3 2. Opening a Digital Image/Photo in Photoshop 3 3. Changing/removing the Background 4 3.1 Using the
Painting Special Effects on Photographs
 TUTORIAL 7 Painting Special Effects on Photographs In this tutorial you will learn how to transform a photo into a striking color composition with paintbrushes, masks, blending modes, color, and paper
Kent Messamore 3/6/2010
 Post Processing Kent Messamore 3/6/2010 What we will cover Post Processing Photoshop, Lightroom, Elements, and others JPEG or RAW Photoshop Elements Workflow Organization, Create, share Photoshop Elements
Figure 9.10 This shows the File Scripts menu, where there is now a new script item called Delete All Empty layers.
 Layers Layers play an essential role in all aspects of Photoshop work. Whether you are designing a Web page layout or editing a photograph, working with layers lets you keep the various elements in a design
RETRO User guide RETRO. Photoshop actions. For PS CC, CS6, CS5, CS4. User Guide
 RETRO Photoshop actions For PS CC, CS6, CS5, CS4 User Guide CONTENTS 1. THE BASICS... 1 1.1. About the effects... 1 1.2. How the actions are organized... 1 1.3. Installing the actions in Photoshop... 2
Ascension's Atlas Tutorial in GIMP
 Ascension's Atlas Tutorial in GIMP What follows is, as near as I can make it, an approximation in gimp of Ascension s Photoshop Atlas Style tutorial. Only the techniques used are in this version, so I
FLAMING HOT FIRE TEXT
 FLAMING HOT FIRE TEXT In this Photoshop text effects tutorial, we re going to learn how to create a fire text effect, engulfing our letters in burning hot flames. We ll be using Photoshop s powerful Liquify
Editing Using Photoshop CS5
 The Photoshop CS4 Editing Workspace - shown is the document (image) window, ToolBox, Info, Navigator, History, Adjustments and Layers Palettes, Windows Menus and Options Bar (on top). USING THE LAYERS
The horse image used for this tutorial comes from Capgros at the Stock Exchange. The rest are mine.
 First off, sorry to those of you that are on the mailing list or RSS that get this twice. I m finally moved over to a dedicated server, and in doing so, this post was lost. So, I m republishing it. This
L AY E R S A N D M A S K S
 Layers is one of the most used elements in PhotoShop. They allow you to work on an image without disturbing the others. A layer is simply one image stacked on top of another. It builds from the bottom
Downloaded From : Working with Photoshop 7.0
 Adobe Photoshop 1. Introduction What is Adobe Photoshop? Adobe Photoshop is a web designing software used for giving effects and filters to an image to make it more appealing and attractive. Brought out
Learning Adobe Photoshop CS6
 Module 1 Contents Chapter 1: Introduction to Photoshop Loading Photoshop...1-1 The Tools Panel...1-2 Using the Tools...1-3 The Panel Group...1-5 Layers...1-6 Loading a Sample File...1-6 Looking at the
Creating a Contrast Mask. Text and images Copyright (C) 2002 Eric R. Jeschke and may not be used without permission of the author.
 2002 Eric R. Jeschke and may not be used without permission of the author.") Creating a Contrast Mask Text and images Copyright (C) 2002 Eric R. Jeschke and may not be used without permission of the author. Intention In this tutorial I'll show you how to do create a contrast mask
Creating a Contrast Mask Text and images Copyright (C) 2002 Eric R. Jeschke and may not be used without permission of the author. Intention In this tutorial I'll show you how to do create a contrast mask
Photoshop: Manipulating Photos
 Photoshop: Manipulating Photos All Labs must be uploaded to the University s web server and permissions set properly. In this lab we will be manipulating photos using a very small subset of all of Photoshop
Adobe Photoshop cs. Advanced Retouching. Julieanne Kost
 Julieanne Kost www.adobe.com www.adobeevangelists.com Adobe Photoshop cs Advanced Retouching There are several essential tools and techniques for retouching images of people, and one underlying secret: