RETRO User guide RETRO. Photoshop actions. For PS CC, CS6, CS5, CS4. User Guide
|
|
|
- Cassandra Porter
- 5 years ago
- Views:
Transcription


1 RETRO Photoshop actions For PS CC, CS6, CS5, CS4 User Guide
2 CONTENTS 1. THE BASICS About the effects How the actions are organized Installing the actions in Photoshop Removing an older version (or a trial one) THE RETRO LANDSCAPE ACTIONS SET Adding a frame The various frames Running a framing action Add artistic text onto the banners Change the frame color, style, and size Changing the photo edges The 4 edge effects The Soft edges The Fuzzy edges The Vignette Restoring the original edges Modifying the photo colors The 11 color effects Using the aging effects The Blur the photo action The other aging effects THE RETRO SQUARE & ROUND ACTIONS SET Adding a frame The various frames Using the Round with stripes frame: Adding interesting textured backgrounds:... 16
3 1. THE BASICS 1.1. About the effects The Retro is a multi-purpose set of Photoshop actions. You can use them to add beautiful frames to your photos. You can then transform these framed images into old, nostalgic photos using the various aging & color effects. Or, you can create nice retro banners to show off your artwork. The actions make extensive use of non-destructive techniques (vector graphics, smart objects and smart filters) How the actions are organized The product contains 2 sets of Photoshop actions, optimized for images of landscape and square shapes, respectively. The actions in each set are grouped into 4 groups: 1. CHOOSE A FRAME 2. CHANGE PHOTO EDGES 3. COLOR TINTS & SHIFTS 4. ADD AGING EFFECTS The actions in the first group ( CHOOSE A FRAME ) let you add a frame to your photo, allowing you to choose from a wide range of options. For example you can apply a beautiful vintage frame with deckled or arched edges; or you can use the more creative options (e.g. apply a laced frame, a frame with stripes, or even turn your photo into an awesome scroll!) Adding a frame is the only compulsory step. Then you may use the actions in the other groups, in any order: The actions in the second group ( CHANGE PHOTO EDGES ) can be used to modify the photo edges, allowing you to choose from 4 different edge effects. The actions in the third group ( COLOR TINTS & SHIFTS ) can be used to modify the colors of the photos (apply sepia tones, B&W, cross-processing effects, etc). The actions in the fourth group ( ADD AGING EFFECTS ) will make the photo look very old by applying a range of aging effects (scratches, spots, etc.) 1
4 1.3. Installing the actions in Photoshop If you don t know how to install and use Photoshop actions, please refer to this article on PanosFX.com: Removing an older version (or a trial one) If you have an older product version installed, or if you installed the trial version before purchasing the full one, I recommend you remove it prior to installing the new files. This article shows you how to do it: 2

5 2. THE RETRO LANDSCAPE ACTIONS SET 2.1. Adding a frame The various frames The first group of actions is called CHOOSE A FRAME. These actions let you add a frame to the photo, choosing from 11 different options: All actions use vector graphics to create the frames. The frames are therefore fully scalable. The actions are optimized for images of landscape shape. It s very easy to use the framing actions on portrait photos. Simply rotate the photo 90 CCW, using the command: Image > Image Rotation > 90 Counter Clockwise, while placing it over the image background (in the next section you ll learn how to load and place your photos). When you finish, rotate the Photoshop document 90 CW (Image > Image Rotation > 90 Clockwise), to restore the original orientation. The first 7 actions create the following frames: 3
 create 3 banner-shaped")
6 The next 3 actions ( Banner 1, Banner 2, and Banner 3 ) create 3 banner-shaped frames: 4
 for the framed photo.")
7 The last framing action is called Scroll. As indicated by its name, this action creates an impressive scroll from scratch: Running a framing action Select one of the 11 framing actions and hit the Play button. At the beginning you will be asked to enter the preferred width (or height) for the framed photo. The actions use vector graphics to create the frames. This technique has obvious advantages: You get consistently crispy details, no matter the frame width you enter. You can resize the frame when the action finishes, without sacrificing the image quality. Enter the preferred size and hit OK. In a few seconds the action will create a framed photo template on your screen. Now you need to load and place a photo onto this template. 5
 or File > Place (in older PS versions). The file browser window opens up. Select a photo and hit OK to open it.")
8 Go to the actions panel and double click the Photo layer thumbnail: This will open a new Photoshop document on your work area: Select the menu command File > Place Embedded (in Photoshop CC) or File > Place (in older PS versions). The file browser window opens up. Select a photo and hit OK to open it. If your image has a different ratio, it won t cover the entire background: 6

 and click on Save.")
9 In this case press down Shift- Alt (PC) or Shift- option (Mac) and drag a corner handle outwards, to resize the image proportionally so that it covers the entire background: You can use the arrow keys to nudge the photo. When you finish, double click to confirm and place the photo. You can use the Text tool to add your custom text to the photo. You can also use the Custom Shape tool (press Shift-U) to insert one or more vector shapes. When you finish editing the contents of the photo, press Ctrl-W (Mac: cmd-w) and click on Save. The original document will be updated with your changes: You can double click the Photo layer anytime, to edit its contents and even replace the photo with another one! 7

10 Add artistic text onto the banners If you use the 3 Banner frames, check the Paths panel when the action finishes (select: Window > Paths). You ll find a few vector paths stored there. You can use them to insert your artistic text, which flows along these curved paths. This will make your photos even more interesting: TIP: To find out how to put text along a vector path, please refer to this tutorial on my site Change the frame color, style, and size To change the default (white) frame color, double click the Frame (dbl click to change color) layer and pick a color of your preference. You can also try to add a Pattern overlay layer style. To change the frame size, select the Frame (dbl click to change color) layer and press Ctrl-T (Mac: cmd- T); hold down the Alt key (Mac: option) and drag a corner handle to resize. Note: The above instructions do not apply to the Scroll frame. 8

11 2.2. Changing the photo edges The 4 edge effects The second group of actions lets you change the default, straight photo edges. There are 4 different edge effects: You can run these actions in any order. For example you can run the Vignette action and then try the Fuzzy edges effect The Soft edges The Soft edges action will make the photo edges gradually fade away. To change the blurriness of the edges, move the Gaussian blur filter slider when the action prompts you to do so The Fuzzy edges The Fuzzy edges action uses a combination of Photoshop filters to create more artistic edges. The action will present you a Filter Gallery window that combines the Spatter and Accented Edges Photoshop filters. You can tweak the default settings for these filters. You can even experiment with adding different filters and make the photo edges even more interesting! 9

12 The Vignette The Vignette action will fade away the photo at its periphery. The action begins with laying a vector ellipse over the photo. This shape defines the periphery of the vignette effect. Hold down the Alt key and drag a corner handle to change its size. Double click to confirm. Then move the Gaussian blur filter slider to modify the blurriness of the edges Restoring the original edges Use the Restore original edges action to undo any changes you made, and bring back the original photo edges Modifying the photo colors The 11 color effects Old photos have distinctive colors. The actions in this group let you change / shift the colors of your original photos, choosing from 11 different options (sepia, B&W, cross-processing effects, etc). To undo your changes and restore the original colors, run the last action in this group. The following image shows these different color effects: 10
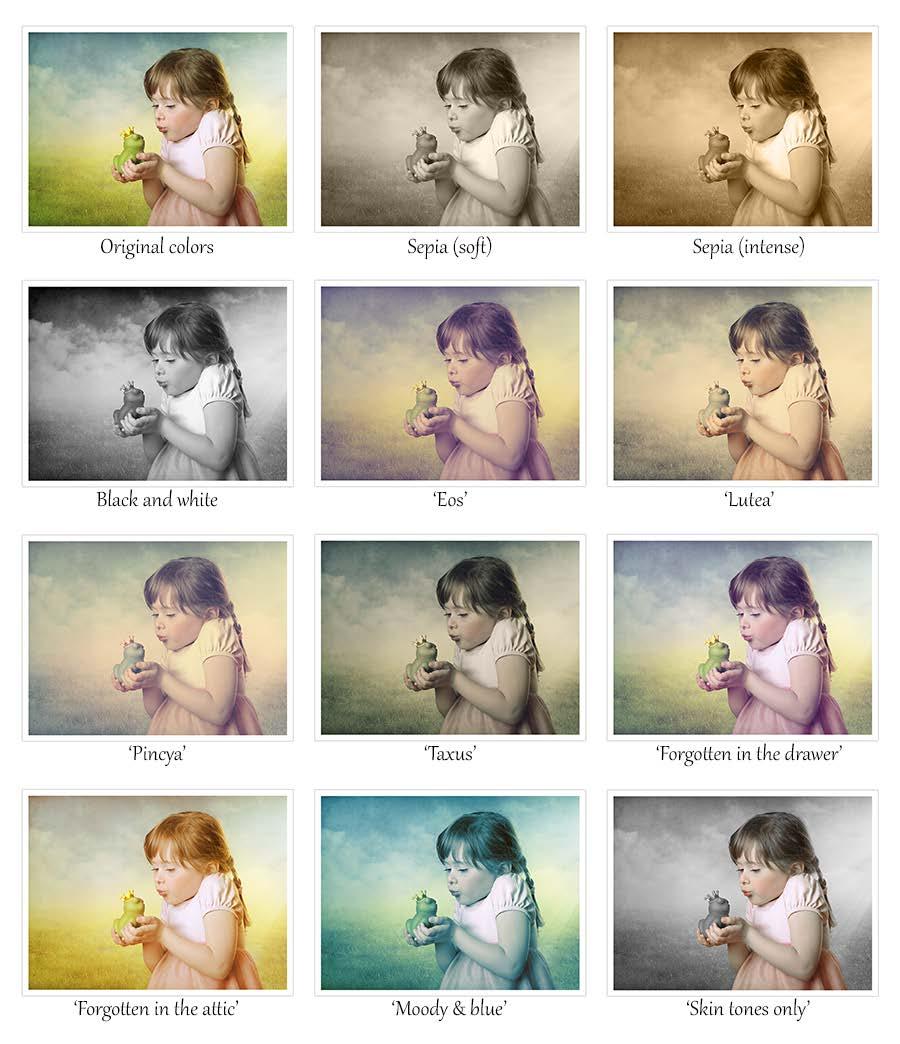
13 11


14 2.4. Using the aging effects Old photos can be blurry; they have cracks, scratches, spots, etc. If you want to make your photo look very old, then use the actions in this group. You can run the same action more than once. Most effects are random The Blur the photo action This action uses the Motion blur filter to make your photo look blurry. Move the filter slider to your taste to modify the intensity of the effect. Your settings are stored in a smart filter below the Photo layer. You can go back anytime and double click the Motion Blur smart filter to modify your settings: The other aging effects Apart from the Blur the photo effect, this group contains 7 other aging effects: Frayed surface Small scratches (vertical) Small scratches (horizontal) Vertical lines Catastrophe Spots Surface cracks You can use some of them, or all of them. Just don t overdo it! Each action creates a different layer: You can run the same action more than once. If you use the Catastrophe or the Spots actions, I recommend you paint the layer mask with a black brush, to hide some spots. Try to change the layer opacity or the blending mode. 12

15 3. THE RETRO SQUARE & ROUND ACTIONS SET The second set of actions included in the product, is called PFx RETRO - square & round. As the name indicates, this set creates photos with square and round frames. The set has exactly the same structure with the PFx RETRO - landscape set: the actions are grouped into 4 groups that let you add a frame, change the photo edges, modify the photo colors, and add aging marks Adding a frame The various frames The first group of actions contains 13 different framing actions: The first 7 actions produce these frames: 13

16 The other 6 actions produce the following frames: To create the photo with frame, use the same steps that were described in This group of actions includes a special effect, called Round with stripes. The following section will show you how to tweak this special frame. 14

17 Using the Round with stripes frame: Select the Round with Stripes action from the PFx RETRO - square & round set, and hit the play button. The action begins with asking you to enter the preferred frame width. It is the extent from the left stripe to the right stripe. When the action finishes, double click the Photo layer and place a photo, the way described in You should now have created an image that looks like this: How to change the color of the round frame: To change the color of the round frame, double click the Frame (dbl click to change color) layer and pick a color of your preference. How to change the color of the stripes: Double click the Stripes (dbl click to change color) layer and pick a color of your preference. How to add a pattern to the stripes: Select the Stripes (dbl click to change color) layer. Select: Layer > New Fill Layer > Pattern from the menu. Pick a pattern of your preference. You may want to try the Color Paper patterns that come pre-installed with Photoshop. How to change the stripe length: If you increase the canvas width you may want to increase the length of the stripes. It s easy: 15

 and change the")
 and change the")


18 Select the Stripes (dbl click to change color) layer. Press A to select the Path Selection Tool (the black arrow in the toolbar). Click on the left stripe; press Ctrl-T (Mac: cmd-t) and change the stripe length. Click on the right stripe; press Ctrl-T (Mac: cmd-t) and change the stripe length Adding interesting textured backgrounds: Read this tutorial on my site, to find out how to add beautiful textured backgrounds to your images, using Adobe s free Paper Texture Pro Photoshop add-on. If you have any questions, please use the contact form on my site, or use the site forum. Panos Efstathiadis The photos used in this guide were kindly provided by Shutterstock. The Shutterstock IDs are as follows: jpg jpg jpg jpg jpg jpg 16
PUZZLE EFFECTS 2D Photoshop actions For Photoshop CC, CS6, CS5, CS4
 PUZZLE EFFECTS 2D Photoshop actions For Photoshop CC, CS6, CS5, CS4 User Guide CONTENTS 1. THE BASICS... 1 1.1. About the actions... 1 1.2. How the actions are organized... 1 1.3. The Classic effects (examples)...
PanosFX CARTOONS User guide PANOSFX CARTOONS. Photoshop actions - for PS CC, CS6, CS5, CS4, CS3. User Guide
 PANOSFX CARTOONS Photoshop actions - for PS CC, CS6, CS5, CS4, CS3 User Guide CONTENTS 1. THE BASICS... 1 1.1. About the effects... 1 1.2. How the actions are organized... 1 1.3. Installing the actions
JIGSAW PUZZLES User guide JIGSAW PUZZLES. Photoshop Elements actions. For PSE 2019, 2018, 15, 14, 13, 12, 11. User Guide
 JIGSAW PUZZLES Photoshop Elements actions For PSE 2019, 2018, 15, 14, 13, 12, 11 User Guide CONTENTS 1. THE BASICS...1 1.1. About the actions... 1 1.2. How the actions are organized... 1 1.3. The Classic
PUZZLE EFFECTS 3D User guide PUZZLE EFFECTS 3D. Photoshop actions. For PS CC and CS6 Extended. User Guide
 PUZZLE EFFECTS 3D Photoshop actions For PS CC and CS6 Extended User Guide CONTENTS 1. THE BASICS... 1 1.1. About the actions... 1 1.2. How the actions are organized... 1 1.3. The Classic effects (examples)...
PUZZLE EFFECTS 3D User guide JIGSAW PUZZLES 3D. Photoshop CC actions. User Guide
 JIGSAW PUZZLES 3D Photoshop CC actions User Guide CONTENTS 1. THE BASICS...1 1.1. About the actions... 1 1.2. How the actions are organized... 1 1.3. The Classic effects (examples)... 3 1.4. The Special
PanosFX CARTOONS User guide PANOSFX CARTOONS. Photoshop actions - for PS CC, CS6, CS5, CS4. User Guide
 PANOSFX CARTOONS Photoshop actions - for PS CC, CS6, CS5, CS4 User Guide CONTENTS 1. THE BASICS... 1 1.1. About the effects... 1 1.2. How the actions are organized... 1 1.3. Installing the actions in Photoshop...
VECTOR PAINTINGS - User Guide VECTOR PAINTINGS. For Adobe Photoshop Elements 2019, 2018, 15, 14, 13, 12, 11. User Guide
 VECTOR PAINTINGS For Adobe Photoshop Elements 2019, 2018, 15, 14, 13, 12, 11 User Guide CONTENTS 1. THE BASICS...1 1.1. About the effects...1 1.2. How the actions are organized...1 1.3. Downloading and
VECTOR ART - User Guide VECTOR ART. For Adobe Photoshop CC, CS6, CS5, CS4. User Guide
 VECTOR ART For Adobe Photoshop CC, CS6, CS5, CS4 User Guide TABLE OF CONTENTS 1. THE BASICS... 1 1.1. About the effects... 1 1.2. How the actions are organized... 1 2. INSTALLATION & TROUBLESHOOTING...
VECTOR PAINTINGS - User Guide VECTOR PAINTINGS. For Adobe Photoshop CC, CS6, CS5, CS4, CS3. User Guide
 VECTOR PAINTINGS For Adobe Photoshop CC, CS6, CS5, CS4, CS3 User Guide TABLE OF CONTENTS 1. THE BASICS...1 1.1. About the effects...1 1.2. How the actions are organized...1 1.3. Downloading and installing
Creating Pastel Images and other effects in Photoshop
 Creating Pastel Images and other effects in Photoshop Martin Addison 2015 Creating pastel images Page 1 Martin Addison FRPS Using White Layers in Photoshop 1. Create a new empty Layer 2. Edit> Fill 3.
photoshop filters kelly ludwig assistant professor
 photoshop filters kelly ludwig assistant professor sharpening images reducing noise correcting distortions in images practical filters There are over 100 filters that ship with Photoshop and they're all
Photoshop CC Editing Images
 Photoshop CC Editing Images Rotate a Canvas A canvas can be rotated 90 degrees Clockwise, 90 degrees Counter Clockwise, or rotated 180 degrees. Navigate to the Image Menu, select Image Rotation and then
PHOTOSHOP TUTORIAL: DIGITAL DARKROOM TECHNIQUES
 PHOTOSHOP TUTORIAL: DIGITAL DARKROOM TECHNIQUES STEP BY STEP TRAINING Learn by doing step by step exercises. Includes downloadable class files that work on Mac & PC. EDITION 1 Copyright Info Published
The original image. Let s get started! The final rainbow effect. The photo sits on the Background layer in the Layers panel.
 Add A Realistic Rainbow To A Photo In this Photoshop photo effects tutorial, we ll learn how to easily add a rainbow, and even a double rainbow, to a photo! As we ll see, Photoshop ships with a ready-made
CREATE A BURNT EDGE EFFECT
 CREATE A BURNT EDGE EFFECT One of the all-time classic effects in Photoshop is the burnt edge, and there s lots of different ways to create it, but in this Adobe Photoshop tutorial, we re going to look
TEXT PERSPECTIVE SHADOW EFFECT
 TEXT PERSPECTIVE SHADOW EFFECT In this Photoshop text effects tutorial, we ll learn how to create a popular, classic effect by giving text a perspective shadow as if a light source behind the text was
Add Rays Of Sunlight To A Photo With Photoshop
 Add Rays Of Sunlight To A Photo With Photoshop Written by Steve Patterson. In this photo effects tutorial, we'll learn how to easily add rays of sunlight to an image, a great way to make an already beautiful
The original photo. The final result.
 giving a photo painted edges In this Adobe Photoshop tutorial, we re going to combine a couple of different effects. First, we ll give the photo easy-tocreate painted edges, and then we ll make it look
WORN, TORN PHOTO EDGES EFFECT
 Photo Effects: CC - Worn, Torn Photo Edges Effect WORN, TORN PHOTO EDGES EFFECT In this Photoshop tutorial, we ll learn how to take the normally sharp, straight edges of an image and make them look all
PHOTOSHOP DESIGN EFFECTS FOR INTERMEDIATE TO ADVANCED USERS
 PHOTOSHOP DESIGN EFFECTS FOR INTERMEDIATE TO ADVANCED USERS Copyright 2012, National Seminars Training Introduction This class is all about design effects in Adobe Photoshop. For example, let s say that
Photoshop Filters. Applying Filters from the Filter Menu
 Photoshop Filters Filters are easy to learn and use, and yet are one of Photoshop s most powerful features. When used properly, they can recreate a number of photographic and artistic effects, can enhance
Perspective Shadow Text Effect In Photoshop
 Perspective Shadow Text Effect In Photoshop Written by Steve Patterson. In this Photoshop text effects tutorial, we ll learn how to create a popular, classic effect by giving text a perspective shadow
Photoshop Weather Effects Rain
 Photoshop Weather Effects Rain In this photo effects tutorial, we ll learn how to add a simple yet convincing rain effect to a photo, a great way to add mood and atmosphere, without getting your camera
METAL TEXT EFFECT. Step 1: Create A New Document. Step 2: Fill The Background With Black
 METAL TEXT EFFECT In this text effects tutorial, we ll learn how to easily create metal text, a popular effect widely used in video games and movie posters! It may seem like there s a lot of steps involved,
HOW TO CREATE A SUPER SHINY PENCIL ICON
 HOW TO CREATE A SUPER SHINY PENCIL ICON Tutorial from http://psd.tutsplus.com/ Compiled by INTRODUCTION The Pencil is one of the visual metaphors most used to express creativity. In this tutorial,
Photo One Digital Photo Shoots and Edits
 Photo One Digital Photo Shoots and Edits You will submit photo shoots, unedited and you will submit selected edited images. The shoots will be explained first and the edits will be explained later on this
FLAMING HOT FIRE TEXT
 FLAMING HOT FIRE TEXT In this Photoshop text effects tutorial, we re going to learn how to create a fire text effect, engulfing our letters in burning hot flames. We ll be using Photoshop s powerful Liquify
Adobe Photoshop CS5 Tutorial
 Adobe Photoshop CS5 Tutorial GETTING STARTED Adobe Photoshop CS5 is a popular image editing software that provides a work environment consistent with Adobe Illustrator, Adobe InDesign, Adobe Photoshop
PHOTOSHOP1 15 / WORKSPACE
 MassArt Studio Foundation: Visual Language Digital Media Cookbook, Fall 2013 PHOTOSHOP1 15 / WORKSPACE Imaging software, just like our computers, relies on metaphors from the physical world for their design.
ADD A REALISTIC WATER REFLECTION
 ADD A REALISTIC WATER REFLECTION In this Photoshop photo effects tutorial, we re going to learn how to easily add a realistic water reflection to any photo. It s a very easy effect to create and you can
How to Create Website Banners
 How to Create Website Banners In the following instructions you will be creating banners in Adobe Photoshop Elements 6.0, using different images and fonts. The instructions will consist of finding images,
A quick note: We hope that you will find something from the Tips and Tricks that will add a little pizazz to your yearbook pages!
 A quick note: The following pages are tips and tricks for Basic Photoshop users. You may notice that some instructions indicate that non-awpc fonts were used, and that some colors were created using the
Photoshop: a Beginner s course. by: Charina Ong Centre for Development of Teaching and Learning National University of Singapore
 Photoshop: a Beginner s course by: Charina Ong Centre for Development of Teaching and Learning National University of Singapore Table of Contents About the Workshop... 1 Prerequisites... 1 Workshop Objectives...
Adobe Photoshop CC 2018 Tutorial
 Adobe Photoshop CC 2018 Tutorial GETTING STARTED Adobe Photoshop CC 2018 is a popular image editing software that provides a work environment consistent with Adobe Illustrator, Adobe InDesign, Adobe Photoshop,
Name the layer you rotated in step 3 Stripe and lower the opacity to 43%.
 Step 1 Open Photoshop and create a new file 1085 649 pixels. Fill the layer with a bright blue color (#0095db) by pressing Shift + F5. This will be the background for our pop art scene. Step 2 Let s create
ReMask 2 TOPAZ REMASK 2. How It Works
 TOPAZ REMASK 2 Having a thorough understanding of the new Topaz and how it works will allow you to use the program and its tools most effectively. This will help you achieve optimal results with every
The original image. As I said, we ll be looking at a few different variations on the effect. Here s the first one we ll be working towards:
 DIGITAL PIXEL EFFECT In this Photoshop tutorial, we re going to look at how to create a digital pixel effect, which is often used in ads that sell anything to do with digital. We re going to first pixelate
AGENDA :: MULTI- MEDIA TOOLS :: CLASS NOTES. :: Homework Critiques Best and Worst Websites. :: Photoshop Lesson 2 Things aren t what they seem
 CLASS :: 02 02.02 2018 AGENDA :: Homework Critiques Best and Worst Websites :: Photoshop Lesson 2 Things aren t what they seem I. PHOTO RETOUCHING: Before There Were Computers (Web Post) http://jmcolberg.com/weblog/2010/01/photoshop_before_there_were_computers_the_art_of_retouching_and_improving_negatives_and_prints/
Photo Editing in Mac and ipad and iphone
 Page 1 Photo Editing in Mac and ipad and iphone Switching to Edit mode in Photos for Mac To edit a photo you ll first need to double-click its thumbnail to open it for viewing, and then click the Edit
HIGH KEY GLOW EFFECT IN PHOTOSHOP
 HIGH KEY GLOW EFFECT IN PHOTOSHOP In this Photoshop tutorial, we ll learn how to create a high key glow effect, which is a fancy way of saying we ll be applying a glow only to the highlights in an image.
The original image. Let s get started! The final effect.
 Non-Destructive Infrared Glow Effect In this Photoshop tutorial, we ll learn how to quickly and easily add a dream-like infrared glow effect to an image, and we ll do it non-destructively using Smart Filters
Photoshop: Manipulating Photos
 Photoshop: Manipulating Photos All Labs must be uploaded to the University s web server and permissions set properly. In this lab we will be manipulating photos using a very small subset of all of Photoshop
A.J. Wood on Instagram
 A.J. Wood http://ajwood.com ajwood@adobe.com @adobewan on Instagram The Photoshop Environment Photoshop's Start Workspace provides info at a glance including recent files, CC files, and presets for starting
Photoshop CC 2018 Essential Skills
 Photoshop CC 2018 Essential Skills Adobe Photoshop Creative Cloud 2018 University Information Technology Services Learning Technology, Training, Audiovisual and Outreach Copyright 2018 KSU Division of
11 Advanced Layer Techniques
 11 Advanced Layer Techniques After you ve learned basic layer techniques, you can create more complex effects in your artwork using layer masks, path groups, filters, adjustment layers, and more style
The original image. Let s get started! The final result.
 Miniature Effect With Tilt-Shift In Photoshop CS6 In this tutorial, we ll learn how to create a miniature effect in Photoshop CS6 using its brand new Tilt-Shift blur filter. Tilt-shift camera lenses are
The original image. The final rainbow effect.
 ADD A realistic rainbow to a photo In this Photoshop photo effects tutorial, we re going to learn how to easily add a rainbow, even a double rainbow, to a photo. Of course, as with most photo effects,
TOPAZ LENS EFFECTS QUICK START GUIDE
 TOPAZ LENS EFFECTS QUICK START GUIDE Introduction Topaz Lens Effects is designed to give you the power to direct and focus your viewer s eyes where you want them. With Lens Effects, you get advanced technology
Clipping Masks And Type Placing An Image In Text With Photoshop
 Clipping Masks And Type Placing An Image In Text With Photoshop Written by Steve Patterson. In a previous tutorial, we learned the basics and essentials of using clipping masks in Photoshop to hide unwanted
Movie Merchandising. Movie Poster. Open the Poster Background.psd file. Open the Cloud.jpg file.
 Movie Poster Open the Poster Background.psd file. Open the Cloud.jpg file. Movie Merchandising Choose Image>Adjustments>Desaturate to make it a grayscale image. Select the Move tool in the Toolbar and
Photoshop CS6 automatically places a crop box and handles around the image. Click and drag the handles to resize the crop box.
 CROPPING IMAGES In Photoshop CS6 One of the great new features in Photoshop CS6 is the improved and enhanced Crop Tool. If you ve been using earlier versions of Photoshop to crop your photos, you ll find
GRINDHOUSE MOVIE POSTERS
 Follow the instructions below to create a grindhouse style movie poster for your short film. You can also see a detailed video tutorial here: http://www.youtube.com/watch?v=-drhbfvhft0 GOOD LUCK!! CREATING
Contents: Bibliography:
 ( 2 ) Contents: Sizing an Image...4 RAW File Conversion...4 Selection Tools...5 Colour Range...5 Quick Mask...6 Extract Tool...7 Adding a Layer Style...7 Adjustment Layer...8 Adding a gradient to an Adjustment
4 PHOTOSHOP SPECIAL EFFECTS HACKS FROM SCOTT KELBY
 4 PHOTOSHOP SPECIAL EFFECTS HACKS FROM SCOTT KELBY You can do some pretty cool stuff in Photoshop, with most tiny tweaks taking no time at all. However, for some of us (myself included) it s hard to know
How to Create Fake Shadows
 TIP SHEET #8 How to Create Fake Shadows As well as the colour, it s the shadows in a picture that help to give it mood and atmosphere so in this tutorial I want to show you how you can add in extra shadows.
Add Excitement to Your Photos with Textures
 IMAGE DIANA DAY Add Excitement to Your Photos with Textures By Diana Day You may have noticed that applying textures to photos is a trend that s pretty hot on the Web these days. Whether you use them for
Recitation 2 Introduction to Photoshop
 Recitation 2 Introduction to Photoshop What is Adobe Photoshop? Adobe Photoshop is a tool for creating digital graphics either by starting with a scanned photograph or artwork or by creating the graphics
Key Terms. Where is it Located Start > All Programs > Adobe Design Premium CS5> Adobe Photoshop CS5. Description
 Adobe Adobe Creative Suite (CS) is collection of video editing, graphic design, and web developing applications made by Adobe Systems. It includes Photoshop, InDesign, and Acrobat among other programs.
Advanced Photography. Topic 3 - Photoshop Filters. Learning Outcomes
 Topic 3 - Photoshop Filters Learning Outcomes In this lesson, we're going to take a look at some techniques that make use of some of the more practical filters. We are also going to learn how to convert
Transforming Your Photographs with Photoshop
 Transforming Your Photographs with Photoshop Jesús Ramirez PhotoshopTrainingChannel.com Contents Introduction 2 About the Instructor 2 Lab Project Files 2 Lab Objectives 2 Lab Description 2 Removing Distracting
Miniature Effect With Tilt-Shift In Photoshop CS6
 Miniature Effect With Tilt-Shift In Photoshop CS6 This effect works best with a photo taken from high overhead and looking down on your subject at an angle. You ll also want a photo where everything is
Step 1: Select The Main Subject In The Photo
 Create A custom Motion Trail from your subject In this Photoshop photo effects tutorial, we ll learn how to add a sense of action and movement to an image by giving the main subject an easy to create motion
By Washan Najat Nawi
 By Washan Najat Nawi how to get started how to use the interface how to modify images with basic editing skills Adobe Photoshop: is a popular image-editing software. Two general usage of Photoshop Creating
Retouching Portraits in Photoshop
 Retouching Portraits in Photoshop I Removing Blemishes When removing blemishes, acne or other imperfections on the skin, our goal is to maintain as much of the original skin texture as possible. That way,
Types of Mask. Layer masks
 Photoshop Layer Mask Features Non destructive (does not delete pixels) until applied Uses brush tool which is configurable Can be added to any layer (except Background unless double click to unlock) including
Photoshop: Manipulating Photos
 Photoshop: Manipulating Photos All Labs must be uploaded to the University s web server and permissions set properly. In this lab we will be manipulating photos using a very small subset of all of Photoshop
Photoshop CC: Essentials
 Photoshop CC: Essentials Summary Workspace Overview... 2 Exercise Files... 2 Selection Tools... 3 Select All, Deselect, And Reselect... 3 Adding, Subtracting, and Intersecting... 3 Working with Layers...
Animated Snowman. Image size: 11 w x 17 h 300 dpi
 Animated Snowman Image size: 11 w x 17 h 300 dpi Step 1 First of all, you ll need the texture on my website. Now open a new document. I usually work on really big documents because I can work on the details
ADOBE PHOTOSHOP CS 3 QUICK REFERENCE
 ADOBE PHOTOSHOP CS 3 QUICK REFERENCE INTRODUCTION Adobe PhotoShop CS 3 is a powerful software environment for editing, manipulating and creating images and other graphics. This reference guide provides
Undress a Giraffe in Photoshop
 Undress a Giraffe in Photoshop By: Alexandra Fomicheva Have you ever wanted to know what a Giraffe looks like without its spots? If so, this tutorial is for you, you pervert! Today, we will demonstrate
Introduction to Layers
 Introduction to Layers By Anna Castano A layer is an image or text that is piled on top of another. There are many things you can do with layer and it is easy to understand how it works. Through the introduction
Photoshop Tutorial. Millbrae Camera Club 2008 August 21
 Photoshop Tutorial Millbrae Camera Club 2008 August 21 Introduction Tutorial For this session Speak up if: you have a question I m going too fast or too slow I m not speaking loudly enough you know a better
Project 8: Nice Close-Up
 ps7ie_p08_b.qxd 11/18/02 3:25 PM Page 74 ps7ie_p08_b.qxd 11/18/02 3:25 PM Page 75 Photoshop 7 Image Effects In this project, work with a picture that was taken at an angle for effect. Correct and crop
The original image. Let s get started! The final light rays effect. Photoshop adds a new layer named Layer 1 above the Background layer.
 Add Rays Of Light To A Photo In this photo effects tutorial, we ll learn how to quickly and easily add rays of sunlight to an image with Photoshop! I ll be using Photoshop CS5 throughout this tutorial
Practice: Using Layer Masks
 DIGITAL IMAGING I UNIT 4 1 Practice: Using Layer Masks INTRODUCTION: Layer Masks are a way to hide elements on a layer without erasing them. In that manner, the hidden elements can be re-exposed without
PhotoFiltre DEPARTMENT OF EDUCATION
 DEPARTMENT OF EDUCATION PhotoFiltre Updated on 20 February 2010 This resource is part of the resource collection available through the ecentre for teachers. www.ecentre.education.tas.gov.au PhotoFiltre
This Photoshop Tutorial 2012 Steve Patterson, Photoshop Essentials.com. Not To Be Reproduced Or Redistributed Without Permission.
 How To Replace The Sky In A Photo In this Photoshop tutorial, we ll learn how to easily replace the sky in a photo! We ll use a basic selection tool and a layer mask to separate the sky from the area below
Learn More about TechnoPhotoshop SAMPLE
 Learn More about TechnoPhotoshop Session 2 Filtering Fun In this session, students are introduced to Photoshop photo editing software. To start, they learn about the program environment. Afterwards, they
Adobe PhotoShop Elements
 Adobe PhotoShop Elements North Lake College DCCCD 2006 1 When you open Adobe PhotoShop Elements, you will see this welcome screen. You can open any of the specialized areas. We will talk about 4 of them:
Enhanced Eyes. Here's the image I'll be working with (glamour eyes photo from Shutterstock): Here's what the eyes will look like when we're done:
: Here's what the eyes will look like when we're done:") Enhanced Eyes Here's the image I'll be working with (glamour eyes photo from Shutterstock): The original image. Here's what the eyes will look like when we're done: The final effect. Here's a close-up
Enhanced Eyes Here's the image I'll be working with (glamour eyes photo from Shutterstock): The original image. Here's what the eyes will look like when we're done: The final effect. Here's a close-up
Reveal the mystery of the mask
 Reveal the mystery of the mask Imagine you're participating in a group brainstorming session to generate new ideas for the design phase of a new project. The facilitator starts the brainstorming session
Photoshop CS2. Step by Step Instructions Using Layers. Adobe. About Layers:
 About Layers: Layers allow you to work on one element of an image without disturbing the others. Think of layers as sheets of acetate stacked one on top of the other. You can see through transparent areas
How to use Photoshop to turn a photo into a realistic painting Create a digital painting, complete with canvas texture.
 How to use Photoshop to turn a photo into a realistic painting Create a digital painting, complete with canvas texture. BY LESA SNIDER 141 CREATE TURN A PHOTO INTO A REALISTIC PAINTING One of the most
LESSON 02: GET STRONGER FOR PS USERS COMPANION BOOK. Digital Scrapbook Academy. February 2018: Lesson 02 Get Stronger for Photoshop Users
 Digital Scrapbook Academy February 2018: Lesson 02 LESSON 02: GET STRONGER FOR PS USERS COMPANION BOOK Page 1 of 19 Table of Contents Table of Contents 2 Welcome to Lesson 02 for Photoshop Users 4 1: Add
OLD FASHIONED HAND TINTED EFFECT
 OLD FASHIONED HAND TINTED EFFECT In this Photoshop tutorial, we re going to learn how to easily create an old-fashioned, hand-tinted photo effect. All it takes is an adjustment layer, a layer blend mode,
The horse image used for this tutorial comes from Capgros at the Stock Exchange. The rest are mine.
 First off, sorry to those of you that are on the mailing list or RSS that get this twice. I m finally moved over to a dedicated server, and in doing so, this post was lost. So, I m republishing it. This
ADOBE PHOTOSHOP CS TUTORIAL
 ADOBE PHOTOSHOP CS TUTORIAL A D O B E P H O T O S H O P C S Adobe Photoshop CS is a popular image editing software that provides a work environment consistent with Adobe Illustrator, Adobe InDesign, Adobe
Adobe Photoshop. How To Get Started With Adobe InDesign CC: 10 Things Beginners Want To Know How To Do TO START: 1) ZOOM, MOVE, RETOUCH (05:11)
 ZOOM, MOVE, RETOUCH (05:11)") Adobe Photoshop How To Get Started With Adobe InDesign CC: 10 Things Beginners Want To Know How To Do Video By Terry White Tutorial Sheet by Juliet Davis TO START: Open the tutorial in YouTube, download
Adobe Photoshop How To Get Started With Adobe InDesign CC: 10 Things Beginners Want To Know How To Do Video By Terry White Tutorial Sheet by Juliet Davis TO START: Open the tutorial in YouTube, download
prepared by Allison Hwang for T. Purdy 2011
 There are many ways to create material textures in Photoshop. In addition to using primarily the blending tool, you can also use filters to create textures. In this tutorial, the objective is to create
Corel PHOTO-PAINT BERNINA Page 1 DL
 Corel PHOTO-PAINT 2018 BERNINA Page 1 Corel PHOTO-PAINT Corel PHOTO-PAINT is part of BERNINA Embroidery Software and gives users many tools for editing photos or bitmap artwork. Corel PHOTO- PAINT can
Adobe Photoshop CS2 Workshop
 COMMUNITY TECHNICAL SUPPORT Adobe Photoshop CS2 Workshop Photoshop CS2 Help For more technical assistance, open Photoshop CS2 and press the F1 key, or go to Help > Photoshop Help. Selection Tools - The
Thank you for spending your evening with me! Truly enjoyed chatting and sharing image blending.. :)
") easymail Webmail :: Texture Blending Notes 1 of 2 9/4/2016 8:38 PM Subject From To Date Texture Blending Notes Denise Silva Denise Silva 2016-09-02 8:10 am Texture
easymail Webmail :: Texture Blending Notes 1 of 2 9/4/2016 8:38 PM Subject From To Date Texture Blending Notes Denise Silva Denise Silva 2016-09-02 8:10 am Texture
ADDING FIREWORKS TO A PHOTO
 ADDING FIREWORKS TO A PHOTO In this Photoshop tutorial, we re going to learn how to add fireworks to a photo. What you ll need is a photo of fireworks and the photo you want to add the fireworks to (preferably
Exploring Photoshop Tutorial
 Exploring Photoshop Tutorial Objective: In this tutorial we will create a poster composed of three distinct elements: a Bokeh, an image and title text. The Bokeh is an effect which is sometimes seen in
All Creative Suite Design documents are saved in the same way. Click the Save or Save As (if saving for the first time) command on the File menu to
 command on the File menu to") 1 The Application bar is new in the CS4 applications. It combines the menu bar with control buttons that allow you to perform tasks such as arranging multiple documents or changing the workspace view.
1 The Application bar is new in the CS4 applications. It combines the menu bar with control buttons that allow you to perform tasks such as arranging multiple documents or changing the workspace view.
Create a Beautiful Abstract Portrait in Photoshop - Psd Premium Tutorial
 Create a Beautiful Abstract Portrait in Photoshop - Psd Premium Tutorial By: Wojciech Pijecki In this tutorial we will combine several stock images to create an artistic, abstract portrait of a woman.
Star Diffusion Tutorial
 Star Diffusion Tutorial Learn how to add a unique dreamy effect to your photos with this Star Diffusion Photoshop tutorial. This Photoshop effect creates diffusion in the shape of a four-point star and
Create a Street Art Style Illustration By CorelDRAW Master Stefan Lindblad
 Create a Street Art Style Illustration By CorelDRAW Master Stefan Lindblad Start with an original drawing on paper. With Corel PHOTO-PAINT and CorelDRAW, creating street art images, and later printing
Blend Photos Like a Hollywood Movie Poster
 Blend Photos Like a Hollywood Movie Poster Written By Steve Patterson In this Photoshop tutorial, we're going to learn how to blend photos together like a Hollywood movie poster. Blending photos is easy
Creative Cut-Outs. 1Go to File>New>Blank File to create a new document and enter. Projects EXTRAS: GET MORE ONLINE!
 ALL IMAGES MIKE RODRIGUEZ Creative Cut-Outs By Mike Rodriguez Are you interested in applying some of your rapidly developing layer skills? In the May/June issue, we covered the basics of layers (Layers