Here is a 100% zoom close up. Name in Popsicles
|
|
|
- Lindsey Bradley
- 5 years ago
- Views:
Transcription


1 Here is a 100% zoom close up Name in Popsicles
, and double click on the layer thumb to open the layer styles window.")
2 Step 1 Let s start by creating a new Photoshop document. Mine is pixels. Fill the background with a color of your choice (it s not important at this stage), and double click on the layer thumb to open the layer styles window. Here add a gradient (radial) overlay going from #c0e6df to #15a48b, thus overlapping the first fill color. Step 2 At this point we need to choose the right font for the illustration. If you have more patience, you could try drawing custom letters in Illustrator. Just try to make them bold and a bit irregular. If you re lazy, like me, use a font like Bauhaus 93. Type your name. A suggestion: type each letter on a separate layer.

3 Step 3 I will show you how I created the first letter, S. The process for the other letters is the same, so once you ve learned how to create your first ice-cream letter, you ll be able to reproduce it infinite times. Start by rasterizing the type: right-click on the letter thumbnail > rasterize type. Then right-click again and select Blending options. We will play with layer styles to start giving color and depth to the illustration. Add a light red (#fd5e74) color overlay.

4 Select Bevel and Emboss with the following settings and check contour to make the 3d effect more evident.

5 Finally add Satin, set on color dodge, to put in some interesting details.
, directly above the letter.")
6 Step 4 To make the ice-cream/letter more realistic we can use a texture. Download this ice image and merge it into the document (File > Open ), directly above the letter. Press ctrl+t to activate the free transform tool and resize the image.

7 Set the texture color mode to color burn with opacity 10%
 to make a selection of its pixels, and add a layer mask.")

8 Finally with the texture still selected, ctrl+click over the letter (layer thumbnail) to make a selection of its pixels, and add a layer mask. By doing this you will remove the texture areas that exceed the letter. To add a layer mask simply click the add layer mask button which is at the bottom of the layer window.

9 Step 5 Select both the texture and letter layers and press alt+ctrl+e to merge them into a new layer. We will use this image from now on, feel free to hide the 2 original layers. Now let s add a noise effect. Make sure to have white and black as foreground and background color, then create a new layer and fill it with black. Go to Filter > Noise > Add Noise Add a layer mask, as shown in step 4, so the noise effect will affect only the area covered by the letter:
10 Set the layer to screen to remove the black area, and reduce the opacity to around 30% to make the effect subtle.
11 Step 6 Let s create the stick. Draw the main shape with the rounded rectangle tool (radius 30px).

12 Add a light brown (#f4d0b0) color overlay, then rasterize the layer.
13 With the Rectangular Marquee tool, select the top area of the shape and hit delete. Then ctrl+d to deselect.

14 Duplicate the shape layer by pressing ctrl+j. Then move the shape which is below a couple of pixel to the bottom-right. Switch its color to a darker brown (#d68f61).
15 Step 7 With the same technique used in step 4 and 5, let s apply a wooden texture to the stick. Download our wooden textures and pick up a photo of your choice. Then merge it into the document. Set the layer blend mode to overlay to see how it will affect the stick.

16 Reduce the opacity to around 60%, and add a layer mask to remove the area that exceeds the stick. (To select both the shapes of the sticks, ctrl+click on the first shape, then hold down shift and click on the second one).
17 Select the texture layer and the two shapes of the stick from the layers window, then merge them into a new layer (alt+ctrl+e) and hide the original layers. With the pen tool in path mode, create a path that covers a small top area of the stick that we will remove later. The purpose of this step is to make the stick less rigid.

18 Press ctrl+enter to activate the selection and hit delete. Step 8 Using the Burn and Dodge tools, make darker and brighter areas of the ice cream main body. From the screenshot below you can see how I darkened the area behind the stick:

19 Apply the burn tool again, this time over the top of the stick. Based on the direction of the light source, this area should look darker.
20 Step 9 A light effect can help to enhance some texture details and make the frozen effect over the icecream look more realistic. So create a new group and set its blending mode to color dodge. Create a layer inside the group, grab a large, soft (hardness 0%), white brush and click once over the ice-cream. Reduce the opacity, if the effect is too strong. Here is my outcome.

21 Step 10 Here comes the fun part! We will create drops and ice pieces with the use of layer styles. My first thought was to use stock images of drops and water, and play with their blending options to add the drops to the scene. However, after several attempts I decided to proceed with brushes and layer styles, thanks to the help of our great illustrator Diego. The result is more than satisfactory! Create a new layer and grab a small round brush with hardness 100%. Then paint a spot over the ice-cream.


22 Double-click on the drop layer to open the style window. Reduce the fill opacity to 0%.

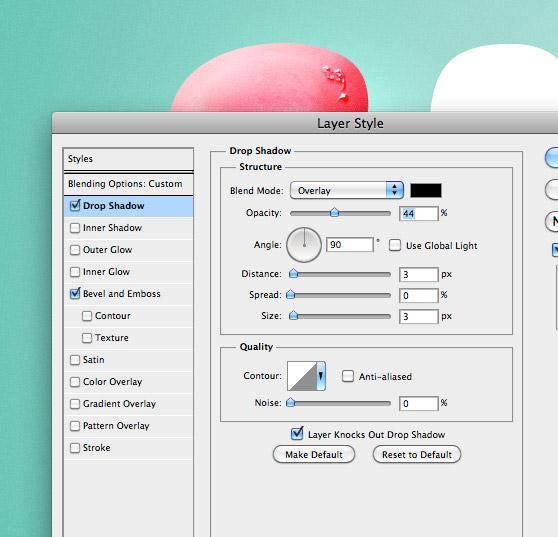
23 Add bevel and emboss. This will give depth to the drop: Add a drop shadow and inner shadow.
24

25 Finally add inner glow and satin as the last touches:

26

27 Step 11 Now that you have the layer set up, just paint! I ve created this screencast so you can see my process to realize the drops (with the help of my Wacom tablet). Step 12 Here is the first letter complete:

28 Now create a new layer and paint the shadow effect with a soft black brush. Reduce the opacity so the result will look softer. Finally, use the same brush to create the drops on the floor.
 to blue (#002874) to yellow (#f9e600). Set the layer to overlay with opacity 30%.")
29 The last touch: to increase the contrasts, just add a new gradient map layer (Layer > New Adjustment Layer > Gradient map). Add a gradient going from red (#ee202e) to blue (#002874) to yellow (#f9e600). Set the layer to overlay with opacity 30%.

30 Now that you know how to create a letter, you can apply it to the entire word or phrase. Exercise your creativity and play with different forms and colors. The ice-cream is now complete! Are you hungry???
31
Design a Halloween Pumpkin Wallpaper in Photoshop
 Design a Halloween Pumpkin Wallpaper in Photoshop By: Alvaro Guzman Halloween is near! So let's take a pumpkin image, carve it up, and light it for this coming holiday. You'll learn how to get this nice
Digital Image Manipulation 2014
 Week 4 Advanced Type Techniques- create special effect type Step 1 Create a new 1024 x 768 px document. Set the document background color to light pink or follow my colour (#f8cece) Create the text using
HOW TO CREATE A SUPER SHINY PENCIL ICON
 HOW TO CREATE A SUPER SHINY PENCIL ICON Tutorial from http://psd.tutsplus.com/ Compiled by INTRODUCTION The Pencil is one of the visual metaphors most used to express creativity. In this tutorial,
Glowing Surreal Planet Design. Final Image Preview
 Glowing Surreal Planet Design Final Image Preview. Step 1 First, go to the S:\ drive and locate the folder called Glowing Planet Design. Copy the City Skyline file and paste it in your Glowing Planet Design
Photoshop. Make a Spooky Halloween Pumpkin Text Effect in Photoshop - Photoshop tutorial PSDDude
 Photoshop October 4th,2017 1 2 Image size: 7 in wide x 3 in high 300 dpi Start with a simple black gradient background layer. Radial Gradiant, black to gray. Install the CREEPSVILLE font. Center and Type
Name the layer you rotated in step 3 Stripe and lower the opacity to 43%.
 Step 1 Open Photoshop and create a new file 1085 649 pixels. Fill the layer with a bright blue color (#0095db) by pressing Shift + F5. This will be the background for our pop art scene. Step 2 Let s create
FLAMING HOT FIRE TEXT
 FLAMING HOT FIRE TEXT In this Photoshop text effects tutorial, we re going to learn how to create a fire text effect, engulfing our letters in burning hot flames. We ll be using Photoshop s powerful Liquify
Create an Amazing Surreal-Style Treehouse in Photoshop Photoshop Tutorials
 Download the PSD Surreal Treehouse.zip 23.59 MB Download from Website Surreal Treehouse Photoshop Tutorial Tutorial Resources Tree Houses Thanks archetype, Deviantart Bonsai Tree Thanks fabemiko, Deviantart
Colorful Glowing Mask Photoshop Tutorial Photoshop TUTfactory The best Photoshop tutorials in one place
 Step 1: To start, create new canvas sized at 994 1312 pixels, and fill it with black. Next, create a new layer, and go to Filter->Render->Clouds. Duplicate this layer, and then merge the two layers. Set
TV Aquarium. Create a new document. 8.5 x 11, 300 dpi. Save as TV Aquarium Your Name. Create TV shape. Use Pen
 Create a new document. 8.5 x 11, 300 dpi. Save as TV Aquarium Your Name. Create TV shape. Use Pen Tool, Convert Point Tool and Direct Selection Tool. We need side shapes to create patches of light and
ADDING FIREWORKS TO A PHOTO
 ADDING FIREWORKS TO A PHOTO In this Photoshop tutorial, we re going to learn how to add fireworks to a photo. What you ll need is a photo of fireworks and the photo you want to add the fireworks to (preferably
A quick note: We hope that you will find something from the Tips and Tricks that will add a little pizazz to your yearbook pages!
 A quick note: The following pages are tips and tricks for Basic Photoshop users. You may notice that some instructions indicate that non-awpc fonts were used, and that some colors were created using the
Quick Mask Setting Up your Work Environment Setting Up the Quickmask Parameters
 Quick Mask Quickmask gets its name from the fact that as you create your selection area, Photoshop masks that area off, tinting it with a colored mask to show what has been selected. When you're finished
prepared by Allison Hwang for T. Purdy 2011
 There are many ways to create material textures in Photoshop. In addition to using primarily the blending tool, you can also use filters to create textures. In this tutorial, the objective is to create
METAL TEXT EFFECT. Step 1: Create A New Document. Step 2: Fill The Background With Black
 METAL TEXT EFFECT In this text effects tutorial, we ll learn how to easily create metal text, a popular effect widely used in video games and movie posters! It may seem like there s a lot of steps involved,
Cute Gooey Blob Photoshop Tutorial
 Download the PSD Cute 3D Character.zip 22.11 MB Download from Website (http://photoshoptutorials.ws/downloads/psd/cute 3D Character.zip) Cute Gooey Blob Photoshop Tutorial Step 1 Create a new document
Converse Chuck Taylor Shoes Photoshop Tutorial
 20 Converse Chuck Taylor Shoes Photoshop Tutorial Step 1 Create A New Document Create a New Document. The size of my canvas is 600px x 700px with a 72dpi resolution. Save as Chuck Taylor - Your Name. Step
An Idiot's Guide to Photoshop. Part II Azamat Bohed E. TrueKolor.net
 An Idiot's Guide to Photoshop Part II Azamat Bohed E. TrueKolor.net Table of Contents 1.Introduction 3 2. Opening a Digital Image/Photo in Photoshop 3 3. Changing/removing the Background 4 3.1 Using the
How to Draw a Realistic iphone 4 with
 Home Freebies Submit Your Work Contact Us How to Draw a Realistic iphone 4 with Photoshop Jan 3 2011 By Mohammad Jeprie 34 Comments In this tutorial, we will draw a realistic-looking iphone 4 using Photoshop.
Adding Fireworks To A Photo With Photoshop
 Adding Fireworks To A Photo With Photoshop Written by Steve Patterson. In this Photoshop Effects tutorial, we re going to learn how to add fireworks to a photo. What you ll need is a photo of fireworks
Photoshop & Illustrator
 Week 6 Lesson 6 : Utilize Filters Effect Applying filters Creating and editing Smart Filters Hiding, copying, and deleting Smart Filters Working with the Smart Filter mask More filter techniques Photoshop
Lesson 16 Text, Layer Effects, & Filters
 Lesson 16 Text, Layer Effects, & Filters Digital Media I Susan M. Raymond West High School In this tutorial, you will: Create a Type Layer Add and Format Type within a Type Layer Apply Layer Effects Apply
CREATE A BURNT EDGE EFFECT
 CREATE A BURNT EDGE EFFECT One of the all-time classic effects in Photoshop is the burnt edge, and there s lots of different ways to create it, but in this Adobe Photoshop tutorial, we re going to look
The original image. The final rainbow effect.
 ADD A realistic rainbow to a photo In this Photoshop photo effects tutorial, we re going to learn how to easily add a rainbow, even a double rainbow, to a photo. Of course, as with most photo effects,
Central Photography [OUT OF BOUNDS]
![Central Photography [OUT OF BOUNDS]](/thumbs/77/75801528.jpg "Central Photography [OUT OF BOUNDS]") The effect is called Out of Bounds or sometimes 3D Border Breakout. 1. First off you need to pick a suitable picture. Photos with a strong subject help, one that has some depth in the frame. Movement is
The effect is called Out of Bounds or sometimes 3D Border Breakout. 1. First off you need to pick a suitable picture. Photos with a strong subject help, one that has some depth in the frame. Movement is
Using Adobe Photoshop
 Using Adobe Photoshop 6 One of the most useful features of applications like Photoshop is the ability to work with layers. allow you to have several pieces of images in the same file, which can be arranged
SAVING, LOADING AND REUSING LAYER STYLES
 SAVING, LOADING AND REUSING LAYER STYLES In this Photoshop tutorial, we re going to learn how to save, load and reuse layer styles! Layer styles are a great way to create fun and interesting photo effects
How to Create The Top 10 Design Trends of 2018
 Inspired by Philip VanDusen The techniques I m sharing in class were inspired by a great video called 15 Trends in Graphic Design for 2018 by Principal & COO of Verhall Brand Design, Philip VanDusen. This
WORN, TORN PHOTO EDGES EFFECT
 Photo Effects: CC - Worn, Torn Photo Edges Effect WORN, TORN PHOTO EDGES EFFECT In this Photoshop tutorial, we ll learn how to take the normally sharp, straight edges of an image and make them look all
PHOTOSHOP & ILLUSTRATOR BOOTCAMP
 FALL 2014 - ELIZABETH LIN PHOTOSHOP & ILLUSTRATOR BOOTCAMP ILLUSTRATOR ALIGNMENT To access the alignment panel, go to Window -> Align. You should see a panel like the one below. This panel allows you to
PHOTOSHOP TUTORIAL: DIGITAL DARKROOM TECHNIQUES
 PHOTOSHOP TUTORIAL: DIGITAL DARKROOM TECHNIQUES STEP BY STEP TRAINING Learn by doing step by step exercises. Includes downloadable class files that work on Mac & PC. EDITION 1 Copyright Info Published
Contents: Bibliography:
 ( 2 ) Contents: Sizing an Image...4 RAW File Conversion...4 Selection Tools...5 Colour Range...5 Quick Mask...6 Extract Tool...7 Adding a Layer Style...7 Adjustment Layer...8 Adding a gradient to an Adjustment
 http://blog.spoongraphics.co.uk/tutorials/how-to-intensify-your-landscape-photos-in-photoshop This post was originally published in 2011 THE TIPS AND TECHNIQUES EXPLAINED MAY BE OUTDATED. The post-processing
Adobe PhotoShop Elements
 Adobe PhotoShop Elements North Lake College DCCCD 2006 1 When you open Adobe PhotoShop Elements, you will see this welcome screen. You can open any of the specialized areas. We will talk about 4 of them:
Project 25 Page 1 ` JAZZ POSTCARD
 Project 25 Page 1 ` JAZZ POSTCARD Reset all tools! Create the Background 1. Create a new RGB document, 4.25 in. wide by 5.75 in. high at 100 dpi with a white background. 2. Click the foreground color swatch
How to Create Website Banners
 How to Create Website Banners In the following instructions you will be creating banners in Adobe Photoshop Elements 6.0, using different images and fonts. The instructions will consist of finding images,
The original image. Let s get started! The final rainbow effect. The photo sits on the Background layer in the Layers panel.
 Add A Realistic Rainbow To A Photo In this Photoshop photo effects tutorial, we ll learn how to easily add a rainbow, and even a double rainbow, to a photo! As we ll see, Photoshop ships with a ready-made
EXTREME CONTRAST PHOTO EFFECT
 EXTREME CONTRAST PHOTO EFFECT In this Photoshop tutorial, we re going to learn how to use layers, layer blend modes, some noise, a little sharpening, and a simple adjustment layer to easily give a photo
Central Photography [INSTAGRAM EFFECTS]
![Central Photography [INSTAGRAM EFFECTS]](/thumbs/96/129260346.jpg "Central Photography [INSTAGRAM EFFECTS]") 1 1. Open Photoshop. 2. Go to File/New (Ctrl+N). 3. Name your file. 4. Set the Width to 11 inches. 2 5. Set the Height to 8.5 inches. 6. Set your Resolution to 200 pixels/inch. 7. Set your Background Contents
1 1. Open Photoshop. 2. Go to File/New (Ctrl+N). 3. Name your file. 4. Set the Width to 11 inches. 2 5. Set the Height to 8.5 inches. 6. Set your Resolution to 200 pixels/inch. 7. Set your Background Contents
Animated Snowman. Image size: 11 w x 17 h 300 dpi
 Animated Snowman Image size: 11 w x 17 h 300 dpi Step 1 First of all, you ll need the texture on my website. Now open a new document. I usually work on really big documents because I can work on the details
This special use of burn and dodge techniques can improve your image in several ways:
 Why is this section included? In Photoshop and with Layers, Burn & Dodge can be even more useful because it can also help to bring light and shadow to flat images with the purpose of creating depth and
'Photoshop'. "Realistic Eye Texture Painting" by Krishnamurti Martins Costa
 Level: intermediate Technique: digital painting Software: Adobe Photoshop 'Photoshop'. "Realistic Eye Texture Painting" by Krishnamurti Martins Costa Email: kris@antropus.com Web: http://www.antropus.com
How can images be manipulated to represent an animal?
 Roboanimal This lesson will explore the concept of natural objects when combined with manmade objects. You will be choosing an animal or natural being to digitally manipulate into a total manmade creature.
Create a Creepy Face Photo Manipulation in Photoshop
 i TUTORIALS Create a Creepy Face Photo Manipulation in Photoshop by Alan Klim Advertisement In this tutorial we ll show you an easy way to create a nice creepy face effect using Photoshop. We strongly
11 Advanced Layer Techniques
 11 Advanced Layer Techniques After you ve learned basic layer techniques, you can create more complex effects in your artwork using layer masks, path groups, filters, adjustment layers, and more style
Organizing artwork on layers
 3 Layer Basics Both Adobe Photoshop and Adobe ImageReady let you isolate different parts of an image on layers. Each layer can then be edited as discrete artwork, allowing unlimited flexibility in composing
Turning a Photo into a Painting by Jack Davis & Linnea Dayton
 Turning a Photo into a Painting by Jack Davis & Linnea Dayton WITH VERSION 7, PHOTOSHOP CAN FINALLY PAINT! Using the new capacities built into Photoshop s Brush engine and the settings you can save as
GRINDHOUSE MOVIE POSTERS
 Follow the instructions below to create a grindhouse style movie poster for your short film. You can also see a detailed video tutorial here: http://www.youtube.com/watch?v=-drhbfvhft0 GOOD LUCK!! CREATING
The original image. As I said, we ll be looking at a few different variations on the effect. Here s the first one we ll be working towards:
 DIGITAL PIXEL EFFECT In this Photoshop tutorial, we re going to look at how to create a digital pixel effect, which is often used in ads that sell anything to do with digital. We re going to first pixelate
How to Create Fake Shadows
 TIP SHEET #8 How to Create Fake Shadows As well as the colour, it s the shadows in a picture that help to give it mood and atmosphere so in this tutorial I want to show you how you can add in extra shadows.
Introduction to Photoshop
 Introduction to Photoshop Instructional Services at KU Libraries A Division of Information Services www.lib.ku.edu/instruction Abstract: This course covers the basics of Photoshop, including common tools
Step 1. Facebook Twitter Google+ Find us on Facebook. Vectortuts+ How to Create a Curious Owl in Illustrator CS4 Vectortuts+
 Joomla developers needed - Long term potential in India Copywriter Email Campaigns Wordpress Creative design Social media in UK More Freelance Jobs... Facebook Twitter Google+ Find us on Facebook Step
::: Update: June 1st, :46 :::
 ::: Update: June 1st, 2009 17:46 ::: This lesson has been written by Ann on May 18th 2009 using the Dutch version of PSP X2 Copyright 2009 - website: tdstudio - tubegroup: TubesBellisimo - guestbook :::
Painting Special Effects on Photographs
 TUTORIAL 7 Painting Special Effects on Photographs In this tutorial you will learn how to transform a photo into a striking color composition with paintbrushes, masks, blending modes, color, and paper
Town and Village Tutorial
 Town and Village Tutorial For Adobe Photoshop by Lerb This tutorial will take you through the basic techniques I use when creating village and town maps in Adobe Photoshop. The techniques can also be used
Learning Adobe Photoshop CS6
 Module 1 Contents Chapter 1: Introduction to Photoshop Loading Photoshop...1-1 The Tools Panel...1-2 Using the Tools...1-3 The Panel Group...1-5 Layers...1-6 Loading a Sample File...1-6 Looking at the
Tutorial Resources. Combine a Crocodile with a Car to Create an Exotic Crocomobile Photoshop Tutorials
 Tutorial Resources Crocodile1 SXC Crocodile2 charadestock Crocodile3 frostdragon64 Old car achatinastock Background SXC Bird rml-stock sign1 discordia-stock Sign2 ecathe Step 1 Open the background image
IMAGE CORRECTION. You can find this and more information with video tutorials at
 IMAGE CORRECTION You can find this and more information with video tutorials at http://www.adobe.com/support/photoshop/ P H O T O S H O P T O O L S CLONE STAMP TOOL The Clone Stamp tool paints one part
Diploma in Photoshop
 Diploma in Photoshop Photoshop Selection Tools Selection Tools allow us to isolate areas of our image and apply adjustments to these selected areas only. A selection simply isolates one or more parts of
ITEC185 INTRODUCTION TO DIGITAL MEDIA
 1 ITEC185 INTRODUCTION TO DIGITAL MEDIA ADOBE PHOTOSHOP ITEC185 - Introduction to Digital Media ITEC185 - Introduction to Digital Media 2 What is Adobe Photoshop? Photoshop is the leading professional
Saderan a tutorial. page 1. Contents. Introduction
 page 1 Saderan a tutorial Introduction Contents Several people on the Cartographer s Guild forums asked for a tutorial about the style I used in my Saderan map. This document tries to deliver. This is
Perspective Shadow Text Effect In Photoshop
 Perspective Shadow Text Effect In Photoshop Written by Steve Patterson. In this Photoshop text effects tutorial, we ll learn how to create a popular, classic effect by giving text a perspective shadow
Create a new image: 10 IN height and 16 IN width, 300 dpi.
 The images needed for this project are on my website. Create a new image: 10 IN height and 16 IN width, 300 dpi. Create a new layer and fill the layer with white.. Create a radial gradient by using following
The toolbar in Pixlr Editor always appears on the left-hand side, although you can drag it anywhere you like.
 The toolbar in Pixlr Editor always appears on the left-hand side, although you can drag it anywhere you like. Crop (Shortcut: C) Reframe your entire canvas to a desired size and remove everything else.
PHOTOSHOP PUZZLE EFFECT
 PHOTOSHOP PUZZLE EFFECT In this Photoshop tutorial, we re going to look at how to easily create a puzzle effect, allowing us to turn any photo into a jigsaw puzzle! Or at least, we ll be creating the illusion
Downloaded From : Working with Photoshop 7.0
 Adobe Photoshop 1. Introduction What is Adobe Photoshop? Adobe Photoshop is a web designing software used for giving effects and filters to an image to make it more appealing and attractive. Brought out
Photoshop Textures Assignment # 2
 Photoshop Textures Assignment # 2 Objective: Use Photoshop to create unique texture from scratch that can be applied to backgrounds, objects, tetx and 3D objects to create new and exciting compositions.
This tutorial will show you how to change your images into a cool dirty grunge design, which could be used for posters, prints, CD covers, etc.
 This tutorial will show you how to change your images into a cool dirty grunge design, which could be used for posters, prints, CD covers, etc.today We ll be making this: STEP 1: Open a new document in
Reveal the mystery of the mask
 Reveal the mystery of the mask Imagine you're participating in a group brainstorming session to generate new ideas for the design phase of a new project. The facilitator starts the brainstorming session
HIGH KEY GLOW EFFECT IN PHOTOSHOP
 HIGH KEY GLOW EFFECT IN PHOTOSHOP In this Photoshop tutorial, we ll learn how to create a high key glow effect, which is a fancy way of saying we ll be applying a glow only to the highlights in an image.
Realistic Skin Smoothing
 TIP SHEET #7 Realistic Skin Smoothing I think it s fair to say when it comes to retouching techniques, the number of different ways to smooth skin is seemingly endless. From blurring techniques through
Web Graphics Chapter 7 Review
 Web Graphics Chapter 7 Review Name Date 1. The Add Layer Mask button is located on/in the. a. Toolbox b. Layers palette c. Mask palette d. History palette 2. How many color adjustments commands are available
COLORIZING IMAGES WITH GRADIENT MAPS
 COLORIZING IMAGES WITH GRADIENT MAPS In this Photoshop tutorial, we ll learn how to add complex colorizing effects to images using custom gradients! Specifically, we ll look at the Gradient Map image adjustment
Make a Planet. by Greg Martin
 Make a Planet by Greg Martin This tutorial should step you through making a simple, yet realistic-looking planet using Adobe Photoshop 7, and ONLY Adobe Photoshop 7. We're working small here, so keep in
How to Create a Curious Owl in Illustrator
 How to Create a Curious Owl in Illustrator Tutorial Details Program: Adobe Illustrator Difficulty: Intermediate Estimated Completion Time: 1.5 hours Take a look at what we're aiming for, an inquisitive
Post-Processing/Editing Page 1
 All images need a little something to help re-create or re-imagine what you think a particular image should look like. Whether it is adding a digital gradient to a sky to help saturate and deepen the colours
daevart.deviantart.com
 The Making Of Compass Rose (Photoshop Tutorial) Difficulty : Intermediate daevart.deviantart.com Heyya... I would like to share my Technique on making Compass rose With Photoshop ^^. The Core of Lesson
Photoshop Backgrounds: Turn Any Photo Into A Background
 Photoshop Backgrounds: Turn Any Photo Into A Background Step 1: Duplicate The Background Layer As always, we want to avoid doing any work on our original image, so before we do anything else, we need to
1. Create a rough sketch
 1. Create a rough sketch Go to File>New (Cmd/Ctrl+N), name it Whale. Set Width to 230mm, Height to 310mm and Resolution to 300ppi. Click OK. Create a new layer (Shift+Cmd/Ctrl+N) and name it Sketch 1,
TEXT PERSPECTIVE SHADOW EFFECT
 TEXT PERSPECTIVE SHADOW EFFECT In this Photoshop text effects tutorial, we ll learn how to create a popular, classic effect by giving text a perspective shadow as if a light source behind the text was
Photoshop CC: Essentials
 Photoshop CC: Essentials Summary Workspace Overview... 2 Exercise Files... 2 Selection Tools... 3 Select All, Deselect, And Reselect... 3 Adding, Subtracting, and Intersecting... 3 Working with Layers...
All Creative Suite Design documents are saved in the same way. Click the Save or Save As (if saving for the first time) command on the File menu to
 command on the File menu to") 1 The Application bar is new in the CS4 applications. It combines the menu bar with control buttons that allow you to perform tasks such as arranging multiple documents or changing the workspace view.
1 The Application bar is new in the CS4 applications. It combines the menu bar with control buttons that allow you to perform tasks such as arranging multiple documents or changing the workspace view.
Building - Image*After Bokeh - Regularjane Landscape 1 - Anders Bjerré Pedersen Landscape 2 - author Sundstrom(nickname)
") Click to enlarge the image. Used images: Download Moon shape(image created with the Photoshop tools) Icicles - Sergei Furtcev Cloud 1(Ruslan Olinchuk), Cloud 2(Image*After), Cloud 3(Sergei Perov) Stars
Click to enlarge the image. Used images: Download Moon shape(image created with the Photoshop tools) Icicles - Sergei Furtcev Cloud 1(Ruslan Olinchuk), Cloud 2(Image*After), Cloud 3(Sergei Perov) Stars
Your texture pattern may be slightly different, but should now resemble the sample shown here to the right.
 YOU RE BUSTED! For this project you are going to make a statue of your bust. First you will need to have a classmate take your picture, or use the built in computer camera. The statue you re going to make
This tutorial will show you how to use artistic grunge overlays to transform your photos into works of art.
 ARTISTIC GRUNGE OVERLAYS For all photo editing software that supports PNG files If you have any questions, please feel free to contact me at kim@photosbykimhill.com. This tutorial will show you how to
Okay so its not the best drawing, well it's not suppose to be, your going to make the image a complete piece of art.
 In this lesson you will see that Adobe Photoshop is not just an image editor, but it is also useful in creating art work by drawing and painting. In this lesson we will focus on Painting, but you can always
Create a Beautiful Abstract Portrait in Photoshop - Psd Premium Tutorial
 Create a Beautiful Abstract Portrait in Photoshop - Psd Premium Tutorial By: Wojciech Pijecki In this tutorial we will combine several stock images to create an artistic, abstract portrait of a woman.
How to make non-destructive textured maps in Photoshop
 How to make non-destructive textured maps in Photoshop This tutorial assumes that you are reasonably familiar with using photoshop. E.g. You know how to create layers, layer styles, masks etc. After you
Essential Skills - 3 Key Blend Modes. Ken Fisher
 Ken Fisher One of the best ways to understand blending modes is to experiment with them. Get two layers together and play around. The results sometimes will leave you cold, the effects wont inspire you.
prepared by Allison Hwang for T. Purdy 2011
 This tutorial shows you how to create a basic screen display on a product in Adobe Photoshop. Creating details, such as shadows and reflections, can help make your product more realistic and convincing
Reflection Project. Please start by resetting all tools in Photoshop.
 Reflection Project You will be creating a floor and wall for your advertisement. Before you begin on the Reflection Project, create a new composition. File New: Width 720 Pixels / Height 486 Pixels. Resolution
PHOTOSHOP DESIGN EFFECTS FOR INTERMEDIATE TO ADVANCED USERS
 PHOTOSHOP DESIGN EFFECTS FOR INTERMEDIATE TO ADVANCED USERS Copyright 2012, National Seminars Training Introduction This class is all about design effects in Adobe Photoshop. For example, let s say that
PhotoText. PhotoText is a great introduction to Photoshop.
 1 is a great introduction to Photoshop. To earn an A, you ll need to have the complete the following tasks within your : Downloaded and installed font. All photos are student taken and appropriate. Textures
Reducing Noise in an image
 Reducing Noise in an image - Open the image in Photoshop. - Go to the Filter menu then click on Noise and then the Reduce Noise button. - Zoom in on the preview image in the Reduce Noise window, so that
Ian Barber Photography
 1 Ian Barber Photography Sharpen & Diffuse Photoshop Extension Panel June 2014 By Ian Barber 2 Ian Barber Photography Introduction The Sharpening and Diffuse Photoshop panel gives you easy access to various
How to Create Spooky Halloween Typography in Photoshop
 Envato Elements: Unlimited templates, graphics, courses, ebooks, and now 300,000 photos! Only $29/month envato-tuts+ Sign Up Sign In Advertisement DESIGN & ILLUSTRATION > TEXT EFFECTS How to Create Spooky
Introduction to Layers
 Introduction to Layers By Anna Castano A layer is an image or text that is piled on top of another. There are many things you can do with layer and it is easy to understand how it works. Through the introduction
How to blend, feather, and smooth
 How to blend, feather, and smooth Quite often, you need to select part of an image to modify it. When you select uniform geometric areas squares, circles, ovals, rectangles you don t need to worry too
Project 8: Nice Close-Up
 ps7ie_p08_b.qxd 11/18/02 3:25 PM Page 74 ps7ie_p08_b.qxd 11/18/02 3:25 PM Page 75 Photoshop 7 Image Effects In this project, work with a picture that was taken at an angle for effect. Correct and crop
3. Notice how you can barely see my leaf brush? And what you can see is extremely transparent. But it s there. Now, to get rid of that transparency.
 Some brushes were made to be transparent, others were not. And because of the nature of Photoshop (or PSP/GIMP) brushes, sometimes they end up looking that way when they shouldn t. This tutorial will explain