HOW TO CREATE A DARK SURREAL ILLUSTRATION IN PHOTOSHOP
|
|
|
- Bartholomew Cross
- 6 years ago
- Views:
Transcription
1 HOW TO CREATE A DARK SURREAL ILLUSTRATION IN PHOTOSHOP Tutorial from Compiled by <<coldbing>>

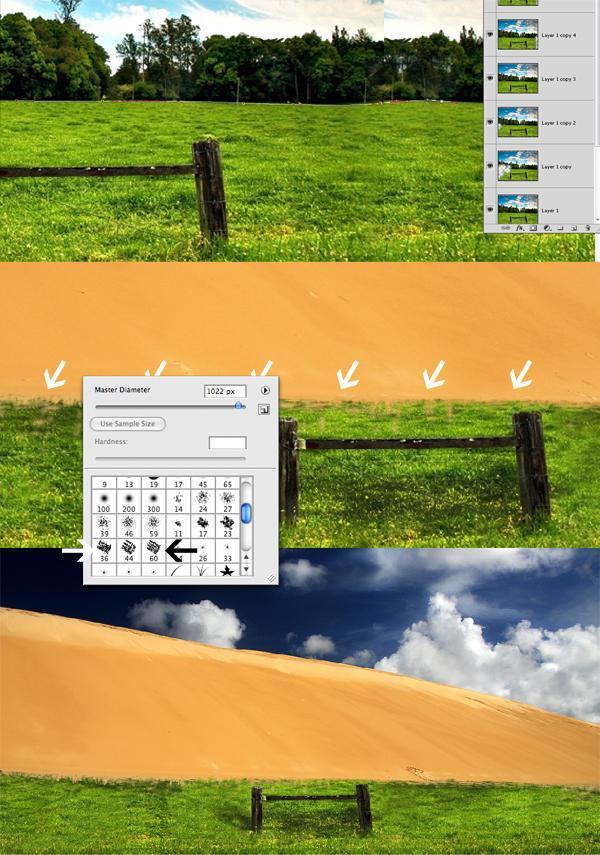
2 INTRODUCTION In this tutorial we are going to create a dark surreal illustration using a few techniques and a handful of images. In the end, we will apply stylish color settings and give the illustration that extra polish it needs to give it that finished look. Also, I would like to take this opportunity to thank the photographers for giving me permission to use their images. Without them I could never create this art. Please visit their amazing galleries: blacksockstock, Wayne Benedet, Drew Hopper, Nikola M., and Nicolas Raymond. Now, let's jump into this tutorial! Step 1: First, open up the desert image created by Nikola M. This is the image you will be working over. Next, duplicate the image by simply pressing Command + J or go to Layer > Duplicate Layer and name it "Sand." Step 2: Next, we need an image with really nice grass. The image Drew Hopper created is amazing and perfect for this piece. After you import the image into the document you will see that the width of the image is smaller then the width of the sand image so you will need to duplicate the grass image a few times and then blend each piece together. To do this you first need to erase a few parts of the duplicated grass images using the Eraser Tool (E), merge all of them. Next, retouch the grass and make the images blend in nicely using the Clone Stamp Tool (S).

3 Step 3: Next, erase the upper part of the grass image. Do this using the Pen Tool (P). After you cut out the trees and sky you will need to make the transition between sand and grass look more interesting. Use some brushes that are already installed in Photoshop and create an effect similar with the one below.
4

5 Step 4: Now you need to import another image. I chose the one photographed by Wayne Benedet. Before you import the image you will have to first cut the wind turbines using the Pen Tool (P). Here is a really great tutorial to show you how to use the Pen Tool. After you finish cutting the turbines, position them into place. Next, burn the lower part of the turbines, sand and grass. The image indicates the places you need to use the Burn Tool (O). Now duplicate the turbines using the Transform Tool (Command + T) and place the turbines on the sand, make them look like a shadow. Next, make a selection of the turbines and fill them with black. Go to Filter > Blur > Gaussian Blur and give some blur to the layer. This makes it more like a shadow. The final step is to use the Warp setting under the Transform Tool and change the shape of the shadow as you want to make it more real.

6 Step 5: Next, place a balloon in the upper left side of the image. I used the image photographed by Nicolas Raymond. Before you are done, you will need to create a new layer over the balloon and you need to draw 2 spots over the balloon using a soft brush, like in the image below. Color codes are: #c101a4 and #0984bf. Set the layer to Multiply and Opacity to 50%.
 and place her on the document you are working on. Copy a piece of the wooden legs and place it below her hand.")
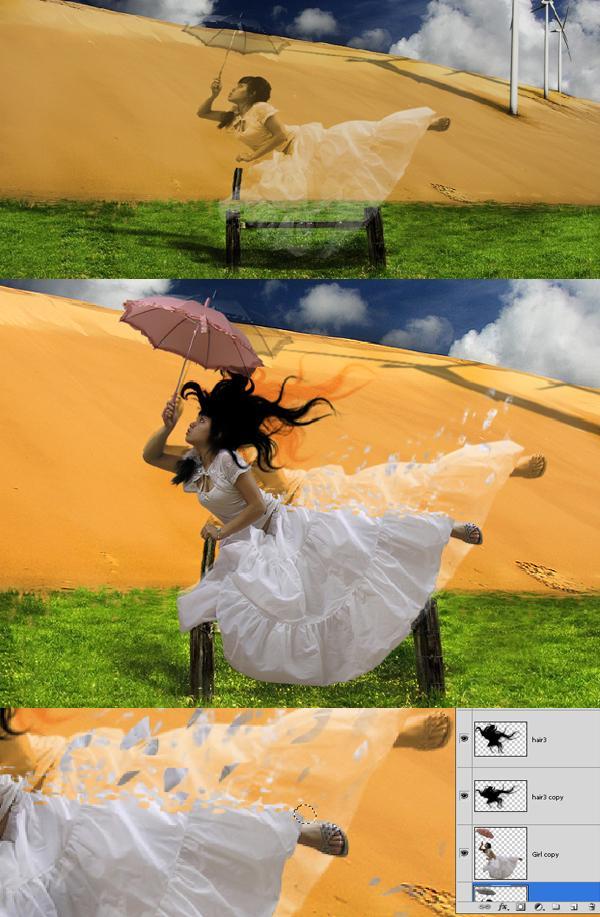
7 Step 6: Now it is time to add in the woman image. The image I used was photographed by ~blacksockstock. Cut her out from the picture using the Pen Tool (P) and place her on the document you are working on. Copy a piece of the wooden legs and place it below her hand. This will give the impression that the girl is supporting her body on that wood.
 with Warp and Distort to make her look like in the image below. The original woman layer is invisible.")
8 Step 7: Duplicate the girl layer and place it behind the original one. Desaturate it, set it to Hard Light and Opacity to 75%. In the end, use the Transform Tool (T) with Warp and Distort to make her look like in the image below. The original woman layer is invisible. Activate the original woman's layer again so we can see her over the duplicate. Now using the Lasso Tool (L) make small selections of the woman's body and drag them around to give a breakapart effect. And one last thing is to make her hair wild. For this I have used a brush provided by gorjuss-stock. Same as you did with the girl, duplicate the hair, desaturate it, and set it to Hard Light and Opacity of 75%.
9
 and picked some colors from my document.")
10 Step 8 Create a new layer and spray some color over the image. As you can see, I have used the same blue I used for the balloon in the top right, the same pink over the girl and a few greens. After you finish applying the spray you need to set the layer to Multiply and Opacity to 60%. To choose these colors I used the Eye Picker Tool (I) and picked some colors from my document. Step 9: In this step we will use the Brush Tool (B) and using a bubble brush I have provided in this tutorial folder available for the Psd Plus Members. You will need to spray a few bubbles like in the image below and set the layer to Soft Light.


11 Double-click the layer and in the Blending Options choose Drop Shadow, set it to Multiply with a 53 Opacity, 90 for the Angle, 299 Distance, 0 Spread and Size 13. This effect ads shadow on the grass and makes the bubbles look like they are floating. Next duplicate the layer and go to Filter > Blur > Motion Blur and use a 0 angle and 15% Distance. In the end, set the layer blend mode to Normal and 60% Opacity.

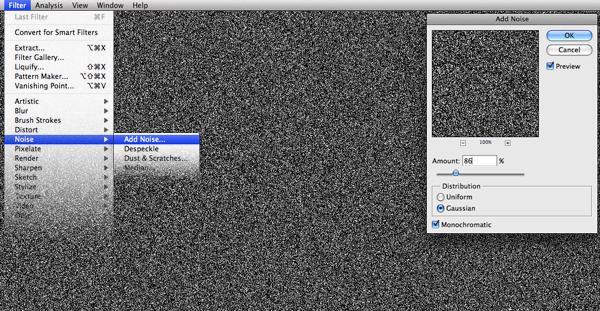
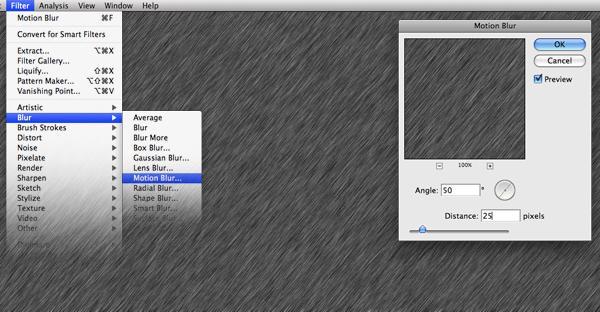
12 Step 10: Now it's time to create the rain effect. For this you need to make a new layer on top of all the other layers and fill it with black. Then go to Filter > Noise > Add Noise and use 86 for the Amount. Next go to Filter > Blur > Motion Blur, chose a 50 degree angle, and 25 pixels distance. Then press Command + L to activate the Level Adjustment and set the Adjustment Shadow Input Level to 100. Then in the end Scale the "rain" layer and set it to Screen Mode.

13

14 Step 11: These are the final steps, where I will use some splat brushes behind the girl and also work some more on details. Now you will have to save your work as a JPG, as from now on you will work only with the JPG image. Then as you open up the JPG you need to add the Adjustment settings represented in the image below. The project has been done with Photoshop CS4 and the tabs you see there might be new to you but they can be found in the Adjustments tab.


15 Step 12: Next up you will have to add in some more effects. For this you can use a plug-in called Topaz Labs. So with your JPG open, go to Filter > Topaz Labs, use the Vibrance Effect and Portrait Drama, these will make the image more interesting.

16 Step 13: At this point, your image should look like the one below. Now it is time to start taking this illustration in a dark direction. Step 14: First of all you need to duplicate your current layer by pressing Command + J.


17 Step 15: Next go to Image > Adjustments > Levels and add 244 to the highlight input level. Step 16: Next you need to create a new layer and name it "Color Fill 1." Next, go to Create a new fill or adjustment layer and choose Solid Color with this code #0f6465.

18 Step 17: Set the current layer style to Color Dodge, Opacity 65 and Fill to 37. After this flatten the image. Step 18: Now you will need to set the Color Balance. Change only the Midtones levels 0, -33, 0.

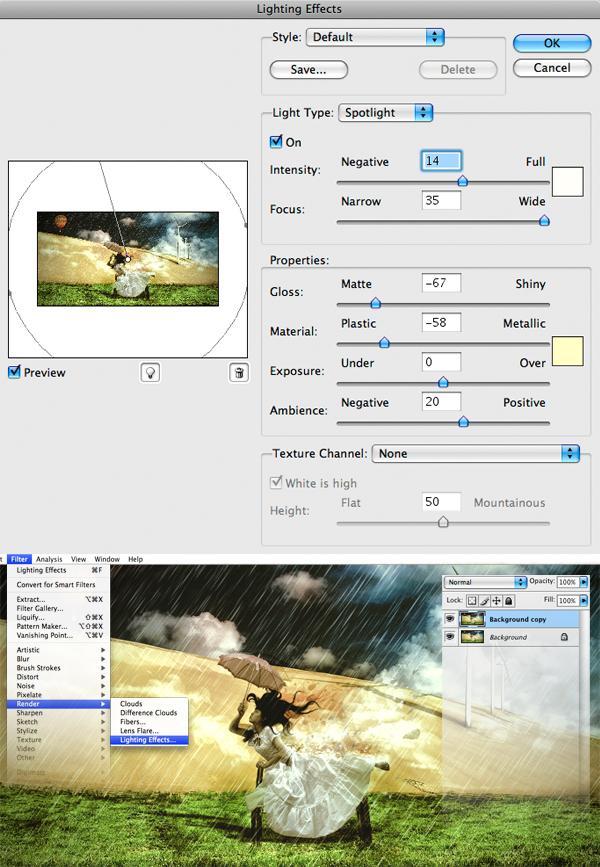
19 Step 19: Go to Adjustments > Selective Color and use cyan +45% for Red, cyan -14% magenta -18% and yellow +21% for Neutrals, yellow +12% and black +14% for Blacks, yellow +74% for Whites, and then duplicate the layer. Step 20: Next go to Filter > Render > Lightning Effect, and use the settings below, then flatten the layer and duplicate it again.
20


21 Step 21: Use the selective color settings again, but this time change only the Blacks to yellow -20% and black -11%. Step 22 Make another Fill Layer as you did in Step 16 but use a different color #0b1a39.

22 Step 23: Set the layer style to Lighten. Flatten the layer, duplicate the background layer and set the duplicated layer's Fill to 47%. Step 24: Again go to Filter > Render > Lightning Effect and use the settings shown below. Merge the layers and duplicate the layer again.

23


24 Step 25: Now it is time to apply another selective color to the layer. Chose Blacks and set yellow to -14% and black +17%. Step 26: I must say that the result looks pretty amazing as it is now but I am looking for a darker look. Go to Image > Adjustments > Curves and use the settings below, then duplicate the layer.


25 Step 27: Go to Image > Adjustments > Hue/Saturation and change the Master Saturation to Step 28: Go to Image > Adjustments > Auto Levels. Then set the Background layer Opacity to 96%, flatten the image, then duplicate the background, and set the Fill to 46%. Flatten the image and duplicate it again.


26 Step 29: Again you need to go to Image > Adjustments > Selective Color and for Neutrals use magenta +1%, yellow -6%, black +6% and for Blacks use yellow -9% and black +5%. Step 30: Make another Fill Layer, this time use this code #39340c. Then set the layer to Lighten and Fill to 8%.

27 CONCLUSION The final step is to flatten the image and use a final Selective Color set to Neutrals as magenta - 7%, yellow -12%, and black +24%. Hope you learned something new and had fun. You can view the final image below. Compiled by <<coldbing>>
Create a Beautiful Abstract Portrait in Photoshop - Psd Premium Tutorial
 Create a Beautiful Abstract Portrait in Photoshop - Psd Premium Tutorial By: Wojciech Pijecki In this tutorial we will combine several stock images to create an artistic, abstract portrait of a woman.
Create a Surreal Out of Bounds Photo Manipulation in Photoshop
 Create a Surreal Out of Bounds Photo Manipulation in Photoshop By: Loredana Papp In this tutorial we will combine several images of water, animals, and people to create a surreal out of bounds photo manipulation
Tutorial Resources. Combine a Crocodile with a Car to Create an Exotic Crocomobile Photoshop Tutorials
 Tutorial Resources Crocodile1 SXC Crocodile2 charadestock Crocodile3 frostdragon64 Old car achatinastock Background SXC Bird rml-stock sign1 discordia-stock Sign2 ecathe Step 1 Open the background image
HOW TO CREATE A SUPER SHINY PENCIL ICON
 HOW TO CREATE A SUPER SHINY PENCIL ICON Tutorial from http://psd.tutsplus.com/ Compiled by INTRODUCTION The Pencil is one of the visual metaphors most used to express creativity. In this tutorial,
Painting Special Effects on Photographs
 TUTORIAL 7 Painting Special Effects on Photographs In this tutorial you will learn how to transform a photo into a striking color composition with paintbrushes, masks, blending modes, color, and paper
Winter Card.
 Winter Card Used images: http://www.cgtextures.com/texview.php?id=24321&phpsessid=95e8e8290894cc5194898 e16d1dddb4c http://www.cgtextures.com/texview.php?id=14285&phpsessid=95e8e8290894cc5194898 e16d1dddb4c
Design a Halloween Pumpkin Wallpaper in Photoshop
 Design a Halloween Pumpkin Wallpaper in Photoshop By: Alvaro Guzman Halloween is near! So let's take a pumpkin image, carve it up, and light it for this coming holiday. You'll learn how to get this nice
Creating Pastel Images and other effects in Photoshop
 Creating Pastel Images and other effects in Photoshop Martin Addison 2015 Creating pastel images Page 1 Martin Addison FRPS Using White Layers in Photoshop 1. Create a new empty Layer 2. Edit> Fill 3.
Extreme Makeovers: Photoshop Retouching Techniques
 Extreme Makeovers: Table of Contents About the Workshop... 1 Workshop Objectives... 1 Getting Started... 1 Photoshop Workspace... 1 Retouching Tools... 2 General Steps... 2 Resolution and image size...
Building - Image*After Bokeh - Regularjane Landscape 1 - Anders Bjerré Pedersen Landscape 2 - author Sundstrom(nickname)
") Click to enlarge the image. Used images: Download Moon shape(image created with the Photoshop tools) Icicles - Sergei Furtcev Cloud 1(Ruslan Olinchuk), Cloud 2(Image*After), Cloud 3(Sergei Perov) Stars
Click to enlarge the image. Used images: Download Moon shape(image created with the Photoshop tools) Icicles - Sergei Furtcev Cloud 1(Ruslan Olinchuk), Cloud 2(Image*After), Cloud 3(Sergei Perov) Stars
Create an Amazing Surreal-Style Treehouse in Photoshop Photoshop Tutorials
 Download the PSD Surreal Treehouse.zip 23.59 MB Download from Website Surreal Treehouse Photoshop Tutorial Tutorial Resources Tree Houses Thanks archetype, Deviantart Bonsai Tree Thanks fabemiko, Deviantart
Compiled by <<coldbing>> FIRE EFFECTS
 FIRE EFFECTS Compiled by Step 1 - New Document Make a new document. Fill it with black. Then make a new layer, and type out (or whatever) you want to set on fire in white. Step 2 - Windy Go
PASS4TEST. IT Certification Guaranteed, The Easy Way! We offer free update service for one year
 PASS4TEST IT Certification Guaranteed, The Easy Way! \ We offer free update service for one year Exam : 9A0-125 Title : Adobe Photoshop Lightroom 2 ACE Exam Vendors : Adobe Version : DEMO Get Latest &
Teach Yourself Adobe Photoshop Topic 9: Photo Retouching Part 2
 http://www.gerrykruyer.com Teach Yourself Adobe Photoshop Topic 9: Photo Retouching Part 2 In the last week s lesson, you repaired damaged areas of an image, removed unwanted parts of an image, cloned
Learning Photo Retouching techniques the simple way
 Learning Photo Retouching techniques the simple way Table of Contents About the Workshop... i Workshop Objectives... i Getting Started... 1 Photoshop Workspace... 1 Setting up the Preferences... 2 Retouching
Glowing Surreal Planet Design. Final Image Preview
 Glowing Surreal Planet Design Final Image Preview. Step 1 First, go to the S:\ drive and locate the folder called Glowing Planet Design. Copy the City Skyline file and paste it in your Glowing Planet Design
Create a Dreamlike Photo Manipulation of an Emotional Girl with a Dramatic Lighting in Photoshop. By Andrea Garcia - February 12,
 Create a Dreamlike Photo Manipulation of an Emotional Girl with a Dramatic Lighting in Photoshop By Andrea Garcia - February 12, 2015 396 11 Create a Dreamlike Photo Manipulation of an Emotional Girl with
Photoshop. Make a Spooky Halloween Pumpkin Text Effect in Photoshop - Photoshop tutorial PSDDude
 Photoshop October 4th,2017 1 2 Image size: 7 in wide x 3 in high 300 dpi Start with a simple black gradient background layer. Radial Gradiant, black to gray. Install the CREEPSVILLE font. Center and Type
PHOTOSHOP DESIGN EFFECTS FOR INTERMEDIATE TO ADVANCED USERS
 PHOTOSHOP DESIGN EFFECTS FOR INTERMEDIATE TO ADVANCED USERS Copyright 2012, National Seminars Training Introduction This class is all about design effects in Adobe Photoshop. For example, let s say that
Contents: Bibliography:
 ( 2 ) Contents: Sizing an Image...4 RAW File Conversion...4 Selection Tools...5 Colour Range...5 Quick Mask...6 Extract Tool...7 Adding a Layer Style...7 Adjustment Layer...8 Adding a gradient to an Adjustment
Tablet overrides: overrides current settings for opacity and size based on pen pressure.
 Photoshop 1 Painting Eye Dropper Tool Samples a color from an image source and makes it the foreground color. Brush Tool Paints brush strokes with anti-aliased (smooth) edges. Brush Presets Quickly access
Using Adobe Photoshop
 Using Adobe Photoshop 8 In the last section we looked at adjusting colours to improve your image. In this section we ll look at various ways of touching up your images to fix problems with the images or
Undress a Giraffe in Photoshop
 Undress a Giraffe in Photoshop By: Alexandra Fomicheva Have you ever wanted to know what a Giraffe looks like without its spots? If so, this tutorial is for you, you pervert! Today, we will demonstrate
Retouching Portraits in Photoshop
 Retouching Portraits in Photoshop I Removing Blemishes When removing blemishes, acne or other imperfections on the skin, our goal is to maintain as much of the original skin texture as possible. That way,
Unit 7 : Image Painting, Editing and Layers
 Unit 7 : Image Painting, Editing and Layers Introduction This Unit describes about various painting tools; such as selection, cropping and measuring tools, retouching, drawing and type tools, Navigation
 http://blog.spoongraphics.co.uk/tutorials/how-to-intensify-your-landscape-photos-in-photoshop This post was originally published in 2011 THE TIPS AND TECHNIQUES EXPLAINED MAY BE OUTDATED. The post-processing
PROFESSIONAL PHOTOGRAPH RESTORATION WORKFLOW
 PROFESSIONAL PHOTOGRAPH RESTORATION WORKFLOW Tutorial from http://psd.tutsplus.com/ Compiled by INTRODUCTION In this tutorial, we'll take an in-depth look at restoring an old torn photograph.
CS 547 Digital Imaging Lecture 2
 CS 547 Digital Imaging Lecture 2 Basic Photo Corrections & Retouching and Repairing Selection Tools Rectangular marquee tool Use to select rectangular images Elliptical Marque Tool Use to select elliptical
Using Photoshop Elements
 Using Photoshop Elements Created By: Rick Williams August 2004 Table of Contents Photoshop Element Tools...Page 1 Tool Descriptions... Page 3 Starting Photoshop Elements... Page 7 Resizing an Image...
Adobe Photoshop cs. Advanced Retouching. Julieanne Kost
 Julieanne Kost www.adobe.com www.adobeevangelists.com Adobe Photoshop cs Advanced Retouching There are several essential tools and techniques for retouching images of people, and one underlying secret:
Using Adobe Photoshop
 Using Adobe Photoshop 8 In the last section we looked at adjusting colours to improve your image. In this section we ll look at various ways of touching up your images to fix problems with the images or
Name the layer you rotated in step 3 Stripe and lower the opacity to 43%.
 Step 1 Open Photoshop and create a new file 1085 649 pixels. Fill the layer with a bright blue color (#0095db) by pressing Shift + F5. This will be the background for our pop art scene. Step 2 Let s create
Commercial Art 1 Photoshop Study Guide. 8) How is on-screen image resolution measured? PPI - Pixels Per Inch
 How is on-screen image resolution measured? PPI - Pixels Per Inch") Commercial Art 1 Photoshop Study Guide To help prepare you for the Photoshop test, be sure you can answer the following questions: 1) What are the three things should you do when you first open a Photoshop
Commercial Art 1 Photoshop Study Guide To help prepare you for the Photoshop test, be sure you can answer the following questions: 1) What are the three things should you do when you first open a Photoshop
EXTREME CONTRAST PHOTO EFFECT
 EXTREME CONTRAST PHOTO EFFECT In this Photoshop tutorial, we re going to learn how to use layers, layer blend modes, some noise, a little sharpening, and a simple adjustment layer to easily give a photo
Realistic Skin Smoothing
 TIP SHEET #7 Realistic Skin Smoothing I think it s fair to say when it comes to retouching techniques, the number of different ways to smooth skin is seemingly endless. From blurring techniques through
Simple Surreal Landscape
 Simple Surreal Landscape By Kirin Knapp Use some easy photo manipulation skills to make a surreal landscape scene. Here are all of the images we re going to use. Open a new file and make it oversized so
Challenge Image: Blur the Background
 Challenge Image: Blur the Background Challenge Image: Blur the Background In this lesson, we re going to work on a challenge image that was submitted by a Masters Academy member. The image features a little
COLORIZING IMAGES WITH GRADIENT MAPS
 COLORIZING IMAGES WITH GRADIENT MAPS In this Photoshop tutorial, we ll learn how to add complex colorizing effects to images using custom gradients! Specifically, we ll look at the Gradient Map image adjustment
Add Photoshop Masks and Adjustments to RAW Images
 Add Photoshop Masks and Adjustments to RAW Images Contributor: Seán Duggan n Specialty: Fine Art Primary Tool Used: Photoshop Masks The adjustments you make in Camera Raw are global in nature, meaning
From Advanced pixel blending
 1 From www.studio.adobe.com Blending pixel layers in Adobe Photoshop CS2 lets you do things that you simply can t do by adjusting a single image. One situation where we blend pixel layers is when we want
Transforming Your Photographs with Photoshop
 Transforming Your Photographs with Photoshop Jesús Ramirez PhotoshopTrainingChannel.com Contents Introduction 2 About the Instructor 2 Lab Project Files 2 Lab Objectives 2 Lab Description 2 Removing Distracting
Turning Photograph Into Cartoon-Style Picture. Digital Media I West High School Susan M. Raymond
 Turning Photograph Into Cartoon-Style Picture Digital Media I West High School Susan M. Raymond Part 1: Creating Outline Wondering how those guys on the internet turn photograph into a nice cartoon-style
Students will be able to create movement through the use of line or implied line and repetition.
 Title of Unit Digital Imaging Title of Lesson Self Portrait Montage in Photoshop Course Graphic Design 1 Instructor Heidi Stachulak hstachulak@hf233.org Objectives: Composition Students will be able to
Types of Mask. Layer masks
 Photoshop Layer Mask Features Non destructive (does not delete pixels) until applied Uses brush tool which is configurable Can be added to any layer (except Background unless double click to unlock) including
Photoshop Elements Hints by Steve Miller
 2015 Elements 13 A brief tutorial for basic photo file processing To begin, click on the Elements 13 icon, click on Photo Editor in the first box that appears. We will not be discussing the Organizer portion
Texts and Resources: Assessments: Freefoto.com Group Photo Projects
 Effective Date: 2009-10 Name of Course: Digital Photography Grade Level: 9-12 Department: Industrial Technology and Engineering Length of Course: 30 cycles Instructional Time: 180 days Period Per Cycle:
Luminosity Masks Program Notes Gateway Camera Club January 2017
 Luminosity Masks Program Notes Gateway Camera Club January 2017 What are Luminosity Masks : Luminosity Masks are a way of making advanced selections in Photoshop Selections are based on Luminosity - how
images + editing steps by Lisa DiGeso, Milk & Honey Photography + Amy McDaniel of Dewdrops Photography 2014 TheMilkyWay.ca Milk and Honey newborns
 Milk and Honey newborns Milk and Honey newborns images + editing steps by Lisa DiGeso, Milk & Honey Photography + Amy McDaniel of Dewdrops Photography Creamy Baby Skin The biggest tip for creamy baby skin
Create a Creepy Face Photo Manipulation in Photoshop
 i TUTORIALS Create a Creepy Face Photo Manipulation in Photoshop by Alan Klim Advertisement In this tutorial we ll show you an easy way to create a nice creepy face effect using Photoshop. We strongly
Photoshop 1. click Create.
 Photoshop 1 Step 1: Create a new file Open Adobe Photoshop. Create a new file: File->New On the right side, create a new file of size 600x600 pixels at a resolution of 300 pixels per inch. Name the file
Kent Messamore 3/6/2010
 Post Processing Kent Messamore 3/6/2010 What we will cover Post Processing Photoshop, Lightroom, Elements, and others JPEG or RAW Photoshop Elements Workflow Organization, Create, share Photoshop Elements
Module All You Ever Need to Know About The Displace Filter
 Module 02-05 All You Ever Need to Know About The Displace Filter 02-05 All You Ever Need to Know About The Displace Filter [00:00:00] In this video, we're going to talk about the Displace Filter in Photoshop.
IMAGE CORRECTION. You can find this and more information with video tutorials at
 IMAGE CORRECTION You can find this and more information with video tutorials at http://www.adobe.com/support/photoshop/ P H O T O S H O P T O O L S CLONE STAMP TOOL The Clone Stamp tool paints one part
Adobe Photoshop. How To Get Started With Adobe InDesign CC: 10 Things Beginners Want To Know How To Do TO START: 1) ZOOM, MOVE, RETOUCH (05:11)
 ZOOM, MOVE, RETOUCH (05:11)") Adobe Photoshop How To Get Started With Adobe InDesign CC: 10 Things Beginners Want To Know How To Do Video By Terry White Tutorial Sheet by Juliet Davis TO START: Open the tutorial in YouTube, download
Adobe Photoshop How To Get Started With Adobe InDesign CC: 10 Things Beginners Want To Know How To Do Video By Terry White Tutorial Sheet by Juliet Davis TO START: Open the tutorial in YouTube, download
A quick note: We hope that you will find something from the Tips and Tricks that will add a little pizazz to your yearbook pages!
 A quick note: The following pages are tips and tricks for Basic Photoshop users. You may notice that some instructions indicate that non-awpc fonts were used, and that some colors were created using the
PHOTOSHOP & ILLUSTRATOR BOOTCAMP
 FALL 2014 - ELIZABETH LIN PHOTOSHOP & ILLUSTRATOR BOOTCAMP ILLUSTRATOR ALIGNMENT To access the alignment panel, go to Window -> Align. You should see a panel like the one below. This panel allows you to
Make a Planet. by Greg Martin
 Make a Planet by Greg Martin This tutorial should step you through making a simple, yet realistic-looking planet using Adobe Photoshop 7, and ONLY Adobe Photoshop 7. We're working small here, so keep in
> color scheme painting
 > color scheme painting > objective(s): Students will create a highly accurate brush overlay painting of a closely cropped image of their eye using only colors within a specific selected color scheme,
A Basic Guide to Photoshop CS Adjustment Layers
 A Basic Guide to Photoshop CS Adjustment Layers Alvaro Guzman Photoshop CS4 has a new Panel named Adjustments, based on the Adjustment Layers of previous versions. These adjustments can be used for non-destructive
How to Create a Landscape Wallpaper for your Desktop
 How to Create a Landscape Wallpaper for your Desktop Why not create a vector landscape wallpaper? In this simple tutorial, you will learn how to create an eye-appealing wallpaper quickly and effectively.
Create a Candy Cane. Create a new canvas with the size 8x10 inches at 300 pixel/inch. See image below Ctrl + N
 Create a Candy Cane The Basic Candy Cane Canvas and Shape 1. Create a new folder, name it Candy Cane your name. Create a new canvas with the size 8x10 inches at 300 pixel/inch. See image below Ctrl + N
Your texture pattern may be slightly different, but should now resemble the sample shown here to the right.
 YOU RE BUSTED! For this project you are going to make a statue of your bust. First you will need to have a classmate take your picture, or use the built in computer camera. The statue you re going to make
A Basic Guide to Photoshop Adjustment Layers
 A Basic Guide to Photoshop Adjustment Layers Photoshop has a Panel named Adjustments, based on the Adjustment Layers of previous versions. These adjustments can be used for non-destructive editing, can
Animated Snowman. Image size: 11 w x 17 h 300 dpi
 Animated Snowman Image size: 11 w x 17 h 300 dpi Step 1 First of all, you ll need the texture on my website. Now open a new document. I usually work on really big documents because I can work on the details
AGENDA :: MULTIMEDIA TOOLS :: CLASS NOTES. :: Homework Critiques (5-7 minutes each) :: Photoshop Lesson 3. A-1 Gorgeous! [ COMPOSITE DEMO ] :: 7mins.
![AGENDA :: MULTIMEDIA TOOLS :: CLASS NOTES. :: Homework Critiques (5-7 minutes each) :: Photoshop Lesson 3. A-1 Gorgeous! [ COMPOSITE DEMO ] :: 7mins.](/thumbs/86/93336476.jpg "AGENDA :: MULTIMEDIA TOOLS :: CLASS NOTES. :: Homework Critiques (5-7 minutes each) :: Photoshop Lesson 3. A-1 Gorgeous! [ COMPOSITE DEMO ] :: 7mins.") CLASS :: 03 02.10 2017 AGENDA :: Homework Critiques (5-7 minutes each) A-1 Gorgeous! Upload A-1 Project to Student Folder :: Photoshop Lesson 3 [ COMPOSITE DEMO ] :: 7mins. I. SELECTIONS [ Common Law ]:
CLASS :: 03 02.10 2017 AGENDA :: Homework Critiques (5-7 minutes each) A-1 Gorgeous! Upload A-1 Project to Student Folder :: Photoshop Lesson 3 [ COMPOSITE DEMO ] :: 7mins. I. SELECTIONS [ Common Law ]:
Dark & Surreal Poster
 Step 1 Dark & Surreal Poster Start off with the creation of your document and, in this case 1200 1600. If you want to print this you might want to work in CMYK mode, a higher resolution and also 300DPI.
Professional Photograph Restoration 50 Points
 Professional Photograph Restoration 50 Points In this tutorial, we'll take an in-depth look at restoring an old torn photograph. Restoring old family photos is something that you can do for your relatives
Learning Adobe Photoshop CS6
 Module 1 Contents Chapter 1: Introduction to Photoshop Loading Photoshop...1-1 The Tools Panel...1-2 Using the Tools...1-3 The Panel Group...1-5 Layers...1-6 Loading a Sample File...1-6 Looking at the
Creating a Contrast Mask. Text and images Copyright (C) 2002 Eric R. Jeschke and may not be used without permission of the author.
 2002 Eric R. Jeschke and may not be used without permission of the author.") Creating a Contrast Mask Text and images Copyright (C) 2002 Eric R. Jeschke and may not be used without permission of the author. Intention In this tutorial I'll show you how to do create a contrast mask
Creating a Contrast Mask Text and images Copyright (C) 2002 Eric R. Jeschke and may not be used without permission of the author. Intention In this tutorial I'll show you how to do create a contrast mask
Tech Savvy Senior Selfie
 Tech Savvy Senior Selfie Commercial Design II Teacher : Mrs. Stroud Due: 10/13/2017 Overview & Purpose Create a futuristic portrait of yourself in 2058 in an old fashioned style of bubble glass portraits
Photoshop: Manipulating Photos
 Photoshop: Manipulating Photos All Labs must be uploaded to the University s web server and permissions set properly. In this lab we will be manipulating photos using a very small subset of all of Photoshop
HOW TO BREAK SUNLIGHT THROUGH THE CLOUDS
 HOW TO BREAK SUNLIGHT THROUGH THE CLOUDS Tutorial from http://psd.tutsplus.com/ Compiled by INTRODUCTION In this tutorial I will show you how to turn an overcast day into a stunningly dramatic
photoshop filters kelly ludwig assistant professor
 photoshop filters kelly ludwig assistant professor sharpening images reducing noise correcting distortions in images practical filters There are over 100 filters that ship with Photoshop and they're all
ITEC185 INTRODUCTION TO DIGITAL MEDIA
 1 ITEC185 INTRODUCTION TO DIGITAL MEDIA ADOBE PHOTOSHOP ITEC185 - Introduction to Digital Media ITEC185 - Introduction to Digital Media 2 What is Adobe Photoshop? Photoshop is the leading professional
Photoshop: Manipulating Photos
 Photoshop: Manipulating Photos All Labs must be uploaded to the University s web server and permissions set properly. In this lab we will be manipulating photos using a very small subset of all of Photoshop
ADOBE PHOTOSHOP CS TUTORIAL
 ADOBE PHOTOSHOP CS TUTORIAL A D O B E P H O T O S H O P C S Adobe Photoshop CS is a popular image editing software that provides a work environment consistent with Adobe Illustrator, Adobe InDesign, Adobe
Compositing. Compositing is the art of combining two or more distinct elements to create a sense of seamlessness or a feeling of belonging.
 Compositing Compositing is the art of combining two or more distinct elements to create a sense of seamlessness or a feeling of belonging. Selection Tools In the simplest terms, selections help us to cut
TV Aquarium. Create a new document. 8.5 x 11, 300 dpi. Save as TV Aquarium Your Name. Create TV shape. Use Pen
 Create a new document. 8.5 x 11, 300 dpi. Save as TV Aquarium Your Name. Create TV shape. Use Pen Tool, Convert Point Tool and Direct Selection Tool. We need side shapes to create patches of light and
How to Create The Top 10 Design Trends of 2018
 Inspired by Philip VanDusen The techniques I m sharing in class were inspired by a great video called 15 Trends in Graphic Design for 2018 by Principal & COO of Verhall Brand Design, Philip VanDusen. This
POLAROID EMULATION INCREASED CONTRAST, SATURATION & CLARITY
 POLAROID EMULATION The Polaroid SX-70 Camera was a sensational tool. It took photographs in real time. But just the color balance of the film and they way it developed had a unique look. Here are some
GETTING STARTED. 0 P a g e B a s i c s o f A d o b e P h o t o s h o p A g a P r i v a t e I n s t i t u t e f o r c o m p u t e r s c i e n c e
 GETTING STARTED 0 P a g e B a s i c s o f A d o b e P h o t o s h o p Adobe Photoshop: is a popular image editing software that provides a work environment consistent with Adobe Illustrator, Adobe InDesign,
How to Make Instagram Filters in Photoshop: Earlybird
 How to Make Instagram Filters in Photoshop: Earlybird JANUARY 9, 2013 BY MELANIE MAYNE Cell phone cameras and apps like Instagram have made it possible for anyone to practice and enjoy the art of Photography.
The Layer Blend Modes drop-down box in the top left corner of the Layers palette.
 Photoshop s Five Essential Blend Modes For Photo Editing When it comes to learning Photoshop, believe it or not, there's really only a handful of things you absolutely, positively need to know. Sure, Photoshop
Inverted Colors Photo Effect With Photoshop
 Inverted Colors Photo Effect With Photoshop Written by Steve Patterson. In this Photoshop Effects tutorial, we re going to look at how to invert the colors in an image to create interesting photo effects.
Pacific New Media David Ulrich
 Pacific New Media David Ulrich pacimage@maui.net www.creativeguide.com 808.721.2862 Digital Imaging Workflow in Adobe Photoshop All color and tonal correction editing should be done in a non-destructive
Composite Master Class Blend two images together to create a seamless collage
 Composite Master Class Blend two images together to create a seamless collage By Liz Ness Whether it s a custom senior photo, an album cover, or a basic digital collage, combining two or more images to
A.J. Wood on Instagram
 A.J. Wood http://ajwood.com ajwood@adobe.com @adobewan on Instagram The Photoshop Environment Photoshop's Start Workspace provides info at a glance including recent files, CC files, and presets for starting
Introduction to Photoshop
 Introduction to Photoshop Instructional Services at KU Libraries A Division of Information Services www.lib.ku.edu/instruction Abstract: This course covers the basics of Photoshop, including common tools
Photoshop fun CS3 Lab.docx 02/02/09
 Starting Off - with Adobe Photoshop CS3 Create a new folder in your StudentBackup storage area (or on your USB drive). Name this new folder with your last name and first initial (lastnamefirstinitial Photoshop
Super Nova. 1. Create a Background. Photoshop Textures Assignment # 3
 Photoshop Textures Assignment # 3 Super Nova 1. Create a Background First, start by creating a new document, I ve used a document size of 400 x 400 pixels here, but you might want to use something much
Colorful Glowing Mask Photoshop Tutorial Photoshop TUTfactory The best Photoshop tutorials in one place
 Step 1: To start, create new canvas sized at 994 1312 pixels, and fill it with black. Next, create a new layer, and go to Filter->Render->Clouds. Duplicate this layer, and then merge the two layers. Set
By Washan Najat Nawi
 By Washan Najat Nawi how to get started how to use the interface how to modify images with basic editing skills Adobe Photoshop: is a popular image-editing software. Two general usage of Photoshop Creating
PHOTOSHOP INVERTED COLORS PHOTO EFFECT
 Photo Effects: Photoshop Inverted Colors Photo Effect PHOTOSHOP INVERTED COLORS PHOTO EFFECT Most people would agree that taking a stroll through the forest can be very calming and peaceful, with all of
The toolbar in Pixlr Editor always appears on the left-hand side, although you can drag it anywhere you like.
 The toolbar in Pixlr Editor always appears on the left-hand side, although you can drag it anywhere you like. Crop (Shortcut: C) Reframe your entire canvas to a desired size and remove everything else.
Lesson 2: Choosing Colors and Painting Chapter 1, Video 1: "Lesson 2 Introduction"
 Chapter 1, Video 1: "Lesson 2 Introduction" Welcome to Lesson 2. Now that you've had a chance to play with Photoshop a little bit and explore its interface, and the interface is becoming a bit more familiar
Photoshop Project 1: Create Vector Art
 Photoshop Project 1: Create Vector Art Duplicate and name layers Create new layers Show and hide layers Apply the desaturate adjustment Work with the Pen tool Work with shape layers Zoom in and out of
AGENDA :: MULTI- MEDIA TOOLS :: CLASS NOTES. :: Homework Critiques Best and Worst Websites. :: Photoshop Lesson 2 Things aren t what they seem
 CLASS :: 02 02.02 2018 AGENDA :: Homework Critiques Best and Worst Websites :: Photoshop Lesson 2 Things aren t what they seem I. PHOTO RETOUCHING: Before There Were Computers (Web Post) http://jmcolberg.com/weblog/2010/01/photoshop_before_there_were_computers_the_art_of_retouching_and_improving_negatives_and_prints/
Adobe Photoshop CS5 Tutorial
 Adobe Photoshop CS5 Tutorial GETTING STARTED Adobe Photoshop CS5 is a popular image editing software that provides a work environment consistent with Adobe Illustrator, Adobe InDesign, Adobe Photoshop
Create a Street Art Style Illustration By CorelDRAW Master Stefan Lindblad
 Create a Street Art Style Illustration By CorelDRAW Master Stefan Lindblad Start with an original drawing on paper. With Corel PHOTO-PAINT and CorelDRAW, creating street art images, and later printing
Photoshop: Manipulating Photos
 Photoshop: Manipulating Photos All Labs must be uploaded to the University s web server and permissions set properly. In this lab we will be manipulating photos using a very small subset of all of Photoshop