A Basic Guide to Photoshop CS Adjustment Layers
|
|
|
- Megan Simon
- 5 years ago
- Views:
Transcription

1 A Basic Guide to Photoshop CS Adjustment Layers Alvaro Guzman Photoshop CS4 has a new Panel named Adjustments, based on the Adjustment Layers of previous versions. These adjustments can be used for non-destructive editing, can be masked to edit only a part of an image, it can be applied to several layers on a single document and even you can change the Adjustment Layer s Blending Mode to create outstanding results. This time we ll take a tour around this wonderful new feature. Adjustments Panel Photoshop CS4 introduces a new Panel to make our lives easier. Adjustments is a quick and accurate way to edit any picture or image by simply clicking on one of the Adjustment options shown on it. You will be able to edit the colors, saturation, levels, channels, mix colors, add gradients and whatnot from a single interface. You ll be able to easily change the adjustment settings, hide/show a specific adjustment layer, quickly add clipping masks in order to apply an Adjustment to a single layer or several layers depending on your needs, and much more. This tutorial is a reference guide for any user level, and helps you to better understand this fantastic tool. First of all, lets see what we are talking about. Open Photoshop and check the Workspace selector at the top-right of the window. You ll see several options, where you can add your very own. A quick way to show the Adjustment tools is by selecting the option Essentials. Another way is just going to Window > Adjustments, either way is fine. You ll see the Adjustment panel then, in the panels area, at the right side of the workspace. 1/35


2 Clipping Masks Apply an Adjustment to Only One or to Many Layers The Adjustment Panel shows two main areas, the first one with three rows of several filter layers, and a second one with several presets for the Adjustment Layers. At the bottom-right there s a button that is used to enable/disable a clipping mask in order to apply the Adjustment only to one layer, or apply it to several layers below when the clipping mask is disabled. 2/35

3 Adjustments Panel Overview 3/35

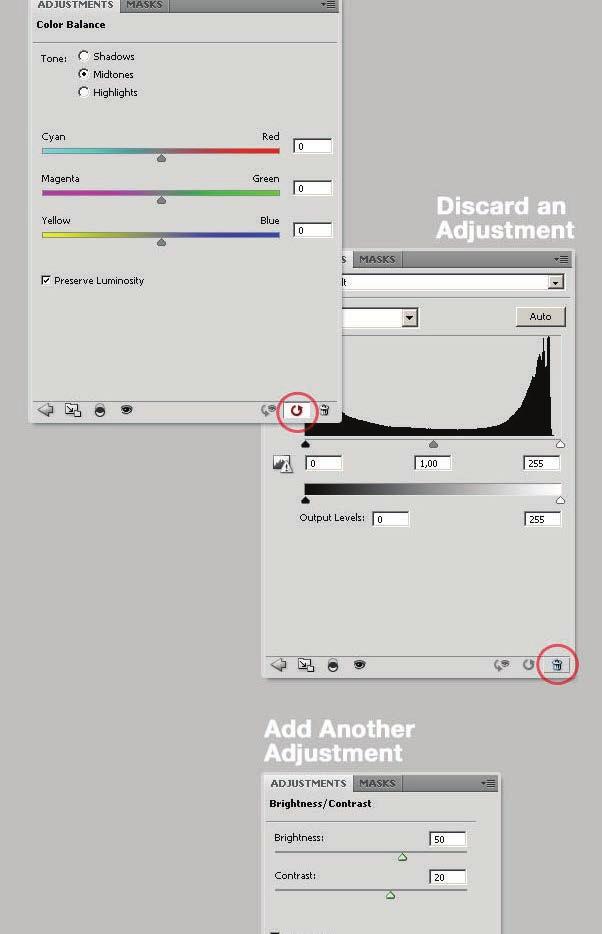
4 Once you select any of the Adjustments, you ll see the Settings options on the panel, you can enlarge the panel if that works better for you. Besides you can easily toggle the visibility of the Adjustment, reset the default settings or even discard the Adjustment Layer. To add another Adjustment layer click on the arrow at the bottom left of the panel, that will take you to the list, if you want to go back to the current Adjustment Click on the arrow pointing backwards. Well, that s enough with the panel itself, let s try the power of the Adjustment Layers. 4/35

5 5/35
6 6/35


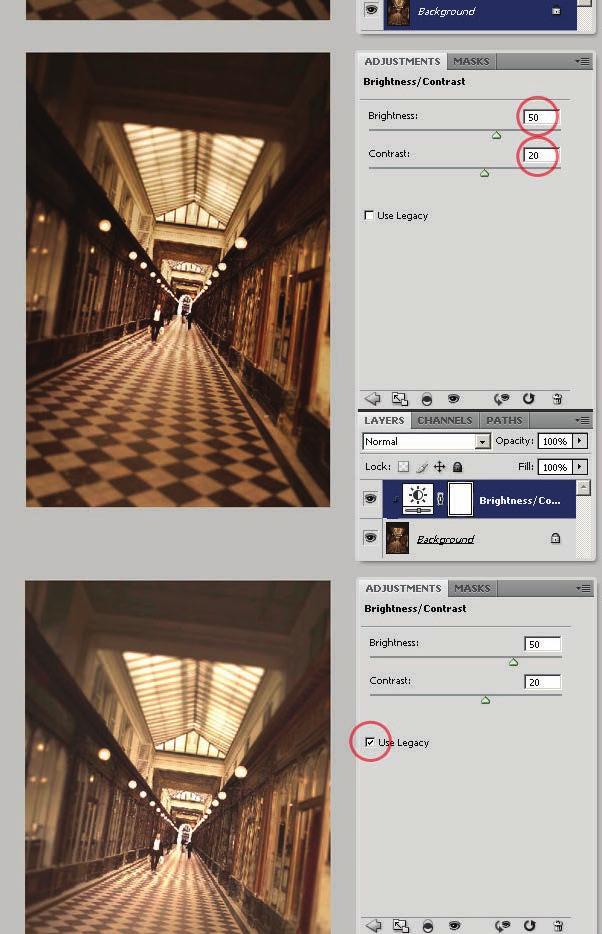
7 1. Brightness and Contrast The first in line is the Brightness and Contrast adjustment. This is one of the simplest adjustments and yet very powerful. You can add it by clicking on the Brightness and Contrast icon on the Adjustments Panel. You can simply edit the tonal range of an image in a very smart way. See the examples below, just move the sliders to adjust your desired settings. If you check the Use Legacy box, Photoshop will only increase/decrease each pixel s brightness value, that s why it isn t recommended. 7/35
8 8/35
 and the last for the highlights.")
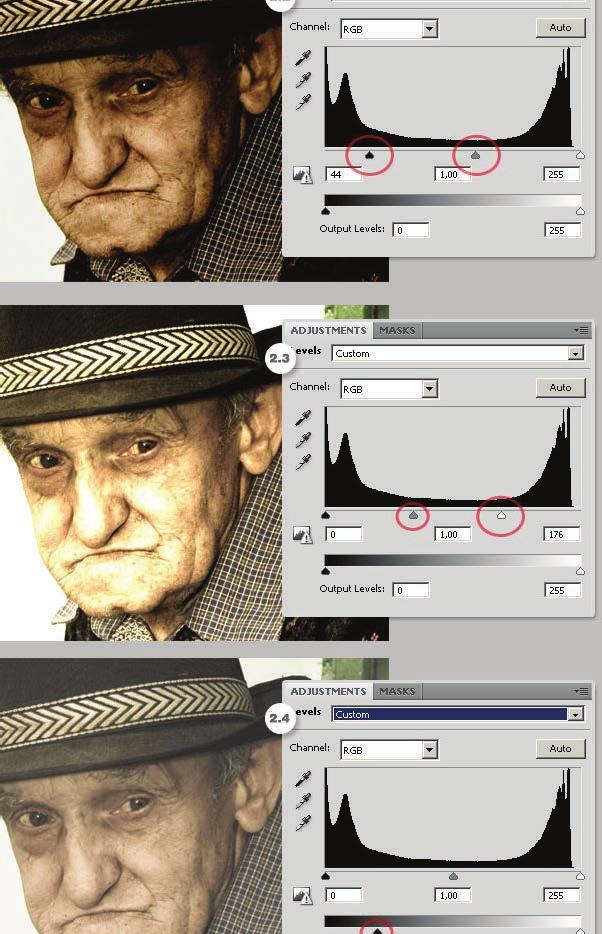
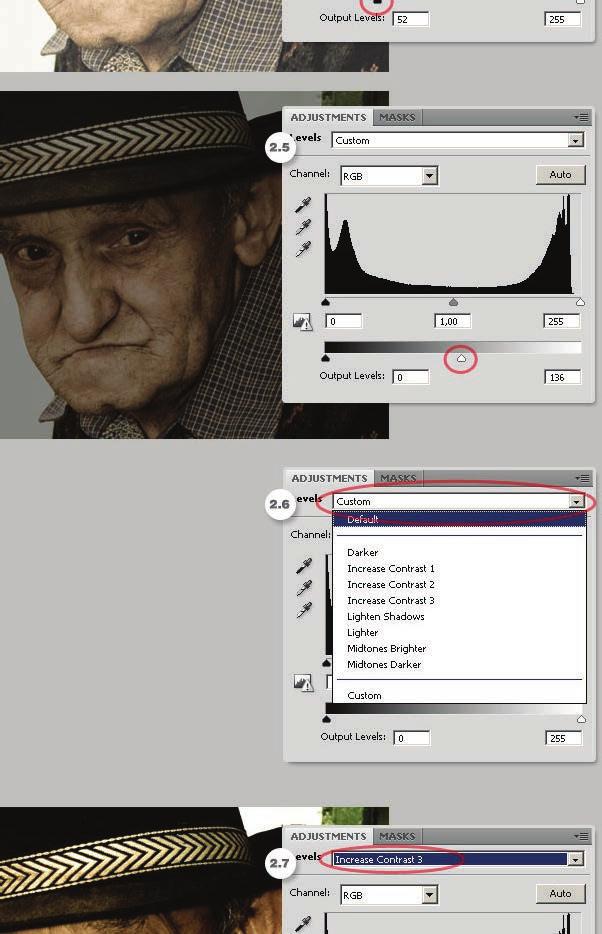
9 2. Levels Who doesn t know about Levels? One of the most used Adjustments in Photoshop. You will be able to easily adjust the color and tonal range by dragging three sliders: one for the dark tones, another for the midtones (gamma) and the last for the highlights. To add a Levels Adjustment just click on the Levels icon in the Adjustments Panel and edit the settings as you wish. You can always go back to the Default values as shown in image 2.1 below. Or even customize your desired settings by dragging the sliders, 2.2 shows a dark enhancement dragging the dark slider to the right and 2.3 shows how to highlight the image by dragging the white slider to the left. 2.4 and 2.5 show how to increase/decrease the levels of Black and White. At 2.6 you can see several presets of the Levels adjustment, you can choose any of them and modify it later, 2.7 shows an example of Increase Contrast. Finally you can edit the levels of each channel (Red, Blue, Green) separately, 2.8 shows a dark enhancement of the Red Channel. Besides, you can always click on the Auto button 9/35

10 for an automatic correction. 10/35
11 11/35
12 12/35

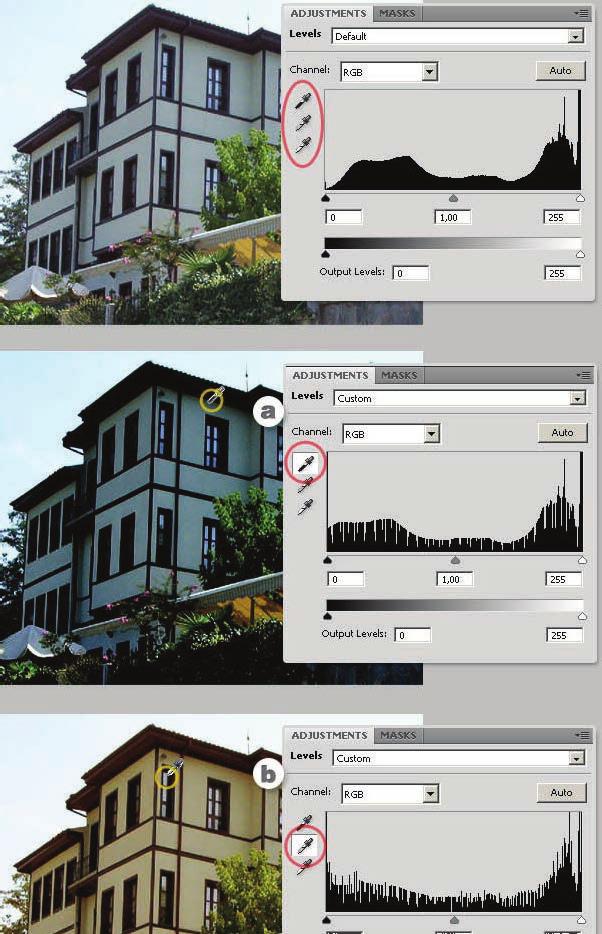
13 Eyedropper on Adjustment Layers How to Use It In both Levels and Curves adjustments there are three little eyedroppers. They are pretty useful to neutralize some colors in the histogram, by electing any of them and clicking anywhere on your image you ll be setting a black, gray or white point respectively to auto adjust the colors. In the images below you can see how the black point is set by clicking on a dark gray area of the image (a), since the clicked zone isn t 100% black the image turns a little bit darker. Then by setting the gray point I m clicking somewhere over a window (b) that will neutralize the window color for midtones, as the window is a little bit blue, Photoshop will neutralize the blue tone on the entire image making it more red/yellow/orange. Finally, by setting the white point somewhere over a highlighted wall (c), the image turns a little bit brighter. Is a good practice to start with the neutral gray eyedropper. 13/35
14 14/35
 you can adjust as many point as you want (with Levels you can only adjust three).")
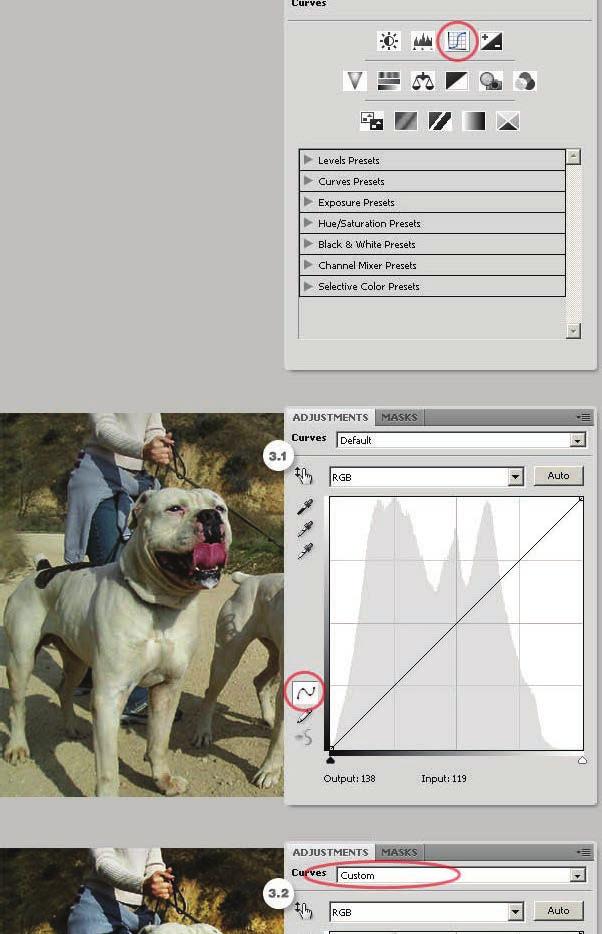
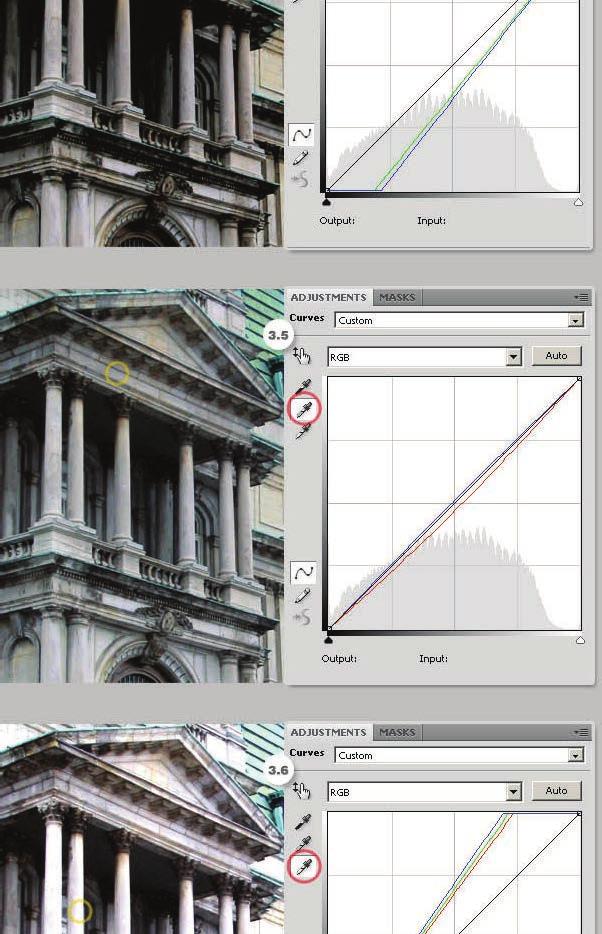
15 3. Curves Curves adjustments is a must-know filter for any Photoshop user. It basically lets you adjust points throughout the tonal range of an image (from shadows to highlights) you can adjust as many point as you want (with Levels you can only adjust three). To add a Curves adjustment, just click on the icon on the adjustment panel. The first thing you ll see is a line, because the tonal range is represented as a straight diagonal baseline, as shown in the image 3.1 below. The horizontal axis represents the input levels and the vertical the output levels. Then you ll need to add some points to the curve and play with them (3.2). As shows the image 3.3 below you can select only one of the color Channels by choosing it form the select list above the curves graphic. When you re editing a single channel the points above the baseline increase the intensity of the color, and the points below the baseline make the color a little bit gray, or less intense. Besides you can easily use the eyedroppers to set the black, gray and white points respectively (images 3.4 to 3.6) this process will modify the baseline for each color. Anyway you can always click the Auto button to make your job easier but less accurate. 15/35
16 16/35

17 17/35
18 18/35


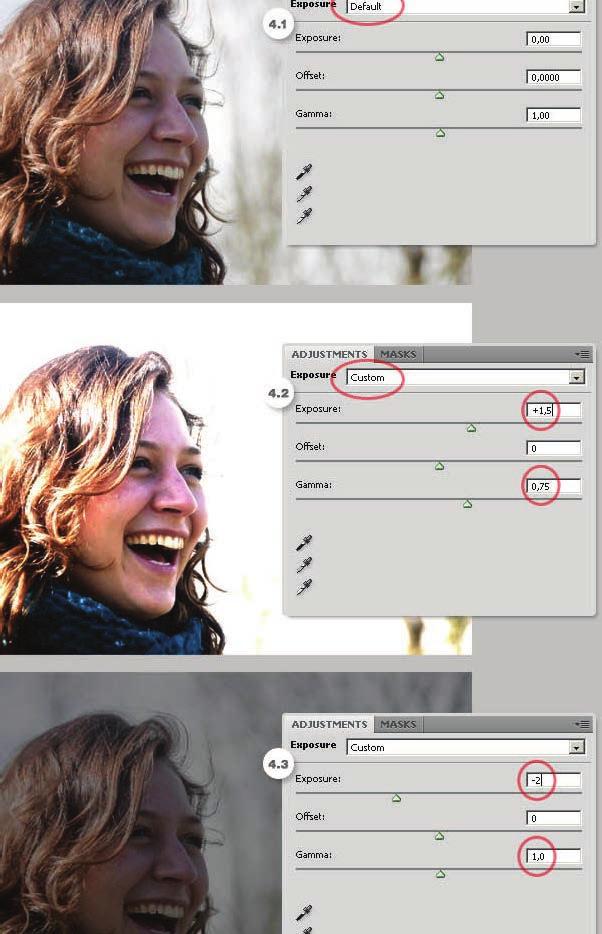
19 4. Exposure The fourth filter on the list is Exposure, add it by clicking over the icon on the Adjustments Panel. This is a pretty simple filter actually, basically it allows you to adjust the exposure levels by adjusting three sliders, Exposure, Offset and Gamma (4.1). Exposure will adjust the highlights of the image without effecting the dark shadows. Offset will adjust the midtones and Gamma will adjust the dark tones without modify the highlights. This filter is pretty useful when you re editing or even creating HDR pictures. 19/35
20 20/35

21 5. Vibrance The Vibrance Adjustment is an easy way to edit the color saturation. Add it by clicking on the Vibrance icon on the Adjustment Panel. This adjustment increases the saturation of less-saturated colors more than the colors that are already saturated. This filter is really useful when you re editing skin colors. 21/35

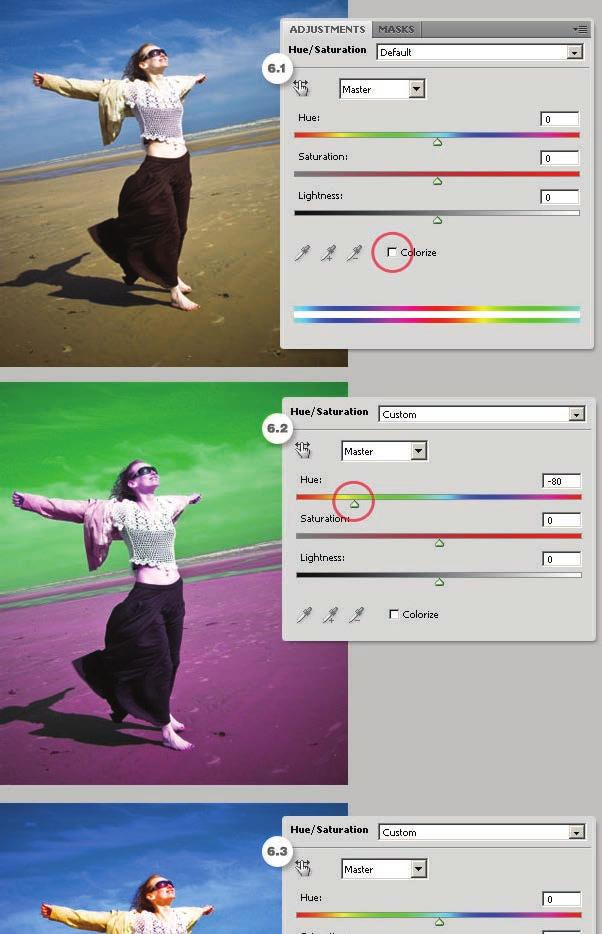
22 6. Hue / Saturation Another must-know Adjustment, Hue/Saturation lets you adjust the hue, saturation, and lightness of a specific range of colors in an image or simultaneously adjust all the colors on it. Add it by clicking on the Hue/Saturation icon on the Adjustments Panel. 22/35
.")
.")
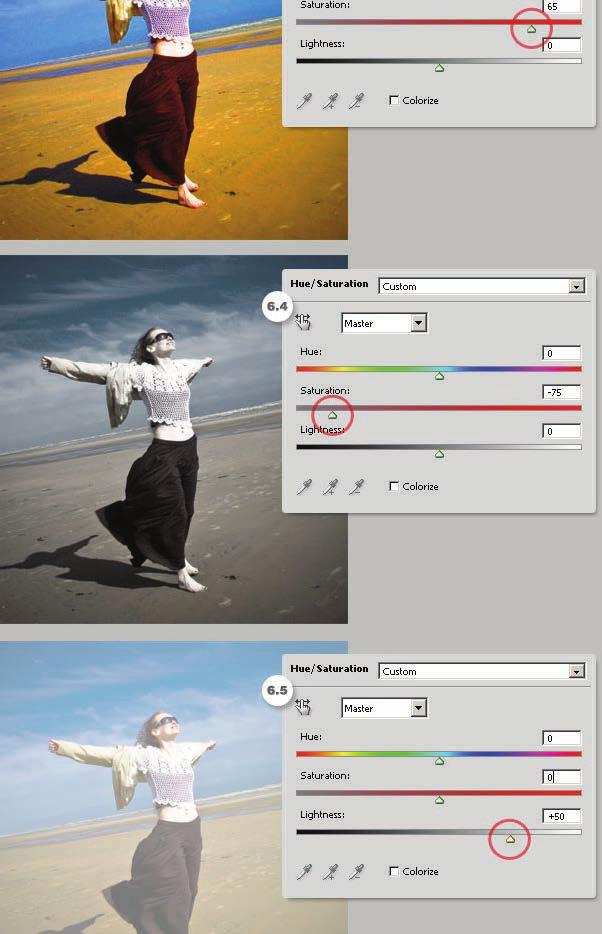
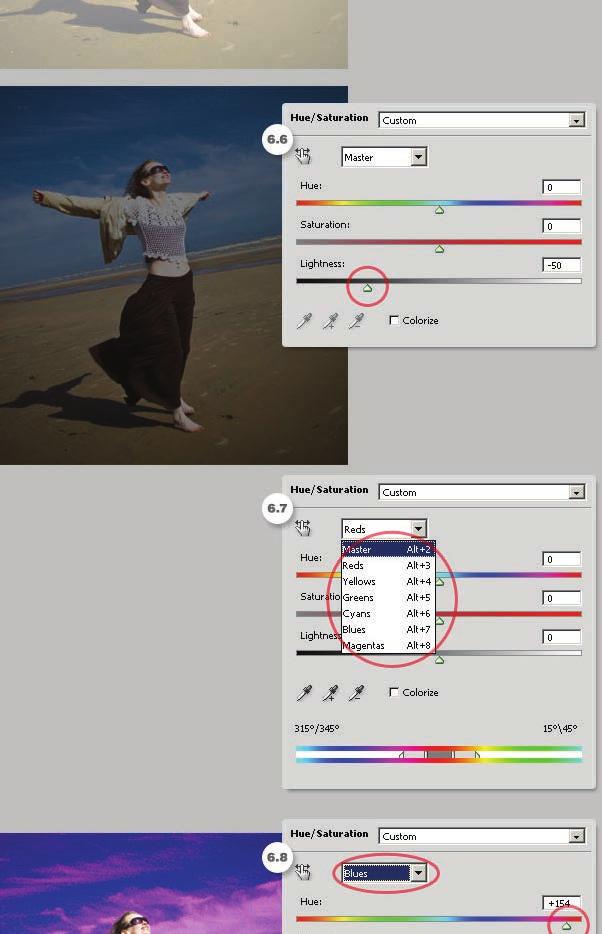
23 To adjust all the colors at the same time select Master on the color list and then move any of the three sliders. The Hue slider changes the color itself (6.2). The Saturation slider modifies the amount of the color, less saturated color means a more gray image (6.3, 6.4). The Lightness slider adjusts the amount of black/white of the image (6.5, 6.6). The image 6.8 below shows the colors list, which means that you can edit only one color channel and adjust the hue/saturation/lightness values only for that channel (6.8). Finally there s a check box named Colorize, check it if you want to colorize a grayscale image. For full color images I recommend the Photo Filter Adjustment, that we ll see shortly. 23/35
24 24/35
25 25/35
26 26/35
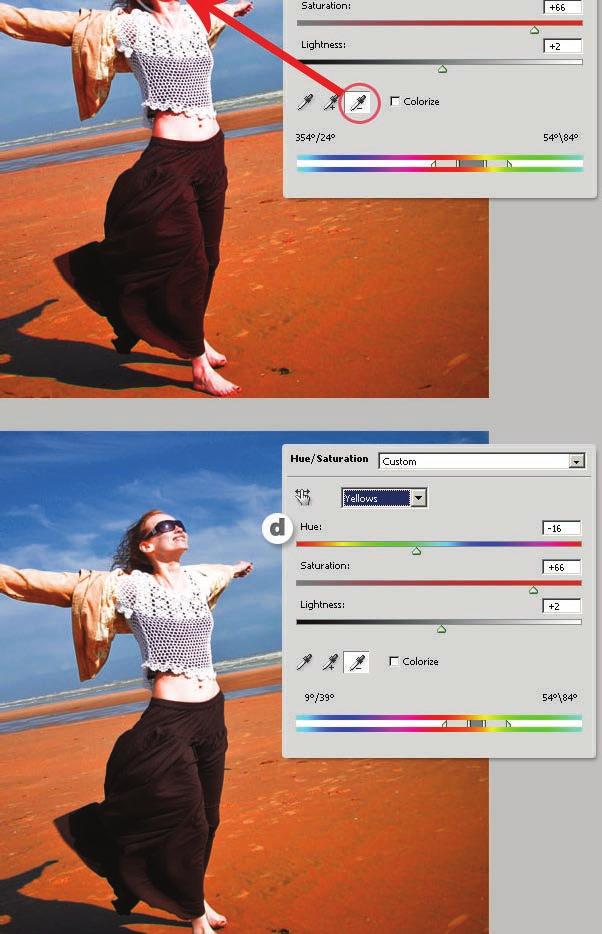
 to select a base color range, e.g. somewhere over the sand, then play with the sliders.")

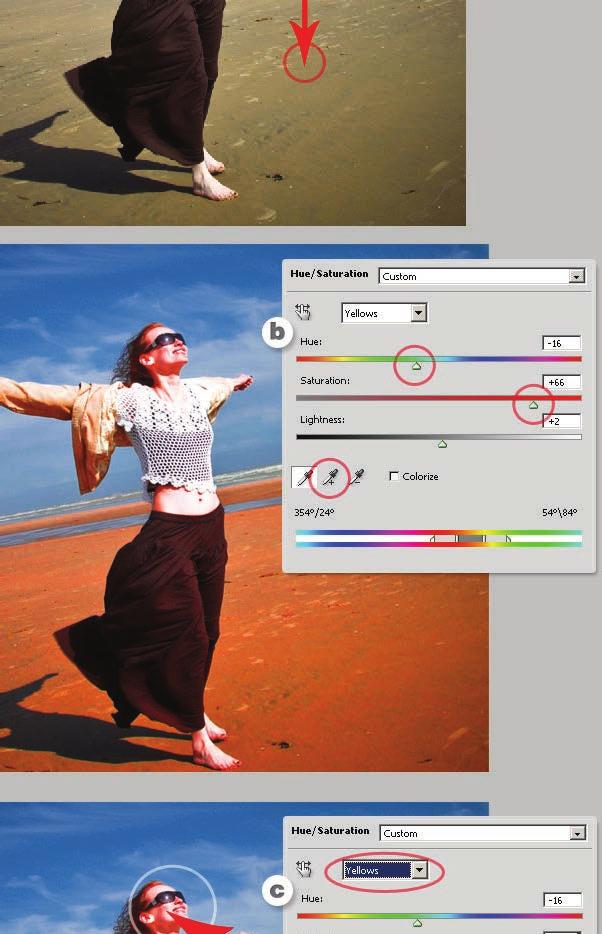
27 Hue/Saturation Eyedroppers You ll notice there are three eyedroppers below the sliders in the Hue/Saturation panel. To make them work you must select a color channel first, the Yellow channel in the following example. Use the first eyedropper (a) to select a base color range, e.g. somewhere over the sand, then play with the sliders. Following select the next eyedropper to Add a color range to the editable range (b). Finally, you ll notice in the following example that the girl s skin tone became almost red because of the adjustments. In order to fix it select the last eyedropper to delete or remove a color from the editable range of the face skin tone on the example. The final result is at the bottom of the image below (d). Useful isn t it? 27/35
28 28/35
29 29/35

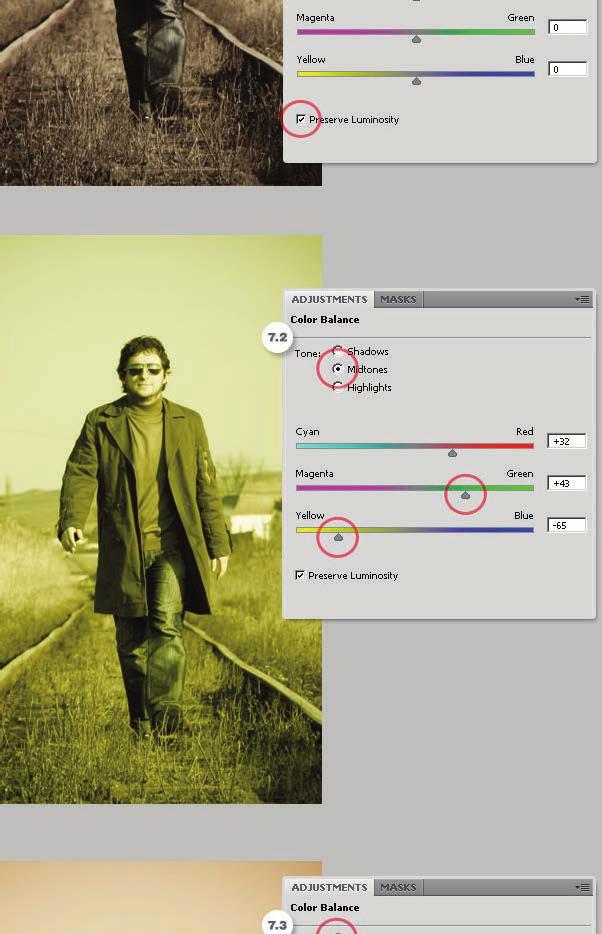
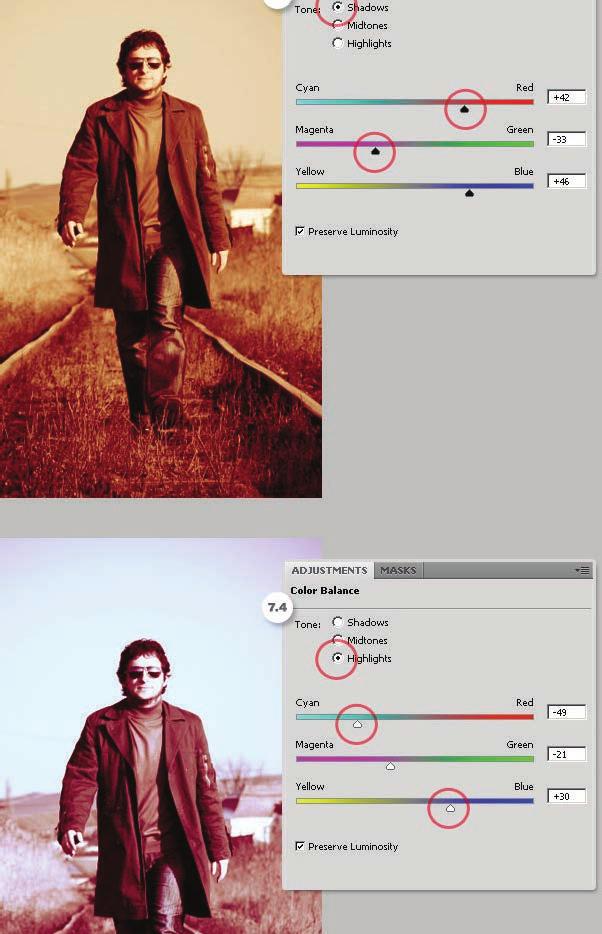
30 7. Color Balance The seventh on the list is the Color Balance adjustment. Add this filter by clicking on its icon in the Adjustment Panel. This adjustment changes the overall mixture of colors in an image for generalized color correction. It basically adds something like a tint over the Shadows, Midtones and Highlights of the image. By default the filter shows the Midtone colors mix in 0 (See image 7.1 below) you can move the sliders to paint the midtones. I painted the midtones a little bit yellow (7.2). Do the same with the Shadows and Highlights, as shown in the images 7.3 and 7.4 of the example. I ve painted the shadows red and the highlights a little bit blue. 30/35
31 31/35
32 32/35

33 8. Black & White Maybe one of my favorites, the Black & White adjustment allows you to create quick and beautiful grayscale images. Add this filter by clicking on the B/W icon on the Adjustments Panel. This filter allows you to maintain full control over how individual colors are converted. Select the Default mode to create an automatic black and white image, or chose one of the many presets. Click on the auto Button to automate the adjustment. Besides you can mark the Tint checkbox and colorize the grayscale image. 9. Photo Filter This Adjustment is just like if you put a color filter in front of the camera lens. Add it by clicking on the Photo filter icon in the Adjustment Panel. The are are several presets based on standards (see 9.1 below), increase/decrease the filter s density to adjust the color intensity. Image 9.2 shows a warming filter by using an orange tone, and 9.3 shows a cooling filter by using a blue tone. You can easily customize a color filter by selecting the color radio button and selecting a color from Photoshop s color picker. 10. Channel Mixer This Adjustment makes it easy to create high quality tinted or grayscale images. Add it by clicking the Channel Mixer icon in the Adjustments Panel. On the Adjustment Panel, select an Output channel as shown in the image 10.1 below. You ll see the slider associated to the selected channel is 100%, then you can modify the color values by using the sliders (see 10.2). You can work with other channels as well, for example on the image 10.3 the Blue channel is selected. There s a color enhancement over the image s blue areas (like the sky), as shows images 10.4 and 10.6 below. You can click over the Monochrome checkbox to edit the channels in grayscale mode. This is very useful to create advanced grayscale images, or apply a custom tint to an output channel or choose any of the several grayscale presets (10.5). 33/35
34 11. Invert This is the simplest adjustment ever, but yet so useful. Click on the Invert icon in the Adjustments Panel and you ll see the image s colors inverted (like a negative). 12. Posterize Posterize is a rapid way to adjust the number of tonal levels. Add this Adjustment by clicking on the Posterize icon in the Adjustments Panel. The Posterize works this way, you chose a Levels value, e.g. 5 (see the image 12.1 below) that means the image will have 15 colors, 5 for red, 5 for green and 5 for blue. The higher the levels, the better the better quality the image. 13. Threshold This adjustment converts any picture into a two color (black and white) image. Add this adjustment by clicking on its icon in the Adjustments Panel. How it works? You specify a Threshold Level, all the pixels darker than that level will turn into black and all the pixels lighter into white. 14. Gradient Map The Gradient Map adjustment maps the grayscale range of an image to the colors of a custom gradient fill. To add it click on the Gradient map icon in the Adjustment Panel. The way this adjustment works is really simple, one of the sides of the gradient replaces the dark areas of the image, the other side replaces the highlights, and all the middle tones of the gradient replaces the midtones of the original image, just as examples 14.1 and 14.2 show below. Click the Dither checkbox to add random noise in order to make the gradient smooth. Click on the Reverse checkbox to invert the colors of the gradient (14.3). 15. Selective Color With this adjustment you can modify the amount of a primary color selectively without affecting the other primary colors. This filter works extremely well on CMYK images, but it works on RGB as well. Add it by clicking on the Selective Color icon in the Adjustments Panel. As you can see on image 15.1 below, there are fields to select the channel. Adjust the CMYK colors percentage and select Relative or Absolute adjustment, for example on image 15.3 the Cyan color is selected and I increased its amount of Black in order to make the sky darker. That looks fine because the Absolute option is selected. The Absolute value adds the exact percentage to the color channel. The Relative option, as shown in image 15.4 is le ss dramatic since it changes the existing amount of the CMYK colors by its percentage of the total. 34/35
35 Conclusion Obviously this is only the the tip of the iceberg of the unlimited power of this panel. Since each Adjustment Layer has all the properties of a Layer in Photoshop, you can change its Blending Mode, Opacity, Mask it, or even combine several Adjustment Layers to create outstanding results. Your imagination is the only limit. Subscribe to the Psdtuts+ RSS Feed for the best Photoshop tuts and articles on the web. 35/35
A Basic Guide to Photoshop Adjustment Layers
 A Basic Guide to Photoshop Adjustment Layers Photoshop has a Panel named Adjustments, based on the Adjustment Layers of previous versions. These adjustments can be used for non-destructive editing, can
1. Brightness/Contrast
 1. Brightness/Contrast Brightness/Contrast makes adjustments to the tonal range of your image. The brightness slider is for adjusting the highlights in your image and the Contrast slider is for adjusting
Diploma in Photoshop
 Diploma in Photoshop Adjustment Layers An adjustment layer applies colour and tonal adjustments to your image without permanently changing pixel values. The colour and tonal adjustments are stored in the
Color and More. Color basics
 Color and More In this lesson, you'll evaluate an image in terms of its overall tonal range (lightness, darkness, and contrast), its overall balance of color, and its overall appearance for areas that
Tablet overrides: overrides current settings for opacity and size based on pen pressure.
 Photoshop 1 Painting Eye Dropper Tool Samples a color from an image source and makes it the foreground color. Brush Tool Paints brush strokes with anti-aliased (smooth) edges. Brush Presets Quickly access
How to use advanced color techniques
 Adobe Photoshop CS5 Extended Project 6 guide How to use advanced color techniques In Adobe Photoshop CS5, you can adjust an image s colors in a variety of ways. Using the techniques described in this guide,
How to use advanced color techniques
 How to use advanced color techniques In Adobe Photoshop, you can adjust an image s colors in a variety of ways. Using the techniques described in this guide, you can take the raw material of your image
Color Correction and Enhancement
 10 Approach to Color Correction 151 Color Correction and Enhancement The primary purpose of Photoshop is to act as a digital darkroom where images can be corrected, enhanced, and refined. How do you know
Black and White Photoshop Conversion Techniques
 Black and White Photoshop Conversion Techniques Andrew Gibson on Jan 27th 2011 Final Product What You'll Be Creating A quick glance through any photography or fashion magazine, or at the photos on social
Photoshop CC Editing Images
 Photoshop CC Editing Images Rotate a Canvas A canvas can be rotated 90 degrees Clockwise, 90 degrees Counter Clockwise, or rotated 180 degrees. Navigate to the Image Menu, select Image Rotation and then
32 Float v3 Quick Start Guide. AUTHORED BY ANTHONY HERNANDEZ (415)
") 32 Float v3 Quick Start Guide 32 Float v3 Trademark/Copyright Information Copyright 2013 by United Color Technologies, LLC. All rights reserved. Unified Color Technologies, BeyondRGB, and HDR Expose are
32 Float v3 Quick Start Guide 32 Float v3 Trademark/Copyright Information Copyright 2013 by United Color Technologies, LLC. All rights reserved. Unified Color Technologies, BeyondRGB, and HDR Expose are
How to use advanced color techniques
 Adobe Photoshop CC Guide How to use advanced color techniques In Adobe Photoshop, you can adjust an image s colors in a variety of ways. Using the techniques described in this guide, you can take the raw
Black and White using Photoshop
 Topics to be covered: Methods for B&W conversion Improving the image Toning Printer color management Black and White using Photoshop Various ways to get to B&W Adobe Raw Converter (ACR) in from Bridge
COLORIZING IMAGES WITH GRADIENT MAPS
 COLORIZING IMAGES WITH GRADIENT MAPS In this Photoshop tutorial, we ll learn how to add complex colorizing effects to images using custom gradients! Specifically, we ll look at the Gradient Map image adjustment
Master digital black and white conversion with our Photoshop plug-in. Black & White Studio plug-in - Tutorial
 Master digital black and white conversion with our Photoshop plug-in This Photoshop plug-in turns Photoshop into a digital darkroom for black and white. Use the light sensitivity of films (Tri-X, etc)
Luminosity Masks Program Notes Gateway Camera Club January 2017
 Luminosity Masks Program Notes Gateway Camera Club January 2017 What are Luminosity Masks : Luminosity Masks are a way of making advanced selections in Photoshop Selections are based on Luminosity - how
Extended Studies - Intro to Adobe Photoshop
 Working with Curves Curves are the Swiss Army knife of Photoshop. They re great for adjusting both the contrast and color balance of an image in one window. They can lighten and darken areas without selections
Master digital black and white conversion with our Photoshop plug-in. Black & White Studio plug-in - Tutorial
 Master digital black and white conversion with our Photoshop plug-in This Photoshop plug-in turns Photoshop into a digital darkroom for black and white. Use the light sensitivity of films (Tri-X, etc)
32 Float v2 Quick Start Guide. AUTHORED BY ANTHONY HERNANDEZ - (415)
") 32 Float v2 Quick Start Guide 32 Float V2 Trademark/Copyright Information Copyright 2011 by United Color Technologies, LLC. All rights reserved. Unified Color Technologies, BeyondRGB, and HDR Float are
32 Float v2 Quick Start Guide 32 Float V2 Trademark/Copyright Information Copyright 2011 by United Color Technologies, LLC. All rights reserved. Unified Color Technologies, BeyondRGB, and HDR Float are
Adobe Photoshop. Levels
 How to correct color Once you ve opened an image in Photoshop, you may want to adjust color quality or light levels, convert it to black and white, or correct color or lens distortions. This can improve
Selective Editing in Camera Raw 5
 Selective Editing in Camera Raw 5 The editing tools that you saw in the last chapter are global editing tools. That is, they affect all parts of the image. So, when you choose to, for example, brighten
Select your Image in Bridge. Make sure you are opening the RAW version of your image file!
 CO 3403: Photographic Communication Steps for Non-Destructive Image Adjustments in Photoshop Use the application Bridge to preview your images and open your files with Camera Raw Review the information
All Creative Suite Design documents are saved in the same way. Click the Save or Save As (if saving for the first time) command on the File menu to
 command on the File menu to") 1 The Application bar is new in the CS4 applications. It combines the menu bar with control buttons that allow you to perform tasks such as arranging multiple documents or changing the workspace view.
1 The Application bar is new in the CS4 applications. It combines the menu bar with control buttons that allow you to perform tasks such as arranging multiple documents or changing the workspace view.
Module All You Ever Need to Know About The Displace Filter
 Module 02-05 All You Ever Need to Know About The Displace Filter 02-05 All You Ever Need to Know About The Displace Filter [00:00:00] In this video, we're going to talk about the Displace Filter in Photoshop.
PHOTOSHOP. pixel based image editing software (pixel=picture element) several small dots or pixels make up an image.
 several small dots or pixels make up an image.") Photoshop PHOTOSHOP pixel based image editing software (pixel=picture element) several small dots or pixels make up an image. RESOLUTION measurement of the total number of pixels displayed determines the
Photoshop PHOTOSHOP pixel based image editing software (pixel=picture element) several small dots or pixels make up an image. RESOLUTION measurement of the total number of pixels displayed determines the
The original image. Let s get started! The final rainbow effect. The photo sits on the Background layer in the Layers panel.
 Add A Realistic Rainbow To A Photo In this Photoshop photo effects tutorial, we ll learn how to easily add a rainbow, and even a double rainbow, to a photo! As we ll see, Photoshop ships with a ready-made
Photoshop CS part 2. Workshop Objective. Getting Started Quit all open applications Single click Adobe Photoshop from the Dock
 pg. 1 Photoshop CS part 2 Photoshop is the premier digital photo editor application used for photo retouching, creating web images, film/video compositing, and other pixel/vector-based imagery. Workshop
Digital Design and Communication Teaching (DiDACT) University of Sheffield Department of Landscape. Adobe Photoshop CS5 INTRODUCTION WORKSHOPS
 University of Sheffield Department of Landscape. Adobe Photoshop CS5 INTRODUCTION WORKSHOPS") Adobe INTRODUCTION WORKSHOPS WORKSHOP 1 - what is Photoshop + what does it do? Outcomes: What is Photoshop? Opening, importing and creating images. Basic knowledge of Photoshop tools. Examples of work.
Adobe INTRODUCTION WORKSHOPS WORKSHOP 1 - what is Photoshop + what does it do? Outcomes: What is Photoshop? Opening, importing and creating images. Basic knowledge of Photoshop tools. Examples of work.
CS 547 Digital Imaging Lecture 2
 CS 547 Digital Imaging Lecture 2 Basic Photo Corrections & Retouching and Repairing Selection Tools Rectangular marquee tool Use to select rectangular images Elliptical Marque Tool Use to select elliptical
Gernot Hoffmann. Sky Blue
 Gernot Hoffmann Sky Blue Contents 1. Introduction 2 2. Examples A / Lighter Sky 5 3. Examples B / Lighter Part of Sky 8 4. Examples C / Uncorrected Images 11 5. CIELab 14 6. References 17 1. Introduction
ADJUSTMENT LAYERS TUTORIAL
 ADJUSTMENT LAYERS TUTORIAL I briefly showed layers in the original layers tutorial but there is a lot more to layers than discussed there. First let us recap the premise behind layers. Layers are like
B&W Photos from Colour:
 Quick and Dirty Methods for PS, PS Elements and Canon Software 8/1/2007 New Westminster Photography Club Derek Carlin New Westminster Photography Club Page 1 Introduction This is a very brief article on
How to create beautiful B&W images with Adobe Photoshop Elements 12
 How to create beautiful B&W images with Adobe Photoshop Elements 12 Whether it s an Instagram snap or a film portrait, black and white photography is never out of style. Today, there are a number of ways
Selective Edits in Camera Raw
 Complete Digital Photography Seventh Edition Selective Edits in Camera Raw by Ben Long If you ve read Chapter 18: Masking, you ve already seen how Camera Raw lets you edit your raw files. What we haven
IMAGE CORRECTION. You can find this and more information with video tutorials at
 IMAGE CORRECTION You can find this and more information with video tutorials at http://www.adobe.com/support/photoshop/ P H O T O S H O P T O O L S CLONE STAMP TOOL The Clone Stamp tool paints one part
ACA Photoshop CC Exam Prep Questions
 ACA Photoshop CC Exam Prep Questions 1. Which of the following would you do first in order to present initial ideas to a client for their approval and feedback? A. Show the client the final project B.
Translating the Actual into a Digital Photographic Language Working in Grayscale
 Translating the Actual into a Digital Photographic Language Working in Grayscale Overview Photographs are informed by considered and intentional choices. These choices are suggested by a need or desire
Chapter 4. Incorporating Color Techniques
 Chapter 4 Incorporating Color Techniques Color Modes Photoshop displays and prints images using specific color modes A mode is the amount of color data that can be stored in a given file format 2 Color
Create A Starry Night Sky In Photoshop
 Create A Starry Night Sky In Photoshop Written by Steve Patterson. In this Photoshop effects tutorial, we ll learn how to easily add a star-filled sky to a night time photo. I ll be using Photoshop CS5
Using Curves and Histograms
 Written by Jonathan Sachs Copyright 1996-2003 Digital Light & Color Introduction Although many of the operations, tools, and terms used in digital image manipulation have direct equivalents in conventional
Camera Raw software is included as a plug-in with Adobe Photoshop and also adds some functions to Adobe Bridge.
 Editing Images in Camera RAW Camera Raw software is included as a plug-in with Adobe Photoshop and also adds some functions to Adobe Bridge. Camera Raw gives each of these applications the ability to import
The Layer Blend Modes drop-down box in the top left corner of the Layers palette.
 Photoshop s Five Essential Blend Modes For Photo Editing When it comes to learning Photoshop, believe it or not, there's really only a handful of things you absolutely, positively need to know. Sure, Photoshop
Photoshop: Manipulating Photos
 Photoshop: Manipulating Photos All Labs must be uploaded to the University s web server and permissions set properly. In this lab we will be manipulating photos using a very small subset of all of Photoshop
Add Photoshop Masks and Adjustments to RAW Images
 Add Photoshop Masks and Adjustments to RAW Images Contributor: Seán Duggan n Specialty: Fine Art Primary Tool Used: Photoshop Masks The adjustments you make in Camera Raw are global in nature, meaning
Advanced Masking Tutorial
 Complete Digital Photography Seventh Edition Advanced Masking Tutorial by Ben Long In this tutorial, we re going to look at some more advanced masking concepts. This particular example is not a technique
An Introduction to Layers, Masks and Channels in Photoshop
 An Introduction to Layers, Masks and Channels in Photoshop Roy Killen, GMAPS, EFIAP, GMPSA (c) 2017 Roy Killen Layers, Masks and Channels Page 1 Two approaches to image editing When images are edited in
Bramhall Photographic Society
 Bramhall Photographic Society PHOTOSHOP ELEMENTS ADJUSTMENT LAYERS EXPLAINED (WHAT THEY DO) (This technique will work in any version of Elements although the screenshots may vary slightly) There are a
In order to manage and correct color photos, you need to understand a few
 In This Chapter 1 Understanding Color Getting the essentials of managing color Speaking the language of color Mixing three hues into millions of colors Choosing the right color mode for your image Switching
Adding Dimension to Your Monochrome Images
 Adding Dimension to Your Monochrome Images Printing Duotones, Tritones, and Quadtones 2004, Glenn E. Mitchell II, Ph.D. of The Light s Right Studio, http://www.thelightsrightstudio.com Computer programs,
Pacific New Media David Ulrich
 Pacific New Media David Ulrich pacimage@maui.net www.creativeguide.com 808.721.2862 Digital Imaging Workflow in Adobe Photoshop All color and tonal correction editing should be done in a non-destructive
Using Adobe Photoshop
 and Using Adobe Photoshop 7 One of Photoshop s strengths has always been its ability to assist in touching up photographs. Even photos taken by the best of photographers can do with a little touching up
XXXX - ILLUSTRATING FROM SKETCHES IN PHOTOSHOP 1 N/08/08
 INTRODUCTION TO GRAPHICS Illustrating from sketches in Photoshop Information Sheet No. XXXX Creating illustrations from existing photography is an excellent method to create bold and sharp works of art
Making Digital POSiTiVES & Negatives for Contact Printing Sandra C. Davis
 Making Digital POSiTiVES & Negatives for Contact Printing 2005-13 Sandra C. Davis Suggested reading: Making Digital Negatives for Contact Printing by Dan Burkholder, Twin Palms Press, and The Inkjet Negative
Unit 7 : Image Painting, Editing and Layers
 Unit 7 : Image Painting, Editing and Layers Introduction This Unit describes about various painting tools; such as selection, cropping and measuring tools, retouching, drawing and type tools, Navigation
The original image. The final rainbow effect.
 ADD A realistic rainbow to a photo In this Photoshop photo effects tutorial, we re going to learn how to easily add a rainbow, even a double rainbow, to a photo. Of course, as with most photo effects,
Composite Master Class Blend two images together to create a seamless collage
 Composite Master Class Blend two images together to create a seamless collage By Liz Ness Whether it s a custom senior photo, an album cover, or a basic digital collage, combining two or more images to
The original image. Let s get started! The final effect.
 Non-Destructive Infrared Glow Effect In this Photoshop tutorial, we ll learn how to quickly and easily add a dream-like infrared glow effect to an image, and we ll do it non-destructively using Smart Filters
Correction Techniques
 10 Advanced Color Correction Techniques Learning Objectives After completing this chapter, you will be able to: Explain how a computer monitor displays color. Describe how color is created in the printing
Color Balancing Techniques
 Written by Jonathan Sachs Copyright 1996-2007 Digital Light & Color Introduction Color balancing refers to the process of removing an overall color bias from an image. For example, if an image appears
Using Adobe Photoshop
 Using Adobe Photoshop 4 Colour is important in most art forms. For example, a painter needs to know how to select and mix colours to produce the right tones in a picture. A Photographer needs to understand
Adobe Photoshop Chapter 5 Study Questions /50 Total Points
 Name: Class: Date: Adobe Photoshop Chapter 5 Study Questions /50 Total Points True/False Indicate whether the statement is true or false. 1. Bitmapped images are resolution-independent, maintaining their
Improve your photos and rescue old pictures
 PSPRO REVISTED Nov 5 2007 Page 1 of 7 Improve your photos and rescue old pictures This guide gives tips on how you can use Paint Shop5 and similar free graphic programmes to improve your photos. It doesn
COLORIZE A PHOTO WITH MULTIPLE COLORS
 COLORIZE A PHOTO WITH MULTIPLE COLORS In this Photoshop photo effects tutorial, we re going to learn how to colorize a photo using multiple colors. It s an effect I ve seen used quite a bit in ads for
From Advanced pixel blending
 1 From www.studio.adobe.com Blending pixel layers in Adobe Photoshop CS2 lets you do things that you simply can t do by adjusting a single image. One situation where we blend pixel layers is when we want
Professional RAW Editor for ios and icloud Photo Library (v2.0)
") Professional RAW Editor for ios and icloud Photo Library (v2.0) INTRODUCTION Thank you for downloading RAW Power. RAW Power is the first RAW editor for ios 11 that can read and modify the ios Photo Library
Professional RAW Editor for ios and icloud Photo Library (v2.0) INTRODUCTION Thank you for downloading RAW Power. RAW Power is the first RAW editor for ios 11 that can read and modify the ios Photo Library
Guidance on Using Scanning Software: Part 5. Epson Scan
 Guidance on Using Scanning Software: Part 5. Epson Scan Version of 4/29/2012 Epson Scan comes with Epson scanners and has simple manual adjustments, but requires vigilance to control the default settings
Colorizing A Photo With Multiple Colors In Photoshop
 Colorizing A Photo With Multiple Colors In Photoshop Written by Steve Patterson. In this Photoshop Effects tutorial, we re going to learn how to colorize a photo using multiple colors. It s an effect I
Basic Digital Dark Room
 Basic Digital Dark Room When I took a good photograph I almost always trying to improve it using Photoshop: exposure, depth of field, black and white, duotones, blur and sharpness or even replace washed
Combine Black-and-White and Color
 Combine Black-and-White and Color Contributor: Seán Duggan n Specialty: Fine Art Primary Tool Used: Smart Objects Combining color and black-and-white in the same image is a technique that has been around
What You ll Learn in This Hour:
 HOUR 5 Adjusting Color What You ll Learn in This Hour:. Evaluating Your Color Adjustment Needs. Adjusting by Eye with Variations. Making Other Adjustments. Preserving the Original with Adjustment Layers.
Color Correction with Curves
 Lecture 02 wk 07 with Curves Channels o Photoshop uses Channels to provide access to the different color components of an image. o In most cases, an image is composed of one or more 8-bit channels. o Channels
In Search of... the PERFECT B&W Print
 In Search of... the PERFECT B&W Print B y J e f f S c h e w e Additional Notes: schewephoto.com/workshop The Object is to Convert from Color... To Optimized B&W To Final Print...in Neutral Tones Or Warm
What is a Raw file? How a RAW file differs from a JPEG
 What is a Raw file? RAW is simply a file type, like a JPEG. But, where a JPEG photo is considered a photograph, a RAW is a digital negative, an image that hasn t been processed or adjusted by software
Name the layer you rotated in step 3 Stripe and lower the opacity to 43%.
 Step 1 Open Photoshop and create a new file 1085 649 pixels. Fill the layer with a bright blue color (#0095db) by pressing Shift + F5. This will be the background for our pop art scene. Step 2 Let s create
Adobe Photoshop CS5 Layers and Masks
 Adobe Photoshop CS5 Layers and Masks Email: training@health.ufl.edu Web Page: http://training.health.ufl.edu Adobe Photoshop CS5: Layers and Masks 2.0 Hours The workshop will cover creating and manipulating
Transforming Your Photographs with Photoshop
 Transforming Your Photographs with Photoshop Jesús Ramirez PhotoshopTrainingChannel.com Contents Introduction 2 About the Instructor 2 Lab Project Files 2 Lab Objectives 2 Lab Description 2 Removing Distracting
HISTOGRAMS. These notes are a basic introduction to using histograms to guide image capture and image processing.
 HISTOGRAMS Roy Killen, APSEM, EFIAP, GMPSA These notes are a basic introduction to using histograms to guide image capture and image processing. What are histograms? Histograms are graphs that show what
Contents: Bibliography:
 ( 2 ) Contents: Sizing an Image...4 RAW File Conversion...4 Selection Tools...5 Colour Range...5 Quick Mask...6 Extract Tool...7 Adding a Layer Style...7 Adjustment Layer...8 Adding a gradient to an Adjustment
DD IMAGES PHOTOSHOP TUTORIAL 7
 Page1 DD IMAGES PHOTOSHOP TUTORIAL 7 Converting a colour image to B&W The DEREK DOAR METHOD This Tutorial will show you my way of converting colour images to Black & White, using RGB Channel Mixer and
W i n d o w s. ScanGear CS-S 4.3 for CanoScan FB1200S Color Image Scanner. User's Guide
 f o r W i n d o w s ScanGear CS-S 4.3 for CanoScan FB1200S Color Image Scanner User's Guide How to Make Best Use of the Manuals 2 When you open the box Printed Manual CanoScan FB1200S Quick Start Guide
Design a Halloween Pumpkin Wallpaper in Photoshop
 Design a Halloween Pumpkin Wallpaper in Photoshop By: Alvaro Guzman Halloween is near! So let's take a pumpkin image, carve it up, and light it for this coming holiday. You'll learn how to get this nice
Panoramas and the Info Palette By: Martin Kesselman 5/25/09
 Panoramas and the Info Palette By: Martin Kesselman 5/25/09 Any time you have a color you would like to copy exactly, use the info palette. When cropping to achieve a particular size, it is useful to use
MY ASTROPHOTOGRAPHY WORKFLOW Scott J. Davis June 21, 2012
 Table of Contents Image Acquisition Types 2 Image Acquisition Exposure 3 Image Acquisition Some Extra Notes 4 Stacking Setup 5 Stacking 7 Preparing for Post Processing 8 Preparing your Photoshop File 9
Extreme Makeovers: Photoshop Retouching Techniques
 Extreme Makeovers: Table of Contents About the Workshop... 1 Workshop Objectives... 1 Getting Started... 1 Photoshop Workspace... 1 Retouching Tools... 2 General Steps... 2 Resolution and image size...
LESSON 09: THE STYLISH SCRAPPER FOR PS & PSE USERS COMPANION BOOK. Digital Scrapbook Academy
 Digital Scrapbook Academy September 2018: Lesson 09 LESSON 09: THE STYLISH SCRAPPER FOR PS & PSE USERS COMPANION BOOK Page 1 of 12 Table of Contents Table of Contents 2 Welcome to Lesson 09 for Photoshop
Painting Special Effects on Photographs
 TUTORIAL 7 Painting Special Effects on Photographs In this tutorial you will learn how to transform a photo into a striking color composition with paintbrushes, masks, blending modes, color, and paper
TOPAZ LENS EFFECTS QUICK START GUIDE
 TOPAZ LENS EFFECTS QUICK START GUIDE Introduction Topaz Lens Effects is designed to give you the power to direct and focus your viewer s eyes where you want them. With Lens Effects, you get advanced technology
Lightroom Classic CC and Lightroom CC Updates
 Lightroom Classic CC and Lightroom CC Updates Information about the latest December 2017 Lightroom system updates This December Adobe have released updates for the entire Lightroom CC ecosystem, including
The Magazine for Photographers August 2016
 The Magazine for Photographers The Magazine for Photographers CONTENTS AUGUST 4 Color Tinting in Photoshop 17 Circular Polarizer Tips 29 Step by Step: Mirror Image 37 Export Settings 54 (Not So) Smart
Challenge Image: Blur the Background
 Challenge Image: Blur the Background Challenge Image: Blur the Background In this lesson, we re going to work on a challenge image that was submitted by a Masters Academy member. The image features a little
Machinery HDR Effects 3
 1 Machinery HDR Effects 3 MACHINERY HDR is a photo editor that utilizes HDR technology. You do not need to be an expert to achieve dazzling effects even from a single image saved in JPG format! MACHINERY
A quick overview of the basics of my workflow in. Those gaps in Photoshop s Histogram indicate missing information.
 Another Photoshop tutorial by Bruce Philpott Copyright 2007 Bruce Philpott A quick overview of the basics of my workflow in Adobe Camera Raw This short tutorial certainly won t cover everything about Adobe
Adobe Photoshop CS5 Tutorial
 Adobe Photoshop CS5 Tutorial GETTING STARTED Adobe Photoshop CS5 is a popular image editing software that provides a work environment consistent with Adobe Illustrator, Adobe InDesign, Adobe Photoshop
2Click the Symbol XX
 Adjustment Layers, Channels and Layer Masks 2Click the Symbol XX ( Adjustment Layer ) and choose Channel Mixer. 3Check the box Monochrome and choose the values R=30, G=60, B=10. Thus you ll get a grayscale
Title goes Shadows and here Highlights
 Shadows Title goes and Highlights here The new Shadows and Highlights command in Photoshop CS (8) is a great new tool that will allow you to adjust the shadow areas of an image while leaving the highlights
METAL TEXT EFFECT. Step 1: Create A New Document. Step 2: Fill The Background With Black
 METAL TEXT EFFECT In this text effects tutorial, we ll learn how to easily create metal text, a popular effect widely used in video games and movie posters! It may seem like there s a lot of steps involved,
Photoshop Tutorial. Millbrae Camera Club 2008 August 21
 Photoshop Tutorial Millbrae Camera Club 2008 August 21 Introduction Tutorial For this session Speak up if: you have a question I m going too fast or too slow I m not speaking loudly enough you know a better
ImagesPlus Basic Interface Operation
 ImagesPlus Basic Interface Operation The basic interface operation menu options are located on the File, View, Open Images, Open Operators, and Help main menus. File Menu New The New command creates a
Mullingar Camera Club Basic introduction to Digital Printing using Photoshop CC.
 Mullingar Camera Club Basic introduction to Digital Printing using Photoshop CC. Table of Contents Course aims: 1 Course presentation notes: 1 Introducing Photoshop: 1 Adjusting the Brightness or Contrast
Adobe Photoshop CC 2018 Tutorial
 Adobe Photoshop CC 2018 Tutorial GETTING STARTED Adobe Photoshop CC 2018 is a popular image editing software that provides a work environment consistent with Adobe Illustrator, Adobe InDesign, Adobe Photoshop,