Design a Halloween Pumpkin Wallpaper in Photoshop
|
|
|
- Posy Floyd
- 5 years ago
- Views:
Transcription

1 Design a Halloween Pumpkin Wallpaper in Photoshop By: Alvaro Guzman Halloween is near! So let's take a pumpkin image, carve it up, and light it for this coming holiday. You'll learn how to get this nice effect on any pumpkin picture, how to play with the colors, apply some layer blending modes to skip the extraction process, and more. Final Image Preview Before we get started, let's take a look at the image we'll be creating. Want access to full PSD files and downloadable copies of every tutorial, including this one? Join PSDTUTS PLUS for just $9/month. You can view the final image preview below or view a larger version here.
2 Step 1 Let's begin. First create a new document, use the size of your screen resolution if you want to. In my case 1440 pixels by 900 pixels. Then fill the background with a radial brown to black gradient. Notice that I always use two guides to obtain the center of the document.
3

4 Step 2 Now look for your pumpkin image, or download this picture and paste it into the middle of the document. It doesn't matter if your pumpkin is too large or wide or even if the colors aren't right. That's why we'll be using Photoshop, to make it look like a contest winner pumpkin. Extract the pumpkin from the background, you can use the Lasso Tool or by creating a path around the contour and creating a vector mask, either way it's fine. Free Transform the pumpkin to reduce it width. Also, take care with the details, like the little branch on the top, I'm making it softer. Finally, you'll get something like the bottom of the image below.
5
6 Step 3 Select the "Pumpkin" layer, then using the Lasso Tool, make a selection around the little branch area and hit Command + Shift + I to invert the selection. This way you'll be editing all the pumpkin without the branch area, then hit Command + U to adjust the Hue/Saturation of the selection mark the Colorize option to make the selection more orange. If you want, set the first group of values of the image below. Invert the selection again and hit Command + U to adjust the Hue/Saturation of the branch this time, make it more green you can use the second group of values shown below.
7
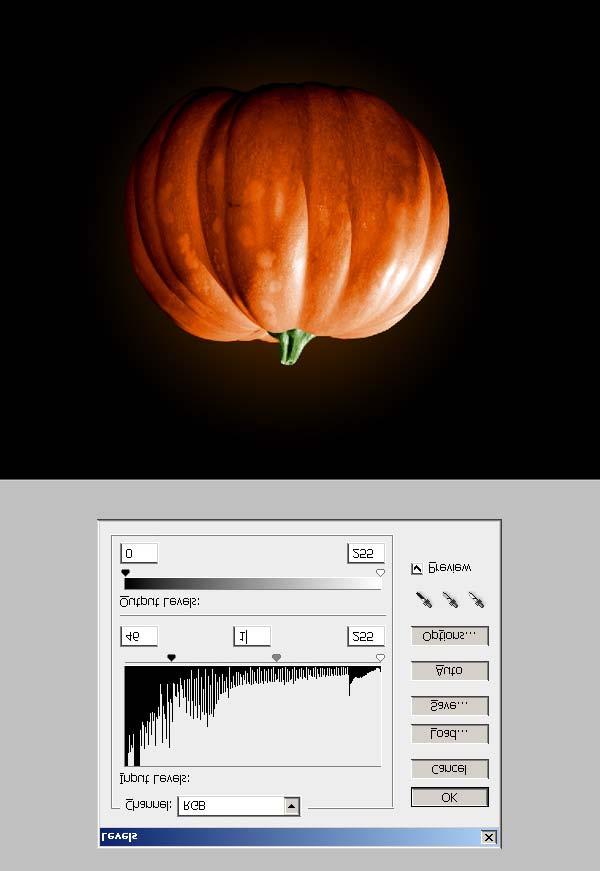
8 Step 4 Hit Command + L to adjust the levels of the "Pumpkin" layer, increase the dark areas levels, you can set the values below. Also, it's a good moment to resize the pumpkin if you want it a little bit smaller.
9 Step 5

10 Create a new layer above the pumpkin, name it "Sketch." Now using the Brush Tool, draw a quick sketch of the pumpkin face: the eyes, nose, and mouth, I'm using a tablet so this step is really easy. Anyway, you can use the Pen Tool, draw the face, apply a Stroke effect to the paths, and change Fill value to 0%, then rasterize the result by merging the paths layer with an empty layer above or below it. Step 6 Now create a new layer above the "Sketch" layer, name it "Fill." Next, using the Magic Wand Tool, select inside the sketch. Now. using the Fill Tool, fill the selection with black into the "Fill" layer. Then hide the "Sketch" layer.
11
12 Step 7 Now to create a inner light effect, apply a Radial Gradient Overlay effect and also a Pattern Overlay effect to the "Fill" layer. Just set the Blend Mode of the Gradient Overlay to Multiply to see the pattern effect.
13
14 Step 8 Command + Click on the "Fill" layer's miniature to select the holes' shapes. Select the "Pumpkin" layer and fill the selection into a layer mask, or simply delete the selection. Then put the "Fill" layer below the "Pumpkin" layer in the layer palette and place the "Sketch" layer above everything.
15
16 Step 9 Now let's add some light sources, in this case some candles, I'm using this one. Paste it into a new layer and just make a quick selection around the candle, hit Command + Option + D to Feather the selection, Command + Shit + I to invert it, and then delete the selection. You'll get something like the image below. Now, a good way to add this candle to our design without spending hours extracting the fire is by changing the "Candle" layer Blending Mode to Screen. Just put the candle layer below the "Pumpkin" layer and above the "Fill" layer. Duplicate the candle a few times if you want to.
17 Step 10 Show the "Sketch" layer, and draw some lines to improve the hole's effect by adding depth. Select the new areas using the Magic Wand Tool. Create a new layer below the "Pumpkin" layer, I call it "Fill 2," and fill the selection with black. Finally, hide the sketch once again.
18

19 Step 11 Now add a Radial Gradient Overlay and a Pattern Overlay effect to the "Fill 2" layer just to give it more depth and texture.
20
21 Step 12 Now it's time to add some light and dark details to our pumpkin. Create a new layer called "Light details." Start with a small soft brush maybe around 5px, paint a few lines close to the carved edge borders and use the Smudge Tool to make the lines softer.
22 Step 13 Add more clear lines over the white light reflections.

23 Step 14 Now to add volume to the holes' borders. Let's add some soft dark lines here and there. Create a new layer called "Dark details" and use the same 5px brush, but this time change the color to a dark brown. Then Smudge the lines a little bit.
24
. Hit OK and see the result. Step 16 Again, using the dark Brush, paint some dark areas inside the carves. This way you'll have inner shadows for each hole.")
25 Step 15 Now select the "Fill 2" layer, and in the Layers Palette double-click on the Gradient Overlay effect and change the gradient to make it more light with these colors: (#741A02 - #AC3304). Hit OK and see the result. Step 16 Again, using the dark Brush, paint some dark areas inside the carves. This way you'll have inner shadows for each hole.
26 Step 17 Duplicate the "Fill" layer and name it "Light." Delete the layer styles and fill it with orange. Place it above all other layers and convert it into a Smart Object. Next go to Filters > Blur > Radial Blur, then set the Amount 100, Zoom, and Best Quality. Apply the filter one more time and change the layer's Blending Mode to Linear Dodge (Add).
27
.")
28 Step 18 Now duplicate the "Light" layer and render the filters, you can do that by adding a blank layer above "Light copy" and merge both. Then apply a Gaussian Blur with a Radius px to "Light copy" layer. Also, change it's Blending Mode to Linear Dodge (Add). Duplicate "Light copy" layer one more time, then using the Lasso Tool, delete the pumpkin's tooth area without light on the "Light copy 2" layer.
29
30
31 Step 19 Now, we'll add a nice background. Create a new layer just above the "Background" layer, and name it "Clouds." Press the D Key on your keyboard to set the default black and white colors. Next, go to Filter > Render > Clouds, hit Command + F a few times until you're happy with the result. Go to Filter > Render > Difference Clouds and apply that filter a few times until you've got something like the middle of the image below. Then go to select "Clouds" layer and change it's Blending mode to Color Dodge, this way we'll be merging the clouds with the background radial gradient. Finally, merge both the "Background" and the "Clouds" layer, and name this new layer "Bg1," or if you want to keep these layers editable, put both into a new folder, convert it into a Smart object, duplicate the Smart Object, and rasterize it.
32

33 Step 20 Using the Lasso Tool, select a big area of "Bg1" layer and copy it. Paste the copy just above the first one and resize it a little bit, then name it "Bg2." Next, hit Command + U to adjust the Hue/Saturation, change the Hue values to make it more red. Next, change the "Bg2" Blending Mode to Screen.
34
35

36 Step 21 Add a few more clouds repeating the previous step, use different colors. When you have finished, create a new folder and put all the clouds in it, then convert the folder into a Smart Object. Step 22 Notice that our pumpkin has a black shadow on the left side. We'll try to keep that lightening in the final outcome. Select the "background" layer's Smart Object, and go to Layer > Layer Mask > Reveal all.
37 Now, using the Eliptical Marquee Tool, draw an ellipse as shown. Next, while holding the Shift key, draw another eliptical selection on the pumpkin's base. Then hit Command + Option + D to Feather the selection about 50px. And fill the selection with black directly into the layer mask.
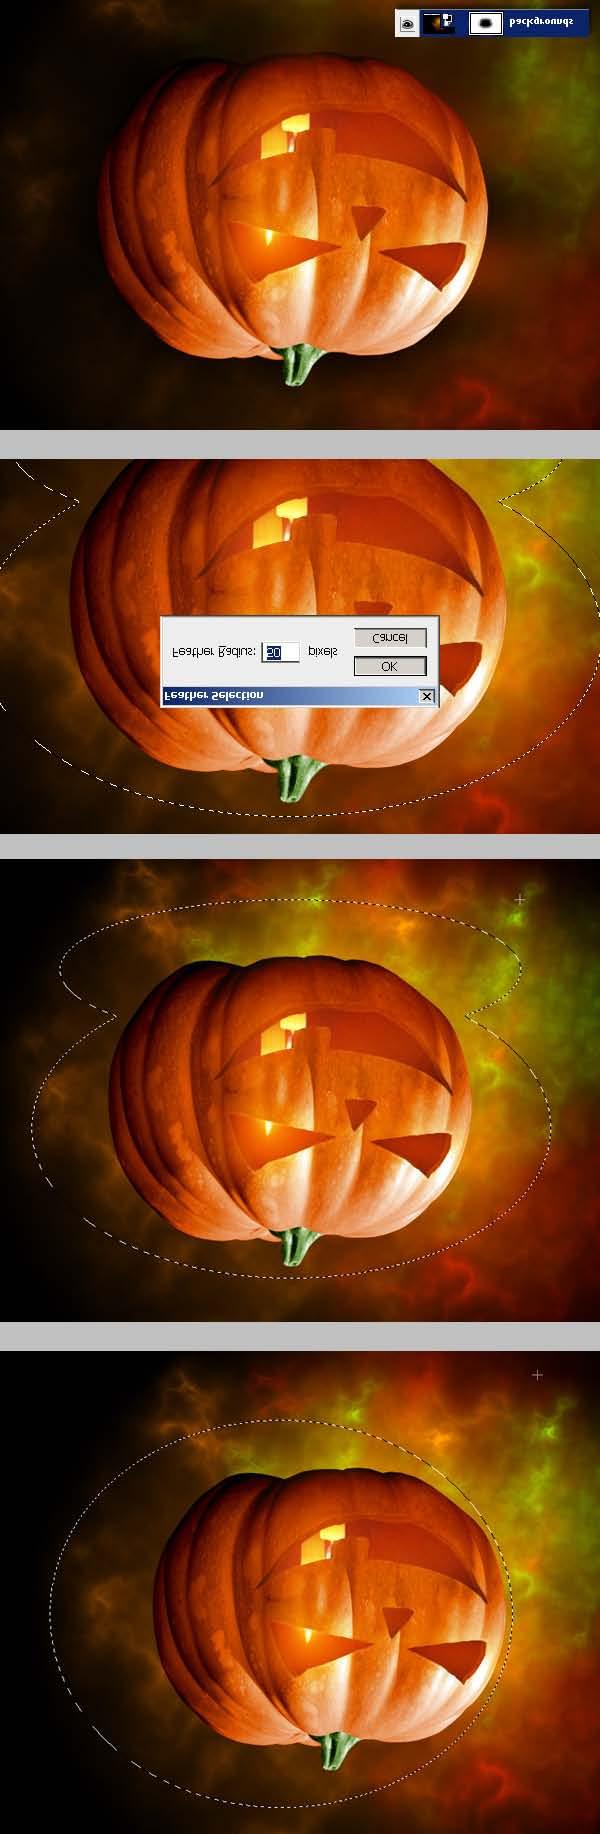
38
39 Step 23 Now add a surface. Draw a black rectangle using the Rectangle Tool just above the "backgrounds" layer, then change the rectangle's Opacity to 75%.

40 Step 24 Now we need a ground shadow, Create a new layer called "Ground shadow" above every layer on your design. Make an eliptical selection, then Feather it 50px, and fill it with black. Next, using the Lasso Tool, draw an irregular shape following pumpkin's shape. Feather the selection about 20 pixels and Delete it. Then change the layer's Opacity to 75%.
41
42
43 Step 25 Next, create a new layer below the "Ground shadow" layer and name it "Inner Shadow." Now using a big dark brush, paint some areas inside the eyes, nose, and mouth. Command-click the "Fill" layer, Command + I to inverse the selection, and Delete all the extra painting of the "Inner Shadow" layer. Then Command-click the "Fill 2" layer, Feather the selection 2 pixels and Delete it.
44
45 Step 26
46 We're close to finished. Now we'll add more details. Duplicate one of the candles, name it "Candle Front," and bring the layer above all the others. As you can see, the original candle picture has a black fade out that we don't need right now, we need to fix that. Make a linear selection on the "Candle Front" layer, then using the Free Transform options (V), make the selection higher. Fix the brighter areas next to the candle using the Clone Tool and Erase all the dirty areas.
47

48 Step 27 Next select the Clone Tool, set the cloning source somewhere inside the candle, set a small brush and draw some wax drops all around the candle. Use the Smudge Tool to improve the wax drops. Also, use the Clone Tool to add some lightening details.
49 Step 28 Duplicate the "Candle front" layer. Go to Edit > Transform > Flip Vertical, and add to it a Layer Mask filled with a black to white Gradient Overlay. Also, fill a small eliptical selection with black above the "Candle Front" layer to add a little
50 shadow to the candle. Put the three layers ("Candle Front," "Candle Front copy," and "Candle Shadow") into a folder and convert it into a Smart Object. Duplicate the Smart Object and place it above the "Floor" layer. Apply a Blur filter to it.
51

52 Step 29 Finally, put all the pumpkin's layers into a folder, duplicate the folder and merge it. Then apply the same reflection process as the previous step.

53 Conclusion Our image is ready! Now we have a nice Halloween's wallpaper to use and share. Obviously, you can create your very own design and carve your pumpkin as you want. Give it a try! You can view the final image preview below or view a larger version here.

54 Subscribe to the PSDTUTS RSS Feed for the best Photoshop tuts and articles on the web.
Glowing Surreal Planet Design. Final Image Preview
 Glowing Surreal Planet Design Final Image Preview. Step 1 First, go to the S:\ drive and locate the folder called Glowing Planet Design. Copy the City Skyline file and paste it in your Glowing Planet Design
prepared by Allison Hwang for T. Purdy 2011
 There are many ways to create material textures in Photoshop. In addition to using primarily the blending tool, you can also use filters to create textures. In this tutorial, the objective is to create
Here is a 100% zoom close up. Name in Popsicles
 Here is a 100% zoom close up Name in Popsicles Step 1 Let s start by creating a new Photoshop document. Mine is 2560 1440 pixels. Fill the background with a color of your choice (it s not important at
Photoshop. Make a Spooky Halloween Pumpkin Text Effect in Photoshop - Photoshop tutorial PSDDude
 Photoshop October 4th,2017 1 2 Image size: 7 in wide x 3 in high 300 dpi Start with a simple black gradient background layer. Radial Gradiant, black to gray. Install the CREEPSVILLE font. Center and Type
A quick note: We hope that you will find something from the Tips and Tricks that will add a little pizazz to your yearbook pages!
 A quick note: The following pages are tips and tricks for Basic Photoshop users. You may notice that some instructions indicate that non-awpc fonts were used, and that some colors were created using the
Introduction to Photoshop
 Introduction to Photoshop Instructional Services at KU Libraries A Division of Information Services www.lib.ku.edu/instruction Abstract: This course covers the basics of Photoshop, including common tools
HOW TO CREATE A SUPER SHINY PENCIL ICON
 HOW TO CREATE A SUPER SHINY PENCIL ICON Tutorial from http://psd.tutsplus.com/ Compiled by INTRODUCTION The Pencil is one of the visual metaphors most used to express creativity. In this tutorial,
How to Create Spooky Halloween Typography in Photoshop
 Envato Elements: Unlimited templates, graphics, courses, ebooks, and now 300,000 photos! Only $29/month envato-tuts+ Sign Up Sign In Advertisement DESIGN & ILLUSTRATION > TEXT EFFECTS How to Create Spooky
Create an Amazing Surreal-Style Treehouse in Photoshop Photoshop Tutorials
 Download the PSD Surreal Treehouse.zip 23.59 MB Download from Website Surreal Treehouse Photoshop Tutorial Tutorial Resources Tree Houses Thanks archetype, Deviantart Bonsai Tree Thanks fabemiko, Deviantart
Types of Mask. Layer masks
 Photoshop Layer Mask Features Non destructive (does not delete pixels) until applied Uses brush tool which is configurable Can be added to any layer (except Background unless double click to unlock) including
Module All You Ever Need to Know About The Displace Filter
 Module 02-05 All You Ever Need to Know About The Displace Filter 02-05 All You Ever Need to Know About The Displace Filter [00:00:00] In this video, we're going to talk about the Displace Filter in Photoshop.
How to Create a Landscape Wallpaper for your Desktop
 How to Create a Landscape Wallpaper for your Desktop Why not create a vector landscape wallpaper? In this simple tutorial, you will learn how to create an eye-appealing wallpaper quickly and effectively.
Exploring Photoshop Tutorial
 Exploring Photoshop Tutorial Objective: In this tutorial we will create a poster composed of three distinct elements: a Bokeh, an image and title text. The Bokeh is an effect which is sometimes seen in
TV Aquarium. Create a new document. 8.5 x 11, 300 dpi. Save as TV Aquarium Your Name. Create TV shape. Use Pen
 Create a new document. 8.5 x 11, 300 dpi. Save as TV Aquarium Your Name. Create TV shape. Use Pen Tool, Convert Point Tool and Direct Selection Tool. We need side shapes to create patches of light and
IMAGE CORRECTION. You can find this and more information with video tutorials at
 IMAGE CORRECTION You can find this and more information with video tutorials at http://www.adobe.com/support/photoshop/ P H O T O S H O P T O O L S CLONE STAMP TOOL The Clone Stamp tool paints one part
Photoshop 1. click Create.
 Photoshop 1 Step 1: Create a new file Open Adobe Photoshop. Create a new file: File->New On the right side, create a new file of size 600x600 pixels at a resolution of 300 pixels per inch. Name the file
photoshop filters kelly ludwig assistant professor
 photoshop filters kelly ludwig assistant professor sharpening images reducing noise correcting distortions in images practical filters There are over 100 filters that ship with Photoshop and they're all
Undress a Giraffe in Photoshop
 Undress a Giraffe in Photoshop By: Alexandra Fomicheva Have you ever wanted to know what a Giraffe looks like without its spots? If so, this tutorial is for you, you pervert! Today, we will demonstrate
Digital Design and Communication Teaching (DiDACT) University of Sheffield Department of Landscape. Adobe Photoshop CS5 INTRODUCTION WORKSHOPS
 University of Sheffield Department of Landscape. Adobe Photoshop CS5 INTRODUCTION WORKSHOPS") Adobe INTRODUCTION WORKSHOPS WORKSHOP 1 - what is Photoshop + what does it do? Outcomes: What is Photoshop? Opening, importing and creating images. Basic knowledge of Photoshop tools. Examples of work.
Adobe INTRODUCTION WORKSHOPS WORKSHOP 1 - what is Photoshop + what does it do? Outcomes: What is Photoshop? Opening, importing and creating images. Basic knowledge of Photoshop tools. Examples of work.
AGENDA. :: Homework Critiques (5 minutes each) :: Photoshop Lesson 3. A-1 Gorgeous! [ COMPOSITE DEMO ] :: 7mins. I. SELECTIONS [ Common Law ]:
![AGENDA. :: Homework Critiques (5 minutes each) :: Photoshop Lesson 3. A-1 Gorgeous! [ COMPOSITE DEMO ] :: 7mins. I. SELECTIONS [ Common Law ]:](/thumbs/93/112781712.jpg "AGENDA. :: Homework Critiques (5 minutes each) :: Photoshop Lesson 3. A-1 Gorgeous! [ COMPOSITE DEMO ] :: 7mins. I. SELECTIONS [ Common Law ]:") CLASS :: 09.24 2018 AGENDA :: Homework Critiques (5 minutes each) A-1 Gorgeous! Upload A-1 Project to Student Folder :: Photoshop Lesson 3 [ COMPOSITE DEMO ] :: 7mins. I. SELECTIONS [ Common Law ]: a.
CLASS :: 09.24 2018 AGENDA :: Homework Critiques (5 minutes each) A-1 Gorgeous! Upload A-1 Project to Student Folder :: Photoshop Lesson 3 [ COMPOSITE DEMO ] :: 7mins. I. SELECTIONS [ Common Law ]: a.
Create a Beautiful Abstract Portrait in Photoshop - Psd Premium Tutorial
 Create a Beautiful Abstract Portrait in Photoshop - Psd Premium Tutorial By: Wojciech Pijecki In this tutorial we will combine several stock images to create an artistic, abstract portrait of a woman.
How to Draw a Realistic iphone 4 with
 Home Freebies Submit Your Work Contact Us How to Draw a Realistic iphone 4 with Photoshop Jan 3 2011 By Mohammad Jeprie 34 Comments In this tutorial, we will draw a realistic-looking iphone 4 using Photoshop.
Easily Smooth And Soften Skin In A Photo With Photoshop
 Easily Smooth And Soften Skin In A Photo With Photoshop Written by Steve Patterson OPEN THE START FILE BY RIGHT CLICKING THE.JPG FILE AND CHOOSING OPEN WITH ADOBE PHOTOSHOP. SAVE AS: X_lastname_firstname_Smooth_Soft
Texts and Resources: Assessments: Freefoto.com Group Photo Projects
 Effective Date: 2009-10 Name of Course: Digital Photography Grade Level: 9-12 Department: Industrial Technology and Engineering Length of Course: 30 cycles Instructional Time: 180 days Period Per Cycle:
Quick Mask Setting Up your Work Environment Setting Up the Quickmask Parameters
 Quick Mask Quickmask gets its name from the fact that as you create your selection area, Photoshop masks that area off, tinting it with a colored mask to show what has been selected. When you're finished
Learning Adobe Photoshop CS6
 Module 1 Contents Chapter 1: Introduction to Photoshop Loading Photoshop...1-1 The Tools Panel...1-2 Using the Tools...1-3 The Panel Group...1-5 Layers...1-6 Loading a Sample File...1-6 Looking at the
Winter Card.
 Winter Card Used images: http://www.cgtextures.com/texview.php?id=24321&phpsessid=95e8e8290894cc5194898 e16d1dddb4c http://www.cgtextures.com/texview.php?id=14285&phpsessid=95e8e8290894cc5194898 e16d1dddb4c
HOW TO BREAK SUNLIGHT THROUGH THE CLOUDS
 HOW TO BREAK SUNLIGHT THROUGH THE CLOUDS Tutorial from http://psd.tutsplus.com/ Compiled by INTRODUCTION In this tutorial I will show you how to turn an overcast day into a stunningly dramatic
Turning Photograph Into Cartoon-Style Picture. Digital Media I West High School Susan M. Raymond
 Turning Photograph Into Cartoon-Style Picture Digital Media I West High School Susan M. Raymond Part 1: Creating Outline Wondering how those guys on the internet turn photograph into a nice cartoon-style
How To Change Eye Color In Photoshop
 Change Eye Color In An Image With Photoshop Learn how to easily change someone's eye color in a photo with Photoshop! We'll use a Hue/Saturation adjustment layer, a layer mask and a layer blend mode to
Tutorial Resources. Combine a Crocodile with a Car to Create an Exotic Crocomobile Photoshop Tutorials
 Tutorial Resources Crocodile1 SXC Crocodile2 charadestock Crocodile3 frostdragon64 Old car achatinastock Background SXC Bird rml-stock sign1 discordia-stock Sign2 ecathe Step 1 Open the background image
PhotoFiltre. Reverse foreground/background colors. Background & foreground colors. Set default foreground/background colors. Color choice palette
 PhotoFiltre BASIC TOOLS PALETTE Background & foreground colors Reverse foreground/background colors Set default foreground/background colors Color choice palette Toggle through color choice palettes Selection
GIMP (GNU Image Manipulation Program) MANUAL
 MANUAL") Selection Tools Icon Tool Name Function Select Rectangle Select Ellipse Select Hand-drawn area (lasso tool) Select Contiguous Region (magic wand) Selects a rectangular area, drawn from upper left (or lower
Selection Tools Icon Tool Name Function Select Rectangle Select Ellipse Select Hand-drawn area (lasso tool) Select Contiguous Region (magic wand) Selects a rectangular area, drawn from upper left (or lower
Creating a Watercolor Painting From a Photo. Open the photo you want to appear to be a watercolor painting. I am using the photo below:
 Creating a Watercolor Painting From a Photo Open the photo you want to appear to be a watercolor painting. I am using the photo below: Make any adjustments as needed like cropping the photo before preceding
Step 1. Facebook Twitter Google+ Find us on Facebook. Vectortuts+ How to Create a Curious Owl in Illustrator CS4 Vectortuts+
 Joomla developers needed - Long term potential in India Copywriter Email Campaigns Wordpress Creative design Social media in UK More Freelance Jobs... Facebook Twitter Google+ Find us on Facebook Step
Building - Image*After Bokeh - Regularjane Landscape 1 - Anders Bjerré Pedersen Landscape 2 - author Sundstrom(nickname)
") Click to enlarge the image. Used images: Download Moon shape(image created with the Photoshop tools) Icicles - Sergei Furtcev Cloud 1(Ruslan Olinchuk), Cloud 2(Image*After), Cloud 3(Sergei Perov) Stars
Click to enlarge the image. Used images: Download Moon shape(image created with the Photoshop tools) Icicles - Sergei Furtcev Cloud 1(Ruslan Olinchuk), Cloud 2(Image*After), Cloud 3(Sergei Perov) Stars
AGENDA :: MULTIMEDIA TOOLS :: CLASS NOTES. :: Homework Critiques (5-7 minutes each) :: Photoshop Lesson 3. A-1 Gorgeous! [ COMPOSITE DEMO ] :: 7mins.
![AGENDA :: MULTIMEDIA TOOLS :: CLASS NOTES. :: Homework Critiques (5-7 minutes each) :: Photoshop Lesson 3. A-1 Gorgeous! [ COMPOSITE DEMO ] :: 7mins.](/thumbs/86/93336476.jpg "AGENDA :: MULTIMEDIA TOOLS :: CLASS NOTES. :: Homework Critiques (5-7 minutes each) :: Photoshop Lesson 3. A-1 Gorgeous! [ COMPOSITE DEMO ] :: 7mins.") CLASS :: 03 02.10 2017 AGENDA :: Homework Critiques (5-7 minutes each) A-1 Gorgeous! Upload A-1 Project to Student Folder :: Photoshop Lesson 3 [ COMPOSITE DEMO ] :: 7mins. I. SELECTIONS [ Common Law ]:
CLASS :: 03 02.10 2017 AGENDA :: Homework Critiques (5-7 minutes each) A-1 Gorgeous! Upload A-1 Project to Student Folder :: Photoshop Lesson 3 [ COMPOSITE DEMO ] :: 7mins. I. SELECTIONS [ Common Law ]:
Saderan a tutorial. page 1. Contents. Introduction
 page 1 Saderan a tutorial Introduction Contents Several people on the Cartographer s Guild forums asked for a tutorial about the style I used in my Saderan map. This document tries to deliver. This is
GETTING STARTED MAKING A NEW DOCUMENT
 Accessed with permission from http://web.ics.purdue.edu/~agenad/help/photoshop.html GETTING STARTED MAKING A NEW DOCUMENT To get a new document started, simply choose new from the File menu. You'll get
Colorful Glowing Mask Photoshop Tutorial Photoshop TUTfactory The best Photoshop tutorials in one place
 Step 1: To start, create new canvas sized at 994 1312 pixels, and fill it with black. Next, create a new layer, and go to Filter->Render->Clouds. Duplicate this layer, and then merge the two layers. Set
Photoshop Backgrounds: Turn Any Photo Into A Background
 Photoshop Backgrounds: Turn Any Photo Into A Background Step 1: Duplicate The Background Layer As always, we want to avoid doing any work on our original image, so before we do anything else, we need to
PHOTOSHOP & ILLUSTRATOR BOOTCAMP
 FALL 2014 - ELIZABETH LIN PHOTOSHOP & ILLUSTRATOR BOOTCAMP ILLUSTRATOR ALIGNMENT To access the alignment panel, go to Window -> Align. You should see a panel like the one below. This panel allows you to
Compositing. Compositing is the art of combining two or more distinct elements to create a sense of seamlessness or a feeling of belonging.
 Compositing Compositing is the art of combining two or more distinct elements to create a sense of seamlessness or a feeling of belonging. Selection Tools In the simplest terms, selections help us to cut
Add Rays Of Sunlight To A Photo With Photoshop
 Add Rays Of Sunlight To A Photo With Photoshop Written by Steve Patterson. In this photo effects tutorial, we'll learn how to easily add rays of sunlight to an image, a great way to make an already beautiful
Extreme Makeovers: Photoshop Retouching Techniques
 Extreme Makeovers: Table of Contents About the Workshop... 1 Workshop Objectives... 1 Getting Started... 1 Photoshop Workspace... 1 Retouching Tools... 2 General Steps... 2 Resolution and image size...
'Photoshop'. "Realistic Eye Texture Painting" by Krishnamurti Martins Costa
 Level: intermediate Technique: digital painting Software: Adobe Photoshop 'Photoshop'. "Realistic Eye Texture Painting" by Krishnamurti Martins Costa Email: kris@antropus.com Web: http://www.antropus.com
Animated Snowman. Image size: 11 w x 17 h 300 dpi
 Animated Snowman Image size: 11 w x 17 h 300 dpi Step 1 First of all, you ll need the texture on my website. Now open a new document. I usually work on really big documents because I can work on the details
An Idiot's Guide to Photoshop. Part II Azamat Bohed E. TrueKolor.net
 An Idiot's Guide to Photoshop Part II Azamat Bohed E. TrueKolor.net Table of Contents 1.Introduction 3 2. Opening a Digital Image/Photo in Photoshop 3 3. Changing/removing the Background 4 3.1 Using the
Downloaded From : Working with Photoshop 7.0
 Adobe Photoshop 1. Introduction What is Adobe Photoshop? Adobe Photoshop is a web designing software used for giving effects and filters to an image to make it more appealing and attractive. Brought out
How to Create a Curious Owl in Illustrator
 How to Create a Curious Owl in Illustrator Tutorial Details Program: Adobe Illustrator Difficulty: Intermediate Estimated Completion Time: 1.5 hours Take a look at what we're aiming for, an inquisitive
Enhanced Eyes. Here's the image I'll be working with (glamour eyes photo from Shutterstock): Here's what the eyes will look like when we're done:
: Here's what the eyes will look like when we're done:") Enhanced Eyes Here's the image I'll be working with (glamour eyes photo from Shutterstock): The original image. Here's what the eyes will look like when we're done: The final effect. Here's a close-up
Enhanced Eyes Here's the image I'll be working with (glamour eyes photo from Shutterstock): The original image. Here's what the eyes will look like when we're done: The final effect. Here's a close-up
DAZ Productions - 3D Models, 3D Content, and 3D Software
 Página 1 de 26 Postwork made Easy Author: mizgriz Step 1: Preparing the image. Step 2: Get your glow on. Step 3: And now for something completely (not) different... Step 4: Hue and Saturate Step 5: About
Diploma in Photoshop
 Diploma in Photoshop Photoshop Selection Tools Selection Tools allow us to isolate areas of our image and apply adjustments to these selected areas only. A selection simply isolates one or more parts of
Adobe Photoshop CC 2018 Tutorial
 Adobe Photoshop CC 2018 Tutorial GETTING STARTED Adobe Photoshop CC 2018 is a popular image editing software that provides a work environment consistent with Adobe Illustrator, Adobe InDesign, Adobe Photoshop,
Using Photoshop Elements
 Using Photoshop Elements Created By: Rick Williams August 2004 Table of Contents Photoshop Element Tools...Page 1 Tool Descriptions... Page 3 Starting Photoshop Elements... Page 7 Resizing an Image...
Thank you for spending your evening with me! Truly enjoyed chatting and sharing image blending.. :)
") easymail Webmail :: Texture Blending Notes 1 of 2 9/4/2016 8:38 PM Subject From To Date Texture Blending Notes Denise Silva Denise Silva 2016-09-02 8:10 am Texture
easymail Webmail :: Texture Blending Notes 1 of 2 9/4/2016 8:38 PM Subject From To Date Texture Blending Notes Denise Silva Denise Silva 2016-09-02 8:10 am Texture
ITEC185 INTRODUCTION TO DIGITAL MEDIA
 1 ITEC185 INTRODUCTION TO DIGITAL MEDIA ADOBE PHOTOSHOP ITEC185 - Introduction to Digital Media ITEC185 - Introduction to Digital Media 2 What is Adobe Photoshop? Photoshop is the leading professional
Digital Image Manipulation 2014
 Week 4 Advanced Type Techniques- create special effect type Step 1 Create a new 1024 x 768 px document. Set the document background color to light pink or follow my colour (#f8cece) Create the text using
Create a Magical Flaming Heart Illustration in Photoshop
 All Topics Free Tutorials Courses ebooks Pricing Sign In Free Account Advertisement Design & Illustration Categories Learning Guides PHOTO EFFECTS Create a Magical Flaming Heart Illustration in Photoshop
Reflection Project. Please start by resetting all tools in Photoshop.
 Reflection Project You will be creating a floor and wall for your advertisement. Before you begin on the Reflection Project, create a new composition. File New: Width 720 Pixels / Height 486 Pixels. Resolution
Learning Photo Retouching techniques the simple way
 Learning Photo Retouching techniques the simple way Table of Contents About the Workshop... i Workshop Objectives... i Getting Started... 1 Photoshop Workspace... 1 Setting up the Preferences... 2 Retouching
Rendering a perspective drawing using Adobe Photoshop
 Rendering a perspective drawing using Adobe Photoshop This hand-out will take you through the steps to render a perspective line drawing using Adobe Photoshop. The first important element in this process
EXTREME CONTRAST PHOTO EFFECT
 EXTREME CONTRAST PHOTO EFFECT In this Photoshop tutorial, we re going to learn how to use layers, layer blend modes, some noise, a little sharpening, and a simple adjustment layer to easily give a photo
images + editing steps by Lisa DiGeso, Milk & Honey Photography + Amy McDaniel of Dewdrops Photography 2014 TheMilkyWay.ca Milk and Honey newborns
 Milk and Honey newborns Milk and Honey newborns images + editing steps by Lisa DiGeso, Milk & Honey Photography + Amy McDaniel of Dewdrops Photography Creamy Baby Skin The biggest tip for creamy baby skin
PHOTO 11: INTRODUCTION TO DIGITAL IMAGING
 PHOTO 11: INTRODUCTION TO DIGITAL IMAGING Instructor: Sue Leith Exam Review On your camera, what are the following and what are they used for? WB matches the color temperature of light ISO - The sensitivity
Photoshop Textures Assignment # 2
 Photoshop Textures Assignment # 2 Objective: Use Photoshop to create unique texture from scratch that can be applied to backgrounds, objects, tetx and 3D objects to create new and exciting compositions.
Doing More with Photoshop
 Doing More with Photoshop Topic 7 Layer Masks Learning Outcomes In this lesson, we will take a look at layer masks in Photoshop. By the end of this lesson, you will have a good understanding of what layer
How to blur a background in Photoshop CS3, Elements 9 or later By Steve Zimic
 This is a technique I developed which allows blurring of the background without any bleeding of the main subject into the background. This technique does require a working knowledge of the various selection
Create a Candy Cane. Create a new canvas with the size 8x10 inches at 300 pixel/inch. See image below Ctrl + N
 Create a Candy Cane The Basic Candy Cane Canvas and Shape 1. Create a new folder, name it Candy Cane your name. Create a new canvas with the size 8x10 inches at 300 pixel/inch. See image below Ctrl + N
The Little Fish Transcript
 The Little Fish Transcript welcome back everybody we are going to do this nice little scare to fish so if you've been following on to our shark tutorial you might notice this little guy in the thumbnail
The toolbar in Pixlr Editor always appears on the left-hand side, although you can drag it anywhere you like.
 The toolbar in Pixlr Editor always appears on the left-hand side, although you can drag it anywhere you like. Crop (Shortcut: C) Reframe your entire canvas to a desired size and remove everything else.
Inverted Colors Photo Effect With Photoshop
 Inverted Colors Photo Effect With Photoshop Written by Steve Patterson. In this Photoshop Effects tutorial, we re going to look at how to invert the colors in an image to create interesting photo effects.
Advanced Photography. Topic 3 - Photoshop Filters. Learning Outcomes
 Topic 3 - Photoshop Filters Learning Outcomes In this lesson, we're going to take a look at some techniques that make use of some of the more practical filters. We are also going to learn how to convert
1. Create a rough sketch
 1. Create a rough sketch Go to File>New (Cmd/Ctrl+N), name it Whale. Set Width to 230mm, Height to 310mm and Resolution to 300ppi. Click OK. Create a new layer (Shift+Cmd/Ctrl+N) and name it Sketch 1,
Project 8: Nice Close-Up
 ps7ie_p08_b.qxd 11/18/02 3:25 PM Page 74 ps7ie_p08_b.qxd 11/18/02 3:25 PM Page 75 Photoshop 7 Image Effects In this project, work with a picture that was taken at an angle for effect. Correct and crop
CREATE A SPECTACULAR GRASS TEXT EFFECT IN PHOTOSHOP
 CREATE A SPECTACULAR GRASS TEXT EFFECT IN PHOTOSHOP Tutorial from http://psd.tutsplus.com/ Compiled by INTRODUCTION Ever wanted to make text out of grass? Well with Photoshop you can. In this
How to make non-destructive textured maps in Photoshop
 How to make non-destructive textured maps in Photoshop This tutorial assumes that you are reasonably familiar with using photoshop. E.g. You know how to create layers, layer styles, masks etc. After you
::: Update: June 1st, :46 :::
 ::: Update: June 1st, 2009 17:46 ::: This lesson has been written by Ann on May 18th 2009 using the Dutch version of PSP X2 Copyright 2009 - website: tdstudio - tubegroup: TubesBellisimo - guestbook :::
Introduction to Layers
 Introduction to Layers By Anna Castano A layer is an image or text that is piled on top of another. There are many things you can do with layer and it is easy to understand how it works. Through the introduction
FLAMING HOT FIRE TEXT
 FLAMING HOT FIRE TEXT In this Photoshop text effects tutorial, we re going to learn how to create a fire text effect, engulfing our letters in burning hot flames. We ll be using Photoshop s powerful Liquify
ADOBE PHOTOSHOP CS TUTORIAL
 ADOBE PHOTOSHOP CS TUTORIAL A D O B E P H O T O S H O P C S Adobe Photoshop CS is a popular image editing software that provides a work environment consistent with Adobe Illustrator, Adobe InDesign, Adobe
30 Transform filter 163 (tutorial) RGB color 5, 38-39, 149
 RGB color 5, 38-39, 149") Index il The index is arranged hierarchically, in alphabetical order, with symbols preceding the letter A. Many second-level entries also occur as first-level entries. This is to ensure that you will find
Index il The index is arranged hierarchically, in alphabetical order, with symbols preceding the letter A. Many second-level entries also occur as first-level entries. This is to ensure that you will find
Out of Bounds - Dolphins
 Out of Bounds - Dolphins Let's start by making a copy of our original image layer - This is not essential but it's easier to rectify mistakes. From the menus, select Layer > Duplicate Layer or drag the
Create a new image: 10 IN height and 16 IN width, 300 dpi.
 The images needed for this project are on my website. Create a new image: 10 IN height and 16 IN width, 300 dpi. Create a new layer and fill the layer with white.. Create a radial gradient by using following
Adobe Photoshop CS5 Tutorial
 Adobe Photoshop CS5 Tutorial GETTING STARTED Adobe Photoshop CS5 is a popular image editing software that provides a work environment consistent with Adobe Illustrator, Adobe InDesign, Adobe Photoshop
The Layer Blend Modes drop-down box in the top left corner of the Layers palette.
 Photoshop s Five Essential Blend Modes For Photo Editing When it comes to learning Photoshop, believe it or not, there's really only a handful of things you absolutely, positively need to know. Sure, Photoshop
Create a Creepy Face Photo Manipulation in Photoshop
 i TUTORIALS Create a Creepy Face Photo Manipulation in Photoshop by Alan Klim Advertisement In this tutorial we ll show you an easy way to create a nice creepy face effect using Photoshop. We strongly
CREATE A BASIC VEXEL IMAGE
 CREATE A BASIC VEXEL IMAGE Tutorial from http://psd.tutsplus.com/ Compiled by INTRODUCTION This time we'll create a simple vexel image from a picture. Also, we'll use some pattern effects
AGENDA :: MULTI- MEDIA TOOLS :: CLASS NOTES. :: Homework Critiques Best and Worst Websites. :: Photoshop Lesson 2 Things aren t what they seem
 CLASS :: 02 02.02 2018 AGENDA :: Homework Critiques Best and Worst Websites :: Photoshop Lesson 2 Things aren t what they seem I. PHOTO RETOUCHING: Before There Were Computers (Web Post) http://jmcolberg.com/weblog/2010/01/photoshop_before_there_were_computers_the_art_of_retouching_and_improving_negatives_and_prints/
Adobe PhotoShop Elements
 Adobe PhotoShop Elements North Lake College DCCCD 2006 1 When you open Adobe PhotoShop Elements, you will see this welcome screen. You can open any of the specialized areas. We will talk about 4 of them:
Reducing Noise in an image
 Reducing Noise in an image - Open the image in Photoshop. - Go to the Filter menu then click on Noise and then the Reduce Noise button. - Zoom in on the preview image in the Reduce Noise window, so that
Using Adobe Photoshop
 Using Adobe Photoshop 6 One of the most useful features of applications like Photoshop is the ability to work with layers. allow you to have several pieces of images in the same file, which can be arranged
Make a Planet. by Greg Martin
 Make a Planet by Greg Martin This tutorial should step you through making a simple, yet realistic-looking planet using Adobe Photoshop 7, and ONLY Adobe Photoshop 7. We're working small here, so keep in
GETTING STARTED. 0 P a g e B a s i c s o f A d o b e P h o t o s h o p A g a P r i v a t e I n s t i t u t e f o r c o m p u t e r s c i e n c e
 GETTING STARTED 0 P a g e B a s i c s o f A d o b e P h o t o s h o p Adobe Photoshop: is a popular image editing software that provides a work environment consistent with Adobe Illustrator, Adobe InDesign,
HIGH KEY GLOW EFFECT IN PHOTOSHOP
 HIGH KEY GLOW EFFECT IN PHOTOSHOP In this Photoshop tutorial, we ll learn how to create a high key glow effect, which is a fancy way of saying we ll be applying a glow only to the highlights in an image.
Ascension's Atlas Tutorial in GIMP
 Ascension's Atlas Tutorial in GIMP What follows is, as near as I can make it, an approximation in gimp of Ascension s Photoshop Atlas Style tutorial. Only the techniques used are in this version, so I
Create a Multicolored Splashed Text Effect in Adobe Illustrator
 Create a Multicolored Splashed Text Effect in Adobe Illustrator by Diana Toma17 Nov 2014 What You'll Be Creating In this tutorial you will learn how to create a multicolored splashed text effect in Adobe
Your texture pattern may be slightly different, but should now resemble the sample shown here to the right.
 YOU RE BUSTED! For this project you are going to make a statue of your bust. First you will need to have a classmate take your picture, or use the built in computer camera. The statue you re going to make
PHOTOSHOP INVERTED COLORS PHOTO EFFECT
 Photo Effects: Photoshop Inverted Colors Photo Effect PHOTOSHOP INVERTED COLORS PHOTO EFFECT Most people would agree that taking a stroll through the forest can be very calming and peaceful, with all of
CATEGORY SKILL SET REF. TASK ITEM
 ECDL / ICDL Image Editing This module sets out essential concepts and skills relating to the ability to understand the main concepts underlying digital images and to use an image editing application to