How to Create a Landscape Wallpaper for your Desktop
|
|
|
- Bethany Jenkins
- 5 years ago
- Views:
Transcription
1 How to Create a Landscape Wallpaper for your Desktop Why not create a vector landscape wallpaper? In this simple tutorial, you will learn how to create an eye-appealing wallpaper quickly and effectively. Let's get to it!

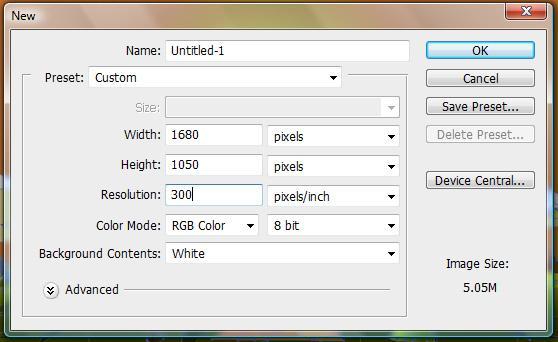
2 Step 1 To begin your wallpaper, create a new document in Illustrator (Command + N). I have a wide screen monitor and so I enjoy 1680 pixels by 1050 pixels. Since you're creating this in vector, your artwork will be able to be resized to any resolution. It is better to create wide screen artwork because you can always crop the sides off in 4:3 aspect ratio resolutions.
 and, having the rectangle selected, click and drag to raise the")
3 Step 2 Use the Rectangle Tool (M) and create your land. Make it a nice green or refraction from the sky color of your choice. Step 3 To create the foreground rolling hills use the Warp Tool (Shift + R) and, having the rectangle selected, click and drag to raise the horizon line.
4 Step 4 Use the Mesh Tool (U) to click on your landscape and create rows growing further apart as they reach the foreground. This will simulate distance.
 and brighten up the color on these points. I chose C=9%, M=0%, Y=95%, and K=0%.")
5 Step 5 I created six rows. Row 1 is the horizon line and row 6 is the foreground. Use the Direct Selection Tool (A), hold shift, and select each point along the row 1. Once you have selected all the points along row 1, open up your Color window (F6) and brighten up the color on these points. I chose C=9%, M=0%, Y=95%, and K=0%. Now continue this step with each row going all the way down to row 6. For each row I darkened the K channel as follows: row 2 at 0%, row 3 at 25%, row 4 at 72%, row 5 at 88%, and row 6 at 100%. I did this in each channel to give us black. Make sure you do this to each point along the row in the gradient mesh.

6 Step 6 To create the sky place a rectangle behind the horizon and apply a nice radial gradient to it. I like sunsets so I used orange. Use whatever type of lighting you desire. Violet and purple make for a great twilight.

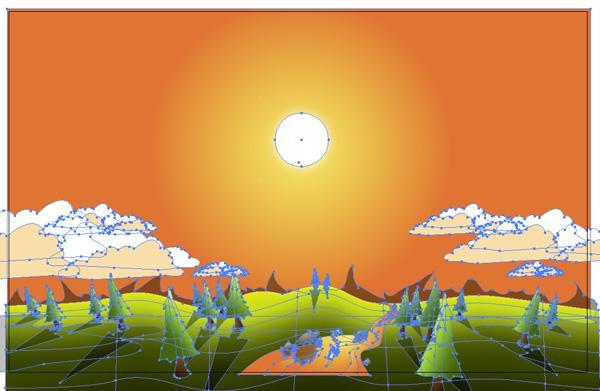
7 Step 7 Now lets create the sun. Grab the Ellipse Tool (L). Create a circle in the middle of the gradient that you created in the previous step. Select the circle and then click Filter > Stylize > Outer Glow. Apply a nice screen to it with a blur. You can add an additional outer glows to it as well if you want it to pop even more. Also, try applying a Hard lightor Overlay Mode to your Outer Glow.

8 Step 8 To draw the mountains in the background use the Paint Brush Tool (B) and loosely sketch an abstract mountain range. Make the fill a dark green and change the Transparency to Multiply and the Opacity to 50%. Also, make sure the mountains are behind the foreground hills and in front of the orange sky.

9 Step 9 Now to create some clouds. Use the Paint Brush Tool again and sketch some a clouds. If you hold the Alt key when you reach the point you started drawing from, it will join the end point with the start point. Now, with the outlined cloud selected, press Shift + X. This will invert your stroke color to your fill color and vice versa. Make sure you have a white selected when drawing your cloud.
.")
10 Step 10 Select your single cloud, hold Alt, and then drag your cloud shape to duplicate. Do this four times. Bring two of the clouds in front of the other two and change the coloring of the front clouds to an off white that compliments the color of the sky (Clouds 3 and 4 are complimenting the sky). Also, to mix things up and create a more organic feel, select the 2nd white cloud, right click on it, and Transform > Reflect it 90 degrees vertical. Also, you can shrink clouds 2 and 4 a bit by using the Scale Tool (S) and dragging them smaller.

11 Step 11 Group this cluster of clouds you have just created by selected them all and pressing Command + G. Now hold Alt and drag this grouped cluster to the other points in the sky. Do this until you are happy with the amount of precipitation. Shrink a couple of the clusters and reflect them as well to simulate clouds in the distance.
.")
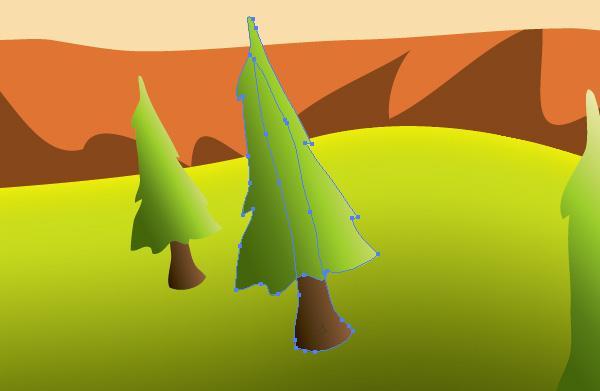
12 Step 12 Let's draw some trees. Use your Paint Brush Tool again to draw a quick tree trunk and some green pine separately. Throw a brown gradient on the trunk and a green gradient similar to the hills on the pine. Drag the green over the trunk and group the two objects together (Command + G). You can spruce up your pine tree by drawing more details if you desire. Maybe an owl or a dead tree with no needles. Use your imagination.

13 Step 13 Once you have your prototype tree grouped, select it, hold Alt, and spread the trees out sporadically over the landscape. Use the Transform > Reflect option on some of the trees so they don't all look cookie cutter. Also, scale some of them down as they appear further towards the horizon. Rotate the trees slightly at the base of the trunk by selecting the tree, grabbing the Rotate Tool (R) and clicking on the base of the trunk. Rotate the trees that are closer to the edges of your artboard to simulate a panoramic lens.
14
.")
15 Step 14 With the Gradient Tool (G) apply a gradient to each tree in the direction that the light is hitting it. The lighter gradient is on the side the sun is hitting. Step 15 Draw a river going off into the horizon with the Paint Brush Tool. Then apply the same gradient that you used in the sky. You can do this by using the Eyedropper Tool (I). With the river selected, press I and then click on the sky.

16 Step 16 Draw some rocks along the river and apply a radial white to black gradient on each one separately. This will give them a nice gray. Make sure you consider the lighting on these objects as you did with the trees.

17 Step 17 Now, lets get into the shading of our scene. To do this grab your Paint Brush Tool again, select black, and draw some loose and flowing shapes below the rocks. This will be the shadow of the rocks cast into the river. They are squiggly because the river is fluid and distorts the shadow and reflection of the rocks. Send the shadow layer behind the rocks (press Command + Left or Right Bracket keys to move the shadow behind or in front of other objects). Then in the Transparency window (Command + Shift + F10), set it's Mode to Multiply and it's Opacity to 50%.

18 Step 18 Using the lighting principles in Step 14 and 17, Paint the shadows cast by the trees in the scene. I find that shading really brings life and depth to the landscape.

19 Step 19 Now draw the shadow cast by the rolling clouds. I made the shadow from the cloud 25% Opacity instead of 50%.

20 Step 20 Next, paint some swirl flowing lines in your stream. color them with the same gradient you used on the river. And try to match each flowing shape to the gradient in the area of the stream that it is in. For example, the swirl furthest in the horizon contains more dark orange than yellow.


21 Step 21 Last of all, paint some wildlife. I enjoy a good salmon every now and then so I painted one jumping in the river. You can combine some pretty simple shapes to create a pretty sweet salmon (see below). I also painted some splashing from where the fish jumped.

22 Step 22 Now, open Photoshop and create a new document. My desktop resolution is 1680 pixels by 1050 pixels, so I created a new document that size at 300 pixels/inch. Once you have done that, open Illustrator again, drag your mouse over all the objects in your landscape, press Command + C to copy. After you have copied your landscape, open your new document in Photoshop and press Command + V to paste your vector into Photoshop. Select Smart Object and press OK. Now your illustration will appear in your document. Holding Shift + Alt, drag one of the four corners of the Smart Object out until it fits perfectly in your artboard. You can also move the Smart Object around by holding your left mouse inside of the Smart Object and dragging. Once you have a good position, press Enter. Smart Objects are great because you can scale it up or down without loosing any quality.
23


24 Advertisement Step 23 Create a new layer by hitting the Paper Icon in the Layers Window or pressing the hot key Command + Shift + Alt + N. Fill that layer with 50% gray (Thats 50% B on the HSB scale). Next apply the infamous

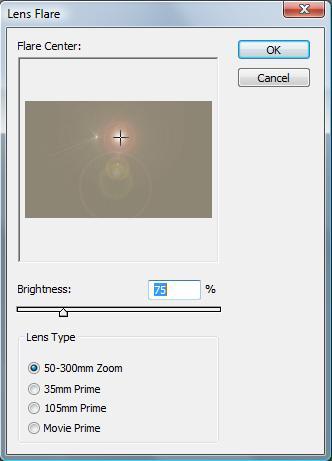
25 Lens Flare. I know that the Lens Flare is hated because of its over use, but this is a great time to use the Lens Flare correctly. Select your new "gray" layer and click Filter > Render > Lens Flare. Set your Lens Flare in the center upper half of the layer by clicking on the spot where the sun would be. Set the Brightness to 75% and click OK. Now set that layer's blend mode to Overlay. You should have a really cool Lens Flare from your sun.
26 Step 24
27 Now all you have to do is save it as a jpg. Click File > Save As and select the Format JPEG. Bump the Quality to 12 and press OK. Now you've made a sweet vector landscape for your desktop. If you want to make different resolutions other than 1680 pixels by 1050 pixels, all you need to do is open up the PSD of your landscape in Photoshop and click Image > Canvas Size and change your pixels to 800px by 600px, 1024px by 768px, 1280px by 1024px, etc. Just make sure you have the measurements set to pixels and not percent, inches, or centimeters. Note, you will lose some of the edges if you change the canvas size to a 4:3 aspect ratio.

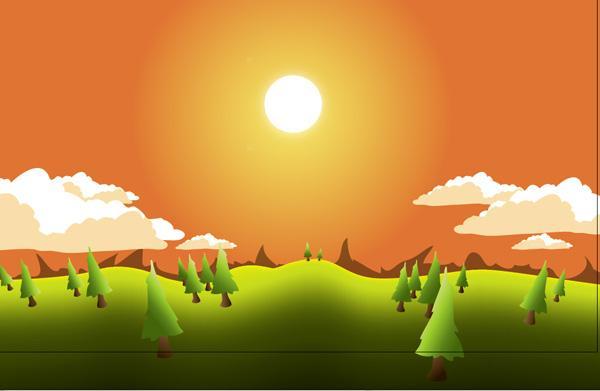
28 <="" h2="" style="box-sizing: border-box;"> There you have it! A quick and simple landscape desktop. You can really play around with this and do a lot of different types of landscapes. I hope you've enjoyed this tutorial. The final image is below.

29
How to Create a Curious Owl in Illustrator
 How to Create a Curious Owl in Illustrator Tutorial Details Program: Adobe Illustrator Difficulty: Intermediate Estimated Completion Time: 1.5 hours Take a look at what we're aiming for, an inquisitive
Step 1. Facebook Twitter Google+ Find us on Facebook. Vectortuts+ How to Create a Curious Owl in Illustrator CS4 Vectortuts+
 Joomla developers needed - Long term potential in India Copywriter Email Campaigns Wordpress Creative design Social media in UK More Freelance Jobs... Facebook Twitter Google+ Find us on Facebook Step
Design a Halloween Pumpkin Wallpaper in Photoshop
 Design a Halloween Pumpkin Wallpaper in Photoshop By: Alvaro Guzman Halloween is near! So let's take a pumpkin image, carve it up, and light it for this coming holiday. You'll learn how to get this nice
Glowing Surreal Planet Design. Final Image Preview
 Glowing Surreal Planet Design Final Image Preview. Step 1 First, go to the S:\ drive and locate the folder called Glowing Planet Design. Copy the City Skyline file and paste it in your Glowing Planet Design
Adobe Illustrator. Mountain Sunset
 Adobe Illustrator Mountain Sunset Adobe Illustrator Mountain Sunset Introduction Today we re going to be doing a very simple yet very appealing mountain sunset tutorial. You can see the finished product
Create A Briefcase Icon
 Create A Briefcase Icon In this tutorial, I will show you how to create a briefcase icon with rectangles, ellipses, and gradients. This briefcase icon is great for web designs and user interfaces. Moreover,
Adobe Photoshop CS5 Tutorial
 Adobe Photoshop CS5 Tutorial GETTING STARTED Adobe Photoshop CS5 is a popular image editing software that provides a work environment consistent with Adobe Illustrator, Adobe InDesign, Adobe Photoshop
A quick note: We hope that you will find something from the Tips and Tricks that will add a little pizazz to your yearbook pages!
 A quick note: The following pages are tips and tricks for Basic Photoshop users. You may notice that some instructions indicate that non-awpc fonts were used, and that some colors were created using the
Create a Happy Sun Character. Below is the final illustration we will be working towards.
 Create a Happy Sun Character Below is the final illustration we will be working towards. 1 Step 1 Create a new document and with the Ellipse tool (L), create an ellipse. 2 Step 2 Fill the ellipse with
ADOBE PHOTOSHOP CS TUTORIAL
 ADOBE PHOTOSHOP CS TUTORIAL A D O B E P H O T O S H O P C S Adobe Photoshop CS is a popular image editing software that provides a work environment consistent with Adobe Illustrator, Adobe InDesign, Adobe
Drawing the Red Christmas Bell
 Vector 3D Christmas Bells Thinking of drawing some Christmas bells for this Christmas? Read this illustrator tutorial to learn how to draw 5 different styles of vector Christmas bells using the 3D Revolve
People In Spaces A Workshop on using Photoshop to introduce Entourage Elements into existing work.
 People In Spaces A Workshop on using Photoshop to introduce Entourage Elements into existing work. Peter M. Gruhn peter.gruhn@the-bac.edu Sponsored by Atelier and the Learning Resource Center 1 Layers
Exploring Photoshop Tutorial
 Exploring Photoshop Tutorial Objective: In this tutorial we will create a poster composed of three distinct elements: a Bokeh, an image and title text. The Bokeh is an effect which is sometimes seen in
Create a Beautiful Abstract Portrait in Photoshop - Psd Premium Tutorial
 Create a Beautiful Abstract Portrait in Photoshop - Psd Premium Tutorial By: Wojciech Pijecki In this tutorial we will combine several stock images to create an artistic, abstract portrait of a woman.
Add Rays Of Sunlight To A Photo With Photoshop
 Add Rays Of Sunlight To A Photo With Photoshop Written by Steve Patterson. In this photo effects tutorial, we'll learn how to easily add rays of sunlight to an image, a great way to make an already beautiful
Photoshop Textures Assignment # 2
 Photoshop Textures Assignment # 2 Objective: Use Photoshop to create unique texture from scratch that can be applied to backgrounds, objects, tetx and 3D objects to create new and exciting compositions.
Undress a Giraffe in Photoshop
 Undress a Giraffe in Photoshop By: Alexandra Fomicheva Have you ever wanted to know what a Giraffe looks like without its spots? If so, this tutorial is for you, you pervert! Today, we will demonstrate
By Washan Najat Nawi
 By Washan Najat Nawi how to get started how to use the interface how to modify images with basic editing skills Adobe Photoshop: is a popular image-editing software. Two general usage of Photoshop Creating
Create a Simple Storefront Icon
 Create a Simple Storefront Icon In this tutorial I will show you how to create a simple storefront icon using some rectangles, Illustrator Effects, and gradients. This icon is great for use in e-commerce
PHOTOSHOP & ILLUSTRATOR BOOTCAMP
 FALL 2014 - ELIZABETH LIN PHOTOSHOP & ILLUSTRATOR BOOTCAMP ILLUSTRATOR ALIGNMENT To access the alignment panel, go to Window -> Align. You should see a panel like the one below. This panel allows you to
Winter Card.
 Winter Card Used images: http://www.cgtextures.com/texview.php?id=24321&phpsessid=95e8e8290894cc5194898 e16d1dddb4c http://www.cgtextures.com/texview.php?id=14285&phpsessid=95e8e8290894cc5194898 e16d1dddb4c
Adobe Photoshop CC 2018 Tutorial
 Adobe Photoshop CC 2018 Tutorial GETTING STARTED Adobe Photoshop CC 2018 is a popular image editing software that provides a work environment consistent with Adobe Illustrator, Adobe InDesign, Adobe Photoshop,
How to Create Website Banners
 How to Create Website Banners In the following instructions you will be creating banners in Adobe Photoshop Elements 6.0, using different images and fonts. The instructions will consist of finding images,
Using layer masks to remove backgrounds with Photoshop CS5 and CS6
 Using layer masks to remove backgrounds with Photoshop CS5 and CS6 Use layer masks to combine these pictures into this You will learn: 1. Layers and layer masks 2. Brushes 3. Layer styles 4. Type tool
Building - Image*After Bokeh - Regularjane Landscape 1 - Anders Bjerré Pedersen Landscape 2 - author Sundstrom(nickname)
") Click to enlarge the image. Used images: Download Moon shape(image created with the Photoshop tools) Icicles - Sergei Furtcev Cloud 1(Ruslan Olinchuk), Cloud 2(Image*After), Cloud 3(Sergei Perov) Stars
Click to enlarge the image. Used images: Download Moon shape(image created with the Photoshop tools) Icicles - Sergei Furtcev Cloud 1(Ruslan Olinchuk), Cloud 2(Image*After), Cloud 3(Sergei Perov) Stars
Super Nova. 1. Create a Background. Photoshop Textures Assignment # 3
 Photoshop Textures Assignment # 3 Super Nova 1. Create a Background First, start by creating a new document, I ve used a document size of 400 x 400 pixels here, but you might want to use something much
Creating Pastel Images and other effects in Photoshop
 Creating Pastel Images and other effects in Photoshop Martin Addison 2015 Creating pastel images Page 1 Martin Addison FRPS Using White Layers in Photoshop 1. Create a new empty Layer 2. Edit> Fill 3.
Photoshop 1. click Create.
 Photoshop 1 Step 1: Create a new file Open Adobe Photoshop. Create a new file: File->New On the right side, create a new file of size 600x600 pixels at a resolution of 300 pixels per inch. Name the file
'Photoshop'. "Realistic Eye Texture Painting" by Krishnamurti Martins Costa
 Level: intermediate Technique: digital painting Software: Adobe Photoshop 'Photoshop'. "Realistic Eye Texture Painting" by Krishnamurti Martins Costa Email: kris@antropus.com Web: http://www.antropus.com
Digital Photography 1
 Digital Photography 1 Photoshop Lesson 3 Resizing and transforming images Name Date Create a new image 1. Choose File > New. 2. In the New dialog box, type a name for the image. 3. Choose document size
GETTING STARTED. 0 P a g e B a s i c s o f A d o b e P h o t o s h o p A g a P r i v a t e I n s t i t u t e f o r c o m p u t e r s c i e n c e
 GETTING STARTED 0 P a g e B a s i c s o f A d o b e P h o t o s h o p Adobe Photoshop: is a popular image editing software that provides a work environment consistent with Adobe Illustrator, Adobe InDesign,
Essential Post Processing
 Essential Post Processing By Ian Cran Preamble Getting to grips with Photoshop and Lightroom could be described in three stages. One is always learning and going through stages but there are three main
Photoshop: Manipulating Photos
 Photoshop: Manipulating Photos All Labs must be uploaded to the University s web server and permissions set properly. In this lab we will be manipulating photos using a very small subset of all of Photoshop
Compiled by <<coldbing>> FIRE EFFECTS
 FIRE EFFECTS Compiled by Step 1 - New Document Make a new document. Fill it with black. Then make a new layer, and type out (or whatever) you want to set on fire in white. Step 2 - Windy Go
HOW TO CREATE A SUPER SHINY PENCIL ICON
 HOW TO CREATE A SUPER SHINY PENCIL ICON Tutorial from http://psd.tutsplus.com/ Compiled by INTRODUCTION The Pencil is one of the visual metaphors most used to express creativity. In this tutorial,
Town and Village Tutorial
 Town and Village Tutorial For Adobe Photoshop by Lerb This tutorial will take you through the basic techniques I use when creating village and town maps in Adobe Photoshop. The techniques can also be used
This tutorial will show you how to change your images into a cool dirty grunge design, which could be used for posters, prints, CD covers, etc.
 This tutorial will show you how to change your images into a cool dirty grunge design, which could be used for posters, prints, CD covers, etc.today We ll be making this: STEP 1: Open a new document in
Preparing Images For Print
 Preparing Images For Print The aim of this tutorial is to offer various methods in preparing your photographs for printing. Sometimes the processing a printer does is not as good as Adobe Photoshop, so
Photoshop: Manipulating Photos
 Photoshop: Manipulating Photos All Labs must be uploaded to the University s web server and permissions set properly. In this lab we will be manipulating photos using a very small subset of all of Photoshop
Create an Amazing Surreal-Style Treehouse in Photoshop Photoshop Tutorials
 Download the PSD Surreal Treehouse.zip 23.59 MB Download from Website Surreal Treehouse Photoshop Tutorial Tutorial Resources Tree Houses Thanks archetype, Deviantart Bonsai Tree Thanks fabemiko, Deviantart
ADOBE ILLUSTRATOR. Step 1. Dificultad: Intermedio Tiempo: 30 minutos 1 hora. Create a new document and with the Ellipse tool (L), create an ellipse.
, create an ellipse.") Dificultad: Intermedio Tiempo: 30 minutos 1 hora Step 1 Create a new document and with the Ellipse tool (L), create an ellipse. Lic. José Luis Solórzano Vera Página 1 Step 2 Fill the ellipse with a radial
Dificultad: Intermedio Tiempo: 30 minutos 1 hora Step 1 Create a new document and with the Ellipse tool (L), create an ellipse. Lic. José Luis Solórzano Vera Página 1 Step 2 Fill the ellipse with a radial
Mullingar Camera Club Basic introduction to Digital Printing using Photoshop CC.
 Mullingar Camera Club Basic introduction to Digital Printing using Photoshop CC. Table of Contents Course aims: 1 Course presentation notes: 1 Introducing Photoshop: 1 Adjusting the Brightness or Contrast
prepared by Allison Hwang for T. Purdy 2011
 This tutorial shows you how to create a basic screen display on a product in Adobe Photoshop. Creating details, such as shadows and reflections, can help make your product more realistic and convincing
CREATE A SPECTACULAR GRASS TEXT EFFECT IN PHOTOSHOP
 CREATE A SPECTACULAR GRASS TEXT EFFECT IN PHOTOSHOP Tutorial from http://psd.tutsplus.com/ Compiled by INTRODUCTION Ever wanted to make text out of grass? Well with Photoshop you can. In this
Name the layer you rotated in step 3 Stripe and lower the opacity to 43%.
 Step 1 Open Photoshop and create a new file 1085 649 pixels. Fill the layer with a bright blue color (#0095db) by pressing Shift + F5. This will be the background for our pop art scene. Step 2 Let s create
Photoshop: a Beginner s course. by: Charina Ong Centre for Development of Teaching and Learning National University of Singapore
 Photoshop: a Beginner s course by: Charina Ong Centre for Development of Teaching and Learning National University of Singapore Table of Contents About the Workshop... 1 Prerequisites... 1 Workshop Objectives...
Professional Photograph Restoration 50 Points
 Professional Photograph Restoration 50 Points In this tutorial, we'll take an in-depth look at restoring an old torn photograph. Restoring old family photos is something that you can do for your relatives
WORN, TORN PHOTO EDGES EFFECT
 Photo Effects: CC - Worn, Torn Photo Edges Effect WORN, TORN PHOTO EDGES EFFECT In this Photoshop tutorial, we ll learn how to take the normally sharp, straight edges of an image and make them look all
HOW TO BREAK SUNLIGHT THROUGH THE CLOUDS
 HOW TO BREAK SUNLIGHT THROUGH THE CLOUDS Tutorial from http://psd.tutsplus.com/ Compiled by INTRODUCTION In this tutorial I will show you how to turn an overcast day into a stunningly dramatic
Approaching Photoshop Efforts With an Eye toward Layers A Step-by-Step Procedure Explained
 Approaching Photoshop Efforts With an Eye toward Layers A Step-by-Step Procedure Explained By: Marty Kesselman June 3, 2009 We keep talking about layers and that they are useful and important to use in
Create a Candy Cane. Create a new canvas with the size 8x10 inches at 300 pixel/inch. See image below Ctrl + N
 Create a Candy Cane The Basic Candy Cane Canvas and Shape 1. Create a new folder, name it Candy Cane your name. Create a new canvas with the size 8x10 inches at 300 pixel/inch. See image below Ctrl + N
 http://blog.spoongraphics.co.uk/tutorials/how-to-intensify-your-landscape-photos-in-photoshop This post was originally published in 2011 THE TIPS AND TECHNIQUES EXPLAINED MAY BE OUTDATED. The post-processing
Photoshop CC: Essentials
 Photoshop CC: Essentials Summary Workspace Overview... 2 Exercise Files... 2 Selection Tools... 3 Select All, Deselect, And Reselect... 3 Adding, Subtracting, and Intersecting... 3 Working with Layers...
Start from Scratch Open Photoshop.
 Mr. Manders Repeating Patterns (Developed by Mr. Kasten) Our goals in this activity: To understand the similarities and differences working with the shape tools vs the marquee tools in Photoshop. It can
Module All You Ever Need to Know About The Displace Filter
 Module 02-05 All You Ever Need to Know About The Displace Filter 02-05 All You Ever Need to Know About The Displace Filter [00:00:00] In this video, we're going to talk about the Displace Filter in Photoshop.
METAL TEXT EFFECT. Step 1: Create A New Document. Step 2: Fill The Background With Black
 METAL TEXT EFFECT In this text effects tutorial, we ll learn how to easily create metal text, a popular effect widely used in video games and movie posters! It may seem like there s a lot of steps involved,
Transparency and blending modes
 Transparency and blending modes About transparency Transparency is such an integral part of Illustrator that it s possible to add transparency to your artwork without realizing it. You can add transparency
Using the Shoe Advertisement tutorial, create a shoe ad that is specifically designed to appeal to your assigned consumer.
 Lesson Instructions: Using the Shoe Advertisement tutorial, create a shoe ad that is specifically designed to appeal to your assigned consumer. Consider the specifications in the tutorial as the requests
PROFESSIONAL PHOTOGRAPH RESTORATION WORKFLOW
 PROFESSIONAL PHOTOGRAPH RESTORATION WORKFLOW Tutorial from http://psd.tutsplus.com/ Compiled by INTRODUCTION In this tutorial, we'll take an in-depth look at restoring an old torn photograph.
Create a Multicolored Splashed Text Effect in Adobe Illustrator
 Create a Multicolored Splashed Text Effect in Adobe Illustrator by Diana Toma17 Nov 2014 What You'll Be Creating In this tutorial you will learn how to create a multicolored splashed text effect in Adobe
Movie Merchandising. Movie Poster. Open the Poster Background.psd file. Open the Cloud.jpg file.
 Movie Poster Open the Poster Background.psd file. Open the Cloud.jpg file. Movie Merchandising Choose Image>Adjustments>Desaturate to make it a grayscale image. Select the Move tool in the Toolbar and
DAZ Productions - 3D Models, 3D Content, and 3D Software
 Página 1 de 26 Postwork made Easy Author: mizgriz Step 1: Preparing the image. Step 2: Get your glow on. Step 3: And now for something completely (not) different... Step 4: Hue and Saturate Step 5: About
Colorful Glowing Mask Photoshop Tutorial Photoshop TUTfactory The best Photoshop tutorials in one place
 Step 1: To start, create new canvas sized at 994 1312 pixels, and fill it with black. Next, create a new layer, and go to Filter->Render->Clouds. Duplicate this layer, and then merge the two layers. Set
Central Photography [INSTAGRAM EFFECTS]
![Central Photography [INSTAGRAM EFFECTS]](/thumbs/96/129260346.jpg "Central Photography [INSTAGRAM EFFECTS]") 1 1. Open Photoshop. 2. Go to File/New (Ctrl+N). 3. Name your file. 4. Set the Width to 11 inches. 2 5. Set the Height to 8.5 inches. 6. Set your Resolution to 200 pixels/inch. 7. Set your Background Contents
1 1. Open Photoshop. 2. Go to File/New (Ctrl+N). 3. Name your file. 4. Set the Width to 11 inches. 2 5. Set the Height to 8.5 inches. 6. Set your Resolution to 200 pixels/inch. 7. Set your Background Contents
Painting Special Effects on Photographs
 TUTORIAL 7 Painting Special Effects on Photographs In this tutorial you will learn how to transform a photo into a striking color composition with paintbrushes, masks, blending modes, color, and paper
ADDING A RAINBOW TO A PHOTOGRAPH
 ADDING A RAINBOW TO A PHOTOGRAPH This assignment will cover how to add a simple rainbow (or if you want to go crazy, a double rainbow) to any photograph. This will give us some great work with gradients,
Adobe Illustrator Craft a Dramatic Vector Landscape Environment
 Adobe Illustrator Craft a Dramatic Vector Landscape Environment This tutorial will show the intermediate Adobe Illustrator artist how to make a dramatic landscape environment. You should have a basic understanding
Lesson 16 Text, Layer Effects, & Filters
 Lesson 16 Text, Layer Effects, & Filters Digital Media I Susan M. Raymond West High School In this tutorial, you will: Create a Type Layer Add and Format Type within a Type Layer Apply Layer Effects Apply
Challenge Image: Blur the Background
 Challenge Image: Blur the Background Challenge Image: Blur the Background In this lesson, we re going to work on a challenge image that was submitted by a Masters Academy member. The image features a little
Key Terms. Where is it Located Start > All Programs > Adobe Design Premium CS5> Adobe Photoshop CS5. Description
 Adobe Adobe Creative Suite (CS) is collection of video editing, graphic design, and web developing applications made by Adobe Systems. It includes Photoshop, InDesign, and Acrobat among other programs.
Stitching Panoramas using the GIMP
 Stitching Panoramas using the GIMP Reference: http://mailman.linuxchix.org/pipermail/courses/2005-april/001854.html Put your camera in scene mode and place it on a tripod. Shoot a series of photographs,
Creating Digital Illustrations for Your Research Workshop IV Illustration Demo Part II
 Creating Digital Illustrations for Your Research Workshop IV Illustration Demo Part II Final Figure Workshop IV Components Topics & Techniques covered How to randomly transform a group of individual shapes.
PhotoFiltre DEPARTMENT OF EDUCATION
 DEPARTMENT OF EDUCATION PhotoFiltre Updated on 20 February 2010 This resource is part of the resource collection available through the ecentre for teachers. www.ecentre.education.tas.gov.au PhotoFiltre
Learning Adobe Photoshop CS6
 Module 1 Contents Chapter 1: Introduction to Photoshop Loading Photoshop...1-1 The Tools Panel...1-2 Using the Tools...1-3 The Panel Group...1-5 Layers...1-6 Loading a Sample File...1-6 Looking at the
Enhanced Eyes. Here's the image I'll be working with (glamour eyes photo from Shutterstock): Here's what the eyes will look like when we're done:
: Here's what the eyes will look like when we're done:") Enhanced Eyes Here's the image I'll be working with (glamour eyes photo from Shutterstock): The original image. Here's what the eyes will look like when we're done: The final effect. Here's a close-up
Enhanced Eyes Here's the image I'll be working with (glamour eyes photo from Shutterstock): The original image. Here's what the eyes will look like when we're done: The final effect. Here's a close-up
How to Draw a Realistic iphone 4 with
 Home Freebies Submit Your Work Contact Us How to Draw a Realistic iphone 4 with Photoshop Jan 3 2011 By Mohammad Jeprie 34 Comments In this tutorial, we will draw a realistic-looking iphone 4 using Photoshop.
TV Aquarium. Create a new document. 8.5 x 11, 300 dpi. Save as TV Aquarium Your Name. Create TV shape. Use Pen
 Create a new document. 8.5 x 11, 300 dpi. Save as TV Aquarium Your Name. Create TV shape. Use Pen Tool, Convert Point Tool and Direct Selection Tool. We need side shapes to create patches of light and
Ascension's Atlas Tutorial in GIMP
 Ascension's Atlas Tutorial in GIMP What follows is, as near as I can make it, an approximation in gimp of Ascension s Photoshop Atlas Style tutorial. Only the techniques used are in this version, so I
Ian Barber Photography
 1 Ian Barber Photography Sharpen & Diffuse Photoshop Extension Panel June 2014 By Ian Barber 2 Ian Barber Photography Introduction The Sharpening and Diffuse Photoshop panel gives you easy access to various
FLAMING HOT FIRE TEXT
 FLAMING HOT FIRE TEXT In this Photoshop text effects tutorial, we re going to learn how to create a fire text effect, engulfing our letters in burning hot flames. We ll be using Photoshop s powerful Liquify
Rendering a perspective drawing using Adobe Photoshop
 Rendering a perspective drawing using Adobe Photoshop This hand-out will take you through the steps to render a perspective line drawing using Adobe Photoshop. The first important element in this process
GIMP (GNU Image Manipulation Program) MANUAL
 MANUAL") Selection Tools Icon Tool Name Function Select Rectangle Select Ellipse Select Hand-drawn area (lasso tool) Select Contiguous Region (magic wand) Selects a rectangular area, drawn from upper left (or lower
Selection Tools Icon Tool Name Function Select Rectangle Select Ellipse Select Hand-drawn area (lasso tool) Select Contiguous Region (magic wand) Selects a rectangular area, drawn from upper left (or lower
XXXX - ILLUSTRATING FROM SKETCHES IN PHOTOSHOP 1 N/08/08
 INTRODUCTION TO GRAPHICS Illustrating from sketches in Photoshop Information Sheet No. XXXX Creating illustrations from existing photography is an excellent method to create bold and sharp works of art
Students will be able to create movement through the use of line or implied line and repetition.
 Title of Unit Digital Imaging Title of Lesson Self Portrait Montage in Photoshop Course Graphic Design 1 Instructor Heidi Stachulak hstachulak@hf233.org Objectives: Composition Students will be able to
Photo One Digital Photo Shoots and Edits
 Photo One Digital Photo Shoots and Edits You will submit photo shoots, unedited and you will submit selected edited images. The shoots will be explained first and the edits will be explained later on this
The original image. Let s get started! The final effect.
 Non-Destructive Infrared Glow Effect In this Photoshop tutorial, we ll learn how to quickly and easily add a dream-like infrared glow effect to an image, and we ll do it non-destructively using Smart Filters
11 Advanced Layer Techniques
 11 Advanced Layer Techniques After you ve learned basic layer techniques, you can create more complex effects in your artwork using layer masks, path groups, filters, adjustment layers, and more style
SAVING, LOADING AND REUSING LAYER STYLES
 SAVING, LOADING AND REUSING LAYER STYLES In this Photoshop tutorial, we re going to learn how to save, load and reuse layer styles! Layer styles are a great way to create fun and interesting photo effects
Create a Cute Furry Vector Monster in Illustrator
 Create a Cute Furry Vector Monster in Illustrator Other labs from this author can be found at http://www.blog.spoongraphics.co.uk/tutorials/create-a-cute-furry-vector-monster-inillustrator Follow these
Ms. Cavo Graphic Art & Design Illustrator CS3 Notes
 Ms. Cavo Graphic Art & Design Illustrator CS3 Notes 1. Selection tool - Lets you select objects and groups by clicking or dragging over them. You can also select groups within groups and objects within
ADD TRANSPARENT TYPE TO AN IMAGE
 ADD TRANSPARENT TYPE TO AN IMAGE In this Photoshop tutorial, we re going to learn how to add transparent type to an image. There s lots of different ways to make type transparent in Photoshop, and in this
Quick Mask Setting Up your Work Environment Setting Up the Quickmask Parameters
 Quick Mask Quickmask gets its name from the fact that as you create your selection area, Photoshop masks that area off, tinting it with a colored mask to show what has been selected. When you're finished
Photoshop. Make a Spooky Halloween Pumpkin Text Effect in Photoshop - Photoshop tutorial PSDDude
 Photoshop October 4th,2017 1 2 Image size: 7 in wide x 3 in high 300 dpi Start with a simple black gradient background layer. Radial Gradiant, black to gray. Install the CREEPSVILLE font. Center and Type
XXXX - MAKING A FLYER BOOKLET COVER 1 N/08/08
 INTRODUCTION TO GRAPHICS Making a flyer booklet cover Information Sheet No. XXXX Create a new document with these settings. Note that you will be using 300 dpi because this will be made for print. Keepit
Create a Stylized GPS Icon
 Home About Resources Contact Shop Tutorials Tips and Tricks Interviews Inspiration Create a Stylized GPS Icon Tutorials July 9th, 2009 Location based software and peripherals are very popular these days.
UNDERSTANDING LAYER MASKS IN PHOTOSHOP
 UNDERSTANDING LAYER MASKS IN PHOTOSHOP In this Adobe Photoshop tutorial, we re going to look at one of the most essential features in all of Photoshop - layer masks. We ll cover exactly what layer masks
Introduction to Photoshop
 Introduction to Photoshop Instructional Services at KU Libraries A Division of Information Services www.lib.ku.edu/instruction Abstract: This course covers the basics of Photoshop, including common tools
The Layer Blend Modes drop-down box in the top left corner of the Layers palette.
 Photoshop s Five Essential Blend Modes For Photo Editing When it comes to learning Photoshop, believe it or not, there's really only a handful of things you absolutely, positively need to know. Sure, Photoshop
Introduction to Photoshop Elements
 John W. Jacobs Technology Center 450 Exton Square Parkway Exton, PA 19341 610.280.2666 ccljtc@ccls.org www.ccls.org Facebook.com/ChesterCountyLibrary Introduction to Photoshop Elements Chester County Library
Tech Savvy Senior Selfie
 Tech Savvy Senior Selfie Commercial Design II Teacher : Mrs. Stroud Due: 10/13/2017 Overview & Purpose Create a futuristic portrait of yourself in 2058 in an old fashioned style of bubble glass portraits