How to Make Instagram Filters in Photoshop: Earlybird
|
|
|
- Tracy Bryan
- 5 years ago
- Views:
Transcription

1 How to Make Instagram Filters in Photoshop: Earlybird JANUARY 9, 2013 BY MELANIE MAYNE Cell phone cameras and apps like Instagram have made it possible for anyone to practice and enjoy the art of Photography. The filters that come with Instagram do a great job of altering the mood or tone of photographs. They also add a flare of drama to otherwise boring images. However, because Instagram filters lack the ability to customize exactly how the images will be altered, using these filters can actually lower the quality of your photographs. If you want to create photographs with high-quality post-editing, it is much better to use photo-editing software that has more customization features. This guide will show you how to add really cool Instagram-inspired effects to your photos using Adobe Photoshop so that you can Instagram the professional way. You will also level up your Photoshop skills and pick up some tips and tricks along the way! Prepare your workspace in Adobe Photoshop

2 Note: For this tutorial, I used Adobe Photoshop CS5 on Windows. Step 1: Open the image you want to edit in Adobe Photoshop. Unless you have an amazing computer, you might want to close all other programs except for this window. Photoshop tends to be unkind to older computers that don t have gobs of RAM. Step 2: Set up a Photography workspace by selecting Window > Workspace > Photography. This will open up all the windows you need for this tutorial. Step 3: Select the Rectangular Marquee Tool (or press M) and frame the area of the photo that you wish to be in the final image. Go to Image > Crop. Hint: Do not crop out the subject s feet like I did when I took the picture. Step 4: (Optional) The cropping tool on Instagram forces all photos to have a 1:1 dimensional ratio, or more simply put, to be square-shaped. Unless you want your photo to look exactly like an Instagram photo, feel free to skip this step. Go to Image > Canvas Size or press Alt+Ctrl+C. Change the number in the Height box so that it is identical to the number in the Width box (i.e., give it a 1:1 ratio). Click OK. Your image should now be square-shaped. Step 5: Go to File > Save As and save the file under a new name so that the original photo will not be affected. The Earlybird Filter

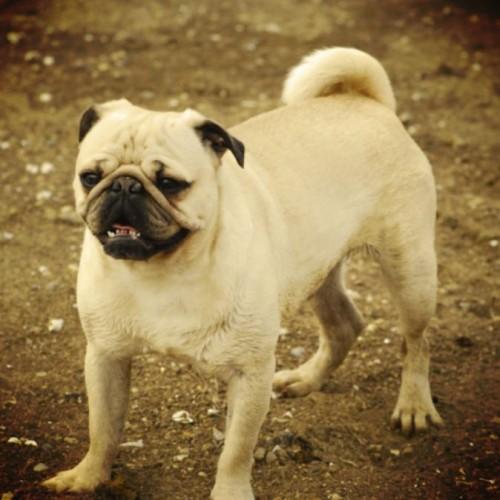
3 According to Webstagram, Earlybird is the most popular Instagram filter after Normal. The Earlybird filter adds sepia and yellow photo effects, as well as a soft blur and dramatic vignetting (darker edges and corners). Earlybird filter effect in Instagram.
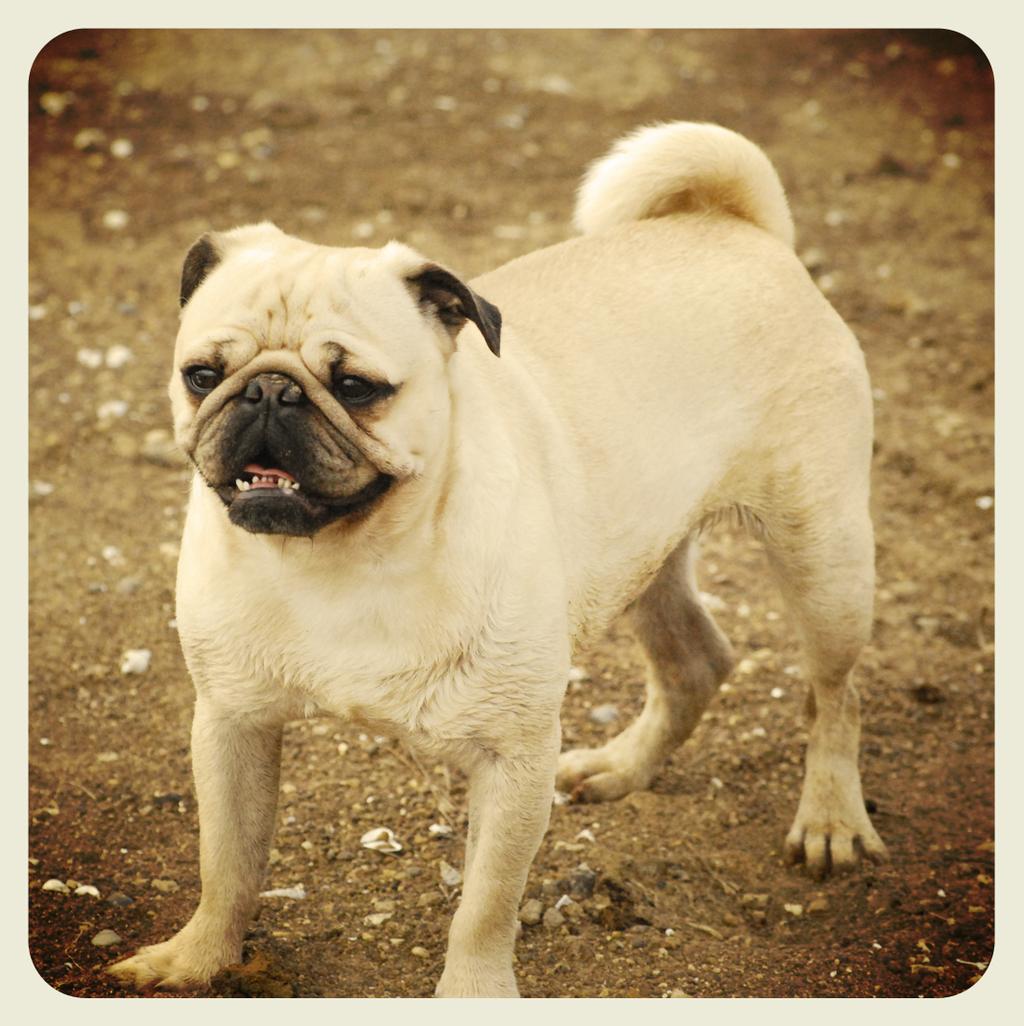
4 Similar effect achieved in Photoshop. Achieve the Earlybird Filter Effect Step 1: Right-click the background layer and select duplicate. Name the new layer Lighting Effects. Now you can alter the duplicate layer while keeping the original intact.

5 Step 2: With the Lighting Effects layer selected, go to Filter > Render > Lighting Effects. Change the Light Type to Omni. This will render an artificial lighting effect that looks like a light bulb is located directly above the image. Drag the circle so that the sides touch the edge of the photo. The light will be brightest in the middle and grow dimmer toward the edges. Change the Intensity to about 32 so that the center is a little overexposed and the edges are a little darker. Click OK.

6 Step 3: Change the blending mode of the Lighting Effects layer to Luminosity using the drop-down menu. The Luminosity mode prevents the layer from affecting the colors of the original image so that only the lightness values will change. Using the slider, change the opacity so that the center of the photo is just slightly over-exposed, and the corners of the photo are a bit dark. For my image, the magic number was 33%.


7 Step 4: Click Photo Filter in the Adjustments menu. Click the circle next to Color, and then click on the color box. In the box that has a # symbol next to it, type in the following code: b39f77. Change the Density to 75. This setting will add some strong Sepia-like tones to the image.

8 Step 5: Select Vibrance in the Adjustments menu. Change the Vibrance to +54 and the Saturation to +4. Generously increasing the Vibrance will make muted colors look more vivid, while leaving

9 already vivid colors and skin-tones unchanged. Slightly increasing the saturation will make all colors in the image appear slightly more vivid. Step 6: Create another Photo Filter by selecting Photo Filter in the Adjustments Menu. Choose Yellow in the drop-down menu next to filter. Set the Density to 56%. Click on the Photo Filter 2 layer in the Layers box. Change the Blending Mode to Hue and the Opacity to around 50% so that the filter only affects the colors and hue of the original image. The colors in the image should now have a subtle yellow tint. If the colors look extremely yellow, lower the opacity and density settings until you get the desired effect.

10 Step 7: Press Ctrl+Shift+N to create a new layer. Name the Layer Vignetting. Right-click the Rectangular Marquee Tool in the menu on the left and select Elliptical Marquee Tool. Press M to use this tool. Align your cursor just outside the upper-left corner of the photo. Click and drag toward the bottom-right corner until the edges of the circle are just outside the edges of the image.

11 Step 8: Press Ctrl+Shift+I or go to Select > Inverse to select the opposite of what you selected before. Only the corners of the image should now be selected.
.")
12 Step 9: Press Shift+F6 or go to Select > Modify > Feather. Type 100 in the box and click OK. This will greatly soften the selection. You may need to adjust this value according to the size of your photo (i.e. use a larger number for a larger photo). Step 10: With black set as the Foreground color, press G to open the Paint Bucket Tool and click inside one of the corners of the selection to fill it with black. Change the opacity of the Vignetting layer to around 85% and change the blending mode to Overlay. The Overlay blending mode will
: This step will show you how to achieve the Earlybird blur effect; however, it is optional since it does lower the quality of the photo a little (I prefer images without blur, so I")
13 lighten the lighter parts of the image and darken the darker parts. Press Ctrl+D to deselect the image. The edges of the image, especially the corners, should look much darker and more dramatic. Step 11 (Optional): This step will show you how to achieve the Earlybird blur effect; however, it is optional since it does lower the quality of the photo a little (I prefer images without blur, so I did not include the blur effect in my final image). Save the image as a jpeg and include blurred in the file name. Open the jpeg in photoshop. Go to Filter > Blur > Gaussian Blur. A Guassian Blur will reduce noise as well as detail. Move the slider so that the blur is barely noticeable and the Radius value reads 1.0.

14 Create Earlybird Border (Optional)

15 Step 1: Right-click the Rectangle Tool on the menu on the left. Select the Rounded Rectangle Tool. At the top, change the Radius to.2 in, and select the third icon from that left that says Paths when you hover over it. We will use the paths tool to turn the rounded rectangle into a selection rather than a filled shape. Step 2: Starting just inside the upper-left corner of the photo, click and drag toward the bottom-right corner so that the edges of the rounded rectangle shape touch the edges of the photo.
16 Step 3: Press Alt+Ctrl+C or go to Image > Canvas Size. Check the box next to Relative and change Width and Height to 4 percent. This will expand the size of the image by 4% so that the frame will cut off as little of the actual photograph as possible. There should now a white border around the image.


17 Step 4: Press Ctrl+Shift+N to create a new layer. Name the new layer Border. Click on the Paths Tab in the Layers box. Click the icon that looks like a circle made of dashes and says Load path as selection when you hover over it. This will turn the rounded rectangle path into a selection instead. Press Control+Shift+I to select everything opposite, or outside, the rounded rectangle selection. Step 5: Click inside the Foreground color box to bring up the Color Picker menu. In the box next to the # symbol, enter the following code: ecebd9. This yellow-gray color matches the color of the


18 Instagram Earlybird border. Press OK. Using the Paint Bucket Tool, click inside the selection to fill the frame with this color. Congratulations! You ve just finished creating a high quality version of Instagram s most popular photo filter, Earlybird. Feel like a pro yet? Check back soon for more Instagram filter tutorials! Here s my finished, super-adorable product:
19
A quick note: We hope that you will find something from the Tips and Tricks that will add a little pizazz to your yearbook pages!
 A quick note: The following pages are tips and tricks for Basic Photoshop users. You may notice that some instructions indicate that non-awpc fonts were used, and that some colors were created using the
EXTREME CONTRAST PHOTO EFFECT
 EXTREME CONTRAST PHOTO EFFECT In this Photoshop tutorial, we re going to learn how to use layers, layer blend modes, some noise, a little sharpening, and a simple adjustment layer to easily give a photo
Creating Pastel Images and other effects in Photoshop
 Creating Pastel Images and other effects in Photoshop Martin Addison 2015 Creating pastel images Page 1 Martin Addison FRPS Using White Layers in Photoshop 1. Create a new empty Layer 2. Edit> Fill 3.
Reflection Project. Please start by resetting all tools in Photoshop.
 Reflection Project You will be creating a floor and wall for your advertisement. Before you begin on the Reflection Project, create a new composition. File New: Width 720 Pixels / Height 486 Pixels. Resolution
CREATE A BURNT EDGE EFFECT
 CREATE A BURNT EDGE EFFECT One of the all-time classic effects in Photoshop is the burnt edge, and there s lots of different ways to create it, but in this Adobe Photoshop tutorial, we re going to look
Project 8: Nice Close-Up
 ps7ie_p08_b.qxd 11/18/02 3:25 PM Page 74 ps7ie_p08_b.qxd 11/18/02 3:25 PM Page 75 Photoshop 7 Image Effects In this project, work with a picture that was taken at an angle for effect. Correct and crop
This tutorial will show you how to use artistic grunge overlays to transform your photos into works of art.
 ARTISTIC GRUNGE OVERLAYS For all photo editing software that supports PNG files If you have any questions, please feel free to contact me at kim@photosbykimhill.com. This tutorial will show you how to
Selective Editing in Camera Raw 5
 Selective Editing in Camera Raw 5 The editing tools that you saw in the last chapter are global editing tools. That is, they affect all parts of the image. So, when you choose to, for example, brighten
How to blend, feather, and smooth
 How to blend, feather, and smooth Quite often, you need to select part of an image to modify it. When you select uniform geometric areas squares, circles, ovals, rectangles you don t need to worry too
Using Adobe Photoshop
 Using Adobe Photoshop 6 One of the most useful features of applications like Photoshop is the ability to work with layers. allow you to have several pieces of images in the same file, which can be arranged
Photoshop CC Editing Images
 Photoshop CC Editing Images Rotate a Canvas A canvas can be rotated 90 degrees Clockwise, 90 degrees Counter Clockwise, or rotated 180 degrees. Navigate to the Image Menu, select Image Rotation and then
By Washan Najat Nawi
 By Washan Najat Nawi how to get started how to use the interface how to modify images with basic editing skills Adobe Photoshop: is a popular image-editing software. Two general usage of Photoshop Creating
Retouching Portraits in Photoshop
 Retouching Portraits in Photoshop I Removing Blemishes When removing blemishes, acne or other imperfections on the skin, our goal is to maintain as much of the original skin texture as possible. That way,
Turning Photograph Into Cartoon-Style Picture. Digital Media I West High School Susan M. Raymond
 Turning Photograph Into Cartoon-Style Picture Digital Media I West High School Susan M. Raymond Part 1: Creating Outline Wondering how those guys on the internet turn photograph into a nice cartoon-style
COLORIZING IMAGES WITH GRADIENT MAPS
 COLORIZING IMAGES WITH GRADIENT MAPS In this Photoshop tutorial, we ll learn how to add complex colorizing effects to images using custom gradients! Specifically, we ll look at the Gradient Map image adjustment
Kent Messamore 3/6/2010
 Post Processing Kent Messamore 3/6/2010 What we will cover Post Processing Photoshop, Lightroom, Elements, and others JPEG or RAW Photoshop Elements Workflow Organization, Create, share Photoshop Elements
Exploring Photoshop Tutorial
 Exploring Photoshop Tutorial Objective: In this tutorial we will create a poster composed of three distinct elements: a Bokeh, an image and title text. The Bokeh is an effect which is sometimes seen in
HOW TO CREATE A SUPER SHINY PENCIL ICON
 HOW TO CREATE A SUPER SHINY PENCIL ICON Tutorial from http://psd.tutsplus.com/ Compiled by INTRODUCTION The Pencil is one of the visual metaphors most used to express creativity. In this tutorial,
TURN A PHOTO INTO A PATTERN OF COLORED DOTS (CS6)
") TURN A PHOTO INTO A PATTERN OF COLORED DOTS (CS6) In this photo effects tutorial, we ll learn how to turn a photo into a pattern of solid-colored dots! As we ll see, all it takes to create the effect is
TURN A PHOTO INTO A PATTERN OF COLORED DOTS (CS6) In this photo effects tutorial, we ll learn how to turn a photo into a pattern of solid-colored dots! As we ll see, all it takes to create the effect is
PHOTOSHOP & ILLUSTRATOR BOOTCAMP
 FALL 2014 - ELIZABETH LIN PHOTOSHOP & ILLUSTRATOR BOOTCAMP ILLUSTRATOR ALIGNMENT To access the alignment panel, go to Window -> Align. You should see a panel like the one below. This panel allows you to
GETTING STARTED. 0 P a g e B a s i c s o f A d o b e P h o t o s h o p A g a P r i v a t e I n s t i t u t e f o r c o m p u t e r s c i e n c e
 GETTING STARTED 0 P a g e B a s i c s o f A d o b e P h o t o s h o p Adobe Photoshop: is a popular image editing software that provides a work environment consistent with Adobe Illustrator, Adobe InDesign,
Extreme Makeovers: Photoshop Retouching Techniques
 Extreme Makeovers: Table of Contents About the Workshop... 1 Workshop Objectives... 1 Getting Started... 1 Photoshop Workspace... 1 Retouching Tools... 2 General Steps... 2 Resolution and image size...
How to create beautiful B&W images with Adobe Photoshop Elements 12
 How to create beautiful B&W images with Adobe Photoshop Elements 12 Whether it s an Instagram snap or a film portrait, black and white photography is never out of style. Today, there are a number of ways
Enhanced Eyes. Here's the image I'll be working with (glamour eyes photo from Shutterstock): Here's what the eyes will look like when we're done:
: Here's what the eyes will look like when we're done:") Enhanced Eyes Here's the image I'll be working with (glamour eyes photo from Shutterstock): The original image. Here's what the eyes will look like when we're done: The final effect. Here's a close-up
Enhanced Eyes Here's the image I'll be working with (glamour eyes photo from Shutterstock): The original image. Here's what the eyes will look like when we're done: The final effect. Here's a close-up
OLD FASHIONED HAND TINTED EFFECT
 OLD FASHIONED HAND TINTED EFFECT In this Photoshop tutorial, we re going to learn how to easily create an old-fashioned, hand-tinted photo effect. All it takes is an adjustment layer, a layer blend mode,
Using Photoshop Elements
 Using Photoshop Elements Created By: Rick Williams August 2004 Table of Contents Photoshop Element Tools...Page 1 Tool Descriptions... Page 3 Starting Photoshop Elements... Page 7 Resizing an Image...
15 Photoshop Tips. Changing Photoshop rulers from inches to picas
 5 Photoshop Tips Changing Photoshop rulers from inches to picas What s the difference between inches and picas? a 6x inch RGB JPEG file is.9 MB a 6x pica RGB JPEG file is. MB a 6x inch RGB TIFF file is.
Adobe PhotoShop Elements
 Adobe PhotoShop Elements North Lake College DCCCD 2006 1 When you open Adobe PhotoShop Elements, you will see this welcome screen. You can open any of the specialized areas. We will talk about 4 of them:
Realistic Skin Smoothing
 TIP SHEET #7 Realistic Skin Smoothing I think it s fair to say when it comes to retouching techniques, the number of different ways to smooth skin is seemingly endless. From blurring techniques through
PHOTOSHOP TUTORIAL: DIGITAL DARKROOM TECHNIQUES
 PHOTOSHOP TUTORIAL: DIGITAL DARKROOM TECHNIQUES STEP BY STEP TRAINING Learn by doing step by step exercises. Includes downloadable class files that work on Mac & PC. EDITION 1 Copyright Info Published
Learning Photo Retouching techniques the simple way
 Learning Photo Retouching techniques the simple way Table of Contents About the Workshop... i Workshop Objectives... i Getting Started... 1 Photoshop Workspace... 1 Setting up the Preferences... 2 Retouching
COLORIZE A PHOTO WITH MULTIPLE COLORS
 COLORIZE A PHOTO WITH MULTIPLE COLORS In this Photoshop photo effects tutorial, we re going to learn how to colorize a photo using multiple colors. It s an effect I ve seen used quite a bit in ads for
How to Create Website Banners
 How to Create Website Banners In the following instructions you will be creating banners in Adobe Photoshop Elements 6.0, using different images and fonts. The instructions will consist of finding images,
POLAROID EMULATION INCREASED CONTRAST, SATURATION & CLARITY
 POLAROID EMULATION The Polaroid SX-70 Camera was a sensational tool. It took photographs in real time. But just the color balance of the film and they way it developed had a unique look. Here are some
ADOBE PHOTOSHOP CS TUTORIAL
 ADOBE PHOTOSHOP CS TUTORIAL A D O B E P H O T O S H O P C S Adobe Photoshop CS is a popular image editing software that provides a work environment consistent with Adobe Illustrator, Adobe InDesign, Adobe
PHOTOSHOP DESIGN EFFECTS FOR INTERMEDIATE TO ADVANCED USERS
 PHOTOSHOP DESIGN EFFECTS FOR INTERMEDIATE TO ADVANCED USERS Copyright 2012, National Seminars Training Introduction This class is all about design effects in Adobe Photoshop. For example, let s say that
HIGH KEY GLOW EFFECT IN PHOTOSHOP
 HIGH KEY GLOW EFFECT IN PHOTOSHOP In this Photoshop tutorial, we ll learn how to create a high key glow effect, which is a fancy way of saying we ll be applying a glow only to the highlights in an image.
Adobe Photoshop CC 2018 Tutorial
 Adobe Photoshop CC 2018 Tutorial GETTING STARTED Adobe Photoshop CC 2018 is a popular image editing software that provides a work environment consistent with Adobe Illustrator, Adobe InDesign, Adobe Photoshop,
Basic Digital Dark Room
 Basic Digital Dark Room When I took a good photograph I almost always trying to improve it using Photoshop: exposure, depth of field, black and white, duotones, blur and sharpness or even replace washed
Painting Special Effects on Photographs
 TUTORIAL 7 Painting Special Effects on Photographs In this tutorial you will learn how to transform a photo into a striking color composition with paintbrushes, masks, blending modes, color, and paper
FLAMING HOT FIRE TEXT
 FLAMING HOT FIRE TEXT In this Photoshop text effects tutorial, we re going to learn how to create a fire text effect, engulfing our letters in burning hot flames. We ll be using Photoshop s powerful Liquify
How to Create Fake Shadows
 TIP SHEET #8 How to Create Fake Shadows As well as the colour, it s the shadows in a picture that help to give it mood and atmosphere so in this tutorial I want to show you how you can add in extra shadows.
Photoshop 1. click Create.
 Photoshop 1 Step 1: Create a new file Open Adobe Photoshop. Create a new file: File->New On the right side, create a new file of size 600x600 pixels at a resolution of 300 pixels per inch. Name the file
Add Photoshop Masks and Adjustments to RAW Images
 Add Photoshop Masks and Adjustments to RAW Images Contributor: Seán Duggan n Specialty: Fine Art Primary Tool Used: Photoshop Masks The adjustments you make in Camera Raw are global in nature, meaning
Adobe Photoshop CS5 Tutorial
 Adobe Photoshop CS5 Tutorial GETTING STARTED Adobe Photoshop CS5 is a popular image editing software that provides a work environment consistent with Adobe Illustrator, Adobe InDesign, Adobe Photoshop
WORN, TORN PHOTO EDGES EFFECT
 Photo Effects: CC - Worn, Torn Photo Edges Effect WORN, TORN PHOTO EDGES EFFECT In this Photoshop tutorial, we ll learn how to take the normally sharp, straight edges of an image and make them look all
Black and White using Photoshop
 Topics to be covered: Methods for B&W conversion Improving the image Toning Printer color management Black and White using Photoshop Various ways to get to B&W Adobe Raw Converter (ACR) in from Bridge
HISTOGRAMS. These notes are a basic introduction to using histograms to guide image capture and image processing.
 HISTOGRAMS Roy Killen, APSEM, EFIAP, GMPSA These notes are a basic introduction to using histograms to guide image capture and image processing. What are histograms? Histograms are graphs that show what
Introduction to Photoshop: Basic Editing & Prepare Images for the Web
 Introduction to Photoshop: Basic Editing & Prepare Images for the Web 1 LEARNING OBJECTIVES Basic tools in Photoshop & Use of Bridge Prepare images for print and web use TOPICS COVERED Photoshop Interface
Rendering a perspective drawing using Adobe Photoshop
 Rendering a perspective drawing using Adobe Photoshop This hand-out will take you through the steps to render a perspective line drawing using Adobe Photoshop. The first important element in this process
Easily Smooth And Soften Skin In A Photo With Photoshop
 Easily Smooth And Soften Skin In A Photo With Photoshop Written by Steve Patterson OPEN THE START FILE BY RIGHT CLICKING THE.JPG FILE AND CHOOSING OPEN WITH ADOBE PHOTOSHOP. SAVE AS: X_lastname_firstname_Smooth_Soft
Reveal the mystery of the mask
 Reveal the mystery of the mask Imagine you're participating in a group brainstorming session to generate new ideas for the design phase of a new project. The facilitator starts the brainstorming session
Colorizing A Photo With Multiple Colors In Photoshop
 Colorizing A Photo With Multiple Colors In Photoshop Written by Steve Patterson. In this Photoshop Effects tutorial, we re going to learn how to colorize a photo using multiple colors. It s an effect I
Challenge Image: Blur the Background
 Challenge Image: Blur the Background Challenge Image: Blur the Background In this lesson, we re going to work on a challenge image that was submitted by a Masters Academy member. The image features a little
Photoshop Elements for Genealogists Part 1
 Photoshop Elements for Genealogists Part 1 By Barry J. Ewell Topics Covered Photoshop Elements Workspace Exploring the Tools Quick Fix Preview Photoshop Elements Workspace Workspace File Edit Image Enhance
Teach Yourself Adobe Photoshop Topic 9: Photo Retouching Part 2
 http://www.gerrykruyer.com Teach Yourself Adobe Photoshop Topic 9: Photo Retouching Part 2 In the last week s lesson, you repaired damaged areas of an image, removed unwanted parts of an image, cloned
Editing Using Photoshop CS5
 The Photoshop CS4 Editing Workspace - shown is the document (image) window, ToolBox, Info, Navigator, History, Adjustments and Layers Palettes, Windows Menus and Options Bar (on top). USING THE LAYERS
The final wrap text in 3D result.
 WRAPPING TEXT IN 3D In this Photoshop tutorial, we re going to learn how to easily wrap text around a 3D object in Photoshop, without the need for any 3D software. We re going to be wrapping our text around
Preparing Images For Print
 Preparing Images For Print The aim of this tutorial is to offer various methods in preparing your photographs for printing. Sometimes the processing a printer does is not as good as Adobe Photoshop, so
ADDING RAIN TO A PHOTO
 ADDING RAIN TO A PHOTO Most of us would prefer to avoid being caught in the rain if possible, especially if we have our cameras with us. But what if you re one of a large number of people who enjoy taking
How to Control Tone and Contrast in BW Conversion
 How to Control Tone and Contrast in BW Conversion This article explains how to select and manipulate tone and contrast compositions in conversion of a color image into a black and white image, and how
Reflections Project Tutorial Digital Media 1
 Reflections Project Tutorial Digital Media 1 You are creating your own floor and wall for your advertisement. Please do this before you begin on the Diamonds Project: 1. Reset all tools in Photoshop. 2.
Adobe Lightroom CC Tutorial
 Adobe Lightroom CC Tutorial GETTING STARTED Adobe Lightroom CC is a photo editing program which can be used to manipulate and edit large quantities of photos at once. It has great exporting and metadata
How to use advanced color techniques
 Adobe Photoshop CS5 Extended Project 6 guide How to use advanced color techniques In Adobe Photoshop CS5, you can adjust an image s colors in a variety of ways. Using the techniques described in this guide,
Select your Image in Bridge. Make sure you are opening the RAW version of your image file!
 CO 3403: Photographic Communication Steps for Non-Destructive Image Adjustments in Photoshop Use the application Bridge to preview your images and open your files with Camera Raw Review the information
Luminosity Masks Program Notes Gateway Camera Club January 2017
 Luminosity Masks Program Notes Gateway Camera Club January 2017 What are Luminosity Masks : Luminosity Masks are a way of making advanced selections in Photoshop Selections are based on Luminosity - how
Combine Black-and-White and Color
 Combine Black-and-White and Color Contributor: Seán Duggan n Specialty: Fine Art Primary Tool Used: Smart Objects Combining color and black-and-white in the same image is a technique that has been around
Black and White Photoshop Conversion Techniques
 Black and White Photoshop Conversion Techniques Andrew Gibson on Jan 27th 2011 Final Product What You'll Be Creating A quick glance through any photography or fashion magazine, or at the photos on social
An Introduction to Layers, Masks and Channels in Photoshop
 An Introduction to Layers, Masks and Channels in Photoshop Roy Killen, GMAPS, EFIAP, GMPSA (c) 2017 Roy Killen Layers, Masks and Channels Page 1 Two approaches to image editing When images are edited in
ADD A REALISTIC WATER REFLECTION
 ADD A REALISTIC WATER REFLECTION In this Photoshop photo effects tutorial, we re going to learn how to easily add a realistic water reflection to any photo. It s a very easy effect to create and you can
An Idiot's Guide to Photoshop. Part II Azamat Bohed E. TrueKolor.net
 An Idiot's Guide to Photoshop Part II Azamat Bohed E. TrueKolor.net Table of Contents 1.Introduction 3 2. Opening a Digital Image/Photo in Photoshop 3 3. Changing/removing the Background 4 3.1 Using the
Photoshop. Part 1. A few tips and hints before we get started.
 Photoshop Part 1 A few tips and hints before we get started. In focus: In this class, we will work with digital and scanned images. The better the original picture, the easier it will be for you to get
INTRO TO LAYERS (PART 2)
") Adobe Photoshop Elements INTRO TO LAYERS (PART 2) By Dave Cross In Part 1, we talked about the main concept behind layers and why they re so important. Now we ll take it a step further and show how to
Adobe Photoshop Elements INTRO TO LAYERS (PART 2) By Dave Cross In Part 1, we talked about the main concept behind layers and why they re so important. Now we ll take it a step further and show how to
Adobe Photoshop. Levels
 How to correct color Once you ve opened an image in Photoshop, you may want to adjust color quality or light levels, convert it to black and white, or correct color or lens distortions. This can improve
DIGITAL ECLIPSE. Eclipse photos courtesy of Fred Espanak 1998
 If you ve ever experienced a total solar eclipse, then you know that film truly cannot capture the entire visual experience. Many have tried, using complex darkroom printing techniques, but now Adobe Photoshop
Photoshop Elements 3 Selections and Paint Tools
 Photoshop Elements 3 Selections and Paint Tools In the lessons up to this point we generally have worked on modifying an entire image. In this lesson you will learn how to select specific portions of an
How to Draw a Realistic iphone 4 with
 Home Freebies Submit Your Work Contact Us How to Draw a Realistic iphone 4 with Photoshop Jan 3 2011 By Mohammad Jeprie 34 Comments In this tutorial, we will draw a realistic-looking iphone 4 using Photoshop.
PHOTOSHOP INVERTED COLORS PHOTO EFFECT
 Photo Effects: Photoshop Inverted Colors Photo Effect PHOTOSHOP INVERTED COLORS PHOTO EFFECT Most people would agree that taking a stroll through the forest can be very calming and peaceful, with all of
SIMPLY TIFFANY STUDIOS SCRAPANEERS.COM
 Get Prepped Organize & Prepare The tips I want to share with you today will help you prepare tomorrow for Scanning Day and increase your scanning speed. Tip 1: Divide & Conquer Arrange your photos into
DAZ Productions - 3D Models, 3D Content, and 3D Software
 Página 1 de 26 Postwork made Easy Author: mizgriz Step 1: Preparing the image. Step 2: Get your glow on. Step 3: And now for something completely (not) different... Step 4: Hue and Saturate Step 5: About
How to use advanced color techniques
 How to use advanced color techniques In Adobe Photoshop, you can adjust an image s colors in a variety of ways. Using the techniques described in this guide, you can take the raw material of your image
Create A Briefcase Icon
 Create A Briefcase Icon In this tutorial, I will show you how to create a briefcase icon with rectangles, ellipses, and gradients. This briefcase icon is great for web designs and user interfaces. Moreover,
Commercial Art 1 Photoshop Study Guide. 8) How is on-screen image resolution measured? PPI - Pixels Per Inch
 How is on-screen image resolution measured? PPI - Pixels Per Inch") Commercial Art 1 Photoshop Study Guide To help prepare you for the Photoshop test, be sure you can answer the following questions: 1) What are the three things should you do when you first open a Photoshop
Commercial Art 1 Photoshop Study Guide To help prepare you for the Photoshop test, be sure you can answer the following questions: 1) What are the three things should you do when you first open a Photoshop
The toolbar in Pixlr Editor always appears on the left-hand side, although you can drag it anywhere you like.
 The toolbar in Pixlr Editor always appears on the left-hand side, although you can drag it anywhere you like. Crop (Shortcut: C) Reframe your entire canvas to a desired size and remove everything else.
Out of Bounds - Dolphins
 Out of Bounds - Dolphins Let's start by making a copy of our original image layer - This is not essential but it's easier to rectify mistakes. From the menus, select Layer > Duplicate Layer or drag the
Create a Dreamlike Photo Manipulation of an Emotional Girl with a Dramatic Lighting in Photoshop. By Andrea Garcia - February 12,
 Create a Dreamlike Photo Manipulation of an Emotional Girl with a Dramatic Lighting in Photoshop By Andrea Garcia - February 12, 2015 396 11 Create a Dreamlike Photo Manipulation of an Emotional Girl with
SAVING, LOADING AND REUSING LAYER STYLES
 SAVING, LOADING AND REUSING LAYER STYLES In this Photoshop tutorial, we re going to learn how to save, load and reuse layer styles! Layer styles are a great way to create fun and interesting photo effects
Introduction to Photoshop
 Introduction to Photoshop Instructional Services at KU Libraries A Division of Information Services www.lib.ku.edu/instruction Abstract: This course covers the basics of Photoshop, including common tools
Adobe Photoshop CS2 Workshop
 COMMUNITY TECHNICAL SUPPORT Adobe Photoshop CS2 Workshop Photoshop CS2 Help For more technical assistance, open Photoshop CS2 and press the F1 key, or go to Help > Photoshop Help. Selection Tools - The
Digitally Removing Uneven Field Illumination
 Digitally Removing Uneven Field Illumination A problem that is encountered with many telescopes, and nearly all camera lenses used for longexposure deepsky astrophotography is uneven field illumination.
Darkroom Effects. Solarization. Bleach Bypass
 Darkroom Effects Solarization A popular technique with surrealists like May Ray, solarization is achieved in the darkroom by exposing a developing image to a flash of light. Darkroom solarization is difficult
Black (and White) Magic
 Magic") Black (and White) Magic Close your eyes, take a deep breath, and imagine a future where you no longer shoot both color and black and white images. Instead, you capture only color. Then, following the shoot,
Black (and White) Magic Close your eyes, take a deep breath, and imagine a future where you no longer shoot both color and black and white images. Instead, you capture only color. Then, following the shoot,
Digital Photography 1
 Digital Photography 1 Photoshop Lesson 3 Resizing and transforming images Name Date Create a new image 1. Choose File > New. 2. In the New dialog box, type a name for the image. 3. Choose document size
> color scheme painting
 > color scheme painting > objective(s): Students will create a highly accurate brush overlay painting of a closely cropped image of their eye using only colors within a specific selected color scheme,
Transparency and blending modes
 Transparency and blending modes About transparency Transparency is such an integral part of Illustrator that it s possible to add transparency to your artwork without realizing it. You can add transparency
Diploma in Photoshop
 Diploma in Photoshop Adjustment Layers An adjustment layer applies colour and tonal adjustments to your image without permanently changing pixel values. The colour and tonal adjustments are stored in the
PhotoFiltre. Reverse foreground/background colors. Background & foreground colors. Set default foreground/background colors. Color choice palette
 PhotoFiltre BASIC TOOLS PALETTE Background & foreground colors Reverse foreground/background colors Set default foreground/background colors Color choice palette Toggle through color choice palettes Selection
LESSON 04: ORGANIZE IT FOR PSE USERS COMPANION BOOK. Digital Scrapbook Academy. April 2018: Lesson 04 Organize It for Elements Users
 Digital Scrapbook Academy April 2018: Lesson 04 LESSON 04: ORGANIZE IT FOR PSE USERS COMPANION BOOK Page 1 of 15 Table of Contents Table of Contents 2 Welcome to Lesson 04 for Elements Users 3 1: Add Photos,
Unit 7 : Image Painting, Editing and Layers
 Unit 7 : Image Painting, Editing and Layers Introduction This Unit describes about various painting tools; such as selection, cropping and measuring tools, retouching, drawing and type tools, Navigation
Sunglass Selfi Illustration
 Sunglass Selfi Illustration www.orchardviewcolor.com theresa@orchardviewcolor.com @tjsorchard Mobile App Illustration with Adobe Capture & Adobe Draw In this hands on creative lab you will illustrate a