Create a Surreal Out of Bounds Photo Manipulation in Photoshop
|
|
|
- Mabel Kathlyn Paul
- 6 years ago
- Views:
Transcription


1 Create a Surreal Out of Bounds Photo Manipulation in Photoshop By: Loredana Papp In this tutorial we will combine several images of water, animals, and people to create a surreal out of bounds photo manipulation in Photoshop. Let s get started! Tutorial Details
2 Program: Adobe Photoshop CS3+ Difficulty: Intermediate Estimated Completion Time:3 Hours Tutorial Assets The following assets were used during the production of this tutorial. Head (no. 6) - ahrum-stock Sea - darkrose42-stock Sky - resurgere Waterfall - flynn-the-cat Hinge - kiyoi-stock Water splash - seductive-stock Big dolphin - zeds-stock Small dolphin - greeneyezz-stock Big birds 1 - viperkid89 Big birds 2 - della-stock Small birds - grannysatticstock Water textures - deviantart Glitter texture - frozenstarro Water splash brushes - deviantart Step 1 The first Step is to open the picture with the human head. Select the pen tool and cut out the left part as I did in the picture below. This is going to be the right part also, because we are going to flip it in the next steps.

3 Next I have extracted the head from the initial background, for this go to Select-Color range. The extraction will be very easy because of the contrasts of the picture. Use the eye picker to select the head and extract it. This is a good method to extract hair since the pen tool is not so precise.

4 Step 2 Now that we have the head lets create the missing part. We are going to work on the left part only and then flip it to create the right part of the head. Create a new layer under the head s layer. Using the pen tool make a shape as I did in the picture. Use the color code shown below.

5 Using the pen tool, create a new shape smaller then the last one and fill it with blue.

6 Step 3 We are going to leave the head pending for a few layers and open the sky picture.

7 Since the sky picture is a bit too small I ve duplicated the layer and filled the missing parts. Use the clone stamp tool for this. Open the sea picture and, on the layer s mask, erase the top part to blend it with the sky.

8 Step 4 Now that we have the background let s go back to the head. In this Step we will add some shadows and lights to the head using the burn and dodge tools. Use the picture below as a reference. Also add some hair, with the clone stamp tool, as you see below.

9 Use some curves on a clipping mask attached to the head s layer.

10 Let s desaturate the picture. Choose Hue/Saturation and use the settings shown below.

11 Duplicate the layer with the head. Go to Filters > Other > High Pass. Set it to 2-3px and put the layer s blending mode to overlay.

12 Step 5 Now that the right part is done create a new folder and place all the head s layers in. Name it left. Duplicate the folder and name it right. Flip it horizontally. Now we have the other part of the head.
. Set the layer s opacity to 10-12%.")
13 Step 6 Create a new layer. With the pen tool create a shape as you see below. Fill it with black. Go to Filter > Blur > Gaussian Blur (5.5 pix). Set the layer s opacity to 10-12%. This is going to be the shadow cast by the head on the water.

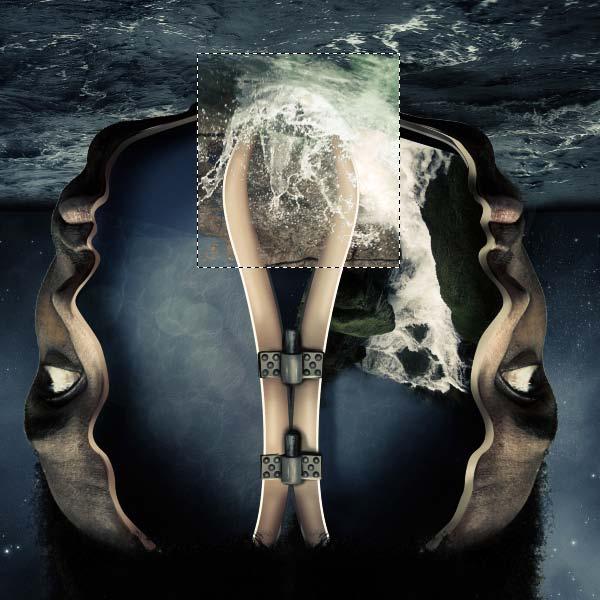
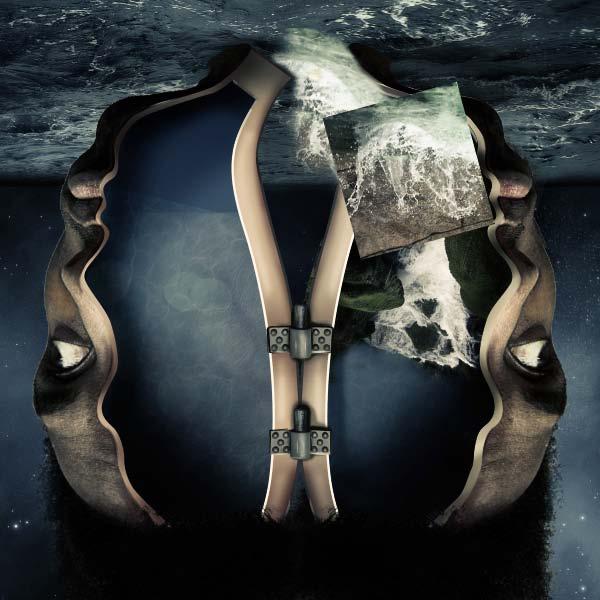
14 Duplicate the layer (Command/Ctrl+J) and flip it horizontally. Use it on the right part of the head also.

15 Step 7 Select the clone stamp tool and place some hair. You have to cover the whole area of the head with hair.

16 Step 8 Use some curves to darken the face so it will blend in with the night atmosphere.

17 Step 9 Open the hinge photo and cut it out. Place it like in the photo below. We need 2 hinges, so duplicate the layer.
18 Select the brush tool and add some lights with white and some shadows with a dark grey.

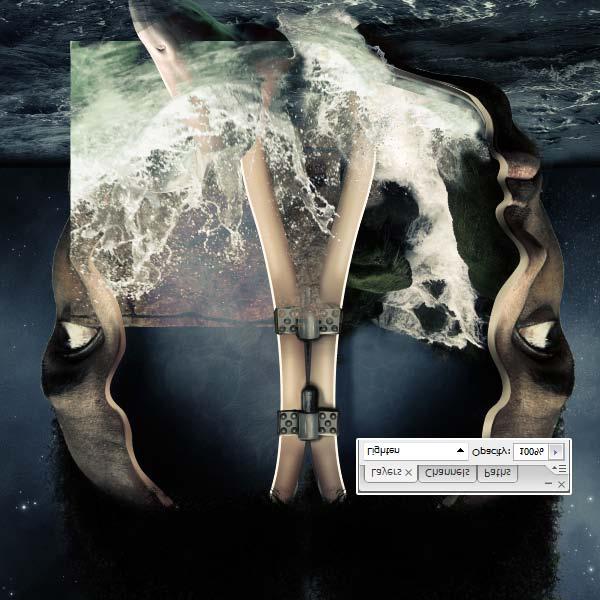
19 Step 10 In this Step we will try to make all the objects to blend in. This is usually done in the last steps but here it helps us to see the big picture since we have so many elements. So all the layers from now on are going to be under this 3 layers. Go on top of all the layers and use the Gradient map with the color codes shown below.

20 Step 11 Adjustment Layers > Levels.
.")
21 Step 12 Adjustment Layers > Photo Filter > Sepia (25%).

22 Step 13 Drag in the waterfall picture. Transform it so it will fit into the right part of the head. Place the waterfall as a clipping mask to the head.
23 Step 14 Next, place the water texture as a clipping mask to the head s layer. Set its blending mode to soft light.

24 Step 15 Create a new clipping mask for the Curves layer. Use this to create some shadows on the waterfall, for a sensation of depth.

25 Step 16 Now let s go a bit on the left part of the head and add the same water texture as a clipping mask on the head s layer. Set its blending mode to soft light.

26 Open the glitter texture and place it on top of the left part of the head as a clipping mask. Set the blending mode to soft light.

27 Step 17 In this Step we will make the water splashes, so open the splash picture. Transform it so it will fit perfectly in the photo manipulation. This is the picture that we will use for all the splashes, we will flip it, transform it so it won t look like a pattern. Set the blending mode to lighter color.
28
29 Duplicate the splash layer and decrease it s size. Set the blending mode to lighter color also. Do this as many times as you like. To complete this part add some mode splash with some costume made brushes.
30

31 Step 18 Cut out the dolphin using the pen tool and place it on top of the left part of the head.
, erase some parts so it will look like his head is")
32 Create a mask to this layer and, with a brush (opacity 20-30%), erase some parts so it will look like his head is under water.
33 Step 19 Drag in, again, the water splash image and place it on top of the dolphin. Set its blending mode to lighter color and erase, on the mask, all the edges. You should have the same result as shown in the image below.
34

35 Step 20 With the help of some splash brushes add more water. Use the image below as a reference.

36 Step 21 Open the second dolphin picture and cut it out with a pen tool. Drag the second dolphin in. Transform it and place it in the back.

37 Select the clone stamp tool and create a new layer. Start adding some small waves and splashes were the big dolphin is touching the water.
. Transform each layer separately so it will look that the dolphins are casting a shadow.")
38 In this Step we will add some shadow for the 2 dolphins. Duplicate the 2 dolphins layers and fill them with black. Go to Filters > Blur > Gaussian blur ( 3-4 pix). Transform each layer separately so it will look that the dolphins are casting a shadow. Set the layers opacity to about 10-15%.
39 Step 22 Next we are going to finalize this surreal photo manipulation by adding the birds. First cut out the big bird and place it in the front of the head. Use some Gaussian Blur on the bird ( pix).

40 Add all the other birds. Decrease their size like you see in the image below.

41 Add the birds' shadows on the head so they will blend in.

42 Final Image
43
Tutorial Resources. Combine a Crocodile with a Car to Create an Exotic Crocomobile Photoshop Tutorials
 Tutorial Resources Crocodile1 SXC Crocodile2 charadestock Crocodile3 frostdragon64 Old car achatinastock Background SXC Bird rml-stock sign1 discordia-stock Sign2 ecathe Step 1 Open the background image
Create a Creepy Face Photo Manipulation in Photoshop
 i TUTORIALS Create a Creepy Face Photo Manipulation in Photoshop by Alan Klim Advertisement In this tutorial we ll show you an easy way to create a nice creepy face effect using Photoshop. We strongly
HOW TO CREATE A DARK SURREAL ILLUSTRATION IN PHOTOSHOP
 HOW TO CREATE A DARK SURREAL ILLUSTRATION IN PHOTOSHOP Tutorial from http://psd.tutsplus.com/ Compiled by INTRODUCTION In this tutorial we are going to create a dark surreal illustration using
Create an Amazing Surreal-Style Treehouse in Photoshop Photoshop Tutorials
 Download the PSD Surreal Treehouse.zip 23.59 MB Download from Website Surreal Treehouse Photoshop Tutorial Tutorial Resources Tree Houses Thanks archetype, Deviantart Bonsai Tree Thanks fabemiko, Deviantart
Winter Card.
 Winter Card Used images: http://www.cgtextures.com/texview.php?id=24321&phpsessid=95e8e8290894cc5194898 e16d1dddb4c http://www.cgtextures.com/texview.php?id=14285&phpsessid=95e8e8290894cc5194898 e16d1dddb4c
Hello Champions. I have added some bubble brushes to the resources that I found on Deviantart that are by Jennyle88.
 Hello Champions I m Renée and once again I am bringing you a Daydreamer or Fantasy style tutorial. Fantasy style pages come about from kits that contain certain elements like cars, treasure chests, furniture
Undress a Giraffe in Photoshop
 Undress a Giraffe in Photoshop By: Alexandra Fomicheva Have you ever wanted to know what a Giraffe looks like without its spots? If so, this tutorial is for you, you pervert! Today, we will demonstrate
Creating Pastel Images and other effects in Photoshop
 Creating Pastel Images and other effects in Photoshop Martin Addison 2015 Creating pastel images Page 1 Martin Addison FRPS Using White Layers in Photoshop 1. Create a new empty Layer 2. Edit> Fill 3.
Building - Image*After Bokeh - Regularjane Landscape 1 - Anders Bjerré Pedersen Landscape 2 - author Sundstrom(nickname)
") Click to enlarge the image. Used images: Download Moon shape(image created with the Photoshop tools) Icicles - Sergei Furtcev Cloud 1(Ruslan Olinchuk), Cloud 2(Image*After), Cloud 3(Sergei Perov) Stars
Click to enlarge the image. Used images: Download Moon shape(image created with the Photoshop tools) Icicles - Sergei Furtcev Cloud 1(Ruslan Olinchuk), Cloud 2(Image*After), Cloud 3(Sergei Perov) Stars
Photoshop. Make a Spooky Halloween Pumpkin Text Effect in Photoshop - Photoshop tutorial PSDDude
 Photoshop October 4th,2017 1 2 Image size: 7 in wide x 3 in high 300 dpi Start with a simple black gradient background layer. Radial Gradiant, black to gray. Install the CREEPSVILLE font. Center and Type
Colorful Glowing Mask Photoshop Tutorial Photoshop TUTfactory The best Photoshop tutorials in one place
 Step 1: To start, create new canvas sized at 994 1312 pixels, and fill it with black. Next, create a new layer, and go to Filter->Render->Clouds. Duplicate this layer, and then merge the two layers. Set
Create a Beautiful Abstract Portrait in Photoshop - Psd Premium Tutorial
 Create a Beautiful Abstract Portrait in Photoshop - Psd Premium Tutorial By: Wojciech Pijecki In this tutorial we will combine several stock images to create an artistic, abstract portrait of a woman.
Design a Halloween Pumpkin Wallpaper in Photoshop
 Design a Halloween Pumpkin Wallpaper in Photoshop By: Alvaro Guzman Halloween is near! So let's take a pumpkin image, carve it up, and light it for this coming holiday. You'll learn how to get this nice
How to Create a Curious Owl in Illustrator
 How to Create a Curious Owl in Illustrator Tutorial Details Program: Adobe Illustrator Difficulty: Intermediate Estimated Completion Time: 1.5 hours Take a look at what we're aiming for, an inquisitive
Glowing Surreal Planet Design. Final Image Preview
 Glowing Surreal Planet Design Final Image Preview. Step 1 First, go to the S:\ drive and locate the folder called Glowing Planet Design. Copy the City Skyline file and paste it in your Glowing Planet Design
TV Aquarium. Create a new document. 8.5 x 11, 300 dpi. Save as TV Aquarium Your Name. Create TV shape. Use Pen
 Create a new document. 8.5 x 11, 300 dpi. Save as TV Aquarium Your Name. Create TV shape. Use Pen Tool, Convert Point Tool and Direct Selection Tool. We need side shapes to create patches of light and
Create a Dreamlike Photo Manipulation of an Emotional Girl with a Dramatic Lighting in Photoshop. By Andrea Garcia - February 12,
 Create a Dreamlike Photo Manipulation of an Emotional Girl with a Dramatic Lighting in Photoshop By Andrea Garcia - February 12, 2015 396 11 Create a Dreamlike Photo Manipulation of an Emotional Girl with
Tablet overrides: overrides current settings for opacity and size based on pen pressure.
 Photoshop 1 Painting Eye Dropper Tool Samples a color from an image source and makes it the foreground color. Brush Tool Paints brush strokes with anti-aliased (smooth) edges. Brush Presets Quickly access
How to Create Spooky Halloween Typography in Photoshop
 Envato Elements: Unlimited templates, graphics, courses, ebooks, and now 300,000 photos! Only $29/month envato-tuts+ Sign Up Sign In Advertisement DESIGN & ILLUSTRATION > TEXT EFFECTS How to Create Spooky
Types of Mask. Layer masks
 Photoshop Layer Mask Features Non destructive (does not delete pixels) until applied Uses brush tool which is configurable Can be added to any layer (except Background unless double click to unlock) including
HOW TO CREATE A SUPER SHINY PENCIL ICON
 HOW TO CREATE A SUPER SHINY PENCIL ICON Tutorial from http://psd.tutsplus.com/ Compiled by INTRODUCTION The Pencil is one of the visual metaphors most used to express creativity. In this tutorial,
PHOTOSHOP DESIGN EFFECTS FOR INTERMEDIATE TO ADVANCED USERS
 PHOTOSHOP DESIGN EFFECTS FOR INTERMEDIATE TO ADVANCED USERS Copyright 2012, National Seminars Training Introduction This class is all about design effects in Adobe Photoshop. For example, let s say that
 http://blog.spoongraphics.co.uk/tutorials/how-to-intensify-your-landscape-photos-in-photoshop This post was originally published in 2011 THE TIPS AND TECHNIQUES EXPLAINED MAY BE OUTDATED. The post-processing
IMAGE CORRECTION. You can find this and more information with video tutorials at
 IMAGE CORRECTION You can find this and more information with video tutorials at http://www.adobe.com/support/photoshop/ P H O T O S H O P T O O L S CLONE STAMP TOOL The Clone Stamp tool paints one part
Create a Magical Flaming Heart Illustration in Photoshop
 All Topics Free Tutorials Courses ebooks Pricing Sign In Free Account Advertisement Design & Illustration Categories Learning Guides PHOTO EFFECTS Create a Magical Flaming Heart Illustration in Photoshop
EXTREME CONTRAST PHOTO EFFECT
 EXTREME CONTRAST PHOTO EFFECT In this Photoshop tutorial, we re going to learn how to use layers, layer blend modes, some noise, a little sharpening, and a simple adjustment layer to easily give a photo
Movie Merchandising. Movie Poster. Open the Poster Background.psd file. Open the Cloud.jpg file.
 Movie Poster Open the Poster Background.psd file. Open the Cloud.jpg file. Movie Merchandising Choose Image>Adjustments>Desaturate to make it a grayscale image. Select the Move tool in the Toolbar and
This special use of burn and dodge techniques can improve your image in several ways:
 Why is this section included? In Photoshop and with Layers, Burn & Dodge can be even more useful because it can also help to bring light and shadow to flat images with the purpose of creating depth and
Dark & Surreal Poster
 Step 1 Dark & Surreal Poster Start off with the creation of your document and, in this case 1200 1600. If you want to print this you might want to work in CMYK mode, a higher resolution and also 300DPI.
ITEC185 INTRODUCTION TO DIGITAL MEDIA
 1 ITEC185 INTRODUCTION TO DIGITAL MEDIA ADOBE PHOTOSHOP ITEC185 - Introduction to Digital Media ITEC185 - Introduction to Digital Media 2 What is Adobe Photoshop? Photoshop is the leading professional
Using Adobe Photoshop
 Using Adobe Photoshop 8 In the last section we looked at adjusting colours to improve your image. In this section we ll look at various ways of touching up your images to fix problems with the images or
Step 1. Facebook Twitter Google+ Find us on Facebook. Vectortuts+ How to Create a Curious Owl in Illustrator CS4 Vectortuts+
 Joomla developers needed - Long term potential in India Copywriter Email Campaigns Wordpress Creative design Social media in UK More Freelance Jobs... Facebook Twitter Google+ Find us on Facebook Step
PHOTOSHOP & ILLUSTRATOR BOOTCAMP
 FALL 2014 - ELIZABETH LIN PHOTOSHOP & ILLUSTRATOR BOOTCAMP ILLUSTRATOR ALIGNMENT To access the alignment panel, go to Window -> Align. You should see a panel like the one below. This panel allows you to
DAZ Productions - 3D Models, 3D Content, and 3D Software
 Página 1 de 26 Postwork made Easy Author: mizgriz Step 1: Preparing the image. Step 2: Get your glow on. Step 3: And now for something completely (not) different... Step 4: Hue and Saturate Step 5: About
Black and White using Photoshop
 Topics to be covered: Methods for B&W conversion Improving the image Toning Printer color management Black and White using Photoshop Various ways to get to B&W Adobe Raw Converter (ACR) in from Bridge
1. Create a rough sketch
 1. Create a rough sketch Go to File>New (Cmd/Ctrl+N), name it Whale. Set Width to 230mm, Height to 310mm and Resolution to 300ppi. Click OK. Create a new layer (Shift+Cmd/Ctrl+N) and name it Sketch 1,
Simple Surreal Landscape
 Simple Surreal Landscape By Kirin Knapp Use some easy photo manipulation skills to make a surreal landscape scene. Here are all of the images we re going to use. Open a new file and make it oversized so
Adobe PhotoShop Elements
 Adobe PhotoShop Elements North Lake College DCCCD 2006 1 When you open Adobe PhotoShop Elements, you will see this welcome screen. You can open any of the specialized areas. We will talk about 4 of them:
Creating a Contrast Mask. Text and images Copyright (C) 2002 Eric R. Jeschke and may not be used without permission of the author.
 2002 Eric R. Jeschke and may not be used without permission of the author.") Creating a Contrast Mask Text and images Copyright (C) 2002 Eric R. Jeschke and may not be used without permission of the author. Intention In this tutorial I'll show you how to do create a contrast mask
Creating a Contrast Mask Text and images Copyright (C) 2002 Eric R. Jeschke and may not be used without permission of the author. Intention In this tutorial I'll show you how to do create a contrast mask
METAL TEXT EFFECT. Step 1: Create A New Document. Step 2: Fill The Background With Black
 METAL TEXT EFFECT In this text effects tutorial, we ll learn how to easily create metal text, a popular effect widely used in video games and movie posters! It may seem like there s a lot of steps involved,
Realistic Skin Smoothing
 TIP SHEET #7 Realistic Skin Smoothing I think it s fair to say when it comes to retouching techniques, the number of different ways to smooth skin is seemingly endless. From blurring techniques through
Create a Multicolored Splashed Text Effect in Adobe Illustrator
 Create a Multicolored Splashed Text Effect in Adobe Illustrator by Diana Toma17 Nov 2014 What You'll Be Creating In this tutorial you will learn how to create a multicolored splashed text effect in Adobe
How can images be manipulated to represent an animal?
 Roboanimal This lesson will explore the concept of natural objects when combined with manmade objects. You will be choosing an animal or natural being to digitally manipulate into a total manmade creature.
COLORIZING IMAGES WITH GRADIENT MAPS
 COLORIZING IMAGES WITH GRADIENT MAPS In this Photoshop tutorial, we ll learn how to add complex colorizing effects to images using custom gradients! Specifically, we ll look at the Gradient Map image adjustment
Editing Using Photoshop CS5
 The Photoshop CS4 Editing Workspace - shown is the document (image) window, ToolBox, Info, Navigator, History, Adjustments and Layers Palettes, Windows Menus and Options Bar (on top). USING THE LAYERS
AGENDA :: MULTI- MEDIA TOOLS :: CLASS NOTES. :: Homework Critiques Best and Worst Websites. :: Photoshop Lesson 2 Things aren t what they seem
 CLASS :: 02 02.02 2018 AGENDA :: Homework Critiques Best and Worst Websites :: Photoshop Lesson 2 Things aren t what they seem I. PHOTO RETOUCHING: Before There Were Computers (Web Post) http://jmcolberg.com/weblog/2010/01/photoshop_before_there_were_computers_the_art_of_retouching_and_improving_negatives_and_prints/
Extreme Makeovers: Photoshop Retouching Techniques
 Extreme Makeovers: Table of Contents About the Workshop... 1 Workshop Objectives... 1 Getting Started... 1 Photoshop Workspace... 1 Retouching Tools... 2 General Steps... 2 Resolution and image size...
The original image. The final rainbow effect.
 ADD A realistic rainbow to a photo In this Photoshop photo effects tutorial, we re going to learn how to easily add a rainbow, even a double rainbow, to a photo. Of course, as with most photo effects,
Name the layer you rotated in step 3 Stripe and lower the opacity to 43%.
 Step 1 Open Photoshop and create a new file 1085 649 pixels. Fill the layer with a bright blue color (#0095db) by pressing Shift + F5. This will be the background for our pop art scene. Step 2 Let s create
TEXT PERSPECTIVE SHADOW EFFECT
 TEXT PERSPECTIVE SHADOW EFFECT In this Photoshop text effects tutorial, we ll learn how to create a popular, classic effect by giving text a perspective shadow as if a light source behind the text was
An Idiot's Guide to Photoshop. Part II Azamat Bohed E. TrueKolor.net
 An Idiot's Guide to Photoshop Part II Azamat Bohed E. TrueKolor.net Table of Contents 1.Introduction 3 2. Opening a Digital Image/Photo in Photoshop 3 3. Changing/removing the Background 4 3.1 Using the
How to Create Fake Shadows
 TIP SHEET #8 How to Create Fake Shadows As well as the colour, it s the shadows in a picture that help to give it mood and atmosphere so in this tutorial I want to show you how you can add in extra shadows.
Kent Messamore 3/6/2010
 Post Processing Kent Messamore 3/6/2010 What we will cover Post Processing Photoshop, Lightroom, Elements, and others JPEG or RAW Photoshop Elements Workflow Organization, Create, share Photoshop Elements
Topic: Photoshop and Digital Painting
 Let there be color! Photoshop is as much an artistic tool as it is for digitally altering images. But let s face it most people only relate the Adobe powerhouse program to the later category, hell it is
Essential Skills - 3 Key Blend Modes. Ken Fisher
 Ken Fisher One of the best ways to understand blending modes is to experiment with them. Get two layers together and play around. The results sometimes will leave you cold, the effects wont inspire you.
Your texture pattern may be slightly different, but should now resemble the sample shown here to the right.
 YOU RE BUSTED! For this project you are going to make a statue of your bust. First you will need to have a classmate take your picture, or use the built in computer camera. The statue you re going to make
L AY E R S A N D M A S K S
 Layers is one of the most used elements in PhotoShop. They allow you to work on an image without disturbing the others. A layer is simply one image stacked on top of another. It builds from the bottom
DD IMAGES PHOTOSHOP TUTORIAL 13 USING MULTIPLE LEVELS ADJUSTMENT LAYERS, TO LIGHTEN, DARKEN OR ADJUST THE CONTRAST OF AN IMAGE
 Page1 DD IMAGES PHOTOSHOP TUTORIAL 13 USING MULTIPLE LEVELS ADJUSTMENT LAYERS, TO LIGHTEN, DARKEN OR ADJUST THE CONTRAST OF AN IMAGE This method involves the creation of 3 separate LEVELS Adjustment layers.
Basic Digital Dark Room
 Basic Digital Dark Room When I took a good photograph I almost always trying to improve it using Photoshop: exposure, depth of field, black and white, duotones, blur and sharpness or even replace washed
Learning Adobe Photoshop CS6
 Module 1 Contents Chapter 1: Introduction to Photoshop Loading Photoshop...1-1 The Tools Panel...1-2 Using the Tools...1-3 The Panel Group...1-5 Layers...1-6 Loading a Sample File...1-6 Looking at the
Using Adobe Photoshop
 Using Adobe Photoshop 8 In the last section we looked at adjusting colours to improve your image. In this section we ll look at various ways of touching up your images to fix problems with the images or
Texts and Resources: Assessments: Freefoto.com Group Photo Projects
 Effective Date: 2009-10 Name of Course: Digital Photography Grade Level: 9-12 Department: Industrial Technology and Engineering Length of Course: 30 cycles Instructional Time: 180 days Period Per Cycle:
An Introduction to Photoshop 6. Photoshop. retouching applications. images, Lightweight version: Photoshop Elements
 An Introduction to Photoshop 6 Gustav Taxén gustavt@nada.kth.se 2D1640 Grafik och Interaktionsprogrammering VT 2006 Photoshop One of the world s best known image retouching applications Current version
Photoshop Blending Modes
 Photoshop Blending Modes https://photoshoptrainingchannel.com/blending-modes-explained/#when-blend-modes-added For those mathematically inclined. https://photoblogstop.com/photoshop/photoshop-blend-modes-
Perspective Guides. Perspective Contextual Toolbar. 1-Point Perspective
 WHAT S NEW 1. Perspective Guides 2. Flipbook Animation 3. Gradient Flood Fills 4. Layer Workflow Enhancements - Layer Grouping - Extended Blending Modes - Background Color - Multi-Layer Select 5. Distort
Here is a 100% zoom close up. Name in Popsicles
 Here is a 100% zoom close up Name in Popsicles Step 1 Let s start by creating a new Photoshop document. Mine is 2560 1440 pixels. Fill the background with a color of your choice (it s not important at
Learning Adobe FireWorks CS5
 Module 1 Contents Chapter 1: Introduction to FireWorks Starting the Document...1-1 Screen Modes...1-3 Bitmap and Vector Tools...1-4 Bitmap Tools... 1-4 Vector Tools... 1-6 Filling Shapes...1-8 Importing
How to Draw a Realistic iphone 4 with
 Home Freebies Submit Your Work Contact Us How to Draw a Realistic iphone 4 with Photoshop Jan 3 2011 By Mohammad Jeprie 34 Comments In this tutorial, we will draw a realistic-looking iphone 4 using Photoshop.
Digital Design and Communication Teaching (DiDACT) University of Sheffield Department of Landscape. Adobe Photoshop CS5 INTRODUCTION WORKSHOPS
 University of Sheffield Department of Landscape. Adobe Photoshop CS5 INTRODUCTION WORKSHOPS") Adobe INTRODUCTION WORKSHOPS WORKSHOP 1 - what is Photoshop + what does it do? Outcomes: What is Photoshop? Opening, importing and creating images. Basic knowledge of Photoshop tools. Examples of work.
Adobe INTRODUCTION WORKSHOPS WORKSHOP 1 - what is Photoshop + what does it do? Outcomes: What is Photoshop? Opening, importing and creating images. Basic knowledge of Photoshop tools. Examples of work.
Turning Photograph Into Cartoon-Style Picture. Digital Media I West High School Susan M. Raymond
 Turning Photograph Into Cartoon-Style Picture Digital Media I West High School Susan M. Raymond Part 1: Creating Outline Wondering how those guys on the internet turn photograph into a nice cartoon-style
Perspective Shadow Text Effect In Photoshop
 Perspective Shadow Text Effect In Photoshop Written by Steve Patterson. In this Photoshop text effects tutorial, we ll learn how to create a popular, classic effect by giving text a perspective shadow
LESSON 09: THE STYLISH SCRAPPER FOR PS & PSE USERS COMPANION BOOK. Digital Scrapbook Academy
 Digital Scrapbook Academy September 2018: Lesson 09 LESSON 09: THE STYLISH SCRAPPER FOR PS & PSE USERS COMPANION BOOK Page 1 of 12 Table of Contents Table of Contents 2 Welcome to Lesson 09 for Photoshop
POLAROID EMULATION INCREASED CONTRAST, SATURATION & CLARITY
 POLAROID EMULATION The Polaroid SX-70 Camera was a sensational tool. It took photographs in real time. But just the color balance of the film and they way it developed had a unique look. Here are some
The original image. Let s get started! The final rainbow effect. The photo sits on the Background layer in the Layers panel.
 Add A Realistic Rainbow To A Photo In this Photoshop photo effects tutorial, we ll learn how to easily add a rainbow, and even a double rainbow, to a photo! As we ll see, Photoshop ships with a ready-made
Adding Light Beams to a Photo
 Adding Light Beams to a Photo Creating Light Beams (so-called God Rays if you are so inclined) is pretty easy. It requires the use of so ware that can composite layers. So, Lightroom won t work but Photoshop
Animated Snowman. Image size: 11 w x 17 h 300 dpi
 Animated Snowman Image size: 11 w x 17 h 300 dpi Step 1 First of all, you ll need the texture on my website. Now open a new document. I usually work on really big documents because I can work on the details
AGENDA. :: Homework Critiques (5 minutes each) :: Photoshop Lesson 3. A-1 Gorgeous! [ COMPOSITE DEMO ] :: 7mins. I. SELECTIONS [ Common Law ]:
![AGENDA. :: Homework Critiques (5 minutes each) :: Photoshop Lesson 3. A-1 Gorgeous! [ COMPOSITE DEMO ] :: 7mins. I. SELECTIONS [ Common Law ]:](/thumbs/93/112781712.jpg "AGENDA. :: Homework Critiques (5 minutes each) :: Photoshop Lesson 3. A-1 Gorgeous! [ COMPOSITE DEMO ] :: 7mins. I. SELECTIONS [ Common Law ]:") CLASS :: 09.24 2018 AGENDA :: Homework Critiques (5 minutes each) A-1 Gorgeous! Upload A-1 Project to Student Folder :: Photoshop Lesson 3 [ COMPOSITE DEMO ] :: 7mins. I. SELECTIONS [ Common Law ]: a.
CLASS :: 09.24 2018 AGENDA :: Homework Critiques (5 minutes each) A-1 Gorgeous! Upload A-1 Project to Student Folder :: Photoshop Lesson 3 [ COMPOSITE DEMO ] :: 7mins. I. SELECTIONS [ Common Law ]: a.
Practice: Using Layer Masks
 DIGITAL IMAGING I UNIT 4 1 Practice: Using Layer Masks INTRODUCTION: Layer Masks are a way to hide elements on a layer without erasing them. In that manner, the hidden elements can be re-exposed without
This tutorial will show you how to use artistic grunge overlays to transform your photos into works of art.
 ARTISTIC GRUNGE OVERLAYS For all photo editing software that supports PNG files If you have any questions, please feel free to contact me at kim@photosbykimhill.com. This tutorial will show you how to
Introduction to Photoshop
 Introduction to Photoshop Instructional Services at KU Libraries A Division of Information Services www.lib.ku.edu/instruction Abstract: This course covers the basics of Photoshop, including common tools
Adobe Photoshop cs. Advanced Retouching. Julieanne Kost
 Julieanne Kost www.adobe.com www.adobeevangelists.com Adobe Photoshop cs Advanced Retouching There are several essential tools and techniques for retouching images of people, and one underlying secret:
prepared by Allison Hwang for T. Purdy 2011
 There are many ways to create material textures in Photoshop. In addition to using primarily the blending tool, you can also use filters to create textures. In this tutorial, the objective is to create
Contents: Bibliography:
 ( 2 ) Contents: Sizing an Image...4 RAW File Conversion...4 Selection Tools...5 Colour Range...5 Quick Mask...6 Extract Tool...7 Adding a Layer Style...7 Adjustment Layer...8 Adding a gradient to an Adjustment
2007 Advanced Imaging Conference
 Color Filtering October 26-28, 2007 San Jose, California by R. Jay GaBany www.cosmotography.com 2007 The role of color This is a personal view R. Jay GaBany, www.cosmotography.com 2 The purpose of color
Photoshop: Manipulating Photos
 Photoshop: Manipulating Photos All Labs must be uploaded to the University s web server and permissions set properly. In this lab we will be manipulating photos using a very small subset of all of Photoshop
An Introduction to Layers, Masks and Channels in Photoshop
 An Introduction to Layers, Masks and Channels in Photoshop Roy Killen, GMAPS, EFIAP, GMPSA (c) 2017 Roy Killen Layers, Masks and Channels Page 1 Two approaches to image editing When images are edited in
Professional Photograph Restoration 50 Points
 Professional Photograph Restoration 50 Points In this tutorial, we'll take an in-depth look at restoring an old torn photograph. Restoring old family photos is something that you can do for your relatives
Retouching Portraits in Photoshop
 Retouching Portraits in Photoshop I Removing Blemishes When removing blemishes, acne or other imperfections on the skin, our goal is to maintain as much of the original skin texture as possible. That way,
OLD FASHIONED HAND TINTED EFFECT
 OLD FASHIONED HAND TINTED EFFECT In this Photoshop tutorial, we re going to learn how to easily create an old-fashioned, hand-tinted photo effect. All it takes is an adjustment layer, a layer blend mode,
'Photoshop'. "Realistic Eye Texture Painting" by Krishnamurti Martins Costa
 Level: intermediate Technique: digital painting Software: Adobe Photoshop 'Photoshop'. "Realistic Eye Texture Painting" by Krishnamurti Martins Costa Email: kris@antropus.com Web: http://www.antropus.com
This tutorial will show you how to change your images into a cool dirty grunge design, which could be used for posters, prints, CD covers, etc.
 This tutorial will show you how to change your images into a cool dirty grunge design, which could be used for posters, prints, CD covers, etc.today We ll be making this: STEP 1: Open a new document in
Photoshop Project 1: Create Vector Art
 Photoshop Project 1: Create Vector Art Duplicate and name layers Create new layers Show and hide layers Apply the desaturate adjustment Work with the Pen tool Work with shape layers Zoom in and out of
> color scheme painting
 > color scheme painting > objective(s): Students will create a highly accurate brush overlay painting of a closely cropped image of their eye using only colors within a specific selected color scheme,
Learning Photo Retouching techniques the simple way
 Learning Photo Retouching techniques the simple way Table of Contents About the Workshop... i Workshop Objectives... i Getting Started... 1 Photoshop Workspace... 1 Setting up the Preferences... 2 Retouching
Adobe Photoshop CS5 Tutorial
 Adobe Photoshop CS5 Tutorial GETTING STARTED Adobe Photoshop CS5 is a popular image editing software that provides a work environment consistent with Adobe Illustrator, Adobe InDesign, Adobe Photoshop
ADD A REALISTIC WATER REFLECTION
 ADD A REALISTIC WATER REFLECTION In this Photoshop photo effects tutorial, we re going to learn how to easily add a realistic water reflection to any photo. It s a very easy effect to create and you can
Photoshop CC Editing Images
 Photoshop CC Editing Images Rotate a Canvas A canvas can be rotated 90 degrees Clockwise, 90 degrees Counter Clockwise, or rotated 180 degrees. Navigate to the Image Menu, select Image Rotation and then
Photoshop Tutorial. Millbrae Camera Club 2008 August 21
 Photoshop Tutorial Millbrae Camera Club 2008 August 21 Introduction Tutorial For this session Speak up if: you have a question I m going too fast or too slow I m not speaking loudly enough you know a better
PHOTO 11: INTRODUCTION TO DIGITAL IMAGING
 PHOTO 11: INTRODUCTION TO DIGITAL IMAGING Instructor: Sue Leith Exam Review On your camera, what are the following and what are they used for? WB matches the color temperature of light ISO - The sensitivity
The effect is not that noticeable, but it should be enough to highlight some of the coasts further. And that s it.
 MAKING A CUSTOM M-CLASS PLANET Okay, well this is my first real tutorial, and it might show, but this is just to give you a basic idea of the principles, so that when the time comes you can take this and