Professional Photograph Restoration 50 Points
|
|
|
- Theodore Stanley Mason
- 5 years ago
- Views:
Transcription
1 Professional Photograph Restoration 50 Points In this tutorial, we'll take an in-depth look at restoring an old torn photograph. Restoring old family photos is something that you can do for your relatives and bring tears to their eyes, and yes this is a service you can offer to clients as well. Let's take a look at a professional workflow for restoring old photographs to their former glory. 1. Introduction The print size is of course limited due to this. That said. The importance with this tutorial is guiding you through the workflow process. There are some important steps, however, you must keep in mind, but never hesitate to be creative and explore different approaches. The steps to follow are: 1. Make a copy of the original to work from
 6. Adjust the brightness and contrast 7.")
2 Step 1 2. Adjust the dimension you need and crop the image so you don't work on areas you don't need. 3. Retouch/restore areas in the image as needed. 4. Remove noise or unwanted patterns 5. Adjust highlights shadows and neutrals (in color photos you would also adjust skin color) 6. Adjust the brightness and contrast 7. Sharpen In Step 1 I have already specified dimensions and cropped the image. You would then go about the restoration. I always start out in photos like this with the patch tool and get larger areas roughly patched. Then I get more specific and change between the Patch Tool, the Healing Tool, and the Clone Tool as suited. I'll explain in more detail in the next steps.

3 Step 2 The Patch Tool works just as the Marquee Tool in regards to behavior. You drag a selection around the area you want to fix, then you click in the middle of your selection, and whilst holding the mouse button down, you drag the selection to another location in the picture with similarities and let go. Be sure to align your selection before you let it go. See next step and watch the alignment. Step 3 Watch alignment in the shades of the curtain in the background. Do all larger areas in the picture. This tool not only works great, but it's also a timesaver and a good way to start your restoration.

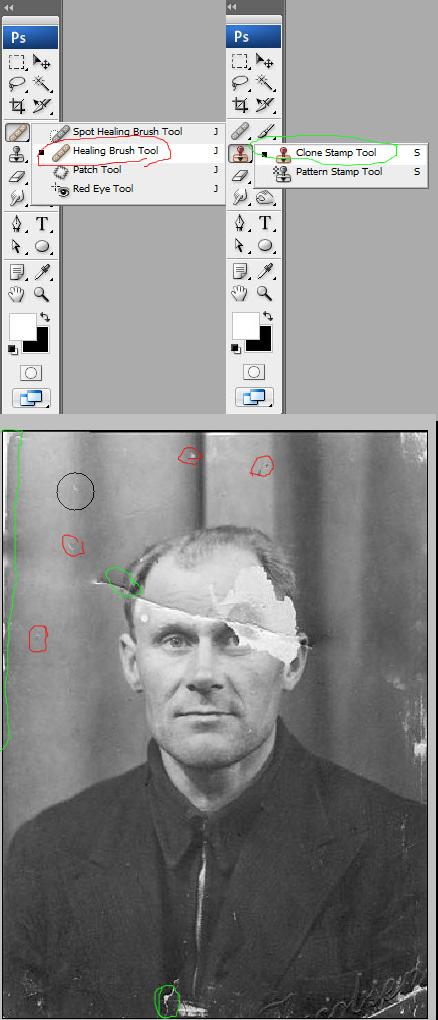
4 Step 4 After getting all the larger areas done change to the Healing Brush Tool (see corresponding red color in the picture below) and Clone Stamp Tool. As you work on your picture always feel free to experiment with these tools. If you are concerned with an efficient workflow, it's good to get the grasp of these three tools. Note that the Spot Healing Tool is also a tool you would use where, as its name suggests, there are spots. It works by just clicking on the spots you want to remove and I find myself using this often in some pictures where there are spots scattered around in the image. The workflow would then be to start out with the Spot Healing Brush, then changing between this and the Healing Brush Tool. In this picture, I had no need for it though. As the picture below suggest, I use the Clone Stamp Tool at the edges of the picture. The Healing Brush Tool and the Patch Tool will usually create some effects you don't want when you work towards the edges of a picture. Just try it out and you'll see what I mean. Again, just change between the tools and feel free to experiment between them until you get your desired result.
5
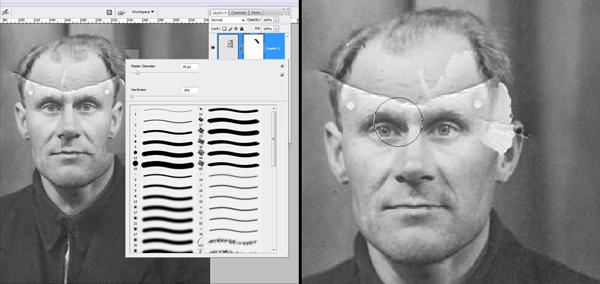
6 Step 5 Here we have done the first part of the restoration. Step 6 And now for the serious defections in our picture. Here we ll use the man s right eye to substitute his missing left eye. Just draw a rough marquee selection around his right eye, and then hit Command + J to jump the layer (copy the selection to a new layer).

7 Step 7 Then hit Command + T to enter the Free Transform Tool.

8 Step 8 Right-click inside the selection and hit Flip Horizontal.
 to commit the changes.")
9 Step 9 At this point, when you drag the selection over to where the left eye should be, you would want to lower the Opacity and align the eye with what's left of his torn away eye behind your new layer. When you have it aligned, hit enter or hit the mark I've placed the green circle around (shown below) to commit the changes. Then raise the Opacity to 100% again.
 too apply a mask.")
10 Step 10 Now, with the layer selected hit the mask-button (as indicated by the green circle below) too apply a mask.

11 Step 11 Now we want to paint with black in the mask to hide the areas we don't need or don't want to see. When using masks the rule is: white reveals and black conceals. If you need soft transitions, use gray. A good way to paint away areas in your selection is to lower the opacity of your brush, then sweep across the areas you want to get rid of until you have the transition result between the two layers you would want. Bonus Tip: Keep your finger at the X button to flip between black and white. It's always good to go back and forth like this in smaller areas until you get what you want. The D key will make your foreground and background colors black and white if the colors are set to something different than black and white. If you want to see only the mask on your screen to smoothen out the areas, hold down the Alt key and click the mask.
12

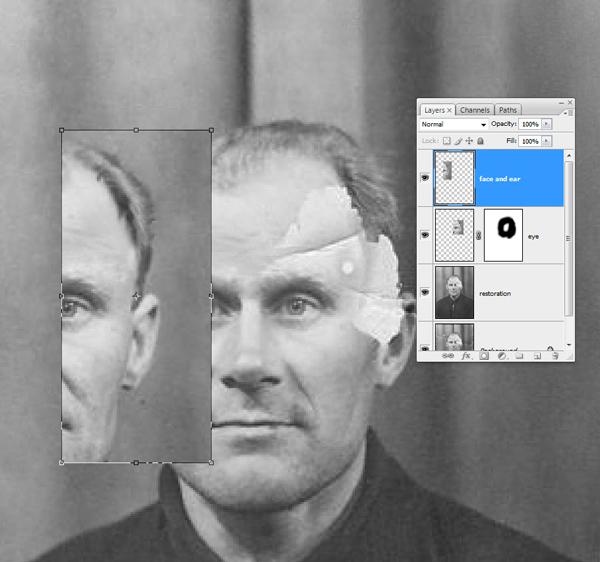
13 Step 12 Now you want to do the same process with the ear. Depending on the picture you would try out different free transform modes you also could use. For the ear I did use warp. I also did a minor part from the hairline at the man's right side, rotated, and scaled it slightly just to get a better start for the missing hairline. Then I cloned where needed.
14

15 If you look at my layers here, don't be confused. The "retouch" layer is the next step, but when doing the picture I didn't decide on the hairline right away. The layer called "Layer 1" is the hairline layer.

16 Step 13 After getting all the larger parts into place, I went back to the Clone Tool and touched up all the edges I needed to fix. This is what I put on its own layer; the "retouch" layer. Usually you want the Opacity on the Clone Tool set down so you get better control over the cloning and can do them in more than one sweep. Just drag over the area until you get the result you desire. Command + Z is of course something you want to keep your fingers at during the whole of this process.

17 Step 14 Often when you go about doing the last retouching, you would use different layers for different parts. If you don't want a lot of layers, just merge them down when you are satisfied. I usually do small parts on different layers and merge them back to one "retouch" layer, but never merge these basic layers.

18 You don't want to merge everything together if you later see something you didn't spot right away. It's always good to be able to go back and delete only the "retouch" layer, and fix that, or the eye-layer, if you found something out of place in it, and so on. Step 15 So now the restoration part is done.
19 Step 16 The next thing I do is to select all the layers and group them. Command + G. Then I make a new layer from this group. Command + Shift + Alt + E and rename it "noise." This layer is for our noise reduction. One thing I want to point out, which I probably haven't mentioned. As you can see from my layers below I've kept the original file in the PSD as the background layer, and then turned it off. I like to keep the original file together with my PSD file, so I always start by jumping this (Command + J). This way I get an exact copy to work from, then turn of the background.

20 Bonus Tip: If you hold the Alt key down while clicking on the eye in front of the background image, you turn this layer on and all the other layers off. Click again to turn this layer off, and all the others on. Good for quick comparisons.

21 Step 17 Now we remove noise in the image. Noise reduction is done in various ways, but here I use the Reduce Noise filter found under Noise. I exaggerated the noise reduction a little for this tutorial, and believe my original numbers were 8 for the strength and about 20 for detail. Another tip here is to go into the Advanced Dialogue and crank the strength up to full in the blue channel with 0 on details. In the red channel you crank also the strength up high with some detail, and leave the red channel with no alterations. This lets the red channel keep some of the details in the picture without blurring it too much.

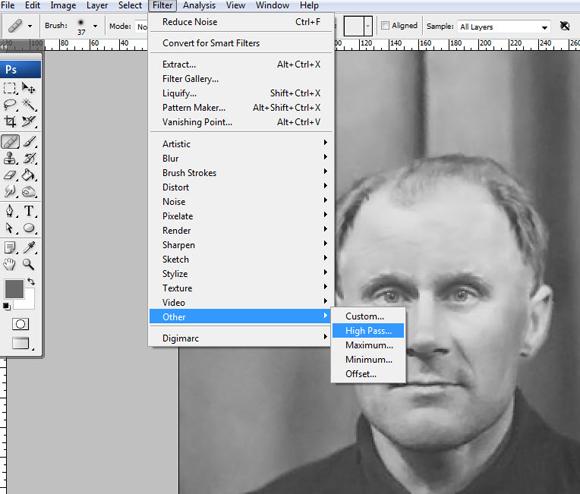
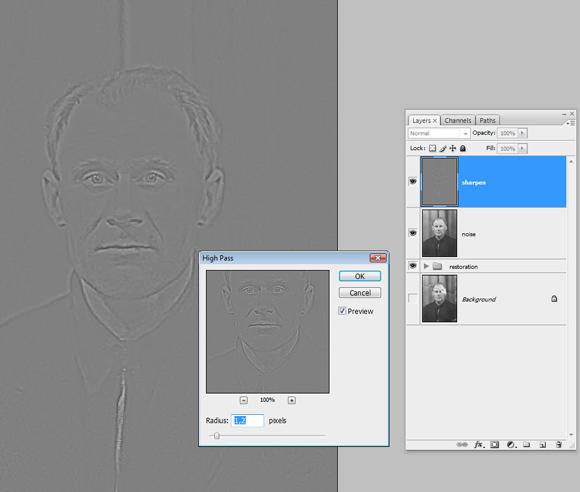
22 Step 18 After noise reductions we would go on to sharpening. Sharpening is another big topic, but a common use, and a good one, is the High Pass Sharpening. When you apply the High Pass filter, you would want to use low settings. For this tutorial, I have raised the values a bit too much, and you would want to see less in the gray picture than here. The edges are what you want to sharpen. There are also some technical issues you want to keep in mind. When you sharpen for print, you always want to over-sharpen a little on screen. Printers have a natural way to blur out pictures a little. When you have applied the High Pass filter you would set the Blending Mode to Overlay or Soft Light. I usually make use of a little over sharpen anyhow, and then lower the value by using the opacity control.
23
24

25 Bonus Tip: Often you would want to sharpen only areas of the picture. In the example picture below, I've made a mask and painted away everything but the face, so this is the only part that gets sharpened. Often this technique is used for only the eyes. The technique works also well using curves to lighten or darken areas of the picture. If you only want the eyes lighter, you would make a curves layer, hit Command + I to invert the mask, making the mask go black, and paint back with white where the eyes are, and so on. It's quicker to invert the mask than starting to paint away everything you don't want.

26 Step 19 In this final step, I did adjust the contrast with an s-curve. This step I didn't make use of in my original file, and you would probably want to do it before the sharpening, but I added it here just to get a more complete workflow overview, since that is the nature of

27 this tutorial. I often make use of Command + Shift + Alt + E to make a new layer from the layers below, and that's what I would have done here. I would have put the "curves" layer over the "noise" layer, then merging all the layers below to a new layer on top. Next sharpen this with the High Pass filter, keeping the curves layer intact, just in case I wanted to go back and adjust the last two steps.
28 2. Conclusion So this was the whole process of restoring an old, torn photograph. But keep in mind that a lot of these steps can be explored in greater depth. Always experiment and look for things you could add to your workflow to get an even better result.
PROFESSIONAL PHOTOGRAPH RESTORATION WORKFLOW
 PROFESSIONAL PHOTOGRAPH RESTORATION WORKFLOW Tutorial from http://psd.tutsplus.com/ Compiled by INTRODUCTION In this tutorial, we'll take an in-depth look at restoring an old torn photograph.
Extreme Makeovers: Photoshop Retouching Techniques
 Extreme Makeovers: Table of Contents About the Workshop... 1 Workshop Objectives... 1 Getting Started... 1 Photoshop Workspace... 1 Retouching Tools... 2 General Steps... 2 Resolution and image size...
Photoshop CC Editing Images
 Photoshop CC Editing Images Rotate a Canvas A canvas can be rotated 90 degrees Clockwise, 90 degrees Counter Clockwise, or rotated 180 degrees. Navigate to the Image Menu, select Image Rotation and then
IMAGE CORRECTION. You can find this and more information with video tutorials at
 IMAGE CORRECTION You can find this and more information with video tutorials at http://www.adobe.com/support/photoshop/ P H O T O S H O P T O O L S CLONE STAMP TOOL The Clone Stamp tool paints one part
Learning Photo Retouching techniques the simple way
 Learning Photo Retouching techniques the simple way Table of Contents About the Workshop... i Workshop Objectives... i Getting Started... 1 Photoshop Workspace... 1 Setting up the Preferences... 2 Retouching
Contents: Bibliography:
 ( 2 ) Contents: Sizing an Image...4 RAW File Conversion...4 Selection Tools...5 Colour Range...5 Quick Mask...6 Extract Tool...7 Adding a Layer Style...7 Adjustment Layer...8 Adding a gradient to an Adjustment
This tutorial will show you how to use artistic grunge overlays to transform your photos into works of art.
 ARTISTIC GRUNGE OVERLAYS For all photo editing software that supports PNG files If you have any questions, please feel free to contact me at kim@photosbykimhill.com. This tutorial will show you how to
Adobe Photoshop CS 6 Level I. Topics: Toolbars Workspace Panels Camera Raw Image Adjustment
 Adobe Photoshop CS 6 Level I Topics: Toolbars Workspace Panels Camera Raw Image Adjustment Chapter 1 Toolbars Selections By default, Photoshop gives you a set of tools on the left called the Toolbar or
Unit 7 : Image Painting, Editing and Layers
 Unit 7 : Image Painting, Editing and Layers Introduction This Unit describes about various painting tools; such as selection, cropping and measuring tools, retouching, drawing and type tools, Navigation
PHOTOSHOP & ILLUSTRATOR BOOTCAMP
 FALL 2014 - ELIZABETH LIN PHOTOSHOP & ILLUSTRATOR BOOTCAMP ILLUSTRATOR ALIGNMENT To access the alignment panel, go to Window -> Align. You should see a panel like the one below. This panel allows you to
Glowing Surreal Planet Design. Final Image Preview
 Glowing Surreal Planet Design Final Image Preview. Step 1 First, go to the S:\ drive and locate the folder called Glowing Planet Design. Copy the City Skyline file and paste it in your Glowing Planet Design
CS 547 Digital Imaging Lecture 3
 CS 547 Digital Imaging Lecture 3 Working with Selections Layer Basics Free Transform & Basic Type Selection Tools Rectangular Marquee tool Elliptical Marque Tool Shift Select perfect circle Alt Select
Module All You Ever Need to Know About The Displace Filter
 Module 02-05 All You Ever Need to Know About The Displace Filter 02-05 All You Ever Need to Know About The Displace Filter [00:00:00] In this video, we're going to talk about the Displace Filter in Photoshop.
Tablet overrides: overrides current settings for opacity and size based on pen pressure.
 Photoshop 1 Painting Eye Dropper Tool Samples a color from an image source and makes it the foreground color. Brush Tool Paints brush strokes with anti-aliased (smooth) edges. Brush Presets Quickly access
Using Adobe Photoshop
 Using Adobe Photoshop 8 In the last section we looked at adjusting colours to improve your image. In this section we ll look at various ways of touching up your images to fix problems with the images or
Challenge Image: Blur the Background
 Challenge Image: Blur the Background Challenge Image: Blur the Background In this lesson, we re going to work on a challenge image that was submitted by a Masters Academy member. The image features a little
Create a Beautiful Abstract Portrait in Photoshop - Psd Premium Tutorial
 Create a Beautiful Abstract Portrait in Photoshop - Psd Premium Tutorial By: Wojciech Pijecki In this tutorial we will combine several stock images to create an artistic, abstract portrait of a woman.
Adobe Photoshop CC 2018 Tutorial
 Adobe Photoshop CC 2018 Tutorial GETTING STARTED Adobe Photoshop CC 2018 is a popular image editing software that provides a work environment consistent with Adobe Illustrator, Adobe InDesign, Adobe Photoshop,
HOW TO CREATE A SUPER SHINY PENCIL ICON
 HOW TO CREATE A SUPER SHINY PENCIL ICON Tutorial from http://psd.tutsplus.com/ Compiled by INTRODUCTION The Pencil is one of the visual metaphors most used to express creativity. In this tutorial,
Using Adobe Photoshop
 Using Adobe Photoshop 8 In the last section we looked at adjusting colours to improve your image. In this section we ll look at various ways of touching up your images to fix problems with the images or
Realistic Skin Smoothing
 TIP SHEET #7 Realistic Skin Smoothing I think it s fair to say when it comes to retouching techniques, the number of different ways to smooth skin is seemingly endless. From blurring techniques through
Adobe Photoshop CS5 Tutorial
 Adobe Photoshop CS5 Tutorial GETTING STARTED Adobe Photoshop CS5 is a popular image editing software that provides a work environment consistent with Adobe Illustrator, Adobe InDesign, Adobe Photoshop
Adobe PhotoShop Elements
 Adobe PhotoShop Elements North Lake College DCCCD 2006 1 When you open Adobe PhotoShop Elements, you will see this welcome screen. You can open any of the specialized areas. We will talk about 4 of them:
Easily Smooth And Soften Skin In A Photo With Photoshop
 Easily Smooth And Soften Skin In A Photo With Photoshop Written by Steve Patterson OPEN THE START FILE BY RIGHT CLICKING THE.JPG FILE AND CHOOSING OPEN WITH ADOBE PHOTOSHOP. SAVE AS: X_lastname_firstname_Smooth_Soft
Adobe Photoshop cs. Advanced Retouching. Julieanne Kost
 Julieanne Kost www.adobe.com www.adobeevangelists.com Adobe Photoshop cs Advanced Retouching There are several essential tools and techniques for retouching images of people, and one underlying secret:
Mullingar Camera Club Basic introduction to Digital Printing using Photoshop CC.
 Mullingar Camera Club Basic introduction to Digital Printing using Photoshop CC. Table of Contents Course aims: 1 Course presentation notes: 1 Introducing Photoshop: 1 Adjusting the Brightness or Contrast
ADOBE PHOTOSHOP CS TUTORIAL
 ADOBE PHOTOSHOP CS TUTORIAL A D O B E P H O T O S H O P C S Adobe Photoshop CS is a popular image editing software that provides a work environment consistent with Adobe Illustrator, Adobe InDesign, Adobe
Project 8: Nice Close-Up
 ps7ie_p08_b.qxd 11/18/02 3:25 PM Page 74 ps7ie_p08_b.qxd 11/18/02 3:25 PM Page 75 Photoshop 7 Image Effects In this project, work with a picture that was taken at an angle for effect. Correct and crop
Introduction to Photoshop
 Introduction to Photoshop Instructional Services at KU Libraries A Division of Information Services www.lib.ku.edu/instruction Abstract: This course covers the basics of Photoshop, including common tools
Name the layer you rotated in step 3 Stripe and lower the opacity to 43%.
 Step 1 Open Photoshop and create a new file 1085 649 pixels. Fill the layer with a bright blue color (#0095db) by pressing Shift + F5. This will be the background for our pop art scene. Step 2 Let s create
Assignment Project Due & Critique 3.18 Retouching Photo Due 3.4
 Portraits Assignment Project Due & Critique 3.18 Retouching Photo Due 3.4 For this project, you will be exploring the subject of portraits with three different objectives. 1. In the style of Arnold Newman:
Approaching Photoshop Efforts With an Eye toward Layers A Step-by-Step Procedure Explained
 Approaching Photoshop Efforts With an Eye toward Layers A Step-by-Step Procedure Explained By: Marty Kesselman June 3, 2009 We keep talking about layers and that they are useful and important to use in
AGENDA. :: Homework Critiques (5 minutes each) :: Photoshop Lesson 3. A-1 Gorgeous! [ COMPOSITE DEMO ] :: 7mins. I. SELECTIONS [ Common Law ]:
![AGENDA. :: Homework Critiques (5 minutes each) :: Photoshop Lesson 3. A-1 Gorgeous! [ COMPOSITE DEMO ] :: 7mins. I. SELECTIONS [ Common Law ]:](/thumbs/93/112781712.jpg "AGENDA. :: Homework Critiques (5 minutes each) :: Photoshop Lesson 3. A-1 Gorgeous! [ COMPOSITE DEMO ] :: 7mins. I. SELECTIONS [ Common Law ]:") CLASS :: 09.24 2018 AGENDA :: Homework Critiques (5 minutes each) A-1 Gorgeous! Upload A-1 Project to Student Folder :: Photoshop Lesson 3 [ COMPOSITE DEMO ] :: 7mins. I. SELECTIONS [ Common Law ]: a.
CLASS :: 09.24 2018 AGENDA :: Homework Critiques (5 minutes each) A-1 Gorgeous! Upload A-1 Project to Student Folder :: Photoshop Lesson 3 [ COMPOSITE DEMO ] :: 7mins. I. SELECTIONS [ Common Law ]: a.
Course Syllabus. Course Title. Who should attend? Course Description. Photoshop ( Level 2 (
 Course Title Photoshop ( Level 2 ( Course Description Adobe Photoshop CC (Creative Clouds) is the world's most powerful graphic design (bitmap-based) program for editing, manipulating, compositing, enhancing
Add Photoshop Masks and Adjustments to RAW Images
 Add Photoshop Masks and Adjustments to RAW Images Contributor: Seán Duggan n Specialty: Fine Art Primary Tool Used: Photoshop Masks The adjustments you make in Camera Raw are global in nature, meaning
CS 547 Digital Imaging Lecture 2
 CS 547 Digital Imaging Lecture 2 Basic Photo Corrections & Retouching and Repairing Selection Tools Rectangular marquee tool Use to select rectangular images Elliptical Marque Tool Use to select elliptical
The toolbar in Pixlr Editor always appears on the left-hand side, although you can drag it anywhere you like.
 The toolbar in Pixlr Editor always appears on the left-hand side, although you can drag it anywhere you like. Crop (Shortcut: C) Reframe your entire canvas to a desired size and remove everything else.
Recitation 2 Introduction to Photoshop
 Recitation 2 Introduction to Photoshop What is Adobe Photoshop? Adobe Photoshop is a tool for creating digital graphics either by starting with a scanned photograph or artwork or by creating the graphics
By Washan Najat Nawi
 By Washan Najat Nawi how to get started how to use the interface how to modify images with basic editing skills Adobe Photoshop: is a popular image-editing software. Two general usage of Photoshop Creating
Adobe Photoshop CS5 Layers and Masks
 Adobe Photoshop CS5 Layers and Masks Email: training@health.ufl.edu Web Page: http://training.health.ufl.edu Adobe Photoshop CS5: Layers and Masks 2.0 Hours The workshop will cover creating and manipulating
Enhanced Eyes. Here's the image I'll be working with (glamour eyes photo from Shutterstock): Here's what the eyes will look like when we're done:
: Here's what the eyes will look like when we're done:") Enhanced Eyes Here's the image I'll be working with (glamour eyes photo from Shutterstock): The original image. Here's what the eyes will look like when we're done: The final effect. Here's a close-up
Enhanced Eyes Here's the image I'll be working with (glamour eyes photo from Shutterstock): The original image. Here's what the eyes will look like when we're done: The final effect. Here's a close-up
HDR Show & Tell Image / Workflow Review Session. Dave Curtin Nassau County Camera Club October 3 rd, 2016
 HDR Show & Tell Image / Workflow Review Session Dave Curtin Nassau County Camera Club October 3 rd, 2016 Capturing Realistic HDR Images Topics: HDR Review (Brief Summary from HDR Presentation Parts: 1
PHOTOSHOP DESIGN EFFECTS FOR INTERMEDIATE TO ADVANCED USERS
 PHOTOSHOP DESIGN EFFECTS FOR INTERMEDIATE TO ADVANCED USERS Copyright 2012, National Seminars Training Introduction This class is all about design effects in Adobe Photoshop. For example, let s say that
Undress a Giraffe in Photoshop
 Undress a Giraffe in Photoshop By: Alexandra Fomicheva Have you ever wanted to know what a Giraffe looks like without its spots? If so, this tutorial is for you, you pervert! Today, we will demonstrate
2.0 4 Easy Ways to Delete Background to Transparent with GIMP. 2.1 Using GIMP to Delete Background to Transparent
 1.0 Introduction As JPG files don't support transparency, when you open a JPG image in GIMP with the purpose of making the background transparent. The first thing you must to do is Add Alpha Channel. It
2 BASiC PHOTO COrrECTiOnS lesson overview
 2 basic photo corrections Lesson overview In this lesson, you ll learn how to do the following: Understand image resolution and size. Straighten and crop an image. Adjust the tonal range of an image. Remove
Retouching and Restoring Images
 Beauty Retouching Open the Woman.psd file. Retouching and Restoring Images When retouching images first evaluate the faults that need to be eliminated vs. the ones that need to be minimized. First we will
Reveal the mystery of the mask
 Reveal the mystery of the mask Imagine you're participating in a group brainstorming session to generate new ideas for the design phase of a new project. The facilitator starts the brainstorming session
Photoshop Domain 4: Manipulating Images. Dreamweaver Domain 3
 Photoshop Domain 4: Manipulating Images 1 Objectives Demonstrate knowledge of working with selections and measurement. Use Photoshop guides and rulers. Transform images. Adjust or correct the tonal range,
 Retouching Your Images: Have you ever seen an amazing photo but could never figure out how it was taken? A good photographer can accomplish this. And if not, has tools for correcting many kinds of imperfections,
Introduction to Layers in Photoshop. Layers palette
 Layers: Are an essential element of Photoshop and a tool of every digital darkroom. Allow you to optimize one part of your photograph without affecting other parts. Allow an Undo of everything from minor
How to Create a Landscape Wallpaper for your Desktop
 How to Create a Landscape Wallpaper for your Desktop Why not create a vector landscape wallpaper? In this simple tutorial, you will learn how to create an eye-appealing wallpaper quickly and effectively.
Create a Candy Cane. Create a new canvas with the size 8x10 inches at 300 pixel/inch. See image below Ctrl + N
 Create a Candy Cane The Basic Candy Cane Canvas and Shape 1. Create a new folder, name it Candy Cane your name. Create a new canvas with the size 8x10 inches at 300 pixel/inch. See image below Ctrl + N
Compositing. Compositing is the art of combining two or more distinct elements to create a sense of seamlessness or a feeling of belonging.
 Compositing Compositing is the art of combining two or more distinct elements to create a sense of seamlessness or a feeling of belonging. Selection Tools In the simplest terms, selections help us to cut
Photo One Digital Photo Shoots and Edits
 Photo One Digital Photo Shoots and Edits You will submit photo shoots, unedited and you will submit selected edited images. The shoots will be explained first and the edits will be explained later on this
> andy warhol > objective(s): > curricular focus: > specifications: > instruction: > procedure: > requirements:
: > curricular focus: > specifications: > instruction: > procedure: > requirements:") > andy warhol > objective(s): Students will select a portrait image, crop it tightly and eliminate the background, then uniquely color several times in the style of Andy Warhol. > curricular focus: This
> andy warhol > objective(s): Students will select a portrait image, crop it tightly and eliminate the background, then uniquely color several times in the style of Andy Warhol. > curricular focus: This
A.J. Wood on Instagram
 A.J. Wood http://ajwood.com ajwood@adobe.com @adobewan on Instagram The Photoshop Environment Photoshop's Start Workspace provides info at a glance including recent files, CC files, and presets for starting
Creating Pastel Images and other effects in Photoshop
 Creating Pastel Images and other effects in Photoshop Martin Addison 2015 Creating pastel images Page 1 Martin Addison FRPS Using White Layers in Photoshop 1. Create a new empty Layer 2. Edit> Fill 3.
Sharpening is an essential final step before output. But sometimes, you don t want to
 Sharpening is an essential final step before output. But sometimes, you don t want to sharpen your entire image equally. Skin tones, clouds, noisy areas - it s best to apply less sharpening to these areas,
Design a Halloween Pumpkin Wallpaper in Photoshop
 Design a Halloween Pumpkin Wallpaper in Photoshop By: Alvaro Guzman Halloween is near! So let's take a pumpkin image, carve it up, and light it for this coming holiday. You'll learn how to get this nice
An Introduction to Layers, Masks and Channels in Photoshop
 An Introduction to Layers, Masks and Channels in Photoshop Roy Killen, GMAPS, EFIAP, GMPSA (c) 2017 Roy Killen Layers, Masks and Channels Page 1 Two approaches to image editing When images are edited in
ITEC185 INTRODUCTION TO DIGITAL MEDIA
 1 ITEC185 INTRODUCTION TO DIGITAL MEDIA ADOBE PHOTOSHOP ITEC185 - Introduction to Digital Media ITEC185 - Introduction to Digital Media 2 What is Adobe Photoshop? Photoshop is the leading professional
Introduction to Photoshop Elements
 John W. Jacobs Technology Center 450 Exton Square Parkway Exton, PA 19341 610.280.2666 ccljtc@ccls.org www.ccls.org Facebook.com/ChesterCountyLibrary Introduction to Photoshop Elements Chester County Library
Martin Evening Adobe Photoshop CS4 for Photographers. Client: ET Nail Art Model: Karen Bookings Makeup: Camilla Pascucci
 Martin Evening Adobe Photoshop CS4 for Photographers Getting the balance right The main thing I show on these pages is how to use the paint brush to smooth the skin tones on the face and hands. I happen
Photoshop Basics. Mark Wallace. snapfactory
 Photoshop Basics Mark Wallace snapfactory Session One Photoshop Basics 1 Introducing Photoshop Adobe Photoshop CS3 is a powerful image editing application. In addition to basic image editing it provides
Teach Yourself Adobe Photoshop Topic 9: Photo Retouching Part 2
 http://www.gerrykruyer.com Teach Yourself Adobe Photoshop Topic 9: Photo Retouching Part 2 In the last week s lesson, you repaired damaged areas of an image, removed unwanted parts of an image, cloned
DIGITAL ECLIPSE. Eclipse photos courtesy of Fred Espanak 1998
 If you ve ever experienced a total solar eclipse, then you know that film truly cannot capture the entire visual experience. Many have tried, using complex darkroom printing techniques, but now Adobe Photoshop
15 Photoshop Tips. Changing Photoshop rulers from inches to picas
 5 Photoshop Tips Changing Photoshop rulers from inches to picas What s the difference between inches and picas? a 6x inch RGB JPEG file is.9 MB a 6x pica RGB JPEG file is. MB a 6x inch RGB TIFF file is.
Step 5) Split the red data using the Multi Scale Decomposition tool into a detail and residual background image.
 Split the red data using the Multi Scale Decomposition tool into a detail and residual background image.") Step 1) Press the Copy Portion toolbar button then left-click and drag a rectangle to crop the image. Press the Copy Portion button again to turn off cropping. Step 2) Scale the cropped image by 0.50 to
Step 1) Press the Copy Portion toolbar button then left-click and drag a rectangle to crop the image. Press the Copy Portion button again to turn off cropping. Step 2) Scale the cropped image by 0.50 to
Photoshop CC: Essentials
 Photoshop CC: Essentials Summary Workspace Overview... 2 Exercise Files... 2 Selection Tools... 3 Select All, Deselect, And Reselect... 3 Adding, Subtracting, and Intersecting... 3 Working with Layers...
The Future. of History
 The Future Non-Linear History option allows you to undo a state and try a new version of the image while the previous states remain available for reference (Figure 2). of History The Photoshop 5.0 History
Photoshop Tutorial. Millbrae Camera Club 2008 August 21
 Photoshop Tutorial Millbrae Camera Club 2008 August 21 Introduction Tutorial For this session Speak up if: you have a question I m going too fast or too slow I m not speaking loudly enough you know a better
All Creative Suite Design documents are saved in the same way. Click the Save or Save As (if saving for the first time) command on the File menu to
 command on the File menu to") 1 The Application bar is new in the CS4 applications. It combines the menu bar with control buttons that allow you to perform tasks such as arranging multiple documents or changing the workspace view.
1 The Application bar is new in the CS4 applications. It combines the menu bar with control buttons that allow you to perform tasks such as arranging multiple documents or changing the workspace view.
Page 1 of 9. Blending Multiple Exposures The Manual Way to HDR (High Dynamic Range) TJ Avery 7-Feb-2008
 TJ Avery 7-Feb-2008") Page 1 of 9 Blending Multiple Exposures The Manual Way to HDR (High Dynamic Range) TJ Avery 7-Feb-2008 The Problem Many natural landscape photographs will contain a range of light that exceeds what can
Page 1 of 9 Blending Multiple Exposures The Manual Way to HDR (High Dynamic Range) TJ Avery 7-Feb-2008 The Problem Many natural landscape photographs will contain a range of light that exceeds what can
Car Ad Photoshop Tutorial Miss Van Lenten Tools: Paint brush, Eraser, Quick Selection/Magic Wand, Quick Mask, Layer Mask
 Car Ad Photoshop Tutorial Miss Van Lenten Tools: Paint brush, Eraser, Quick Selection/Magic Wand, Quick Mask, Layer Mask Part One: Google image search for a car of your choosing. Make sure you go to tools
How to Create Fake Shadows
 TIP SHEET #8 How to Create Fake Shadows As well as the colour, it s the shadows in a picture that help to give it mood and atmosphere so in this tutorial I want to show you how you can add in extra shadows.
GETTING STARTED. 0 P a g e B a s i c s o f A d o b e P h o t o s h o p A g a P r i v a t e I n s t i t u t e f o r c o m p u t e r s c i e n c e
 GETTING STARTED 0 P a g e B a s i c s o f A d o b e P h o t o s h o p Adobe Photoshop: is a popular image editing software that provides a work environment consistent with Adobe Illustrator, Adobe InDesign,
Using Photoshop for Common Photo Issues Alan J. Cutler 3/2017
 Using Photoshop for Common Photo Issues Alan J. Cutler alancutler@verizon.net http://www.photorescuer.com 3/2017 Introduction A basic understanding of Photoshop will help you get the most out of this training
The Layer Blend Modes drop-down box in the top left corner of the Layers palette.
 Photoshop s Five Essential Blend Modes For Photo Editing When it comes to learning Photoshop, believe it or not, there's really only a handful of things you absolutely, positively need to know. Sure, Photoshop
2ND EDITION COVERS GIMP 2.8 GIMP. creative techniques for photographers, artists, and designers. michael j. hammel THE ARTIST S GUIDE TO
 2ND EDITION COVERS GIMP 2.8 THE ARTIST S GUIDE TO GIMP creative techniques for photographers, artists, and designers michael j. hammel 2.8 Photo Restoration Photo restoration and retouching the art of
Improve your photos and rescue old pictures
 PSPRO REVISTED Nov 5 2007 Page 1 of 7 Improve your photos and rescue old pictures This guide gives tips on how you can use Paint Shop5 and similar free graphic programmes to improve your photos. It doesn
Inverted Colors Photo Effect With Photoshop
 Inverted Colors Photo Effect With Photoshop Written by Steve Patterson. In this Photoshop Effects tutorial, we re going to look at how to invert the colors in an image to create interesting photo effects.
EXTREME CONTRAST PHOTO EFFECT
 EXTREME CONTRAST PHOTO EFFECT In this Photoshop tutorial, we re going to learn how to use layers, layer blend modes, some noise, a little sharpening, and a simple adjustment layer to easily give a photo
With the paper layer selected, select the lock transparent pixels box. An icon of a lock should now appear in the paper layer
 Eye In Hand Project This project is going to entail placing the eyeball you made in your last project in the middle of your hand. The goal is to make it look like it s popping out of the skin and to make
Luminosity Masks Program Notes Gateway Camera Club January 2017
 Luminosity Masks Program Notes Gateway Camera Club January 2017 What are Luminosity Masks : Luminosity Masks are a way of making advanced selections in Photoshop Selections are based on Luminosity - how
Introduction to Photoshop: Basic Editing & Prepare Images for the Web
 Introduction to Photoshop: Basic Editing & Prepare Images for the Web 1 LEARNING OBJECTIVES Basic tools in Photoshop & Use of Bridge Prepare images for print and web use TOPICS COVERED Photoshop Interface
PHOTOSHOP INVERTED COLORS PHOTO EFFECT
 Photo Effects: Photoshop Inverted Colors Photo Effect PHOTOSHOP INVERTED COLORS PHOTO EFFECT Most people would agree that taking a stroll through the forest can be very calming and peaceful, with all of
PHOTOSHOP TUTORIAL: DIGITAL DARKROOM TECHNIQUES
 PHOTOSHOP TUTORIAL: DIGITAL DARKROOM TECHNIQUES STEP BY STEP TRAINING Learn by doing step by step exercises. Includes downloadable class files that work on Mac & PC. EDITION 1 Copyright Info Published
Kent Messamore 3/6/2010
 Post Processing Kent Messamore 3/6/2010 What we will cover Post Processing Photoshop, Lightroom, Elements, and others JPEG or RAW Photoshop Elements Workflow Organization, Create, share Photoshop Elements
Texts and Resources: Assessments: Freefoto.com Group Photo Projects
 Effective Date: 2009-10 Name of Course: Digital Photography Grade Level: 9-12 Department: Industrial Technology and Engineering Length of Course: 30 cycles Instructional Time: 180 days Period Per Cycle:
PICTURE AS PAINT. Most magazine articles written. Creating a seamless, tileable texture in GIMP KNOW-HOW. Brightness. From Photo to Tile
 Creating a seamless, tileable texture in GIMP PICTURE AS PAINT Graphic artists often face the problem of turning a photograph into an image that will tile over a larger surface. This task is not as easy
u Selections, Channels, Masks, and Paths
 6 u Selections, Channels, Masks, and Paths No matter what type of Photoshop work you do, you will most likely have to make selections. Spot color corrections require selections. Compositing requires selections.
Adobe Photoshop. How To Get Started With Adobe InDesign CC: 10 Things Beginners Want To Know How To Do TO START: 1) ZOOM, MOVE, RETOUCH (05:11)
 ZOOM, MOVE, RETOUCH (05:11)") Adobe Photoshop How To Get Started With Adobe InDesign CC: 10 Things Beginners Want To Know How To Do Video By Terry White Tutorial Sheet by Juliet Davis TO START: Open the tutorial in YouTube, download
Adobe Photoshop How To Get Started With Adobe InDesign CC: 10 Things Beginners Want To Know How To Do Video By Terry White Tutorial Sheet by Juliet Davis TO START: Open the tutorial in YouTube, download
Make a Trendy Double Exposure Effect in Adobe Photoshop by Yulia Sokolova6 days ago
 Make a Trendy Double Exposure Effect in Adobe Photoshop by Yulia Sokolova6 days ago Difficulty:IntermediateLength:LongLanguages: Photo ManipulationAdobe PhotoshopPhoto EffectsDouble ExposureClipping Mask
AGENDA :: MULTIMEDIA TOOLS :: CLASS NOTES. :: Homework Critiques (5-7 minutes each) :: Photoshop Lesson 3. A-1 Gorgeous! [ COMPOSITE DEMO ] :: 7mins.
![AGENDA :: MULTIMEDIA TOOLS :: CLASS NOTES. :: Homework Critiques (5-7 minutes each) :: Photoshop Lesson 3. A-1 Gorgeous! [ COMPOSITE DEMO ] :: 7mins.](/thumbs/86/93336476.jpg "AGENDA :: MULTIMEDIA TOOLS :: CLASS NOTES. :: Homework Critiques (5-7 minutes each) :: Photoshop Lesson 3. A-1 Gorgeous! [ COMPOSITE DEMO ] :: 7mins.") CLASS :: 03 02.10 2017 AGENDA :: Homework Critiques (5-7 minutes each) A-1 Gorgeous! Upload A-1 Project to Student Folder :: Photoshop Lesson 3 [ COMPOSITE DEMO ] :: 7mins. I. SELECTIONS [ Common Law ]:
CLASS :: 03 02.10 2017 AGENDA :: Homework Critiques (5-7 minutes each) A-1 Gorgeous! Upload A-1 Project to Student Folder :: Photoshop Lesson 3 [ COMPOSITE DEMO ] :: 7mins. I. SELECTIONS [ Common Law ]:
From Advanced pixel blending
 1 From www.studio.adobe.com Blending pixel layers in Adobe Photoshop CS2 lets you do things that you simply can t do by adjusting a single image. One situation where we blend pixel layers is when we want
An Idiot's Guide to Photoshop. Part II Azamat Bohed E. TrueKolor.net
 An Idiot's Guide to Photoshop Part II Azamat Bohed E. TrueKolor.net Table of Contents 1.Introduction 3 2. Opening a Digital Image/Photo in Photoshop 3 3. Changing/removing the Background 4 3.1 Using the
PHOTOSHOP BASICS: VINTAGE PHOTO FIXES
 PHOTOSHOP BASICS: VINTAGE PHOTO FIXES Course Topics: Photo Adjustments Photo Editing Tools Layers What is Photoshop Elements? Photoshop Elements is a streamlined version of Adobe Photoshop CC. Despite
This tutorial will show you how to change your images into a cool dirty grunge design, which could be used for posters, prints, CD covers, etc.
 This tutorial will show you how to change your images into a cool dirty grunge design, which could be used for posters, prints, CD covers, etc.today We ll be making this: STEP 1: Open a new document in
Learning Adobe Photoshop CS6
 Module 1 Contents Chapter 1: Introduction to Photoshop Loading Photoshop...1-1 The Tools Panel...1-2 Using the Tools...1-3 The Panel Group...1-5 Layers...1-6 Loading a Sample File...1-6 Looking at the