The horse image used for this tutorial comes from Capgros at the Stock Exchange. The rest are mine.
|
|
|
- Cecilia Whitehead
- 6 years ago
- Views:
Transcription


1 First off, sorry to those of you that are on the mailing list or RSS that get this twice. I m finally moved over to a dedicated server, and in doing so, this post was lost. So, I m republishing it. This tutorial will walk you through how to create a faux bokeh background in Photoshop. For those of you that are unsure about what bokeh is, it is a Japanese term used in photography. It is used to describe the qualities of the area of a photo that is out of focus, and is used to help draw your eye to the subject of the photograph. Some pretty cool things happen with bokeh, too. Especially where lights or heavily lighted areas are concerned. Have you ever looked at a photograph or been watching a movie, perhaps where it was dark out, and the lights in the background are all blurry, but instead of just being blurry they appear as these odd gatherings of circles and/or polygons? I didn t notice it all that often until I started looking, and now I see it everywhere! You ll need to grab my Bokeh Photoshop & GIMP Brushes to follow along with this tutorial. This tutorial is specifically geared toward Photoshop users. If you re a Photoshop Elements or GIMP user, you should still be able to follow along, though the steps may not be exact for you. Let s get started!

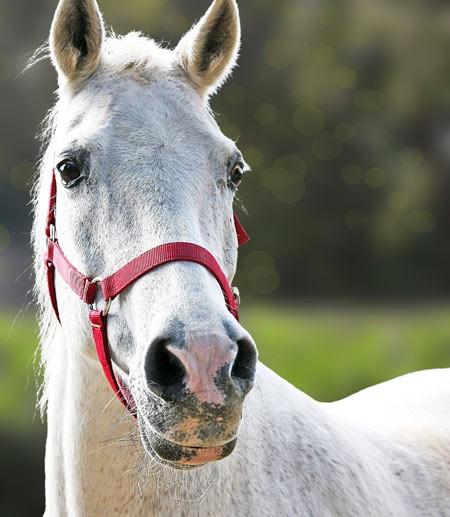
2 The horse image used for this tutorial comes from Capgros at the Stock Exchange. The rest are mine. 1. First, find the photo you ll be using to follow along. Now, take a good look at that photo. What it looks like will determine which part of this tutorial you will follow. If your photo is made up of all foreground and background, like the photo on the left below, then follow steps If your photo has your subject completely surrounded by the background of the photo, like the one on the right below, follow steps 2-11, then jump ahead to the alternate steps I will tell you when to skip ahead in the course of the tutorial, so just go get it in your mind whether or not you need to use the alternate steps or the regular steps, and get started.

3 2. Here s our before picture. It looks like a regular photo, with the horse in the foreground and the leaves, etc. behind it. The horse is already fairly prominent in this example, whereas there will be other photos that are in need of the bokeh effect much more than this one is. However, it will still illustrate the point. 3. The first step is going to be to isolate the foreground from the background, so that we can blur the background only. Open up your Layers window (if it s not open, choose Window > Layers to open it). Right click on the background layer and choose Duplicate Layer. If it gives you a chance to, type Foreground for the layer name. You should now have a layer just above the Background. If you didn t rename it to Foreground before, right click on that top Background copy layer and choose Layer Properties to rename it. Under Name, type Foreground and hit OK. Your layers window should now look something like this:

4 4. In this next part, we re going to basically remove the background from the Foreground layer, but we re going to do it using a layer mask. Those of you not familiar with how Layer Masks work, here s your chance to learn! Click on the Foreground layer. Now, near the bottom of the Layers window, find Add a Layer Mask and click on it. It should create something that looks like this: 5. Now click on the Background layer. I m going to have you make a bright blue temporary layer between these two, to help make it easier to cut out the foreground part of the image. Click on the Create a New Layer button near the bottom right of the layers window (or CTRL-SHIFT-N(PC) / CMD-SHIFT-N(Mac)). Choose a bright blue color for your foreground color by clicking on it and choosing the color from the palette. Then select the paint bucket tool ( G or right click on the Gradient Tool to switch from it to the Paint Bucket), and click once on the canvas anywhere. You won t see any change yet, because it s still hidden by the Foreground layer. For now. 6. Click back on your Foreground layer, but click specifically on the white square (the mask) part of it. Now click on the image part of the layer, just to the left of it. See how it highlights whichever part of the layer is currently active? That s how you know whether you re editing the photo part of that layer, or the mask part of that layer. This next part is, by far, the most time consuming part of this tutorial. But, any of you photo manipulators out there already know how very un-fun it can be to remove backgrounds. There aren t many tips that I can give you on how to get it just right. It s a matter of practice, and patience. There are some programs out there that will help you, and so if you have them, by all means use them. Let me explain to you how layer masks work, for those of you that haven t used them before. Any black on the layer mask will make the corresponding part of the image show up as transparent. Let s try something, just so you see what I mean. Make black your foreground color, and then select the mask part of the Foreground layer by clicking on it. Take a brush, any brush, and paint a stroke of black across the canvas. As you ll see, wherever that black shows up, the blue background is now showing through. CTRL-ALT-Z to undo (CMD-OPTION-Z on Mac). Click once on the photo thumbnail on the Foreground layer to make sure it s selected. You now have a few options. If you have a tablet and/or a steady hand, you can use black to paint out the background by hand, using black on the mask to cover the entire background portion. Probably the easiest way to do this, though, is to use the magic wand tool. Select the magic wand tool ( W or right click on the direct selection tool to switch to magic wand). If your background is mainly made up of one color, you can try moving the
5 tolerance (located on the top bar, just under the main menu) up to about 75% or so. If it s not, I d suggest keeping it in the 30-50% range. Use it to click on various portions of the background, making sure that you ONLY get background. Hold SHIFT, and select the next part of the background. Keep going like this, until you get a decent chunk of your background selected, then click once on the mask part of the Foreground layer. Using the paint bucket tool and with black as your selected color, click once within that selection to fill it with black. Keep doing this, switching back to the photo part of the Foreground layer to make your selections, then back to the mask part of the layer to fill them in with black. As you use the paint bucket to fill the selections in with black on the mask, the blue layer should start showing through, replacing the background of the photo. Here s what mine looks like. Notice that I ve made a mistake, and ended up taking a part of the horse s eye along with the background on accident. Fear not! That s the great thing about using masks, rather than simply deleting the background. You delete it, and it s gone. You use a mask, and it s as easy as taking some white and brushing over the eye area to fix it!

6 7. Most of our background is gone, leaving those ugly chunky parts behind. Well, that s easy enough to fix. This is the point where I usually grab a decent sized brush and go in there on the mask part of the layer, painting black over all those small spots to remove them entirely. Use a smaller brush to help clean up the edges of the foreground, remembering to use white to make a part visible, and black to make it transparent. Tip: If you need to see what you re supposed to be painting, click on the small eye to the left of the blue layer to hide that layer and see what s beneath it, then click on the eye again to make it visible once more. You can even paint with it hidden if that makes it easier for you in some parts. When you re done, you should have something that looks like this (I m also including a screenshot of my layers window, just so you can see my mask): 8. Now it s time to go in there and remove that ugly blue background. Right click on that blue layer and choose Delete Layer or click on the trashcan on the bottom right of the layers window to delete it.
, then click on the layer to make it active.")
7 9. Click on your Foreground layer to be sure it s active. Open the Channels window by choosing Window > Channels. At the very bottom, there should be a Foreground Mask layer. Click on the small box to the left of that layer to make it visible (where the eye would be, if there were one showing), then click on the layer to make it active. Choose Select > Color Range from the main menu. A window will pop up, and your mouse will turn into an eyedropper. Click within the black area of the mask (the background of the photo). Set the Fuzziness slider to around 80 or so, somewhere in the middle. Hit OK. The background of the photo should now be selected. Click on the small eye to the left of the Foreground Mask layer in the Channels palette to hide it once again, and then switch back over to your Layers Window. (If your Photoshop is still set up to the default configuration, they will be in the same window together, with tabs up at the top. You can just click on Layers there, or choose Windows > Layers, or hit F7.) 10. Click on the Background layer. CTRL-C (CMD-C on Mac) to copy. CTRL-V (CMD-V on Mac) to paste. You ve just made a new layer with JUST the background on it. Right click on that layer and choose Layer Properties, then name it Background2. We re going to blur this layer to take it out of focus. Why do we make this new, Background2 layer? Because if you were to blur the Background layer, you would also be blurring the subject. Granted, it s hidden behind the top layer, which also contains the subject. But with my example, since the horse is white, when I blurred the Background layer, I would get this odd, white halo effect around the horse because of the horse being blurred into the background. We don t want this. Blurring can do some odd things around the edges of the blur, if there s nothing there to blur into so we re going to need to extend the edges of the background, too. 11. Click on the small eye on the left side of the Foreground layer in the layers palette to make it invisible for now. Then click on the Background2 layer to make sure it is selected. Select the Smudge Tool ( R or right click on the Blur Tool/Sharpen Tool to select the Smudge Tool from the 3 choices). Select a medium sized round brush, and put the Strength (up on the top bar, under the main menu) on about 65%. Now go along the edges of the Background2 layer, smudging the edges of it inward.
, skip ahead to step 14 now!! Otherwise, continue on to step 12.")
8 Yes, it s going to look a little funny for now. But don t worry, it ll be blurred beyond recognition in a few moments. *** If your photo has the subject surrounded by background and you need to use the alternate steps (see step 1 for an explanation), skip ahead to step 14 now!! Otherwise, continue on to step 12.*** 12. Click on the small eye next to the Foreground layer once again, to un-hide it. Make sure your Background2 layer is still selected if it isn t, click on it! Choose Filter > Blur > Gaussian Blur from the top menu. What radius you select here is really up to personal preference (and the size of your canvas). You can move the slider up and down and see the effects that it has on your canvas. I would suggest choosing a decently high radius, so that the background becomes fairly indistinct.
9 13. Now load up the Bokeh Brushes. Use the Eyedropper Tool ( I or right click on the Color Sampler or Ruler Tools and choose Eyedropper from the 3 choices) to pick up one of the very lightest colors from your background. Any color of your choosing. You may even want to do a few different colors, it s up to you and what your photo looks like. I chose one of the very lightest greens from my foliage background. Click on the Create a New Layer button on the bottom right part of the Layers Window (or CTRL-SHIFT-N/CMD-SHIFT-N). Name it Bokeh. On that layer, you ll add the bokeh effect. You can either use one of the pre-made, scattered brushes or use one of the painting brushes and click on the canvas in the places where you d like the bokeh to show up. Each brush will have a different effect, so find the one you like the most. In this example, I ve used two of the scattered brushes, one round and one polygon shaped. Note: Bokeh will usually correspond to the most lighted areas of your background. I would suggest turning the opacity of that Bokeh layer down (on the top right of the Layers Window) to perhaps about 40-60%, depending on what bokeh brushes you use. Or, you can leave it how it is if you want the bokeh to be really obvious. It s totally up to you. That s it! Play around with the brushes and the colors, and enjoy! Let me know in the comments below if you have any problems..
10
11 14. You should only be following these next steps if your photograph has the subject completely surrounded by background. You should have followed steps 1-11 above, then skipped down to here. We re going to blur the background differently in this version, because part of the background is actually our foreground! So, here s how to do that. Click on the Background2 layer. Choose Filter > Blur > Gaussian Blur from the top menu. The radius is up to you, and will depend on the size of your photo. Play around with the slider until you get it to be looking fairly blobby and indistinct, but not all completely mushed together. Something like this: 15. You can see why we need to modify this, because that just looks odd. So, add another layer mask, this time to the Background2 layer by clicking on the Add Layer Mask button on the bottom of the layers window. Select the Gradient Tool by right clicking on the Paint Bucket Tool (which we used earlier) and choose the Gradient Tool from the 2 choices. Just below the top menu, you should see the various settings for the Gradient Tool. Click on the small arrow just to the right of the larger gradient thumbnail (it s highlighted in red in my photo above). It will open up a window of various gradient colors and styles. (Note: Before doing this next step, if you ve created any custom gradients and have them currently loaded in your gradient palette but haven t saved them, make sure you save them first!) Click on the small arrow on the right side of that window, and then choose Reset Gradients. It ll ask if you re sure, and choose OK.
12 16. Third from the left on the top row should be a black to white gradient. Select it by clicking on it. Click on the mask part of the Background2 layer to make it active. Starting right around the feet of your subject(s), click on the canvas and drag upwards. Let go about 3/4 of the way up the photo. If you don t get it right the first time, play around with it where you make your gradient will vary greatly from photo to photo. You can just keep redoing it until it looks right. You see what you re doing here? You re making the background slowly blur out as it gets further away. The foreground should be in focus, along with our subjects. The background should be blurry. Now, with mine, I thought that the blurry part was a bit too transparent, showing some of the background behind it, in focus. So, what I did was I right clicked on that Background2 layer and chose Duplicate Layer to thicken it up a bit. Mine now looks like this: 17. Now load up the Bokeh Brushes. Use the Eyedropper Tool ( I or right click on the Color Sampler or Ruler Tools and choose Eyedropper from the 3 choices) to pick up one of the very lightest colors from your background. Any color of your choosing. You may even want to do a few different colors, it s up to you and what your photo looks like. I chose one of the very lightest greens from my foliage background, a light blue from the sky, and a lighter straw color for the field. Click on the Create a New Layer button on the bottom right part of the Layers Window (or CTRL-SHIFT-N/CMD-SHIFT-N). Name it Bokeh. On that layer, you ll add the bokeh effect. You can either use one of the pre-made, scattered brushes or use one of the painting brushes and click on the canvas in the places where you d like the bokeh to show up. Each brush will have a different effect, so find the one you like the most. In this example, I ve used two of the scattered brushes, one round and one polygon shaped. Note: Bokeh will usually correspond to the most lighted areas of your background. I would suggest turning the opacity of that Bokeh layer down (on the top right of the Layers

13 Window) to perhaps about 40-60%, depending on what bokeh brushes you use. Or, you can leave it how it is if you want the bokeh to be really obvious. It s totally up to you. Here s how mine looks: Note: If the subject of your photo is more toward the background, then you may want to blur out the foreground of the background, leave the middle sharp, and then blur out the very back of the background. In other words, it should be sharp around the feet or bottom of your subject, then a bit blurry in front of that and blurry in back of it. I ll show you what I mean. Click on the mask part of the Background2 layer to select it. Look up at the gradient thumbnail on the top bar, just under the main menu. The same one that we clicked the little arrow next to last time. This time, click ON the gradient part. It should open up a window that looks like this:

14 Yours should still go from black to white. You want to make it look like the photo above. Click on the small box on the bottom left of the gradient bar, then click on the box just to the right of Color: and make it white. Do the same thing with the box on the lower right of the gradient click on it, then click on the Color box and make it white. Then click just under the gradient somewhere in the middle. It will make another box there. Click on that box, then click on the Color, and make that one black. Your gradient should now look like mine. Make your gradient the same way that you did before, except instead of clicking at the feet/bottom of the subject and dragging upwards, click near the very bottom of the photo (or below it, even, if you zoom out and make the canvas window bigger than your photo this is how I did it) and drag upward until you re a bit above the feet/bottom of your subject and then let go.
15 See how mine looks now? It s sharp around the feet of my subjects, a little blurry in the foreground of that, and gets very blurry toward the back. This photo didn t need it, really, but some photos will. If the subjects had been standing more toward the back of that field, they would most definitely have needed this step. Play around with the gradient and see what looks best.


16 That s it! Let me know in the comments below if you have any problems. Here s some before and after photos, side by side: Tutorial is ObsidianDawn.com
3. Notice how you can barely see my leaf brush? And what you can see is extremely transparent. But it s there. Now, to get rid of that transparency.
 Some brushes were made to be transparent, others were not. And because of the nature of Photoshop (or PSP/GIMP) brushes, sometimes they end up looking that way when they shouldn t. This tutorial will explain
The original photo. The final result.
 giving a photo painted edges In this Adobe Photoshop tutorial, we re going to combine a couple of different effects. First, we ll give the photo easy-tocreate painted edges, and then we ll make it look
Reveal the mystery of the mask
 Reveal the mystery of the mask Imagine you're participating in a group brainstorming session to generate new ideas for the design phase of a new project. The facilitator starts the brainstorming session
SAVING, LOADING AND REUSING LAYER STYLES
 SAVING, LOADING AND REUSING LAYER STYLES In this Photoshop tutorial, we re going to learn how to save, load and reuse layer styles! Layer styles are a great way to create fun and interesting photo effects
Photoshop 1. click Create.
 Photoshop 1 Step 1: Create a new file Open Adobe Photoshop. Create a new file: File->New On the right side, create a new file of size 600x600 pixels at a resolution of 300 pixels per inch. Name the file
Retouching Portraits in Photoshop
 Retouching Portraits in Photoshop I Removing Blemishes When removing blemishes, acne or other imperfections on the skin, our goal is to maintain as much of the original skin texture as possible. That way,
ADD A REALISTIC WATER REFLECTION
 ADD A REALISTIC WATER REFLECTION In this Photoshop photo effects tutorial, we re going to learn how to easily add a realistic water reflection to any photo. It s a very easy effect to create and you can
TOPAZ LENS EFFECTS QUICK START GUIDE
 TOPAZ LENS EFFECTS QUICK START GUIDE Introduction Topaz Lens Effects is designed to give you the power to direct and focus your viewer s eyes where you want them. With Lens Effects, you get advanced technology
5 Masks and Channels
 5 Masks and Channels Adobe Photoshop uses masks to isolate and manipulate specific parts of an image. A mask is like a stencil. The cutout portion of the mask can be altered, but the area surrounding the
FLAMING HOT FIRE TEXT
 FLAMING HOT FIRE TEXT In this Photoshop text effects tutorial, we re going to learn how to create a fire text effect, engulfing our letters in burning hot flames. We ll be using Photoshop s powerful Liquify
ADDING RAIN TO A PHOTO
 ADDING RAIN TO A PHOTO Most of us would prefer to avoid being caught in the rain if possible, especially if we have our cameras with us. But what if you re one of a large number of people who enjoy taking
The original image. Let s get started! The final rainbow effect. The photo sits on the Background layer in the Layers panel.
 Add A Realistic Rainbow To A Photo In this Photoshop photo effects tutorial, we ll learn how to easily add a rainbow, and even a double rainbow, to a photo! As we ll see, Photoshop ships with a ready-made
Here s the photo I ll be starting with: The original photo. Let s get started! The final result.
 How To Lighten And Brighten Eyes In this Photo Retouching tutorial, we ll learn a fast and easy way to lighten and brighten someone s eyes in a photo using nothing more than a simple adjustment layer,
The original image. The final rainbow effect.
 ADD A realistic rainbow to a photo In this Photoshop photo effects tutorial, we re going to learn how to easily add a rainbow, even a double rainbow, to a photo. Of course, as with most photo effects,
Rendering a perspective drawing using Adobe Photoshop
 Rendering a perspective drawing using Adobe Photoshop This hand-out will take you through the steps to render a perspective line drawing using Adobe Photoshop. The first important element in this process
CREATE A BURNT EDGE EFFECT
 CREATE A BURNT EDGE EFFECT One of the all-time classic effects in Photoshop is the burnt edge, and there s lots of different ways to create it, but in this Adobe Photoshop tutorial, we re going to look
Introduction to Photoshop Elements
 John W. Jacobs Technology Center 450 Exton Square Parkway Exton, PA 19341 610.280.2666 ccljtc@ccls.org www.ccls.org Facebook.com/ChesterCountyLibrary Introduction to Photoshop Elements Chester County Library
VERY. Note: You ll need to use the Zoom Tools at the top of your PDF screen to really see my example illustrations.
 VERY This tutorial is written for those of you who ve found or been given some version of Photoshop, and you don t have a clue about how to use it. There are a lot of books out there which will instruct
Learning Photo Retouching techniques the simple way
 Learning Photo Retouching techniques the simple way Table of Contents About the Workshop... i Workshop Objectives... i Getting Started... 1 Photoshop Workspace... 1 Setting up the Preferences... 2 Retouching
Exploring Photoshop Tutorial
 Exploring Photoshop Tutorial Objective: In this tutorial we will create a poster composed of three distinct elements: a Bokeh, an image and title text. The Bokeh is an effect which is sometimes seen in
Adding Fireworks To A Photo With Photoshop
 Adding Fireworks To A Photo With Photoshop Written by Steve Patterson. In this Photoshop Effects tutorial, we re going to learn how to add fireworks to a photo. What you ll need is a photo of fireworks
Adobe Photoshop CS5 Layers and Masks
 Adobe Photoshop CS5 Layers and Masks Email: training@health.ufl.edu Web Page: http://training.health.ufl.edu Adobe Photoshop CS5: Layers and Masks 2.0 Hours The workshop will cover creating and manipulating
This Photoshop Tutorial 2012 Steve Patterson, Photoshop Essentials.com. Not To Be Reproduced Or Redistributed Without Permission.
 How To Replace The Sky In A Photo In this Photoshop tutorial, we ll learn how to easily replace the sky in a photo! We ll use a basic selection tool and a layer mask to separate the sky from the area below
Digital Design and Communication Teaching (DiDACT) University of Sheffield Department of Landscape. Adobe Photoshop CS5 INTRODUCTION WORKSHOPS
 University of Sheffield Department of Landscape. Adobe Photoshop CS5 INTRODUCTION WORKSHOPS") Adobe INTRODUCTION WORKSHOPS WORKSHOP 1 - what is Photoshop + what does it do? Outcomes: What is Photoshop? Opening, importing and creating images. Basic knowledge of Photoshop tools. Examples of work.
Adobe INTRODUCTION WORKSHOPS WORKSHOP 1 - what is Photoshop + what does it do? Outcomes: What is Photoshop? Opening, importing and creating images. Basic knowledge of Photoshop tools. Examples of work.
Introduction to Photoshop
 Introduction to Photoshop Instructional Services at KU Libraries A Division of Information Services www.lib.ku.edu/instruction Abstract: This course covers the basics of Photoshop, including common tools
ADDING A RAINBOW TO A PHOTOGRAPH
 ADDING A RAINBOW TO A PHOTOGRAPH This assignment will cover how to add a simple rainbow (or if you want to go crazy, a double rainbow) to any photograph. This will give us some great work with gradients,
Extreme Makeovers: Photoshop Retouching Techniques
 Extreme Makeovers: Table of Contents About the Workshop... 1 Workshop Objectives... 1 Getting Started... 1 Photoshop Workspace... 1 Retouching Tools... 2 General Steps... 2 Resolution and image size...
Perspective Shadow Text Effect In Photoshop
 Perspective Shadow Text Effect In Photoshop Written by Steve Patterson. In this Photoshop text effects tutorial, we ll learn how to create a popular, classic effect by giving text a perspective shadow
The final wrap text in 3D result.
 WRAPPING TEXT IN 3D In this Photoshop tutorial, we re going to learn how to easily wrap text around a 3D object in Photoshop, without the need for any 3D software. We re going to be wrapping our text around
15 Photoshop Tips. Changing Photoshop rulers from inches to picas
 5 Photoshop Tips Changing Photoshop rulers from inches to picas What s the difference between inches and picas? a 6x inch RGB JPEG file is.9 MB a 6x pica RGB JPEG file is. MB a 6x inch RGB TIFF file is.
Creating Photo Borders With Photoshop Brushes
 Creating Photo Borders With Photoshop Brushes Written by Steve Patterson. In this Photoshop photo effects tutorial, we ll learn how to create interesting photo border effects using Photoshop s brushes.
How useful would it be if you had the ability to make unimportant things suddenly
 c h a p t e r 3 TRANSPARENCY NOW YOU SEE IT, NOW YOU DON T How useful would it be if you had the ability to make unimportant things suddenly disappear? By one touch, any undesirable thing in your life
TEXT PERSPECTIVE SHADOW EFFECT
 TEXT PERSPECTIVE SHADOW EFFECT In this Photoshop text effects tutorial, we ll learn how to create a popular, classic effect by giving text a perspective shadow as if a light source behind the text was
ADDING FIREWORKS TO A PHOTO
 ADDING FIREWORKS TO A PHOTO In this Photoshop tutorial, we re going to learn how to add fireworks to a photo. What you ll need is a photo of fireworks and the photo you want to add the fireworks to (preferably
HIGH KEY GLOW EFFECT IN PHOTOSHOP
 HIGH KEY GLOW EFFECT IN PHOTOSHOP In this Photoshop tutorial, we ll learn how to create a high key glow effect, which is a fancy way of saying we ll be applying a glow only to the highlights in an image.
ADD A SPARKLE TRAIL TO A PHOTO
 ADD A SPARKLE TRAIL TO A PHOTO In this Adobe Photoshop tutorial, we re going to learn how to add a sparkle trail to a photo, using a custom Photoshop brush we ll be creating. I got the idea for this tutorial
Enhanced Eyes. Here's the image I'll be working with (glamour eyes photo from Shutterstock): Here's what the eyes will look like when we're done:
: Here's what the eyes will look like when we're done:") Enhanced Eyes Here's the image I'll be working with (glamour eyes photo from Shutterstock): The original image. Here's what the eyes will look like when we're done: The final effect. Here's a close-up
Enhanced Eyes Here's the image I'll be working with (glamour eyes photo from Shutterstock): The original image. Here's what the eyes will look like when we're done: The final effect. Here's a close-up
PHOTOSHOP PUZZLE EFFECT
 PHOTOSHOP PUZZLE EFFECT In this Photoshop tutorial, we re going to look at how to easily create a puzzle effect, allowing us to turn any photo into a jigsaw puzzle! Or at least, we ll be creating the illusion
Okay, that s enough talking. Let s get things started. Here s the photo I m going to be using in this tutorial: The original photo.
 add visual interest with the rule of thirds In this Photoshop tutorial, we re going to look at how to add more visual interest to our photos by cropping them using a simple, tried and true design trick
WORN, TORN PHOTO EDGES EFFECT
 Photo Effects: CC - Worn, Torn Photo Edges Effect WORN, TORN PHOTO EDGES EFFECT In this Photoshop tutorial, we ll learn how to take the normally sharp, straight edges of an image and make them look all
UNDERSTANDING LAYER MASKS IN PHOTOSHOP
 UNDERSTANDING LAYER MASKS IN PHOTOSHOP In this Adobe Photoshop tutorial, we re going to look at one of the most essential features in all of Photoshop - layer masks. We ll cover exactly what layer masks
Adobe Photoshop CC 2018 Tutorial
 Adobe Photoshop CC 2018 Tutorial GETTING STARTED Adobe Photoshop CC 2018 is a popular image editing software that provides a work environment consistent with Adobe Illustrator, Adobe InDesign, Adobe Photoshop,
Painting Special Effects on Photographs
 TUTORIAL 7 Painting Special Effects on Photographs In this tutorial you will learn how to transform a photo into a striking color composition with paintbrushes, masks, blending modes, color, and paper
How to blur a background in Photoshop CS3, Elements 9 or later By Steve Zimic
 This is a technique I developed which allows blurring of the background without any bleeding of the main subject into the background. This technique does require a working knowledge of the various selection
People In Spaces A Workshop on using Photoshop to introduce Entourage Elements into existing work.
 People In Spaces A Workshop on using Photoshop to introduce Entourage Elements into existing work. Peter M. Gruhn peter.gruhn@the-bac.edu Sponsored by Atelier and the Learning Resource Center 1 Layers
Photoshop: Manipulating Photos
 Photoshop: Manipulating Photos All Labs must be uploaded to the University s web server and permissions set properly. In this lab we will be manipulating photos using a very small subset of all of Photoshop
Teton Technique C H A P T E R 3
 C H A P T E R 3 Teton Technique TRY IT AT HOME: TetonTechnique.psd SIT BACK AND WATCH: TetonTechnique.mov Ladies and gentlemen, girls and boys of all ages, welcome to the Grand Teton National Park. But
GETTING STARTED MAKING A NEW DOCUMENT
 Accessed with permission from http://web.ics.purdue.edu/~agenad/help/photoshop.html GETTING STARTED MAKING A NEW DOCUMENT To get a new document started, simply choose new from the File menu. You'll get
Adobe PhotoShop Elements
 Adobe PhotoShop Elements North Lake College DCCCD 2006 1 When you open Adobe PhotoShop Elements, you will see this welcome screen. You can open any of the specialized areas. We will talk about 4 of them:
XXXX - ILLUSTRATING FROM SKETCHES IN PHOTOSHOP 1 N/08/08
 INTRODUCTION TO GRAPHICS Illustrating from sketches in Photoshop Information Sheet No. XXXX Creating illustrations from existing photography is an excellent method to create bold and sharp works of art
Composite Master Class Blend two images together to create a seamless collage
 Composite Master Class Blend two images together to create a seamless collage By Liz Ness Whether it s a custom senior photo, an album cover, or a basic digital collage, combining two or more images to
The original image. As I said, we ll be looking at a few different variations on the effect. Here s the first one we ll be working towards:
 DIGITAL PIXEL EFFECT In this Photoshop tutorial, we re going to look at how to create a digital pixel effect, which is often used in ads that sell anything to do with digital. We re going to first pixelate
Adobe Photoshop CS5 Tutorial
 Adobe Photoshop CS5 Tutorial GETTING STARTED Adobe Photoshop CS5 is a popular image editing software that provides a work environment consistent with Adobe Illustrator, Adobe InDesign, Adobe Photoshop
THE BACKGROUND ERASER TOOL
 THE BACKGROUND ERASER TOOL In this Photoshop tutorial, we look at the Background Eraser Tool and how we can use it to easily remove background areas of an image. The Background Eraser is especially useful
Photoshop: Manipulating Photos
 Photoshop: Manipulating Photos All Labs must be uploaded to the University s web server and permissions set properly. In this lab we will be manipulating photos using a very small subset of all of Photoshop
Car Ad Photoshop Tutorial Miss Van Lenten Tools: Paint brush, Eraser, Quick Selection/Magic Wand, Quick Mask, Layer Mask
 Car Ad Photoshop Tutorial Miss Van Lenten Tools: Paint brush, Eraser, Quick Selection/Magic Wand, Quick Mask, Layer Mask Part One: Google image search for a car of your choosing. Make sure you go to tools
ADOBE PHOTOSHOP CS TUTORIAL
 ADOBE PHOTOSHOP CS TUTORIAL A D O B E P H O T O S H O P C S Adobe Photoshop CS is a popular image editing software that provides a work environment consistent with Adobe Illustrator, Adobe InDesign, Adobe
Turn A Photo Into A Collage Of Polaroids With Photoshop
 http://www.photoshopessentials.com/photo-effects/polaroids/ Turn A Photo Into A Collage Of Polaroids With Photoshop Written by Steve Patterson. In this Photoshop Effects tutorial, we ll learn how to take
Add Rays Of Sunlight To A Photo With Photoshop
 Add Rays Of Sunlight To A Photo With Photoshop Written by Steve Patterson. In this photo effects tutorial, we'll learn how to easily add rays of sunlight to an image, a great way to make an already beautiful
Step 1: Open A Photo To Place Inside Your Text
 Place A Photo Or Image In Text In Photoshop In this Photoshop tutorial, we re going to learn how to place a photo or image inside text, a very popular thing to do in Photoshop, and also a very easy thing
METAL TEXT EFFECT. Step 1: Create A New Document. Step 2: Fill The Background With Black
 METAL TEXT EFFECT In this text effects tutorial, we ll learn how to easily create metal text, a popular effect widely used in video games and movie posters! It may seem like there s a lot of steps involved,
ADD TRANSPARENT TYPE TO AN IMAGE
 ADD TRANSPARENT TYPE TO AN IMAGE In this Photoshop tutorial, we re going to learn how to add transparent type to an image. There s lots of different ways to make type transparent in Photoshop, and in this
Create A Starry Night Sky In Photoshop
 Create A Starry Night Sky In Photoshop Written by Steve Patterson. In this Photoshop effects tutorial, we ll learn how to easily add a star-filled sky to a night time photo. I ll be using Photoshop CS5
Create a Candy Cane. Create a new canvas with the size 8x10 inches at 300 pixel/inch. See image below Ctrl + N
 Create a Candy Cane The Basic Candy Cane Canvas and Shape 1. Create a new folder, name it Candy Cane your name. Create a new canvas with the size 8x10 inches at 300 pixel/inch. See image below Ctrl + N
Ascension's Atlas Tutorial in GIMP
 Ascension's Atlas Tutorial in GIMP What follows is, as near as I can make it, an approximation in gimp of Ascension s Photoshop Atlas Style tutorial. Only the techniques used are in this version, so I
Challenge Image: Blur the Background
 Challenge Image: Blur the Background Challenge Image: Blur the Background In this lesson, we re going to work on a challenge image that was submitted by a Masters Academy member. The image features a little
XXXX - MAKING A FLYER BOOKLET COVER 1 N/08/08
 INTRODUCTION TO GRAPHICS Making a flyer booklet cover Information Sheet No. XXXX Create a new document with these settings. Note that you will be using 300 dpi because this will be made for print. Keepit
Selective Edits in Camera Raw
 Complete Digital Photography Seventh Edition Selective Edits in Camera Raw by Ben Long If you ve read Chapter 18: Masking, you ve already seen how Camera Raw lets you edit your raw files. What we haven
Quick Cut Outs with Photoshop Brushes
 TIP SHEET #10 Quick Cut Outs with Photoshop Brushes Compositing or rather, the process of selecting and cutting out assets from one picture and realistically adding them into another is an extremely common
TURN A PHOTO INTO A PATTERN OF COLORED DOTS (CS6)
") TURN A PHOTO INTO A PATTERN OF COLORED DOTS (CS6) In this photo effects tutorial, we ll learn how to turn a photo into a pattern of solid-colored dots! As we ll see, all it takes to create the effect is
TURN A PHOTO INTO A PATTERN OF COLORED DOTS (CS6) In this photo effects tutorial, we ll learn how to turn a photo into a pattern of solid-colored dots! As we ll see, all it takes to create the effect is
Using Adobe Photoshop
 Using Adobe Photoshop 6 One of the most useful features of applications like Photoshop is the ability to work with layers. allow you to have several pieces of images in the same file, which can be arranged
Using layer masks to remove backgrounds with Photoshop CS5 and CS6
 Using layer masks to remove backgrounds with Photoshop CS5 and CS6 Use layer masks to combine these pictures into this You will learn: 1. Layers and layer masks 2. Brushes 3. Layer styles 4. Type tool
Compiled by <<coldbing>> FIRE EFFECTS
 FIRE EFFECTS Compiled by Step 1 - New Document Make a new document. Fill it with black. Then make a new layer, and type out (or whatever) you want to set on fire in white. Step 2 - Windy Go
Turning Photograph Into Cartoon-Style Picture. Digital Media I West High School Susan M. Raymond
 Turning Photograph Into Cartoon-Style Picture Digital Media I West High School Susan M. Raymond Part 1: Creating Outline Wondering how those guys on the internet turn photograph into a nice cartoon-style
Create a Beautiful Abstract Portrait in Photoshop - Psd Premium Tutorial
 Create a Beautiful Abstract Portrait in Photoshop - Psd Premium Tutorial By: Wojciech Pijecki In this tutorial we will combine several stock images to create an artistic, abstract portrait of a woman.
SURREALISM IN PHOTOSHOP
 SURREALISM IN PHOTOSHOP In this tutorial your aim is to create a surrealist inspired image using Photoshop. You will combine a selection of images in an illogical, non realistic manner. Set up a folder
Here s the image I ll be working with:
 FOCUS WITH LIGHT - The Lighting Effects FILTER In this Photoshop tutorial, we ll learn how to add focus to an image with light using Photoshop s Lighting Effects filter. We ll see how easy it is to add
By Washan Najat Nawi
 By Washan Najat Nawi how to get started how to use the interface how to modify images with basic editing skills Adobe Photoshop: is a popular image-editing software. Two general usage of Photoshop Creating
GETTING STARTED. 0 P a g e B a s i c s o f A d o b e P h o t o s h o p A g a P r i v a t e I n s t i t u t e f o r c o m p u t e r s c i e n c e
 GETTING STARTED 0 P a g e B a s i c s o f A d o b e P h o t o s h o p Adobe Photoshop: is a popular image editing software that provides a work environment consistent with Adobe Illustrator, Adobe InDesign,
Key Terms. Where is it Located Start > All Programs > Adobe Design Premium CS5> Adobe Photoshop CS5. Description
 Adobe Adobe Creative Suite (CS) is collection of video editing, graphic design, and web developing applications made by Adobe Systems. It includes Photoshop, InDesign, and Acrobat among other programs.
Inverted Colors Photo Effect With Photoshop
 Inverted Colors Photo Effect With Photoshop Written by Steve Patterson. In this Photoshop Effects tutorial, we re going to look at how to invert the colors in an image to create interesting photo effects.
Stone Creek Textiles. Layers! part 1
 Stone Creek Textiles Layers! part 1 This tutorial is all about working with layers. This, to my mind, is one of the two critical areas to master in order to work creatively with Photoshop Elements. So,
Varis PhotoMedia Tutorials
 Varis PhotoMedia Tutorials 2002, Lee Varis Welcome This tutorial has been prepared for the photographer who is striving to learn digital imaging. I make an effort to supply current information about digital
Make a Trendy Double Exposure Effect in Adobe Photoshop by Yulia Sokolova6 days ago
 Make a Trendy Double Exposure Effect in Adobe Photoshop by Yulia Sokolova6 days ago Difficulty:IntermediateLength:LongLanguages: Photo ManipulationAdobe PhotoshopPhoto EffectsDouble ExposureClipping Mask
PHOTOSHOP INVERTED COLORS PHOTO EFFECT
 Photo Effects: Photoshop Inverted Colors Photo Effect PHOTOSHOP INVERTED COLORS PHOTO EFFECT Most people would agree that taking a stroll through the forest can be very calming and peaceful, with all of
Clipping Masks And Type Placing An Image In Text With Photoshop
 Clipping Masks And Type Placing An Image In Text With Photoshop Written by Steve Patterson. In a previous tutorial, we learned the basics and essentials of using clipping masks in Photoshop to hide unwanted
ITEC185 INTRODUCTION TO DIGITAL MEDIA
 1 ITEC185 INTRODUCTION TO DIGITAL MEDIA ADOBE PHOTOSHOP ITEC185 - Introduction to Digital Media ITEC185 - Introduction to Digital Media 2 What is Adobe Photoshop? Photoshop is the leading professional
GIMP Simple Animation Tutorial
 GIMP Simple Animation Tutorial Banner size: 690 x 200 transparent background layer There are really two parts to making an animated banner. The first is to set up the banner all the components besides
EXTREME CONTRAST PHOTO EFFECT
 EXTREME CONTRAST PHOTO EFFECT In this Photoshop tutorial, we re going to learn how to use layers, layer blend modes, some noise, a little sharpening, and a simple adjustment layer to easily give a photo
Photoshop: Manipulating Photos
 Photoshop: Manipulating Photos All Labs must be uploaded to the University s web server and permissions set properly. In this lab we will be manipulating photos using a very small subset of all of Photoshop
Add Transparent Type To An Image With Photoshop
 Add Transparent Type To An Image With Photoshop Written by Steve Patterson. In this Photoshop Effects tutorial, we re going to learn how to add transparent type to an image. There s lots of different ways
Superhero. Here s the image I ll be using for this Photoshop tutorial:
 Superhero Here s the image I ll be using for this Photoshop tutorial: The original image. Obviously, this little guy sees himself as a mighty super hero, so let s help him out by projecting a super hero
Photoshop: a Beginner s course. by: Charina Ong Centre for Development of Teaching and Learning National University of Singapore
 Photoshop: a Beginner s course by: Charina Ong Centre for Development of Teaching and Learning National University of Singapore Table of Contents About the Workshop... 1 Prerequisites... 1 Workshop Objectives...
Blend Photos Like a Hollywood Movie Poster
 Blend Photos Like a Hollywood Movie Poster Written By Steve Patterson In this Photoshop tutorial, we're going to learn how to blend photos together like a Hollywood movie poster. Blending photos is easy
Making Selections: 3 Ways to isolate an area in an image: Layer Mask : Mask the part of the layer you don t want to be visible
 3 Ways to isolate an area in an image: Layer Mask : Mask the part of the layer you don t want to be visible Eraser Tool: Erase the areas of an image or layer you don t want to be visible Make a Selection:
Getting Started. 1. Double click on the eye con. 2. Single click on File, then new, then OK. Click here.
 Getting Started 1. Double click on the eye con. 2. Single click on File, then new, then OK. Click here. What is Photoshop? Photoshop is a program that lets you make pictures. You can put away your markers
11 Advanced Layer Techniques
 11 Advanced Layer Techniques After you ve learned basic layer techniques, you can create more complex effects in your artwork using layer masks, path groups, filters, adjustment layers, and more style
Stitching Panoramas using the GIMP
 Stitching Panoramas using the GIMP Reference: http://mailman.linuxchix.org/pipermail/courses/2005-april/001854.html Put your camera in scene mode and place it on a tripod. Shoot a series of photographs,
Sharpening is an essential final step before output. But sometimes, you don t want to
 Sharpening is an essential final step before output. But sometimes, you don t want to sharpen your entire image equally. Skin tones, clouds, noisy areas - it s best to apply less sharpening to these areas,
Practice: Using Layer Masks
 DIGITAL IMAGING I UNIT 4 1 Practice: Using Layer Masks INTRODUCTION: Layer Masks are a way to hide elements on a layer without erasing them. In that manner, the hidden elements can be re-exposed without