Converse Chuck Taylor Shoes Photoshop Tutorial
|
|
|
- Domenic Copeland
- 5 years ago
- Views:
Transcription
1

2 20 Converse Chuck Taylor Shoes Photoshop Tutorial Step 1 Create A New Document Create a New Document. The size of my canvas is 600px x 700px with a 72dpi resolution. Save as Chuck Taylor - Your Name.
3 Step 2 Background Open the Background image and drag it onto the Chuck Taylor canvas. Step 3 Shoe Open the PATTERN image. Drag the PATTERN on to the CHUCK TAYLOR canvas. Name the layer PATTERN. You will use this as the pattern for your shoe. Step 3 Pen the Shoe Shape CREATE A NEW LAYER and name it SHOE. Using the pen tool, pen a path around the shoe. Use the CONVERT POINT tool to round out the path. Right click and make selection. Fill the selection with # A864a8. CMD+D to deselect. Duplicate the SHOE layer and name it SHOE 2. Delete the PATTERN layer.


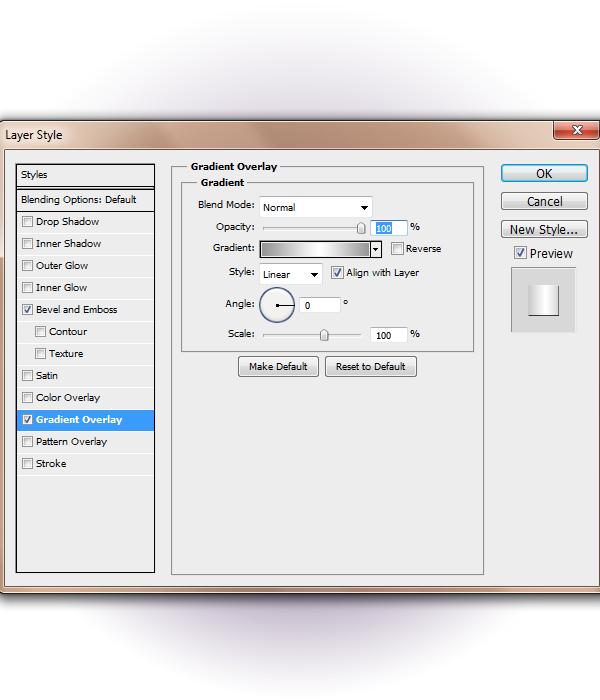
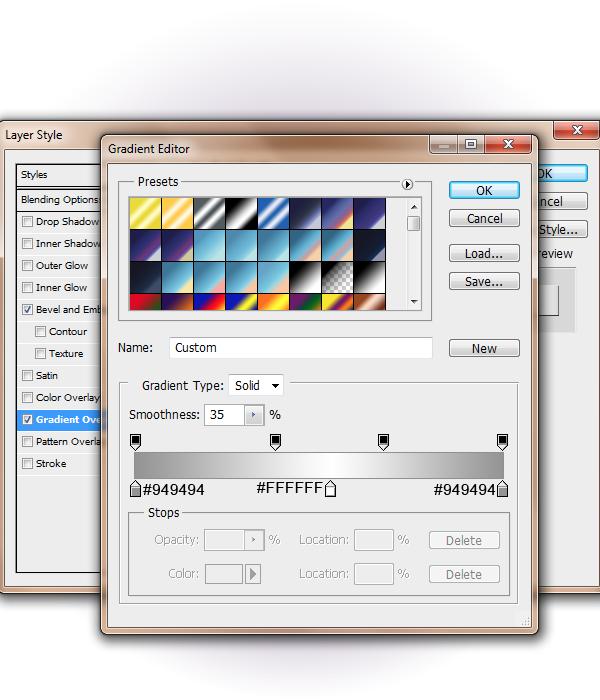
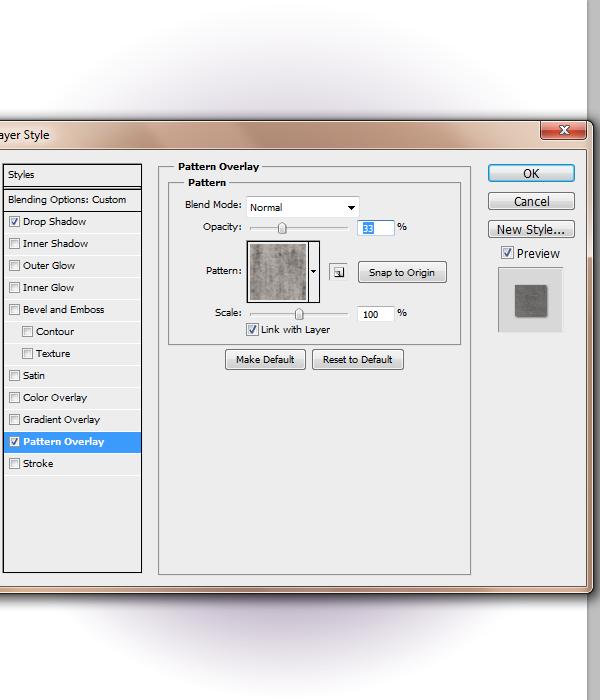
4 Step 4 DOUBLE CLICK on the SHOE 2 layer add a pattern overlay. See below: (Select the Artist Surfaces and click on the 4th box.) In the layers pallet, set the FILL to 0%. SAVE!!!!!

5 Step 5 RIGHT CLICK the SHOE 2 layer and select CONVERT TO SMART OBJECT. RIGHT CLICK the SHOE 2 layer again and select RASTERIZE. Then change the layer blend to Multiply. It should look like this:


6 Step 6 Create a NEW LAYER and name it SHADOW. Click on the SHADOW layer, hold the CMD key and click the thumbnail of the SHOE 2 layer. This should select the shoe. Click on the paint brush tool and set the brush to soft round, 60 px, color Black (#000000). Lightly darken in the areas around the edge of the shoe. Change this LAYER BLEND to soft light.
. With one click, paint the tip of the shoe. As long as the shoe shape is selected, the paint will only cover the shoe area.")
7 Step 7 Create a NEW LAYER and name it TOE. Make sure the shoe shape is still selected. If it isnt, while on the TOE LAYER, CMD+click the thumbnail of the SHOE 2 layer. Select a HARD ROUND paint brush, 125 px, WHITE (#ffffff). With one click, paint the tip of the shoe. As long as the shoe shape is selected, the paint will only cover the shoe area. Step 8 Create a NEW LAYER and name it TOE SHADOW. Make sure the shoe image is still selected. Select a SOFT ROUND paint brush, 45 px, Gray (#dedcdc ). Set the brush Flow to 27% and paint along the bottom tip of the shoe,

8 Step 9 Now we will create the sole of the shoe. Create a NEW LAYER and name it SOLE. Grab your pen tool and make a shape like the image below, use the CONVERT POINT tool and round out the edge. Right click, make selection and fill it with #ffffff.

9 CMD+D to deselect. Use a hard eraser to smooth out and reshape the sole if necessary. SAVE!!!!! Step 9 Now we will shade the SOLE just like we did the tip of the shoe. CREATE A NEW LAYER. Name it SOLE SHADOW. While on the SOLE SHADOW layer, CMD+click the thumbnail of the SOLE layer. Use a soft round paintbrush, 32px soft round brush (#dedcdc, Flow:27%) and lightly shade the sole around the bottom.

10 Step 10 Create a NEW LAYER and name it LINE. Grab your pen tool. Make sure that your paint brush is set to a hard round brush, 4 px and the color is set to #2f2f2f. The select the PEN tool and pen a path like below: Use the CONVERT POINT tool and round out where needed. Right click and stroke the path to create a line like the one below:

11 Step 11 Create a NEW LAYER and name it TOE LINE. Grab your pen tool. Make sure that your paint brush is set to a hard round brush, 4 px and the color is set to # Then select the PEN tool and pen a path like below: Use the CONVERT POINT tool to round out the points. Right click and stroke path. CMD+D to deselect.

12 10/8/2015 Step 12 Rings Now we will create the holes or the rings that the shoe laces go through. CREATE A NEW LAYER and name it RING. Grab your Elliptical Marquee Tool and make a circle. Note: I like to hold down the shift key when doing this so that I get a even round circle. Fill it with #ffffff 4


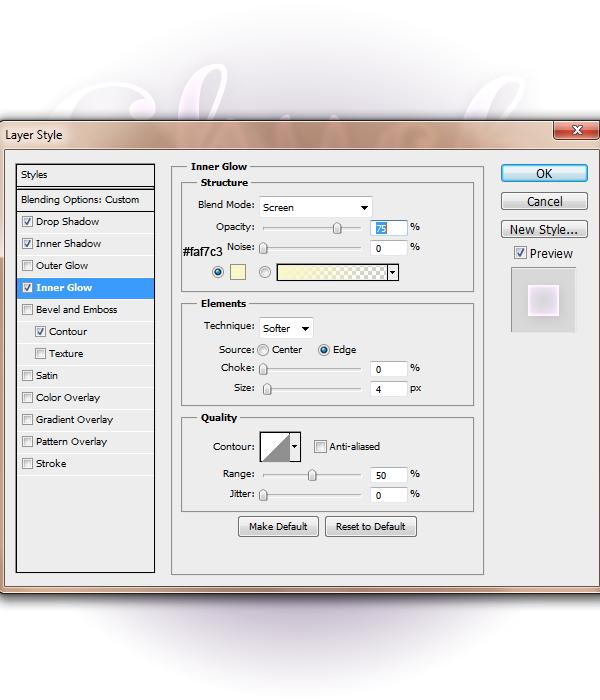
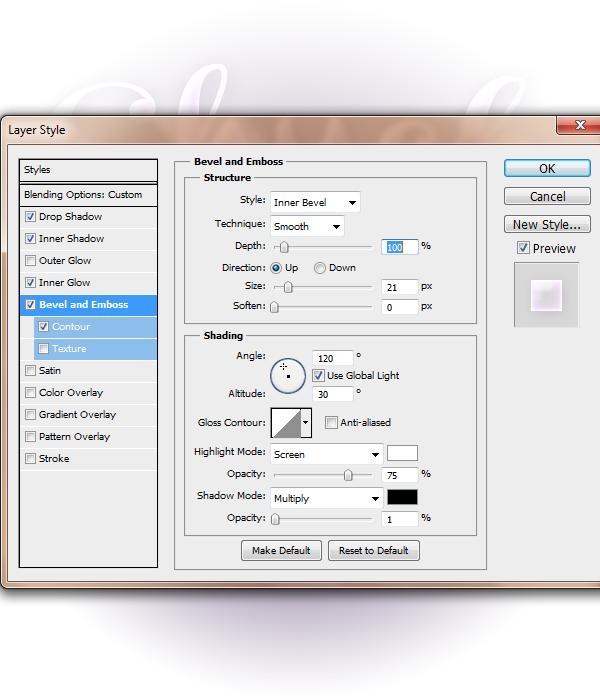
13 After the selection is filled, Select>Modify>Contract 4 px, then click ok. Then press delete. Double click the RING LAYER and set the following Layer styles
14
15

16 Duplicate the RING layer, name it RING 2 and move it next to the first ring. Repeat these last couple of steps again to make the circles but this time contract it by 3 px instead of the 4 px and duplicate this ring several times.


17 Step 13 Now we will create the inside of the shoe. CREATE A NEW LAYER and name it LINING. Grab your pen tool and make this shape and fill it with #ffffff. Create a NEW LAYER and name it LINING SHADOW. Make sure the LINING area is still selected so that the gray paint will stay inside the selection. With a soft round brush, #b9b9b8, paint on the inner lining like below. Change the layer Opacity to create different shades.

18 Step 14 Create a NEW LAYER and name it WHITE. Make sure the LINING is still selected. With a 4 px soft round brush, #ffffff, paint along the outer edge. See below:

19 Step 15 Go back to one of your ring layers, duplicate it, name it TOP RING and place it on top of the LINING of the shoe. See below: Erase the part of the ring that overlaps the shoe. Step 16 Create a NEW LAYER underneath TOP RING layer and paint a dark shadow underneath using the paint brush tool. Don t use black but use a dark gray color.
20 Step 17 Converse logo Create a NEW LAYER and name it LOGO. Use the Elliptical Marquee tool make a circle (hold down the shift key) and fill it with white #ffffff. Step 18 Create a NEW LAYER and name it LOGO SHADOW. Make sure the circle is still selected. Use a large soft round brush, #d6d4d4, and shade in the circle.

21 Step 19 Create a NEW LAYER and name it STAR. Select the paint brush and look in the brushes - close to the bottom for the star brush we created in the Avatar tutorial. Use the star brush to paint a Navy Blue star. Step 20 Stitching Create a NEW LAYER and name it STITCH. While on the STITCH layer, hold the CMD key and click on the thumbnail of the LOGO layer. This will make the selection of the circle. Go to SELECT/MODIFY/ CONTRACT and contract the circle 2 px.


22 Step 20 Stitching Select EDIT/STROKE. Use a dark gray. CMD+D to deselect. Using a very small, hard paint brush, erase tiny sections of the stroke to make it look like stitches.

23 Step 21 Download the font from my website. To install the font, double click on the file. Choose Install. Use the Type tool, select the Bou College Font, Change the color of the text to #e34f4d and type Converse. ARC or bend the text so it curves it over the star.
24 Step 22 Type out All Star and add this setting Step 23 Download the font called Bradley Hand ITC from my website. Install it and Type out Chuck Taylor.
25 Step 24 Go back down to the very first circle layer and add this drop shadow:
26 Step 25 Create a new layer and name it LINE 1. Grab your pen tool and draw a line from the edge of the inner lining to the outside tip of the shoe. USE THE Convert Point tool to round out the edges. Make sure your paint brush tool is set at 2px hard round brush #f2f2f2. Select stroke path after right clicking the pen tool line. Step 46 Create a new layer and name it LINE 2. Create another line but change the color to #2c1b2c
27
28 Step 27 Add this drop shadow Step 28 Shoe strings Create a new layer and name it String 1. Grab your pen tool and start making your shoe laces. Use the Convert Point tool to round out the edges. Right Click and make selection, fill with white #ffffff.
29 Step 29 Add thses layer styles
30
31
32 Step 30 Create a new layer and name it STRING SHADOW 1. While on the String Shadow layer, CMD+CLICK the THUMBNAIL of the STRING 1 layer to select the string. With a small soft round brush #6e6e6e darken in the areas of the laces. Play around with different opacities too to get the right look.
33 Step 31 Create a new layer and name it HIGHLIGHT 1. Highlight some of the areas with #ffffff change the Opacity of this layer to 74% 60/89
34
35 Step 32 Now create a new layer and name it TIP. With your Elliptical marquee tool make a oval. Fill it with white #FFFFFF, see below:

36 Step 33 Add a Drop Shadow
37 Step 34 Create a new layer and name it TIP SHADOW. Make sure the shape tip is selected and with a small round brush #6e6e6e darken the edge of this shape 64/89
38 Step 35 Now create the rest of the laces and repeat the above steps. MAKE A NEW LAYER FOR EACH STRING! Step 36 Create a new layer and with a #5d5d5d 8px soft round brush paint inside the holes where the laces are. Just darken in those areas. Change this layer to Multiply with an Opacity of 72%
39 Step 37 Create a new layer and with a medium size soft round paint brush #5d5d5d darken the area on the tip of the shoe
40 Step 38 Create a new layer repeat the last step but use this color #6a506b with a Fill of 72%
41
42 Step 39 Now we are done with the shoe and it's time for the text. Download the font Channel from my website. Change the text color to white #ffffff. Type out Chuck.

43 Step 33 Then click the warp text icon and add this setting Step 34 Change this layer to Soft Light and a Fill of 0% and add these layer styles
44
45
46
47

48 Step 35 Repeat these same steps and layer styles for the word Taylor. The only thing to change is the warped text
49 Step 36 Create a new layer and name it TEXT SHADOW and with a 8px soft round paint brush #5b3c70 paint along the edges of the word.
50 Step 37 Change this layer to Divide
51 We are done!
52
TV Aquarium. Create a new document. 8.5 x 11, 300 dpi. Save as TV Aquarium Your Name. Create TV shape. Use Pen
 Create a new document. 8.5 x 11, 300 dpi. Save as TV Aquarium Your Name. Create TV shape. Use Pen Tool, Convert Point Tool and Direct Selection Tool. We need side shapes to create patches of light and
Using the Shoe Advertisement tutorial, create a shoe ad that is specifically designed to appeal to your assigned consumer.
 Lesson Instructions: Using the Shoe Advertisement tutorial, create a shoe ad that is specifically designed to appeal to your assigned consumer. Consider the specifications in the tutorial as the requests
Create a new image: 10 IN height and 16 IN width, 300 dpi.
 The images needed for this project are on my website. Create a new image: 10 IN height and 16 IN width, 300 dpi. Create a new layer and fill the layer with white.. Create a radial gradient by using following
This tutorial will show you how to change your images into a cool dirty grunge design, which could be used for posters, prints, CD covers, etc.
 This tutorial will show you how to change your images into a cool dirty grunge design, which could be used for posters, prints, CD covers, etc.today We ll be making this: STEP 1: Open a new document in
Animated Snowman. Image size: 11 w x 17 h 300 dpi
 Animated Snowman Image size: 11 w x 17 h 300 dpi Step 1 First of all, you ll need the texture on my website. Now open a new document. I usually work on really big documents because I can work on the details
Reflection Project. Please start by resetting all tools in Photoshop.
 Reflection Project You will be creating a floor and wall for your advertisement. Before you begin on the Reflection Project, create a new composition. File New: Width 720 Pixels / Height 486 Pixels. Resolution
How to Draw a Realistic iphone 4 with
 Home Freebies Submit Your Work Contact Us How to Draw a Realistic iphone 4 with Photoshop Jan 3 2011 By Mohammad Jeprie 34 Comments In this tutorial, we will draw a realistic-looking iphone 4 using Photoshop.
A quick note: We hope that you will find something from the Tips and Tricks that will add a little pizazz to your yearbook pages!
 A quick note: The following pages are tips and tricks for Basic Photoshop users. You may notice that some instructions indicate that non-awpc fonts were used, and that some colors were created using the
Here is a 100% zoom close up. Name in Popsicles
 Here is a 100% zoom close up Name in Popsicles Step 1 Let s start by creating a new Photoshop document. Mine is 2560 1440 pixels. Fill the background with a color of your choice (it s not important at
Digital Image Manipulation 2014
 Week 4 Advanced Type Techniques- create special effect type Step 1 Create a new 1024 x 768 px document. Set the document background color to light pink or follow my colour (#f8cece) Create the text using
Winter Card.
 Winter Card Used images: http://www.cgtextures.com/texview.php?id=24321&phpsessid=95e8e8290894cc5194898 e16d1dddb4c http://www.cgtextures.com/texview.php?id=14285&phpsessid=95e8e8290894cc5194898 e16d1dddb4c
AGENDA :: MULTIMEDIA TOOLS :: CLASS NOTES. :: Homework Critiques (5-7 minutes each) :: Photoshop Lesson 3. A-1 Gorgeous! [ COMPOSITE DEMO ] :: 7mins.
![AGENDA :: MULTIMEDIA TOOLS :: CLASS NOTES. :: Homework Critiques (5-7 minutes each) :: Photoshop Lesson 3. A-1 Gorgeous! [ COMPOSITE DEMO ] :: 7mins.](/thumbs/86/93336476.jpg "AGENDA :: MULTIMEDIA TOOLS :: CLASS NOTES. :: Homework Critiques (5-7 minutes each) :: Photoshop Lesson 3. A-1 Gorgeous! [ COMPOSITE DEMO ] :: 7mins.") CLASS :: 03 02.10 2017 AGENDA :: Homework Critiques (5-7 minutes each) A-1 Gorgeous! Upload A-1 Project to Student Folder :: Photoshop Lesson 3 [ COMPOSITE DEMO ] :: 7mins. I. SELECTIONS [ Common Law ]:
CLASS :: 03 02.10 2017 AGENDA :: Homework Critiques (5-7 minutes each) A-1 Gorgeous! Upload A-1 Project to Student Folder :: Photoshop Lesson 3 [ COMPOSITE DEMO ] :: 7mins. I. SELECTIONS [ Common Law ]:
Create a Candy Cane. Create a new canvas with the size 8x10 inches at 300 pixel/inch. See image below Ctrl + N
 Create a Candy Cane The Basic Candy Cane Canvas and Shape 1. Create a new folder, name it Candy Cane your name. Create a new canvas with the size 8x10 inches at 300 pixel/inch. See image below Ctrl + N
Adobe Illustrator Craft a Dramatic Vector Landscape Environment
 Adobe Illustrator Craft a Dramatic Vector Landscape Environment This tutorial will show the intermediate Adobe Illustrator artist how to make a dramatic landscape environment. You should have a basic understanding
Building - Image*After Bokeh - Regularjane Landscape 1 - Anders Bjerré Pedersen Landscape 2 - author Sundstrom(nickname)
") Click to enlarge the image. Used images: Download Moon shape(image created with the Photoshop tools) Icicles - Sergei Furtcev Cloud 1(Ruslan Olinchuk), Cloud 2(Image*After), Cloud 3(Sergei Perov) Stars
Click to enlarge the image. Used images: Download Moon shape(image created with the Photoshop tools) Icicles - Sergei Furtcev Cloud 1(Ruslan Olinchuk), Cloud 2(Image*After), Cloud 3(Sergei Perov) Stars
Make a Planet. by Greg Martin
 Make a Planet by Greg Martin This tutorial should step you through making a simple, yet realistic-looking planet using Adobe Photoshop 7, and ONLY Adobe Photoshop 7. We're working small here, so keep in
Design a Halloween Pumpkin Wallpaper in Photoshop
 Design a Halloween Pumpkin Wallpaper in Photoshop By: Alvaro Guzman Halloween is near! So let's take a pumpkin image, carve it up, and light it for this coming holiday. You'll learn how to get this nice
Outlined Doodle Element
 Outlined Doodle Element digitalscrapper.com/blog/qt-outlined-doodles Jen White Outlined Doodle Element by Jen White Repurpose the doodles in your stash into trendy outlined elements. Important Design Concept:
WORN, TORN PHOTO EDGES EFFECT
 Photo Effects: CC - Worn, Torn Photo Edges Effect WORN, TORN PHOTO EDGES EFFECT In this Photoshop tutorial, we ll learn how to take the normally sharp, straight edges of an image and make them look all
CREATE A BASIC VEXEL IMAGE
 CREATE A BASIC VEXEL IMAGE Tutorial from http://psd.tutsplus.com/ Compiled by INTRODUCTION This time we'll create a simple vexel image from a picture. Also, we'll use some pattern effects
Drawing the Red Christmas Bell
 Vector 3D Christmas Bells Thinking of drawing some Christmas bells for this Christmas? Read this illustrator tutorial to learn how to draw 5 different styles of vector Christmas bells using the 3D Revolve
prepared by Allison Hwang for T. Purdy 2011
 There are many ways to create material textures in Photoshop. In addition to using primarily the blending tool, you can also use filters to create textures. In this tutorial, the objective is to create
Using Adobe Photoshop
 Using Adobe Photoshop 6 One of the most useful features of applications like Photoshop is the ability to work with layers. allow you to have several pieces of images in the same file, which can be arranged
Exploring Photoshop Tutorial
 Exploring Photoshop Tutorial Objective: In this tutorial we will create a poster composed of three distinct elements: a Bokeh, an image and title text. The Bokeh is an effect which is sometimes seen in
AGENDA. :: Homework Critiques (5 minutes each) :: Photoshop Lesson 3. A-1 Gorgeous! [ COMPOSITE DEMO ] :: 7mins. I. SELECTIONS [ Common Law ]:
![AGENDA. :: Homework Critiques (5 minutes each) :: Photoshop Lesson 3. A-1 Gorgeous! [ COMPOSITE DEMO ] :: 7mins. I. SELECTIONS [ Common Law ]:](/thumbs/93/112781712.jpg "AGENDA. :: Homework Critiques (5 minutes each) :: Photoshop Lesson 3. A-1 Gorgeous! [ COMPOSITE DEMO ] :: 7mins. I. SELECTIONS [ Common Law ]:") CLASS :: 09.24 2018 AGENDA :: Homework Critiques (5 minutes each) A-1 Gorgeous! Upload A-1 Project to Student Folder :: Photoshop Lesson 3 [ COMPOSITE DEMO ] :: 7mins. I. SELECTIONS [ Common Law ]: a.
CLASS :: 09.24 2018 AGENDA :: Homework Critiques (5 minutes each) A-1 Gorgeous! Upload A-1 Project to Student Folder :: Photoshop Lesson 3 [ COMPOSITE DEMO ] :: 7mins. I. SELECTIONS [ Common Law ]: a.
Colorful Glowing Mask Photoshop Tutorial Photoshop TUTfactory The best Photoshop tutorials in one place
 Step 1: To start, create new canvas sized at 994 1312 pixels, and fill it with black. Next, create a new layer, and go to Filter->Render->Clouds. Duplicate this layer, and then merge the two layers. Set
Project 8: Nice Close-Up
 ps7ie_p08_b.qxd 11/18/02 3:25 PM Page 74 ps7ie_p08_b.qxd 11/18/02 3:25 PM Page 75 Photoshop 7 Image Effects In this project, work with a picture that was taken at an angle for effect. Correct and crop
Na'vi from Avatar Movie
 Na'vi from Avatar Movie Prep Open Photoshop. Go to Photoshop>Preferences>Performance. Where is says "History && Cache" Change the history states to "200". Chances are you will mess up A LOT and you want
Sports Jersey Mania, Part 2 By Joel Day
 Sports Jersey Mania, Part 2 By Joel Day jersey. We ll continue with all the finer details to create our basketball jersey template and at the end we ll show you a Home and Away STEP THIRTEEN: In this step,
Making Selections: 3 Ways to isolate an area in an image: Layer Mask : Mask the part of the layer you don t want to be visible
 3 Ways to isolate an area in an image: Layer Mask : Mask the part of the layer you don t want to be visible Eraser Tool: Erase the areas of an image or layer you don t want to be visible Make a Selection:
Humanoid. By: Adeel Naseer
 Humanoid In this tutorial we will manipulate a women s portrait in into a human robot. Main tool used to get the robotic body figure is, Pen tool. We will stroke the path by using various brush sizes.
Star Diffusion Tutorial
 Star Diffusion Tutorial Learn how to add a unique dreamy effect to your photos with this Star Diffusion Photoshop tutorial. This Photoshop effect creates diffusion in the shape of a four-point star and
PHOTOSHOP TUTORIAL: DIGITAL DARKROOM TECHNIQUES
 PHOTOSHOP TUTORIAL: DIGITAL DARKROOM TECHNIQUES STEP BY STEP TRAINING Learn by doing step by step exercises. Includes downloadable class files that work on Mac & PC. EDITION 1 Copyright Info Published
How to Create a Landscape Wallpaper for your Desktop
 How to Create a Landscape Wallpaper for your Desktop Why not create a vector landscape wallpaper? In this simple tutorial, you will learn how to create an eye-appealing wallpaper quickly and effectively.
Students will be able to create movement through the use of line or implied line and repetition.
 Title of Unit Digital Imaging Title of Lesson Self Portrait Montage in Photoshop Course Graphic Design 1 Instructor Heidi Stachulak hstachulak@hf233.org Objectives: Composition Students will be able to
Tutorial. Creating digital artworks. Photographic edges
 Tutorial Creating digital artworks Photographic edges Disclaimer The views expressed herein do not necessarily represent the views of the Australian Government Department of Education, Science and Training.
prepared by Allison Hwang for T. Purdy 2011
 This tutorial shows you how to create a basic screen display on a product in Adobe Photoshop. Creating details, such as shadows and reflections, can help make your product more realistic and convincing
Learning Adobe Photoshop CS6
 Module 1 Contents Chapter 1: Introduction to Photoshop Loading Photoshop...1-1 The Tools Panel...1-2 Using the Tools...1-3 The Panel Group...1-5 Layers...1-6 Loading a Sample File...1-6 Looking at the
Create a Beautiful Abstract Portrait in Photoshop - Psd Premium Tutorial
 Create a Beautiful Abstract Portrait in Photoshop - Psd Premium Tutorial By: Wojciech Pijecki In this tutorial we will combine several stock images to create an artistic, abstract portrait of a woman.
How to Create a Curious Owl in Illustrator
 How to Create a Curious Owl in Illustrator Tutorial Details Program: Adobe Illustrator Difficulty: Intermediate Estimated Completion Time: 1.5 hours Take a look at what we're aiming for, an inquisitive
Create an Amazing Surreal-Style Treehouse in Photoshop Photoshop Tutorials
 Download the PSD Surreal Treehouse.zip 23.59 MB Download from Website Surreal Treehouse Photoshop Tutorial Tutorial Resources Tree Houses Thanks archetype, Deviantart Bonsai Tree Thanks fabemiko, Deviantart
Create A Briefcase Icon
 Create A Briefcase Icon In this tutorial, I will show you how to create a briefcase icon with rectangles, ellipses, and gradients. This briefcase icon is great for web designs and user interfaces. Moreover,
Creating Pastel Images and other effects in Photoshop
 Creating Pastel Images and other effects in Photoshop Martin Addison 2015 Creating pastel images Page 1 Martin Addison FRPS Using White Layers in Photoshop 1. Create a new empty Layer 2. Edit> Fill 3.
Introduction to Layers
 Introduction to Layers By Anna Castano A layer is an image or text that is piled on top of another. There are many things you can do with layer and it is easy to understand how it works. Through the introduction
Create a Creepy Face Photo Manipulation in Photoshop
 i TUTORIALS Create a Creepy Face Photo Manipulation in Photoshop by Alan Klim Advertisement In this tutorial we ll show you an easy way to create a nice creepy face effect using Photoshop. We strongly
Create a Multicolored Splashed Text Effect in Adobe Illustrator
 Create a Multicolored Splashed Text Effect in Adobe Illustrator by Diana Toma17 Nov 2014 What You'll Be Creating In this tutorial you will learn how to create a multicolored splashed text effect in Adobe
PHOTOSHOP & ILLUSTRATOR BOOTCAMP
 FALL 2014 - ELIZABETH LIN PHOTOSHOP & ILLUSTRATOR BOOTCAMP ILLUSTRATOR ALIGNMENT To access the alignment panel, go to Window -> Align. You should see a panel like the one below. This panel allows you to
This tutorial will show you how to use artistic grunge overlays to transform your photos into works of art.
 ARTISTIC GRUNGE OVERLAYS For all photo editing software that supports PNG files If you have any questions, please feel free to contact me at kim@photosbykimhill.com. This tutorial will show you how to
Photoshop. Make a Spooky Halloween Pumpkin Text Effect in Photoshop - Photoshop tutorial PSDDude
 Photoshop October 4th,2017 1 2 Image size: 7 in wide x 3 in high 300 dpi Start with a simple black gradient background layer. Radial Gradiant, black to gray. Install the CREEPSVILLE font. Center and Type
Step 1. Facebook Twitter Google+ Find us on Facebook. Vectortuts+ How to Create a Curious Owl in Illustrator CS4 Vectortuts+
 Joomla developers needed - Long term potential in India Copywriter Email Campaigns Wordpress Creative design Social media in UK More Freelance Jobs... Facebook Twitter Google+ Find us on Facebook Step
How To Create a Stylish Skull Based Vector Illustration
 How To Create a Stylish Skull Based Vector Illustration The skull and crossed pistons mark is a popular adaption of the tradition skull and crossbones symbol and is commonly seen in motorcycle culture,
22B / NONDESTRUCTIVE EDITING - QUICK MASKS 1
 22B / NONDESTRUCTIVE EDITING - QUICK MASKS 1 The following sections will deal with photoshop more as an artists studio and not just as an extension of photography. You will work more with layers and using
How to Create Spooky Halloween Typography in Photoshop
 Envato Elements: Unlimited templates, graphics, courses, ebooks, and now 300,000 photos! Only $29/month envato-tuts+ Sign Up Sign In Advertisement DESIGN & ILLUSTRATION > TEXT EFFECTS How to Create Spooky
Painting Special Effects on Photographs
 TUTORIAL 7 Painting Special Effects on Photographs In this tutorial you will learn how to transform a photo into a striking color composition with paintbrushes, masks, blending modes, color, and paper
Reflections Project Tutorial Digital Media 1
 Reflections Project Tutorial Digital Media 1 You are creating your own floor and wall for your advertisement. Please do this before you begin on the Diamonds Project: 1. Reset all tools in Photoshop. 2.
EXTREME CONTRAST PHOTO EFFECT
 EXTREME CONTRAST PHOTO EFFECT In this Photoshop tutorial, we re going to learn how to use layers, layer blend modes, some noise, a little sharpening, and a simple adjustment layer to easily give a photo
Hello Champions. I have added some bubble brushes to the resources that I found on Deviantart that are by Jennyle88.
 Hello Champions I m Renée and once again I am bringing you a Daydreamer or Fantasy style tutorial. Fantasy style pages come about from kits that contain certain elements like cars, treasure chests, furniture
How to Create Fake Shadows
 TIP SHEET #8 How to Create Fake Shadows As well as the colour, it s the shadows in a picture that help to give it mood and atmosphere so in this tutorial I want to show you how you can add in extra shadows.
Diploma in Photoshop
 Diploma in Photoshop Photoshop Selection Tools Selection Tools allow us to isolate areas of our image and apply adjustments to these selected areas only. A selection simply isolates one or more parts of
Make Watercolor and Marker Style Portraits with Illustrator
 Make Watercolor and Marker Style Portraits with Illustrator Save Preview Resources Portrait by Lillian Bertram (Creative Commons Share Alike used here with permission) Step 1: Set up your Illustrator document
LAC TIRE PRINTER. Manual for creating data. Attention for creating print data Create the Printing Data Make data from original data...
 LAC TIRE PRINTER Manual for creating data Attention for creating print data... 2 Create the Printing Data... 3 Make data from original data... 11 How to Create Data for Letters... 14 Examples on How to
> color scheme painting
 > color scheme painting > objective(s): Students will create a highly accurate brush overlay painting of a closely cropped image of their eye using only colors within a specific selected color scheme,
HOW TO CREATE A SUPER SHINY PENCIL ICON
 HOW TO CREATE A SUPER SHINY PENCIL ICON Tutorial from http://psd.tutsplus.com/ Compiled by INTRODUCTION The Pencil is one of the visual metaphors most used to express creativity. In this tutorial,
Part 1- Fundamental Functions
 Part 1- Fundamental Functions Note: Alt+Tab will allow you to move between programs in the docker. Shift+Tab removes right pallets Tab removes all pallets Ctrl+1= centers art board Ctrl + 0= fill window
All Creative Suite Design documents are saved in the same way. Click the Save or Save As (if saving for the first time) command on the File menu to
 command on the File menu to") 1 The Application bar is new in the CS4 applications. It combines the menu bar with control buttons that allow you to perform tasks such as arranging multiple documents or changing the workspace view.
1 The Application bar is new in the CS4 applications. It combines the menu bar with control buttons that allow you to perform tasks such as arranging multiple documents or changing the workspace view.
CREATE A BURNT EDGE EFFECT
 CREATE A BURNT EDGE EFFECT One of the all-time classic effects in Photoshop is the burnt edge, and there s lots of different ways to create it, but in this Adobe Photoshop tutorial, we re going to look
Practice: Using Layer Masks
 DIGITAL IMAGING I UNIT 4 1 Practice: Using Layer Masks INTRODUCTION: Layer Masks are a way to hide elements on a layer without erasing them. In that manner, the hidden elements can be re-exposed without
Photoshop 1. click Create.
 Photoshop 1 Step 1: Create a new file Open Adobe Photoshop. Create a new file: File->New On the right side, create a new file of size 600x600 pixels at a resolution of 300 pixels per inch. Name the file
 http://blog.spoongraphics.co.uk/tutorials/how-to-intensify-your-landscape-photos-in-photoshop This post was originally published in 2011 THE TIPS AND TECHNIQUES EXPLAINED MAY BE OUTDATED. The post-processing
11 Advanced Layer Techniques
 11 Advanced Layer Techniques After you ve learned basic layer techniques, you can create more complex effects in your artwork using layer masks, path groups, filters, adjustment layers, and more style
PHOTOSHOP DESIGN EFFECTS FOR INTERMEDIATE TO ADVANCED USERS
 PHOTOSHOP DESIGN EFFECTS FOR INTERMEDIATE TO ADVANCED USERS Copyright 2012, National Seminars Training Introduction This class is all about design effects in Adobe Photoshop. For example, let s say that
Educator s Guide to Cartoon Yourself in Photoshop
 Educator s Guide to Cartoon Yourself in Photoshop Overview: Photoshop is the leading program for editing photos. The aim of this lesson is to help students become more familiar with this industry standard
TURN A PHOTO INTO A PATTERN OF COLORED DOTS (CS6)
") TURN A PHOTO INTO A PATTERN OF COLORED DOTS (CS6) In this photo effects tutorial, we ll learn how to turn a photo into a pattern of solid-colored dots! As we ll see, all it takes to create the effect is
TURN A PHOTO INTO A PATTERN OF COLORED DOTS (CS6) In this photo effects tutorial, we ll learn how to turn a photo into a pattern of solid-colored dots! As we ll see, all it takes to create the effect is
Create a Magical Flaming Heart Illustration in Photoshop
 All Topics Free Tutorials Courses ebooks Pricing Sign In Free Account Advertisement Design & Illustration Categories Learning Guides PHOTO EFFECTS Create a Magical Flaming Heart Illustration in Photoshop
Using Photoshop Elements
 Using Photoshop Elements Created By: Rick Williams August 2004 Table of Contents Photoshop Element Tools...Page 1 Tool Descriptions... Page 3 Starting Photoshop Elements... Page 7 Resizing an Image...
Reducing Noise in an image
 Reducing Noise in an image - Open the image in Photoshop. - Go to the Filter menu then click on Noise and then the Reduce Noise button. - Zoom in on the preview image in the Reduce Noise window, so that
Adobes Photoshop CS Class 2. Levels, Layers, Magic Wand and Gradients. 1. Open Monkey 2.
 Adobes Photoshop CS Class 2 Levels, Layers, Magic Wand and Gradients 1. Open Monkey 2. 2. Using the Crop Tool select most of picture, cutting off the black border on top and the right side and the ragged
Getting Started. 1. Double click on the eye con. 2. Single click on File, then new, then OK. Click here.
 Getting Started 1. Double click on the eye con. 2. Single click on File, then new, then OK. Click here. What is Photoshop? Photoshop is a program that lets you make pictures. You can put away your markers
An Idiot's Guide to Photoshop. Part II Azamat Bohed E. TrueKolor.net
 An Idiot's Guide to Photoshop Part II Azamat Bohed E. TrueKolor.net Table of Contents 1.Introduction 3 2. Opening a Digital Image/Photo in Photoshop 3 3. Changing/removing the Background 4 3.1 Using the
Chapter 4: Draw with the Pencil and Brush
 Page 1 of 15 Chapter 4: Draw with the Pencil and Brush Tools In Illustrator, you create and edit drawings by defining anchor points and the paths between them. Before you start drawing lines and curves,
Adobe Photoshop CC 2018 Tutorial
 Adobe Photoshop CC 2018 Tutorial GETTING STARTED Adobe Photoshop CC 2018 is a popular image editing software that provides a work environment consistent with Adobe Illustrator, Adobe InDesign, Adobe Photoshop,
EXPANSION TEAM UNIFORM LOGO CREATION HOW TO
 EXPANSION TEAM UNIFORM LOGO CREATION HOW TO These logos will be used on the player uniforms (ie: helmet, jersey, pants). When used on helmets, they are thick vinyl stickers. When used on jerseys and pants,
Photo Retouching. Get more model faces from Google
 Get more model faces from Google Part 1 - Basic Model Retouching 1.- Face and Hair... Here we have a very Beautiful lady, but she is not as beautiful as she could be. Here, in this tutorial, you will see
How to Create Website Banners
 How to Create Website Banners In the following instructions you will be creating banners in Adobe Photoshop Elements 6.0, using different images and fonts. The instructions will consist of finding images,
Downloaded From : Working with Photoshop 7.0
 Adobe Photoshop 1. Introduction What is Adobe Photoshop? Adobe Photoshop is a web designing software used for giving effects and filters to an image to make it more appealing and attractive. Brought out
Transparency and blending modes
 Transparency and blending modes About transparency Transparency is such an integral part of Illustrator that it s possible to add transparency to your artwork without realizing it. You can add transparency
Dark & Surreal Poster
 Step 1 Dark & Surreal Poster Start off with the creation of your document and, in this case 1200 1600. If you want to print this you might want to work in CMYK mode, a higher resolution and also 300DPI.
POLAROID EMULATION INCREASED CONTRAST, SATURATION & CLARITY
 POLAROID EMULATION The Polaroid SX-70 Camera was a sensational tool. It took photographs in real time. But just the color balance of the film and they way it developed had a unique look. Here are some
CREATE A 60 S PSYCHEDELIC STYLE CONCERT POSTER
 CREATE A 60 S PSYCHEDELIC STYLE CONCERT POSTER Tutorial from http://psd.tutsplus.com/ Compiled by INTRODUCTION In this tutorial, we will go through the steps to create a retro 1960s psychedelic
Basic Digital Dark Room
 Basic Digital Dark Room When I took a good photograph I almost always trying to improve it using Photoshop: exposure, depth of field, black and white, duotones, blur and sharpness or even replace washed
Selective Edits in Camera Raw
 Complete Digital Photography Seventh Edition Selective Edits in Camera Raw by Ben Long If you ve read Chapter 18: Masking, you ve already seen how Camera Raw lets you edit your raw files. What we haven
Adobe Photoshop CS5 Tutorial
 Adobe Photoshop CS5 Tutorial GETTING STARTED Adobe Photoshop CS5 is a popular image editing software that provides a work environment consistent with Adobe Illustrator, Adobe InDesign, Adobe Photoshop
Cute Gooey Blob Photoshop Tutorial
 Download the PSD Cute 3D Character.zip 22.11 MB Download from Website (http://photoshoptutorials.ws/downloads/psd/cute 3D Character.zip) Cute Gooey Blob Photoshop Tutorial Step 1 Create a new document
Photoshop CC: Essentials
 Photoshop CC: Essentials Summary Workspace Overview... 2 Exercise Files... 2 Selection Tools... 3 Select All, Deselect, And Reselect... 3 Adding, Subtracting, and Intersecting... 3 Working with Layers...
GRINDHOUSE MOVIE POSTERS
 Follow the instructions below to create a grindhouse style movie poster for your short film. You can also see a detailed video tutorial here: http://www.youtube.com/watch?v=-drhbfvhft0 GOOD LUCK!! CREATING
Out of Bounds - Dolphins
 Out of Bounds - Dolphins Let's start by making a copy of our original image layer - This is not essential but it's easier to rectify mistakes. From the menus, select Layer > Duplicate Layer or drag the
Name the layer you rotated in step 3 Stripe and lower the opacity to 43%.
 Step 1 Open Photoshop and create a new file 1085 649 pixels. Fill the layer with a bright blue color (#0095db) by pressing Shift + F5. This will be the background for our pop art scene. Step 2 Let s create
XXXX - MAKING A FLYER BOOKLET COVER 1 N/08/08
 INTRODUCTION TO GRAPHICS Making a flyer booklet cover Information Sheet No. XXXX Create a new document with these settings. Note that you will be using 300 dpi because this will be made for print. Keepit
Key Terms. Where is it Located Start > All Programs > Adobe Design Premium CS5> Adobe Photoshop CS5. Description
 Adobe Adobe Creative Suite (CS) is collection of video editing, graphic design, and web developing applications made by Adobe Systems. It includes Photoshop, InDesign, and Acrobat among other programs.
Movie Merchandising. Movie Poster. Open the Poster Background.psd file. Open the Cloud.jpg file.
 Movie Poster Open the Poster Background.psd file. Open the Cloud.jpg file. Movie Merchandising Choose Image>Adjustments>Desaturate to make it a grayscale image. Select the Move tool in the Toolbar and