CREATE A BASIC VEXEL IMAGE
|
|
|
- Eustacia Marshall
- 5 years ago
- Views:
Transcription

1 CREATE A BASIC VEXEL IMAGE Tutorial from Compiled by <<coldbing>>
2 INTRODUCTION This time we'll create a simple vexel image from a picture. Also, we'll use some pattern effects to give the image some interesting texture. This is a basic way to create a vexel image using predominately Photoshop's vector based tools. After completing this tutorial, you'll become a master of the Pen Tool. Before we get started, let's take a look at the image we'll be creating.

3 Step 1: Get started by creating a new document 768px by 1024px and paste this image in. Delete the background layer. Then add a new white Solid Color Fill Layer. Step 2: Now the few things you'll need is the Pen Tool and a lot of patience. Select the Pen Tool, and set this Foreground Color as #FFE400. This is not really important because you'll change the colors later. Create some points over the yellow stripes. After you have created a shape, select Add To Shape Area in the Pen options. Then continue drawing. This way you'll get a complex shape in one layer. Name this layer "BGLines." Hide the picture layer for a moment. You'll get something like image 3 below. Finally, put the picture layer above the "BGLines" layer, and show it. Remember this step, because you must put the picture layer above the others as many times as you need.

4

5 Step 3: Now use a white foreground, and draw the shirt contour. Create a new layer named "Shirt." Don't worry about the green stripes right now. Once you have finish all the shirt shape, hide the picture layer. View the result. Then put the "Shirt" layer above the "BGLines," and remember to put the "picture" layer above all the other layers every time you draw a shape.

6 Step 4: Draw the arms and the hands. I draw each one on a different layer, but you can draw both arms in a single layer. Maybe the most difficult object to draw is the human hand. Check the fingernails; I used almost a 90º curved angle there. Finally place the "hands" and "arms" layers above the "Shirt" layer.
.")
7 Step 5: Draw the pants shape; use a blue foreground color (#002352). Place the "Jeans" layer above the "BGLines" layer.

8 Step 6: Using the same foreground color as the hands, draw the face and head shape, and place the "Head" layer below the "Shirt" layer.

9 Step 7: Now draw the brunette hair (#7e4a22). Then place the new "Hair" layer above the "Head layer.
.")
10 Step 8: Now, for the sun glasses use a dark gray foreground color (#212121). Put the "Sunglasses" layer above both the "Head" and the "Hair" layers.
.")
11 Step 9: At this point, we get the basic shape of the girl. Now it's time to add some details. First, add the green stripes. It's not difficult, and should take only about ten to fifteen minutes. Remember to select Add to Shape Area in the Pen Options. Then set a green foreground (#03b72d). Place the "Shirt lines" layer above the "Shirt" layer.

12 Step 10: Draw the lips (#E05328) and the upper lip (#A33B1E). Also, draw a little black nose hole. Put these three layers above the "Head" layer.

13 Step 11: Now we'll add the final details. Set the "picture" layer Opacity to 50%. This will give it a better look than the previous drawn shapes. Add the sunglasses crystal using a gray color (#404040), place the "Sunglasses Crystal" layer above the "Sunglasses" layer.
.")
14 Step 12: This is an important step; we'll add some vector shadows to the skin to create a lightening illusion. For this there's no shape to follow. You must use your common sense. A good way to do it is looking at the dark areas of the skin create a similar shape. Be sure to always use the Pen Tool for this. I used a dark orange color (#d29115). Place the "Skin Shadows" layer above the "Hands" layers.

15 Step 13: Draw some shadow shapes using a dark blue foreground. Then place the "Jeans shadow" layer above the "Jeans" layer.

, Skin Shadow (#E7B148), Shirt stripes")
16 Step 14: At this point you have a basic vexel of the girl's picture, you can add more details if you want to. Step 15: Now you can customize the shapes using your imagination, I'll begin changing the colors as follows: Skin (#F8C769), Skin Shadow (#E7B148), Shirt stripes (#C50505), Background (#C50505), and Background stripes (#FFFFFF).
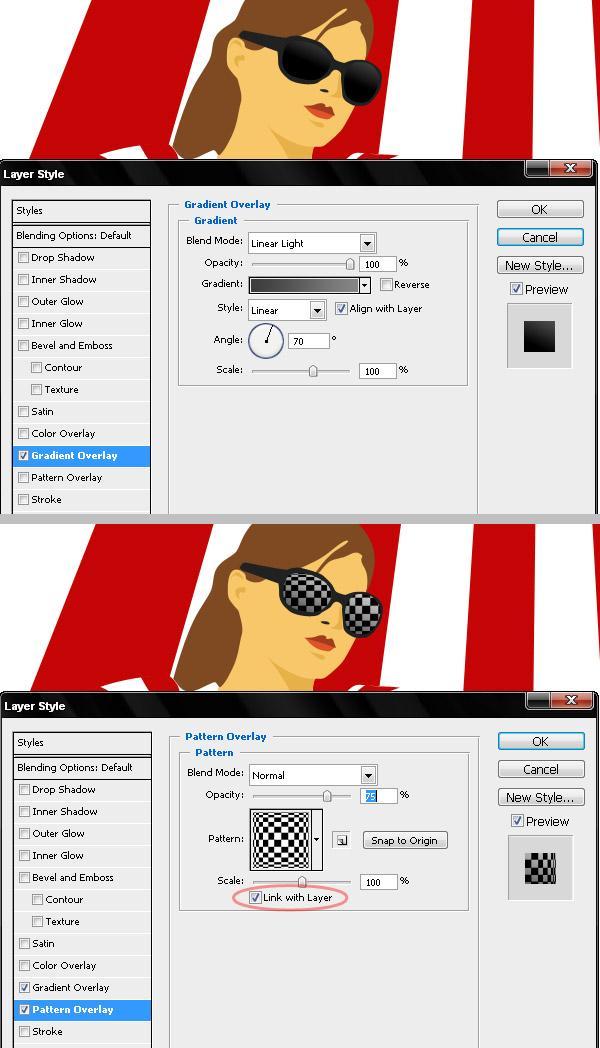
. First add Linear Light Overlay then a Pattern Overlay. I used the \"Optical Checkerboard\" pattern. Ensure that Link with Layer option is selected.")
17 Step 16: Create a new Group of layers; name them "Girl." Add all the layers to the group except "BGLines" and "BG." Select the group and resize it. Step 17: Select the "Sunglasses Crystal" layer. Then add a Gradient Overlay (#3D3D3D to #858585). First add Linear Light Overlay then a Pattern Overlay. I used the "Optical Checkerboard" pattern. Ensure that Link with Layer option is selected. Drag the pattern a little to get the result shown below.
18

19 Step 18: Select the "Jeans" layer. Then add a Gradient Overlay (#00345E - #025B87).

20 Step 19: Select the "BG" layer. Then add a Gradient Overlay that goes from red to dark red (#C #6A0000).

21 Step 20: Add the same Overlay to the "Shirt lines" layer, but reverse the colors this time (#6A #C70704 ).

22 Step 21: Now select the "BGLines" layer, and add a Gradient Stroke style using these values.

23 Step 22: In "BGLines" layer add a Pattern Overlay using the same pattern as the sunglasses, but this time deselect the Link with layer option. Then click on Snap to Origin, this way you are fixing the pattern to the origin of the document.

24 Step 23: Add the same pattern style to the "Shirt" layer. Remember to deselect the Link to Layer option. As you can see below, it looks like only one layer style. CONCLUSION This technique is one of the most flexible, as a vector graphic can be resized without losing any quality. This can help you in printing your designs as well. Remember that your imagination is the only limit. Try vexeling other pictures and playing with the style.
25 Final Image Compiled by <<coldbing>>
Design a Halloween Pumpkin Wallpaper in Photoshop
 Design a Halloween Pumpkin Wallpaper in Photoshop By: Alvaro Guzman Halloween is near! So let's take a pumpkin image, carve it up, and light it for this coming holiday. You'll learn how to get this nice
XXXX - ILLUSTRATING FROM SKETCHES IN PHOTOSHOP 1 N/08/08
 INTRODUCTION TO GRAPHICS Illustrating from sketches in Photoshop Information Sheet No. XXXX Creating illustrations from existing photography is an excellent method to create bold and sharp works of art
HOW TO CREATE A SUPER SHINY PENCIL ICON
 HOW TO CREATE A SUPER SHINY PENCIL ICON Tutorial from http://psd.tutsplus.com/ Compiled by INTRODUCTION The Pencil is one of the visual metaphors most used to express creativity. In this tutorial,
Converse Chuck Taylor Shoes Photoshop Tutorial
 20 Converse Chuck Taylor Shoes Photoshop Tutorial Step 1 Create A New Document Create a New Document. The size of my canvas is 600px x 700px with a 72dpi resolution. Save as Chuck Taylor - Your Name. Step
Animated Snowman. Image size: 11 w x 17 h 300 dpi
 Animated Snowman Image size: 11 w x 17 h 300 dpi Step 1 First of all, you ll need the texture on my website. Now open a new document. I usually work on really big documents because I can work on the details
Module All You Ever Need to Know About The Displace Filter
 Module 02-05 All You Ever Need to Know About The Displace Filter 02-05 All You Ever Need to Know About The Displace Filter [00:00:00] In this video, we're going to talk about the Displace Filter in Photoshop.
Cute Gooey Blob Photoshop Tutorial
 Download the PSD Cute 3D Character.zip 22.11 MB Download from Website (http://photoshoptutorials.ws/downloads/psd/cute 3D Character.zip) Cute Gooey Blob Photoshop Tutorial Step 1 Create a new document
Glowing Surreal Planet Design. Final Image Preview
 Glowing Surreal Planet Design Final Image Preview. Step 1 First, go to the S:\ drive and locate the folder called Glowing Planet Design. Copy the City Skyline file and paste it in your Glowing Planet Design
How To Change Eye Color In Photoshop
 Change Eye Color In An Image With Photoshop Learn how to easily change someone's eye color in a photo with Photoshop! We'll use a Hue/Saturation adjustment layer, a layer mask and a layer blend mode to
Create a Candy Cane. Create a new canvas with the size 8x10 inches at 300 pixel/inch. See image below Ctrl + N
 Create a Candy Cane The Basic Candy Cane Canvas and Shape 1. Create a new folder, name it Candy Cane your name. Create a new canvas with the size 8x10 inches at 300 pixel/inch. See image below Ctrl + N
How to Create a Landscape Wallpaper for your Desktop
 How to Create a Landscape Wallpaper for your Desktop Why not create a vector landscape wallpaper? In this simple tutorial, you will learn how to create an eye-appealing wallpaper quickly and effectively.
Here is a 100% zoom close up. Name in Popsicles
 Here is a 100% zoom close up Name in Popsicles Step 1 Let s start by creating a new Photoshop document. Mine is 2560 1440 pixels. Fill the background with a color of your choice (it s not important at
Figure 9.10 This shows the File Scripts menu, where there is now a new script item called Delete All Empty layers.
 Layers Layers play an essential role in all aspects of Photoshop work. Whether you are designing a Web page layout or editing a photograph, working with layers lets you keep the various elements in a design
Easily Smooth And Soften Skin In A Photo With Photoshop
 Easily Smooth And Soften Skin In A Photo With Photoshop Written by Steve Patterson OPEN THE START FILE BY RIGHT CLICKING THE.JPG FILE AND CHOOSING OPEN WITH ADOBE PHOTOSHOP. SAVE AS: X_lastname_firstname_Smooth_Soft
Dark & Surreal Poster
 Step 1 Dark & Surreal Poster Start off with the creation of your document and, in this case 1200 1600. If you want to print this you might want to work in CMYK mode, a higher resolution and also 300DPI.
Create a Creepy Face Photo Manipulation in Photoshop
 i TUTORIALS Create a Creepy Face Photo Manipulation in Photoshop by Alan Klim Advertisement In this tutorial we ll show you an easy way to create a nice creepy face effect using Photoshop. We strongly
PHOTOSHOP DESIGN EFFECTS FOR INTERMEDIATE TO ADVANCED USERS
 PHOTOSHOP DESIGN EFFECTS FOR INTERMEDIATE TO ADVANCED USERS Copyright 2012, National Seminars Training Introduction This class is all about design effects in Adobe Photoshop. For example, let s say that
PROFESSIONAL PHOTOGRAPH RESTORATION WORKFLOW
 PROFESSIONAL PHOTOGRAPH RESTORATION WORKFLOW Tutorial from http://psd.tutsplus.com/ Compiled by INTRODUCTION In this tutorial, we'll take an in-depth look at restoring an old torn photograph.
Assessment Project Requirements 10 x ppi
 Color Replacement Color Wheel The color wheel provides independent artists, designers, illustrators and any other professionals that depend on color a foundation for choosing and creating colorful designs.
A Basic Guide to Photoshop Adjustment Layers
 A Basic Guide to Photoshop Adjustment Layers Photoshop has a Panel named Adjustments, based on the Adjustment Layers of previous versions. These adjustments can be used for non-destructive editing, can
DAZ Productions - 3D Models, 3D Content, and 3D Software
 Página 1 de 26 Postwork made Easy Author: mizgriz Step 1: Preparing the image. Step 2: Get your glow on. Step 3: And now for something completely (not) different... Step 4: Hue and Saturate Step 5: About
TV Aquarium. Create a new document. 8.5 x 11, 300 dpi. Save as TV Aquarium Your Name. Create TV shape. Use Pen
 Create a new document. 8.5 x 11, 300 dpi. Save as TV Aquarium Your Name. Create TV shape. Use Pen Tool, Convert Point Tool and Direct Selection Tool. We need side shapes to create patches of light and
Reflection Project. Please start by resetting all tools in Photoshop.
 Reflection Project You will be creating a floor and wall for your advertisement. Before you begin on the Reflection Project, create a new composition. File New: Width 720 Pixels / Height 486 Pixels. Resolution
METAL TEXT EFFECT. Step 1: Create A New Document. Step 2: Fill The Background With Black
 METAL TEXT EFFECT In this text effects tutorial, we ll learn how to easily create metal text, a popular effect widely used in video games and movie posters! It may seem like there s a lot of steps involved,
prepared by Allison Hwang for T. Purdy 2011
 There are many ways to create material textures in Photoshop. In addition to using primarily the blending tool, you can also use filters to create textures. In this tutorial, the objective is to create
Name the layer you rotated in step 3 Stripe and lower the opacity to 43%.
 Step 1 Open Photoshop and create a new file 1085 649 pixels. Fill the layer with a bright blue color (#0095db) by pressing Shift + F5. This will be the background for our pop art scene. Step 2 Let s create
Photoshop Textures Assignment # 2
 Photoshop Textures Assignment # 2 Objective: Use Photoshop to create unique texture from scratch that can be applied to backgrounds, objects, tetx and 3D objects to create new and exciting compositions.
PHOTOSHOP PUZZLE EFFECT
 PHOTOSHOP PUZZLE EFFECT In this Photoshop tutorial, we re going to look at how to easily create a puzzle effect, allowing us to turn any photo into a jigsaw puzzle! Or at least, we ll be creating the illusion
Make Watercolor and Marker Style Portraits with Illustrator
 Make Watercolor and Marker Style Portraits with Illustrator Save Preview Resources Portrait by Lillian Bertram (Creative Commons Share Alike used here with permission) Step 1: Set up your Illustrator document
photoshop filters kelly ludwig assistant professor
 photoshop filters kelly ludwig assistant professor sharpening images reducing noise correcting distortions in images practical filters There are over 100 filters that ship with Photoshop and they're all
COLORIZING IMAGES WITH GRADIENT MAPS
 COLORIZING IMAGES WITH GRADIENT MAPS In this Photoshop tutorial, we ll learn how to add complex colorizing effects to images using custom gradients! Specifically, we ll look at the Gradient Map image adjustment
Photoshop CS2. Step by Step Instructions Using Layers. Adobe. About Layers:
 About Layers: Layers allow you to work on one element of an image without disturbing the others. Think of layers as sheets of acetate stacked one on top of the other. You can see through transparent areas
Compiled by <<coldbing>> FIRE EFFECTS
 FIRE EFFECTS Compiled by Step 1 - New Document Make a new document. Fill it with black. Then make a new layer, and type out (or whatever) you want to set on fire in white. Step 2 - Windy Go
Stitching Panoramas using the GIMP
 Stitching Panoramas using the GIMP Reference: http://mailman.linuxchix.org/pipermail/courses/2005-april/001854.html Put your camera in scene mode and place it on a tripod. Shoot a series of photographs,
A quick note: We hope that you will find something from the Tips and Tricks that will add a little pizazz to your yearbook pages!
 A quick note: The following pages are tips and tricks for Basic Photoshop users. You may notice that some instructions indicate that non-awpc fonts were used, and that some colors were created using the
Selective Edits in Camera Raw
 Complete Digital Photography Seventh Edition Selective Edits in Camera Raw by Ben Long If you ve read Chapter 18: Masking, you ve already seen how Camera Raw lets you edit your raw files. What we haven
Digital Image Manipulation 2014
 Week 4 Advanced Type Techniques- create special effect type Step 1 Create a new 1024 x 768 px document. Set the document background color to light pink or follow my colour (#f8cece) Create the text using
Drawing Line Art in Flash
 Ads by Google Image Drawing Painting Drawing Flash Drawing Drawing Animals Drawing Books Flash.NET PHP Photoshop Web Dev Forums About Drawing Line Art in Flash by Kitiara So how do you go about creating
SAVING, LOADING AND REUSING LAYER STYLES
 SAVING, LOADING AND REUSING LAYER STYLES In this Photoshop tutorial, we re going to learn how to save, load and reuse layer styles! Layer styles are a great way to create fun and interesting photo effects
TURN A PHOTO INTO A PATTERN OF COLORED DOTS (CS6)
") TURN A PHOTO INTO A PATTERN OF COLORED DOTS (CS6) In this photo effects tutorial, we ll learn how to turn a photo into a pattern of solid-colored dots! As we ll see, all it takes to create the effect is
TURN A PHOTO INTO A PATTERN OF COLORED DOTS (CS6) In this photo effects tutorial, we ll learn how to turn a photo into a pattern of solid-colored dots! As we ll see, all it takes to create the effect is
CREATE A BURNT EDGE EFFECT
 CREATE A BURNT EDGE EFFECT One of the all-time classic effects in Photoshop is the burnt edge, and there s lots of different ways to create it, but in this Adobe Photoshop tutorial, we re going to look
LaGuardia Community College Thomson Ave, Long Island City, New York Created by ISMD s Dept. Training Team. Overview. Basic Hair Selection
 Overview If you want to get into Photoshop compositing, one of the first features you'll have to conquer is selections. If you've ever tried selecting people (especially people with wispy hair) from one
Your texture pattern may be slightly different, but should now resemble the sample shown here to the right.
 YOU RE BUSTED! For this project you are going to make a statue of your bust. First you will need to have a classmate take your picture, or use the built in computer camera. The statue you re going to make
Quick Mask Setting Up your Work Environment Setting Up the Quickmask Parameters
 Quick Mask Quickmask gets its name from the fact that as you create your selection area, Photoshop masks that area off, tinting it with a colored mask to show what has been selected. When you're finished
Photo Retouching. Get more model faces from Google
 Get more model faces from Google Part 1 - Basic Model Retouching 1.- Face and Hair... Here we have a very Beautiful lady, but she is not as beautiful as she could be. Here, in this tutorial, you will see
3. Notice how you can barely see my leaf brush? And what you can see is extremely transparent. But it s there. Now, to get rid of that transparency.
 Some brushes were made to be transparent, others were not. And because of the nature of Photoshop (or PSP/GIMP) brushes, sometimes they end up looking that way when they shouldn t. This tutorial will explain
Turning Photograph Into Cartoon-Style Picture. Digital Media I West High School Susan M. Raymond
 Turning Photograph Into Cartoon-Style Picture Digital Media I West High School Susan M. Raymond Part 1: Creating Outline Wondering how those guys on the internet turn photograph into a nice cartoon-style
2.0 4 Easy Ways to Delete Background to Transparent with GIMP. 2.1 Using GIMP to Delete Background to Transparent
 1.0 Introduction As JPG files don't support transparency, when you open a JPG image in GIMP with the purpose of making the background transparent. The first thing you must to do is Add Alpha Channel. It
Create a Beautiful Abstract Portrait in Photoshop - Psd Premium Tutorial
 Create a Beautiful Abstract Portrait in Photoshop - Psd Premium Tutorial By: Wojciech Pijecki In this tutorial we will combine several stock images to create an artistic, abstract portrait of a woman.
Creating a Contrast Mask. Text and images Copyright (C) 2002 Eric R. Jeschke and may not be used without permission of the author.
 2002 Eric R. Jeschke and may not be used without permission of the author.") Creating a Contrast Mask Text and images Copyright (C) 2002 Eric R. Jeschke and may not be used without permission of the author. Intention In this tutorial I'll show you how to do create a contrast mask
Creating a Contrast Mask Text and images Copyright (C) 2002 Eric R. Jeschke and may not be used without permission of the author. Intention In this tutorial I'll show you how to do create a contrast mask
NMC Second Life Educator s Skills Series: How to Make a T-Shirt
 NMC Second Life Educator s Skills Series: How to Make a T-Shirt Creating a t-shirt is a great way to welcome guests or students to Second Life and create school/event spirit. This article of clothing could
Transparency and blending modes
 Transparency and blending modes About transparency Transparency is such an integral part of Illustrator that it s possible to add transparency to your artwork without realizing it. You can add transparency
How to Draw a Realistic iphone 4 with
 Home Freebies Submit Your Work Contact Us How to Draw a Realistic iphone 4 with Photoshop Jan 3 2011 By Mohammad Jeprie 34 Comments In this tutorial, we will draw a realistic-looking iphone 4 using Photoshop.
Photo Within A Photo - Photoshop
 Photo Within A Photo - Photoshop Here s the image I ll be starting with: The original image. And here s what the final "photo within a photo" effect will look like: The final result. Let s get started!
Add Rays Of Sunlight To A Photo With Photoshop
 Add Rays Of Sunlight To A Photo With Photoshop Written by Steve Patterson. In this photo effects tutorial, we'll learn how to easily add rays of sunlight to an image, a great way to make an already beautiful
HOW TO CREATE A DARK SURREAL ILLUSTRATION IN PHOTOSHOP
 HOW TO CREATE A DARK SURREAL ILLUSTRATION IN PHOTOSHOP Tutorial from http://psd.tutsplus.com/ Compiled by INTRODUCTION In this tutorial we are going to create a dark surreal illustration using
Ascension's Atlas Tutorial in GIMP
 Ascension's Atlas Tutorial in GIMP What follows is, as near as I can make it, an approximation in gimp of Ascension s Photoshop Atlas Style tutorial. Only the techniques used are in this version, so I
By Washan Najat Nawi
 By Washan Najat Nawi how to get started how to use the interface how to modify images with basic editing skills Adobe Photoshop: is a popular image-editing software. Two general usage of Photoshop Creating
Speech Balloons How I Do It...
 Speech Balloons How I Do It... I've had a number of people ask me how I do the speech balloons on my Girls From T.N.A. strip on Renderosity. This is not really a tutorial; actually it's more of a demonstration
GRINDHOUSE MOVIE POSTERS
 Follow the instructions below to create a grindhouse style movie poster for your short film. You can also see a detailed video tutorial here: http://www.youtube.com/watch?v=-drhbfvhft0 GOOD LUCK!! CREATING
Sharpening is an essential final step before output. But sometimes, you don t want to
 Sharpening is an essential final step before output. But sometimes, you don t want to sharpen your entire image equally. Skin tones, clouds, noisy areas - it s best to apply less sharpening to these areas,
How to Create Animated Vector Icons in Adobe Illustrator and Photoshop
 How to Create Animated Vector Icons in Adobe Illustrator and Photoshop by Mary Winkler (Illustrator CC) What You'll Be Creating Animating vector icons and designs is made easy with Adobe Illustrator and
'Photoshop'. "Realistic Eye Texture Painting" by Krishnamurti Martins Costa
 Level: intermediate Technique: digital painting Software: Adobe Photoshop 'Photoshop'. "Realistic Eye Texture Painting" by Krishnamurti Martins Costa Email: kris@antropus.com Web: http://www.antropus.com
Professional Photograph Restoration 50 Points
 Professional Photograph Restoration 50 Points In this tutorial, we'll take an in-depth look at restoring an old torn photograph. Restoring old family photos is something that you can do for your relatives
Digital Arts I - Course Outline
 Points Course Possible Hours Course Overview 4 Lesson 1: Start the Course Identify computer requirements. Learn how to move through the course. Switch between windows. Lesson 2: Set Up Your Computer Find
Superhero. Here s the image I ll be using for this Photoshop tutorial:
 Superhero Here s the image I ll be using for this Photoshop tutorial: The original image. Obviously, this little guy sees himself as a mighty super hero, so let s help him out by projecting a super hero
Movie Merchandising. Movie Poster. Open the Poster Background.psd file. Open the Cloud.jpg file.
 Movie Poster Open the Poster Background.psd file. Open the Cloud.jpg file. Movie Merchandising Choose Image>Adjustments>Desaturate to make it a grayscale image. Select the Move tool in the Toolbar and
Adobe Photoshop CC 2018 Tutorial
 Adobe Photoshop CC 2018 Tutorial GETTING STARTED Adobe Photoshop CC 2018 is a popular image editing software that provides a work environment consistent with Adobe Illustrator, Adobe InDesign, Adobe Photoshop,
Retouching and Restoring Images
 Beauty Retouching Open the Woman.psd file. Retouching and Restoring Images When retouching images first evaluate the faults that need to be eliminated vs. the ones that need to be minimized. First we will
> color scheme painting
 > color scheme painting > objective(s): Students will create a highly accurate brush overlay painting of a closely cropped image of their eye using only colors within a specific selected color scheme,
> andy warhol > objective(s): > curricular focus: > specifications: > instruction: > procedure: > requirements:
: > curricular focus: > specifications: > instruction: > procedure: > requirements:") > andy warhol > objective(s): Students will select a portrait image, crop it tightly and eliminate the background, then uniquely color several times in the style of Andy Warhol. > curricular focus: This
> andy warhol > objective(s): Students will select a portrait image, crop it tightly and eliminate the background, then uniquely color several times in the style of Andy Warhol. > curricular focus: This
Painting Special Effects on Photographs
 TUTORIAL 7 Painting Special Effects on Photographs In this tutorial you will learn how to transform a photo into a striking color composition with paintbrushes, masks, blending modes, color, and paper
Essential Skills - 3 Key Blend Modes. Ken Fisher
 Ken Fisher One of the best ways to understand blending modes is to experiment with them. Get two layers together and play around. The results sometimes will leave you cold, the effects wont inspire you.
Extreme Makeovers: Photoshop Retouching Techniques
 Extreme Makeovers: Table of Contents About the Workshop... 1 Workshop Objectives... 1 Getting Started... 1 Photoshop Workspace... 1 Retouching Tools... 2 General Steps... 2 Resolution and image size...
Car Ad Photoshop Tutorial Miss Van Lenten Tools: Paint brush, Eraser, Quick Selection/Magic Wand, Quick Mask, Layer Mask
 Car Ad Photoshop Tutorial Miss Van Lenten Tools: Paint brush, Eraser, Quick Selection/Magic Wand, Quick Mask, Layer Mask Part One: Google image search for a car of your choosing. Make sure you go to tools
11 Advanced Layer Techniques
 11 Advanced Layer Techniques After you ve learned basic layer techniques, you can create more complex effects in your artwork using layer masks, path groups, filters, adjustment layers, and more style
Exploring Photoshop Tutorial
 Exploring Photoshop Tutorial Objective: In this tutorial we will create a poster composed of three distinct elements: a Bokeh, an image and title text. The Bokeh is an effect which is sometimes seen in
PHOTOSHOP & ILLUSTRATOR BOOTCAMP
 FALL 2014 - ELIZABETH LIN PHOTOSHOP & ILLUSTRATOR BOOTCAMP ILLUSTRATOR ALIGNMENT To access the alignment panel, go to Window -> Align. You should see a panel like the one below. This panel allows you to
Everything you ever wanted to know about Layer Styles with Adobe Photoshop CS3 - CS5
 Everything you ever wanted to know about Layer Styles with Adobe Photoshop CS3 - CS5 A layer style is one or more effects applied to a layer or layer group. You can apply one of the preset styles provided
A Basic Guide to Photoshop CS Adjustment Layers
 A Basic Guide to Photoshop CS Adjustment Layers Alvaro Guzman Photoshop CS4 has a new Panel named Adjustments, based on the Adjustment Layers of previous versions. These adjustments can be used for non-destructive
Add Photoshop Masks and Adjustments to RAW Images
 Add Photoshop Masks and Adjustments to RAW Images Contributor: Seán Duggan n Specialty: Fine Art Primary Tool Used: Photoshop Masks The adjustments you make in Camera Raw are global in nature, meaning
Blend Textures With Photos
 Blend Textures With Photos Here's the photo I'll be starting with: The original image. ( 2015 Steve Patterson) I like the photo, but given its subject matter, I think it would look even better if I grunged
Create a Multicolored Splashed Text Effect in Adobe Illustrator
 Create a Multicolored Splashed Text Effect in Adobe Illustrator by Diana Toma17 Nov 2014 What You'll Be Creating In this tutorial you will learn how to create a multicolored splashed text effect in Adobe
Create a Happy Sun Character. Below is the final illustration we will be working towards.
 Create a Happy Sun Character Below is the final illustration we will be working towards. 1 Step 1 Create a new document and with the Ellipse tool (L), create an ellipse. 2 Step 2 Fill the ellipse with
PhotoFiltre. Reverse foreground/background colors. Background & foreground colors. Set default foreground/background colors. Color choice palette
 PhotoFiltre BASIC TOOLS PALETTE Background & foreground colors Reverse foreground/background colors Set default foreground/background colors Color choice palette Toggle through color choice palettes Selection
Learning Photo Retouching techniques the simple way
 Learning Photo Retouching techniques the simple way Table of Contents About the Workshop... i Workshop Objectives... i Getting Started... 1 Photoshop Workspace... 1 Setting up the Preferences... 2 Retouching
Photoshop: a Beginner s course. by: Charina Ong Centre for Development of Teaching and Learning National University of Singapore
 Photoshop: a Beginner s course by: Charina Ong Centre for Development of Teaching and Learning National University of Singapore Table of Contents About the Workshop... 1 Prerequisites... 1 Workshop Objectives...
Contents: Bibliography:
 ( 2 ) Contents: Sizing an Image...4 RAW File Conversion...4 Selection Tools...5 Colour Range...5 Quick Mask...6 Extract Tool...7 Adding a Layer Style...7 Adjustment Layer...8 Adding a gradient to an Adjustment
The Little Fish Transcript
 The Little Fish Transcript welcome back everybody we are going to do this nice little scare to fish so if you've been following on to our shark tutorial you might notice this little guy in the thumbnail
The Layer Blend Modes drop-down box in the top left corner of the Layers palette.
 Photoshop s Five Essential Blend Modes For Photo Editing When it comes to learning Photoshop, believe it or not, there's really only a handful of things you absolutely, positively need to know. Sure, Photoshop
Adobe Photoshop CS5 Tutorial
 Adobe Photoshop CS5 Tutorial GETTING STARTED Adobe Photoshop CS5 is a popular image editing software that provides a work environment consistent with Adobe Illustrator, Adobe InDesign, Adobe Photoshop
Tracing a Vector Face From a Reference Photo - Envato Tuts+ Design & Illustration Tutorial
 Tracing a Vector Face From a Reference Photo - Envato Tuts+ Design & Illustration Tutorial A few times a each month we revisit some of our reader s favorite posts from throughout the history of Vectortuts+.
PHOTOSHOP TUTORIAL: DIGITAL DARKROOM TECHNIQUES
 PHOTOSHOP TUTORIAL: DIGITAL DARKROOM TECHNIQUES STEP BY STEP TRAINING Learn by doing step by step exercises. Includes downloadable class files that work on Mac & PC. EDITION 1 Copyright Info Published
Hello Champions. I have added some bubble brushes to the resources that I found on Deviantart that are by Jennyle88.
 Hello Champions I m Renée and once again I am bringing you a Daydreamer or Fantasy style tutorial. Fantasy style pages come about from kits that contain certain elements like cars, treasure chests, furniture
Adobe Illustrator CS6
 Adobe Illustrator CS6 Table of Contents Image Formats 3 ai (Adobe Illustrator) 3 eps (Encapsulated PostScript) 3 PDF (Portable Document Format) 3 JPEG or JPG (Joint Photographic Experts Group) 3 Vectors
SIMPLE POP ART EFFECT
 SIMPLE POP ART EFFECT In this Photoshop tutorial, we re going to see how to turn a photo into a simple 1950 s and 60 s pop art-style effect. If you can make a selection with the Lasso tool and you understand
Create a Dreamlike Photo Manipulation of an Emotional Girl with a Dramatic Lighting in Photoshop. By Andrea Garcia - February 12,
 Create a Dreamlike Photo Manipulation of an Emotional Girl with a Dramatic Lighting in Photoshop By Andrea Garcia - February 12, 2015 396 11 Create a Dreamlike Photo Manipulation of an Emotional Girl with
This tutorial will show you how to change your images into a cool dirty grunge design, which could be used for posters, prints, CD covers, etc.
 This tutorial will show you how to change your images into a cool dirty grunge design, which could be used for posters, prints, CD covers, etc.today We ll be making this: STEP 1: Open a new document in
All Creative Suite Design documents are saved in the same way. Click the Save or Save As (if saving for the first time) command on the File menu to
 command on the File menu to") 1 The Application bar is new in the CS4 applications. It combines the menu bar with control buttons that allow you to perform tasks such as arranging multiple documents or changing the workspace view.
1 The Application bar is new in the CS4 applications. It combines the menu bar with control buttons that allow you to perform tasks such as arranging multiple documents or changing the workspace view.
Tutorial Resources. Combine a Crocodile with a Car to Create an Exotic Crocomobile Photoshop Tutorials
 Tutorial Resources Crocodile1 SXC Crocodile2 charadestock Crocodile3 frostdragon64 Old car achatinastock Background SXC Bird rml-stock sign1 discordia-stock Sign2 ecathe Step 1 Open the background image