Create a Multicolored Splashed Text Effect in Adobe Illustrator
|
|
|
- Arthur Ethan Garrison
- 6 years ago
- Views:
Transcription

1 Create a Multicolored Splashed Text Effect in Adobe Illustrator by Diana Toma17 Nov 2014 What You'll Be Creating In this tutorial you will learn how to create a multicolored splashed text effect in Adobe Illustrator. In the beginning you will manipulate the text a little and once ready, you will add some dimension to it with the help of the Bas Relief effect. Next, you will create the multicolored splashes using the Appearance panel and by playing with two built-in Scatter Brushes and their settings. Towards the end of the tutorial you will add highlights and shading to the text and also to the splashes, and that s it! Sounds easy? Let s find out. 1. Start a New Project Open Illustrator and go to File > New to open a blank document. Type a name for your file and set up the dimensions, and then select Pixels as Units and RGB as Color Mode. Next, go to Edit > Preferences > General and set the Keyboard Increment to 1 px and while there, go to Units & Display Performance to make sure that the Units are as in the following image. I usually work with these settings, and they will help you throughout the drawing process.

2 2. Type and Prepare the Text Step 1 Grab the Type Tool (T) and type Paint me on your artboard. The font that I've used is LeckerliOne, Regular, size of 117 pt and is created by Gesine Todt. Select Expand from the Object menu.

3 Step 2 Next, take the Direct Selection Tool (A) and drag a selection over the top half of the letter t as shown below. This allows you to select all the points in that area and move them upwards in a single movement. After this, the letter t should be about the same size as the letter i.

4 Step 3 Use the Direct Selection Tool (A) again to drag a selection over the letter t as shown in the following image. Move the selected points towards the letter m. Step 4 Now, select all the letters and press Add in the Pathfinder panel to unite them into a single shape.

5 3. Add Dimension to the Text Step 1 Select the compound path that you created in the previous step and set the fill color to black. Next, go to Effect > Sketch and apply the Bas Relief effect. Reduce the Opacity to 40% for a less dramatic look. I will name this the bas relief shape.

6 Apply these settings for the Bas Relief effect and set the Light to Top.

7 Step 2 Copy and Paste in Back (Control-B) the bas relief shape and remove all existing appearances by pressing the Clear Appearance icon at the bottom of the Appearance panel. Use the color indicated as the fill color, and then go to Effect> Stylize > Drop Shadow and apply this effect four times. I will name this the shadow shape.

8 These are the settings for the four Drop Shadow effects:
 the bas relief shape and remove all existing appearances.")
9 Step 3 If you zoom in on the letters, you will notice they have pixelated edges. To fix this problem, you will use a mask. Copy and Paste in Front (Control-F) the bas relief shape and remove all existing appearances. Now, select this new copy along with the bas relief shape and go to Object > Clipping Mask > Make (Control-7). You can name the resulting group Bas Relief if you want, and at this point in the Layers panel you should have this group and the shadow shape under it.
![Step 4 Copy and Paste in Front (Control-F) the shadow shape, and then bring it in front of everything by going to Object > Arrange > Bring to Front (Shift-Control-]).](/docs-images/75/71895615/images/10-0.jpg "Remove all existing appearances, select white as the fill color, and set the Blending Mode to Soft Light.")
10 Step 4 Copy and Paste in Front (Control-F) the shadow shape, and then bring it in front of everything by going to Object > Arrange > Bring to Front (Shift-Control-]). Remove all existing appearances, select white as the fill color, and set the Blending Mode to Soft Light. As a result, your text will be whiter, and we want this because the multicolored splashes will stand out more. I will name this the white shape.

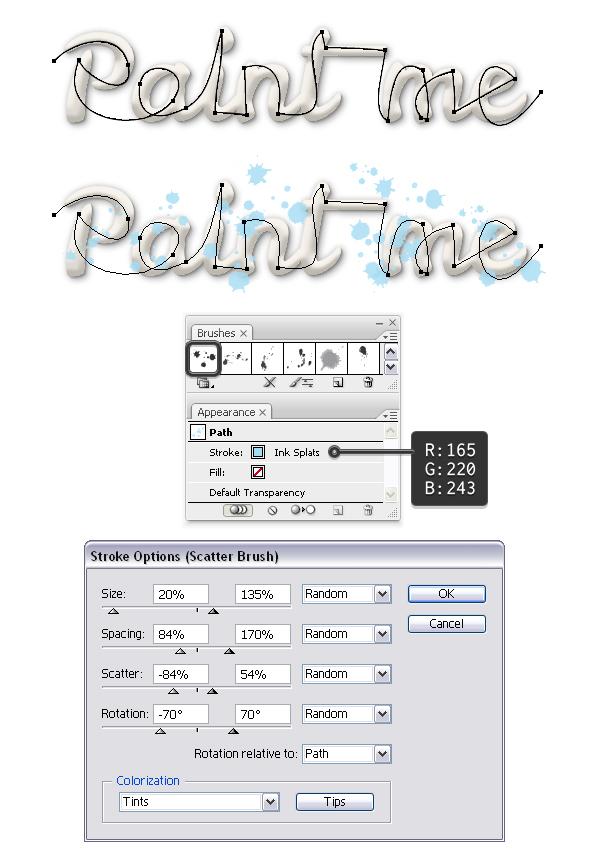
11 4. Create the Multicolored Splashes Step 1 Grab the Pencil Tool (N) and draw a path over the letters as in the next image. Try to follow the shape of the letters as accurately as possible because you want most of the splashes to be on the letters, not around them on the background. If needed, you can make additional adjustments with the Direct Selection Tool (A). Stroke this path with the Ink Splats Scatter Brush that you can find in Brush Libraries Menu > Artistic > Artistic_Ink. Since the Colorization Method is set to Tints, by changing the stroke color to light blue, your splashes will turn light blue as well. Keep the Stroke weight at 1 pt, but go to the Appearance panel and double-click on the brush stroke to open the Stroke Options window and change the settings. I've only changed the settings for Size and Spacing and left the others as they were.
12
13 Step 2 With the path still selected, choose Add New Stroke from the fly-out menu of the Appearance panel. As a result you will get a second Stroke attribute above the first. Change the color to red and use the Ink Splats Scatter Brush again. Open the Stroke Options window and change the settings as shown. We want bigger splashes at the beginning and smaller splashes later.

14 Step 3 With the path still selected, add the third Stroke attribute above the others. Set the color to orange and this time use the Ink Spatter 1 Scatter Brush from the library. Open the Stroke Options window and change only the settings for Size and Spacing as shown.

15 Step 4 Add a new Stroke attribute and use the color indicated. Select the Ink Splats Scatter Brush again, and then change the settings. Obviously, you won t get a result identical to mine, but it should be pretty similar.
16 Step 5 Add a new Stroke attribute, set the color to green, and use the Ink Splats Scatter Brush again. Use smaller values for Size in order to get smaller splashes. Step 6
17 Add another Stroke attribute above the others and set the color to brown. This time use the Ink Spatter 1 Scatter Brush and change the settings for Size and Spacing in the Stroke Options window. You want to get really small brown splashes this time.
18 Step 7 Add the last Stroke attribute and set the color to purple. Use the Ink Spatter 1 Scatter Brush again, with the settings shown below. The purple splashes should be pretty small as well.
 the white shape and remove all existing appearances. Bring this copy in front of everything by going to Object > Arrange > Bring to Front (Shift-Control-]).")
19 Step 8 It s time to mask the splashes around the letters, but before you continue, make a copy of the stroked path for later use. Now, Copy and Paste in Front (Control-F) the white shape and remove all existing appearances. Bring this copy in front of everything by going to Object > Arrange > Bring to Front (Shift-Control-]). Select the newly made shape along with the stroked path and go to Object > Clipping Mask > Make (Control-7). Step 9 Next, we will add more splashes around the text, on the background, because at this point the text looks quite strange. Select the copy of the stroked path that you made earlier and move it in a new layer under the text. Select Expand Appearance in order to turn the strokes into fills. At this point, in the Layers panel you should have a group that contains seven other groups (each Stroke attribute will turn into a group of splashes). In each of these groups you will find the path that you have used (stroke-none, fill-none). Therefore open each group, scroll to the end of it and delete them. It s important to delete all seven paths before you continue. When you are done, select the big group of splashes and Ungroup (Shift-Control-G) two or three times until you are able to select individual splashes or smaller groups of splashes.

20 Step 10 Start to delete some of the splashes from around the text because at this point it is much too crowded. In the next image you can see the areas that I've cleaned up, so you can follow my example or create your own unique design.

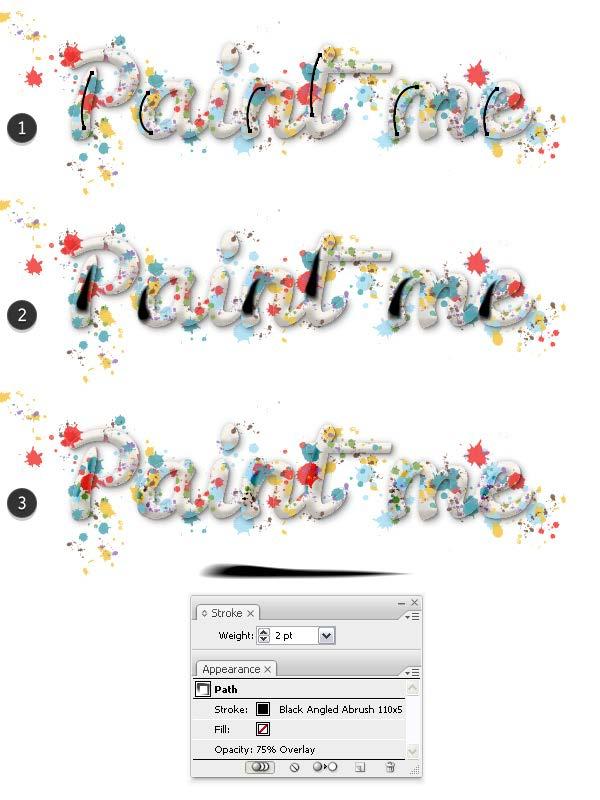
21 The important thing here is to keep the bigger splashes located right at the edge of the text (indicated by the arrows), otherwise the overall look is going to be weird. You are free to delete a large part of the splashes that are further from the text. 5. Add Highlights/Shading to the Text Step 1 First, create a new layer above the one with the text. Grab the Pen Tool (P) or the Pencil Tool (N) and draw a path over the left side of the letters P, a, n, t, m, and e, as in the next image (1). Stroke these six paths with a brush from the Set of Multi-Use Blend Brushes called Black Angled Art Brush, which we created a while ago. Increase the Stroke weight to 2 pt (2) and set all of them to Blending Mode Overlay and 75% Opacity (3).
22

23 Step 2 Next, draw the paths shown in the following image over the letters (1). Stroke these paths with the White Angled Art Brush from the Set of Multi-Use Blend Brushes, which is just the white version of the previously used brush. Set the Stroke weight to pt depending on the letter (2), and then set all of them to Blending Mode Overlay (3).

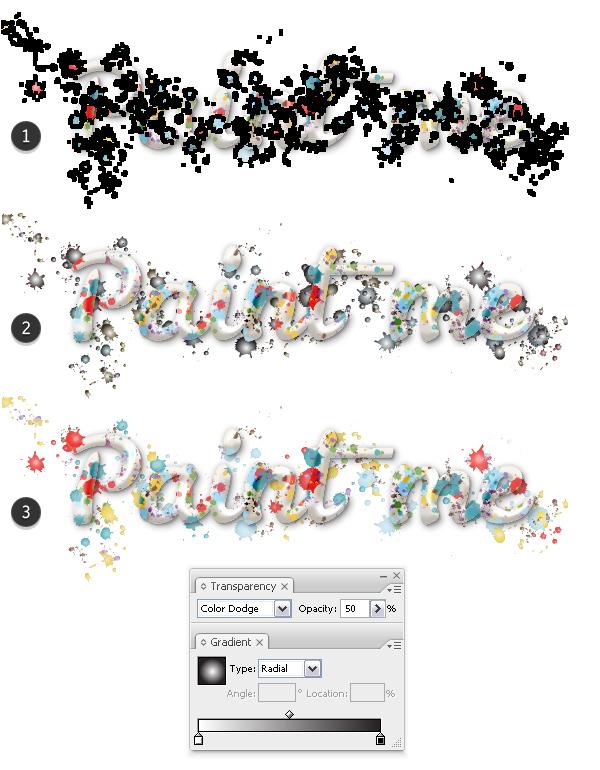
24 Step 3 Here is a before and after image. At the beginning the text looked pretty flat, but after the highlights/shading the text looks shiny and more defined. 6. Add Dimension to the Outer Splashes Step 1 Before you continue, lock the layer with the text and the layer with the highlights/shading. Now select all the splashes around the letters and Copy and Paste in Front (Control-F) all of them (1). Keeping them selected, fill all the copies with a radial gradient from white to black (2) and set them to Blending Mode Color Dodge and 50% Opacity (3).
25 Step 2

26 Select all the splashes around the text again, and Copy and Paste in Front (Control-F) all of them. Keeping them selected, press Add in the Pathfinder panel to unite them into a single shape. Remove any existing appearances of the newly created compound path, and select white as the fill color. Step 3 With the white compound path from the previous step still selected, go to Effect > Stylize and apply the Drop Shadow effect twice. After that, reduce the Opacity to 0% but only for the white Fill attribute, otherwise we won't be able to see the color of the splashes. We are interested in only the shadow. Set the shape to Blending Mode Color Burn.

27 These are the settings for the two Drop Shadow effects. Notice that the first one uses the color black and the other one uses white.

28 Step 4 In the last step let's add even more shine to the outer splashes. Grab the Pen Tool (P) or the Pencil Tool (N) and draw a few small paths over the bigger splashes (1). Stroke these paths with the White Blend Art Brush, size of 100 x 3 px, from the Set of Multi-Use Blend Brushes. Set the Stroke weight at 1 2 pt depending on the size of the splashes, and reduce the Opacity to 40-75% depending how shiny you want them to be (2). And with this you've just finished!

29 Congratulations! You're Done I hope you learned something new from this tutorial. If you decide to create this splashed text effect, please share it with us. It would be lovely to see other color combinations, or maybe a unique design.
30
Drawing the Red Christmas Bell
 Vector 3D Christmas Bells Thinking of drawing some Christmas bells for this Christmas? Read this illustrator tutorial to learn how to draw 5 different styles of vector Christmas bells using the 3D Revolve
How to Create a Curious Owl in Illustrator
 How to Create a Curious Owl in Illustrator Tutorial Details Program: Adobe Illustrator Difficulty: Intermediate Estimated Completion Time: 1.5 hours Take a look at what we're aiming for, an inquisitive
Step 1. Facebook Twitter Google+ Find us on Facebook. Vectortuts+ How to Create a Curious Owl in Illustrator CS4 Vectortuts+
 Joomla developers needed - Long term potential in India Copywriter Email Campaigns Wordpress Creative design Social media in UK More Freelance Jobs... Facebook Twitter Google+ Find us on Facebook Step
Adobe Illustrator Craft a Dramatic Vector Landscape Environment
 Adobe Illustrator Craft a Dramatic Vector Landscape Environment This tutorial will show the intermediate Adobe Illustrator artist how to make a dramatic landscape environment. You should have a basic understanding
Design a Halloween Pumpkin Wallpaper in Photoshop
 Design a Halloween Pumpkin Wallpaper in Photoshop By: Alvaro Guzman Halloween is near! So let's take a pumpkin image, carve it up, and light it for this coming holiday. You'll learn how to get this nice
Add Rays Of Sunlight To A Photo With Photoshop
 Add Rays Of Sunlight To A Photo With Photoshop Written by Steve Patterson. In this photo effects tutorial, we'll learn how to easily add rays of sunlight to an image, a great way to make an already beautiful
Create A Briefcase Icon
 Create A Briefcase Icon In this tutorial, I will show you how to create a briefcase icon with rectangles, ellipses, and gradients. This briefcase icon is great for web designs and user interfaces. Moreover,
Animated Snowman. Image size: 11 w x 17 h 300 dpi
 Animated Snowman Image size: 11 w x 17 h 300 dpi Step 1 First of all, you ll need the texture on my website. Now open a new document. I usually work on really big documents because I can work on the details
This tutorial will show you how to use artistic grunge overlays to transform your photos into works of art.
 ARTISTIC GRUNGE OVERLAYS For all photo editing software that supports PNG files If you have any questions, please feel free to contact me at kim@photosbykimhill.com. This tutorial will show you how to
How To Create a Stylish Skull Based Vector Illustration
 How To Create a Stylish Skull Based Vector Illustration The skull and crossed pistons mark is a popular adaption of the tradition skull and crossbones symbol and is commonly seen in motorcycle culture,
SAVING, LOADING AND REUSING LAYER STYLES
 SAVING, LOADING AND REUSING LAYER STYLES In this Photoshop tutorial, we re going to learn how to save, load and reuse layer styles! Layer styles are a great way to create fun and interesting photo effects
The Layer Blend Modes drop-down box in the top left corner of the Layers palette.
 Photoshop s Five Essential Blend Modes For Photo Editing When it comes to learning Photoshop, believe it or not, there's really only a handful of things you absolutely, positively need to know. Sure, Photoshop
GIMP (GNU Image Manipulation Program) MANUAL
 MANUAL") Selection Tools Icon Tool Name Function Select Rectangle Select Ellipse Select Hand-drawn area (lasso tool) Select Contiguous Region (magic wand) Selects a rectangular area, drawn from upper left (or lower
Selection Tools Icon Tool Name Function Select Rectangle Select Ellipse Select Hand-drawn area (lasso tool) Select Contiguous Region (magic wand) Selects a rectangular area, drawn from upper left (or lower
prepared by Allison Hwang for T. Purdy 2011
 This tutorial shows you how to create a basic screen display on a product in Adobe Photoshop. Creating details, such as shadows and reflections, can help make your product more realistic and convincing
HOW TO CREATE A SUPER SHINY PENCIL ICON
 HOW TO CREATE A SUPER SHINY PENCIL ICON Tutorial from http://psd.tutsplus.com/ Compiled by INTRODUCTION The Pencil is one of the visual metaphors most used to express creativity. In this tutorial,
How to Create a Landscape Wallpaper for your Desktop
 How to Create a Landscape Wallpaper for your Desktop Why not create a vector landscape wallpaper? In this simple tutorial, you will learn how to create an eye-appealing wallpaper quickly and effectively.
Make Watercolor and Marker Style Portraits with Illustrator
 Make Watercolor and Marker Style Portraits with Illustrator Save Preview Resources Portrait by Lillian Bertram (Creative Commons Share Alike used here with permission) Step 1: Set up your Illustrator document
Glowing Surreal Planet Design. Final Image Preview
 Glowing Surreal Planet Design Final Image Preview. Step 1 First, go to the S:\ drive and locate the folder called Glowing Planet Design. Copy the City Skyline file and paste it in your Glowing Planet Design
Turning Photograph Into Cartoon-Style Picture. Digital Media I West High School Susan M. Raymond
 Turning Photograph Into Cartoon-Style Picture Digital Media I West High School Susan M. Raymond Part 1: Creating Outline Wondering how those guys on the internet turn photograph into a nice cartoon-style
Enhanced Eyes. Here's the image I'll be working with (glamour eyes photo from Shutterstock): Here's what the eyes will look like when we're done:
: Here's what the eyes will look like when we're done:") Enhanced Eyes Here's the image I'll be working with (glamour eyes photo from Shutterstock): The original image. Here's what the eyes will look like when we're done: The final effect. Here's a close-up
Enhanced Eyes Here's the image I'll be working with (glamour eyes photo from Shutterstock): The original image. Here's what the eyes will look like when we're done: The final effect. Here's a close-up
Hello Champions. I have added some bubble brushes to the resources that I found on Deviantart that are by Jennyle88.
 Hello Champions I m Renée and once again I am bringing you a Daydreamer or Fantasy style tutorial. Fantasy style pages come about from kits that contain certain elements like cars, treasure chests, furniture
How to Create Fake Shadows
 TIP SHEET #8 How to Create Fake Shadows As well as the colour, it s the shadows in a picture that help to give it mood and atmosphere so in this tutorial I want to show you how you can add in extra shadows.
Working with Live Paint
 Adobe Illustrator Working with Live Paint In Illustrator CS2, Adobe introduced the Live Paint feature, which revolutionized how a designer artist could add color to a drawing. The Live Paint feature allows
Clipping Masks And Type Placing An Image In Text With Photoshop
 Clipping Masks And Type Placing An Image In Text With Photoshop Written by Steve Patterson. In a previous tutorial, we learned the basics and essentials of using clipping masks in Photoshop to hide unwanted
Digital Design and Communication Teaching (DiDACT) University of Sheffield Department of Landscape. Adobe Photoshop CS5 INTRODUCTION WORKSHOPS
 University of Sheffield Department of Landscape. Adobe Photoshop CS5 INTRODUCTION WORKSHOPS") Adobe INTRODUCTION WORKSHOPS WORKSHOP 1 - what is Photoshop + what does it do? Outcomes: What is Photoshop? Opening, importing and creating images. Basic knowledge of Photoshop tools. Examples of work.
Adobe INTRODUCTION WORKSHOPS WORKSHOP 1 - what is Photoshop + what does it do? Outcomes: What is Photoshop? Opening, importing and creating images. Basic knowledge of Photoshop tools. Examples of work.
Chapter 4: Draw with the Pencil and Brush
 Page 1 of 15 Chapter 4: Draw with the Pencil and Brush Tools In Illustrator, you create and edit drawings by defining anchor points and the paths between them. Before you start drawing lines and curves,
METAL TEXT EFFECT. Step 1: Create A New Document. Step 2: Fill The Background With Black
 METAL TEXT EFFECT In this text effects tutorial, we ll learn how to easily create metal text, a popular effect widely used in video games and movie posters! It may seem like there s a lot of steps involved,
A quick note: We hope that you will find something from the Tips and Tricks that will add a little pizazz to your yearbook pages!
 A quick note: The following pages are tips and tricks for Basic Photoshop users. You may notice that some instructions indicate that non-awpc fonts were used, and that some colors were created using the
The original image. The final rainbow effect.
 ADD A realistic rainbow to a photo In this Photoshop photo effects tutorial, we re going to learn how to easily add a rainbow, even a double rainbow, to a photo. Of course, as with most photo effects,
Create a Beautiful Abstract Portrait in Photoshop - Psd Premium Tutorial
 Create a Beautiful Abstract Portrait in Photoshop - Psd Premium Tutorial By: Wojciech Pijecki In this tutorial we will combine several stock images to create an artistic, abstract portrait of a woman.
The original image. Let s get started! The final light rays effect. Photoshop adds a new layer named Layer 1 above the Background layer.
 Add Rays Of Light To A Photo In this photo effects tutorial, we ll learn how to quickly and easily add rays of sunlight to an image with Photoshop! I ll be using Photoshop CS5 throughout this tutorial
WORN, TORN PHOTO EDGES EFFECT
 Photo Effects: CC - Worn, Torn Photo Edges Effect WORN, TORN PHOTO EDGES EFFECT In this Photoshop tutorial, we ll learn how to take the normally sharp, straight edges of an image and make them look all
Create a Stylized GPS Icon
 Home About Resources Contact Shop Tutorials Tips and Tricks Interviews Inspiration Create a Stylized GPS Icon Tutorials July 9th, 2009 Location based software and peripherals are very popular these days.
GRINDHOUSE MOVIE POSTERS
 Follow the instructions below to create a grindhouse style movie poster for your short film. You can also see a detailed video tutorial here: http://www.youtube.com/watch?v=-drhbfvhft0 GOOD LUCK!! CREATING
Assessment Project Requirements 10 x ppi
 Color Replacement Color Wheel The color wheel provides independent artists, designers, illustrators and any other professionals that depend on color a foundation for choosing and creating colorful designs.
The Little Fish Transcript
 The Little Fish Transcript welcome back everybody we are going to do this nice little scare to fish so if you've been following on to our shark tutorial you might notice this little guy in the thumbnail
11 Advanced Layer Techniques
 11 Advanced Layer Techniques After you ve learned basic layer techniques, you can create more complex effects in your artwork using layer masks, path groups, filters, adjustment layers, and more style
MODULE 1 IMAGE TRACE AND BASIC MANIPULATION IN ADOBE ILLUSTRATOR. The Art and Business of Surface Pattern Design
 The Art and Business of Surface Pattern Design MODULE 1 IMAGE TRACE AND BASIC MANIPULATION IN ADOBE ILLUSTRATOR The Art and Business of Surface Pattern Design 1 Hi everybody and welcome to our Make it
The original photo. The final result.
 giving a photo painted edges In this Adobe Photoshop tutorial, we re going to combine a couple of different effects. First, we ll give the photo easy-tocreate painted edges, and then we ll make it look
Photoshop. Make a Spooky Halloween Pumpkin Text Effect in Photoshop - Photoshop tutorial PSDDude
 Photoshop October 4th,2017 1 2 Image size: 7 in wide x 3 in high 300 dpi Start with a simple black gradient background layer. Radial Gradiant, black to gray. Install the CREEPSVILLE font. Center and Type
ITEC185 INTRODUCTION TO DIGITAL MEDIA
 1 ITEC185 INTRODUCTION TO DIGITAL MEDIA ADOBE PHOTOSHOP ITEC185 - Introduction to Digital Media ITEC185 - Introduction to Digital Media 2 What is Adobe Photoshop? Photoshop is the leading professional
All Creative Suite Design documents are saved in the same way. Click the Save or Save As (if saving for the first time) command on the File menu to
 command on the File menu to") 1 The Application bar is new in the CS4 applications. It combines the menu bar with control buttons that allow you to perform tasks such as arranging multiple documents or changing the workspace view.
1 The Application bar is new in the CS4 applications. It combines the menu bar with control buttons that allow you to perform tasks such as arranging multiple documents or changing the workspace view.
TV Aquarium. Create a new document. 8.5 x 11, 300 dpi. Save as TV Aquarium Your Name. Create TV shape. Use Pen
 Create a new document. 8.5 x 11, 300 dpi. Save as TV Aquarium Your Name. Create TV shape. Use Pen Tool, Convert Point Tool and Direct Selection Tool. We need side shapes to create patches of light and
Living on a Heart Grunge by Dhanank Pambayun
 Living on a Heart Grunge by Dhanank Pambayun Dhanank Pambayun is a digital artist who lives in Jogjakarta, Indonesia. He started his career in 2002, building a personal website, www.tragikpixel.com, which
Create a Cute Furry Vector Monster in Illustrator
 Create a Cute Furry Vector Monster in Illustrator Other labs from this author can be found at http://www.blog.spoongraphics.co.uk/tutorials/create-a-cute-furry-vector-monster-inillustrator Follow these
PHOTOSHOP PUZZLE EFFECT
 PHOTOSHOP PUZZLE EFFECT In this Photoshop tutorial, we re going to look at how to easily create a puzzle effect, allowing us to turn any photo into a jigsaw puzzle! Or at least, we ll be creating the illusion
Create a Surreal Out of Bounds Photo Manipulation in Photoshop
 Create a Surreal Out of Bounds Photo Manipulation in Photoshop By: Loredana Papp In this tutorial we will combine several images of water, animals, and people to create a surreal out of bounds photo manipulation
Black and White using Photoshop
 Topics to be covered: Methods for B&W conversion Improving the image Toning Printer color management Black and White using Photoshop Various ways to get to B&W Adobe Raw Converter (ACR) in from Bridge
Digital Image Manipulation 2014
 Week 4 Advanced Type Techniques- create special effect type Step 1 Create a new 1024 x 768 px document. Set the document background color to light pink or follow my colour (#f8cece) Create the text using
FLAMING HOT FIRE TEXT
 FLAMING HOT FIRE TEXT In this Photoshop text effects tutorial, we re going to learn how to create a fire text effect, engulfing our letters in burning hot flames. We ll be using Photoshop s powerful Liquify
PHOTOSHOP & ILLUSTRATOR BOOTCAMP
 FALL 2014 - ELIZABETH LIN PHOTOSHOP & ILLUSTRATOR BOOTCAMP ILLUSTRATOR ALIGNMENT To access the alignment panel, go to Window -> Align. You should see a panel like the one below. This panel allows you to
Introduction to Photoshop CS6
 Introduction to Photoshop CS6 Copyright 2016, Faculty and Staff Training, West Chester University. A member of the Pennsylvania State System of Higher Education. No portion of this document may be reproduced
Chapter 8. Working with Transparency, Effects, and Graphic Styles and Recoloring Artwork Delmar, Cengage Learning
 Chapter 8 Working with Transparency, Effects, and Graphic Styles and Recoloring Artwork 2011 Delmar, Cengage Learning Objectives Use the Transparency panel and the Color Picker Recolor artwork Apply effects
Converse Chuck Taylor Shoes Photoshop Tutorial
 20 Converse Chuck Taylor Shoes Photoshop Tutorial Step 1 Create A New Document Create a New Document. The size of my canvas is 600px x 700px with a 72dpi resolution. Save as Chuck Taylor - Your Name. Step
Here is a 100% zoom close up. Name in Popsicles
 Here is a 100% zoom close up Name in Popsicles Step 1 Let s start by creating a new Photoshop document. Mine is 2560 1440 pixels. Fill the background with a color of your choice (it s not important at
Orientation. Making a Mountain Brush
 Introduction I am a big fan of the artistic style of map that is found in the front of all the fantasy novels I read while I was growing up. I like to give out maps to my players when I'm running games,
Making a Printable Business Card Using Pixelmator
 Page 1 of 8 In this project, I will demonstrate for you how to design a simple business card in Pixelmator that will be ready for print. Step 1 Creating a New Document Things sent to commercial printers
Using Adobe Photoshop
 Using Adobe Photoshop 6 One of the most useful features of applications like Photoshop is the ability to work with layers. allow you to have several pieces of images in the same file, which can be arranged
Photoshop Elements Hints by Steve Miller
 2015 Elements 13 A brief tutorial for basic photo file processing To begin, click on the Elements 13 icon, click on Photo Editor in the first box that appears. We will not be discussing the Organizer portion
Using the Shoe Advertisement tutorial, create a shoe ad that is specifically designed to appeal to your assigned consumer.
 Lesson Instructions: Using the Shoe Advertisement tutorial, create a shoe ad that is specifically designed to appeal to your assigned consumer. Consider the specifications in the tutorial as the requests
L AY E R S A N D M A S K S
 Layers is one of the most used elements in PhotoShop. They allow you to work on an image without disturbing the others. A layer is simply one image stacked on top of another. It builds from the bottom
Compiled by <<coldbing>> FIRE EFFECTS
 FIRE EFFECTS Compiled by Step 1 - New Document Make a new document. Fill it with black. Then make a new layer, and type out (or whatever) you want to set on fire in white. Step 2 - Windy Go
Easily Smooth And Soften Skin In A Photo With Photoshop
 Easily Smooth And Soften Skin In A Photo With Photoshop Written by Steve Patterson OPEN THE START FILE BY RIGHT CLICKING THE.JPG FILE AND CHOOSING OPEN WITH ADOBE PHOTOSHOP. SAVE AS: X_lastname_firstname_Smooth_Soft
Photo One Digital Photo Shoots and Edits
 Photo One Digital Photo Shoots and Edits You will submit photo shoots, unedited and you will submit selected edited images. The shoots will be explained first and the edits will be explained later on this
Step 1: Select The Main Subject In The Photo
 Create A custom Motion Trail from your subject In this Photoshop photo effects tutorial, we ll learn how to add a sense of action and movement to an image by giving the main subject an easy to create motion
Organizing artwork on layers
 3 Layer Basics Both Adobe Photoshop and Adobe ImageReady let you isolate different parts of an image on layers. Each layer can then be edited as discrete artwork, allowing unlimited flexibility in composing
Photoshop & Illustrator
 Week 6 Lesson 6 : Utilize Filters Effect Applying filters Creating and editing Smart Filters Hiding, copying, and deleting Smart Filters Working with the Smart Filter mask More filter techniques Photoshop
The original image. As I said, we ll be looking at a few different variations on the effect. Here s the first one we ll be working towards:
 DIGITAL PIXEL EFFECT In this Photoshop tutorial, we re going to look at how to create a digital pixel effect, which is often used in ads that sell anything to do with digital. We re going to first pixelate
Dark & Surreal Poster
 Step 1 Dark & Surreal Poster Start off with the creation of your document and, in this case 1200 1600. If you want to print this you might want to work in CMYK mode, a higher resolution and also 300DPI.
XXXX - ILLUSTRATING FROM SKETCHES IN PHOTOSHOP 1 N/08/08
 INTRODUCTION TO GRAPHICS Illustrating from sketches in Photoshop Information Sheet No. XXXX Creating illustrations from existing photography is an excellent method to create bold and sharp works of art
The final wrap text in 3D result.
 WRAPPING TEXT IN 3D In this Photoshop tutorial, we re going to learn how to easily wrap text around a 3D object in Photoshop, without the need for any 3D software. We re going to be wrapping our text around
12. Creating a Product Mockup in Perspective
 12. Creating a Product Mockup in Perspective Lesson overview In this lesson, you ll learn how to do the following: Understand perspective drawing. Use grid presets. Adjust the perspective grid. Draw and
Everything you ever wanted to know about Layer Styles with Adobe Photoshop CS3 - CS5
 Everything you ever wanted to know about Layer Styles with Adobe Photoshop CS3 - CS5 A layer style is one or more effects applied to a layer or layer group. You can apply one of the preset styles provided
Introduction to Photoshop
 Introduction to Photoshop Instructional Services at KU Libraries A Division of Information Services www.lib.ku.edu/instruction Abstract: This course covers the basics of Photoshop, including common tools
ADD A REALISTIC WATER REFLECTION
 ADD A REALISTIC WATER REFLECTION In this Photoshop photo effects tutorial, we re going to learn how to easily add a realistic water reflection to any photo. It s a very easy effect to create and you can
Colorful Glowing Mask Photoshop Tutorial Photoshop TUTfactory The best Photoshop tutorials in one place
 Step 1: To start, create new canvas sized at 994 1312 pixels, and fill it with black. Next, create a new layer, and go to Filter->Render->Clouds. Duplicate this layer, and then merge the two layers. Set
1. Create a rough sketch
 1. Create a rough sketch Go to File>New (Cmd/Ctrl+N), name it Whale. Set Width to 230mm, Height to 310mm and Resolution to 300ppi. Click OK. Create a new layer (Shift+Cmd/Ctrl+N) and name it Sketch 1,
PHOTO 11: INTRODUCTION TO DIGITAL IMAGING
 PHOTO 11: INTRODUCTION TO DIGITAL IMAGING Instructor: Sue Leith Exam Review On your camera, what are the following and what are they used for? WB matches the color temperature of light ISO - The sensitivity
How can images be manipulated to represent an animal?
 Roboanimal This lesson will explore the concept of natural objects when combined with manmade objects. You will be choosing an animal or natural being to digitally manipulate into a total manmade creature.
Topic: Photoshop and Digital Painting
 Let there be color! Photoshop is as much an artistic tool as it is for digitally altering images. But let s face it most people only relate the Adobe powerhouse program to the later category, hell it is
Overview: Getting to Know the Work Area Design and Print Module 1 of 20
 Adobe Train the Teacher modules written and edited by the T3 curriculum team. Janet Davis Abigail Rudner Steve Tatum Chris Faust Lesson overview: This module provides a basic overview of the workspace,
Web Graphics Chapter 7 Review
 Web Graphics Chapter 7 Review Name Date 1. The Add Layer Mask button is located on/in the. a. Toolbox b. Layers palette c. Mask palette d. History palette 2. How many color adjustments commands are available
How to Create Website Banners
 How to Create Website Banners In the following instructions you will be creating banners in Adobe Photoshop Elements 6.0, using different images and fonts. The instructions will consist of finding images,
Photoshop Textures Assignment # 2
 Photoshop Textures Assignment # 2 Objective: Use Photoshop to create unique texture from scratch that can be applied to backgrounds, objects, tetx and 3D objects to create new and exciting compositions.
prepared by Allison Hwang for T. Purdy 2011
 There are many ways to create material textures in Photoshop. In addition to using primarily the blending tool, you can also use filters to create textures. In this tutorial, the objective is to create
Transparency and blending modes
 Transparency and blending modes About transparency Transparency is such an integral part of Illustrator that it s possible to add transparency to your artwork without realizing it. You can add transparency
Introduction to Layers in Photoshop. Layers palette
 Layers: Are an essential element of Photoshop and a tool of every digital darkroom. Allow you to optimize one part of your photograph without affecting other parts. Allow an Undo of everything from minor
Adobe Photoshop CS5 Tutorial
 Adobe Photoshop CS5 Tutorial GETTING STARTED Adobe Photoshop CS5 is a popular image editing software that provides a work environment consistent with Adobe Illustrator, Adobe InDesign, Adobe Photoshop
Duplicate Layer 1 by dragging it and dropping it on top of the New Layer icon in the Layer s Palette. You should now have two layers rename the top la
 50 Face Project For this project, you are going to put your face on a coin. The object is to make it look as real as possible. Though you will probably be able to tell your project was computer generated,
Doing More with Photoshop
 Doing More with Photoshop Topic 7 Layer Masks Learning Outcomes In this lesson, we will take a look at layer masks in Photoshop. By the end of this lesson, you will have a good understanding of what layer
Winter Card.
 Winter Card Used images: http://www.cgtextures.com/texview.php?id=24321&phpsessid=95e8e8290894cc5194898 e16d1dddb4c http://www.cgtextures.com/texview.php?id=14285&phpsessid=95e8e8290894cc5194898 e16d1dddb4c
Photoshop CS2. Step by Step Instructions Using Layers. Adobe. About Layers:
 About Layers: Layers allow you to work on one element of an image without disturbing the others. Think of layers as sheets of acetate stacked one on top of the other. You can see through transparent areas
Photoshop Blending Modes
 Photoshop Blending Modes https://photoshoptrainingchannel.com/blending-modes-explained/#when-blend-modes-added For those mathematically inclined. https://photoblogstop.com/photoshop/photoshop-blend-modes-
Using layer masks to remove backgrounds with Photoshop CS5 and CS6
 Using layer masks to remove backgrounds with Photoshop CS5 and CS6 Use layer masks to combine these pictures into this You will learn: 1. Layers and layer masks 2. Brushes 3. Layer styles 4. Type tool
Introduction to Layers
 Introduction to Layers By Anna Castano A layer is an image or text that is piled on top of another. There are many things you can do with layer and it is easy to understand how it works. Through the introduction
Selections With Adobe Photoshop CS3
 Selections With Adobe Photoshop CS3 Welcome to Photoshop CS3 tutorials. Note: Learning how to select areas of an image is of primary importance-you must first select what you want to affect. Once you've
Create a new image: 10 IN height and 16 IN width, 300 dpi.
 The images needed for this project are on my website. Create a new image: 10 IN height and 16 IN width, 300 dpi. Create a new layer and fill the layer with white.. Create a radial gradient by using following
photoshop filters kelly ludwig assistant professor
 photoshop filters kelly ludwig assistant professor sharpening images reducing noise correcting distortions in images practical filters There are over 100 filters that ship with Photoshop and they're all
Illustrator. Graphics in Illustrator. Martin Constable February 17, RMIT Vietnam
 Illustrator Graphics in Illustrator Martin Constable February 17, 2018 RMIT Vietnam Introduction Introduction Illustrator s Interface The Tools and Control panel The Pen Tool Stroke/Fill The Selection
An Introduction to Layers, Masks and Channels in Photoshop
 An Introduction to Layers, Masks and Channels in Photoshop Roy Killen, GMAPS, EFIAP, GMPSA (c) 2017 Roy Killen Layers, Masks and Channels Page 1 Two approaches to image editing When images are edited in