Step 1. Facebook Twitter Google+ Find us on Facebook. Vectortuts+ How to Create a Curious Owl in Illustrator CS4 Vectortuts+
|
|
|
- Benedict Morris
- 6 years ago
- Views:
Transcription

1 Joomla developers needed - Long term potential in India Copywriter Campaigns Wordpress Creative design Social media in UK More Freelance Jobs... Facebook Twitter Google+ Find us on Facebook Step 1 Open a new blank document. The size doesn t matter for now. In the end we ll crop the artboard to the illustration. Let s start by creating the eyes of the owl. Draw an orange circle with the Ellipse Tool (L) (1a). Fill it with the gradient you see in image 1b, with colors ranging from light orange to dark red. Draw a dark brown pupil also (1c). Vectortuts+ Like 49,349 people like Vectortuts+.
 and set it to Screen, with 50% Opacity from the Transparency palette (2b).")
2 Step 2 The eye needs a couple of highlights. Draw a light orange ellipse in the top-right corner of the eye (2a) and set it to Screen, with 50% Opacity from the Transparency palette (2b). Add a secondary highlight in the bottom-left corner (2c), move it below the pupil and reduce its Opacity to 30% (2d).
.")
3 Step 3 Let s add an internal shadow. Copy the secondary highlight behind the first one and enlarge it (3a). Fill it with the same color as the pupil and set it to Multiply at 25% Opacity (3b). Go to Effect > Blur > Gaussian Blur and choose a Radius of 5 pixels (3c). We added a nice depth to the eye (3d).
. The eye is finished so group all objects together and create the second eye.")
4 Step 4 Select the main orange circle then go to Object > Path > Offset Path and and enter 5 pixels (4a). Make the new circle very dark (4b). The eye is finished so group all objects together and create the second eye. Place a guide right between them (4c).
. Create the left half by copying and flipping horizontally the one you just drew.")
5 Step 5 Let s draw the beak now. Activate Smart Guides with Command + U then draw the right half of the beak using the Pen Tool (P), while snapping to the guide (5a). Make sure the first and last points have horizontal handles (5b). Create the left half by copying and flipping horizontally the one you just drew. Grab the Direct Selection Tool (A) and use it to select the top points. Hit Command + J to join them: from the pop up dialog choose the Smooth option (5c). Do the same for the bottom points. We now have a single shape for the beak and because we kept the handles of the endpoints horizontal the joints don t have any kinks (5d).
6
7 Step 6 The beak is definitely out of scale and proportion with the eyes so let s adjust it (6a). Go to Object > Create Gradient Mesh and choose 3 rows and 4 columns (6b). Take a look at the instructions in image 6c to color the mesh properly. The result (6d) shows the finished beak: notice the frontal highlight and the shadows at the seams.
8 Step 7 To create the nostril draw a small brown ellipse at the top-right corner (7a). Fill it with a gradient to give it some depth (7b) then mirror it to complete the pair (7c).
.")
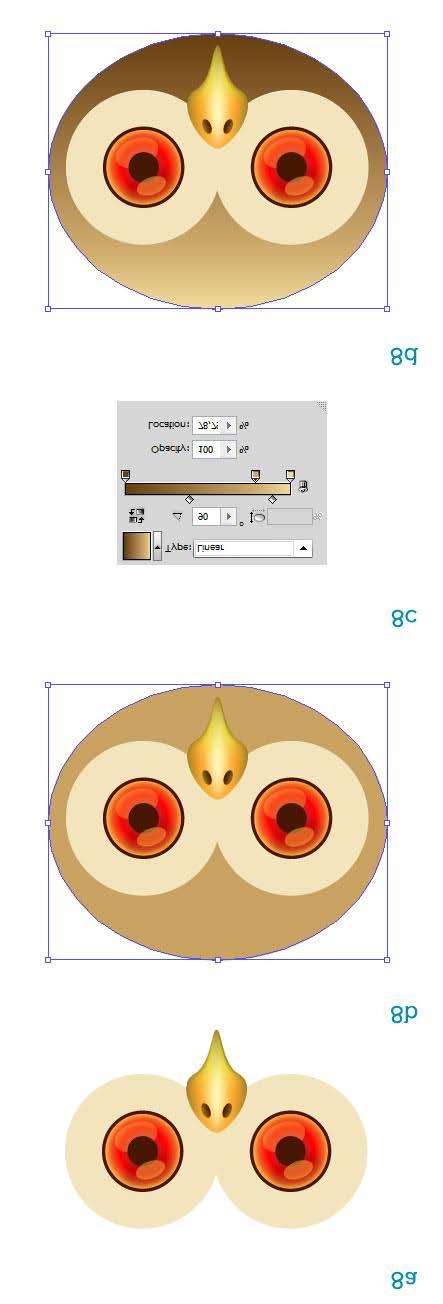
9 Step 8 Let s draw the head now. Create two overlapping circles around the eyes and join them into a single object: the spectacles (8a). Create the head with a brown ellipse (8b) and fill it with a gradient (8c) to imply light coming from the top (8d).
10
11 Step 9 Select the beak (not the nostrils) and go to Effect > Stylize > Drop Shadow and enter the settings shown in image 9a. Add a drop shadow to the eyes too (9b) and see the result (9c).
 and set it to Multiply with 50% Opacity (10d).")
12 Step 10 Create the egg-shaped body (10a) and fill it with the same gradient as the head. Duplicate the head, move the copy behind it and below it (10b). Add a Gaussian Blur effect (10c) and set it to Multiply with 50% Opacity (10d). The values used for the effects may be different for you, depending on the size of your document and the raster effect settings. Just try to obtain similar results. You can see that the head s shadow appears on the background too. We need to crop it to the body. Make a copy of the body and move it above the shadow. Select both this copy and the shadow and hit Command + 7 to create a clipping mask (10e). Now the shadow is cast only onto the body (10f).
13
14 Step 11 Let s finish the head by adding a wedge of lighter plumes. Using the guide as reference draw the right half of the wedge and make it bigger than the head. Don t worry about the weird shape, we ll crop it to the head with a clipping mask later (11a). Mirror the other half and join into a single object like we did earlier with the beak (11b). Use a copy of the head to create a clipping mask (11c) so the wedge is perfectly cropped (11d). Make it less conspicuous by switching to Soft Light mode with 70% Opacity (11e).
15 Step 12 Let s add a patch of lighter plumes on the belly. Duplicate and stretch the body and set it to Screen mode (12a). Go to Effect > Distort > Zig Zag and use the settings in image 12b to add variation to the outline (12c). Now go to Effect > Warp > Fisheye and use the settings shown in image 12d. See how the outline is a bit more dynamic now (12e).
16
17 Step 13 Use a clipping mask to crop the belly to the body. You know the method by now because we ve used it twice already (13a). With the belly selected create a new style in the Graphic Styles palette by clicking on the appropriate icon at the bottom. Apply the style to the spectacles and the wedge (13b). You might need to manually adjust the settings of the individual styles to make up for the objects having different shapes and sizes.
.")
18 Step 14 Draw the left wing with the Pen Tool (P) on its separate layer above the body and below the head (14a). Fill it with a two-tone brown gradient so the wing becomes darker as it recedes from view (14b).
. Add a Gaussian Blur effect (15d) so it looks like a real shadow. Use a clipping mask to crop it to the body (15e).")
19 Step 15 Take a copy of the wing and move it below it. Rotate it counterclockwise around the top edge (15a) and set it to Multiply mode (15b). Now it s darker (15c). Add a Gaussian Blur effect (15d) so it looks like a real shadow. Use a clipping mask to crop it to the body (15e). Mirror the other wing (15f).
20
21 Step 16 Let s draw a feather now. Create a light brown circle (16a) and delete its bottom point (16b). Mirror this circle and move it down (16c). Press P to select the Pen Tool and join the open circle by drawing the straight sides (16d).
22
 and apply a tapered brush (18b). Use a light beige (18c).")
23 Step 17 This feather looks like a band aid! Let s fill it with a gradient (17a) to give it a better appearance (17b). Step 18 Draw a straight path down the middle (18a) and apply a tapered brush (18b). Use a light beige (18c). The feather is complete.
24 Step 19 Now place many instances of the feather on the left wing (19a). Group them together and set them to Hard Light with 75% Opacity (19b). Mirror the feather to the other wing (19c). Populate the owl s belly with feathers, too, using less opacity, about 50% (19d).
25
 and crop it to the branch with a clipping mask (21b).")
26 Step 20 Time to draw the branch now. Using the Pencil Tool (N) draw a fairly irregular shape (20a). Fill it with a brown gradient set so the top is lighter (20b). Step 21 Draw the bark texture with the Pencil Tool (21a) and crop it to the branch with a clipping mask (21b). Set the bark objects to Color Burn mode with 15% Opacity (21c) to blend the texture with the main color (21d).
. Make two smaller copies (22c) and set them both to Screen mode.")
27 Step 22 Arrange the owl behind the branch (22a). We can now draw and position the owl s toes and claws. On a new layer draw a teardrop-shaped claw (22b). Make two smaller copies (22c) and set them both to Screen mode. Blend them with the main claw with a 5px Gaussian Blur effect (22d).
28

29 Step 23 Draw the toe behind the claw (23a) and fill it with the gradient shown in image 23b. When you re done group the three claw shapes and the toe together. Position the toes on the branch, three per side. Rotate and translate the toes so they follow the bulging outline of the branch (23c). Step 24
. Click on any icon in the toolbar to return to the drawing mode.")
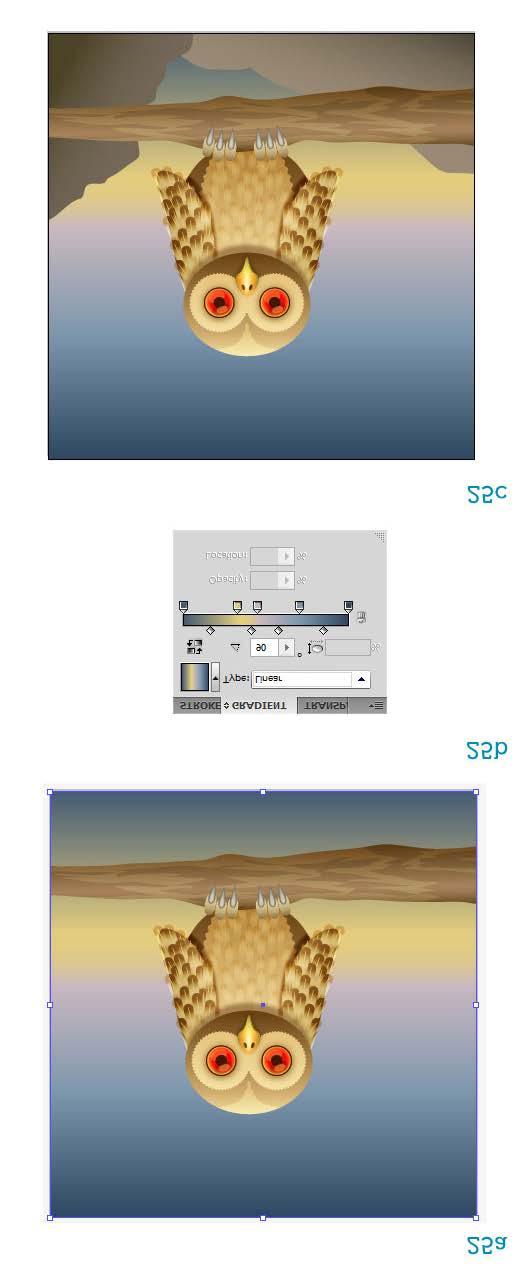
30 Now let s set up the final composition. Hit Alt + Command + P to select the Document Setup. From the popup window press the button labeled Edit Artboards (24a). Resize the artboard so it s square and it fully encloses the branch without showing its ends (24b). Click on any icon in the toolbar to return to the drawing mode. Step 25 On a new layer draw a square that covers the entire artboard and fill it with a multicolored gradient (25a). For the color stops (25b) try to recreate the sky at dusk. The orange and purple shades represent the horizon. With the Pencil Tool (N) draw some sketchy mountains and fill them with desaturated gradients, to suggest depth (25c).
31
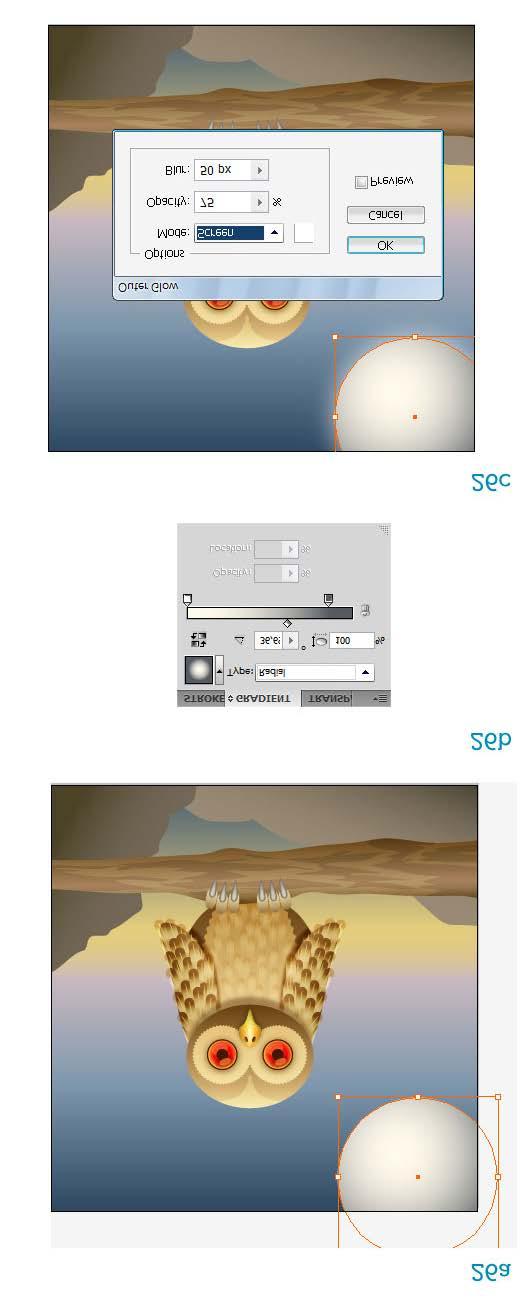
32 Step 26 The moon (26a) is a perfect circle, cropped to the artboard and filled with the radial gradient shown in image 26b. Go to Effect > Stylize > Outer Glow and use the settings from image 26c.
33
34 Step 27 Draw the stars with a lot of small white circles set in Overlay mode. Try to vary their size and opacity (27a). Finally add a drop shadow to the toes (27b). The illustration is done (27c).


35 Conclusion Hopefully this illustration didn t turn out spooky. As always, it was fun to make. I hope you learned an interesting workflow which combines basic shapes, basic gradients and a few effects to achieve a simple but pleasant result. Subscribe to the Vectortuts+ RSS Feed to stay up to date with the latest vector tutorials and articles. Like 139 people like this. Sign Up to see what your friends like.
How to Create a Curious Owl in Illustrator
 How to Create a Curious Owl in Illustrator Tutorial Details Program: Adobe Illustrator Difficulty: Intermediate Estimated Completion Time: 1.5 hours Take a look at what we're aiming for, an inquisitive
How to Create a Landscape Wallpaper for your Desktop
 How to Create a Landscape Wallpaper for your Desktop Why not create a vector landscape wallpaper? In this simple tutorial, you will learn how to create an eye-appealing wallpaper quickly and effectively.
Step 1. Blue Bird Tutorial
 Blue Bird Tutorial Using some basic shapes, effects, and gradients I will show you how to create a Twitter mascot for your blog or website. Twitter is a popular free web service for social networking and
Create a Twitter Style Bird Mascot - Vectortuts+
 Create a Twitter Style Bird Mascot Aug 4th in Illustration by Rype Using some basic shapes, effects, and gradients I will show you how to create a Twitter mascot for your blog or website. Twitter is a
Drawing the Red Christmas Bell
 Vector 3D Christmas Bells Thinking of drawing some Christmas bells for this Christmas? Read this illustrator tutorial to learn how to draw 5 different styles of vector Christmas bells using the 3D Revolve
HOW TO CREATE A SUPER SHINY PENCIL ICON
 HOW TO CREATE A SUPER SHINY PENCIL ICON Tutorial from http://psd.tutsplus.com/ Compiled by INTRODUCTION The Pencil is one of the visual metaphors most used to express creativity. In this tutorial,
Glowing Surreal Planet Design. Final Image Preview
 Glowing Surreal Planet Design Final Image Preview. Step 1 First, go to the S:\ drive and locate the folder called Glowing Planet Design. Copy the City Skyline file and paste it in your Glowing Planet Design
Create A Briefcase Icon
 Create A Briefcase Icon In this tutorial, I will show you how to create a briefcase icon with rectangles, ellipses, and gradients. This briefcase icon is great for web designs and user interfaces. Moreover,
Design a Halloween Pumpkin Wallpaper in Photoshop
 Design a Halloween Pumpkin Wallpaper in Photoshop By: Alvaro Guzman Halloween is near! So let's take a pumpkin image, carve it up, and light it for this coming holiday. You'll learn how to get this nice
Create a Simple Storefront Icon
 Create a Simple Storefront Icon In this tutorial I will show you how to create a simple storefront icon using some rectangles, Illustrator Effects, and gradients. This icon is great for use in e-commerce
Create a Stylized GPS Icon
 Home About Resources Contact Shop Tutorials Tips and Tricks Interviews Inspiration Create a Stylized GPS Icon Tutorials July 9th, 2009 Location based software and peripherals are very popular these days.
Create a Cute Furry Vector Monster in Illustrator
 Create a Cute Furry Vector Monster in Illustrator Other labs from this author can be found at http://www.blog.spoongraphics.co.uk/tutorials/create-a-cute-furry-vector-monster-inillustrator Follow these
Create a Multicolored Splashed Text Effect in Adobe Illustrator
 Create a Multicolored Splashed Text Effect in Adobe Illustrator by Diana Toma17 Nov 2014 What You'll Be Creating In this tutorial you will learn how to create a multicolored splashed text effect in Adobe
Creating Digital Illustrations for Your Research Workshop IV Illustration Demo Part II
 Creating Digital Illustrations for Your Research Workshop IV Illustration Demo Part II Final Figure Workshop IV Components Topics & Techniques covered How to randomly transform a group of individual shapes.
IMAGE CORRECTION. You can find this and more information with video tutorials at
 IMAGE CORRECTION You can find this and more information with video tutorials at http://www.adobe.com/support/photoshop/ P H O T O S H O P T O O L S CLONE STAMP TOOL The Clone Stamp tool paints one part
Digital Photography 1
 Digital Photography 1 Photoshop Lesson 3 Resizing and transforming images Name Date Create a new image 1. Choose File > New. 2. In the New dialog box, type a name for the image. 3. Choose document size
Winter Card.
 Winter Card Used images: http://www.cgtextures.com/texview.php?id=24321&phpsessid=95e8e8290894cc5194898 e16d1dddb4c http://www.cgtextures.com/texview.php?id=14285&phpsessid=95e8e8290894cc5194898 e16d1dddb4c
METAL TEXT EFFECT. Step 1: Create A New Document. Step 2: Fill The Background With Black
 METAL TEXT EFFECT In this text effects tutorial, we ll learn how to easily create metal text, a popular effect widely used in video games and movie posters! It may seem like there s a lot of steps involved,
A quick note: We hope that you will find something from the Tips and Tricks that will add a little pizazz to your yearbook pages!
 A quick note: The following pages are tips and tricks for Basic Photoshop users. You may notice that some instructions indicate that non-awpc fonts were used, and that some colors were created using the
Adobe Illustrator. Mountain Sunset
 Adobe Illustrator Mountain Sunset Adobe Illustrator Mountain Sunset Introduction Today we re going to be doing a very simple yet very appealing mountain sunset tutorial. You can see the finished product
PHOTOSHOP & ILLUSTRATOR BOOTCAMP
 FALL 2014 - ELIZABETH LIN PHOTOSHOP & ILLUSTRATOR BOOTCAMP ILLUSTRATOR ALIGNMENT To access the alignment panel, go to Window -> Align. You should see a panel like the one below. This panel allows you to
Building - Image*After Bokeh - Regularjane Landscape 1 - Anders Bjerré Pedersen Landscape 2 - author Sundstrom(nickname)
") Click to enlarge the image. Used images: Download Moon shape(image created with the Photoshop tools) Icicles - Sergei Furtcev Cloud 1(Ruslan Olinchuk), Cloud 2(Image*After), Cloud 3(Sergei Perov) Stars
Click to enlarge the image. Used images: Download Moon shape(image created with the Photoshop tools) Icicles - Sergei Furtcev Cloud 1(Ruslan Olinchuk), Cloud 2(Image*After), Cloud 3(Sergei Perov) Stars
How to Draw a Realistic iphone 4 with
 Home Freebies Submit Your Work Contact Us How to Draw a Realistic iphone 4 with Photoshop Jan 3 2011 By Mohammad Jeprie 34 Comments In this tutorial, we will draw a realistic-looking iphone 4 using Photoshop.
TV Aquarium. Create a new document. 8.5 x 11, 300 dpi. Save as TV Aquarium Your Name. Create TV shape. Use Pen
 Create a new document. 8.5 x 11, 300 dpi. Save as TV Aquarium Your Name. Create TV shape. Use Pen Tool, Convert Point Tool and Direct Selection Tool. We need side shapes to create patches of light and
FLAMING HOT FIRE TEXT
 FLAMING HOT FIRE TEXT In this Photoshop text effects tutorial, we re going to learn how to create a fire text effect, engulfing our letters in burning hot flames. We ll be using Photoshop s powerful Liquify
Introduction to Photoshop
 Introduction to Photoshop Instructional Services at KU Libraries A Division of Information Services www.lib.ku.edu/instruction Abstract: This course covers the basics of Photoshop, including common tools
Module All You Ever Need to Know About The Displace Filter
 Module 02-05 All You Ever Need to Know About The Displace Filter 02-05 All You Ever Need to Know About The Displace Filter [00:00:00] In this video, we're going to talk about the Displace Filter in Photoshop.
Create a Happy Sun Character. Below is the final illustration we will be working towards.
 Create a Happy Sun Character Below is the final illustration we will be working towards. 1 Step 1 Create a new document and with the Ellipse tool (L), create an ellipse. 2 Step 2 Fill the ellipse with
CREATE A BURNT EDGE EFFECT
 CREATE A BURNT EDGE EFFECT One of the all-time classic effects in Photoshop is the burnt edge, and there s lots of different ways to create it, but in this Adobe Photoshop tutorial, we re going to look
An Idiot's Guide to Photoshop. Part II Azamat Bohed E. TrueKolor.net
 An Idiot's Guide to Photoshop Part II Azamat Bohed E. TrueKolor.net Table of Contents 1.Introduction 3 2. Opening a Digital Image/Photo in Photoshop 3 3. Changing/removing the Background 4 3.1 Using the
11 Advanced Layer Techniques
 11 Advanced Layer Techniques After you ve learned basic layer techniques, you can create more complex effects in your artwork using layer masks, path groups, filters, adjustment layers, and more style
prepared by Allison Hwang for T. Purdy 2011
 There are many ways to create material textures in Photoshop. In addition to using primarily the blending tool, you can also use filters to create textures. In this tutorial, the objective is to create
Perspective Guides. Perspective Contextual Toolbar. 1-Point Perspective
 WHAT S NEW 1. Perspective Guides 2. Flipbook Animation 3. Gradient Flood Fills 4. Layer Workflow Enhancements - Layer Grouping - Extended Blending Modes - Background Color - Multi-Layer Select 5. Distort
Create a Beautiful Abstract Portrait in Photoshop - Psd Premium Tutorial
 Create a Beautiful Abstract Portrait in Photoshop - Psd Premium Tutorial By: Wojciech Pijecki In this tutorial we will combine several stock images to create an artistic, abstract portrait of a woman.
XXXX - MAKING A FLYER BOOKLET COVER 1 N/08/08
 INTRODUCTION TO GRAPHICS Making a flyer booklet cover Information Sheet No. XXXX Create a new document with these settings. Note that you will be using 300 dpi because this will be made for print. Keepit
Photoshop: Manipulating Photos
 Photoshop: Manipulating Photos All Labs must be uploaded to the University s web server and permissions set properly. In this lab we will be manipulating photos using a very small subset of all of Photoshop
CREATE A 60 S PSYCHEDELIC STYLE CONCERT POSTER
 CREATE A 60 S PSYCHEDELIC STYLE CONCERT POSTER Tutorial from http://psd.tutsplus.com/ Compiled by INTRODUCTION In this tutorial, we will go through the steps to create a retro 1960s psychedelic
Extreme Makeovers: Photoshop Retouching Techniques
 Extreme Makeovers: Table of Contents About the Workshop... 1 Workshop Objectives... 1 Getting Started... 1 Photoshop Workspace... 1 Retouching Tools... 2 General Steps... 2 Resolution and image size...
'Photoshop'. "Realistic Eye Texture Painting" by Krishnamurti Martins Costa
 Level: intermediate Technique: digital painting Software: Adobe Photoshop 'Photoshop'. "Realistic Eye Texture Painting" by Krishnamurti Martins Costa Email: kris@antropus.com Web: http://www.antropus.com
Inverted Colors Photo Effect With Photoshop
 Inverted Colors Photo Effect With Photoshop Written by Steve Patterson. In this Photoshop Effects tutorial, we re going to look at how to invert the colors in an image to create interesting photo effects.
Learning Photo Retouching techniques the simple way
 Learning Photo Retouching techniques the simple way Table of Contents About the Workshop... i Workshop Objectives... i Getting Started... 1 Photoshop Workspace... 1 Setting up the Preferences... 2 Retouching
Project 25 Page 1 ` JAZZ POSTCARD
 Project 25 Page 1 ` JAZZ POSTCARD Reset all tools! Create the Background 1. Create a new RGB document, 4.25 in. wide by 5.75 in. high at 100 dpi with a white background. 2. Click the foreground color swatch
1. Create a rough sketch
 1. Create a rough sketch Go to File>New (Cmd/Ctrl+N), name it Whale. Set Width to 230mm, Height to 310mm and Resolution to 300ppi. Click OK. Create a new layer (Shift+Cmd/Ctrl+N) and name it Sketch 1,
PHOTOSHOP INVERTED COLORS PHOTO EFFECT
 Photo Effects: Photoshop Inverted Colors Photo Effect PHOTOSHOP INVERTED COLORS PHOTO EFFECT Most people would agree that taking a stroll through the forest can be very calming and peaceful, with all of
Colorful Glowing Mask Photoshop Tutorial Photoshop TUTfactory The best Photoshop tutorials in one place
 Step 1: To start, create new canvas sized at 994 1312 pixels, and fill it with black. Next, create a new layer, and go to Filter->Render->Clouds. Duplicate this layer, and then merge the two layers. Set
Movie Merchandising. Movie Poster. Open the Poster Background.psd file. Open the Cloud.jpg file.
 Movie Poster Open the Poster Background.psd file. Open the Cloud.jpg file. Movie Merchandising Choose Image>Adjustments>Desaturate to make it a grayscale image. Select the Move tool in the Toolbar and
Tutorial Resources. Combine a Crocodile with a Car to Create an Exotic Crocomobile Photoshop Tutorials
 Tutorial Resources Crocodile1 SXC Crocodile2 charadestock Crocodile3 frostdragon64 Old car achatinastock Background SXC Bird rml-stock sign1 discordia-stock Sign2 ecathe Step 1 Open the background image
Make Watercolor and Marker Style Portraits with Illustrator
 Make Watercolor and Marker Style Portraits with Illustrator Save Preview Resources Portrait by Lillian Bertram (Creative Commons Share Alike used here with permission) Step 1: Set up your Illustrator document
ADD A REALISTIC WATER REFLECTION
 ADD A REALISTIC WATER REFLECTION In this Photoshop photo effects tutorial, we re going to learn how to easily add a realistic water reflection to any photo. It s a very easy effect to create and you can
Undress a Giraffe in Photoshop
 Undress a Giraffe in Photoshop By: Alexandra Fomicheva Have you ever wanted to know what a Giraffe looks like without its spots? If so, this tutorial is for you, you pervert! Today, we will demonstrate
Here is a 100% zoom close up. Name in Popsicles
 Here is a 100% zoom close up Name in Popsicles Step 1 Let s start by creating a new Photoshop document. Mine is 2560 1440 pixels. Fill the background with a color of your choice (it s not important at
Adobe Photoshop CS5 ACE
 Adobe Photoshop CS5 ACE Number: A9A0-150 Passing Score: 800 Time Limit: 120 min File Version: 1.0 Sections 1. Selection Tools Exam A QUESTION 1 John creates a circular selection with Elliptical Marquee
XXXX - ILLUSTRATING FROM SKETCHES IN PHOTOSHOP 1 N/08/08
 INTRODUCTION TO GRAPHICS Illustrating from sketches in Photoshop Information Sheet No. XXXX Creating illustrations from existing photography is an excellent method to create bold and sharp works of art
Create a Magical Flaming Heart Illustration in Photoshop
 All Topics Free Tutorials Courses ebooks Pricing Sign In Free Account Advertisement Design & Illustration Categories Learning Guides PHOTO EFFECTS Create a Magical Flaming Heart Illustration in Photoshop
Tips & Techniques - Materials
 Tips & Techniques - Materials Materials: How to Create a Spherical Map With Corrections For Distortion Download: Project Works with: GO, SE, XL Requires: Version Special Notes: Special Thanks to Chris
Transparency and blending modes
 Transparency and blending modes About transparency Transparency is such an integral part of Illustrator that it s possible to add transparency to your artwork without realizing it. You can add transparency
Perspective Shadow Text Effect In Photoshop
 Perspective Shadow Text Effect In Photoshop Written by Steve Patterson. In this Photoshop text effects tutorial, we ll learn how to create a popular, classic effect by giving text a perspective shadow
Learning Adobe Photoshop CS6
 Module 1 Contents Chapter 1: Introduction to Photoshop Loading Photoshop...1-1 The Tools Panel...1-2 Using the Tools...1-3 The Panel Group...1-5 Layers...1-6 Loading a Sample File...1-6 Looking at the
Part 1- Fundamental Functions
 Part 1- Fundamental Functions Note: Alt+Tab will allow you to move between programs in the docker. Shift+Tab removes right pallets Tab removes all pallets Ctrl+1= centers art board Ctrl + 0= fill window
Advanced Diploma in. Photoshop. Summary Notes
 Advanced Diploma in Photoshop Summary Notes Suggested Set Up Workspace: Essentials or Custom Recommended: Ctrl Shift U Ctrl + T Menu Ctrl + I Ctrl + J Desaturate Free Transform Filter options Invert Duplicate
Creating Pastel Images and other effects in Photoshop
 Creating Pastel Images and other effects in Photoshop Martin Addison 2015 Creating pastel images Page 1 Martin Addison FRPS Using White Layers in Photoshop 1. Create a new empty Layer 2. Edit> Fill 3.
Photoshop. Make a Spooky Halloween Pumpkin Text Effect in Photoshop - Photoshop tutorial PSDDude
 Photoshop October 4th,2017 1 2 Image size: 7 in wide x 3 in high 300 dpi Start with a simple black gradient background layer. Radial Gradiant, black to gray. Install the CREEPSVILLE font. Center and Type
TEXT PERSPECTIVE SHADOW EFFECT
 TEXT PERSPECTIVE SHADOW EFFECT In this Photoshop text effects tutorial, we ll learn how to create a popular, classic effect by giving text a perspective shadow as if a light source behind the text was
People In Spaces A Workshop on using Photoshop to introduce Entourage Elements into existing work.
 People In Spaces A Workshop on using Photoshop to introduce Entourage Elements into existing work. Peter M. Gruhn peter.gruhn@the-bac.edu Sponsored by Atelier and the Learning Resource Center 1 Layers
The original image. Let s get started! The final rainbow effect. The photo sits on the Background layer in the Layers panel.
 Add A Realistic Rainbow To A Photo In this Photoshop photo effects tutorial, we ll learn how to easily add a rainbow, and even a double rainbow, to a photo! As we ll see, Photoshop ships with a ready-made
ADOBE ILLUSTRATOR. Step 1. Dificultad: Intermedio Tiempo: 30 minutos 1 hora. Create a new document and with the Ellipse tool (L), create an ellipse.
, create an ellipse.") Dificultad: Intermedio Tiempo: 30 minutos 1 hora Step 1 Create a new document and with the Ellipse tool (L), create an ellipse. Lic. José Luis Solórzano Vera Página 1 Step 2 Fill the ellipse with a radial
Dificultad: Intermedio Tiempo: 30 minutos 1 hora Step 1 Create a new document and with the Ellipse tool (L), create an ellipse. Lic. José Luis Solórzano Vera Página 1 Step 2 Fill the ellipse with a radial
Photoshop & Illustrator
 Week 6 Lesson 6 : Utilize Filters Effect Applying filters Creating and editing Smart Filters Hiding, copying, and deleting Smart Filters Working with the Smart Filter mask More filter techniques Photoshop
Photoshop Elements Hints by Steve Miller
 2015 Elements 13 A brief tutorial for basic photo file processing To begin, click on the Elements 13 icon, click on Photo Editor in the first box that appears. We will not be discussing the Organizer portion
The original image. The final rainbow effect.
 ADD A realistic rainbow to a photo In this Photoshop photo effects tutorial, we re going to learn how to easily add a rainbow, even a double rainbow, to a photo. Of course, as with most photo effects,
Photoshop CC Editing Images
 Photoshop CC Editing Images Rotate a Canvas A canvas can be rotated 90 degrees Clockwise, 90 degrees Counter Clockwise, or rotated 180 degrees. Navigate to the Image Menu, select Image Rotation and then
Photoshop: Manipulating Photos
 Photoshop: Manipulating Photos All Labs must be uploaded to the University s web server and permissions set properly. In this lab we will be manipulating photos using a very small subset of all of Photoshop
INTRO TO LAYERS (PART 2)
") Adobe Photoshop Elements INTRO TO LAYERS (PART 2) By Dave Cross In Part 1, we talked about the main concept behind layers and why they re so important. Now we ll take it a step further and show how to
Adobe Photoshop Elements INTRO TO LAYERS (PART 2) By Dave Cross In Part 1, we talked about the main concept behind layers and why they re so important. Now we ll take it a step further and show how to
Adobe Photoshop CS5 Layers and Masks
 Adobe Photoshop CS5 Layers and Masks Email: training@health.ufl.edu Web Page: http://training.health.ufl.edu Adobe Photoshop CS5: Layers and Masks 2.0 Hours The workshop will cover creating and manipulating
Desktop Publishing 1- Illustrator Nov 2014 April 2015
 Week 7 Lesson 7.1: Masking using cliping path/opacity mask With Clipping Mask and Opacity Mask, you can quickly mask away any unwanted areas you wish to hide. Let s take a look how it works Clipping Mask
Adobe Photoshop CC 2018 Tutorial
 Adobe Photoshop CC 2018 Tutorial GETTING STARTED Adobe Photoshop CC 2018 is a popular image editing software that provides a work environment consistent with Adobe Illustrator, Adobe InDesign, Adobe Photoshop,
GIMP (GNU Image Manipulation Program) MANUAL
 MANUAL") Selection Tools Icon Tool Name Function Select Rectangle Select Ellipse Select Hand-drawn area (lasso tool) Select Contiguous Region (magic wand) Selects a rectangular area, drawn from upper left (or lower
Selection Tools Icon Tool Name Function Select Rectangle Select Ellipse Select Hand-drawn area (lasso tool) Select Contiguous Region (magic wand) Selects a rectangular area, drawn from upper left (or lower
How to Create Website Banners
 How to Create Website Banners In the following instructions you will be creating banners in Adobe Photoshop Elements 6.0, using different images and fonts. The instructions will consist of finding images,
Unit 7 : Image Painting, Editing and Layers
 Unit 7 : Image Painting, Editing and Layers Introduction This Unit describes about various painting tools; such as selection, cropping and measuring tools, retouching, drawing and type tools, Navigation
Create a Surreal Out of Bounds Photo Manipulation in Photoshop
 Create a Surreal Out of Bounds Photo Manipulation in Photoshop By: Loredana Papp In this tutorial we will combine several images of water, animals, and people to create a surreal out of bounds photo manipulation
Welcome to Corel DESIGNER, a comprehensive vector-based package for technical graphic users and technical illustrators.
 Workspace tour Welcome to Corel DESIGNER, a comprehensive vector-based package for technical graphic users and technical illustrators. This tutorial will help you become familiar with the terminology and
Photoshop CC: Essentials
 Photoshop CC: Essentials Summary Workspace Overview... 2 Exercise Files... 2 Selection Tools... 3 Select All, Deselect, And Reselect... 3 Adding, Subtracting, and Intersecting... 3 Working with Layers...
EXTREME CONTRAST PHOTO EFFECT
 EXTREME CONTRAST PHOTO EFFECT In this Photoshop tutorial, we re going to learn how to use layers, layer blend modes, some noise, a little sharpening, and a simple adjustment layer to easily give a photo
Clipping Masks And Type Placing An Image In Text With Photoshop
 Clipping Masks And Type Placing An Image In Text With Photoshop Written by Steve Patterson. In a previous tutorial, we learned the basics and essentials of using clipping masks in Photoshop to hide unwanted
ADD TRANSPARENT TYPE TO AN IMAGE
 ADD TRANSPARENT TYPE TO AN IMAGE In this Photoshop tutorial, we re going to learn how to add transparent type to an image. There s lots of different ways to make type transparent in Photoshop, and in this
Cute Gooey Blob Photoshop Tutorial
 Download the PSD Cute 3D Character.zip 22.11 MB Download from Website (http://photoshoptutorials.ws/downloads/psd/cute 3D Character.zip) Cute Gooey Blob Photoshop Tutorial Step 1 Create a new document
Contents: Bibliography:
 ( 2 ) Contents: Sizing an Image...4 RAW File Conversion...4 Selection Tools...5 Colour Range...5 Quick Mask...6 Extract Tool...7 Adding a Layer Style...7 Adjustment Layer...8 Adding a gradient to an Adjustment
Reducing Noise in an image
 Reducing Noise in an image - Open the image in Photoshop. - Go to the Filter menu then click on Noise and then the Reduce Noise button. - Zoom in on the preview image in the Reduce Noise window, so that
Tech Savvy Senior Selfie
 Tech Savvy Senior Selfie Commercial Design II Teacher : Mrs. Stroud Due: 10/13/2017 Overview & Purpose Create a futuristic portrait of yourself in 2058 in an old fashioned style of bubble glass portraits
12. Creating a Product Mockup in Perspective
 12. Creating a Product Mockup in Perspective Lesson overview In this lesson, you ll learn how to do the following: Understand perspective drawing. Use grid presets. Adjust the perspective grid. Draw and
Adobe Photoshop CS5 Tutorial
 Adobe Photoshop CS5 Tutorial GETTING STARTED Adobe Photoshop CS5 is a popular image editing software that provides a work environment consistent with Adobe Illustrator, Adobe InDesign, Adobe Photoshop
Lesson 16 Text, Layer Effects, & Filters
 Lesson 16 Text, Layer Effects, & Filters Digital Media I Susan M. Raymond West High School In this tutorial, you will: Create a Type Layer Add and Format Type within a Type Layer Apply Layer Effects Apply
Adobe PhotoShop Elements
 Adobe PhotoShop Elements North Lake College DCCCD 2006 1 When you open Adobe PhotoShop Elements, you will see this welcome screen. You can open any of the specialized areas. We will talk about 4 of them:
Learning Adobe Illustrator CS5
 Module 1 Contents Chapter 1: Introduction to Adobe Illustrator The Adobe Illustrator Screen...1-1 The Tools Panel...1-3 Drawing Lines...1-3 Tearing off a Panel... 1-3 Drawing Different Line Types... 1-4
By Washan Najat Nawi
 By Washan Najat Nawi how to get started how to use the interface how to modify images with basic editing skills Adobe Photoshop: is a popular image-editing software. Two general usage of Photoshop Creating
Chapter 4: Draw with the Pencil and Brush
 Page 1 of 15 Chapter 4: Draw with the Pencil and Brush Tools In Illustrator, you create and edit drawings by defining anchor points and the paths between them. Before you start drawing lines and curves,
Create an Amazing Surreal-Style Treehouse in Photoshop Photoshop Tutorials
 Download the PSD Surreal Treehouse.zip 23.59 MB Download from Website Surreal Treehouse Photoshop Tutorial Tutorial Resources Tree Houses Thanks archetype, Deviantart Bonsai Tree Thanks fabemiko, Deviantart
How To Create a Stylish Skull Based Vector Illustration
 How To Create a Stylish Skull Based Vector Illustration The skull and crossed pistons mark is a popular adaption of the tradition skull and crossbones symbol and is commonly seen in motorcycle culture,
Commercial Art 1 Photoshop Study Guide. 8) How is on-screen image resolution measured? PPI - Pixels Per Inch
 How is on-screen image resolution measured? PPI - Pixels Per Inch") Commercial Art 1 Photoshop Study Guide To help prepare you for the Photoshop test, be sure you can answer the following questions: 1) What are the three things should you do when you first open a Photoshop
Commercial Art 1 Photoshop Study Guide To help prepare you for the Photoshop test, be sure you can answer the following questions: 1) What are the three things should you do when you first open a Photoshop
Diploma in Photoshop
 Diploma in Photoshop Photoshop Selection Tools Selection Tools allow us to isolate areas of our image and apply adjustments to these selected areas only. A selection simply isolates one or more parts of
AVANTUS TRAINING PTE LTD
 [AICS6]: Adobe Illustrator CS6 Length Delivery Method : 2 Days : Instructor-led (Classroom) Course Outline Module 1: Looking at the Work Area Section 1: About Adobe Illustrator CS6 What is Adobe Illustrator