Create a new image: 10 IN height and 16 IN width, 300 dpi.
|
|
|
- Lester Gilbert Beasley
- 5 years ago
- Views:
Transcription


1 The images needed for this project are on my website. Create a new image: 10 IN height and 16 IN width, 300 dpi.

2 Create a new layer and fill the layer with white.. Create a radial gradient by using following settings:

3 Create a new layer, name it pumpkins. Load the pumpkin brushes and use one of them to cover the background with pumpkins. SET THE LAYER BLEND TO OVERLAY. Change the Shape Dynamic, Scattering and Transfer settings as follows:


4 Install the Duncecap font. Type the word Halloween, Your Last Name or Welcome in white. Make sure it is centered, large and bold. Use 155 pt. font. I stretched my text vertically just a little bit.


5 Highlight the word you typed. From the menu bar, select the Character box. Change the vertical spacing to 100, see below: While the text tool is selected and the word is highlighted, select the text warp button, see below: Select Arc and set the horizontal bend to +5, see below: Right click on the text layer and choose Rasterize Type. Then right click on the text layer and choose Rasterize layer style. SAVE!
, paint over the pumpkin. Press Q again, then select & inverse. Cmd C to copy the pumpkin and Cmd V to paste the pumpkin on your Text image.")
6 Open the pumpkin image. Make sure the image is 300 dpi. Make sure that the color pallet is set to default black and white and that your brush is set at 100% opacity. Using quick mask (Q), paint over the pumpkin. Press Q again, then select & inverse. Cmd C to copy the pumpkin and Cmd V to paste the pumpkin on your Text image. Duplicate the pumpkin layer several times and close the eyeball on the layers you are not using.


7 Transform the pumpkin layer and make it thinner and place the pumpkin above the one of the letters. Name the layer the name of the letter. In order to make pumpkin shape closer to the letter shape under it, choose Edit/Free Transform/Warp. Drag corners handles and corners to change the shape. Make sure to keep the stem visible. save! Create a clipping mask between the pumpkin layer and the text.


8 Do the same thing for each letter. Be sure to name the layer the letter that it takes shape.


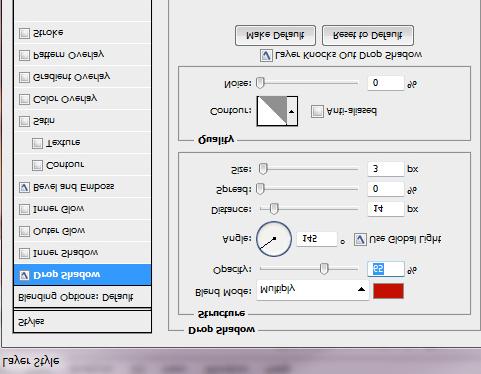
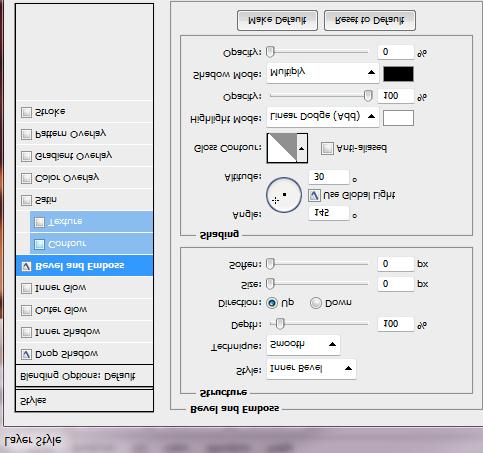
9 Merge the text layer and all of the pumpkins together. Apply an Inner Shadow and Bevel & Emboss, see below: feded1 a00203 Image should look like the one below:

10
 and create as shown below. Use the convert pen tool to round out and twist the vine.")
11 In order to create pumpkin tendrils, Create a new layer, use the pen tool (not the pen & pad) and create as shown below. Use the convert pen tool to round out and twist the vine.


12 Select a small, hard paintbrush. Set the brush settings as shown below:


13 Set you paint color to white. Click on the Convert Pen tool, right click and choose Stroke Path. Make sure Simulate Pen Pressure is checked.

14 Your vines should look like the ones below:


15 Apply Gradient Overlay and Bevel Emboss effects to tendrils.


16 Here is result of Gradient and Bevel and Emboss effects: Create a new layer for each letter and do the same thing to create vines on each letter. It is important that they are on separate layers. After all of the vines have been completed we will create the reflection. Merge all the pumpkin and vines together. Go to Edit > Transform > Flip Vertical. Move the upside down layer below the original pumpkin text. Go to Edit > Transform > Warp > Arch, move arch center point so it curves as a reflection. Lower the layer opacity to 30% or whatever you feel looks best as a reflection.


17 We need to ceate a shadow between the original pumpkins and the reflection. Do the following: Choose the Ellipse Tool and create large round oval on a new layer between the original pumpkins and reflection layer. Fill with black. Go to Filter/Blur and apply a Gaussian Blur to the shape shape:


18 Go go Edit/Transform and reshape the oval as shown below: Then go to Edit > Transform > Warp > Arc Change the layer blend mode to multiply and lower the opacity to 55%.


19 Duplicate the original pumpkin layer and turn the fill down to zero. Apply the following layer styles: Select the pumpkin brush and make it small. Set the foreground color to fca807. Set the brush settings so the shape dynamic is set to pen pressure. Leave the other brush settings the same. Create a new layer and create a straight path like the one above, stroke the path. Add a few more paths on the layer and stroke them. Set the layer blends as below:
20

21 Insert the Fire flame image. Make a duplicate of this layer to create a reflection. Transform the reflection duplicate upside down and move it down just like on the image below. Stay on the reflection layer and Go to Filter/ Blurr/ Lens Blur. Apply Screen Blending Mode to both flame layers. Lower the opacity on the reflective flame layer so it looks like a reflection. Now you are finished. Add you signature on the bottom right corner of you image. SAVE! Then save as a.jpeg and add to the gallery.
Animated Snowman. Image size: 11 w x 17 h 300 dpi
 Animated Snowman Image size: 11 w x 17 h 300 dpi Step 1 First of all, you ll need the texture on my website. Now open a new document. I usually work on really big documents because I can work on the details
TV Aquarium. Create a new document. 8.5 x 11, 300 dpi. Save as TV Aquarium Your Name. Create TV shape. Use Pen
 Create a new document. 8.5 x 11, 300 dpi. Save as TV Aquarium Your Name. Create TV shape. Use Pen Tool, Convert Point Tool and Direct Selection Tool. We need side shapes to create patches of light and
A quick note: We hope that you will find something from the Tips and Tricks that will add a little pizazz to your yearbook pages!
 A quick note: The following pages are tips and tricks for Basic Photoshop users. You may notice that some instructions indicate that non-awpc fonts were used, and that some colors were created using the
Converse Chuck Taylor Shoes Photoshop Tutorial
 20 Converse Chuck Taylor Shoes Photoshop Tutorial Step 1 Create A New Document Create a New Document. The size of my canvas is 600px x 700px with a 72dpi resolution. Save as Chuck Taylor - Your Name. Step
Photoshop. Make a Spooky Halloween Pumpkin Text Effect in Photoshop - Photoshop tutorial PSDDude
 Photoshop October 4th,2017 1 2 Image size: 7 in wide x 3 in high 300 dpi Start with a simple black gradient background layer. Radial Gradiant, black to gray. Install the CREEPSVILLE font. Center and Type
PHOTOSHOP DESIGN EFFECTS FOR INTERMEDIATE TO ADVANCED USERS
 PHOTOSHOP DESIGN EFFECTS FOR INTERMEDIATE TO ADVANCED USERS Copyright 2012, National Seminars Training Introduction This class is all about design effects in Adobe Photoshop. For example, let s say that
HOW TO CREATE A SUPER SHINY PENCIL ICON
 HOW TO CREATE A SUPER SHINY PENCIL ICON Tutorial from http://psd.tutsplus.com/ Compiled by INTRODUCTION The Pencil is one of the visual metaphors most used to express creativity. In this tutorial,
Drawing the Red Christmas Bell
 Vector 3D Christmas Bells Thinking of drawing some Christmas bells for this Christmas? Read this illustrator tutorial to learn how to draw 5 different styles of vector Christmas bells using the 3D Revolve
Introduction to Layers
 Introduction to Layers By Anna Castano A layer is an image or text that is piled on top of another. There are many things you can do with layer and it is easy to understand how it works. Through the introduction
Winter Card.
 Winter Card Used images: http://www.cgtextures.com/texview.php?id=24321&phpsessid=95e8e8290894cc5194898 e16d1dddb4c http://www.cgtextures.com/texview.php?id=14285&phpsessid=95e8e8290894cc5194898 e16d1dddb4c
Building - Image*After Bokeh - Regularjane Landscape 1 - Anders Bjerré Pedersen Landscape 2 - author Sundstrom(nickname)
") Click to enlarge the image. Used images: Download Moon shape(image created with the Photoshop tools) Icicles - Sergei Furtcev Cloud 1(Ruslan Olinchuk), Cloud 2(Image*After), Cloud 3(Sergei Perov) Stars
Click to enlarge the image. Used images: Download Moon shape(image created with the Photoshop tools) Icicles - Sergei Furtcev Cloud 1(Ruslan Olinchuk), Cloud 2(Image*After), Cloud 3(Sergei Perov) Stars
Design a Halloween Pumpkin Wallpaper in Photoshop
 Design a Halloween Pumpkin Wallpaper in Photoshop By: Alvaro Guzman Halloween is near! So let's take a pumpkin image, carve it up, and light it for this coming holiday. You'll learn how to get this nice
Create A Briefcase Icon
 Create A Briefcase Icon In this tutorial, I will show you how to create a briefcase icon with rectangles, ellipses, and gradients. This briefcase icon is great for web designs and user interfaces. Moreover,
Undress a Giraffe in Photoshop
 Undress a Giraffe in Photoshop By: Alexandra Fomicheva Have you ever wanted to know what a Giraffe looks like without its spots? If so, this tutorial is for you, you pervert! Today, we will demonstrate
Learning Adobe Illustrator CS5
 Module 1 Contents Chapter 1: Introduction to Adobe Illustrator The Adobe Illustrator Screen...1-1 The Tools Panel...1-3 Drawing Lines...1-3 Tearing off a Panel... 1-3 Drawing Different Line Types... 1-4
Perspective Shadow Text Effect In Photoshop
 Perspective Shadow Text Effect In Photoshop Written by Steve Patterson. In this Photoshop text effects tutorial, we ll learn how to create a popular, classic effect by giving text a perspective shadow
Exploring Photoshop Tutorial
 Exploring Photoshop Tutorial Objective: In this tutorial we will create a poster composed of three distinct elements: a Bokeh, an image and title text. The Bokeh is an effect which is sometimes seen in
TEXT PERSPECTIVE SHADOW EFFECT
 TEXT PERSPECTIVE SHADOW EFFECT In this Photoshop text effects tutorial, we ll learn how to create a popular, classic effect by giving text a perspective shadow as if a light source behind the text was
LET S GET STARTED! Title: SANTA HEAD. Software: Serif DrawPlus X8. Author: TeejayJoyce. Website: Tutorials by Teejay. Skill Level: Intermediate
 Title: SANTA HEAD Software: Serif DrawPlus X8 Author: TeejayJoyce Website: Tutorials by Teejay Skill Level: Intermediate Supplies: None Description: This tutorial uses simple Quick shapes and Filter Effects
Learning Adobe Photoshop CS6
 Module 1 Contents Chapter 1: Introduction to Photoshop Loading Photoshop...1-1 The Tools Panel...1-2 Using the Tools...1-3 The Panel Group...1-5 Layers...1-6 Loading a Sample File...1-6 Looking at the
Downloaded From : Working with Photoshop 7.0
 Adobe Photoshop 1. Introduction What is Adobe Photoshop? Adobe Photoshop is a web designing software used for giving effects and filters to an image to make it more appealing and attractive. Brought out
Create a Twitter Style Bird Mascot - Vectortuts+
 Create a Twitter Style Bird Mascot Aug 4th in Illustration by Rype Using some basic shapes, effects, and gradients I will show you how to create a Twitter mascot for your blog or website. Twitter is a
Project 25 Page 1 ` JAZZ POSTCARD
 Project 25 Page 1 ` JAZZ POSTCARD Reset all tools! Create the Background 1. Create a new RGB document, 4.25 in. wide by 5.75 in. high at 100 dpi with a white background. 2. Click the foreground color swatch
Tutorial Resources. Combine a Crocodile with a Car to Create an Exotic Crocomobile Photoshop Tutorials
 Tutorial Resources Crocodile1 SXC Crocodile2 charadestock Crocodile3 frostdragon64 Old car achatinastock Background SXC Bird rml-stock sign1 discordia-stock Sign2 ecathe Step 1 Open the background image
Photoshop Domain 4: Manipulating Images. Dreamweaver Domain 3
 Photoshop Domain 4: Manipulating Images 1 Objectives Demonstrate knowledge of working with selections and measurement. Use Photoshop guides and rulers. Transform images. Adjust or correct the tonal range,
Step 1. Blue Bird Tutorial
 Blue Bird Tutorial Using some basic shapes, effects, and gradients I will show you how to create a Twitter mascot for your blog or website. Twitter is a popular free web service for social networking and
Web Graphics Chapter 7 Review
 Web Graphics Chapter 7 Review Name Date 1. The Add Layer Mask button is located on/in the. a. Toolbox b. Layers palette c. Mask palette d. History palette 2. How many color adjustments commands are available
FLAMING HOT FIRE TEXT
 FLAMING HOT FIRE TEXT In this Photoshop text effects tutorial, we re going to learn how to create a fire text effect, engulfing our letters in burning hot flames. We ll be using Photoshop s powerful Liquify
Glowing Surreal Planet Design. Final Image Preview
 Glowing Surreal Planet Design Final Image Preview. Step 1 First, go to the S:\ drive and locate the folder called Glowing Planet Design. Copy the City Skyline file and paste it in your Glowing Planet Design
Part 1- Fundamental Functions
 Part 1- Fundamental Functions Note: Alt+Tab will allow you to move between programs in the docker. Shift+Tab removes right pallets Tab removes all pallets Ctrl+1= centers art board Ctrl + 0= fill window
Getting Started. 1. Double click on the eye con. 2. Single click on File, then new, then OK. Click here.
 Getting Started 1. Double click on the eye con. 2. Single click on File, then new, then OK. Click here. What is Photoshop? Photoshop is a program that lets you make pictures. You can put away your markers
How to Create Fake Shadows
 TIP SHEET #8 How to Create Fake Shadows As well as the colour, it s the shadows in a picture that help to give it mood and atmosphere so in this tutorial I want to show you how you can add in extra shadows.
The original image. The final rainbow effect.
 ADD A realistic rainbow to a photo In this Photoshop photo effects tutorial, we re going to learn how to easily add a rainbow, even a double rainbow, to a photo. Of course, as with most photo effects,
Types of Mask. Layer masks
 Photoshop Layer Mask Features Non destructive (does not delete pixels) until applied Uses brush tool which is configurable Can be added to any layer (except Background unless double click to unlock) including
How to Create Website Banners
 How to Create Website Banners In the following instructions you will be creating banners in Adobe Photoshop Elements 6.0, using different images and fonts. The instructions will consist of finding images,
1. Create a rough sketch
 1. Create a rough sketch Go to File>New (Cmd/Ctrl+N), name it Whale. Set Width to 230mm, Height to 310mm and Resolution to 300ppi. Click OK. Create a new layer (Shift+Cmd/Ctrl+N) and name it Sketch 1,
METAL TEXT EFFECT. Step 1: Create A New Document. Step 2: Fill The Background With Black
 METAL TEXT EFFECT In this text effects tutorial, we ll learn how to easily create metal text, a popular effect widely used in video games and movie posters! It may seem like there s a lot of steps involved,
ADDING A RAINBOW TO A PHOTOGRAPH
 ADDING A RAINBOW TO A PHOTOGRAPH This assignment will cover how to add a simple rainbow (or if you want to go crazy, a double rainbow) to any photograph. This will give us some great work with gradients,
Adobe Photoshop The program: The Menus: Computer Graphics I- Final Review
 Computer Graphics I- Final Review The written portion of your final exam will be 25 multiple choice questions and one free response. Some parts of the exam will be related to examples, images and pictures.
Here is a 100% zoom close up. Name in Popsicles
 Here is a 100% zoom close up Name in Popsicles Step 1 Let s start by creating a new Photoshop document. Mine is 2560 1440 pixels. Fill the background with a color of your choice (it s not important at
Ms. Cavo Graphic Art & Design Illustrator CS3 Notes
 Ms. Cavo Graphic Art & Design Illustrator CS3 Notes 1. Selection tool - Lets you select objects and groups by clicking or dragging over them. You can also select groups within groups and objects within
The original image. Let s get started! The final rainbow effect. The photo sits on the Background layer in the Layers panel.
 Add A Realistic Rainbow To A Photo In this Photoshop photo effects tutorial, we ll learn how to easily add a rainbow, and even a double rainbow, to a photo! As we ll see, Photoshop ships with a ready-made
All Creative Suite Design documents are saved in the same way. Click the Save or Save As (if saving for the first time) command on the File menu to
 command on the File menu to") 1 The Application bar is new in the CS4 applications. It combines the menu bar with control buttons that allow you to perform tasks such as arranging multiple documents or changing the workspace view.
1 The Application bar is new in the CS4 applications. It combines the menu bar with control buttons that allow you to perform tasks such as arranging multiple documents or changing the workspace view.
Lesson 16 Text, Layer Effects, & Filters
 Lesson 16 Text, Layer Effects, & Filters Digital Media I Susan M. Raymond West High School In this tutorial, you will: Create a Type Layer Add and Format Type within a Type Layer Apply Layer Effects Apply
Organizing artwork on layers
 3 Layer Basics Both Adobe Photoshop and Adobe ImageReady let you isolate different parts of an image on layers. Each layer can then be edited as discrete artwork, allowing unlimited flexibility in composing
Using the Shoe Advertisement tutorial, create a shoe ad that is specifically designed to appeal to your assigned consumer.
 Lesson Instructions: Using the Shoe Advertisement tutorial, create a shoe ad that is specifically designed to appeal to your assigned consumer. Consider the specifications in the tutorial as the requests
11 Advanced Layer Techniques
 11 Advanced Layer Techniques After you ve learned basic layer techniques, you can create more complex effects in your artwork using layer masks, path groups, filters, adjustment layers, and more style
PHOTOSHOP & ILLUSTRATOR BOOTCAMP
 FALL 2014 - ELIZABETH LIN PHOTOSHOP & ILLUSTRATOR BOOTCAMP ILLUSTRATOR ALIGNMENT To access the alignment panel, go to Window -> Align. You should see a panel like the one below. This panel allows you to
CATEGORY SKILL SET REF. TASK ITEM
 ECDL / ICDL Image Editing This module sets out essential concepts and skills relating to the ability to understand the main concepts underlying digital images and to use an image editing application to
Cute Gooey Blob Photoshop Tutorial
 Download the PSD Cute 3D Character.zip 22.11 MB Download from Website (http://photoshoptutorials.ws/downloads/psd/cute 3D Character.zip) Cute Gooey Blob Photoshop Tutorial Step 1 Create a new document
Creating Pastel Images and other effects in Photoshop
 Creating Pastel Images and other effects in Photoshop Martin Addison 2015 Creating pastel images Page 1 Martin Addison FRPS Using White Layers in Photoshop 1. Create a new empty Layer 2. Edit> Fill 3.
Movie Merchandising. Movie Poster. Open the Poster Background.psd file. Open the Cloud.jpg file.
 Movie Poster Open the Poster Background.psd file. Open the Cloud.jpg file. Movie Merchandising Choose Image>Adjustments>Desaturate to make it a grayscale image. Select the Move tool in the Toolbar and
Figure 9.10 This shows the File Scripts menu, where there is now a new script item called Delete All Empty layers.
 Layers Layers play an essential role in all aspects of Photoshop work. Whether you are designing a Web page layout or editing a photograph, working with layers lets you keep the various elements in a design
People In Spaces A Workshop on using Photoshop to introduce Entourage Elements into existing work.
 People In Spaces A Workshop on using Photoshop to introduce Entourage Elements into existing work. Peter M. Gruhn peter.gruhn@the-bac.edu Sponsored by Atelier and the Learning Resource Center 1 Layers
Creating Digital Illustrations for Your Research Workshop IV Illustration Demo Part II
 Creating Digital Illustrations for Your Research Workshop IV Illustration Demo Part II Final Figure Workshop IV Components Topics & Techniques covered How to randomly transform a group of individual shapes.
Chapter 4: Draw with the Pencil and Brush
 Page 1 of 15 Chapter 4: Draw with the Pencil and Brush Tools In Illustrator, you create and edit drawings by defining anchor points and the paths between them. Before you start drawing lines and curves,
AGENDA :: MULTI- MEDIA TOOLS :: CLASS NOTES. :: Homework Critiques Best and Worst Websites. :: Photoshop Lesson 2 Things aren t what they seem
 CLASS :: 02 02.02 2018 AGENDA :: Homework Critiques Best and Worst Websites :: Photoshop Lesson 2 Things aren t what they seem I. PHOTO RETOUCHING: Before There Were Computers (Web Post) http://jmcolberg.com/weblog/2010/01/photoshop_before_there_were_computers_the_art_of_retouching_and_improving_negatives_and_prints/
Photoshop Textures Assignment # 2
 Photoshop Textures Assignment # 2 Objective: Use Photoshop to create unique texture from scratch that can be applied to backgrounds, objects, tetx and 3D objects to create new and exciting compositions.
Adobe Photoshop CC 2018 Tutorial
 Adobe Photoshop CC 2018 Tutorial GETTING STARTED Adobe Photoshop CC 2018 is a popular image editing software that provides a work environment consistent with Adobe Illustrator, Adobe InDesign, Adobe Photoshop,
How to Create Spooky Halloween Typography in Photoshop
 Envato Elements: Unlimited templates, graphics, courses, ebooks, and now 300,000 photos! Only $29/month envato-tuts+ Sign Up Sign In Advertisement DESIGN & ILLUSTRATION > TEXT EFFECTS How to Create Spooky
Photoshop Backgrounds: Turn Any Photo Into A Background
 Photoshop Backgrounds: Turn Any Photo Into A Background Step 1: Duplicate The Background Layer As always, we want to avoid doing any work on our original image, so before we do anything else, we need to
Digital Image Manipulation 2014
 Week 4 Advanced Type Techniques- create special effect type Step 1 Create a new 1024 x 768 px document. Set the document background color to light pink or follow my colour (#f8cece) Create the text using
Duplicate Layer 1 by dragging it and dropping it on top of the New Layer icon in the Layer s Palette. You should now have two layers rename the top la
 50 Face Project For this project, you are going to put your face on a coin. The object is to make it look as real as possible. Though you will probably be able to tell your project was computer generated,
XXXX - MAKING A FLYER BOOKLET COVER 1 N/08/08
 INTRODUCTION TO GRAPHICS Making a flyer booklet cover Information Sheet No. XXXX Create a new document with these settings. Note that you will be using 300 dpi because this will be made for print. Keepit
PhotoFiltre. Reverse foreground/background colors. Background & foreground colors. Set default foreground/background colors. Color choice palette
 PhotoFiltre BASIC TOOLS PALETTE Background & foreground colors Reverse foreground/background colors Set default foreground/background colors Color choice palette Toggle through color choice palettes Selection
Create a Street Art Style Illustration By CorelDRAW Master Stefan Lindblad
 Create a Street Art Style Illustration By CorelDRAW Master Stefan Lindblad Start with an original drawing on paper. With Corel PHOTO-PAINT and CorelDRAW, creating street art images, and later printing
Photoshop CC Editing Images
 Photoshop CC Editing Images Rotate a Canvas A canvas can be rotated 90 degrees Clockwise, 90 degrees Counter Clockwise, or rotated 180 degrees. Navigate to the Image Menu, select Image Rotation and then
RETRO User guide RETRO. Photoshop actions. For PS CC, CS6, CS5, CS4. User Guide
 RETRO Photoshop actions For PS CC, CS6, CS5, CS4 User Guide CONTENTS 1. THE BASICS... 1 1.1. About the effects... 1 1.2. How the actions are organized... 1 1.3. Installing the actions in Photoshop... 2
I have an image of a flower that is entirely in focus. I would like to blur the background to make the flower stand out.
 Using Gaussian Blur to blur background Request I have an image of a flower that is entirely in focus. I would like to blur the background to make the flower stand out. Response A portion of the image can
How to Create a Curious Owl in Illustrator
 How to Create a Curious Owl in Illustrator Tutorial Details Program: Adobe Illustrator Difficulty: Intermediate Estimated Completion Time: 1.5 hours Take a look at what we're aiming for, an inquisitive
IMAGE CORRECTION. You can find this and more information with video tutorials at
 IMAGE CORRECTION You can find this and more information with video tutorials at http://www.adobe.com/support/photoshop/ P H O T O S H O P T O O L S CLONE STAMP TOOL The Clone Stamp tool paints one part
Adobe Illustrator. Mountain Sunset
 Adobe Illustrator Mountain Sunset Adobe Illustrator Mountain Sunset Introduction Today we re going to be doing a very simple yet very appealing mountain sunset tutorial. You can see the finished product
prepared by Allison Hwang for T. Purdy 2011
 There are many ways to create material textures in Photoshop. In addition to using primarily the blending tool, you can also use filters to create textures. In this tutorial, the objective is to create
Create a Simple Storefront Icon
 Create a Simple Storefront Icon In this tutorial I will show you how to create a simple storefront icon using some rectangles, Illustrator Effects, and gradients. This icon is great for use in e-commerce
XXXX - ILLUSTRATING FROM SKETCHES IN PHOTOSHOP 1 N/08/08
 INTRODUCTION TO GRAPHICS Illustrating from sketches in Photoshop Information Sheet No. XXXX Creating illustrations from existing photography is an excellent method to create bold and sharp works of art
GRINDHOUSE MOVIE POSTERS
 Follow the instructions below to create a grindhouse style movie poster for your short film. You can also see a detailed video tutorial here: http://www.youtube.com/watch?v=-drhbfvhft0 GOOD LUCK!! CREATING
Introduction to Photoshop
 Introduction to Photoshop Instructional Services at KU Libraries A Division of Information Services www.lib.ku.edu/instruction Abstract: This course covers the basics of Photoshop, including common tools
Photoshop CS2. Step by Step Instructions Using Layers. Adobe. About Layers:
 About Layers: Layers allow you to work on one element of an image without disturbing the others. Think of layers as sheets of acetate stacked one on top of the other. You can see through transparent areas
WORN, TORN PHOTO EDGES EFFECT
 Photo Effects: CC - Worn, Torn Photo Edges Effect WORN, TORN PHOTO EDGES EFFECT In this Photoshop tutorial, we ll learn how to take the normally sharp, straight edges of an image and make them look all
Key Terms. Where is it Located Start > All Programs > Adobe Design Premium CS5> Adobe Photoshop CS5. Description
 Adobe Adobe Creative Suite (CS) is collection of video editing, graphic design, and web developing applications made by Adobe Systems. It includes Photoshop, InDesign, and Acrobat among other programs.
MYGRAPHICSLAB: ADOBE ILLUSTRATOR CS6
 REFINE STROKES MYGRAPHICSLAB: ADOBE ILLUSTRATOR CS6 IN THIS LESSON, YOU WILL LEARN THAT: Defining the features of generated strokes is an important skill for creating illustrations Strokes can have: Different
Quick Mask Setting Up your Work Environment Setting Up the Quickmask Parameters
 Quick Mask Quickmask gets its name from the fact that as you create your selection area, Photoshop masks that area off, tinting it with a colored mask to show what has been selected. When you're finished
Adobe Photoshop CS5 Tutorial
 Adobe Photoshop CS5 Tutorial GETTING STARTED Adobe Photoshop CS5 is a popular image editing software that provides a work environment consistent with Adobe Illustrator, Adobe InDesign, Adobe Photoshop
EXTREME CONTRAST PHOTO EFFECT
 EXTREME CONTRAST PHOTO EFFECT In this Photoshop tutorial, we re going to learn how to use layers, layer blend modes, some noise, a little sharpening, and a simple adjustment layer to easily give a photo
Step 1. Facebook Twitter Google+ Find us on Facebook. Vectortuts+ How to Create a Curious Owl in Illustrator CS4 Vectortuts+
 Joomla developers needed - Long term potential in India Copywriter Email Campaigns Wordpress Creative design Social media in UK More Freelance Jobs... Facebook Twitter Google+ Find us on Facebook Step
Adobe Photoshop CS5 Layers and Masks
 Adobe Photoshop CS5 Layers and Masks Email: training@health.ufl.edu Web Page: http://training.health.ufl.edu Adobe Photoshop CS5: Layers and Masks 2.0 Hours The workshop will cover creating and manipulating
Na'vi from Avatar Movie
 Na'vi from Avatar Movie Prep Open Photoshop. Go to Photoshop>Preferences>Performance. Where is says "History && Cache" Change the history states to "200". Chances are you will mess up A LOT and you want
GIMP (GNU Image Manipulation Program) MANUAL
 MANUAL") Selection Tools Icon Tool Name Function Select Rectangle Select Ellipse Select Hand-drawn area (lasso tool) Select Contiguous Region (magic wand) Selects a rectangular area, drawn from upper left (or lower
Selection Tools Icon Tool Name Function Select Rectangle Select Ellipse Select Hand-drawn area (lasso tool) Select Contiguous Region (magic wand) Selects a rectangular area, drawn from upper left (or lower
2.11 CASTING LIGHT THROUGH A WINDOW
 2.11 CASTING LIGHT THROUGH A WINDOW Adding a light source to a photograph can increase the photograph s dramatic impact especially when the light is shining through a paned window. Actually setting up
Okay so its not the best drawing, well it's not suppose to be, your going to make the image a complete piece of art.
 In this lesson you will see that Adobe Photoshop is not just an image editor, but it is also useful in creating art work by drawing and painting. In this lesson we will focus on Painting, but you can always
Corel PHOTO-PAINT BERNINA Page 1 DL
 Corel PHOTO-PAINT 2018 BERNINA Page 1 Corel PHOTO-PAINT Corel PHOTO-PAINT is part of BERNINA Embroidery Software and gives users many tools for editing photos or bitmap artwork. Corel PHOTO- PAINT can
Create a Cute Furry Vector Monster in Illustrator
 Create a Cute Furry Vector Monster in Illustrator Other labs from this author can be found at http://www.blog.spoongraphics.co.uk/tutorials/create-a-cute-furry-vector-monster-inillustrator Follow these
Introduction to Photoshop
 Introduction to Photoshop Photoshop Creative Cloud (CC) Start -> All Programs -> Classes -> Web Expressions -> Tutorials Google Photoshop CC tutorial Color Replacement Image -> Adjustments -> Replace
Create a Candy Cane. Create a new canvas with the size 8x10 inches at 300 pixel/inch. See image below Ctrl + N
 Create a Candy Cane The Basic Candy Cane Canvas and Shape 1. Create a new folder, name it Candy Cane your name. Create a new canvas with the size 8x10 inches at 300 pixel/inch. See image below Ctrl + N
Compositing. Compositing is the art of combining two or more distinct elements to create a sense of seamlessness or a feeling of belonging.
 Compositing Compositing is the art of combining two or more distinct elements to create a sense of seamlessness or a feeling of belonging. Selection Tools In the simplest terms, selections help us to cut
Create a Multicolored Splashed Text Effect in Adobe Illustrator
 Create a Multicolored Splashed Text Effect in Adobe Illustrator by Diana Toma17 Nov 2014 What You'll Be Creating In this tutorial you will learn how to create a multicolored splashed text effect in Adobe
ITEC185 INTRODUCTION TO DIGITAL MEDIA
 1 ITEC185 INTRODUCTION TO DIGITAL MEDIA ADOBE PHOTOSHOP ITEC185 - Introduction to Digital Media ITEC185 - Introduction to Digital Media 2 What is Adobe Photoshop? Photoshop is the leading professional
ADD A REALISTIC WATER REFLECTION
 ADD A REALISTIC WATER REFLECTION In this Photoshop photo effects tutorial, we re going to learn how to easily add a realistic water reflection to any photo. It s a very easy effect to create and you can
Project 8: Nice Close-Up
 ps7ie_p08_b.qxd 11/18/02 3:25 PM Page 74 ps7ie_p08_b.qxd 11/18/02 3:25 PM Page 75 Photoshop 7 Image Effects In this project, work with a picture that was taken at an angle for effect. Correct and crop
How to Create a Landscape Wallpaper for your Desktop
 How to Create a Landscape Wallpaper for your Desktop Why not create a vector landscape wallpaper? In this simple tutorial, you will learn how to create an eye-appealing wallpaper quickly and effectively.