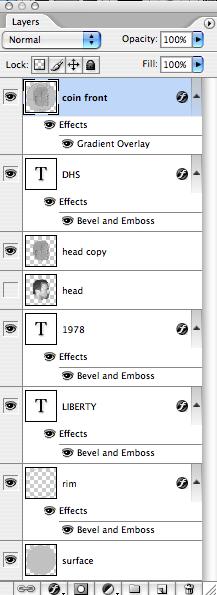
Duplicate Layer 1 by dragging it and dropping it on top of the New Layer icon in the Layer s Palette. You should now have two layers rename the top la
|
|
|
- Solomon Potter
- 5 years ago
- Views:
Transcription


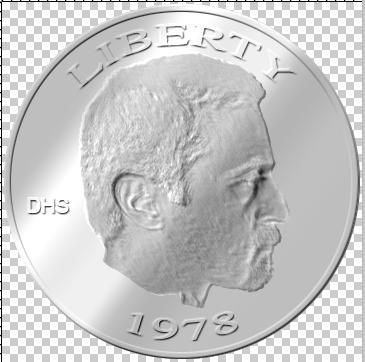
1 50 Face Project For this project, you are going to put your face on a coin. The object is to make it look as real as possible. Though you will probably be able to tell your project was computer generated, really experienced Photoshop artists are good at blurring the lines between make believe and reality. Our goal is to get you to become as close to an expert as possible. When creating artwork on the computer, one needs to consider the destination of the artwork, that is, where is the artwork going to wind up. For this particular project, the final destination will be to post the work on the Internet. Thus, we won t be concerned with a high resolution as if we would for getting a printout. When creating artwork for the Internet, you want your artwork to be the size you would like it displayed with a resolution of 72 pixels/inch because computer monitors display images at 72ppi. Since we post images on our school website art page that are 5 X 5, that is the size we will want to create our images. (I can only post images of students whose parents gave me permission to do so.) Open up a new document in Photoshop (File > New). Select the settings that are listed to the right. 360 pixels at 72 pixels per inch will give you a 5 X 5 document (72 pixels per inch times 5 equals 360 pixels). We are specifying pixels this time, because we need to make very precise Elliptical Marquee selections, and this is easier to do with pixels than inches. It is also good for you to see how pixels work, as many Photoshop artists and books use this unit of measurement over inches. Show the rulers (View > Rulers). If the unit of measurement isn t displayed in inches, have your teacher show you how to set them to inches. Drag a guideline to 2 1/2 both vertically and horizontally. Your document should look like the illustration here to the left. Next you are going to draw a flat coin with a rim around it. For now there will be no face or writing, those details will come later. To do this we will need precise size circles. Select the Elliptical Marquee tool and make sure the tool settings are set like this. Remember the document was 360 pixels square, this size circle is just 5 pixels smaller than that. Place the marquee crosshairs on the intersecting guidelines. Press option, and click the mouse (option draws the marquee from the center outward). Next we re going to fill the circle with 25% gray. Select the color palette, and drag the slider to 25%, or type it into the field. Press option delete to fill the selection with the gray. Deselect the circle.


2 Duplicate Layer 1 by dragging it and dropping it on top of the New Layer icon in the Layer s Palette. You should now have two layers rename the top layer to rim and the bottom layer to surface. Make sure the rim layer is selected. Reset the dimensions in the Elliptical Marquee tool so the Width and Height are set to 340, all other settings should be as the last selection listed above (on the previous page). Make another selection in the center of your document just as you did the last time then press delete. This should leave you with a narrow ring on the rim layer, and a solid circle on the surface layer, though it won t be obvious until you hide the surface layer. Do that now to make sure your document and layers look like those shown here. To make your rim look 3-dimensional you re going to add light and shadow effects via Bevel and Emboss in the styles menu. With the rim layer selected click the add a layer style button (the fancy F in a black circle at the bottom of the layers palette), scroll up to Bevel and Emboss and select it. Select the settings shown here to the left. Keep the surface layer hidden. We re going to add the word LIBERTY to the top of the coin, the year you graduate to the bottom of the coin, and DHS to the one side of where the face will be. If the surface layer is showing, you won t be able to see the text until you add Bevel and Emboss, as the text will be the same color as the coin ( surface layer). ADDING THE TEXT: This part can be hard to follow so pay real close attention. Select the Ellipse tool (not the Elliptical Marquee tool), and MAKE SURE the following settings are selected. You are going to type along a path so you want the path option selected, not selecting this will complicate things and you will have to do this part over. You get the drop-down menu by selecting the down arrow in the blue shaded box. Once you have the correct settings click the Ellipse tool crosshairs in the center of the guidelines like you made the two previous selections. You don t have to press option, because you selected the From Center check box in the drop down menu. You should now have a circular path, smaller than the other two previous circles. You are going to type along this path.
.")


3 Select Window > Character and make sure the settings shown here are selected. Select the type tool make sure caps lock is on. Move the cursor to the very top center of the circular path. When the cursor changes to a cursor with a diagonal, wavy line going through it, click the mouse (make sure the center of the cursor is lined up exactly on the vertical guide line before you click). Type the word LIBERTY. Click the black Commit check icon (top right of tool options) to commit what you typed. It s very hard to see what you typed so let s add some bevel and emboss again, but this time choose Outer Bevel. Keep the size to 1pixel. Now to add the year you graduate. This gets really tricky, and you ll soon see why. If the Paths palette isn t already showing, choose Window > Paths. Select the Work Path path. Select the type tool and this time place the cursor at the bottom of the circle and repeat the same process you used to type LIBERTY. Notice how your type is upside down. We need to change this. Select the Path Selection Tool (black arrow in the tools palette). Place it on the vertical guideline on the graduation year you just typed. Notice the cursor changed to one with two outward facing black arrows. Drag upward on the text so that the text is now right side up and inside the circular path. Apply the same Bevel and Emboss settings you did for the LIBERTY text. Reveal the surface layer and your project should look like this. Notice how LIBERTY is on the outside of the circle and the year is on the inside of the circle. We want both to be outside the circle. To do this we need to select the year by double-clicking it with the text tool. It should now be hi-lited. In the Character palette, hi-lite the 0 in the baseline-shift field. Press the down arrow key on the keyboard until the year is below and outside the circular path. I adjusted the baseline-shift to -21. In the Paths palette select beneath both paths to hide the path outline. Choose View > Show > Guides to hide the guides you created. Are you feeling presidential? Well get ready cause you re going to add your face to the coin. Have a partner take a picture of you from the side. Once you ve got your beautiful mug downloaded to your computer open it in Photoshop and crop it to a 5 by 5 picture with a resolution of 72 pixels/inch. Hug the crop tool fairly close to your head, but leave some of the neck. Select your head and neck with whatever selection method you like best (just make sure to be picky when making selections so as to get the best selection as possible this is ALWAYS important). I like getting a rough selection with the magnetic lasso, and making fine adjustments in Quick-mask mode. Once you ve got a good selection, drag your face into the Coin document. You may need to scale it so it fits well between the upper and lower text. You won t need to de-saturate since your document is in grayscale. Rename this layer head, then duplicate the layer (you want to duplicate this layer in case you mess it up, you have a backup). Your document and layers palette should now look these to the right.


4 With the head copy layer selected choose Filter > Stylize > Emboss. These settings looked good for my pic, yours might require slightly different settings. I also had to adjust the brightness and contrast to make the head more closely match the coin. Now for some finishing touches. Reset the character palette, since you gave it some funky settings. To do this, select the little black arrow in the top RH corner of the character palette, then scroll to Reset Character. Set the font size to 16. Make sure cap lock is on and type in DHS to the right or left side of the head, whichever looks better. Move it into place and size it to your liking. Select the commit check. Add bevel and emboss to the DHS text. Now that isn t a bad looking coin, but it is a little dull. Let s polish it up a little and make it look a little bit more realistic. To do this, we have to get all the layers on a single layer. Select your top layer, which should be the DHS text layer. Choose Select > All. This will give you flashing dotted line (also known as the marching ants ) around the perimeter of your document. Choose Edit > Copy Merged, then choose Edit > Paste. This will create a new layer at the top of the layers palette that combined all of the visible layers into one layer. Choose Select > Deselect. Rename this layer coin front, as you will create a backside to the coin at a later date, and turn it into a spinning coin animation. You will now apply a layer style to this layer to make it look a little more reflective. With the coin front layer selected click the add a layer style button (the fancy F in a black circle at the bottom of the layers palette), scroll up to Gradient Overlay and select it. Select the settings shown here to the left. Select the gradient named Spectrum. Even though this gradient is very colorful, it will appear in grayscale since this is a grayscale (and not an RGB) document. Check to see if your project and layers palette resemble those on the following page. If so, congratulations you are done with this project. If not, you must have made an error, and need to go back and correct it.
5
A quick note: We hope that you will find something from the Tips and Tricks that will add a little pizazz to your yearbook pages!
 A quick note: The following pages are tips and tricks for Basic Photoshop users. You may notice that some instructions indicate that non-awpc fonts were used, and that some colors were created using the
HOW TO CREATE A SUPER SHINY PENCIL ICON
 HOW TO CREATE A SUPER SHINY PENCIL ICON Tutorial from http://psd.tutsplus.com/ Compiled by INTRODUCTION The Pencil is one of the visual metaphors most used to express creativity. In this tutorial,
How to Create Website Banners
 How to Create Website Banners In the following instructions you will be creating banners in Adobe Photoshop Elements 6.0, using different images and fonts. The instructions will consist of finding images,
Your texture pattern may be slightly different, but should now resemble the sample shown here to the right.
 YOU RE BUSTED! For this project you are going to make a statue of your bust. First you will need to have a classmate take your picture, or use the built in computer camera. The statue you re going to make
Digital Design and Communication Teaching (DiDACT) University of Sheffield Department of Landscape. Adobe Photoshop CS5 INTRODUCTION WORKSHOPS
 University of Sheffield Department of Landscape. Adobe Photoshop CS5 INTRODUCTION WORKSHOPS") Adobe INTRODUCTION WORKSHOPS WORKSHOP 1 - what is Photoshop + what does it do? Outcomes: What is Photoshop? Opening, importing and creating images. Basic knowledge of Photoshop tools. Examples of work.
Adobe INTRODUCTION WORKSHOPS WORKSHOP 1 - what is Photoshop + what does it do? Outcomes: What is Photoshop? Opening, importing and creating images. Basic knowledge of Photoshop tools. Examples of work.
A lthough it may not seem so at first
 Photoshop Selections by Jeff The Wizard of Draws Bucchino www.wizardofdraws.com A lthough it may not seem so at first glance, learning to use Photoshop is largely about making selections. Knowing how to
Photoshop CC 2018 Essential Skills
 Photoshop CC 2018 Essential Skills Adobe Photoshop Creative Cloud 2018 University Information Technology Services Learning Technology, Training, Audiovisual and Outreach Copyright 2018 KSU Division of
ITEC185 INTRODUCTION TO DIGITAL MEDIA
 1 ITEC185 INTRODUCTION TO DIGITAL MEDIA ADOBE PHOTOSHOP ITEC185 - Introduction to Digital Media ITEC185 - Introduction to Digital Media 2 What is Adobe Photoshop? Photoshop is the leading professional
Key Terms. Where is it Located Start > All Programs > Adobe Design Premium CS5> Adobe Photoshop CS5. Description
 Adobe Adobe Creative Suite (CS) is collection of video editing, graphic design, and web developing applications made by Adobe Systems. It includes Photoshop, InDesign, and Acrobat among other programs.
Using Adobe Photoshop
 Using Adobe Photoshop 6 One of the most useful features of applications like Photoshop is the ability to work with layers. allow you to have several pieces of images in the same file, which can be arranged
All Creative Suite Design documents are saved in the same way. Click the Save or Save As (if saving for the first time) command on the File menu to
 command on the File menu to") 1 The Application bar is new in the CS4 applications. It combines the menu bar with control buttons that allow you to perform tasks such as arranging multiple documents or changing the workspace view.
1 The Application bar is new in the CS4 applications. It combines the menu bar with control buttons that allow you to perform tasks such as arranging multiple documents or changing the workspace view.
Adobe Photoshop CS5 Layers and Masks
 Adobe Photoshop CS5 Layers and Masks Email: training@health.ufl.edu Web Page: http://training.health.ufl.edu Adobe Photoshop CS5: Layers and Masks 2.0 Hours The workshop will cover creating and manipulating
11 Advanced Layer Techniques
 11 Advanced Layer Techniques After you ve learned basic layer techniques, you can create more complex effects in your artwork using layer masks, path groups, filters, adjustment layers, and more style
Adobe Photoshop CS5 Tutorial
 Adobe Photoshop CS5 Tutorial GETTING STARTED Adobe Photoshop CS5 is a popular image editing software that provides a work environment consistent with Adobe Illustrator, Adobe InDesign, Adobe Photoshop
Photoshop CC: Essentials
 Photoshop CC: Essentials Summary Workspace Overview... 2 Exercise Files... 2 Selection Tools... 3 Select All, Deselect, And Reselect... 3 Adding, Subtracting, and Intersecting... 3 Working with Layers...
Digital Photography 1
 Digital Photography 1 Photoshop Lesson 3 Resizing and transforming images Name Date Create a new image 1. Choose File > New. 2. In the New dialog box, type a name for the image. 3. Choose document size
FLAMING HOT FIRE TEXT
 FLAMING HOT FIRE TEXT In this Photoshop text effects tutorial, we re going to learn how to create a fire text effect, engulfing our letters in burning hot flames. We ll be using Photoshop s powerful Liquify
Photoshop 1. click Create.
 Photoshop 1 Step 1: Create a new file Open Adobe Photoshop. Create a new file: File->New On the right side, create a new file of size 600x600 pixels at a resolution of 300 pixels per inch. Name the file
ADD A REALISTIC WATER REFLECTION
 ADD A REALISTIC WATER REFLECTION In this Photoshop photo effects tutorial, we re going to learn how to easily add a realistic water reflection to any photo. It s a very easy effect to create and you can
ADDING RAIN TO A PHOTO
 ADDING RAIN TO A PHOTO Most of us would prefer to avoid being caught in the rain if possible, especially if we have our cameras with us. But what if you re one of a large number of people who enjoy taking
Panoramas and the Info Palette By: Martin Kesselman 5/25/09
 Panoramas and the Info Palette By: Martin Kesselman 5/25/09 Any time you have a color you would like to copy exactly, use the info palette. When cropping to achieve a particular size, it is useful to use
Photoshop: Manipulating Photos
 Photoshop: Manipulating Photos All Labs must be uploaded to the University s web server and permissions set properly. In this lab we will be manipulating photos using a very small subset of all of Photoshop
Project 25 Page 1 ` JAZZ POSTCARD
 Project 25 Page 1 ` JAZZ POSTCARD Reset all tools! Create the Background 1. Create a new RGB document, 4.25 in. wide by 5.75 in. high at 100 dpi with a white background. 2. Click the foreground color swatch
Downloaded From : Working with Photoshop 7.0
 Adobe Photoshop 1. Introduction What is Adobe Photoshop? Adobe Photoshop is a web designing software used for giving effects and filters to an image to make it more appealing and attractive. Brought out
Adobe Photoshop CC 2018 Tutorial
 Adobe Photoshop CC 2018 Tutorial GETTING STARTED Adobe Photoshop CC 2018 is a popular image editing software that provides a work environment consistent with Adobe Illustrator, Adobe InDesign, Adobe Photoshop,
Reveal the mystery of the mask
 Reveal the mystery of the mask Imagine you're participating in a group brainstorming session to generate new ideas for the design phase of a new project. The facilitator starts the brainstorming session
BRUSHES AND LAYERS We will learn how to use brushes and illustration tools to make a simple composition. Introduction to using layers.
 Brushes BRUSHES AND LAYERS We will learn how to use brushes and illustration tools to make a simple composition. Introduction to using layers. WHAT IS A BRUSH? A brush is a type of tool in Photoshop used
PHOTOSHOP STUDY GUIDE FOR CHAPTER A, B TEST
 1 PHOTOSHOP STUDY GUIDE FOR CHAPTER A, B TEST 1. Adobe CS5 is a graphic arts package that offers Photoshop, Illustrator, Indesign and Flash and Dreamweaver. They are integrated programs used as an industry
Rendering a perspective drawing using Adobe Photoshop
 Rendering a perspective drawing using Adobe Photoshop This hand-out will take you through the steps to render a perspective line drawing using Adobe Photoshop. The first important element in this process
XXXX - MAKING A FLYER BOOKLET COVER 1 N/08/08
 INTRODUCTION TO GRAPHICS Making a flyer booklet cover Information Sheet No. XXXX Create a new document with these settings. Note that you will be using 300 dpi because this will be made for print. Keepit
12. Creating a Product Mockup in Perspective
 12. Creating a Product Mockup in Perspective Lesson overview In this lesson, you ll learn how to do the following: Understand perspective drawing. Use grid presets. Adjust the perspective grid. Draw and
Photoshop CS6 automatically places a crop box and handles around the image. Click and drag the handles to resize the crop box.
 CROPPING IMAGES In Photoshop CS6 One of the great new features in Photoshop CS6 is the improved and enhanced Crop Tool. If you ve been using earlier versions of Photoshop to crop your photos, you ll find
XXXX - ILLUSTRATING FROM SKETCHES IN PHOTOSHOP 1 N/08/08
 INTRODUCTION TO GRAPHICS Illustrating from sketches in Photoshop Information Sheet No. XXXX Creating illustrations from existing photography is an excellent method to create bold and sharp works of art
Lesson 16 Text, Layer Effects, & Filters
 Lesson 16 Text, Layer Effects, & Filters Digital Media I Susan M. Raymond West High School In this tutorial, you will: Create a Type Layer Add and Format Type within a Type Layer Apply Layer Effects Apply
METAL TEXT EFFECT. Step 1: Create A New Document. Step 2: Fill The Background With Black
 METAL TEXT EFFECT In this text effects tutorial, we ll learn how to easily create metal text, a popular effect widely used in video games and movie posters! It may seem like there s a lot of steps involved,
12 Creating Special Effects
 12 Creating Special Effects With the huge assortment of filters available for Adobe Photoshop, you can transform ordinary images into extraordinary digital artwork. You can select filters that simulate
High Speed Motion Trail Effect With Photoshop
 High Speed Motion Trail Effect With Photoshop Written by Steve Patterson. In this Photo Effects tutorial, we'll learn how to add a sense of speed to an object using an easy to create motion blur effect!
Working with Photoshop CS4
 Table of Contents Introduction: Tools and Palettes... 3 The History Palette Saving a Snapshot... 3 Getting Help with Photoshop... 4 Resolution and Image Size... 4 Changing the Image Size... 5 Tips for
Chapter 4: Draw with the Pencil and Brush
 Page 1 of 15 Chapter 4: Draw with the Pencil and Brush Tools In Illustrator, you create and edit drawings by defining anchor points and the paths between them. Before you start drawing lines and curves,
Reflection Project. Please start by resetting all tools in Photoshop.
 Reflection Project You will be creating a floor and wall for your advertisement. Before you begin on the Reflection Project, create a new composition. File New: Width 720 Pixels / Height 486 Pixels. Resolution
The final wrap text in 3D result.
 WRAPPING TEXT IN 3D In this Photoshop tutorial, we re going to learn how to easily wrap text around a 3D object in Photoshop, without the need for any 3D software. We re going to be wrapping our text around
GETTING STARTED MAKING A NEW DOCUMENT
 Accessed with permission from http://web.ics.purdue.edu/~agenad/help/photoshop.html GETTING STARTED MAKING A NEW DOCUMENT To get a new document started, simply choose new from the File menu. You'll get
ADOBE PHOTOSHOP CS TUTORIAL
 ADOBE PHOTOSHOP CS TUTORIAL A D O B E P H O T O S H O P C S Adobe Photoshop CS is a popular image editing software that provides a work environment consistent with Adobe Illustrator, Adobe InDesign, Adobe
This Photoshop Tutorial 2012 Steve Patterson, Photoshop Essentials.com. Not To Be Reproduced Or Redistributed Without Permission.
 How To Replace The Sky In A Photo In this Photoshop tutorial, we ll learn how to easily replace the sky in a photo! We ll use a basic selection tool and a layer mask to separate the sky from the area below
Colorizing A Photo With Multiple Colors In Photoshop
 Colorizing A Photo With Multiple Colors In Photoshop Written by Steve Patterson. In this Photoshop Effects tutorial, we re going to learn how to colorize a photo using multiple colors. It s an effect I
Add Photoshop Masks and Adjustments to RAW Images
 Add Photoshop Masks and Adjustments to RAW Images Contributor: Seán Duggan n Specialty: Fine Art Primary Tool Used: Photoshop Masks The adjustments you make in Camera Raw are global in nature, meaning
Photoshop: Manipulating Photos
 Photoshop: Manipulating Photos All Labs must be uploaded to the University s web server and permissions set properly. In this lab we will be manipulating photos using a very small subset of all of Photoshop
The original image. Let s get started! The final rainbow effect. The photo sits on the Background layer in the Layers panel.
 Add A Realistic Rainbow To A Photo In this Photoshop photo effects tutorial, we ll learn how to easily add a rainbow, and even a double rainbow, to a photo! As we ll see, Photoshop ships with a ready-made
TURN A PHOTO INTO A PATTERN OF COLORED DOTS (CS6)
") TURN A PHOTO INTO A PATTERN OF COLORED DOTS (CS6) In this photo effects tutorial, we ll learn how to turn a photo into a pattern of solid-colored dots! As we ll see, all it takes to create the effect is
TURN A PHOTO INTO A PATTERN OF COLORED DOTS (CS6) In this photo effects tutorial, we ll learn how to turn a photo into a pattern of solid-colored dots! As we ll see, all it takes to create the effect is
Photo Within A Photo - Photoshop
 Photo Within A Photo - Photoshop Here s the image I ll be starting with: The original image. And here s what the final "photo within a photo" effect will look like: The final result. Let s get started!
Photoshop CS2. Step by Step Instructions Using Layers. Adobe. About Layers:
 About Layers: Layers allow you to work on one element of an image without disturbing the others. Think of layers as sheets of acetate stacked one on top of the other. You can see through transparent areas
Enhanced Eyes. Here's the image I'll be working with (glamour eyes photo from Shutterstock): Here's what the eyes will look like when we're done:
: Here's what the eyes will look like when we're done:") Enhanced Eyes Here's the image I'll be working with (glamour eyes photo from Shutterstock): The original image. Here's what the eyes will look like when we're done: The final effect. Here's a close-up
Enhanced Eyes Here's the image I'll be working with (glamour eyes photo from Shutterstock): The original image. Here's what the eyes will look like when we're done: The final effect. Here's a close-up
ADDING A RAINBOW TO A PHOTOGRAPH
 ADDING A RAINBOW TO A PHOTOGRAPH This assignment will cover how to add a simple rainbow (or if you want to go crazy, a double rainbow) to any photograph. This will give us some great work with gradients,
Corel PHOTO-PAINT BERNINA Page 1 DL
 Corel PHOTO-PAINT 2018 BERNINA Page 1 Corel PHOTO-PAINT Corel PHOTO-PAINT is part of BERNINA Embroidery Software and gives users many tools for editing photos or bitmap artwork. Corel PHOTO- PAINT can
Perspective Shadow Text Effect In Photoshop
 Perspective Shadow Text Effect In Photoshop Written by Steve Patterson. In this Photoshop text effects tutorial, we ll learn how to create a popular, classic effect by giving text a perspective shadow
CHANGING EYE COLOR IN A PHOTO
 CHANGING EYE COLOR IN A PHOTO In this photo retouching tutorial, we ll learn a very simple technique for changing someone s eye color in a photo using a Hue/Saturation adjustment layer! Of course, there
Introduction to Photoshop Elements
 John W. Jacobs Technology Center 450 Exton Square Parkway Exton, PA 19341 610.280.2666 ccljtc@ccls.org www.ccls.org Facebook.com/ChesterCountyLibrary Introduction to Photoshop Elements Chester County Library
OLD FASHIONED HAND TINTED EFFECT
 OLD FASHIONED HAND TINTED EFFECT In this Photoshop tutorial, we re going to learn how to easily create an old-fashioned, hand-tinted photo effect. All it takes is an adjustment layer, a layer blend mode,
Organizing artwork on layers
 3 Layer Basics Both Adobe Photoshop and Adobe ImageReady let you isolate different parts of an image on layers. Each layer can then be edited as discrete artwork, allowing unlimited flexibility in composing
Preparing Photos for Laser Engraving
 Preparing Photos for Laser Engraving Epilog Laser 16371 Table Mountain Parkway Golden, CO 80403 303-277-1188 -voice 303-277-9669 - fax www.epiloglaser.com Tips for Laser Engraving Photographs There is
Photoshop Notes and Application Study Packet
 Basic Parts of Photoshop Interface Photoshop Notes and Application Study Packet PANELS Photoshop Study Packet Copyright Law The World Intellectual Property Organization (WIPO) Copyright treaty restrict
GIMP Simple Animation Tutorial
 GIMP Simple Animation Tutorial Banner size: 690 x 200 transparent background layer There are really two parts to making an animated banner. The first is to set up the banner all the components besides
In Photoshop you can change the size of an image by going to:
 Change an images size In Photoshop you can change the size of an image by going to: Image Image Size and change the dimensions of the pictures in pixels. Once you adjust the top number the bottom number
HTCiE 10.indb 4 23/10/ :26
 How to Cheat in E The photograph of a woman in Ecuador, above, shows a strong face, brightly colored clothes and a neatly incongruous hat. But that background is just confusing: how much better it is when
Contents: Bibliography:
 ( 2 ) Contents: Sizing an Image...4 RAW File Conversion...4 Selection Tools...5 Colour Range...5 Quick Mask...6 Extract Tool...7 Adding a Layer Style...7 Adjustment Layer...8 Adding a gradient to an Adjustment
COLORIZE A PHOTO WITH MULTIPLE COLORS
 COLORIZE A PHOTO WITH MULTIPLE COLORS In this Photoshop photo effects tutorial, we re going to learn how to colorize a photo using multiple colors. It s an effect I ve seen used quite a bit in ads for
Introduction to Photoshop: Basic Editing & Prepare Images for the Web
 Introduction to Photoshop: Basic Editing & Prepare Images for the Web 1 LEARNING OBJECTIVES Basic tools in Photoshop & Use of Bridge Prepare images for print and web use TOPICS COVERED Photoshop Interface
Photoshop Backgrounds: Turn Any Photo Into A Background
 Photoshop Backgrounds: Turn Any Photo Into A Background Step 1: Duplicate The Background Layer As always, we want to avoid doing any work on our original image, so before we do anything else, we need to
5 Masks and Channels
 5 Masks and Channels Adobe Photoshop uses masks to isolate and manipulate specific parts of an image. A mask is like a stencil. The cutout portion of the mask can be altered, but the area surrounding the
CREATE A BURNT EDGE EFFECT
 CREATE A BURNT EDGE EFFECT One of the all-time classic effects in Photoshop is the burnt edge, and there s lots of different ways to create it, but in this Adobe Photoshop tutorial, we re going to look
Recitation 2 Introduction to Photoshop
 Recitation 2 Introduction to Photoshop What is Adobe Photoshop? Adobe Photoshop is a tool for creating digital graphics either by starting with a scanned photograph or artwork or by creating the graphics
Retouching Portraits in Photoshop
 Retouching Portraits in Photoshop I Removing Blemishes When removing blemishes, acne or other imperfections on the skin, our goal is to maintain as much of the original skin texture as possible. That way,
Editing Using Photoshop CS5
 The Photoshop CS4 Editing Workspace - shown is the document (image) window, ToolBox, Info, Navigator, History, Adjustments and Layers Palettes, Windows Menus and Options Bar (on top). USING THE LAYERS
PHOTOSHOP DESIGN EFFECTS FOR INTERMEDIATE TO ADVANCED USERS
 PHOTOSHOP DESIGN EFFECTS FOR INTERMEDIATE TO ADVANCED USERS Copyright 2012, National Seminars Training Introduction This class is all about design effects in Adobe Photoshop. For example, let s say that
Making Selections: 3 Ways to isolate an area in an image: Layer Mask : Mask the part of the layer you don t want to be visible
 3 Ways to isolate an area in an image: Layer Mask : Mask the part of the layer you don t want to be visible Eraser Tool: Erase the areas of an image or layer you don t want to be visible Make a Selection:
Using Layers. Chapter Delmar, Cengage Learning
 Using Layers Chapter 5 2011 Delmar, Cengage Learning Chapter Objectives Learn to use the Layers panel and Layer menu for various commands. Create two permanent selections to duplicate graphics for replication
Scanning Guide for Adobe Photoshop
 Scanning Guide for Adobe Photoshop This guide is written for Adobe Photoshop CS2. It describes how to use the scanner through the Import Twain function from within Photoshop, so access to Adobe Photoshop
How to Apply a Halftone Effect as a Photo Background Using CorelDRAW
 How to Apply a Halftone Effect as a Photo Background Using CorelDRAW by Silvio Gomes CorelDRAW offers great tools for applying interesting effects that can really highlight the look of your art work. One
u Selections, Channels, Masks, and Paths
 6 u Selections, Channels, Masks, and Paths No matter what type of Photoshop work you do, you will most likely have to make selections. Spot color corrections require selections. Compositing requires selections.
SHAPE CLUSTER PHOTO DISPLAY
 SHAPE CLUSTER PHOTO DISPLAY In this Photoshop tutorial, we ll learn how to display a single photo as a cluster of shapes, similar to larger wall cluster displays where several photos, usually in different
Contents. Introduction
 Contents Introduction 1. Overview 1-1. Glossary 8 1-2. Menus 11 File Menu 11 Edit Menu 15 Image Menu 19 Layer Menu 20 Select Menu 23 Filter Menu 25 View Menu 26 Window Menu 27 1-3. Tool Bar 28 Selection
In just one word, how would you describe the most widely accepted reason that
 c h a p t e r 6 NAVIGATION, BUTTONS, AND BULLETS In just one word, how would you describe the most widely accepted reason that the Web has become so popular so quickly? Here s a hint: It has nothing to
Selective Edits in Camera Raw
 Complete Digital Photography Seventh Edition Selective Edits in Camera Raw by Ben Long If you ve read Chapter 18: Masking, you ve already seen how Camera Raw lets you edit your raw files. What we haven
Extreme Makeovers: Photoshop Retouching Techniques
 Extreme Makeovers: Table of Contents About the Workshop... 1 Workshop Objectives... 1 Getting Started... 1 Photoshop Workspace... 1 Retouching Tools... 2 General Steps... 2 Resolution and image size...
Miniature Effect With Tilt-Shift In Photoshop CS6
 Miniature Effect With Tilt-Shift In Photoshop CS6 This effect works best with a photo taken from high overhead and looking down on your subject at an angle. You ll also want a photo where everything is
Out of Bounds - Dolphins
 Out of Bounds - Dolphins Let's start by making a copy of our original image layer - This is not essential but it's easier to rectify mistakes. From the menus, select Layer > Duplicate Layer or drag the
Step 1: Create A New Photoshop Document
 Film Strip Photo Collage - Part 2 In part one of this two-part Photoshop tutorial, we learned how Photoshop s shape tools made it easy to draw a simple film strip which we can then use as a photo frame,
Selective Editing in Camera Raw 5
 Selective Editing in Camera Raw 5 The editing tools that you saw in the last chapter are global editing tools. That is, they affect all parts of the image. So, when you choose to, for example, brighten
Creating a Mascot Design
 Creating a Mascot Design From time to time, I'm hired to design a mascot for a sports team. These tend to be some of my favorite projects, but also some of the more challenging projects as well. I tend
Adding Graphics to a Presentation
 8 Adding Graphics to a Presentation LESSON SKILL MATRIX Skill Exam Objective Objective Number Adding a Picture to a Slide Formatting Graphical Elements Resize graphical elements. 3.1.3 Apply styles to
Photoshop CS6. Table of Contents. Image Formats! 3. GIF (Graphics Interchange Format)! 3. JPEG or JPG (Joint Photographic Experts Group)!
! 3. JPEG or JPG (Joint Photographic Experts Group)!") Photoshop CS6 Table of Contents Image Formats! 3 GIF (Graphics Interchange Format)! 3 JPEG or JPG (Joint Photographic Experts Group)! 3 PNG (Portable Network Graphics)! 3 Pixels! 3 Resolution! 3 Creating
Photoshop CS6 Table of Contents Image Formats! 3 GIF (Graphics Interchange Format)! 3 JPEG or JPG (Joint Photographic Experts Group)! 3 PNG (Portable Network Graphics)! 3 Pixels! 3 Resolution! 3 Creating
4 layer BASiCS lesson overview 104
 4 layer basics Lesson overview In this lesson, you ll learn how to do the following: Organize artwork on layers. Create, view, hide, and select layers. Rearrange layers to change the stacking order of
22B / NONDESTRUCTIVE EDITING - QUICK MASKS 1
 22B / NONDESTRUCTIVE EDITING - QUICK MASKS 1 The following sections will deal with photoshop more as an artists studio and not just as an extension of photography. You will work more with layers and using
Exploring Photoshop Tutorial
 Exploring Photoshop Tutorial Objective: In this tutorial we will create a poster composed of three distinct elements: a Bokeh, an image and title text. The Bokeh is an effect which is sometimes seen in
TEXT PERSPECTIVE SHADOW EFFECT
 TEXT PERSPECTIVE SHADOW EFFECT In this Photoshop text effects tutorial, we ll learn how to create a popular, classic effect by giving text a perspective shadow as if a light source behind the text was
Bramhall Photographic Society
 Bramhall Photographic Society PHOTOSHOP ELEMENTS ADJUSTMENT LAYERS EXPLAINED (WHAT THEY DO) (This technique will work in any version of Elements although the screenshots may vary slightly) There are a
AGENDA :: MULTIMEDIA TOOLS :: CLASS NOTES. :: Homework Critiques (5-7 minutes each) :: Photoshop Lesson 3. A-1 Gorgeous! [ COMPOSITE DEMO ] :: 7mins.
![AGENDA :: MULTIMEDIA TOOLS :: CLASS NOTES. :: Homework Critiques (5-7 minutes each) :: Photoshop Lesson 3. A-1 Gorgeous! [ COMPOSITE DEMO ] :: 7mins.](/thumbs/86/93336476.jpg "AGENDA :: MULTIMEDIA TOOLS :: CLASS NOTES. :: Homework Critiques (5-7 minutes each) :: Photoshop Lesson 3. A-1 Gorgeous! [ COMPOSITE DEMO ] :: 7mins.") CLASS :: 03 02.10 2017 AGENDA :: Homework Critiques (5-7 minutes each) A-1 Gorgeous! Upload A-1 Project to Student Folder :: Photoshop Lesson 3 [ COMPOSITE DEMO ] :: 7mins. I. SELECTIONS [ Common Law ]:
CLASS :: 03 02.10 2017 AGENDA :: Homework Critiques (5-7 minutes each) A-1 Gorgeous! Upload A-1 Project to Student Folder :: Photoshop Lesson 3 [ COMPOSITE DEMO ] :: 7mins. I. SELECTIONS [ Common Law ]:
Getting Started. 1. Double click on the eye con. 2. Single click on File, then new, then OK. Click here.
 Getting Started 1. Double click on the eye con. 2. Single click on File, then new, then OK. Click here. What is Photoshop? Photoshop is a program that lets you make pictures. You can put away your markers
I Read Banned Books Poster File Tip Sheet. The Basics
 I Read Banned Books Poster File Tip Sheet The Basics Open the poster file using photo editing software that can support PSD files, such as Adobe Photoshop, Photoshop Elements, or GIMP, a free photo editor
You ve Been Framed! (Adobe Photoshop)
") You ve Been Framed! (Adobe Photoshop) Tip of the Week by Linda Sattgast on September 28, 2009 Do you have a great photo of someone special that you want to bring into sharp focus the special person, that
You ve Been Framed! (Adobe Photoshop) Tip of the Week by Linda Sattgast on September 28, 2009 Do you have a great photo of someone special that you want to bring into sharp focus the special person, that