Create a Simple Storefront Icon
|
|
|
- Pamela Newman
- 6 years ago
- Views:
Transcription

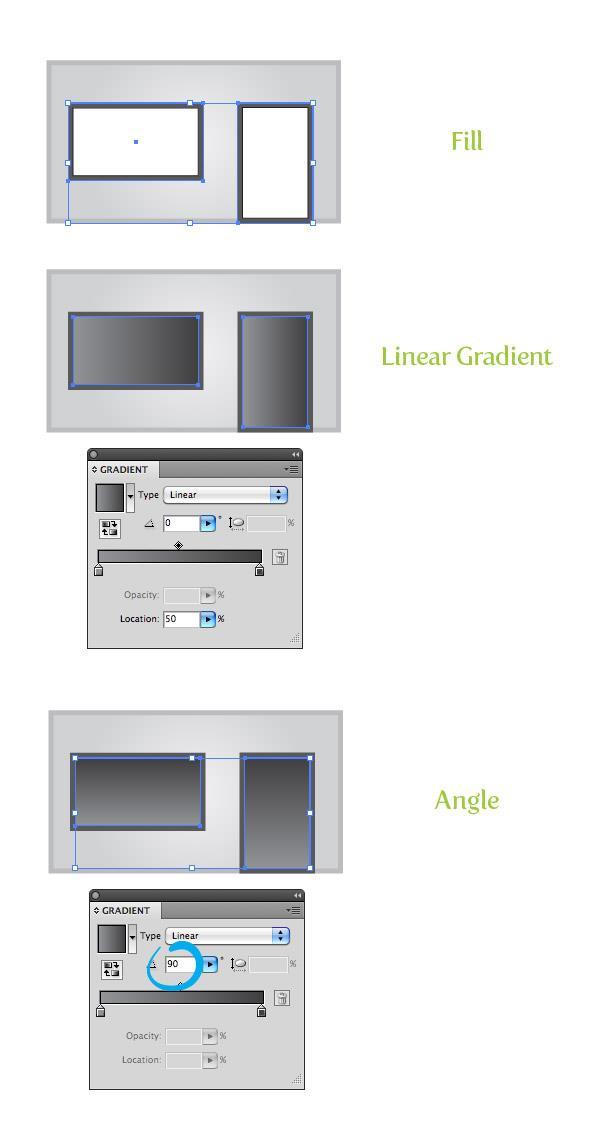
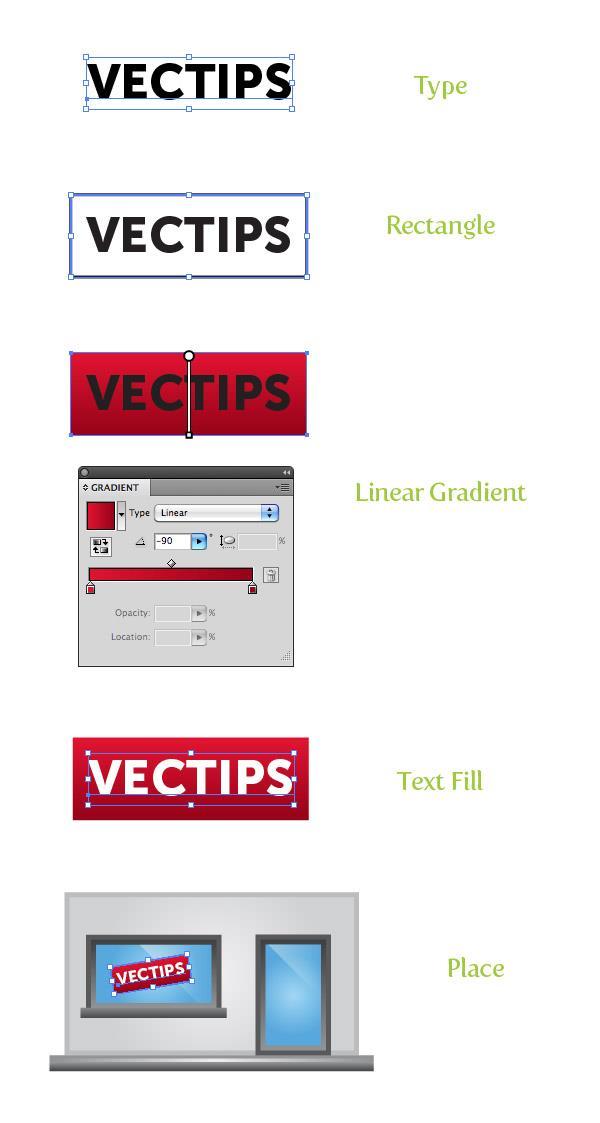
1 Create a Simple Storefront Icon In this tutorial I will show you how to create a simple storefront icon using some rectangles, Illustrator Effects, and gradients. This icon is great for use in e-commerce sites and the techniques in this tutorial can easily be applied to other icons, illustrations, and logos. Final Image Below is the final icon we will be working towards. Tutorial Details Program: Adobe Illustrator CS4 Difficulty: Beginner / Intermediate Topics Covered: Rectangle Tool, Gradients, Bulge Warp Estimated Completion Time: 30 min 1 hour Step 1 Create a new document and create a rectangle with the Rectangle tool (M). Keep this rectangle about half as long as it is tall. Within the rectangle, create two more rectangles. One will be the window and the second will be a door.
2 Step 2 Select all the rectangles and go Object > Path > Offset. In the Offset dialog, change the Offset to -5 px. This value might be different depending on the the original size of your rectangles.

3 Step 3 Select your main store shape and fill it with a gray color. Select the offset of the main store shape a fill it with a radial gradient from the Gradient panel. Change the first color stop in the radial gradient to a light gray and the second color stop to a gray slightly lighter than the main store shape color.

4 Step 4 Select both main window and door shapes and fill them with a dark gray. Next, select the offset window and door shapes and fill them with a linear gradient. Change the first swatch in the linear gradient to a gray lighter then the original window and door shapes and the second swatch a darker gray then the original window and door shapes. Change the angle to 90 from the Gradient panel.
5
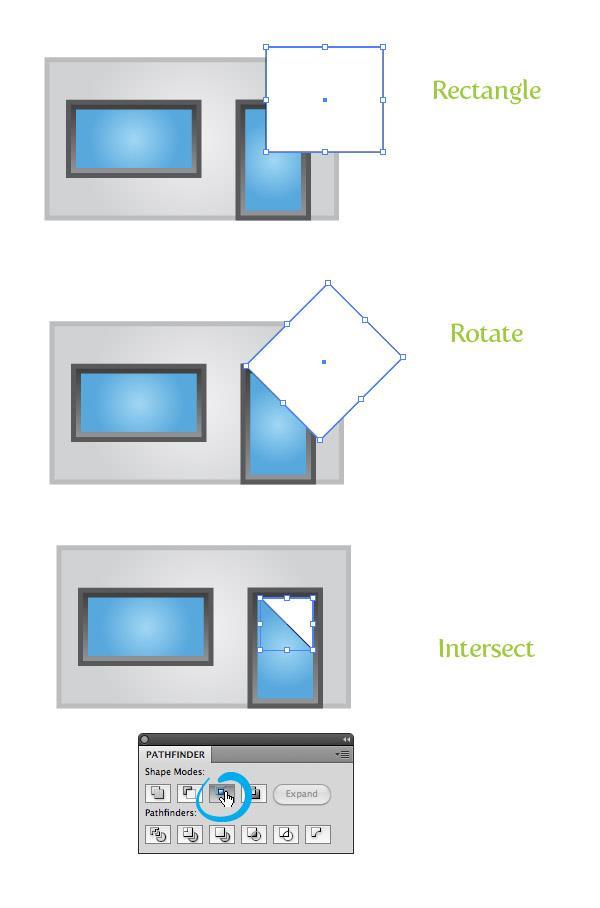
6 Step 5 Select both the window and door offsets and go Object > Path > Offset. In the Offset dialog, change the Offset to -5 px. Change the fill of the new offset to a radial gradient with the first color stop a light cyan color and the second color stop to a darker cyan color.

7
, hold the Shift key and rotate the rectangle 45 degrees. Place the rotated rectangle over the top right side of the door.")
8 Step 6 Select both the new offsets and Copy (Command + C) and Paste in Front (F). Step 7 With the Rectangle tool (M), create a rectangle about one half the width of the door. With the Selection tool (V), hold the Shift key and rotate the rectangle 45 degrees. Place the rotated rectangle over the top right side of the door. Select the cyan door copy and the rectangle and press the Intersect button from the Pathfinder panel.
9 Step 8
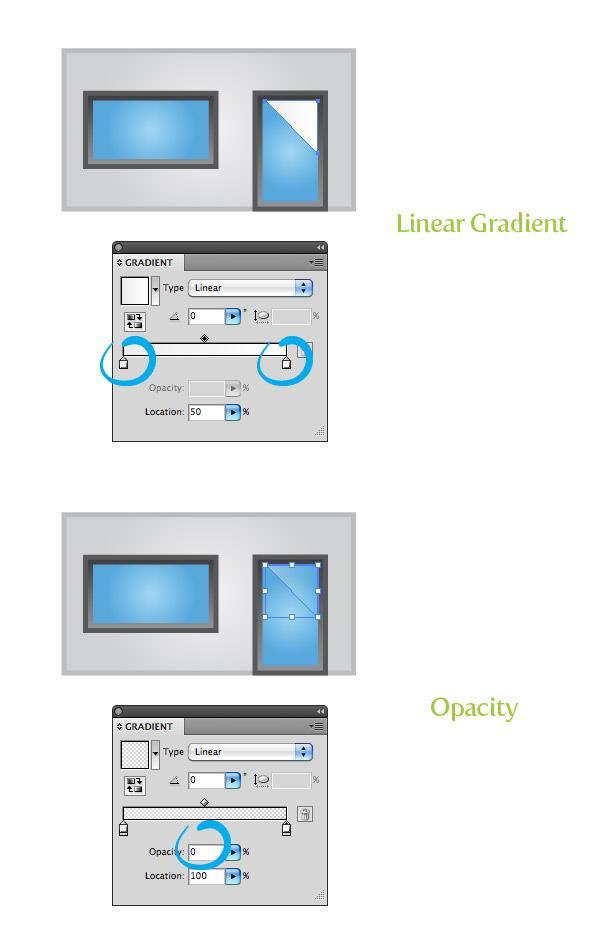
10 Fill the new intersected shape with a linear gradient and change both color stops to white. Select the first white color stop and change the Opacity 45 and change the second white color stop s opacity to 0 from the Gradient panel.
11
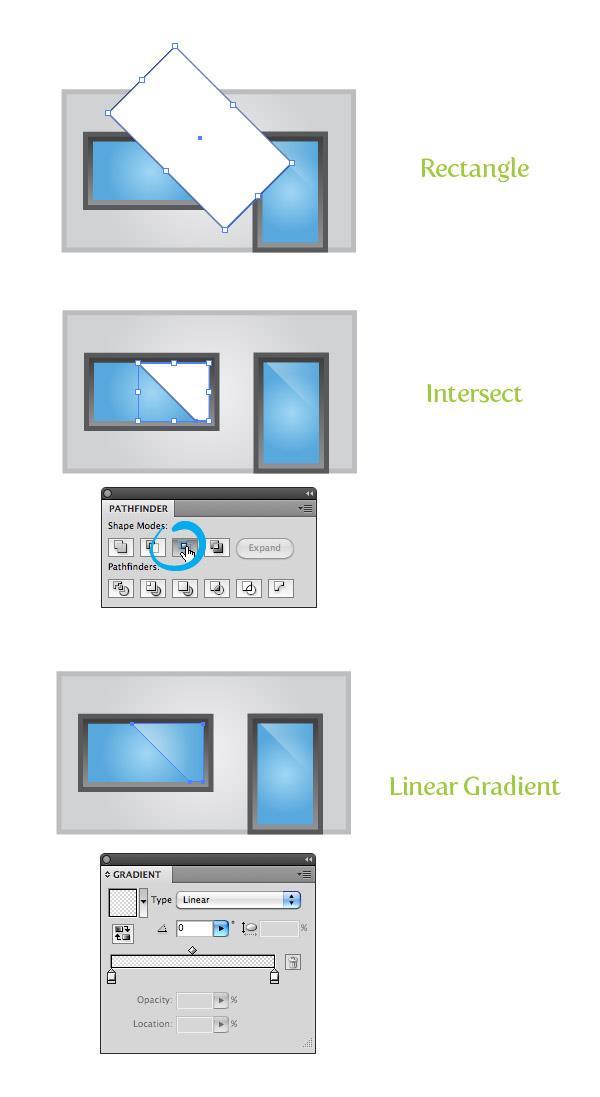
12 Step 9 Repeat steps 7 and 8 for the window.
13
14 Step 10 Create a thin rectangle slightly wider then the main store shape and place right below the main store shape. Fill the new rectangle with the same linear gradient as the first offset window and door shapes. Adjust the gradient with the Gradient tool (G) from top to bottom so the lighter part of the gradient is at the top of the rectangle. Step 11 Create another rectangle about one fourth the height of the previous rectangle and place it inside the previous rectangle. Fill the new rectangle with a linear gradient. For this gradient we need to add another color stop to the gradient. Simply click right below the center of the Gradient Slider in the Gradient panel. Now that there is

15 three color stops, fill the first with the same lighter gray as in the previous rectangle, the second color stop white, and the third the same gray as the first color stop. Step 12 Create another thin rectangle, fill it will the same gradient and the main rectangle at the bottom of the store, and place below the window.
.")
16 Step 13 To add some life to the store we can create a simple sign for the window. Start by typing out some text and change the font size to fit within the window. Create a rectangle slightly bigger than your text and go Object > Arrange > Send Backward (Command + [ ). Fill the rectangle in with a linear gradient with the first color stop red and the second a dark red. Adjust the gradient so the lighter part of it is at the top of the rectangle. Next, fill the text in with white. To complete the sign, select the text and rectangle, slightly rotate with the Selection tool (V), and place over the window.
17
18 Step 14 To add just a little more, create a small rectangle and fill it with a dark grate color for the door handle. Step 15 Now on to the store awning. Create a rectangle that a little taller than the main door shape, half the width of the door, and fill it with red. With the new rectangle selected, go Effect > Stylize > Round Corners. In the Round Corners dialog, change the Radius to 20 px. Like your offsets, this might be bigger or smaller depending on the size of your building. Next, go Object > Expand Appearance. Create a rectangle to cutoff the top rounded corners of the rectangle, select both shapes, and press the Minus Front button from the Pathfinder panel.

19 Step 16 With the Selection tool (V) hold down the Shift key and the Alt / Option key (Shift constrains movements and Alt / Option copies) and drag a copy of the red shape to the right side of the original. Change the fill of the the copy to a light gray. Select both shapes and drag out copies like you just did, making sure they line up with the right side of the gray shape. Again, select all the shapes (you should have a total of four) and drag out a copy to the right of the last shapes. You should now have a total of eight shapes. When dragging out the copies, I like to have Smart Guides enabled ( Command U). Having smart guide activated, will snap object together when editing the shapes, making it a lot easier. For more info on Smart Guides, check my quick tip The Power of Smart Guides.

20 Step 17 Select all the awning shapes and group the objects (Object > Group). Then go Effects > Warp > Bulge. In the Warp Options dialog, check Vertical, Change the bend to 40, Horizontal Distortion to 0, and the Vertical Distortion to 28. Next, go Object > Expand Appearance.
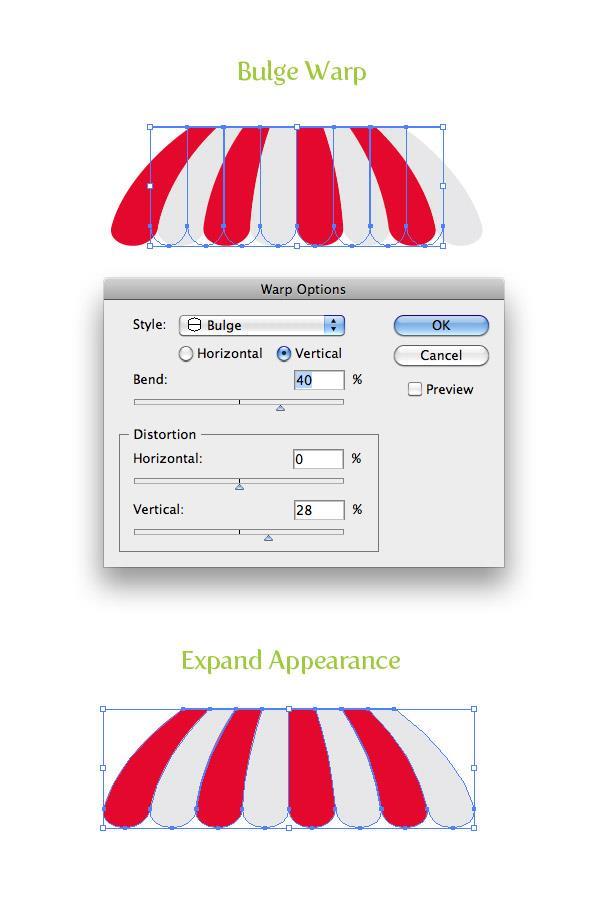
21 Step 18
22 Select the red shapes and fill them with a linear gradient. Add two color stops to the gradient so you have a total of four. Change the first color stop to red, the second to lighter red, the third to red, and the last on to a dark red. With the Gradient tool (G) adjust the gradient from top to bottom. In the gradient panel, change the Location of the third color swatch to 80 and the location of the second color stop to 55. Step 19

23 Select the gray shapes in the awning and repeat the previous steps but change the first color stop to a light gray, the second to white, third to light gray, and the fourth to gray. Place all the awning shape over the top of the store. Step 20
24 Select the main store body shape, Copy (Command C ), and Paste in Front (Command + F). Select all the awing shapes,, Copy (Command C ), and Paste in Back (Command + B). With The shapes still selected, move them down slightly and Group (Command G) them together. Select the copied awning shapes and the copied building shape, hold down the Alt / Option key, press the Intersect button from the Pathfinder panel, and then press the Expand button from the Pathfinder panel. Fill the new shape with a linear gradient with the first color stop a gray color and the second a darker gray color. Adjust the gradient with the Gradient tool (G) so the light part of the gradient is at the bottom of the shape.

25

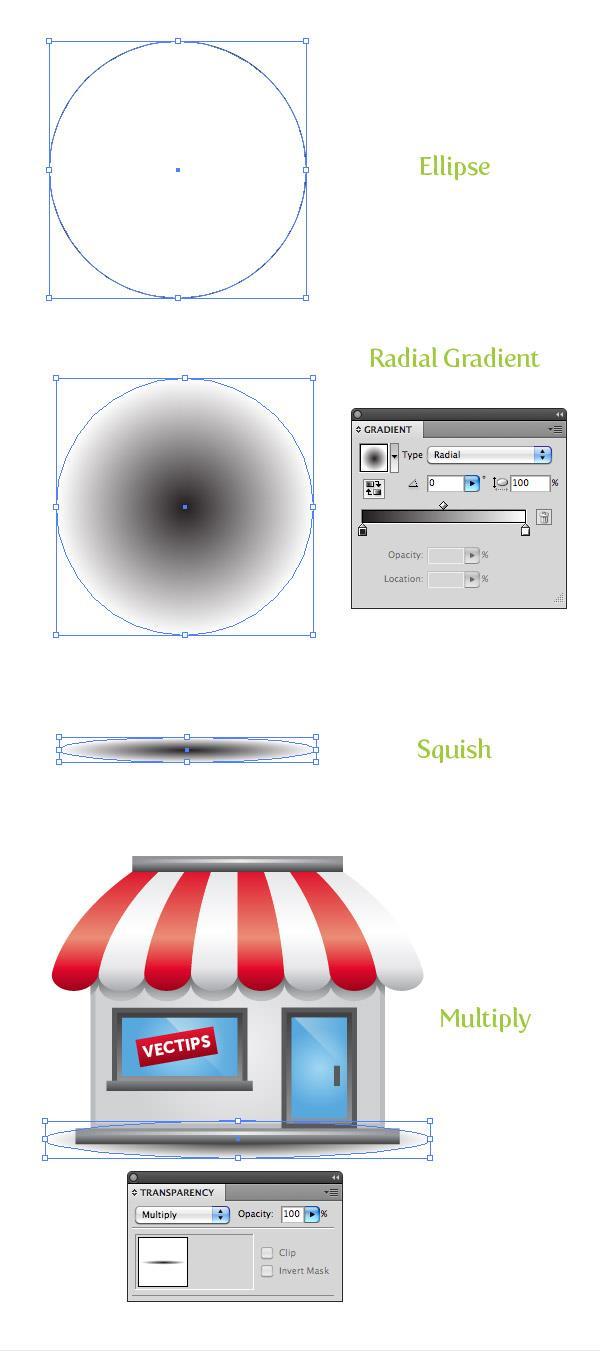
26 Step 21 Select the bottom two long thin rectangle, Copy (Command + C) and Paste (Command + V). Move the copies to the top of the awning and scale them horizontally matching the top width of the awning shapes. Step 22 Create an ellipse a little wider than your main store shape with the Ellipse tool (L), fill with a radial gradient, change the first color stop to black, and the second to white. Squish the ellipse with the Selection tool (V) to about an eighth of its original size, and place behind and towards the bottom of the artwork. Set the Blending Mode of the ellipse to Multiply from the Transparency panel and you are all done!
27
28 Final Image Below is the final image again.
Create A Briefcase Icon
 Create A Briefcase Icon In this tutorial, I will show you how to create a briefcase icon with rectangles, ellipses, and gradients. This briefcase icon is great for web designs and user interfaces. Moreover,
Create a Stylized GPS Icon
 Home About Resources Contact Shop Tutorials Tips and Tricks Interviews Inspiration Create a Stylized GPS Icon Tutorials July 9th, 2009 Location based software and peripherals are very popular these days.
Create a Happy Sun Character. Below is the final illustration we will be working towards.
 Create a Happy Sun Character Below is the final illustration we will be working towards. 1 Step 1 Create a new document and with the Ellipse tool (L), create an ellipse. 2 Step 2 Fill the ellipse with
ADOBE ILLUSTRATOR. Step 1. Dificultad: Intermedio Tiempo: 30 minutos 1 hora. Create a new document and with the Ellipse tool (L), create an ellipse.
, create an ellipse.") Dificultad: Intermedio Tiempo: 30 minutos 1 hora Step 1 Create a new document and with the Ellipse tool (L), create an ellipse. Lic. José Luis Solórzano Vera Página 1 Step 2 Fill the ellipse with a radial
Dificultad: Intermedio Tiempo: 30 minutos 1 hora Step 1 Create a new document and with the Ellipse tool (L), create an ellipse. Lic. José Luis Solórzano Vera Página 1 Step 2 Fill the ellipse with a radial
Step 1. Blue Bird Tutorial
 Blue Bird Tutorial Using some basic shapes, effects, and gradients I will show you how to create a Twitter mascot for your blog or website. Twitter is a popular free web service for social networking and
Create a Twitter Style Bird Mascot - Vectortuts+
 Create a Twitter Style Bird Mascot Aug 4th in Illustration by Rype Using some basic shapes, effects, and gradients I will show you how to create a Twitter mascot for your blog or website. Twitter is a
HOW TO CREATE A SUPER SHINY PENCIL ICON
 HOW TO CREATE A SUPER SHINY PENCIL ICON Tutorial from http://psd.tutsplus.com/ Compiled by INTRODUCTION The Pencil is one of the visual metaphors most used to express creativity. In this tutorial,
How to Create a Curious Owl in Illustrator
 How to Create a Curious Owl in Illustrator Tutorial Details Program: Adobe Illustrator Difficulty: Intermediate Estimated Completion Time: 1.5 hours Take a look at what we're aiming for, an inquisitive
How to Create Animated Vector Icons in Adobe Illustrator and Photoshop
 How to Create Animated Vector Icons in Adobe Illustrator and Photoshop by Mary Winkler (Illustrator CC) What You'll Be Creating Animating vector icons and designs is made easy with Adobe Illustrator and
Step 1. Facebook Twitter Google+ Find us on Facebook. Vectortuts+ How to Create a Curious Owl in Illustrator CS4 Vectortuts+
 Joomla developers needed - Long term potential in India Copywriter Email Campaigns Wordpress Creative design Social media in UK More Freelance Jobs... Facebook Twitter Google+ Find us on Facebook Step
Adobe Illustrator. Mountain Sunset
 Adobe Illustrator Mountain Sunset Adobe Illustrator Mountain Sunset Introduction Today we re going to be doing a very simple yet very appealing mountain sunset tutorial. You can see the finished product
Drawing the Red Christmas Bell
 Vector 3D Christmas Bells Thinking of drawing some Christmas bells for this Christmas? Read this illustrator tutorial to learn how to draw 5 different styles of vector Christmas bells using the 3D Revolve
Adobe Photoshop CC 2018 Tutorial
 Adobe Photoshop CC 2018 Tutorial GETTING STARTED Adobe Photoshop CC 2018 is a popular image editing software that provides a work environment consistent with Adobe Illustrator, Adobe InDesign, Adobe Photoshop,
How to Create a Landscape Wallpaper for your Desktop
 How to Create a Landscape Wallpaper for your Desktop Why not create a vector landscape wallpaper? In this simple tutorial, you will learn how to create an eye-appealing wallpaper quickly and effectively.
Adobe Photoshop CS5 Tutorial
 Adobe Photoshop CS5 Tutorial GETTING STARTED Adobe Photoshop CS5 is a popular image editing software that provides a work environment consistent with Adobe Illustrator, Adobe InDesign, Adobe Photoshop
Part 1- Fundamental Functions
 Part 1- Fundamental Functions Note: Alt+Tab will allow you to move between programs in the docker. Shift+Tab removes right pallets Tab removes all pallets Ctrl+1= centers art board Ctrl + 0= fill window
ADOBE PHOTOSHOP CS TUTORIAL
 ADOBE PHOTOSHOP CS TUTORIAL A D O B E P H O T O S H O P C S Adobe Photoshop CS is a popular image editing software that provides a work environment consistent with Adobe Illustrator, Adobe InDesign, Adobe
METAL TEXT EFFECT. Step 1: Create A New Document. Step 2: Fill The Background With Black
 METAL TEXT EFFECT In this text effects tutorial, we ll learn how to easily create metal text, a popular effect widely used in video games and movie posters! It may seem like there s a lot of steps involved,
Digital Photography 1
 Digital Photography 1 Photoshop Lesson 3 Resizing and transforming images Name Date Create a new image 1. Choose File > New. 2. In the New dialog box, type a name for the image. 3. Choose document size
Undress a Giraffe in Photoshop
 Undress a Giraffe in Photoshop By: Alexandra Fomicheva Have you ever wanted to know what a Giraffe looks like without its spots? If so, this tutorial is for you, you pervert! Today, we will demonstrate
12. Creating a Product Mockup in Perspective
 12. Creating a Product Mockup in Perspective Lesson overview In this lesson, you ll learn how to do the following: Understand perspective drawing. Use grid presets. Adjust the perspective grid. Draw and
By Washan Najat Nawi
 By Washan Najat Nawi how to get started how to use the interface how to modify images with basic editing skills Adobe Photoshop: is a popular image-editing software. Two general usage of Photoshop Creating
A quick note: We hope that you will find something from the Tips and Tricks that will add a little pizazz to your yearbook pages!
 A quick note: The following pages are tips and tricks for Basic Photoshop users. You may notice that some instructions indicate that non-awpc fonts were used, and that some colors were created using the
TEXT PERSPECTIVE SHADOW EFFECT
 TEXT PERSPECTIVE SHADOW EFFECT In this Photoshop text effects tutorial, we ll learn how to create a popular, classic effect by giving text a perspective shadow as if a light source behind the text was
PHOTOSHOP & ILLUSTRATOR BOOTCAMP
 FALL 2014 - ELIZABETH LIN PHOTOSHOP & ILLUSTRATOR BOOTCAMP ILLUSTRATOR ALIGNMENT To access the alignment panel, go to Window -> Align. You should see a panel like the one below. This panel allows you to
All Creative Suite Design documents are saved in the same way. Click the Save or Save As (if saving for the first time) command on the File menu to
 command on the File menu to") 1 The Application bar is new in the CS4 applications. It combines the menu bar with control buttons that allow you to perform tasks such as arranging multiple documents or changing the workspace view.
1 The Application bar is new in the CS4 applications. It combines the menu bar with control buttons that allow you to perform tasks such as arranging multiple documents or changing the workspace view.
The original image. Let s get started! The final effect.
 Non-Destructive Infrared Glow Effect In this Photoshop tutorial, we ll learn how to quickly and easily add a dream-like infrared glow effect to an image, and we ll do it non-destructively using Smart Filters
GETTING STARTED. 0 P a g e B a s i c s o f A d o b e P h o t o s h o p A g a P r i v a t e I n s t i t u t e f o r c o m p u t e r s c i e n c e
 GETTING STARTED 0 P a g e B a s i c s o f A d o b e P h o t o s h o p Adobe Photoshop: is a popular image editing software that provides a work environment consistent with Adobe Illustrator, Adobe InDesign,
A Classic Icon. Overview: Finding different ways to construct the same iconic image.
 A Classic Icon Five Ways to Re-create Simple Shapes Overview: Finding different ways to construct the same iconic image. You can construct even the simplest of iconic images in many ways. Patricia McShane
The original image. Let s get started! The final rainbow effect. The photo sits on the Background layer in the Layers panel.
 Add A Realistic Rainbow To A Photo In this Photoshop photo effects tutorial, we ll learn how to easily add a rainbow, and even a double rainbow, to a photo! As we ll see, Photoshop ships with a ready-made
COLORIZING IMAGES WITH GRADIENT MAPS
 COLORIZING IMAGES WITH GRADIENT MAPS In this Photoshop tutorial, we ll learn how to add complex colorizing effects to images using custom gradients! Specifically, we ll look at the Gradient Map image adjustment
Lab for Working with Adobe Photoshop
 Lab for Working with Adobe Photoshop Try the tasks listed with one of the sample images supplied (You will find them in the Course Materials section of Blackboard as the file sample_images.zip. You will
Introduction to Photoshop
 Introduction to Photoshop Photoshop Creative Cloud (CC) Start -> All Programs -> Classes -> Web Expressions -> Tutorials Google Photoshop CC tutorial Color Replacement Image -> Adjustments -> Replace
Perspective Shadow Text Effect In Photoshop
 Perspective Shadow Text Effect In Photoshop Written by Steve Patterson. In this Photoshop text effects tutorial, we ll learn how to create a popular, classic effect by giving text a perspective shadow
ADD TRANSPARENT TYPE TO AN IMAGE
 ADD TRANSPARENT TYPE TO AN IMAGE In this Photoshop tutorial, we re going to learn how to add transparent type to an image. There s lots of different ways to make type transparent in Photoshop, and in this
Movie Merchandising. Movie Poster. Open the Poster Background.psd file. Open the Cloud.jpg file.
 Movie Poster Open the Poster Background.psd file. Open the Cloud.jpg file. Movie Merchandising Choose Image>Adjustments>Desaturate to make it a grayscale image. Select the Move tool in the Toolbar and
Create a Cute Furry Vector Monster in Illustrator
 Create a Cute Furry Vector Monster in Illustrator Other labs from this author can be found at http://www.blog.spoongraphics.co.uk/tutorials/create-a-cute-furry-vector-monster-inillustrator Follow these
Tips & Techniques - Materials
 Tips & Techniques - Materials Materials: How to Create a Spherical Map With Corrections For Distortion Download: Project Works with: GO, SE, XL Requires: Version Special Notes: Special Thanks to Chris
Chapter 8. Working with Transparency, Effects, and Graphic Styles and Recoloring Artwork Delmar, Cengage Learning
 Chapter 8 Working with Transparency, Effects, and Graphic Styles and Recoloring Artwork 2011 Delmar, Cengage Learning Objectives Use the Transparency panel and the Color Picker Recolor artwork Apply effects
Adobe Photoshop. Levels
 How to correct color Once you ve opened an image in Photoshop, you may want to adjust color quality or light levels, convert it to black and white, or correct color or lens distortions. This can improve
Adobe Illustrator Craft a Dramatic Vector Landscape Environment
 Adobe Illustrator Craft a Dramatic Vector Landscape Environment This tutorial will show the intermediate Adobe Illustrator artist how to make a dramatic landscape environment. You should have a basic understanding
A Basic Guide to Photoshop CS Adjustment Layers
 A Basic Guide to Photoshop CS Adjustment Layers Alvaro Guzman Photoshop CS4 has a new Panel named Adjustments, based on the Adjustment Layers of previous versions. These adjustments can be used for non-destructive
11 Advanced Layer Techniques
 11 Advanced Layer Techniques After you ve learned basic layer techniques, you can create more complex effects in your artwork using layer masks, path groups, filters, adjustment layers, and more style
COLORIZE A PHOTO WITH MULTIPLE COLORS
 COLORIZE A PHOTO WITH MULTIPLE COLORS In this Photoshop photo effects tutorial, we re going to learn how to colorize a photo using multiple colors. It s an effect I ve seen used quite a bit in ads for
LET S GET STARTED! Title: SANTA HEAD. Software: Serif DrawPlus X8. Author: TeejayJoyce. Website: Tutorials by Teejay. Skill Level: Intermediate
 Title: SANTA HEAD Software: Serif DrawPlus X8 Author: TeejayJoyce Website: Tutorials by Teejay Skill Level: Intermediate Supplies: None Description: This tutorial uses simple Quick shapes and Filter Effects
Downloaded From : Working with Photoshop 7.0
 Adobe Photoshop 1. Introduction What is Adobe Photoshop? Adobe Photoshop is a web designing software used for giving effects and filters to an image to make it more appealing and attractive. Brought out
A Basic Guide to Photoshop Adjustment Layers
 A Basic Guide to Photoshop Adjustment Layers Photoshop has a Panel named Adjustments, based on the Adjustment Layers of previous versions. These adjustments can be used for non-destructive editing, can
How to Create Website Banners
 How to Create Website Banners In the following instructions you will be creating banners in Adobe Photoshop Elements 6.0, using different images and fonts. The instructions will consist of finding images,
How to Draw a Realistic iphone 4 with
 Home Freebies Submit Your Work Contact Us How to Draw a Realistic iphone 4 with Photoshop Jan 3 2011 By Mohammad Jeprie 34 Comments In this tutorial, we will draw a realistic-looking iphone 4 using Photoshop.
Using Adobe Photoshop
 Using Adobe Photoshop 4 Colour is important in most art forms. For example, a painter needs to know how to select and mix colours to produce the right tones in a picture. A Photographer needs to understand
66 Photoshop 7 Image Effects
 Project 7: Engraving Collage STEP 1. Opening the Source Photos Choose File, Open (CtrI/Command+O) and open the Book\Sources\picO1.jpg, Book\Sources\pic_O2.jpg, and Book\Sources\picO3.jpg CD-ROM. files
Photoshop: Manipulating Photos
 Photoshop: Manipulating Photos All Labs must be uploaded to the University s web server and permissions set properly. In this lab we will be manipulating photos using a very small subset of all of Photoshop
Adobe Photoshop. How To Get Started With Adobe InDesign CC: 10 Things Beginners Want To Know How To Do TO START: 1) ZOOM, MOVE, RETOUCH (05:11)
 ZOOM, MOVE, RETOUCH (05:11)") Adobe Photoshop How To Get Started With Adobe InDesign CC: 10 Things Beginners Want To Know How To Do Video By Terry White Tutorial Sheet by Juliet Davis TO START: Open the tutorial in YouTube, download
Adobe Photoshop How To Get Started With Adobe InDesign CC: 10 Things Beginners Want To Know How To Do Video By Terry White Tutorial Sheet by Juliet Davis TO START: Open the tutorial in YouTube, download
You ve Been Framed! (Adobe Photoshop)
") You ve Been Framed! (Adobe Photoshop) Tip of the Week by Linda Sattgast on September 28, 2009 Do you have a great photo of someone special that you want to bring into sharp focus the special person, that
You ve Been Framed! (Adobe Photoshop) Tip of the Week by Linda Sattgast on September 28, 2009 Do you have a great photo of someone special that you want to bring into sharp focus the special person, that
TURN A PHOTO INTO A PATTERN OF COLORED DOTS (CS6)
") TURN A PHOTO INTO A PATTERN OF COLORED DOTS (CS6) In this photo effects tutorial, we ll learn how to turn a photo into a pattern of solid-colored dots! As we ll see, all it takes to create the effect is
TURN A PHOTO INTO A PATTERN OF COLORED DOTS (CS6) In this photo effects tutorial, we ll learn how to turn a photo into a pattern of solid-colored dots! As we ll see, all it takes to create the effect is
IMAGE CORRECTION. You can find this and more information with video tutorials at
 IMAGE CORRECTION You can find this and more information with video tutorials at http://www.adobe.com/support/photoshop/ P H O T O S H O P T O O L S CLONE STAMP TOOL The Clone Stamp tool paints one part
Creating Digital Illustrations for Your Research Workshop IV Illustration Demo Part II
 Creating Digital Illustrations for Your Research Workshop IV Illustration Demo Part II Final Figure Workshop IV Components Topics & Techniques covered How to randomly transform a group of individual shapes.
Converting a solid to a sheet metal part tutorial
 Converting a solid to a sheet metal part tutorial Introduction Sometimes it is easier to start with a solid and convert it to create a sheet metal part. This tutorial will guide you through the process
FLAMING HOT FIRE TEXT
 FLAMING HOT FIRE TEXT In this Photoshop text effects tutorial, we re going to learn how to create a fire text effect, engulfing our letters in burning hot flames. We ll be using Photoshop s powerful Liquify
Silhouette Connect Layout... 4 The Preview Window... 5 Undo/Redo... 5 Navigational Zoom Tools... 5 Cut Options... 6
 user s manual Table of Contents Introduction... 3 Sending Designs to Silhouette Connect... 3 Sending a Design to Silhouette Connect from Adobe Illustrator... 3 Sending a Design to Silhouette Connect from
The original image. The final rainbow effect.
 ADD A realistic rainbow to a photo In this Photoshop photo effects tutorial, we re going to learn how to easily add a rainbow, even a double rainbow, to a photo. Of course, as with most photo effects,
Colorizing A Photo With Multiple Colors In Photoshop
 Colorizing A Photo With Multiple Colors In Photoshop Written by Steve Patterson. In this Photoshop Effects tutorial, we re going to learn how to colorize a photo using multiple colors. It s an effect I
Lesson 16 Text, Layer Effects, & Filters
 Lesson 16 Text, Layer Effects, & Filters Digital Media I Susan M. Raymond West High School In this tutorial, you will: Create a Type Layer Add and Format Type within a Type Layer Apply Layer Effects Apply
Clipping Masks And Type Placing An Image In Text With Photoshop
 Clipping Masks And Type Placing An Image In Text With Photoshop Written by Steve Patterson. In a previous tutorial, we learned the basics and essentials of using clipping masks in Photoshop to hide unwanted
PanosFX CARTOONS User guide PANOSFX CARTOONS. Photoshop actions - for PS CC, CS6, CS5, CS4, CS3. User Guide
 PANOSFX CARTOONS Photoshop actions - for PS CC, CS6, CS5, CS4, CS3 User Guide CONTENTS 1. THE BASICS... 1 1.1. About the effects... 1 1.2. How the actions are organized... 1 1.3. Installing the actions
Step 1: Create A New Photoshop Document
 Film Strip Photo Collage - Part 2 In part one of this two-part Photoshop tutorial, we learned how Photoshop s shape tools made it easy to draw a simple film strip which we can then use as a photo frame,
Add A Transparent Text Area To An Image With Photoshop
 Add A Transparent Text Area To An Image With Photoshop Written by Steve Patterson. In this Photoshop tutorial, we ll learn how to add an area of transparent text to an image. By that, I mean the text itself
BORDERS AND FRAMES - DROP SHADOW
 BORDERS AND FRAMES - DROP SHADOW In this tutorial in our series on creating photo borders and frames in Photoshop, we ll learn how to quickly add canvas space and a drop shadow to an image to create a
Illustrator Tutorial - Create a Gang of Vector Ninjas
 Blog.SpoonGraphics - Design Tutorials and Free Vector Downloads Illustrator Tutorial - Create a Gang of Vector Ninjas Free Vector Illustrations Download Amazing Illustrations. Join istockphoto For Free
SCRAPENDIPITY Designs. Electric Quilt 7 Tutorial. Building a Quilt
 Electric Quilt 7 Tutorial Building a Quilt When you start Electric Quilt up, you will see this screen. Type the name of your quilt and hit OK Now we need to make sure we have the correct layout. Go to
Drawing with precision
 Drawing with precision Welcome to Corel DESIGNER, a comprehensive vector-based drawing application for creating technical graphics. Precision is essential in creating technical graphics. This tutorial
NMC Second Life Educator s Skills Series: How to Make a T-Shirt
 NMC Second Life Educator s Skills Series: How to Make a T-Shirt Creating a t-shirt is a great way to welcome guests or students to Second Life and create school/event spirit. This article of clothing could
Winter Card.
 Winter Card Used images: http://www.cgtextures.com/texview.php?id=24321&phpsessid=95e8e8290894cc5194898 e16d1dddb4c http://www.cgtextures.com/texview.php?id=14285&phpsessid=95e8e8290894cc5194898 e16d1dddb4c
Everything you ever wanted to know about Layer Styles with Adobe Photoshop CS3 - CS5
 Everything you ever wanted to know about Layer Styles with Adobe Photoshop CS3 - CS5 A layer style is one or more effects applied to a layer or layer group. You can apply one of the preset styles provided
Welcome to Corel DESIGNER, a comprehensive vector-based package for technical graphic users and technical illustrators.
 Workspace tour Welcome to Corel DESIGNER, a comprehensive vector-based package for technical graphic users and technical illustrators. This tutorial will help you become familiar with the terminology and
Adobe Photoshop CS5 ACE
 Adobe Photoshop CS5 ACE Number: A9A0-150 Passing Score: 800 Time Limit: 120 min File Version: 1.0 Sections 1. Selection Tools Exam A QUESTION 1 John creates a circular selection with Elliptical Marquee
Step 1: Select The Main Subject In The Photo
 Create A custom Motion Trail from your subject In this Photoshop photo effects tutorial, we ll learn how to add a sense of action and movement to an image by giving the main subject an easy to create motion
WORN, TORN PHOTO EDGES EFFECT
 Photo Effects: CC - Worn, Torn Photo Edges Effect WORN, TORN PHOTO EDGES EFFECT In this Photoshop tutorial, we ll learn how to take the normally sharp, straight edges of an image and make them look all
Photo Within A Photo - Photoshop
 Photo Within A Photo - Photoshop Here s the image I ll be starting with: The original image. And here s what the final "photo within a photo" effect will look like: The final result. Let s get started!
Create a Thanksgiving Illustration With Basic Shapes Using Illustrator - Tuts+ Design & Illustration Tutorial
 Our 2015 Halloween theme is here! Join us for The Wizard of Oz inspired tutorials VIEW MORE All Topics Find tutorials, courses, and more...! ) " Design & Illustration Categories # Learning Guides # Forum
Photoshop Backgrounds: Turn Any Photo Into A Background
 Photoshop Backgrounds: Turn Any Photo Into A Background Step 1: Duplicate The Background Layer As always, we want to avoid doing any work on our original image, so before we do anything else, we need to
Color and More. Color basics
 Color and More In this lesson, you'll evaluate an image in terms of its overall tonal range (lightness, darkness, and contrast), its overall balance of color, and its overall appearance for areas that
Photoshop CS2. Step by Step Instructions Using Layers. Adobe. About Layers:
 About Layers: Layers allow you to work on one element of an image without disturbing the others. Think of layers as sheets of acetate stacked one on top of the other. You can see through transparent areas
Add Transparent Type To An Image With Photoshop
 Add Transparent Type To An Image With Photoshop Written by Steve Patterson. In this Photoshop Effects tutorial, we re going to learn how to add transparent type to an image. There s lots of different ways
Painting Special Effects on Photographs
 TUTORIAL 7 Painting Special Effects on Photographs In this tutorial you will learn how to transform a photo into a striking color composition with paintbrushes, masks, blending modes, color, and paper
When you first open the dialog box you only see two sliders.
 Shadow/Highlight Of course there will still be the times when you do not either remember to make two exposures or you have older images that are already exposed you can give Shadow/Highlight a try. I find
PHOTOSHOP DESIGN EFFECTS FOR INTERMEDIATE TO ADVANCED USERS
 PHOTOSHOP DESIGN EFFECTS FOR INTERMEDIATE TO ADVANCED USERS Copyright 2012, National Seminars Training Introduction This class is all about design effects in Adobe Photoshop. For example, let s say that
Create a new image: 10 IN height and 16 IN width, 300 dpi.
 The images needed for this project are on my website. Create a new image: 10 IN height and 16 IN width, 300 dpi. Create a new layer and fill the layer with white.. Create a radial gradient by using following
Session 3: Getting to Know Photoshop Elements. Keep in mind that there are many others ways of solving the problems.
 Tutorial Session 3: Getting to Know Photoshop Elements Now that you have taken some pictures you might have noticed that some of the images have little problems like red-eye, colorcast, and too dark or
Creating Flowers using Illustrator CS3 - CS5
 Creating Flowers using Illustrator CS3 - CS5 In this lesson you'll learn how to use the scale and copy to create flower shapes. Creating Gradients for fill color and use the Roughen filter, Twist, Zig
GIMP (GNU Image Manipulation Program) MANUAL
 MANUAL") Selection Tools Icon Tool Name Function Select Rectangle Select Ellipse Select Hand-drawn area (lasso tool) Select Contiguous Region (magic wand) Selects a rectangular area, drawn from upper left (or lower
Selection Tools Icon Tool Name Function Select Rectangle Select Ellipse Select Hand-drawn area (lasso tool) Select Contiguous Region (magic wand) Selects a rectangular area, drawn from upper left (or lower
Exploring Photoshop Tutorial
 Exploring Photoshop Tutorial Objective: In this tutorial we will create a poster composed of three distinct elements: a Bokeh, an image and title text. The Bokeh is an effect which is sometimes seen in
Modeling an Airframe Tutorial
 EAA SOLIDWORKS University p 1/11 Difficulty: Intermediate Time: 1 hour As an Intermediate Tutorial, it is assumed that you have completed the Quick Start Tutorial and know how to sketch in 2D and 3D. If
Project 25 Page 1 ` JAZZ POSTCARD
 Project 25 Page 1 ` JAZZ POSTCARD Reset all tools! Create the Background 1. Create a new RGB document, 4.25 in. wide by 5.75 in. high at 100 dpi with a white background. 2. Click the foreground color swatch
PhotoFiltre DEPARTMENT OF EDUCATION
 DEPARTMENT OF EDUCATION PhotoFiltre Updated on 20 February 2010 This resource is part of the resource collection available through the ecentre for teachers. www.ecentre.education.tas.gov.au PhotoFiltre
GRINDHOUSE MOVIE POSTERS
 Follow the instructions below to create a grindhouse style movie poster for your short film. You can also see a detailed video tutorial here: http://www.youtube.com/watch?v=-drhbfvhft0 GOOD LUCK!! CREATING
HIGH KEY GLOW EFFECT IN PHOTOSHOP
 HIGH KEY GLOW EFFECT IN PHOTOSHOP In this Photoshop tutorial, we ll learn how to create a high key glow effect, which is a fancy way of saying we ll be applying a glow only to the highlights in an image.
SURREALISM IN PHOTOSHOP
 SURREALISM IN PHOTOSHOP In this tutorial your aim is to create a surrealist inspired image using Photoshop. You will combine a selection of images in an illogical, non realistic manner. Set up a folder
LaGuardia Community College Thomson Ave, Long Island City, New York Created by ISMD s Dept. Training Team. Overview. Basic Hair Selection
 Overview If you want to get into Photoshop compositing, one of the first features you'll have to conquer is selections. If you've ever tried selecting people (especially people with wispy hair) from one