Copyright Gary Faulkner March Attack All rights reserved.
|
|
|
- Cameron Scott
- 6 years ago
- Views:
Transcription


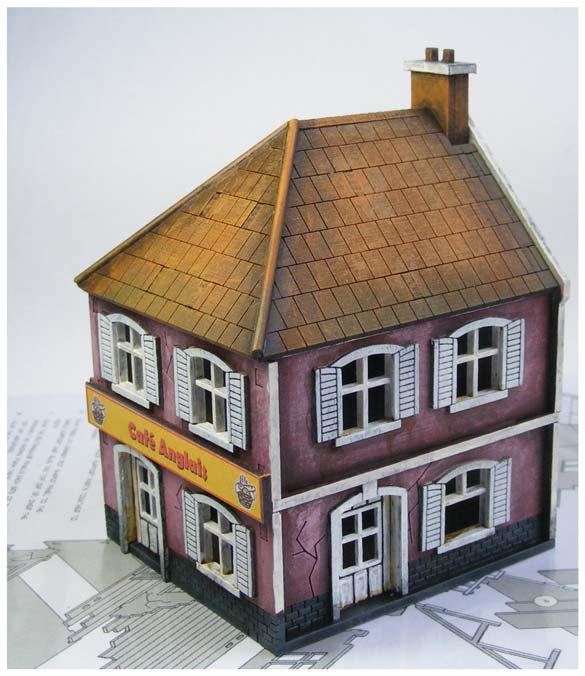
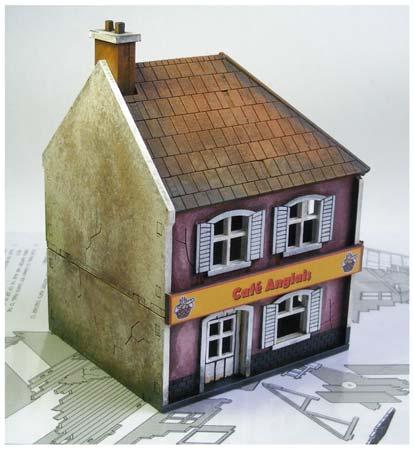
1 Painting and Decorating Sometime passed I posted some painted 28mm Sarissa WWE buildings on to the March Attack Face Book page and had a few show and tell us s, so here goes. If you meet me at the odd trade show in the year and ask me How do you paint these? I will usually start by acting very serious and tell you to fill and boil a kettle, put a tea bag in a mug and make a cup of tea. Well I m suggesting you do the same here. Why? Well you might as well enjoy a cup of tea while you enjoy painting your Sarissa Kits. First off this picture info thingy uses a 15mm Sarissa WWE kit, the methods shown would be the same for all kits with a few variations depending on the era and complexity. Start Always look at the instructions and find the parts referred to in the text and diagrams. Decide what you want the final build to look like, your colours, painted inside and out and what parts you can assemble before painting. Once your decided go for it. info@marchattack.co.uk I decided to leave the card doors shut and to glue the doors in place before painting. I often choose to not glue them in and paint them on card but here they are white and easier to have glued in. I use a thick superglue, its quick and doesn t spill. I can be a kluts and superglue is a real nightmare. The liquid also gasses off badly and you re going to get an headache sniffing it. Once the glue is dry, put a base coat down on the interior walls I m using testor pots of emulsion. This isn t a sealing coat as such, just a covering coat to get the texture of the MDF raised so you can dry brush your heart out and use the texture to good effect. I do also spray prime if I m painting a batch of kits. The nice thing with the emulsion is it dries really quick so you can work on to it fast. It is also porous so inks and tint shades can work well. You will note I ve left the bits on card, it makes life easy for small kits. If the parts have come free just sit them back in place to paint them. Next I started to add corner shading. Again emulsion. Just rough around the edges and areas I want to appear grimy. As you ll see here I use a variety of paints. This kit came with MDF and card detailing parts. I then put a coat or two of lighter shades on, dry brush these. Each coat of emulsion will leave brush marks and give more of a textured ground to get more texture


2 If you look closely you ll see the brushes I use are as rough as nails. These started off and good quality brushes and have just been worn into shape by constant use. As a result they are just perfect for getting a mix of effects. I don t just brush the paint on. I stipple poking the brush onto the panel. Allow a little time between coats. If you work into it too quickly the paint can lift in clumps. This can be good if your looking for that painted over flaky paint look. Time to put the kettle on again. Turn Over and Start Again Many people still ask if the MDF will soak up all the paint, drink water and warp If you soak it, it will. Don t soak it. If you re really worried, paint both sides fast. Even if it does warp a little, you can always bend it back. info@marchattack.co.uk Assembly part 1 All parts off the cards Don t panic, if you don t fancy this brash act of confidence take them off part by part. I normally start by assembling the roof panels. Next is the outside and some inside panels using the same base coat. Here you will see a hipped roof, means it slopes on an end as well as the sides. This bit doesn t come with the kit and is something I like to do. What you can see is 2mm plastic rod (styrene type modelling plastic) glued into the grooved joint between the roof panels. With the parts still on the card, I decided to paint the inside panels before getting ready to assemble. Here it s the 2 floors and the roof supports. Tea? if you insist.


3 The bulldog clip is holding the chimney panels in place. Its not essential but can help. Assemble the walls to the floors and while they dry put the 1 st coat of paint onto the card parts. Again you don t need wet paint. I stipple it in place as it gets the paint where I want it. info@marchattack.co.uk colour shows through. This becomes more noticeable as you add layers and lighter colours. Leave it all to dry before getting to the outside paintwork. Why the nail clippers? I use them to clean moulding worms from metal figures, and the little link bits on panel corners left when they are removed from the cards. It helps to tighten up the assembly. The knife is used to do the same on inside corners. Bright Isn t It? The nice thing about a not pre-painted kit The purpose of the dark brown 1 st coat becomes clear when I add the base colour coat. I wouldn t give it wall space at home but for a ground colour here it works really well. As with figure painting your ground coat will have an effect on the colour result of each coat you put on. You re not painting it on either. You can choose your colour scheme. As you see to the right of the yellow knife I remove excess paint from the brush before I dry brush onto the wall panels. This, along with the texture of the MDF and base coat, means your getting tonal effects where the base


4 Don t be too tidy with the dry brushing. Let the preceding colours show through. If you want damp patches put a patch of black on the base coat area. If you re not too heavy with the paint in that area it will show through and tone down the final colour. Roofs There s not a lot of difference to the painting tech used on roofs. Same dry brushing used. Here I use a modelling paint as it sticks better to the plastic rod on the joints. Add a little weathering to terracotta tiles, use a light ochre to suggest wear and green to age. Windows and Shutters This kit comes with card shutters to be glued on. Here I have decided to colour them white. I use 2 ways to paint my shutters and doors. Here I have just dry brushed over with white. I also paint them using the standard 3-colour method. Base, mid and highlight tones, painting each etched detail as shown by the door here. At the same time I have painted inside the window openings and a little to the wall face. This means if you miss align the frame it doesn t show so much and you don t have so much touching in.


5 Before buildings had damp courses, foundations made of concrete etc. many had brick foundations or were built on the ground directly. As a way to help prevent the brick disintegrating with water the lower courses of brick would be painted with pitch. Waterproof, not really but as a damp proof it did work. That s why I paint the black or coloured base band on the lower brick course. If the card parts don t just drop off cut them off. I don t ink wash all buildings, but show it here. When I do use ink washes it s to get added weathering. Here I have washed round the shutters and in the edges, then dry brushed a light grey to the base brick to give definition. Dampen the wall areas before adding the washes. This allows it to spread and merge. Allow it to run from corners to get the rain washed effect. Glue them to the walls, I use super glue as it is quick drying and stiffens card parts up as it soaks in. I seal the whole lot with a Matte spray. It helps to tie all the finishes together, taking the sheen off the inks and adding some depth of colour to the emulsion paints Gary Faulkner
6
A SIMPLE GUIDE TO GREAT LOOKING MODULAR TERRAIN By Dave Robotham
 A SIMPLE GUIDE TO GREAT LOOKING MODULAR TERRAIN By Dave Robotham Like all wargamers we end up making lots of terrain. This usually ends up being for the magazine or for test games when we are trying out
or clippers to clean the mould lines and flash off the figures.
 In the first of a series of articles aimed at the newbies of wargaming Dave Robotham gives us an insight into his painting methods. This article looks at 10mm scale British WWII armour and infantry from
The Gothic Chess Set
 The Gothic Chess Set Please note that this chess set is a fairly difficult and time consuming project. I strongly suggest building one or two easier models before tackling this one! The miniatures used
Building the Wizards Tower
 Building the Wizards Tower Building Instructions You will need to fill this mold 18 times to have enough blocks to build the tower. Also, the blocks should be completely dry before gluing them together.
The Park Hotel Instructions for Assembly of N Scale Kit
 The Park Hotel Instructions for Assembly of N Scale Kit Kit Contents: 198 ea. Laser Cut Acrylic Parts, 2 ea. Chimney Parts Sheets, 1 ea.2".040 styrene rod, 5 ea. Sidewalk Parts, 14 ea. Cast Resin Dormers,
Noville School Diorama Part 4 Making the Floors and Plastering the Walls and Ceilings
 Noville School Diorama Part 4 Making the Floors and Plastering the Walls and Ceilings Moulds and Materials Making the Floors Plastering the Ceiling Plastering the Walls Installing the Ceiling and Floor
Materials Required. Gravel / Small Stones. Floor Tile Bases* Multi Tool. Masking Tape. Toothpaste Cap. Nails. Bits of Bark Paperclips.
 Materials Required Gravel / Small Stones Floor Tile Bases* Masking Tape Multi Tool Nails Toothpaste Cap Bits of Bark Paperclips Paint Glue Sculpty (Oven Bake Clay) Basing Materials Required Hobby Lichen
KIT BUILDING ED SCHULTZ
 KIT BUILDING ED SCHULTZ KIT BUILDING FIVE BASIC MATERIALS: PLASTIC (STYRENE) WOOD LASER CUT & STANDARD PLASTER METAL RESIN ADDING DETAILS PLASTIC KITS TYPICALLY STYRENE TYPE PLASTIC DPM WALTHERS BACHMANN
Building the Bell Tower
 Building the Bell Tower Mold #55 does not contain all of the blocks to build this tower. You will need extra regular blocks (1/2" x 1/2" x 1") and square blocks (1/2" x 1/2" x 1/2"). These blocks can be
Taco Bell Restaurant kit in HO scale
 Taco Bell Restaurant kit in HO scale Parking lot base and cars not included This kit includes all building parts milled in white styrene plastic, clear window glazing, Plastruct tile roofing, and logo
The Park Hotel Instructions for Assembly
 The Park Hotel Instructions for Assembly Kit Contents: 280 ea. Laser Cut Acrylic Parts. 1 ea. 6" Plastic Coated Wire. 5 ea. Sidewalk Parts. 14 ea. Cast Resin Dormers. 12 ea. Window Glass Templates, 12
The Fyfe Building Instructions for Assembly of the N scale kit.
 The Fyfe Building Instructions for Assembly of the N scale kit. Kit Contents: 150 each laser cut 1/16" acrylic parts. 6 each 020 adhesive backed part 6 each column caps 2 each decorative canopy 1 each.125"
Drawings of all parts have been included for ease of part identification.
 Acme Corporation Instructions for Assembly of the HO Scale Acme Corporation HO Kit Contents: 156 ea. white 1/16" laser cut acrylic part 10 ea. white 1/8" laser cut acrylic part 37 ea. adhesive-backed brick
HRMLaserModels.com T.W. SNOW 25 TON COALING TOWER S SCALE AS USED ON THE MILWAUKEE ROAD
 HRMLaserModels.com T.W. SNOW 25 TON COALING TOWER S SCALE AS USED ON THE MILWAUKEE ROAD HRM-61 S SCALE COAL TOWER T.W.Snow 25 Ton Coaling Tower General Instructions Check out HRMLaserModels.com for construction
Cardboard Model Buildings
 Cardboard Model Buildings Get more model kits from http://www.modelbuildings.org PRINTING & ASSEMBLY TIPS: These OO designs can easily be resized by reducing the print percentage as follows: OO scale is
Hotel Belvedere Instructions for Assembly of the HO scale kit. v1.1
 Hotel Belvedere Instructions for Assembly of the HO scale kit. v1.1 Kit Contents: 319 ea. laser cut.090" acrylic parts. 132 ea. laser cut.060" acrylic parts. 8 ea. window glass templates 8 ea. window glazing
Engine Shed Overview
 Introduction March 2019 About At ScaleCast we want to provide the best real stone products that go far beyond levels of detail, but also provide an easy and effective product set that help you achieve
The Rubley Building Instructions for Assembly of the N scale kit. v1.1
 The Rubley Building Instructions for Assembly of the N scale kit. v1.1 Kit Contents: 197 ea. laser cut 1/16" acrylic parts. 1ea. adhesive backed.020 styrene part. 10 ea..060 x 1" styrene alignment pins.
Railroad Kits PO Box 461 Holden, MA
 (Formerly Downtown Deco DD 1004 Fallburg Station) HO Scale. Thanks for purchasing one of my kits. Because different people have different degrees of experience, I'll walk you through, step by step, explaining
After printing these plans, several pages will need to be taped together to form a larger plan. Below is a diagram of which pages need assembled.
 Watermill Building Plans For complete building instructions and instructional videos, please visit the main web site at www.hirstarts.com/watermill/watermill.html. Using these plans alone will not give
Ben Franklin 5&10 Store
 Ben Franklin 5&10 Store RIVER LEAF MODELS, LLC RIVER LEAF MODELS, LLC Thank you for purchasing the Ben Franklin 5&10 structure kit. Your kit includes everything you need to assemble the final product.
Shell Gas Station & Convenience Store kit in HO scale
 Shell Gas Station & Convenience Store kit in HO scale Parking lot base and cars not included This kit includes all building parts and signs milled in white and black styrene plastic, clear window glazing,
Building the Gothic Church
 Building the Gothic Church Mold #54 does not contain all of the blocks to build this church. You will need extra regular blocks (1/2" x 1/2" x 1") and square blocks (1/2" x 1/2" x 1/2"). These blocks can
Assembly Instructions for Summit Motel Kits # SMFS and SMBD
 Assembly Instructions for Summit Motel Kits # SMFS and SMBD Introduction Thank you for your purchase of the Summit Motel. This modern motel can be converted to almost any chain motel of your choice, depending
STOP! READ THIS FIRST! TIPS FOR BUILDING LASER CUT MODELS
 INSTRUCTIONS STOP! READ THIS FIRST! TIPS FOR BUILDING LASER CUT MODELS 1. Test fit all parts and make sure you know how everything goes together before gluing. If you are contemplating cutting a part to
The Severn Instructions for Assembly of the N scale kit.
 The Severn Instructions for Assembly of the N scale kit. Kit ontents: 172 each laser cut 1/16" acrylic parts 102 each adhesive backed styrene parts 1 each cast entryway 3 each cast balcony 4 each cast
J.W. cobbler 1:160 BUILDING KIT PF5210 WOODLAND SCENICS
 1:160 BUILDING KIT J.W. cobbler PF5210 The partially assembled walls, positive alignment system and prefinished edges make kit assembly quick, easy and accurate. This three-story brownstone features stacked
LASER-ART. The DuBois House. LASER-ARTSTRUCTURES by BRANCHLINE TRAINS BRANCHLINE TRAINS STRUCTURES
 LASER-ARTSTRUCTURES by BRANCHLINE TRAINS LASER-ART STRUCTURES by BRANCHLINE TRAINS The DuBois House History With their gingerbread trim and ornate decoration the Queen Anne style is what most people imagine
Building the 1, 2, or 3 Car
 Building the 1, 2, or 3 Car Garage kit by Railroad Kits. Thanks to Bob Butts for doing the building construction and writing / taking pictures. If this is your first craftsman kit or Railroad Kits purchase
HARRISON S HARDWARE PF5891
 1:48 BUILDING KIT HARRISON S HARDWARE PF5891 Model the local hardware store where layout residents can find all they need to keep their homes in tip-top shape and workshops running smooth. The positive
Subway building kit in HO scale
 Subway building kit in HO scale This kit includes all building parts and signs milled in white and black styrene plastic, clear window glazing, and self-adhesive decals. All parts fit together but may
Norse s 7 Step Painting Guide
 Norse s 7 Step Painting Guide Well, as luck would have it, I worked very closely with Mike Fubar Thorp on the design specs for the Fantasy Football Wizard and Toad, so when the chance came to paint these
Tips & Tricks using Part 8
 Tips & Tricks using Part 8 Easy Sand Texturing...1 Advanced Sand Texturing...3 Making Palm Trees...5 Tips & Tricks using Bruce Hirst Part 8 Page i Easy Sand Texturing I'm going to make the sand textured
Hardee s Restaurant kit in HO scale
 Hardee s Restaurant kit in HO scale Parking lot base and cars not included This kit includes all building parts milled in white styrene plastic and laser cut white acrylic, clear acrylic window glazing,
BUILDING ST. MARTIN S CORNER GAS & GROCERIES By RAILROAD KITS
 Thank you for purchasing this kit. I need to first thank Bob Butts for building the pilot model, and most of all for this wonderful set of instructions. 32 pages. Over 110 super color photos documenting
EXTREME LOAD no. TWO
 1602 - EXTREME LOAD no. TWO Kit Features: 22' 4 " x 14' x 3'-6 Oversize Load 49mm (1.9") actual height Bolt Head Details Welded Load Mounting Fins Painting Handles Tools Required: Hobby Knife Tweezers
Crackle Paste is a water-based product formulated with styrene-acrylic copolymer emulsions, and may have a tendency to yellow.
 PRODUCT DESCRIPTION Crackle Paste is a water-based product formulated with styrene-acrylic copolymer emulsions, and may have a tendency to yellow. This product has white, low-density solids that replace
The Saint Paul Building
 The Saint Paul Building Instructions for Assembly of The Saint Paul Building. Kit Contents: 65 each laser cut acrylic parts. 1 each sheet of AC roof unit parts. 1 each sidewalk. 3 each Window Glass Templates,
Continued on next page
 Please read these instructions completely through to be sure you are familiar with all the steps. Then following along again as you build your structure. Download a.zip file of all the pictures including
STONEYBRIDGE STRUCTURES
 02-208-OO North Eastern Railway N2 Style Signal Box INTRODUCTION Thank you for purchasing one of our products. We hope this information sheet will prove useful in the construction of this model. We have
DAVENPORT DEPARTMENT STORE PF5214
 1:160 BUILDING KIT DAVENPORT DEPARTMENT STORE PF5214 Dress up your downtown scene with the classic Victorian architecture and large first-floor picture windows of the Davenport Department Store. Details
ProSeal Instructions for RB67 film back and camera body
 ProSeal Instructions for RB67 film back and camera body Please read these instructions completely before you start. Knowledge strengthens confidence, and like most jobs, this is better done right the first
CVS Pharmacy kit in HO scale
 CVS Pharmacy kit in HO scale Parking lot base and cars not included This kit includes all building parts and wall-mounted signs milled in white styrene plastic, clear window glazing and pre-cut Plastruct
Thank you for purchasing E.L. Moore Window & Door.
 Thank you for purchasing E.L. Moore Window & Door. Instructions Version 4.28.15 I ve named this kit after one of the greatest modelers I ve ever known, the late Elliot Moore Jr. Rest in peace my friend.
Peter Krause ABN
 Peter Krause ABN 25 736 637 163 T/as O-Aust Kits PO Box 743 ALBANY CREEK QLD 4035 AUSTRALIA Phone +61 (0)7 3298 6283 (7.00pm to 9.30pm ONLY) Facsimile +61 (0)7 3298 6287 (24 hours) Mobile 0419 680 584
The Midtown Apartment Building
 The Midtown Apartment Building Instructions for Assembly of The Midtown Apartment Building. Kit Contents: 70 each laser cut acrylic parts. 3 each sidewalk parts. 3each Window Glass Templates, 3 each Window
Donaldson s Department Store
 Donaldson s Department Store Instructions for Assembly of Donaldson s Department Store Kit Contents: 80 each laser cut acrylic parts. 1 each sheet of canopy parts. 1 each sheet of AC roof unit parts. 1
a V1 launch site How To Build... .net By Paul Davies
 By Paul Davies How To Build... a V1 launch site Some weeks ago, I was fortunate enough to get a sneak preview of the Flames Of War Open Fire boxed set when I was invited to the Wargames Illustrated 300th
Diorama. How to make a diorama or model building
 Diorama How to make a diorama or model building Tools required Basic Tools: Drill, Circular saw, Jig saw, Utility Knife (Stanley) Hammer, Wood Glue and Nails These are all you need to get started. Later
Cowper From Steve Wolverton on the T&TTT forum, Feb 2005 For Reference Only Do not use to build a trailer. Check on Teardrop and Tiny Travel Trailers
 Cowper From Steve Wolverton on the T&TTT forum, Feb 2005 For Reference Only Do not use to build a trailer. Check on Teardrop and Tiny Travel Trailers for up to date building information; http://www.mikenchell.com/forums
Tutorials. To create your antique embroidered book, you'll need:
 Tutorials Part of the beauty in some books is simply how they look, and if we can t find them that way, we ll make 'em! It s a perfect and unusual way to display your favorite literary embroidery designs
Art-Drawing-Painting. 3-D or 3 dimensional when all 3 dimensions: length, height, and width can be touched and felt.
 ART Art-Drawing-Painting *Sculpture words (Additional vocabulary follows the main list) *Crafts and Ceramics (Vocabulary specific to crafts and ceramics follow this main list) Essential Vocabulary Secondary
How to assemble the Reims Gueux Pit End Modules #005
 How to assemble the Reims Gueux Pit End Modules #005 Depending on which kit you have purchased you will either have a pair of end sections, some centre sections or both. We will describe building of the
YOUR PROJECT : CLIENT REQUEST : AMBIENCE : SCANDINAVIAN DECORATOR REPLY :
 YOUR PROJECT : CLIENT REQUEST : Hello, We need to re-think the interior of our Sitting Room to create a whole new atmosphere: modern, warm and welcoming. We love indirect lighting and would consider carpet
Quick Guide to Painting with Autentico
 Quick Guide to Painting with Autentico Discover the world of Autentico Vintage Chalk Paint No sanding or priming necessary (in most cases) Paint over old varnished painted or waxed surfaces. Preparation
PAINT EFFECTS. 2 - Planning the work. 3 - Preparation
 PAINT EFFECTS There are varying levels of skill involved in paint effects, but some of the simplest techniques will produce very attractive results. Be sure all ladders are safe and correctly placed. Keep
Fall Houses by Betty Bowers
 Fall Houses by Betty Bowers Fall Houses By Betty Bowers Palette: DecoArt Americana Acrylics Antique Gold 13009 Antique White 13058 Arbor Green 13209 Bittersweet Chocolate 13195 Burnt Orange 13016 Cocoa
Tips & Tricks using Part 17
 Tips & Tricks using Part 17 Making a Secret Door Using Mold #96...1 Using Cotton Swabs For Antiquing...4 Planning Dungeon Waterways...5 Pouring and Texturing Water...6 Making Water for Fountains...11 Tips
Rural Shamrock Gas Station & Store kit in HO scale
 Rural Shamrock Gas Station & Store kit in HO scale Parking lot base and cars not included This kit includes all building parts and signs milled in white and black styrene plastic, clear window glazing
By Robbo. The CANAL PUB and WHARF THE BUILDING STARTS!
 By Robbo The CANAL PUB and WHARF THE BUILDING STARTS! The first necessity was building the continuation of the Canal with wharfs. As in past modules I have boxed it all up using 7mm Plywood for the platforms
You expect to find PVC. PVC Lumber PROS & CONS OF PVC PROS
 PROS & CONS OF PVC PROS Won t rot. Doesn t have to be painted (but can be). No defects; consistent. Easy to cut and machine. Readily available. CONS Not designed for structural use. Plastic appearance
Step 1. Step 2. Step 3. Step 4. Painting Guide RF Reversible Terracotta Roof. RF Reversible Terracotta Roof Page 1 of 3. Side 1.
 RF-005 - Reversible Terracotta Roof Step 1 Step 2 Step 3 Lava Orange (GT002-LO) Step 4 Apply over the entire surface of the wooden areas with a #3 (Painting) brush. Be careful not to apply too much paint.
Building the Cathedral
 Building the Cathedral Please note that the cathedral is a fairly difficult and time consuming project. I strongly suggest building one or two easier models before tackling this one! Four molds are needed
Fidelity & Guaranty Building
 Fidelity & Guaranty Building N Scale Model Kit Instructions for Assembly of the Fidelity & Guaranty Building Kit Contents: 69 each laser cut acrylic parts. Sidewalk material 1 each Window Glass Templates
ACRYLICS DEMONSTRATION
 ACRYLICS DEMONSTRATION PALETTE KNIFE STILL LIFE By Will Kemp In this lesson we re going to look at a still life floral arrangement, but we re going to practice loosening up with our acrylic painting, so
Fidelity & Guaranty Building
 Fidelity & Guaranty Building Instructions for Assembly of the Fidelity & Guaranty Building Kit Contents: 69 each laser cut acrylic parts. 1 each sheet of AC roof unit parts. 1 each sidewalk base. 4 each
Atelier Mediums. NEW Atelier Mediums All Have A Double Function
 Atelier We have divided our mediums into two sections. The established old mediums are familiar to Atelier Interactive users, and most of them are traditional in behaviour and convert the paint mixed with
Water-colour painting techniques
 INFORMATION SHEET Water-colour painting techniques Andrew Newland T E A C H I N G A R T & D E S I G N Sheeaun, Kilmaley, Ennis, Co. Clare, Ireland. These notes are copyright Andrew Newland Introduction
La Grange, Texas MKT Depot kit in HO scale
 La Grange, Texas MKT Depot kit in HO scale This kit includes all building parts laser cut in plywood, white and clear acrylic, and laser cut self-adhesive shingles. All parts fit together but may need
UNIT 11: PAINTING, STAINING, AND FINISHING
 KEY CONCEPTS 1. Equipment needed 2. Primary kinds of Paint: Interior/Exterior 3. Primary kinds of Stain: Interior/Exterior 4. Proper application techniques: Paint/Stain/Finish 5. Equipment care and clean
San Felipe: Step by Step Pack 3
 Pack 3 Your parts Bulwarks Gun port covers x 2 Tools and equipment Wood glue Sandpaper Brushes Wood stain Hammer Pin pusher/nails Razor saw a Remove the longer bulwark and test-fit it in place at the bow
Installation Instructions
 www.marlite.com Effective Date 03/01/2018 ARTIZAN FRP, SYMMETRIX FRP, ENVUE FRP, STANDARD FRP Installation Instructions Statements expressed in this technical bulletin are recommendations for the application
Atelier Mediums. They are set out in a progression from a thick heavy bodied gel through to a very liquid medium.
 Atelier There are several top quality brands of artist acrylic on the world market, but Atelier Interactive is the only brand that can be used in a Fast Drying Mode and in a Wet Blending Mode. There are
Instructions for Assembly of the HO Scale The Charles
 The Charles Instructions for Assembly of the HO Scale The Charles HO Kit Contents: 337 ea. white 1/16" laser cut acrylic part 19 ea. Clear 1/16" laser cut acrylic part 69 ea. white 1/8" laser cut acrylic
3Insert the second rod no. 4
 Yamato: Step-by-step 37 The stern block and searchlight control towers a b c d e f Recommended tools and materials Wood glue Sandpaper (no. 800 grain) Metal file Putty Craft knife For metal: Super Glue
PS 5077 cu. ft. Boxcar with EOC device. 1:29 scale resin craftsman kit. by Burl Rice
 PS 5077 cu. ft. Boxcar with EOC device 1:29 scale resin craftsman kit by Burl Rice www.burlrice.com Bill of materials (not included): Thick/medium viscosity CA PL adhesive, or Gorilla Glue Heavy Duty Construction
Kentucky 4H Wood Science Plans Notebook. Plans Level 1
 Kentucky 4H Wood Science Plans Notebook Plans Level 1 MATERIALS NEEDED: 1 piece wood 3/4" x 2 x 2 1 piece wood 3/4" x 3 x 3 1/2" 1 wooden spring-type clothespin 2-1 1/2" nails 1-1/2 woodscrew Wood Glue
Atelier Mediums. NEW Atelier Mediums. New! Heavy Gel (Satin)
") Atelier There are several top quality brands of artist acrylic on the world market, but Atelier Interactive is the only brand that can be used in a Fast Drying Mode and in a Wet Blending Mode. There are
Atelier There are several top quality brands of artist acrylic on the world market, but Atelier Interactive is the only brand that can be used in a Fast Drying Mode and in a Wet Blending Mode. There are
HOW TO SELECT & USE A ROLLER
 HOW TO SELECT & USE A ROLLER www.paintaids.co.nz 1 select the right roller The two most important things for a great paint finish are: a good quality paint, and the right roller sleeve to match the paint
Copyright of Mont Marte International Pty Ltd ACN
 Traditional bouquet in Oils pick up these materials from any gold mont marte art centre Cmmd6076 Mont Marte double thick canvas 60 x 72cm bmhs0019 mont marte gallery series brush pack 6pce bmhs0024 mont
CORNER PORCH HOUSE PF5196
 1:87 BUILDING KIT CORNER PORCH HOUSE PF5196 Two-story home with cedar-shake roof and a corner wrap-around porch. Clapboard siding, paned windows, and loaded with accessories, such as a bicycle built for
1Take the keel (3) and
 and") 1 The hull and the bridge 1Take the keel (3) and apply PVA wood glue in the second slot from the left: a toothpick may make it easier. Take care: the left end is the one that has a projection. THE HULL
1 The hull and the bridge 1Take the keel (3) and apply PVA wood glue in the second slot from the left: a toothpick may make it easier. Take care: the left end is the one that has a projection. THE HULL
Swift assembly guide
 Swift assembly guide Download the assembly guide at www.scihighmodels.com/swift.pdf Sample kit shown with aluminium bells (available with the Deluxe kit) Shown here without main tanks Version 10/12/2010
CONCEPT MODELS INSTRUCTIONS FOR UP DC-10 WING CAR El Toro Way Stockton, CA Web Address:
 CONCEPT MODELS Web Address: http://www.con-sys.com 8810 El Toro Way Stockton, CA 95210 INSTRUCTIONS FOR UP DC-10 WING CAR 2 CONCEPT MODELS PARTS DC-10 WING CAR Item No. Part No. DESCRIPTION QTY. 1 2003-1
Voltage Village - Glowing House Set - Bare ConductiveBare Conductive. Step-by-Step instructions to assemble your very own Voltage Village!
 SEARCH CART NAV Voltage Village Glowing House Set Step-by-Step instructions to assemble your very own Voltage Village! INFORMATION SUGGESTED TUTORIALS In this tutorial we will show you how to assemble
BUZZ S SAWMILL PF5195 WOODLAND SCENICS BUILDING KIT
 1:87 BUILDING KIT BUZZ S SAWMILL PF5195 Buzz s Sawmill is a detailed work of art with all workings of a vintage steam-fired, belt-driven sawmill. Details include interior rafters and shake roof, attached
Step 1. Step 2. Step 3. Step 4. Painting Guide RF Reversible Slate Roof. RF Reversible Slate Roof Page 1 of 3. Side 1. Side 2.
 RF-008 - Reversible Slate Roof Step 1 Step 2 White Base Gray (12:1) Step 3 White (GT002-W) Base Wood* (GT002-BW) Apply Base Wood over the wooden beams and window trim with a #3 (Painting) brush. Be careful
Makeover your place with paint
 Makeover your place with paint A new coat of paint can be an instant fix. It s costeffective and easy to apply, and with a little planning and the right equipment you can completely change the look of
Restoration of Circa 1900 Menzenhauer/Oscar Schmidt Niagara Model Chord Zither
 Restoration of Circa 1900 Menzenhauer/Oscar Schmidt Niagara Model Chord Zither Completed by Ron Cook March 2014 For Angela Bostain 1 Background Chord zithers, often called Guitar Zithers, were very popular
WEEK 4 COMPLETE SIDING & EXTERIOR PAINTING
 WEEK 4 COMPLETE SIDING & EXTERIOR PAINTING INSTALL DRY WALL CLIPS (STAFF) Safety Briefing Complete siding Caulk exterior plumbing & electrical boxes First Coat Exterior Second Coat Exterior Install siding
SHOW ME YOUR FLORALS
 STEPHANIE FEHRENBACH SHOW ME YOUR FLORALS WATERCOLOUR BASICS STARTUP GUIDE & SUPPLY LIST Stephanie Fehrenbach Welcome! I m so excited you ve decided to paint with me! Don t worry if you ve never picked
FERAL CAT WINTER SHELTER HOW-TO GUIDE
 FERAL CAT WINTER SHELTER HOW-TO GUIDE WHAT YOU NEED MATERIALS Hard Styrofoam sheet 2 feet wide, 8 feet long, 2 inches thick One tube (that fits a caulk gun) of clear silicone sealant; OR two smaller hand-squeezable
Blakes 7 DSV-1 Liberator
 Blakes 7 DSV-1 Liberator Model kit by Masterpiece Models: www.masterpiecemodels.com Pattern Maker: Alfred Wong Casting: J&S Technologies LLC Parts List Main body 3 Main body nose vanes 4 Main body detail
PostIts, and Aleene s are trademarks of their manufacturers and have no affiliation with Real Good Toys
 Instructions for Real Good Toys My Dreamhouse Congratulations on your choice of a Real Good Toys product. Your kit has been precision made with meticulous care by our craftspeople using carefully selected
MAKE IT YOURS. Digital Photo Decoupage Art. How-2 instruction books for cool projects you can make your own.
 MAKE IT YOURS Digital Photo Decoupage Art How-2 instruction books for cool projects you can make your own. DIGITAL PHOTO DECOUPAGE ART WHAT YOU WILL NEED Computer / Internet Connection Digital photos you
Wednesday, November 17, 2010 CLAY REVIEW
 CLAY REVIEW What is clay? Clay is a naturally occurring material composed primarily of fine-grained minerals, which show plasticity through a variable range of water content, and which can be hardened
If by chance a part is missing or broken please contact us indicating the kit name and part description and we will send you a replacement.
 Six Stall Roundhouse Instructions for Assembly of the HO Scale Six Stall Roundhouse Roundhouse Kit Contents: 18ea. Roof Pieces 12 ea. 1/16" Parts Sheets 9ea. 1/8" Parts Sheets 12ea. Floor Pieces 1ea. 1/4"
How to assemble the Reims Gueux Pit Centre Module #005
 How to assemble the Reims Gueux Pit Centre Module #005 We recommend quick drying super glue for our models. Just a few drops on the joining edges, press and hold them for a few seconds and the connection
Advanced Basketry Materials: Weaving Baskets with Newspaper
 Advanced Basketry Materials: Weaving Baskets with Newspaper Step 1: Making the Newspaper Tubes for Weaving 1. You need to cut long strips of newspaper to about 10cm wide. Fold the newspaper horizontally
NEW equinox INSTALLATION GUIDE Issue
 NEW equinox INSTALLATION GUIDE Issue 1 CONTENTS If in doubt at any stage 1. Preparing the ring beam 2 2. Installing the framework 3 3. Insulation and waterproofing 7 4. Tile application: Steel tiles 9