Railroad Kits PO Box 461 Holden, MA
|
|
|
- Jeffery Alexander
- 5 years ago
- Views:
Transcription

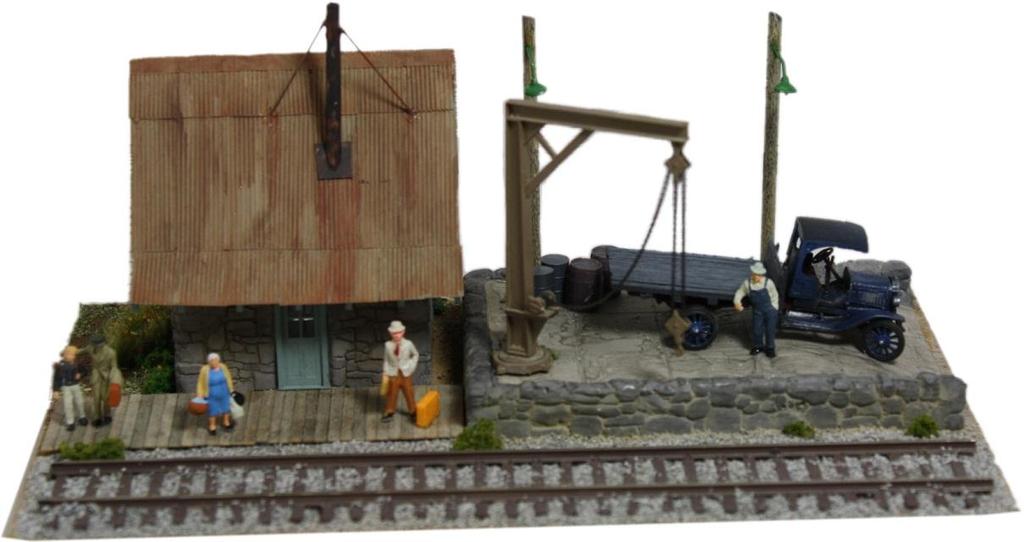
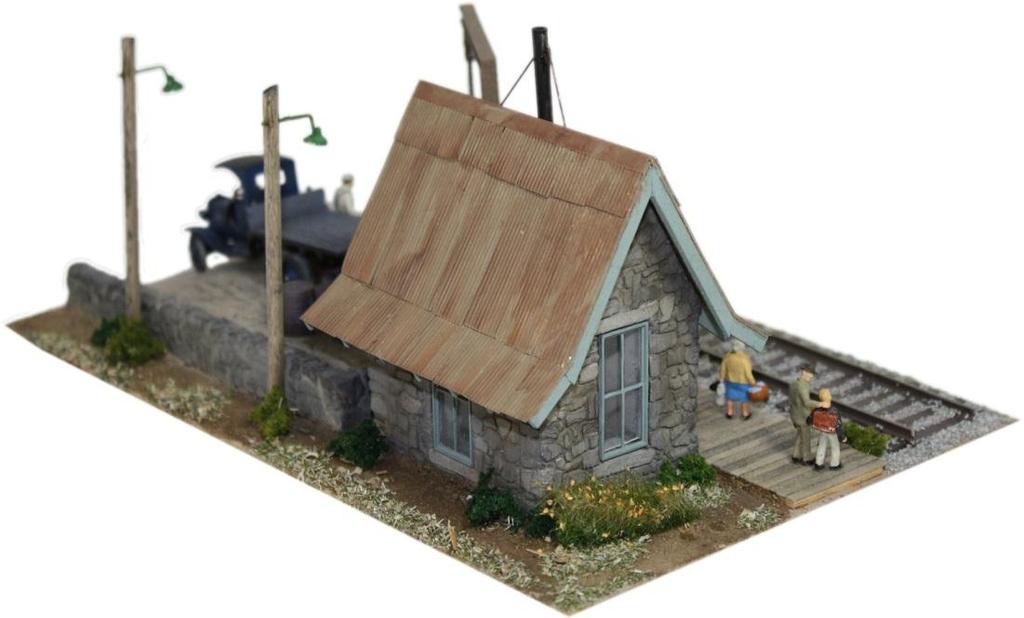
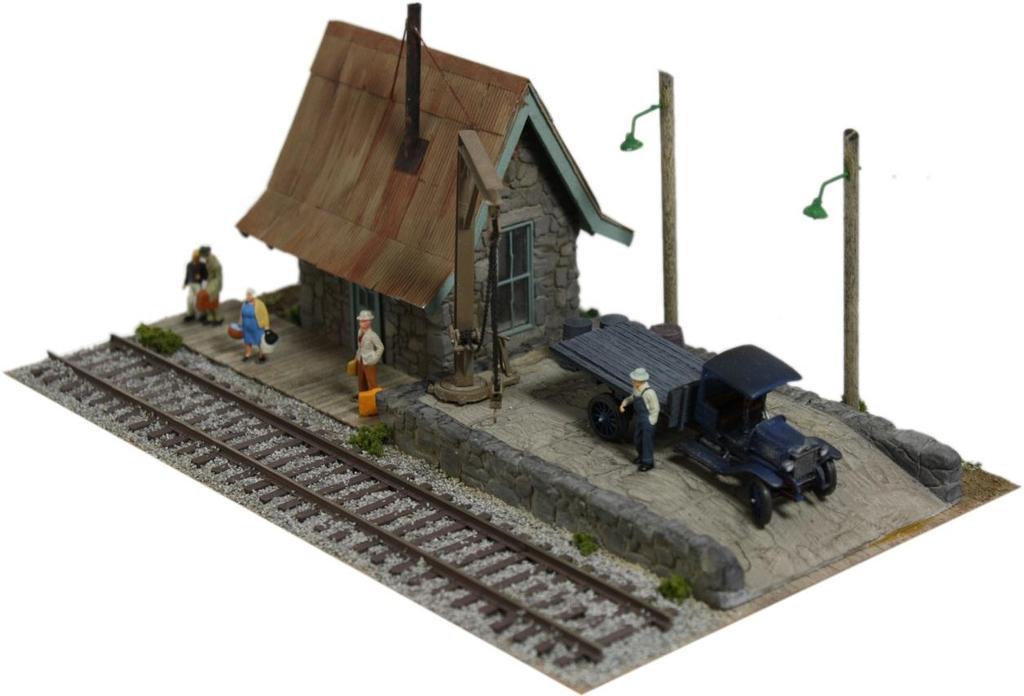
1 (Formerly Downtown Deco DD 1004 Fallburg Station) HO Scale. Thanks for purchasing one of my kits. Because different people have different degrees of experience, I'll walk you through, step by step, explaining everything as if you were a novice. If at any time you are not clear on what the instructions mean, please feel free to give me a call (or ) & I'll be glad to try and help you out. Likewise, in the unlikely event that you have any missing or broken pieces, please contact me directly & I'll send what you need! Jimmy Deignan Railroad Kits PO Box 461 Holden, MA @railroadkits.com Step One. Prepping the Hydrocal castings. The plaster castings are fragile & need to be handled with care. If somehow you end up with a broken piece (even if it's completely your fault) please contact me directly & I'll send you replacement parts at n/c. If a broken part is not too badly shattered (and you don't feel like waiting for a replacement) you can try & just glue the parts back together. You can use 5 minute epoxy, Elmer's white or yellow glue, or even super glue. Clean up any excess flash using a hobby knife or emery board. Pay particular attention to the bottoms and any places where the walls join. Step Two. Gluing the castings together. The best way to get a good looking, square structure is to first glue the two side walls to the front, then after the glue sets, test the fit the rear wall, sand it if necessary, and then glue the rear wall in place. Do not force the rear wall to fit. Unlike plastic or wood, Hydrocal has no "'bend" or "'give", so if you may need to remove a tiny bit of material with either a sanding block or emery board if your original alignment wasn't exactly square. The castings are marked "front", "'rear", "left" & "'right" on the bottom. You can use 5 minute epoxy, Elmer's White or Yellow glue or even super glue to glue the plaster castings together. I prefer 5 minute epoxy, because while it gives you a few minutes to make sure the walls are square, you don't have to wait hours for it to dry like you do with Elmer's.
2 Step Three. Check the fit of the plastic door & windows and touch up the castings. Check the fit of the doors and windows. Do not glue them in place yet, just check to make sure that they drop easily in place. If you need to you can scrape away a tiny bit of the plaster to get a good fit. Also, while you're at it, using an emery board or sand paper, very slightly angle the protruding edges as shown. Step Four. Painting the structure. Now would be a good time to paint the structure, before you add the roof or doors / windows. We started by giving the structure & loading dock 3 or 4 light coats of flat white spray paint. You don't want the castings to be sealed hard & shiny like plastic, you do however, want to take some of the extreme porosity out of the Hydrocal. If you don't, when you apply color to the structure it will soak in so fast that every brush mark will show. We let the spray paint primer dry overnight. Next we gave the castings a dirty "wash" using thinned down (20 to 1) black acrylic paint. Raw umber would also be a good choice. We use the "Creamacoat" brand of acrylic craft paints, but Wal-Mart, A/C Moore, & Michaels sell other brands of craft paints that work equally as well. When the wash dried, we lightly "buffed" the parts using fine steel wool. This helps bring out the highlights and details. Finally, we painted a few of the stones various light earth tones using thinned down acrylic paints. Raw sienna, tan, brown, black are all good colors. Try to keep the colors subtle / light or your end result will look unrealistic. We spray painted the door/windows green, cut and added the glass, and then glued them in place using super glue. Step Five. The roof. First, using a pencil, mark the bottom of the sheet of 4 1/4" x 2 3/4" chipboard roofing card to help you properly space the rafters when you add them later. If the kit you have (version 2.0) has the laser etched marks this has already been done for you! OK. Now let s configure the roof in the angled shape. First turn it over (so that your rafter spacing marks are lying face down on the workbench) and lightly score it in the center using a hobby knife & straight edge as shown in the vertical red lines. Do not cut all the way through, just score it lightly. If the kit you have (version 2.0) has the laser etched marks this has already been done for you!

3 Now, fold the chipboard piece into the roof shape by bending it along the lines. Test fit it to the structure to make sure you have the main roof angle correct, then, glue in place using 5 minute epoxy. If needed, you can run a small stream of glue along the seams to give the roof strength. OK. Now you need to cut the rafters. Using the stripwood provided, cut the pieces needed as shown. Before you start cutting the stripwood into little pieces you may wish to add "wood grain". Do so by dragging a razor saw over the strips to score/grain them. Now, cradling the structure upside down, glue the rafters in place. Use the little markings on the bottom of the roof to help you with the spacing. You may find a place or two where you have to trim the rafters to get a good fit. Brush paint the roof/underside and rafters a flat tan color. When dry, give it a wash of raw umber or black to weather it a bit. Using either scissors or an hobby knife cut out the provided pre-aged corrugated roofing. Starting at the bottom edge of the roof, glue it to. the roof using rubber/contact cement. You can nip/pick at an edge or seam here & there to give it a more weather beaten look. Overlap each layer as you cover the roof.
4 Step Six. Add chimney/lights. Cut the bottom of the chimney pipe at an angle to match the pitch of the roof. Using styrene cement glue together the pipe, base & cover of the chimney. Paint flat black. Super glue it to the roof as shown in the picture. We also added two "guy wires" using thin pieces of wire super glued to roof and pipe. We have provided a few small lamps to add on the wood poles. Assemble, paint & glue the lamps to the poles. Step Seven. The wood platform. Provided is a piece of scribed wood for the platform styrene. Brush paint the platform light tan, followed by a raw umber/black wash to age it to add a little variety I brush painted a few individual boards lighter/darker. This helps make it look like the platform is made up of individual boards rather than a single piece. If You like you can add decorative roof supports. These are not shown on our pilot model but I have seen modelers add them and I think they add a nice touch. Bend four small pieces of wire as so and super glue them in place under the eaves. Bend the wire around a small jar or glass to help form the curves. About this kit. Railroad Kits obtained the rights to manufacturer this kit from Downtown Deco in This kit is based on a design by John Olsen. An article describing the original design appears in the Sept issue of the Narrow Gauge & Short Line Gazette. We would like to thank Mr. Olsen for allowing us to reproduce this unique structure. Instructions originally written by Randy Pepprock of Downtown Deco. Rewritten by Jimmy Deignan for rerelease under Railroad Kits brand.
5
Thank you for purchasing E.L. Moore Window & Door.
 Thank you for purchasing E.L. Moore Window & Door. Instructions Version 4.28.15 I ve named this kit after one of the greatest modelers I ve ever known, the late Elliot Moore Jr. Rest in peace my friend.
The Park Hotel Instructions for Assembly
 The Park Hotel Instructions for Assembly Kit Contents: 280 ea. Laser Cut Acrylic Parts. 1 ea. 6" Plastic Coated Wire. 5 ea. Sidewalk Parts. 14 ea. Cast Resin Dormers. 12 ea. Window Glass Templates, 12
The Park Hotel Instructions for Assembly of N Scale Kit
 The Park Hotel Instructions for Assembly of N Scale Kit Kit Contents: 198 ea. Laser Cut Acrylic Parts, 2 ea. Chimney Parts Sheets, 1 ea.2".040 styrene rod, 5 ea. Sidewalk Parts, 14 ea. Cast Resin Dormers,
Building the 1, 2, or 3 Car
 Building the 1, 2, or 3 Car Garage kit by Railroad Kits. Thanks to Bob Butts for doing the building construction and writing / taking pictures. If this is your first craftsman kit or Railroad Kits purchase
The Rubley Building Instructions for Assembly of the N scale kit. v1.1
 The Rubley Building Instructions for Assembly of the N scale kit. v1.1 Kit Contents: 197 ea. laser cut 1/16" acrylic parts. 1ea. adhesive backed.020 styrene part. 10 ea..060 x 1" styrene alignment pins.
Continued on next page
 Please read these instructions completely through to be sure you are familiar with all the steps. Then following along again as you build your structure. Download a.zip file of all the pictures including
Drawings of all parts have been included for ease of part identification.
 Acme Corporation Instructions for Assembly of the HO Scale Acme Corporation HO Kit Contents: 156 ea. white 1/16" laser cut acrylic part 10 ea. white 1/8" laser cut acrylic part 37 ea. adhesive-backed brick
Fidelity & Guaranty Building
 Fidelity & Guaranty Building N Scale Model Kit Instructions for Assembly of the Fidelity & Guaranty Building Kit Contents: 69 each laser cut acrylic parts. Sidewalk material 1 each Window Glass Templates
Fidelity & Guaranty Building
 Fidelity & Guaranty Building Instructions for Assembly of the Fidelity & Guaranty Building Kit Contents: 69 each laser cut acrylic parts. 1 each sheet of AC roof unit parts. 1 each sidewalk base. 4 each
The Fyfe Building Instructions for Assembly of the N scale kit.
 The Fyfe Building Instructions for Assembly of the N scale kit. Kit Contents: 150 each laser cut 1/16" acrylic parts. 6 each 020 adhesive backed part 6 each column caps 2 each decorative canopy 1 each.125"
Building the Bell Tower
 Building the Bell Tower Mold #55 does not contain all of the blocks to build this tower. You will need extra regular blocks (1/2" x 1/2" x 1") and square blocks (1/2" x 1/2" x 1/2"). These blocks can be
The Midtown Apartment Building
 The Midtown Apartment Building Instructions for Assembly of The Midtown Apartment Building. Kit Contents: 70 each laser cut acrylic parts. 3 each sidewalk parts. 3each Window Glass Templates, 3 each Window
The Saint Paul Building
 The Saint Paul Building Instructions for Assembly of The Saint Paul Building. Kit Contents: 65 each laser cut acrylic parts. 1 each sheet of AC roof unit parts. 1 each sidewalk. 3 each Window Glass Templates,
Taco Bell Restaurant kit in HO scale
 Taco Bell Restaurant kit in HO scale Parking lot base and cars not included This kit includes all building parts milled in white styrene plastic, clear window glazing, Plastruct tile roofing, and logo
BUILDING ST. MARTIN S CORNER GAS & GROCERIES By RAILROAD KITS
 Thank you for purchasing this kit. I need to first thank Bob Butts for building the pilot model, and most of all for this wonderful set of instructions. 32 pages. Over 110 super color photos documenting
Instructions for Assembly of the HO Scale The Charles
 The Charles Instructions for Assembly of the HO Scale The Charles HO Kit Contents: 337 ea. white 1/16" laser cut acrylic part 19 ea. Clear 1/16" laser cut acrylic part 69 ea. white 1/8" laser cut acrylic
Donaldson s Department Store
 Donaldson s Department Store Instructions for Assembly of Donaldson s Department Store Kit Contents: 80 each laser cut acrylic parts. 1 each sheet of canopy parts. 1 each sheet of AC roof unit parts. 1
The Severn Instructions for Assembly of the N scale kit.
 The Severn Instructions for Assembly of the N scale kit. Kit ontents: 172 each laser cut 1/16" acrylic parts 102 each adhesive backed styrene parts 1 each cast entryway 3 each cast balcony 4 each cast
Hotel Belvedere Instructions for Assembly of the HO scale kit. v1.1
 Hotel Belvedere Instructions for Assembly of the HO scale kit. v1.1 Kit Contents: 319 ea. laser cut.090" acrylic parts. 132 ea. laser cut.060" acrylic parts. 8 ea. window glass templates 8 ea. window glazing
Tools and Tips: ( 1 )
") Tools and Tips: As you build the book will show in my many picture manual how to assemble. You can use your own methods as you desire, but these worked best for me. A smooth, flat work surface is very
Tools and Tips: As you build the book will show in my many picture manual how to assemble. You can use your own methods as you desire, but these worked best for me. A smooth, flat work surface is very
LASER-ART. The DuBois House. LASER-ARTSTRUCTURES by BRANCHLINE TRAINS BRANCHLINE TRAINS STRUCTURES
 LASER-ARTSTRUCTURES by BRANCHLINE TRAINS LASER-ART STRUCTURES by BRANCHLINE TRAINS The DuBois House History With their gingerbread trim and ornate decoration the Queen Anne style is what most people imagine
Building the Gothic Church
 Building the Gothic Church Mold #54 does not contain all of the blocks to build this church. You will need extra regular blocks (1/2" x 1/2" x 1") and square blocks (1/2" x 1/2" x 1/2"). These blocks can
Tools: Every craftsman kit builder should have the basic tools you need to construct this kit. They are:
 Thank you for purchasing the Railroad Kits EF20 Car & Loco Repair Shed. This kit is the second one that I ve had the pleasure of working with Ed Fulasz on. Ed painstakingly hand carved the Hydrocal master
Tools and Tips: ( 1 )
") Tools and Tips: As you build instructions will show in my many picture manual how to assemble. You can use your own methods as you desire, my results are very good. A smooth, flat work surface is very
Tools and Tips: As you build instructions will show in my many picture manual how to assemble. You can use your own methods as you desire, my results are very good. A smooth, flat work surface is very
After printing these plans, several pages will need to be taped together to form a larger plan. Below is a diagram of which pages need assembled.
 Watermill Building Plans For complete building instructions and instructional videos, please visit the main web site at www.hirstarts.com/watermill/watermill.html. Using these plans alone will not give
Cobra X Q Construction Tips Construction: Bel y pan
 Cobra X Q Construction Tips : The white plastic in this kit is high impact styrene. It can be painted with most types of coatings if light coats are applied this is necessary due to the thickness of the
N Scale Concrete Coal Dock Instruction Manual
 N Scale Concrete Coal Dock Instruction Manual 1. General Overview This kit combines precision laser cut acrylic, photo etched brass and wood parts to make a highly detailed model of the Roberts and Schaefer
Max Launch Abort System Prod. No *Kevlar is a registered trademark of Dupont
 Flying Model Parts List Max Launch Abort System Prod. No. 3014 A 11820 - Body Tube 3.5 Diam x 5.5" Long B 11824 - Orange Capsule Base Shoulder Ring C 16032 - Laser-cut Ring motor mount rear D 16033 - Laser-cut
 Allied Tool is a freelance model of a small manufacturing company that grew from production in a home basement to a new building. Assume a gentleman starts assembling gauges in his basement and the business
Ben Franklin 5&10 Store
 Ben Franklin 5&10 Store RIVER LEAF MODELS, LLC RIVER LEAF MODELS, LLC Thank you for purchasing the Ben Franklin 5&10 structure kit. Your kit includes everything you need to assemble the final product.
DAVENPORT DEPARTMENT STORE PF5214
 1:160 BUILDING KIT DAVENPORT DEPARTMENT STORE PF5214 Dress up your downtown scene with the classic Victorian architecture and large first-floor picture windows of the Davenport Department Store. Details
How to Use the Wooden Plank Mold
 How to Use the Wooden Plank Mold Even though I'm giving instructions for only two projects, there are tons of uses for this mold. Some of these include: Floors Steps Doors Tables Benches Crates Drawbridge
5If the protruding part is. 6Place 1 as is shown in the. 7Place what was assembled
 Yamato: Step-by-step 49 The base of the bridge and strakes a c b d a Base of the bridge b Base of the bridge c Base of the bridge d Strakes x 10 THE BASE OF THE BRIDGE 1Smooth 1 to 3, first using the metal
Cardboard Model Buildings
 Cardboard Model Buildings Get more model kits from http://www.modelbuildings.org PRINTING & ASSEMBLY TIPS: These OO designs can easily be resized by reducing the print percentage as follows: OO scale is
Tools and Tips: ( 1 )
") Tools and Tips: As you build instructions will show in my many picture manual how to assemble. You can use your own methods as you desire, my results are very good. A smooth, flat work surface is very
Tools and Tips: As you build instructions will show in my many picture manual how to assemble. You can use your own methods as you desire, my results are very good. A smooth, flat work surface is very
Rosalina Accessories Tutorial Version March 2011 Martyn
 Rosalina Accessories Tutorial Version 1.0 - March 2011 Martyn Star Brooch Feel free to experiment with these dimensions, you should make a template you are happy with, the method still works. 1) Creating
1Use the metal file to smooth
 Yamato: Step-by-step 85 Parts of the bridge and the hull a b c d e f a Part of the bridge b Part of the bridge c Part of the bridge d Radar x 2 e Part of the bridge x 2 f Wire Recommended tools and materials
Hardee s Restaurant kit in HO scale
 Hardee s Restaurant kit in HO scale Parking lot base and cars not included This kit includes all building parts milled in white styrene plastic and laser cut white acrylic, clear acrylic window glazing,
Nanton Grain Mill Assembly
 ( 1 ) Nanton Grain Mill Assembly Locate package for assembling storage building. These are cut from 1/8 masonite. Inspect and lightly sand edges where it will be bonded. Use white glue or CA glue to bond.
KIT BUILDING ED SCHULTZ
 KIT BUILDING ED SCHULTZ KIT BUILDING FIVE BASIC MATERIALS: PLASTIC (STYRENE) WOOD LASER CUT & STANDARD PLASTER METAL RESIN ADDING DETAILS PLASTIC KITS TYPICALLY STYRENE TYPE PLASTIC DPM WALTHERS BACHMANN
STONEYBRIDGE STRUCTURES
 02-208-OO North Eastern Railway N2 Style Signal Box INTRODUCTION Thank you for purchasing one of our products. We hope this information sheet will prove useful in the construction of this model. We have
How to Assemble the Vacuum Formed Plastic 7/8 Scale Lewis Gun
 How to Assemble the Vacuum Formed Plastic 7/8 Scale Lewis Gun 1. Read ALL the instructions before starting assembly. 2. Begin assembly by thoroughly washing the inside and outside surfaces of the vacuum
Scratchbuilding with 3D Building Materials Cut Lintels, Install Corners
 The most realistic brick on the market today, these 3D engraved sheets are from actual photos of brick walls. We engrave every detail into basswood with a laser. Why put brick on wood? For modelers who
Building the Cathedral
 Building the Cathedral Please note that the cathedral is a fairly difficult and time consuming project. I strongly suggest building one or two easier models before tackling this one! Four molds are needed
by Dave Lesko Thanks, Detective, for making us look good.
 by Dave Lesko Dave Lesko is a detective in a large police department just outside of Chicago. There are only two things that rival his enthusiasm for his family: the Chicago Bears, his job and monster
The Lansdowne One Car Garage Assembly Instruction by Laser Dollhouse Designs
 The Lansdowne One Car Garage Assembly Instruction by Laser Dollhouse Designs NOTE 1: Please do a dry assembly using only tape to hold house together. This will get you familiar with parts, location, and
After the glue dries, trim the trussrod ends with your cutting pliers
 The following information and photographs are what I did to build the kit. Your methods and needs may differ from this which is fine. There is no right or wrong way if you are used to scratch building.
CA to each one. You may have to hold the end down while to glue sets or use an accelerator like I did.
 The following information and photographs are what I did to build the kit. Your methods and needs may differ from this which is fine. There is no right or wrong way if you are used to scratch building.
If by chance a part is missing or broken please contact us indicating the kit name and part description and we will send you a replacement.
 Six Stall Roundhouse Instructions for Assembly of the HO Scale Six Stall Roundhouse Roundhouse Kit Contents: 18ea. Roof Pieces 12 ea. 1/16" Parts Sheets 9ea. 1/8" Parts Sheets 12ea. Floor Pieces 1ea. 1/4"
Real Good Toys 10 Quarry St Barre, VT
 Real Good Toys Special Edition Kit #SE-RR 29 /5 Congratulations on your choice of a Real Good Toys product. Your kit has been precision made with meticulous care by our craftspeople using carefully selected
Tips & Tricks using Part 8
 Tips & Tricks using Part 8 Easy Sand Texturing...1 Advanced Sand Texturing...3 Making Palm Trees...5 Tips & Tricks using Bruce Hirst Part 8 Page i Easy Sand Texturing I'm going to make the sand textured
CORNER PORCH HOUSE PF5196
 1:87 BUILDING KIT CORNER PORCH HOUSE PF5196 Two-story home with cedar-shake roof and a corner wrap-around porch. Clapboard siding, paned windows, and loaded with accessories, such as a bicycle built for
PS 5077 cu. ft. Boxcar with EOC device. 1:29 scale resin craftsman kit. by Burl Rice
 PS 5077 cu. ft. Boxcar with EOC device 1:29 scale resin craftsman kit by Burl Rice www.burlrice.com Bill of materials (not included): Thick/medium viscosity CA PL adhesive, or Gorilla Glue Heavy Duty Construction
HARRISON S HARDWARE PF5891
 1:48 BUILDING KIT HARRISON S HARDWARE PF5891 Model the local hardware store where layout residents can find all they need to keep their homes in tip-top shape and workshops running smooth. The positive
Model the hub of your layout s rural setting. Planters Feed and Seed Supply Instructions N Scale 1:160 WOODLAND SCENICS
 PF5201 Planters Feed and Seed Supply Instructions N Scale 1:10 Model the hub of your layout s rural setting. Planters Feed and Seed Supply presents a vintage agricultural center where farmers and rural
CVS Pharmacy kit in HO scale
 CVS Pharmacy kit in HO scale Parking lot base and cars not included This kit includes all building parts and wall-mounted signs milled in white styrene plastic, clear window glazing and pre-cut Plastruct
Vivian Mansion Assembly Instruction By Laser Dollhouse Designs
 Vivian Mansion Assembly Instruction By Laser Dollhouse Designs NOTE 1: Please do a dry assembly using only tape to hold house together. This will get you familiar with parts, location, and fit. This also
Copyright Gary Faulkner March Attack All rights reserved.
 Painting and Decorating Sometime passed I posted some painted 28mm Sarissa WWE buildings on to the March Attack Face Book page and had a few show and tell us emails, so here goes. If you meet me at the
This is a modified, 1:22.5 scale, SR&RL
 Build a :22.5-scale SR&RL caboose by Ted Stinson Wiscasset, Maine Plan set #95A This is a modified, :22.5 scale, SR&RL caboose. It closely follows the lines of the Nº 556 SR&RL caboose. However, the model
G. Building the Cab, Cab Roof and Cab Boiler Extension Page 14 and Backhead.
 G. Building the Cab, Cab Roof and Cab Boiler Extension Page 14 and Backhead. Cab. In order to ensure that the cab and tender would actually look right, as what often appears on a drawing is not always
1 16" x 3 16" This is a generic, 1:20.3-scale, short, stock car. Many short. stock car side - make 2. cut 2 from 1 8" x 5 8" stock
 flat wire pin door - make 2 bend here :20. scale, short stock car by Ted Stinson Wiscasset, Maine Plan set #69 6" x 4" 6" x 6" brake wheel 6" dia. rod cotterpin.04" dia. wire flat wire escutcheon pin flat
BUZZ S SAWMILL PF5195 WOODLAND SCENICS BUILDING KIT
 1:87 BUILDING KIT BUZZ S SAWMILL PF5195 Buzz s Sawmill is a detailed work of art with all workings of a vintage steam-fired, belt-driven sawmill. Details include interior rafters and shake roof, attached
San Felipe: Step by Step Pack 3
 Pack 3 Your parts Bulwarks Gun port covers x 2 Tools and equipment Wood glue Sandpaper Brushes Wood stain Hammer Pin pusher/nails Razor saw a Remove the longer bulwark and test-fit it in place at the bow
CONCEPT MODELS INSTRUCTIONS FOR THE KASGRO KRL SPECIAL DEPRESSED CENTER FLAT CARS El Toro Way Stockton, CA 95210
 CONCEPT MODELS Web Address: http://www.con-sys.com Email: concept_models@con-sys.com 8810 El Toro Way Stockton, CA 95210 INSTRUCTIONS FOR THE KASGRO KRL 204000-2 SPECIAL DEPRESSED CENTER FLAT CARS 2 CONCEPT
A trip to Normandy with Sally 4th
 A trip to Normandy with Sally 4th Assembling a random building from the Normandy Kick Starter range Having received the envelope from Sally 4 th I quickly ripped it open to reveal its content. I was met
Blakes 7 DSV-1 Liberator
 Blakes 7 DSV-1 Liberator Model kit by Masterpiece Models: www.masterpiecemodels.com Pattern Maker: Alfred Wong Casting: J&S Technologies LLC Parts List Main body 3 Main body nose vanes 4 Main body detail
WRIGHT FLYER 1 INSTRUCTIONS FOR THE D10LC KIT
 WRIGHT FLYER 1 INSTRUCTIONS FOR THE D10LC KIT Manufactured in the USA by Easy Built Models PO Box 681744, Prattville, AL 36068-1744 Visit us at www.easybuiltmodels.com Easy Built Models GLUE METHODS Always
J.W. cobbler 1:160 BUILDING KIT PF5210 WOODLAND SCENICS
 1:160 BUILDING KIT J.W. cobbler PF5210 The partially assembled walls, positive alignment system and prefinished edges make kit assembly quick, easy and accurate. This three-story brownstone features stacked
Building the Wizards Tower
 Building the Wizards Tower Building Instructions You will need to fill this mold 18 times to have enough blocks to build the tower. Also, the blocks should be completely dry before gluing them together.
Building the Circular Tower
 Building the Circular Tower You will need to fill this mold 18 times to have enough blocks to build the circular tower. Be sure the blocks are completely dry before gluing them together. For detailed instructions
Craftman One Car Garage Assembly Instruction by Laser Dollhouse Designs
 Craftman One Car Garage Assembly Instruction by Laser Dollhouse Designs NOTE 1: Please do a dry assembly using only tape to hold house together. This will get you familiar with parts, location, and fit.
the wire, less is better. And make sure the bends on each truss wire are in line with the other. See the next photo.
 The following information and photographs are what I did to build the kit. Your methods and needs may differ from this which is fine. There is no right or wrong way if you are used to scratch building.
How to Use the Gothic Graveyard Mold #46
 How to Use the Gothic Graveyard Mold #46 The pieces you see here are cast in plastic resin. You cannot use plaster to cast the fence and gate sections, because they would be too fragile and would break
CONCEPT MODELS INSTRUCTIONS FOR UP DC-10 WING CAR El Toro Way Stockton, CA Web Address:
 CONCEPT MODELS Web Address: http://www.con-sys.com 8810 El Toro Way Stockton, CA 95210 INSTRUCTIONS FOR UP DC-10 WING CAR 2 CONCEPT MODELS PARTS DC-10 WING CAR Item No. Part No. DESCRIPTION QTY. 1 2003-1
Tips & Tricks using Part 2
 Tips & Tricks using Part 2 Using the cobblestone mold #210...1 Making a dungeon diorama...2 Making torches...3 Making a textured door...4 Making a portcullis...5 Adding moss...6 Tips & Tricks using Bruce
RoR Step-by-Step Review * Boot Hill Express 1:24 Scale Monogram Kit # Review
 RoR Step-by-Step Review 20130506* Boot Hill Express 1:24 Scale Monogram Kit #85-4999 Review This is what happens when you combine a dragster with an exceptionally ornate hearse. The beautiful wood lines
Instructions: Bethlehem 70 ton Riveted Gondola Kit
 Instructions: Bethlehem 70 ton Riveted Gondola Kit Kit number 10900 01 Steel Floor or 10900 02 Wood Floor 8/2012 Parts included in this kit: 95004 01 Plastic Part Body Shell (either steel or wood floor
This time I am building a 56 Ford 4 Gear Door Slammer for the upcoming race at Sam's.
 PART I I have been meaning for a while, to show you guys what I go through, and my thought process when I decide to do a tear down / scratch build project. Some may remember the Rat Rod Willy's I did as
Noville School Diorama Part 4 Making the Floors and Plastering the Walls and Ceilings
 Noville School Diorama Part 4 Making the Floors and Plastering the Walls and Ceilings Moulds and Materials Making the Floors Plastering the Ceiling Plastering the Walls Installing the Ceiling and Floor
CONCEPT MODELS UTLX 80006,80020 CRYOGENIC TANK CAR KIT INSTRUCTIONS Sheep Ranch Rd. Mountain Ranch, CA 95246
 CONCEPT MODELS Web Address: http://www.con-sys.com Email: concept_models@con-sys.com 8331 Sheep Ranch Rd. Mountain Ranch, CA 95246 UTLX 80006,80020 CRYOGENIC TANK CAR KIT INSTRUCTIONS 2 CONCEPT MODELS
Engineering Directive
 Thing-a-ma-Jig Finishing To Finish a model means to apply paint and other decorations to complete the look of your model. Meaning to apply a finish. That is what we will discuss in this section. Applying
By Robbo. The CANAL PUB and WHARF THE BUILDING STARTS!
 By Robbo The CANAL PUB and WHARF THE BUILDING STARTS! The first necessity was building the continuation of the Canal with wharfs. As in past modules I have boxed it all up using 7mm Plywood for the platforms
GENERAL INSTRUCTIONS. Woodland Scenics PO BOX 98, LINN CREEK, MO woodlandscenics.com PREPARE PLASTIC PARTS PREPARE METAL CASTINGS
 #40700 Popa Weelie's Saloon INSTRUCTIONS CAUTION: Cutting tools recommended. Use with care. This item is not a Children s Product and is not intended for use by Children. Conforms to Health Requirements
CONCEPT MODELS SP DOUBLE STACK CONTAINER CARS INSTRUCTIONS Sheep Ranch Rd. Mountain Ranch, CA Web Address:
 CONCEPT MODELS Web Address: http://www.con-sys.com 8331 Sheep Ranch Rd. Mountain Ranch, CA 95246 SP DOUBLE STACK CONTAINER CARS INSTRUCTIONS 2 CONCEPT MODELS PARTS Item No. PART NO. DESCRIPTION QTY. 1
3Insert the second rod no. 4
 Yamato: Step-by-step 37 The stern block and searchlight control towers a b c d e f Recommended tools and materials Wood glue Sandpaper (no. 800 grain) Metal file Putty Craft knife For metal: Super Glue
Small Town Buildings. Scaled and easy to read patterns and instructions. Shoe / Western Union (with and without porch)
") 1 /24 th Scale Patterns kiva design G R O U P E 1 Story Flat Roof Yard and Garden Buildings Compatible with Garden Railroads or a delight for any child's collection Overall Dimensions Foundation: 10" x
1 /24 th Scale Patterns kiva design G R O U P E 1 Story Flat Roof Yard and Garden Buildings Compatible with Garden Railroads or a delight for any child's collection Overall Dimensions Foundation: 10" x
Aerospace Speciality Products
 Specifications:! Length: 18.75"/47.6 cm! Diameter: 0.98"/24.9 mm! Weight: 1.5 oz/44 gm! Streamer Recovery! Recommended Engines:!! A8-3; B4-4; B6-4; C6-5! Skill Level: Beginner This is a model rocket kit
Model Grandma and Grandpa s cozy cottage, a. Country Cottage Instructions HO Scale 1:87 WOODLAND SCENICS PF5186
 PF586 Country Cottage Instructions HO Scale :87 Model Grandma and Grandpa s cozy cottage, a young family s first home or give this vintage Victorian cottage the run-down look of an abandoned shack. This
You can print these instructions by downloading the PDF here: Boxcar Assembly PDF
 The following information and photographs are what I did to build the kit. Your methods and needs may differ from this which is fine. There is no right or wrong way if you are used to scratch building.
This is a generic, 1:20.3 scale, retired boxcar. Most railroads had a surplus of old boxcars, as well as a need for section houses, Composite View
 6" x 3 6" door make :20.3 retired boxcar Plan set #72 by Ted Stinson Wiscasset, Maine glazing 6" x 4" 6" x 8" This is a generic, :20.3 scale, retired boxcar. Most railroads had a surplus of old boxcars,
Shell Gas Station & Convenience Store kit in HO scale
 Shell Gas Station & Convenience Store kit in HO scale Parking lot base and cars not included This kit includes all building parts and signs milled in white and black styrene plastic, clear window glazing,
Working with Resin Models
 Working with Resin Models This article will run through the basic techniques and methods required to get the most out of preparing, cleaning up and assembling Forge World s resin kits. If you need extra
Materials Required. Gravel / Small Stones. Floor Tile Bases* Multi Tool. Masking Tape. Toothpaste Cap. Nails. Bits of Bark Paperclips.
 Materials Required Gravel / Small Stones Floor Tile Bases* Masking Tape Multi Tool Nails Toothpaste Cap Bits of Bark Paperclips Paint Glue Sculpty (Oven Bake Clay) Basing Materials Required Hobby Lichen
EXTREME LOAD no. TWO
 1602 - EXTREME LOAD no. TWO Kit Features: 22' 4 " x 14' x 3'-6 Oversize Load 49mm (1.9") actual height Bolt Head Details Welded Load Mounting Fins Painting Handles Tools Required: Hobby Knife Tweezers
Wayside Cottage Assembly Instructions By Laser Dollhouse Designs
 Wayside Cottage Assembly Instructions By Laser Dollhouse Designs Parts for assembly Base Floor marked 1A thru 1L 13 post and 11 fences With one gate Walls 1A thru 1L and Alcove roof panels 3 lg and 1 sm
Assembly Instructions for Summit Motel Kits # SMFS and SMBD
 Assembly Instructions for Summit Motel Kits # SMFS and SMBD Introduction Thank you for your purchase of the Summit Motel. This modern motel can be converted to almost any chain motel of your choice, depending
Scratchbuild A Backwoods Water Tank Part V - Making the Frost Box and Hanging the Water Spout
 Scratchbuild A Backwoods Water Tank Part V - Making the Frost Box and Hanging the Water Spout By Dwight Ennis In this section, we're going to make the Frost Box, and we'll build the Spout Hanger Assembly
Hubble Space Telescope Paper Model Directions Downloads, patterns, and other information at:
 Hubble Space Telescope Paper Model Directions Downloads, patterns, and other information at: www.hubblesite.org/go/model Materials: model pattern printed onto cardstock/coverstock instructions printed
Staining and Weathering Stripwood
 Staining and Weathering Stripwood Part 1 All photos and text Mike Chambers 2008 A s a member of Railroad-Line Forums (www.railroad-line.com), I frequently get asked to explain how I stain and weather the
first piece, hold it back from the front edge of all the 2 X 6 s by four it to the tops of these same posts. Once this small assembly has dried,
 FINESTKIND MDL'S TRI STAR OIL CO. KIT #110 BEFORE YOU START: Sort and identify all the parts and visualize each step. Some of the wood parts have been cut to length for you and should need no further work.