Diorama. How to make a diorama or model building
|
|
|
- Dinah Welch
- 6 years ago
- Views:
Transcription

 You will get 2 low set houses out of this size 4 ends, 2 front and 2 back. 1 sheet of ply for the roof, (approx size 600x 600mm).")
1 Diorama How to make a diorama or model building Tools required Basic Tools: Drill, Circular saw, Jig saw, Utility Knife (Stanley) Hammer, Wood Glue and Nails These are all you need to get started. Later on if you can afford it, to make things easier, you can add tools such as. Bench saw, Router, Dremel with some of the extra attachments, Planner and mini saw. Materials Materials we have used to construct the buildings have been Ply and MDF. The walls were 9mm thick. The roof can be a bit thinner 6mm. They come in various sizes but we bought 1mtr x 900mm (approx $15) You will get 2 low set houses out of this size 4 ends, 2 front and 2 back. 1 sheet of ply for the roof, (approx size 600x 600mm). Finishing This covers painting, windows, doors and using stencils to get a brick look Beginners If you are starting out for the 1 st time I suggest you construct a building out of thick cardboard. You can use pins and tape to secure the walls and roof together. This will give you a good idea how it is supposed to look and get a feel of the construction technique.
2 Let s make a basic house. If you are new to woodworking and don t have a shed or workroom, you will properly work on your patio or in you garage. Clear some space and remember it does create a lot of dust. You will need an old table to work on or a portable workstation. You can draw the dimensions from the plan directly onto the ply or make a template out of thin cardboard and then draw around them. I like the template idea, can save a lot of work especially when building a few of these houses. Draw the measurements onto the ply from the plan below. Cut 1 each of Front and Back 230mm Cut 2 Ends


3 Glue and nail the ends onto the front and Back panels Back E N D E N D Front The house should look like the photo below
4 Putting on the roof This is not difficult, you have to decide how much eaves you will have hanging over. The houses we have built are 30mm. You can also have eaves on the end of the house or leave it flush. Measure the roof panel No2 from the apex of the house then add 30mm for the eaves. I Measure the roof panel No1 from the apex of the house then add 30mm for the eaves. If you are going to have eaves over end of house measure length of building plus 60mm End Panel of House


5 The house should look like the photo below


6 Finishing The next stage of the house construction is the finishing, which consists of 1. Painting: Matt or Gloss, Stucco, Stencils, Sponges 2. Adding doors: This can be achieved by using Balsa wood, MDF. 3. Window trims: This can be achieved by using Balsa wood, MDF or Air brushing. 4. Chimneys: Cutting a general shape out of thick timber and gluing onto building where you decide. 5. Damaged Building: This can be achieved by cutting a finished building, at the end or in the middle or just the roof. This is an individual taste depending on what kind of town or village you decide on e.g., French, Italian or German This has just touched the surface of how to finish your building. We would suggest looking at other sites to get ideas. We are open for any ideas that you may have used, to help in our finishing. We can also give you more help by asking questions in the web site. Damage House painted with stucco paint and the chimney with a sponge dipped in paint, to give a stony look. The prototype house was a bought stencil and coloured grout spread over the stencil.
7 Double Story House We have created a double story house simply by cutting out two front panels and two back panels. Assemble the lower section first as if you are building a low set house. The next part of the procedure is to cut and nail a floor on top of the lower section that is as wide as the top section. When this is completed build the top section as per instruction of the lower section and put the roof on. If this seems a bit confusing, have a look at the picture of the double story. Please sent a message to the administrator and perhaps we can help further. Please keep in mind the placement of windows and doors can be changed to personalise the building to your own taste. The cut-out for the double Story house is 50mm
8 The Church
9
10 I started by cutting all the pieces out and placing on the floor, as photo below. You need to cut out the windows and doors before assembly. I did not and discovered that the jigsaw would not sit flat, because of the over-hang of the roof. This made the blade of the jigsaw to run at an angle. Assemble the large end and the front and back. Take the 2 small ends of body of church. Glue and nail all together as per illustration


11 Assemble the tower the 2 sides and 2 ends This photos does not show the back wall of the tower You will need to glue this piece of timber to the back wall of the tower This supports the roof when it is installed. Glue and clamp the tower into the body of the church. Next glue and nail the roof panels on, you may have to adjust this a little bit to get it to sit correctly.
12 The Last part of the church is the spire on top of the tower. Lay out the eight parts as shown in diagram below. Place gaffer tape or grey tape in three places to hold all pieces together When gaffer tape is in place, fold spire so gaffer tape is on the inside and form the conical shape. Glue the joins with liquid nails or some other strong glue. You can strengthen cone by filling with expanding foam, be careful not to fill to top as the foam expands to three time its volume. Allow 24 hours to dry. With the four triangular pieces create a pyramid and glue together. Allow 24 hours to dry. Place spire on top of pyramid and glue together. You don t have to glue final spire onto the tower as the weight will keep it there.

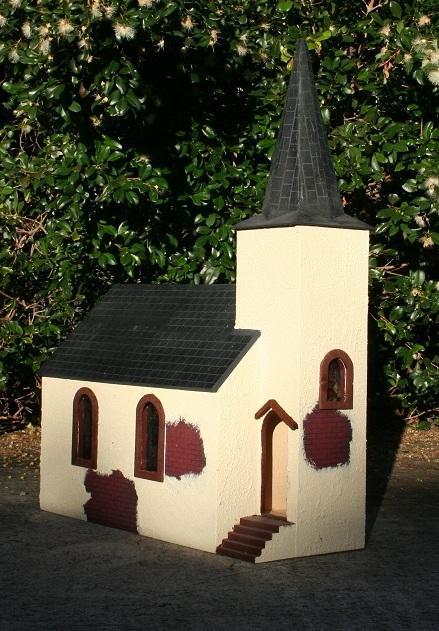
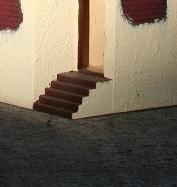
13 Finished Church
Tools and materials. Order of work. Prepare a flat pack as follows:
 DIY Badge Activity Pack What s included in this How To s pack: Making a mug tree...2 Making a magazine storage box... Making a key holder...4 Making a bird apple feeder...5 Making a set of dominoes...6
Small 45 Roof Houses 1 or 2 Story 1 /24 th Scale Patterns
 BA GARDEN TOWNS 45 Roof Houses 10" x 10" 1 or Story Scaled and easy to read patterns and instructions for wood houses. Yard and Garden Buildings Compatible with Garden Railroads or a delight for any child's
REGENCY TIMBER BUILDINGS
 REGENCY TIMBER BUILDINGS TEL 01948 830460 UNIT 22 PENLEY IND EST, PENLEY.WREXHAM. LL13 0LQ 1 Garage fitting instructions Tools needed handsaw, hammer, Stanley knife with hook blade, tape measure, battery
Building the Gothic Church
 Building the Gothic Church Mold #54 does not contain all of the blocks to build this church. You will need extra regular blocks (1/2" x 1/2" x 1") and square blocks (1/2" x 1/2" x 1/2"). These blocks can
Small Town Buildings. Scaled and easy to read patterns and instructions. Shoe / Western Union (with and without porch)
") 1 /24 th Scale Patterns kiva design G R O U P E 1 Story Flat Roof Yard and Garden Buildings Compatible with Garden Railroads or a delight for any child's collection Overall Dimensions Foundation: 10" x
1 /24 th Scale Patterns kiva design G R O U P E 1 Story Flat Roof Yard and Garden Buildings Compatible with Garden Railroads or a delight for any child's collection Overall Dimensions Foundation: 10" x
NOAH S ARK IN JUST 2 WEEKENDS
 INSTRUCTIONS FOR MAKING A 1.8 METRE MODEL OF NOAH S ARK IN JUST 2 WEEKENDS NOW YOU DON T HAVE TO SPEND HUNDREDS OF HOURS TO BUILD YOUR OWN NOAH S ARK MODEL. YOU CAN NOW BE EQUIPPED WITH A GREAT VISUAL
Building the Cathedral
 Building the Cathedral Please note that the cathedral is a fairly difficult and time consuming project. I strongly suggest building one or two easier models before tackling this one! Four molds are needed
After printing these plans, several pages will need to be taped together to form a larger plan. Below is a diagram of which pages need assembled.
 Watermill Building Plans For complete building instructions and instructional videos, please visit the main web site at www.hirstarts.com/watermill/watermill.html. Using these plans alone will not give
About.com :
 http://woodworking.about.com/gi/dynamic/offsite.htm?sit...//www.popularwoodworking.com/features/fea.asp%3fid=1088 (1 of 8)1/28/2004 12:05:01 AM Modern Storage Tower The last thing I want to do when starting
Noville School Diorama Part 4 Making the Floors and Plastering the Walls and Ceilings
 Noville School Diorama Part 4 Making the Floors and Plastering the Walls and Ceilings Moulds and Materials Making the Floors Plastering the Ceiling Plastering the Walls Installing the Ceiling and Floor
 America s leading woodworking authority To download these plans, you will need Adobe Reader installed on your computer. If you want to get a free copy, visit: http://adobe.com/ reader. Having trouble downloading
Obtained from Omarshauntedtrail.com
 http://usersites.horrorfind.com/home/haunts/monstermaze/ The Monster Maze Makes a Castle Facade Under $100 Requirements: $40.00-5 pieces of 4' x 8' plywood $ 3.00 - box of nuts, bolts, and washers $ 4.00-2
The Park Hotel Instructions for Assembly of N Scale Kit
 The Park Hotel Instructions for Assembly of N Scale Kit Kit Contents: 198 ea. Laser Cut Acrylic Parts, 2 ea. Chimney Parts Sheets, 1 ea.2".040 styrene rod, 5 ea. Sidewalk Parts, 14 ea. Cast Resin Dormers,
The Park Hotel Instructions for Assembly
 The Park Hotel Instructions for Assembly Kit Contents: 280 ea. Laser Cut Acrylic Parts. 1 ea. 6" Plastic Coated Wire. 5 ea. Sidewalk Parts. 14 ea. Cast Resin Dormers. 12 ea. Window Glass Templates, 12
Windsor Chair Online. Assembly Instructions
 Windsor Chair Online Assembly Instructions Date: 1/4/2007 Other Chairs Offered Philadelphia Arm Chair New England Comb Back Sackback d Arm Chair Bow Back Side Chair Fan Back Side Chair Page 1 Table of
Router Table. Construction
 Router Table A router table is an invaluable tool. The problem, however, is that ready-built router tables are usually relatively expensive and too narrow for many projects. This router table provides
Kentucky 4H Wood Science Plans Notebook. Plans Level 1
 Kentucky 4H Wood Science Plans Notebook Plans Level 1 MATERIALS NEEDED: 1 piece wood 3/4" x 2 x 2 1 piece wood 3/4" x 3 x 3 1/2" 1 wooden spring-type clothespin 2-1 1/2" nails 1-1/2 woodscrew Wood Glue
Tools and Tips: ( 1 )
") Tools and Tips: As you build instructions will show in my many picture manual how to assemble. You can use your own methods as you desire, my results are very good. A smooth, flat work surface is very
Tools and Tips: As you build instructions will show in my many picture manual how to assemble. You can use your own methods as you desire, my results are very good. A smooth, flat work surface is very
A Day House. A View of One Way to Finish the Exterior of The Day House. Read these instructions all the way through before beginning this project.
 A Day House A View of One Way to Finish the Exterior of The Day House Read these instructions all the way through before beginning this project. General Comments For the purposes of this project, the standard
Nanton Grain Mill Assembly
 ( 1 ) Nanton Grain Mill Assembly Locate package for assembling storage building. These are cut from 1/8 masonite. Inspect and lightly sand edges where it will be bonded. Use white glue or CA glue to bond.
PROJECT PLANS EXPANDABLE CRAFT CENTER
 R PROJECT PLANS EXPANDABLE CRAFT CENTER Whether you re working on craft projects, sewing, or pursuing another hobby, this craft center offers a great place to work. It features a large work surface that
Tools and Tips: ( 1 )
") Tools and Tips: As you build instructions will show in my many picture manual how to assemble. You can use your own methods as you desire, my results are very good. A smooth, flat work surface is very
Tools and Tips: As you build instructions will show in my many picture manual how to assemble. You can use your own methods as you desire, my results are very good. A smooth, flat work surface is very
Cardboard Model Buildings
 Cardboard Model Buildings Get more model kits from http://www.modelbuildings.org PRINTING & ASSEMBLY TIPS: These OO designs can easily be resized by reducing the print percentage as follows: OO scale is
Kalimba Case. Jean Siu.
 Kalimba Case Jean Siu Jeanpsiu@gmail.com Supplies used: Box big enough for the kalimba plus two inches around all the edges of your kalimba, mine came from Hobby Lobby. Paint or Stain Sand paper Modge
Tackling America s To- Do List: Project Steps
 Tackling America s To- Do List: Installing Shoe Molding Living Room/ Bedroom - Dremel 8200 Rotary Tool - 2500-01 Multi- Vise - 407 Sanding Drum - 430 Sanding Drum (optional) - Wall adhesive - 2500-01 Multi-
Ben Franklin 5&10 Store
 Ben Franklin 5&10 Store RIVER LEAF MODELS, LLC RIVER LEAF MODELS, LLC Thank you for purchasing the Ben Franklin 5&10 structure kit. Your kit includes everything you need to assemble the final product.
Instructions and Assembly Guide
 Corona Concepts presents The Creekside Cabin All Wood Dollhouse 1997 Corona Concepts Schenevus, NY 12155 All rights reserved These instructions were printed in New York State Instructions and Assembly
Installation Guide. Pionite Decorative Surfaces One Pionite Road, Auburn, Maine PIONITE ( )
") Installation Guide A Subsidiary of Panolam Surface Systems SMPBRO00-012 6/14 Pionite decorative laminates are designed for finished interior surfaces which require high impact, wear and stain resistance
Installation Guide A Subsidiary of Panolam Surface Systems SMPBRO00-012 6/14 Pionite decorative laminates are designed for finished interior surfaces which require high impact, wear and stain resistance
DAVENPORT DEPARTMENT STORE PF5214
 1:160 BUILDING KIT DAVENPORT DEPARTMENT STORE PF5214 Dress up your downtown scene with the classic Victorian architecture and large first-floor picture windows of the Davenport Department Store. Details
PROJECT PLANS PATIO PLANTER BOX
 PROJECT PLNS PTIO PLNTER BOX This great-looking planter makes the perfect place for your favorite plants and flowers. It s sized to hold an 18" round plastic pot, which you can pick up in any garden center.
Make a cupboard as a BCATS
 National Certificate in Building, Construction, and Allied Trades Skills (BCATS) Make a cupboard as a BCATS project Unit Standard 25921 Level 2, Credit 6 Name: Contents Reference Page What you need to
Assembly Instructions for Summit Motel Kits # SMFS and SMBD
 Assembly Instructions for Summit Motel Kits # SMFS and SMBD Introduction Thank you for your purchase of the Summit Motel. This modern motel can be converted to almost any chain motel of your choice, depending
TOOLS AND MATERIALS USED HOW TO MAKE A MOTTE AND BAILEY CASTLE
 HOW TO MAKE A MOTTE AND BAILEY CASTLE TOOLS AND MATERIALS USED The base board RF50034 RW11003 RF10003 AG00051 AC00009 AP00036 FB10008 TR10009 TK10064 White A2 foamboard 5mm thick MDF sheet, 250 x 500 x
The Gothic Chess Set
 The Gothic Chess Set Please note that this chess set is a fairly difficult and time consuming project. I strongly suggest building one or two easier models before tackling this one! The miniatures used
SE5a Instrument Board part 2 - rev 1.1
 SE5a Instrument Board part 2 - rev 1.1 Fuel (Petrol) Valve This valve uses two circular name plates, eight brass screws, one black plastic base, copper wire and two black plastic risers. You can pick any
Bird Feeder. Tool Requirements
 Bird Feeder Written and constructed by Craig Tilley This wooden bird feeder will be an attractive addition to your garden. Its wide trays allow plenty of room for birds to come and have a snack, and the
TM TM DOG HOUSE Age 9+
 TM TM DOG HOUSE Age 9+ Safety First! Use eye protection, always! Use ear protection with loud power tools Stay with kids while they work! Follow tool manufacturers safety guidelines This project is recommended
Building the Wizards Tower
 Building the Wizards Tower Building Instructions You will need to fill this mold 18 times to have enough blocks to build the tower. Also, the blocks should be completely dry before gluing them together.
1 ¼-inch Pocket Screws Brad Nailer or Hammer 1 ¼-inch Brad Nails Clamps
 MATERIALS: TOOLS: (4) 2 x 6 x 8 Ft. Boards Tape Measure (2) 2 x 4 x 8 Ft. Boards Carpenter s Square (7) 1 x 4 x 8 Ft. Boards Pencil (2) 1 x 3 x 8 Ft. Boards Drill (1) Half Sheet of ¾-inch Thick Plywood
" BASE CABINET
 INSTALLATION GUIDE INSTALLATION GUIDE Before You Begin Installing Your Kitchen Cabinets 1. Read through installation guide to understand all steps and gather tools needed. 2. Verify that all of the hardware,
EZYSTONE WORKSURFACES
 EZYSTONE WORKSURFACES Installation & Maintenance Instructions 1. Tools Required Worktop Edge Finishing Kit Pack 1-100mm Velcro Backing Pad Pack 2-100mm Diamond Dry Cut Velcro Discs (100 Grit Yellow) (200
Tools and Tips: ( 1 )
") Tools and Tips: As you build the book will show in my many picture manual how to assemble. You can use your own methods as you desire, but these worked best for me. A smooth, flat work surface is very
Tools and Tips: As you build the book will show in my many picture manual how to assemble. You can use your own methods as you desire, but these worked best for me. A smooth, flat work surface is very
COMPLIMENTARY WOODWORKING PLAN
 COMPLIMENTARY WOODWORKING PLAN COFFEE TABLE PLAN This downloadable plan is copyrighted. Please do not share or redistribute this plan in any way. It has been paid for on your behalf by JET Tools, a division
Instructions for pasting paper archery target faces on cardboard. Joe Rozmus NCFAA President / Director 03/11/2018
 Instructions for pasting paper archery target faces on cardboard. Joe Rozmus NCFAA President / Director 03/11/2018 These directions refer to the set up at the DCWC, but can be used by any club to create
Wanderlust Suitcase Vanity
 Wanderlust Suitcase Vanity If you re like me, you re always up for an adventure. When I saw some examples of DIY reclaimed suitcases, paired with the exciting new Wanderlust embroidery design collection,
Make every component count.
 Make every component count. Technical Bulletin Installation Instructions ABOUT THE MATERIAL The frame and material have been thoroughly tested for strength, durability and low maintenance, offering a never
Please read through the entire document before starting your installation process to better understand what is required.
 1 P a g e How s It Hanging? Step-by-Step Guide for Hanging your Wallpaper Walls Republic offers a richer and wider selection of designs, textures and colours than ever before found in the wallpaper world,
The Lansdowne One Car Garage Assembly Instruction by Laser Dollhouse Designs
 The Lansdowne One Car Garage Assembly Instruction by Laser Dollhouse Designs NOTE 1: Please do a dry assembly using only tape to hold house together. This will get you familiar with parts, location, and
Building the Bell Tower
 Building the Bell Tower Mold #55 does not contain all of the blocks to build this tower. You will need extra regular blocks (1/2" x 1/2" x 1") and square blocks (1/2" x 1/2" x 1/2"). These blocks can be
Kitchen Step Stool. Premium Plan. In this plan you ll find: America s leading woodworking authority
 America s leading woodworking authority Premium Plan In this plan you ll find: Step-by-step construction instruction. A complete bill of materials. Construction drawings and related photos. Tips to help
Make your own zero clearance throat plate.
 Make your own zero clearance throat plate. A picture tutorial By Wayne Breshears One of the more important table saw accessories you can have is a zero clearance insert or throat plate. The close tolerance
The Hamlin Assembly Instruction By Laser Dollhouse Designs
 The Hamlin Assembly Instruction By Laser Dollhouse Designs NOTE 1: Please do a dry assembly using only tape to hold house together. This will get you familiar with parts, location, and fit. This also gives
G. Building the Cab, Cab Roof and Cab Boiler Extension Page 14 and Backhead.
 G. Building the Cab, Cab Roof and Cab Boiler Extension Page 14 and Backhead. Cab. In order to ensure that the cab and tender would actually look right, as what often appears on a drawing is not always
ROOM FOLD SLIDING FOLDING INTERNAL DOORSET FITTING & FIXING GUIDELINES
 EDITION 7 ROOM FOLD SLIDING FOLDING INTERNAL DOORSET IMPORTANT You can only assemble these door configurations by using the frame provided. Your warranty will be invalid if other alternatives are used.
Beds may be put up or taken down quickly by use of a simple bolted connection at rails and uprights. MATERIALS LIST
 CANPLY This design has been made both functional and attractive by use of pattern cut-outs in head and foot uprights, which serve as ladders. Since most children love to climb, getting them to bed will
PITTS S2S CONSTRUCTION
 PITTS S2S CONSTRUCTION FUSELAGE CONSTRUCTION 1) Place the right fuselage side over the plan and mark the former positions. Place the left side over the right side and mark the former positions. Glue F1
Roof Contour By Bob Parrish
 Roof Contour By Bob Parrish This text will show you how to shape the roof contour on Labelle passenger and trolley kits. The height of the clerestory on the two types of kits is different. Passenger kits
The easy way to an affordable kitchen
 quality, affordable, pre-assembled The easy way to an affordable kitchen In association with All Insta-Cupboard carcass units are supplied pre-assembled to simplify installation Choose the colour of your
I love the outdoors. And I m impressed with whatever forces in the universe have made it possible for me to purchase a collapsible canvasand-metal
 Limbert Chair 9 I love the outdoors. And I m impressed with whatever forces in the universe have made it possible for me to purchase a collapsible canvasand-metal camp chair for under $20. But when you
Hotel Belvedere Instructions for Assembly of the HO scale kit. v1.1
 Hotel Belvedere Instructions for Assembly of the HO scale kit. v1.1 Kit Contents: 319 ea. laser cut.090" acrylic parts. 132 ea. laser cut.060" acrylic parts. 8 ea. window glass templates 8 ea. window glazing
SLIM TRIM MOULDING INSTALLATION METHODS
 Slim Trim as a reducer Use SlimTrack (Metal Track) for up to 4 mm floors. Up to 4 mm Floors 3/8 *If the flooring manufacturer suggests/permits the use of underlayments you may need to shim the track to
How To Create An Entertainment Unit
 How To Create An Entertainment Unit Materials required: 2 x Pine Panels - 1800mm x 450mm x 18mm 4 x Pine Panels - 310mm x 450mm x 18mm 1 x Pine Panels - 650mm x 450mm x 18mm 6 x Bun feet (your choice of
The image above is intended to give you an idea of what the dovecote will look like when finished.
 Thank you for buying my book, I hope it is useful and enjoyable in your quest to building your own dovecote. This book will give you step-by step instructions on how to build your own dovecote also included
INSTALLATION MANUAL FORTRESS SERIES
 Guardian Security Structures TEL 1-406-212-2334 EMAIL rg@gssdoors.com WEB www.gssdoors.com FORTRESS SERIES GENERAL INSTALLATION GUIDELINES 1. The door frame is installed using 16 bolt screws 7,5 mm in
PROJECT PLANS HOBBY BENCH
 PROJECT PLANS HOBBY BENCH This great-looking bench provides the perfect place to pursue a variety of hobbies. It offers a large bench top with built-in trays for small items, plus shelves up above to hold
Three layer Felt Roofing using cold applied adhesive
 Three layer Felt Roofing using cold applied adhesive Useful tips - Skill level - Safety - Felt Roofing Materials - Tools and Equipment Laying a felt roof is within the capabilities of most diy people providing
Copyright Gary Faulkner March Attack All rights reserved.
 Painting and Decorating Sometime passed I posted some painted 28mm Sarissa WWE buildings on to the March Attack Face Book page and had a few show and tell us emails, so here goes. If you meet me at the
FIXING GUIDE. Designed for Garages & Sheds, Houses, DIY, Flat Roofs, Industrial & Agricultural Buildings etc. IS THE LONG TERM ROOFING SOLUTION
 FIXING GUIDE Designed for Garages & Sheds, Houses, DIY, Flat Roofs, Industrial & Agricultural Buildings etc. IS THE LONG TERM ROOFING SOLUTION Permaroof Permaroof Permaroof Profile Roofing Manufacturers
Airport Terminal Building #1 (AD-TB01-0A)
") Thank you for purchasing the Airport Terminal Building #1. I know you will be pleased with the final product. Before you get started, here is a list of what you ll need: Paper. For best results I recommend
Thank you for purchasing the Airport Terminal Building #1. I know you will be pleased with the final product. Before you get started, here is a list of what you ll need: Paper. For best results I recommend
Installing your new Bevella Top. L Shaped Countertop with Joints No Finished Ends (Fits Between Four Walls)
") Installing your new Bevella Top L Shaped Countertop with Joints No Finished Ends (Fits Between Four Walls) Bevella RTI Countertops are engineered and manufactured to the highest quality standards, built
Installing your new Bevella Top L Shaped Countertop with Joints No Finished Ends (Fits Between Four Walls) Bevella RTI Countertops are engineered and manufactured to the highest quality standards, built
Display Case (for J&S)
") Display Case (for J&S) This is constructed of maple plywood with solid maple (soft maple) edge banding. It was made to fit between a door and a kitchen cabinet, and has an elegant circular taper between
Display Case (for J&S) This is constructed of maple plywood with solid maple (soft maple) edge banding. It was made to fit between a door and a kitchen cabinet, and has an elegant circular taper between
Sauna & Steam. Vision Sauna Manual Wall Hung Heater Version (Covers all models)
") Vision Sauna Manual 14.7.18 Wall Hung Heater Version (Covers all models) Oceanic Ltd, Pountney Street, Wolverhampton, WV2 4HX Phone: 01902 450 550 sales@oceanic-saunas.co.uk www.oceanic-saunas.co.uk Table
Vision Sauna Manual 14.7.18 Wall Hung Heater Version (Covers all models) Oceanic Ltd, Pountney Street, Wolverhampton, WV2 4HX Phone: 01902 450 550 sales@oceanic-saunas.co.uk www.oceanic-saunas.co.uk Table
How to install Magic Metal
 How to install Magic Metal First you need the following tools: Glue: Indoor Out Door Carpet Glue 3 gallon pail. A few rollers (the thinner nap the better) a pan with liner. A good utility knife with extra
A trip to Normandy with Sally 4th
 A trip to Normandy with Sally 4th Assembling a random building from the Normandy Kick Starter range Having received the envelope from Sally 4 th I quickly ripped it open to reveal its content. I was met
Pocket Door Kit PD1 / PD2 Installation Instructions. Kit Contents.
 Pocket Door Kit PD1 / PD2 Installation Instructions Kit Contents. 1, Create Rough Opening In Stud Wall Construct rough opening ensuring all sides are square and level. Rough opening should be; Height =
INSTALLATION INSTRUCTIONS FOR ULTRA LATTICE AND ALUMAWOOD ARBORS
 INSTALLATION INSTRUCTIONS FOR ULTRA LATTICE AND ALUMAWOOD ARBORS GENERAL INFORMATION: Lattice arbors are designed to be freestanding or attached. They are designed to resist a 10 lb. to 30 lb. per square
Ziroli D-17 Beech Staggerwing
 Ziroli D-17 Beech Staggerwing Parts List Vacuform Parts: Miscellanous Pieces 1 Four Side Panels 1 3/16" Tube, 2" Long 2 Lower Dash - Back Dash 2 Felt, 12x24 3 Dash 3 Cordury 12x24 4 Dash Hood 4 Aluminum
irdhouse Table Special Tools and Techniques Materials and Supplies Hardware
 B irdhouse Table This whimsical table is one of our favorite projects, because it never fails to produce a smile on the faces of our backyard guests. Not only is it cheerful to behold but the glass top
Architecture and Colour
 Architecture and Colour Copies of architectural drawings and maps of the Bridgewater Canal Selection of Watercolour pencils Pots of water This activity is about shape and colour, linking in the shapes
4 Position the Suntile to the x tile s position and mark the felt around the square box flange. Then remove the Suntile
 4 Position the Suntile to the x tile s position and mark the felt around the square box flange. Then remove the Suntile 5 Using a sharp bladed knife, cut through the felt from corner to corner in an x
Workstation. Multipurpose. Shop Project
 Shop Project Multipurpose Workstation Rock-solid, practical, and inexpensive it s tough to beat this versatile workstation that you can make from one sheet of plywood.. I don t think a woodworker can ever
MATERIALS: TOOLS: CUT LIST:
 MATERIALS: (3) 4x4x8 Ft. Boards (8) 2x4x8 Ft. Boards 2 ½-inch Pocket Screws 2 ½-inch Wood Screws 1-inch Wood Screws (16) Figure 8 Tabletop Fasteners Wood Glue Wood Filler TOOLS: Tape Measure Pencil Carpenter
BUZZ S SAWMILL PF5195 WOODLAND SCENICS BUILDING KIT
 1:87 BUILDING KIT BUZZ S SAWMILL PF5195 Buzz s Sawmill is a detailed work of art with all workings of a vintage steam-fired, belt-driven sawmill. Details include interior rafters and shake roof, attached
15 Dovetail Jig. Instruction Manual. Part # 3452
 15 Dovetail Jig Instruction Manual Part # 3452 CAUTION: Please read, understand, and follow all manufacturers instructions, guidelines and owners manuals that come with your power tools. Peachtree Woodworking
Plexidor Pet Door Wall Kit Instruction for All Sizes Plexidor : S, M, L, XL; BiteGuard KennelPlex TM 1113,1418, 1419 & 1825 and Plexidor Electronic LG
 Plexidor Pet Door Wall Kit Instruction for All Sizes Plexidor : S, M, L, XL; BiteGuard KennelPlex TM 1113,1418, 1419 & 1825 and Plexidor Electronic LG Congratulations on your purchase of the Plexidor Pet
An Inner Hive Cover. In the Beekeeper s Work Shop. Building a Bee Hive: The Inner Hive Cover. by Stephen E. Tilmann
 An Inner Hive Cover In the Beekeeper s Work Shop The project for this article is an inner hive cover. The inner cover sits on top of the topmost hive body (super) and underneath the telescoping top cover
Extendable Large Dovetail Jig
 Extendable Large Dovetail Jig Instruction Manual Part # 3458 CAUTION: Please read, understand, and follow all manufacturers instructions, guidelines and owners manuals that come with your power tools.
Empire Dresser Plans
 1 Empire Dresser Plans Materials 1 sheet 3/4" plywood (cabinet grade 4' x 8') 1 sheet 5 mm (3/16") underlayment plywood 4'x 8', buy another 1/2 sheet if you want to put a back on the dresser. 1-2" x 4"
3Insert the second rod no. 4
 Yamato: Step-by-step 37 The stern block and searchlight control towers a b c d e f Recommended tools and materials Wood glue Sandpaper (no. 800 grain) Metal file Putty Craft knife For metal: Super Glue
Instructables Butcher Block Top
 Instructables Butcher Block Top Project Overview: This project requires basic woodworking skills and access to woodworking machines. Woodworking machines have sharp cutting edges and are NOT forgiving.
A Magazine Rack with a Top
 A Magazine Rack with a Top Introduction: I have never come across a good free plan for a magazine rack. Yet almost all homes have one. So this is one of the few items I have made on my own, as I don t
The Q Frame PROJECT. a picture frame with secrets created exclusively for the Router Forum
 The Q Frame PROJECT a picture frame with secrets created exclusively for the Router Forum 007 OR RELEASE FPLANS APPROVED The Q Frame: Project Overview LIST OF MATERIALS Frame Sides & Face 3/4 x 5 1/2 x
Dresser. Materials & Tools FEATURING FORMALDEHYDE-FREE TECHNOLOGY. Free Plans to build a Dresser
 Free Plans to build a Dresser Materials & Tools Materials: 1-1/4 pocket hole screws 1-1/4 brad nails 3 sets of 18 drawer slides Drawer pulls Edge banding, optional Wood glue Sandpaper (100, 150, 220 grits)
29mm Priority Cinco. Glue all along seam. Tape
 29mm Priority Cinco The 29mm Priority Cinco is a companion to the 29mm Priority Stealth which is made from a used, U.S. Postal Service Priority Mail cardboard box. A clean pizza box would work just as
PROJECT PLANS WOODEN GIFT BOX
 PROJECT PLANS WOODEN GIFT BOX Make the gifts you give even more special by presenting them in this one-of-a-kind gift box. In fact, the box may be valued more than whatever it contains. The box is sized
Robert Bosch GmbH. Minimalist washstand
 Minimalist washstand Neat and tidy Minimalist washstand Minimalist design in the bathroom is in fashion. And rightly so, as this washstand proves: because less is more! 1 Introduction Here s an idea to
Al & Gary's Illusionist Heart
 Al & Gary's Illusionist Heart Plans and Instructions by: Albert Herwig and Gary A. Emerich Al & Gary's Illusionist Heart As Al Would Say: It's a pendant Now it's a heart Our pictures are in there My children'
Phase Two. The Skirt, Play Area and Sub Table ( continued )
") Dry fit the skirt in place and make sure all is tight. Drill a countersink screw hole on the back of the skirt down where you will connect it to the bull nose. Make three holes on each board (ends and
Dry fit the skirt in place and make sure all is tight. Drill a countersink screw hole on the back of the skirt down where you will connect it to the bull nose. Make three holes on each board (ends and
Chapter Six. Getting started inboard. Installing the false deck
 A close look at the thinning down of the bulkhead extensions. They are just 1/16 thick after fairing them. Chapter Six Getting started inboard This next step is one of the last remaining messy tasks to
Grand Garden Chalet 6X3 Assembly Manual
 Revision #11 June 15, 2010 Grand Garden Chalet 6X3 Assembly Manual Thank you for purchasing a Grand Garden Chalet. Please take the time to identify all the parts prior to assembly. Please use Safety Eyewear