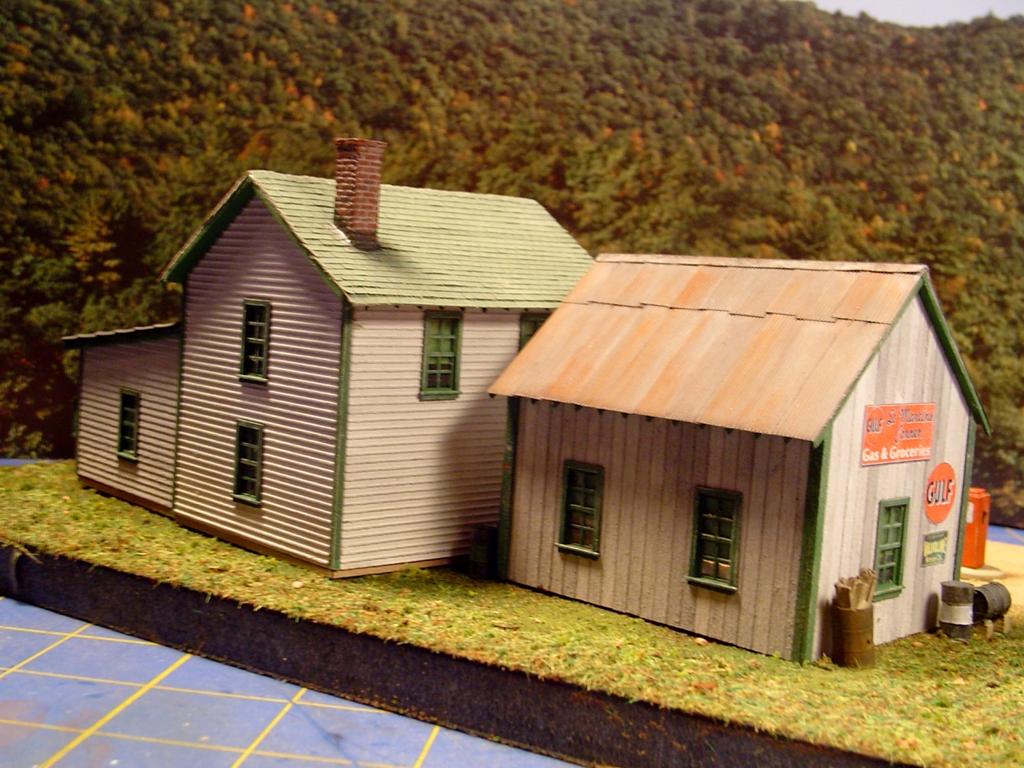
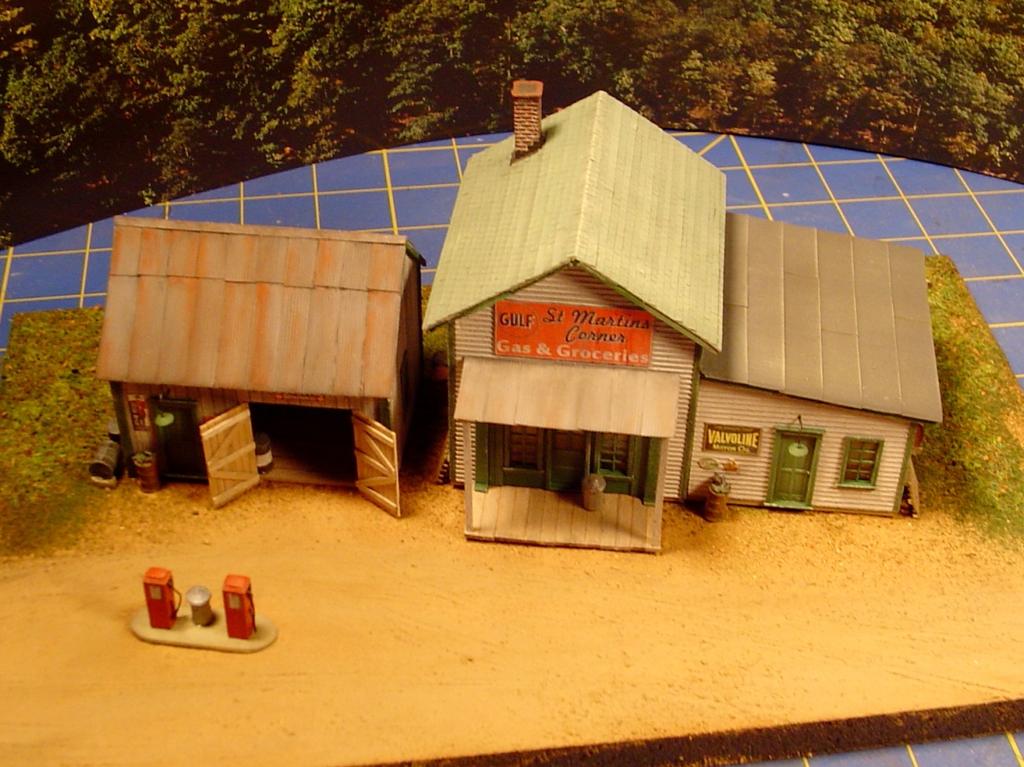
BUILDING ST. MARTIN S CORNER GAS & GROCERIES By RAILROAD KITS
|
|
|
- Herbert Welch
- 5 years ago
- Views:
Transcription

1 Thank you for purchasing this kit. I need to first thank Bob Butts for building the pilot model, and most of all for this wonderful set of instructions. 32 pages. Over 110 super color photos documenting virtually every step of construction. I ve included a CD with this kit that has these instructions in two formats, MS WORD and Adobe PDF. I ve also included all the pictures Bob took while building this model. You can reference the photos if you need to see something larger then I ve shown it here. This kit is part of a series I bought from Paul Turner of New Hampshire several years ago. The kits were The Country Road Series and included Roxbury Roofing, Fisher Fuels, Lewondo & Tilton Antiques (Now called Irish Rose Antiques ), and this one, which Paul called Young s Corner Gas & Groceries. I named it St. Martin s Corner Gas & Groceries after my friend Paul St. Martin. Read these instructions all the way through before you begin building. I know it seems like a lot, but trust me it s the first step in model building. And it s the most important. By reading this manual first you ll be able to gather the list of tools that are required, the paints Bob used, the glue he recommends, the window glass secret, and more. Now I shouldn t have to tell you (but I will) to follow the proper safety precautions by always using your tools only in the manner they were designed for. Follow the manufacturer s instructions when using the tools or the supplies needed to build this structure kit. Use adequate ventilation when painting, gluing, or using any harmful solvents. This is an adult hobby product. It is not safe for children. Jimmy Deignan Box 461 Holden, MA INSTRUCTIONS


2 Figure 1 At the beginning of any new build it s a good practice to replace all the blades used for cutting. I keep two X Acto knifes on the work bench. One holds a standard #11 blade and the other with a #17 chisel blade. I also use single edge razor blade. Tweezers, files, a metal ruler, a square, paint brushes, sandpaper, an emery board, drill bits and pin vise are just some of the tools necessary to assemble this kit. Figure 2 Shown here are an overall shot of the contents of the kit. Figure 3 Here are the metal castings and plastic doors and windows included in the kit. 2 INSTRUCTIONS


3 Figure 4 Shown to the left are the sheets that contain the framework for some of the walls and the roofs. Also shown is the shingle material. Figure 5 This picture shows some of the components that make up the store front. Figure 6 Here is a shot of the rest of the walls that make up the grocery store. 3 INSTRUCTIONS


4 BEGIN BUILDING THE KIT Figure 7 To begin building the kit the windows and doors are removed from the sprues. I used a sprue cutter for this task but a sharp knife can also be used. Figure 8 After removing the windows and doors from the sprues I touched up any rough edges using an emery board. Figure 9 Small imperfections in the metal castings can be cleaned up with a file. Figure 10 Larger nubs on the castings, where the metal was injected into the mold, can be nipped off with an old pair of rail nippers (not the pair you use for track work) or a small pair of wire cutters. This can save a lot of filing. 4 INSTRUCTIONS


5 Figure 11 The next step is to wash all the metal and plastic castings with an old toothbrush and some water with a drop of dishwashing detergent in it. This is optional but I like to do it to ensure that the surface is free of oil, mold release agents, etc. so the paint will properly bond to it. Figure 12 Rinse the washed parts in clean water to get the soap off of them and then allow them to dry. Figure 13 I m going to prime the parts with an airbrush. You can use a good quality spray paint can if you wish. Because they re small and light weight I need a surface that they ll stick to. For this I tape a few pieces of painters tape, turned upside down, onto an old cooking sheet. Figure 14 I lay the parts to be painted out on the tape. I ve also included some of the parts that make up the store front. 5 INSTRUCTIONS


 that will clog the tip of the airbrush.")
6 Figure 15 Before painting the castings, however, I decided to remove the framework for the garage and other parts from the roof and wall sheets to prepare them for painting as well. Figure 16 The edges, where these parts are cut them from the sheet, were cleaned up using an emery board. Figure 17 The parts were primed using thinned, well mixed Floquil Primer which was first stained through a piece of old nylon stocking. This helps insure that there is nothing in the paint (dried up clumps of paint, etc.) that will clog the tip of the airbrush. Figure 18 In a well ventilated area (outdoors in my case) or using a spray booth prime the castings, framework, roof cards and even the shingles. 6 INSTRUCTIONS


7 Figure 19 While the paint on the castings is curing (ideally a couple of days) I started working on the wood walls for the grocery store. I marked the inside of the walls where I wanted to add bracing. The bracing helps prevent the walls from warping when painted/stained. You can follow the bracing diagram enclosed in the kit as well. Figure 20 Using the 5/32 square strip wood I started gluing the framing in place. I let it overlap the ends of the wall and trim it to size after it s been glued to the wall. Figure 21 Weigh the strip wood down while the glue takes hold. Figure 22 Flip the wall over and, using a razor blade or the number #17 Chisel blade, trim the bracing using the edge of the wall as a guide. 7 INSTRUCTIONS

 and the shingles were sprayed first with")


8 Figure 23 It s easier to cut the 5/32 at a slight angle then it is to cutting it directly across the grain. For some of the pieces I cut them before gluing them in place and used a razor saw in a miter box. Figure 24 After the initial coat of Primer dried I went back to painting. The framework was airbrushed with Floquil Earth (when weathered this is a good match for wood) and the shingles were sprayed first with Floquil Light Green with a little Floquil Reefer White mixed in. This was misted on from a bit of a distance to create a slightly rough finish. Next I misted on a very, very small amount of thinned Floquil Grimy Black. Finally I misted on a very, very small amount of Floquil Grime. I was trying to replicate the granules of shingles. Figure 25 At this point all the walls should be braced and framework for the garage painted with Floquil Earth. Figure 26 A wire brush found in the welding section of a home improvement store was then drawn the length of the 2 x 12 strip wood to add some texture to the surface. Both sides of all the pieces were done this way. 8 INSTRUCTIONS


. Paint one side of the 2 x 12 strip wood the same color.")

9 Figure 27 Next, all of the strip wood is stained with a base stain. A stain made out of Alcohol and Black Ink can be used for this or the product I used, Weather It. Stain the exterior of the grocery store walls as well. Figure 28 After the stain dries paint the 1/16 strip with your trim color. I used Floquil Dark Green. This same paint was used to paint the door and window castings as well as the underside of the roof panels and rafter tails. Paint the walls the main color (I chose Polly Scale Reefer White). Paint one side of the 2 x 12 strip wood the same color. This will be the exterior of the garage. The interior will be wood colored. Figure 29 Once the paint has dried use a pounce wheel and a square to add nail holes to the walls that make up the extension of the grocery store. The rows of nail holes (vertical) were spaced two scale feet apart. Figure 30 This is my favorite trick for weathering the walls, trim, doors and windows and adding a peeling paint effect. Find a sponge that doesn t have large holes in it. I prefer the one shown in the picture, the Spongit Wedges which can be found in the acrylic paint section of large craft stores. 9 INSTRUCTIONS


10 Figure 31 Put some light gray (or earth colored) acrylic paint on the sponge and dab it on a paper towel until almost all of the paint has come out of the sponge. Lightly dab it on the walls, trim, doors and windows leaving just the slightest bit of the paint randomly on the surface. Figure 32 In the photo to the left the wall on the left has been dabbed with the gray paint while the wall on the right hasn t been. Light gray on white is hard to see but the effect is there. Figure 33 On the Dark Green trim the effect is more obvious. The bottom piece in the photo has been treated with the sponge while the top piece hasn t. You can see larger pictures on the CD included with the kit. Figure 34 The windows and doors get the sponge treatment as well. After the paint has dried dip the windows, doors and all of the remaining castings, except the chimney, into a light Alcohol and Ink mix and set them on a paper towel to dry. 10 INSTRUCTIONS


11 Figure 35 Apply the A&I to strip wood as well using a paint brush. Figure 36 Paint the walls with the A&I. Since the walls are painted Reefer White a really light A&I stain is all that s needed. Dip the brush in plain Rubbing Alcohol first and then in the A&I mix and that will lighten it up quite bit. Figure 37 Using Floquil Antique White load a paint brush with the paint and then remove most of the paint from the bristles. Lightly brush the doors, windows, trim, etc. with brush so that just the edges and raised surfaces pick up a tiny bit of the Antique White paint. This dry brushing technique helps to highlight the details and make them stand out. Figure 38 Compare the window on the left, which hasn t be dry brushed yet to the one on the right which has. 11 INSTRUCTIONS


12 Figure 39 For glass you can use clear acetate, real glass (microscope slide covers) or a host of other things. I used a Mico Kristal Klear. Using a pin I created and a small amount of Kristal Klear I drug the pin across each pane to create a thin film. Figure 40 Here s a finished window, from the front before the Kristal Klear has dried. Set it aside to dry making sure the wet Kristal Klear isn t touching anything (or it ll glue the window to whatever it s touching). Figure 41 The store front is going to be glued to some of the bracing which was left exposed, on the left and right side of the front wall. Figure 42 The opening in the front wall is a tiny bit wider than the store front so the bracing gives us some surface area to glue the store front to. 12 INSTRUCTIONS


13 Figure 43 The next piece of the store front contains four windows that sit up over the entry way. I used Micro Kristal Clear to add glass to these as well. The weight is just holding the piece suspended so the Kristal Clear isn t touching anything while it dries. Figure 44 The Kristal Clear is starting to dry. As it does it turns from white to clear. Figure 45 Here s a finished window where the Kristal Clear has dried. Figure 46 And the windows over the store front after they have dried. 13 INSTRUCTIONS


14 Figure 47 Next I painted the interior of the walls that make up the Grocery store with Floquil Grimy Black. If lighting is to be added to the structure this will prevent the walls from glowing. Figure 48 Here the interior of all the walls have been painted Grimy Black. Figure 49 Apply a tiny bit of glue to one side of the 1/16 trim. Then glue the trim to the edge of the front wall. Figure 50 Hold the trim in place for a few seconds until the glue starts to bond. Once it s set up enough trim the top to match the pitch of the roof and repeat the process for the other side. Then add trim to the rear wall and the shorter end of the front and rear walls that make up the grocery store extension. 14 INSTRUCTIONS


15 Figure 51 Add the windows, door as well as the piece containing the upper windows to the front of the grocery store. Figure 52 Here s the front wall almost finished. Figure 53 Adding the 1/16 trim to the short end of the front and rear walls that make up the extension. Figure 54 Using a razor blade trim the excess to match the pitch of the roof. 15 INSTRUCTIONS


 to color them because I")

16 Figure 55 After gluing the doors and windows in place on the extension walls they re basically complete. Figure 56 Let s do a little work on the garage. I applied brown weathering powders to the frame work that was air brushed Earth color. Figure 57 The frame work will be visible through the garage door opening if you chose to model the garage with the doors open. An exact match isn t necessary. I think I got close enough with the powders. I chose to airbrush these parts and use weathering powders (in lieu of the A&I stain) to color them because I wanted to avoid any chance they might warp. If you do brush paint them be careful to avoid flooding them with paint. Apply a very thin coat, almost dry brushing the parts so they don t get soaking wet with paint. Figure 58 For the front and rear walls I cut a piece of the 2 x 12 strip wood the height of the wall and used that to set the guide in Chopper. 16 INSTRUCTIONS


17 Figure 59 I then cut forty four pieces to cover the front and rear walls. Be very careful reaching for the cut pieces when removing them from the Chopper. That s an exposed razor blade there. If possible remove them with the blade down, not up as shown in the picture. Figure 60 Mark the exact center of the front and rear wall with a pencil. This will be the starting point for adding the 2 x 12 pieces. Figure 61 Using a square the starting the left or right of the center mark apply a tiny bit of glue to the frame where the boards will touch it and start gluing the boards in place. Figure 62 Continue adding boards until the entire wall is covered. Don t worry about the window and door openings at this point and go beyond the notches at the ends if necessary. 17 INSTRUCTIONS


18 Figure 63 When the wall is finished and the glue has had a chance to set up put it face down on a cutting mat and use a chisel blade to cut out the window and door openings in the walls. Figure 64 Here s what the wall looks like with the window opening cleaned out. Trim the end boards to match the end of the notches if necessary. Figure 65 Add the windows to the finished wall. The picture shows the completed rear all. Figure 66 Here s the front wall ready for the door to be added. 18 INSTRUCTIONS


19 Figure 67 Here s the front wall with the door in place. Figure 68 Starting at the peak of the end walls and working outward add the boards to this wall the same way you did the front and rear wall. This time, however, they are not cut to the height of the wall. Align the boards with the bottom edge of the wall and let them extend beyond the top. Note: The end boards should extended beyond the framework by the width of a single board. Figure 69 Using a razor blade trim the excess from the top of the peaked end walls. Figure 70 The last board on my end walls extended more than the width of a single board so, holding the wall that will adjoin it in place I trimmed the end boards using a razor blade. Don t worry too much about accuracy here; the corner will get covered up with trim pieces later on. Remove the material from the window opening the same way you did for the rear wall and glue the window in place. 19 INSTRUCTIONS
 Light Green, Depot Buff or some other color that would")


20 Figure 71 The four walls of the garage should be complete at this point. Figure 72 Paint a piece of paper (front and back) Light Green, Depot Buff or some other color that would represent window blinds and cut a strip the exact width of the window opening. Then cut short pieces off and glue them in place, using the smallest about of glue possible, in the window openings to represent window shades drawn down to various degrees. Figure 73 Now that the garage walls have been completed it s time to glue them together. Apply a small about of glue to the end of the framework for the front wall and glue the left hand end wall to it. Figure 74 Make sure the two walls are square to one another and the bottom edge is lined up. Hold them, or clamp them, in this position until the glue sets. Do the same for the rear wall and the right hand end wall. 20 INSTRUCTIONS
 to the top of the wall")


21 Figure 75 I noticed a slight bit of warp on the front and rear walls, likely caused from gluing the boards on to the walls, so I added a little bit of bracing (scape strip wood) to the top of the wall (where it won t be visible). The wall on the right has been braced and the wall on the left hasn t been braced yet. Figure 76 Next glue the two wall sections together to form the structure. Figure 77 A piece of the 3 x 8 strip wood, painted the trim color, is then glued flat against the front and rear wall at the corners and even with the edge of the wall. Figure 78 Another piece of the same strip wood is glued against the end wall at the edge, overlapping the piece that was previously added, and trimmed to match the pitch of the roof. One corner is shown completed. Do all four corners this way. 21 INSTRUCTIONS


22 Figure 79 Glue the four walls that make up the grocery store together in the same fashion that the garage walls were glued together. When I did this I noticed that, in spite of all the bracing, the peaks of the front and rear walls were warped outwards slightly. This can be easily corrected. Figure 80 I cut a length of the 5/32 square wood to match the distance between the bracing at the top of the wall and glued this between the peaks of the end walls. I used a clamp to hold it in place. This straightened out the end walls. When the roof is added to one side that provides additional strength and clamp can be removed. Figure 81 The roof has the rafter tails laser cut directly into it. However, the shingles wouldn t be sitting directly on the rafter tails so I cut a piece of black construction paper the size of the roof (including the rafter tails) and laminated it to the top of the roof. Figure 82 When I was painting everything the trim color I did the underside of each roof card and the rafter tails at the same time. The picture above shows the roof being glued to the black construction paper. I only did the construction paper trick on the roof cards used for the grocery store. I didn t bother doing this for the garage since a different material is used on that roof. 22 INSTRUCTIONS


23 Figure 83 Next I glued one of the roof panels in place on the main structure. I did this on the side opposite the one where I had previously placed the clamp. Figure 84 I removed the clamp and everything looked good and square at this point. The top edge of the roof was lined up with the top of the peak. It doesn t extend above it. Figure 85 After the second roof card was glued in place I glued a strip of the 1/16 square wood in place at the peak and trimmed it to length. Then I penciled in some lines across the roof to use as a guide when adding the rows of shingles. The shingles won t be glued against these lines, rather the lines are used just as a visual guide that the shingle are running directly across the roof and not at an angle. Figure 86 I applied 3M Transfer tape to the roof and then trimmed it to fit. 23 INSTRUCTIONS


24 Figure 87 I peeled the backing off of the 3M Transfer Tape and started laying the shingles from the bottom up. The lines were used to keep everything square and the overlap was judged based on the cut of the shingles. Let a little bit of the shingles hang off each end. It s easy to trim them after the fact using a scissors or by turning the structure upside down and using an X Acto knife. Figure 88 One side almost finished. This part goes fast when using the 3M Transfer Tape. Figure 89 Here I m trimming the shingles using a good pair of craft scissors. Figure 90 Back to the garage (I bounced back and forth between the two structures quite a bit during the build). 24 INSTRUCTIONS


25 Figure 91 I glued the roof cards in place on the garage, sans the construction paper, in the same fashion that I did for the grocery store. The 1/16 square strip wood was used for the peak here as well. Figure 92 The garage roofs as well as the small roof that goes over the entry way to the grocery store are covered with panels made out of corrugated aluminum. I cut the corrugated aluminum into roughly 5/16 width panels using an template found in the instructions from a kit build some time ago. We are including a similar template in this kit! Figure 93 Make sure your blade is sharp when you start. It won t be by the time you re finished. Figure 94 I prefer to paint corrugated aluminum after it s been applied the structure. You can certainly do it before hand but handling it and trimming it to length may force you to do some touch up afterwards. I used the 3M Transfer Tape to apply the panels. First I added a row of full length panels lining this up with the bottom edge of the rafters and working from left to right, overlapping each panel slightly over top the previous one. 25 INSTRUCTIONS

.")


26 Figure 95 I cut a bunch of shorter panels to finish the peak of the roof and applied them the same way but his time overlapping the lower panels a bit as well. Figure 96 After the panels were applied the garage has a nice, shiny new roof. Figure 97 Back to the grocery store (I told you I jumped around a bit). I finished the shingles by applying, individual shingle by shingle, folded shingles across the peak. A thin strip of paper, painted the same color as the shingles, can be folded and glued in place at the peak. That s much faster but the individual shingle treatment, although quite tedious, looks better. I then added the grocery store extension to the right hand side of the building. Figure 98 I ran into a small glitch in the kit at this point. None of the include roof cards (with rafter tails) fit the extension properly. So I made a roof out of the chipboard template I had used previously to cut the aluminum panels. 26 INSTRUCTIONS

 mixed in to lighten it up a bit. Figure 101 I removed the painters tape and everything was good.")

.")
27 Figure 99 Back to the garage I glued a thin strip (approximately 3/16 ) of brown paper to the peak using 5 minute epoxy and then masked everything off except for the roof with blue painters tape. Figure 100 I then sprayed the roof with Floquil Primer with a bit of Floquil Reefer White (roughly 2 to 1) mixed in to lighten it up a bit. Figure 101 I removed the painters tape and everything was good. No paint got through to the structure. Figure 102 For the grocery store extension 3M Transfer Tape was once again applied but this time the roof was covered with 3 (scale) strips of rolled roofing material (a very fine grit, wet/dry sandpaper weathered with sprays of Grimy Black and Grime). A few sections were cut shorter than the width of the roof and applied to create some seams and add some visual interest. 27 INSTRUCTIONS


28 Figure 103 Turing the garage upside down I noticed the base of the walls were warped a little bit. This probably wouldn t even be noticeable when the structure is standing up right but I didn t really want it to have a dirt floor so I cobbled together a quick floor for the interior that will also straighten out the walls. Figure 104 Using the Chopper I cut several pieces of 4 x 12 strip wood the length of the garage measured from the inside of the two end walls. I then edge glued them together to form a crude floor. Figure 105 The floor was then trimmed to match the depth of the garage (inside of the front wall to the inside of the back wall). Figure 106 The floor was then installed in the garage. 28 INSTRUCTIONS


29 Figure 107 The chimney casting was first painted a brick color and then individual bricks were painted, randomly, with the same color made darker by adding a little Grimy Black or lighter by adding a little Earth. After the paint dried mortar was applied using by smearing on some light weight spackling and quickly rubbing it off the surface with a finger to leave the spackle only in the crevices. This technique works best when the brick work is well defined and the lines fairly deep. After that a coat of dark A&I was applied to the whole chimney followed by some black weathering powder around the top. Figure 108 The pumps were painted the red and then the white face of the pump was cut out and glued in place. Next a little Kristal Klear was spread over the face to represent glass. Figure 109 Mix up a batch of tar using a drop of Grimy Black and a drop of Elmer s glue. Figure 110 An opening can be cut in the roof for the chimney (do this before mixing up the tar) and the tar spread around it and the base of the chimney. Glue the chimney in place. This is easier than trying to apply the tar neatly after the chimney has been glued in place. 29 INSTRUCTIONS


30 Figure 111 The garage doors are constructed over the template provided. When finished glue them to the garage in the desired position. Weathering can be applied to the roofs as desired. I constructed a porch for the grocery store the same way I constructed the floor for the garage. I lined the bottom of the grocery store with 1/16 square strip wood, set in slightly from the edge of the walls and painted it with Polly Scale Aged Concrete to represent a foundation and to raise the structure up enough for the porch to fit under the columns that make up the store front. 30 INSTRUCTIONS
31 31 INSTRUCTIONS


32 32 INSTRUCTIONS
Building the 1, 2, or 3 Car
 Building the 1, 2, or 3 Car Garage kit by Railroad Kits. Thanks to Bob Butts for doing the building construction and writing / taking pictures. If this is your first craftsman kit or Railroad Kits purchase
Thank you for purchasing E.L. Moore Window & Door.
 Thank you for purchasing E.L. Moore Window & Door. Instructions Version 4.28.15 I ve named this kit after one of the greatest modelers I ve ever known, the late Elliot Moore Jr. Rest in peace my friend.
Continued on next page
 Please read these instructions completely through to be sure you are familiar with all the steps. Then following along again as you build your structure. Download a.zip file of all the pictures including
The Park Hotel Instructions for Assembly of N Scale Kit
 The Park Hotel Instructions for Assembly of N Scale Kit Kit Contents: 198 ea. Laser Cut Acrylic Parts, 2 ea. Chimney Parts Sheets, 1 ea.2".040 styrene rod, 5 ea. Sidewalk Parts, 14 ea. Cast Resin Dormers,
The Park Hotel Instructions for Assembly
 The Park Hotel Instructions for Assembly Kit Contents: 280 ea. Laser Cut Acrylic Parts. 1 ea. 6" Plastic Coated Wire. 5 ea. Sidewalk Parts. 14 ea. Cast Resin Dormers. 12 ea. Window Glass Templates, 12
DAVENPORT DEPARTMENT STORE PF5214
 1:160 BUILDING KIT DAVENPORT DEPARTMENT STORE PF5214 Dress up your downtown scene with the classic Victorian architecture and large first-floor picture windows of the Davenport Department Store. Details
Hotel Belvedere Instructions for Assembly of the HO scale kit. v1.1
 Hotel Belvedere Instructions for Assembly of the HO scale kit. v1.1 Kit Contents: 319 ea. laser cut.090" acrylic parts. 132 ea. laser cut.060" acrylic parts. 8 ea. window glass templates 8 ea. window glazing
Model Grandma and Grandpa s cozy cottage, a. Country Cottage Instructions HO Scale 1:87 WOODLAND SCENICS PF5186
 PF586 Country Cottage Instructions HO Scale :87 Model Grandma and Grandpa s cozy cottage, a young family s first home or give this vintage Victorian cottage the run-down look of an abandoned shack. This
J.W. cobbler 1:160 BUILDING KIT PF5210 WOODLAND SCENICS
 1:160 BUILDING KIT J.W. cobbler PF5210 The partially assembled walls, positive alignment system and prefinished edges make kit assembly quick, easy and accurate. This three-story brownstone features stacked
Model the hub of your layout s rural setting. Planters Feed and Seed Supply Instructions N Scale 1:160 WOODLAND SCENICS
 PF5201 Planters Feed and Seed Supply Instructions N Scale 1:10 Model the hub of your layout s rural setting. Planters Feed and Seed Supply presents a vintage agricultural center where farmers and rural
Vivian Mansion Assembly Instruction By Laser Dollhouse Designs
 Vivian Mansion Assembly Instruction By Laser Dollhouse Designs NOTE 1: Please do a dry assembly using only tape to hold house together. This will get you familiar with parts, location, and fit. This also
HARRISON S HARDWARE PF5891
 1:48 BUILDING KIT HARRISON S HARDWARE PF5891 Model the local hardware store where layout residents can find all they need to keep their homes in tip-top shape and workshops running smooth. The positive
Railroad Kits PO Box 461 Holden, MA
 (Formerly Downtown Deco DD 1004 Fallburg Station) HO Scale. Thanks for purchasing one of my kits. Because different people have different degrees of experience, I'll walk you through, step by step, explaining
HRMLaserModels.com T.W. SNOW 25 TON COALING TOWER S SCALE AS USED ON THE MILWAUKEE ROAD
 HRMLaserModels.com T.W. SNOW 25 TON COALING TOWER S SCALE AS USED ON THE MILWAUKEE ROAD HRM-61 S SCALE COAL TOWER T.W.Snow 25 Ton Coaling Tower General Instructions Check out HRMLaserModels.com for construction
The Rubley Building Instructions for Assembly of the N scale kit. v1.1
 The Rubley Building Instructions for Assembly of the N scale kit. v1.1 Kit Contents: 197 ea. laser cut 1/16" acrylic parts. 1ea. adhesive backed.020 styrene part. 10 ea..060 x 1" styrene alignment pins.
A Day House. A View of One Way to Finish the Exterior of The Day House. Read these instructions all the way through before beginning this project.
 A Day House A View of One Way to Finish the Exterior of The Day House Read these instructions all the way through before beginning this project. General Comments For the purposes of this project, the standard
Tools and Tips: ( 1 )
") Tools and Tips: As you build instructions will show in my many picture manual how to assemble. You can use your own methods as you desire, my results are very good. A smooth, flat work surface is very
Tools and Tips: As you build instructions will show in my many picture manual how to assemble. You can use your own methods as you desire, my results are very good. A smooth, flat work surface is very
BUZZ S SAWMILL PF5195 WOODLAND SCENICS BUILDING KIT
 1:87 BUILDING KIT BUZZ S SAWMILL PF5195 Buzz s Sawmill is a detailed work of art with all workings of a vintage steam-fired, belt-driven sawmill. Details include interior rafters and shake roof, attached
Building the Gothic Church
 Building the Gothic Church Mold #54 does not contain all of the blocks to build this church. You will need extra regular blocks (1/2" x 1/2" x 1") and square blocks (1/2" x 1/2" x 1/2"). These blocks can
Drawings of all parts have been included for ease of part identification.
 Acme Corporation Instructions for Assembly of the HO Scale Acme Corporation HO Kit Contents: 156 ea. white 1/16" laser cut acrylic part 10 ea. white 1/8" laser cut acrylic part 37 ea. adhesive-backed brick
Nanton Grain Mill Assembly
 ( 1 ) Nanton Grain Mill Assembly Locate package for assembling storage building. These are cut from 1/8 masonite. Inspect and lightly sand edges where it will be bonded. Use white glue or CA glue to bond.
CORNER PORCH HOUSE PF5196
 1:87 BUILDING KIT CORNER PORCH HOUSE PF5196 Two-story home with cedar-shake roof and a corner wrap-around porch. Clapboard siding, paned windows, and loaded with accessories, such as a bicycle built for
Assembly Instructions for Summit Motel Kits # SMFS and SMBD
 Assembly Instructions for Summit Motel Kits # SMFS and SMBD Introduction Thank you for your purchase of the Summit Motel. This modern motel can be converted to almost any chain motel of your choice, depending
After printing these plans, several pages will need to be taped together to form a larger plan. Below is a diagram of which pages need assembled.
 Watermill Building Plans For complete building instructions and instructional videos, please visit the main web site at www.hirstarts.com/watermill/watermill.html. Using these plans alone will not give
The Severn Instructions for Assembly of the N scale kit.
 The Severn Instructions for Assembly of the N scale kit. Kit ontents: 172 each laser cut 1/16" acrylic parts 102 each adhesive backed styrene parts 1 each cast entryway 3 each cast balcony 4 each cast
The Midtown Apartment Building
 The Midtown Apartment Building Instructions for Assembly of The Midtown Apartment Building. Kit Contents: 70 each laser cut acrylic parts. 3 each sidewalk parts. 3each Window Glass Templates, 3 each Window
The Saint Paul Building
 The Saint Paul Building Instructions for Assembly of The Saint Paul Building. Kit Contents: 65 each laser cut acrylic parts. 1 each sheet of AC roof unit parts. 1 each sidewalk. 3 each Window Glass Templates,
Craftman One Car Garage Assembly Instruction by Laser Dollhouse Designs
 Craftman One Car Garage Assembly Instruction by Laser Dollhouse Designs NOTE 1: Please do a dry assembly using only tape to hold house together. This will get you familiar with parts, location, and fit.
The Hamlin Assembly Instruction By Laser Dollhouse Designs
 The Hamlin Assembly Instruction By Laser Dollhouse Designs NOTE 1: Please do a dry assembly using only tape to hold house together. This will get you familiar with parts, location, and fit. This also gives
The Fyfe Building Instructions for Assembly of the N scale kit.
 The Fyfe Building Instructions for Assembly of the N scale kit. Kit Contents: 150 each laser cut 1/16" acrylic parts. 6 each 020 adhesive backed part 6 each column caps 2 each decorative canopy 1 each.125"
The Lansdowne One Car Garage Assembly Instruction by Laser Dollhouse Designs
 The Lansdowne One Car Garage Assembly Instruction by Laser Dollhouse Designs NOTE 1: Please do a dry assembly using only tape to hold house together. This will get you familiar with parts, location, and
Fidelity & Guaranty Building
 Fidelity & Guaranty Building N Scale Model Kit Instructions for Assembly of the Fidelity & Guaranty Building Kit Contents: 69 each laser cut acrylic parts. Sidewalk material 1 each Window Glass Templates
Ben Franklin 5&10 Store
 Ben Franklin 5&10 Store RIVER LEAF MODELS, LLC RIVER LEAF MODELS, LLC Thank you for purchasing the Ben Franklin 5&10 structure kit. Your kit includes everything you need to assemble the final product.
Donaldson s Department Store
 Donaldson s Department Store Instructions for Assembly of Donaldson s Department Store Kit Contents: 80 each laser cut acrylic parts. 1 each sheet of canopy parts. 1 each sheet of AC roof unit parts. 1
Instructions for Assembly of the HO Scale The Charles
 The Charles Instructions for Assembly of the HO Scale The Charles HO Kit Contents: 337 ea. white 1/16" laser cut acrylic part 19 ea. Clear 1/16" laser cut acrylic part 69 ea. white 1/8" laser cut acrylic
CVS Pharmacy kit in HO scale
 CVS Pharmacy kit in HO scale Parking lot base and cars not included This kit includes all building parts and wall-mounted signs milled in white styrene plastic, clear window glazing and pre-cut Plastruct
CONCEPT MODELS INSTRUCTIONS FOR UP DC-10 WING CAR El Toro Way Stockton, CA Web Address:
 CONCEPT MODELS Web Address: http://www.con-sys.com 8810 El Toro Way Stockton, CA 95210 INSTRUCTIONS FOR UP DC-10 WING CAR 2 CONCEPT MODELS PARTS DC-10 WING CAR Item No. Part No. DESCRIPTION QTY. 1 2003-1
GENERAL INSTRUCTIONS. Woodland Scenics PO BOX 98, LINN CREEK, MO woodlandscenics.com PREPARE PLASTIC PARTS PREPARE METAL CASTINGS
 #40700 Popa Weelie's Saloon INSTRUCTIONS CAUTION: Cutting tools recommended. Use with care. This item is not a Children s Product and is not intended for use by Children. Conforms to Health Requirements
Small 45 Roof Houses 1 or 2 Story 1 /24 th Scale Patterns
 BA GARDEN TOWNS 45 Roof Houses 10" x 10" 1 or Story Scaled and easy to read patterns and instructions for wood houses. Yard and Garden Buildings Compatible with Garden Railroads or a delight for any child's
Building the Bell Tower
 Building the Bell Tower Mold #55 does not contain all of the blocks to build this tower. You will need extra regular blocks (1/2" x 1/2" x 1") and square blocks (1/2" x 1/2" x 1/2"). These blocks can be
Tools: Every craftsman kit builder should have the basic tools you need to construct this kit. They are:
 Thank you for purchasing the Railroad Kits EF20 Car & Loco Repair Shed. This kit is the second one that I ve had the pleasure of working with Ed Fulasz on. Ed painstakingly hand carved the Hydrocal master
1Use the metal file to smooth
 Yamato: Step-by-step 85 Parts of the bridge and the hull a b c d e f a Part of the bridge b Part of the bridge c Part of the bridge d Radar x 2 e Part of the bridge x 2 f Wire Recommended tools and materials
Copyright Gary Faulkner March Attack All rights reserved.
 Painting and Decorating Sometime passed I posted some painted 28mm Sarissa WWE buildings on to the March Attack Face Book page and had a few show and tell us emails, so here goes. If you meet me at the
Tools and Tips: ( 1 )
") Tools and Tips: As you build the book will show in my many picture manual how to assemble. You can use your own methods as you desire, but these worked best for me. A smooth, flat work surface is very
Tools and Tips: As you build the book will show in my many picture manual how to assemble. You can use your own methods as you desire, but these worked best for me. A smooth, flat work surface is very
If by chance a part is missing or broken please contact us indicating the kit name and part description and we will send you a replacement.
 Six Stall Roundhouse Instructions for Assembly of the HO Scale Six Stall Roundhouse Roundhouse Kit Contents: 18ea. Roof Pieces 12 ea. 1/16" Parts Sheets 9ea. 1/8" Parts Sheets 12ea. Floor Pieces 1ea. 1/4"
Shell Gas Station & Convenience Store kit in HO scale
 Shell Gas Station & Convenience Store kit in HO scale Parking lot base and cars not included This kit includes all building parts and signs milled in white and black styrene plastic, clear window glazing,
KIT BUILDING ED SCHULTZ
 KIT BUILDING ED SCHULTZ KIT BUILDING FIVE BASIC MATERIALS: PLASTIC (STYRENE) WOOD LASER CUT & STANDARD PLASTER METAL RESIN ADDING DETAILS PLASTIC KITS TYPICALLY STYRENE TYPE PLASTIC DPM WALTHERS BACHMANN
A Precision 2000 Mixed Media Project
 Día de los Muertos (Day of the Dead) Panel A Precision 2000 Mixed Media Project PROJECT TITLE: Día de los Muertos (Day of the Dead) Panel DESIGNED BY: Andy Spencer SKILL LEVEL: (Adult 1-5: 1 being the
Seascape Bungalow Assembly instructions. Laser Dollhouse Designs
 Seascape Bungalow Assembly instructions Laser Dollhouse Designs NOTE: Please do a dry assembly using only tape to hold house together. This will get you familiar with parts, location, and fit. This also
Roof Contour By Bob Parrish
 Roof Contour By Bob Parrish This text will show you how to shape the roof contour on Labelle passenger and trolley kits. The height of the clerestory on the two types of kits is different. Passenger kits
Fidelity & Guaranty Building
 Fidelity & Guaranty Building Instructions for Assembly of the Fidelity & Guaranty Building Kit Contents: 69 each laser cut acrylic parts. 1 each sheet of AC roof unit parts. 1 each sidewalk base. 4 each
STOP! READ THIS FIRST! TIPS FOR BUILDING LASER CUT MODELS
 INSTRUCTIONS STOP! READ THIS FIRST! TIPS FOR BUILDING LASER CUT MODELS 1. Test fit all parts and make sure you know how everything goes together before gluing. If you are contemplating cutting a part to
 Allied Tool is a freelance model of a small manufacturing company that grew from production in a home basement to a new building. Assume a gentleman starts assembling gauges in his basement and the business
Corona Concepts presents The Lily All Wood Dollhouse. Instructions and Assembly Guide
 Corona Concepts presents The Lily All Wood Dollhouse Instructions and Assembly Guide Introduction In Short... Welcome to the exciting world of dollhouses and miniatures. Since the first tab and slot die-cut
Make every component count.
 Make every component count. Technical Bulletin Installation Instructions ABOUT THE MATERIAL The frame and material have been thoroughly tested for strength, durability and low maintenance, offering a never
CA to each one. You may have to hold the end down while to glue sets or use an accelerator like I did.
 The following information and photographs are what I did to build the kit. Your methods and needs may differ from this which is fine. There is no right or wrong way if you are used to scratch building.
Corona Concepts presents The Laurel All Wood Dollhouse. Instructions and Assembly Guides
 Corona Concepts presents The Laurel All Wood Dollhouse Instructions and Assembly Guides Introduction In Short... Welcome to the exciting world of dollhouses and miniatures. Since the first tab and slot
WRIGHT FLYER 1 INSTRUCTIONS FOR THE D10LC KIT
 WRIGHT FLYER 1 INSTRUCTIONS FOR THE D10LC KIT Manufactured in the USA by Easy Built Models PO Box 681744, Prattville, AL 36068-1744 Visit us at www.easybuiltmodels.com Easy Built Models GLUE METHODS Always
Little Briana Cottage Dollhouse assembly instructions
 Little Briana Cottage Dollhouse assembly instructions NOTE 1: Please do a dry assembly using only tape to hold house together. This will get you familiar with parts, location, and fit. This also gives
Rural Shamrock Gas Station & Store kit in HO scale
 Rural Shamrock Gas Station & Store kit in HO scale Parking lot base and cars not included This kit includes all building parts and signs milled in white and black styrene plastic, clear window glazing
GENERAL NOTES: Page 1 of 9
 Laminating A Zia Into A Turning Blank by W. H. Kloepping, Jan. 2009 This describes how a zia (the New Mexico state symbol) can be laminated into a turning blank. Materials needed: Square Turning Block
Instructions and Assembly Guide
 Corona Concepts presents The Creekside Cabin All Wood Dollhouse 1997 Corona Concepts Schenevus, NY 12155 All rights reserved These instructions were printed in New York State Instructions and Assembly
Hardee s Restaurant kit in HO scale
 Hardee s Restaurant kit in HO scale Parking lot base and cars not included This kit includes all building parts milled in white styrene plastic and laser cut white acrylic, clear acrylic window glazing,
675 Quick N Stall Neo Angle Framed Hinge Shower Enclosure
 INSTALLATION INSTRUCTIONS 675 Quick N Stall Neo Angle Framed Hinge Shower Enclosure Call Technical Dept @ 1-800-452-2726 QCI1003 Page 1 of 9 Certified 10/01/09 INSTALLATION NOTES: Unpack your unit carefully
Blossburg MT Northern Pacific Depot
 Uploaded to NPRHA site: 3/10/2003 Date Created: 3/10/2003 Title: Blossburg MT Northern Pacific Depot Keywords: Blossburg, Northern Pacific Railway Depot, Mullan Pass, American Model Builders Author: Dean
(56501) Corona Concepts presents The Willow All Wood Dollhouse. Instructions and Assembly Guide RTD AA
 Corona Concepts presents The Willow All Wood Dollhouse. Instructions and Assembly Guide RTD AA") (56501) Corona Concepts presents The Willow All Wood Dollhouse Instructions and Assembly Guide RTD10000572AA Introduction In Short... Welcome to the exciting world of dollhouses and miniatures. Since the
(56501) Corona Concepts presents The Willow All Wood Dollhouse Instructions and Assembly Guide RTD10000572AA Introduction In Short... Welcome to the exciting world of dollhouses and miniatures. Since the
You expect to find PVC. PVC Lumber PROS & CONS OF PVC PROS
 PROS & CONS OF PVC PROS Won t rot. Doesn t have to be painted (but can be). No defects; consistent. Easy to cut and machine. Readily available. CONS Not designed for structural use. Plastic appearance
Taco Bell Restaurant kit in HO scale
 Taco Bell Restaurant kit in HO scale Parking lot base and cars not included This kit includes all building parts milled in white styrene plastic, clear window glazing, Plastruct tile roofing, and logo
Building the Circular Tower
 Building the Circular Tower You will need to fill this mold 18 times to have enough blocks to build the circular tower. Be sure the blocks are completely dry before gluing them together. For detailed instructions
The Gothic Chess Set
 The Gothic Chess Set Please note that this chess set is a fairly difficult and time consuming project. I strongly suggest building one or two easier models before tackling this one! The miniatures used
Building the Cathedral
 Building the Cathedral Please note that the cathedral is a fairly difficult and time consuming project. I strongly suggest building one or two easier models before tackling this one! Four molds are needed
3Insert the second rod no. 4
 Yamato: Step-by-step 37 The stern block and searchlight control towers a b c d e f Recommended tools and materials Wood glue Sandpaper (no. 800 grain) Metal file Putty Craft knife For metal: Super Glue
DARC MANSION ASSEMBLY INSTRUCTIONS page 1.
 DARC MANSION ASSEMBLY INSTRUCTIONS page 1. DARC MANSION ASSEMBLY INSTRUCTIONS page 2. NOTE: This project should be printed on heavy card stock. WHAT YOU'LL NEED: Scissors, Elmer's glue (or a glue stick),
Railroad Kits
 Railroad Kits www.mrrforums.com Seckler s Irish Rose Antiques Instructions by Tom Langford I really hesitate to show you a photo or two of the original model due to the fact this model is really nothing
Background: For the Modeler:
 Right On Replicas, LLC Step-by-Step Review 20141020* Space Shuttle with Fuel Tank and Boosters 1:72 Scale Monogram Model Kit #85-5089 Review (Part 1 of 2) Background: The United States Space Transportation
Darjeeling Coach 4-Wheel First/Second Class
 Darjeeling Coach 4-Wheel First/Second Class Introduction This kit was designed in 16mm scale from early Darjeeling drawings and photographs. It uses brass castings available from Brandbright. The instructions
INSTALLATION INSTRUCTIONS FRAMELESS CONTINUOUS HINGE SHOWER ENCLOSURE QCI5232
 INSTALLATION INSTRUCTIONS FRAMELESS CONTINUOUS HINGE SHOWER ENCLOSURE QCI5232 QCI5232 Rev 0 Page 1 Certified 06/20/2016 INSTALLATION NOTES: Unpack your unit carefully and inspect for freight damage. Lay
Cobra X Q Construction Tips Construction: Bel y pan
 Cobra X Q Construction Tips : The white plastic in this kit is high impact styrene. It can be painted with most types of coatings if light coats are applied this is necessary due to the thickness of the
CONCEPT MODELS INSTRUCTIONS FOR THE KASGRO KRL SPECIAL DEPRESSED CENTER FLAT CARS El Toro Way Stockton, CA 95210
 CONCEPT MODELS Web Address: http://www.con-sys.com Email: concept_models@con-sys.com 8810 El Toro Way Stockton, CA 95210 INSTRUCTIONS FOR THE KASGRO KRL 204000-2 SPECIAL DEPRESSED CENTER FLAT CARS 2 CONCEPT
Cardboard Model Buildings
 Cardboard Model Buildings Get more model kits from http://www.modelbuildings.org PRINTING & ASSEMBLY TIPS: These OO designs can easily be resized by reducing the print percentage as follows: OO scale is
the wire, less is better. And make sure the bends on each truss wire are in line with the other. See the next photo.
 The following information and photographs are what I did to build the kit. Your methods and needs may differ from this which is fine. There is no right or wrong way if you are used to scratch building.
After the glue dries, trim the trussrod ends with your cutting pliers.
 The following information and photographs are what I did to build the kit. Your methods and needs may differ from this which is fine. There is no right or wrong way if you are used to scratch building.
Instructions for Real Good Toys 32 Miniatures Showcase. Kit #MS /10
 Instructions for Real Good Toys 32 Miniatures Showcase Kit #MS-600 04/10 Measure, identify, and label the parts Parts: (Measurements are approximate and are for identification purposes only) 2 Side 1/4
EXTREME LOAD no. TWO
 1602 - EXTREME LOAD no. TWO Kit Features: 22' 4 " x 14' x 3'-6 Oversize Load 49mm (1.9") actual height Bolt Head Details Welded Load Mounting Fins Painting Handles Tools Required: Hobby Knife Tweezers
The image above is intended to give you an idea of what the dovecote will look like when finished.
 Thank you for buying my book, I hope it is useful and enjoyable in your quest to building your own dovecote. This book will give you step-by step instructions on how to build your own dovecote also included
After the glue dries, trim the trussrod ends with your cutting pliers
 The following information and photographs are what I did to build the kit. Your methods and needs may differ from this which is fine. There is no right or wrong way if you are used to scratch building.
Painting Figures Marty Vaughn MMR
 Painting Figures Marty Vaughn MMR There are as many ways to paint figures as there are ways to paint rolling stock or structures. There is no perfect way and no right way, it s just what ever method you
B J SCOTT LUMBER COMPANY. Presented by. Railroad Kits / kit formerly by White River Structures. Kit # WRS21
 B J SCOTT LUMBER COMPANY Presented by Railroad Kits / kit formerly by White River Structures Kit # WRS21 We are proud to present the second kit in this series of structures for your enjoyment. Your response
Personalize. Metal Clay and Resin. Making your own molds is one way to. Make your own texture molds, use your own photo.
 intermediate metal clay/resin Personalize CAPTURE A MOMENT Metal Clay and Resin Make your own texture molds, use your own photo. by Elaine D. Luther FCT-CR-050718-02 Making your own molds is one way to
ScotchBlue Painter s Tapes & Scotch Masking Tapes
 ScotchBlue Painter s Tapes & Scotch Masking Tapes Choose the right tape for the job. When choosing a painter s tape, consider these factors to determine the right product for your project. Surface and
How to Use the Wooden Plank Mold
 How to Use the Wooden Plank Mold Even though I'm giving instructions for only two projects, there are tons of uses for this mold. Some of these include: Floors Steps Doors Tables Benches Crates Drawbridge
INSTALLATION INSTRUCTIONS FRAMELESS CONTINUOUS HINGE SHOWER ENCLOSURE QCI5233
 INSTALLATION INSTRUCTIONS FRAMELESS CONTINUOUS HINGE SHOWER ENCLOSURE QCI5233 QCI5233 Rev 0 Page 1 Certified 06/20/2016 INSTALLATION NOTES: Unpack your unit carefully and inspect for freight damage. Lay
STONEYBRIDGE STRUCTURES
 02-208-OO North Eastern Railway N2 Style Signal Box INTRODUCTION Thank you for purchasing one of our products. We hope this information sheet will prove useful in the construction of this model. We have
MUDGUN Drywall Finishing System
 Watch the demonstration video online at hydetools.com MUDGUN Drywall Finishing System Quick Start Guide Hyde Tools, Inc. / A Hyde Group Company / 800-872-4933 / custrelations@hydetools.com / hydetools.com
You can print these instructions by downloading the PDF here: Boxcar Assembly PDF
 The following information and photographs are what I did to build the kit. Your methods and needs may differ from this which is fine. There is no right or wrong way if you are used to scratch building.
PROJECT PLANS WOODEN GIFT BOX
 PROJECT PLANS WOODEN GIFT BOX Make the gifts you give even more special by presenting them in this one-of-a-kind gift box. In fact, the box may be valued more than whatever it contains. The box is sized
Layout and Fitting. Chapter 6 Layout and Fitting
 6 Layout and Fitting A. RESILIENT SHEET FLOORING Layout and Fitting There are three general methods of fitting resilient sheet flooring into a room: freehand knifing, direct (or straight) scribing and
UNIT No FRAMELESS PIVOT SHOWER DOOR
 INSTALLATION INSTRUCTIONS UNIT No. 3600 FRAMELESS PIVOT SHOWER DOOR NEED INSTALLATION HELP? Call 1-800-45-BASCO (452-2726) Monday - Friday 8:00 A.M. - 4:30 P.M. Eastern Time QCI0020 Rev. 3 Page 1 of 8
How to assemble the Reims Gueux Pit Centre Module #005
 How to assemble the Reims Gueux Pit Centre Module #005 We recommend quick drying super glue for our models. Just a few drops on the joining edges, press and hold them for a few seconds and the connection