How to Build a DIY Extra Long Wood Bench
|
|
|
- Alexandrina Dawson
- 5 years ago
- Views:
Transcription

1 How to Build a DIY Extra Long Wood Bench Free woodworking plans for building a large, extra-long wood bench. This bench measures 9 in length and is designed to match the DIY Large Outdoor Dining Table, located here: Cost: ~$50 Difficulty: Easy PINSPIRATION MOMMY 1
2 Tools and Supplies: Miter Saw Jig Saw Drill/Driver Kreg Jig Countersink Bits 2 1/2 exterior pocket hole screws 2 1/2 exterior wood screws Minwax Dark Walnut Stain Wood Glue Wood Filler Exterior Spar Urethane Wood List: Quantity Board Length 9 2 x 4 10 Cut List: Section Quantity Board Cut Length Bench Top 4 2 x Bench Legs 6 2 x 4 12 Bench Legs 6 2 x 4 14 long end to long end (ends cut at 45 o ) Bench Legs 3 2 x 4 11 ¼ long end to long end (ends cut at 45 o ) Diamond Design 12 2 x 4 ~6 ½ (with ends cut at angles described below) Bench Frame 6 2 x 4 45 Bench Frame 8 2 x 4 4 3/8 2 2 x 4 ~24 (with ends cut at angles described below) PINSPIRATION MOMMY 2
 Cut three 2 4 boards to 11 ¼, long")
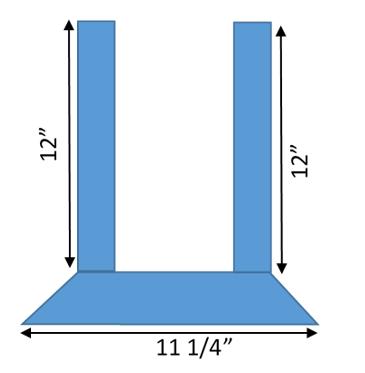
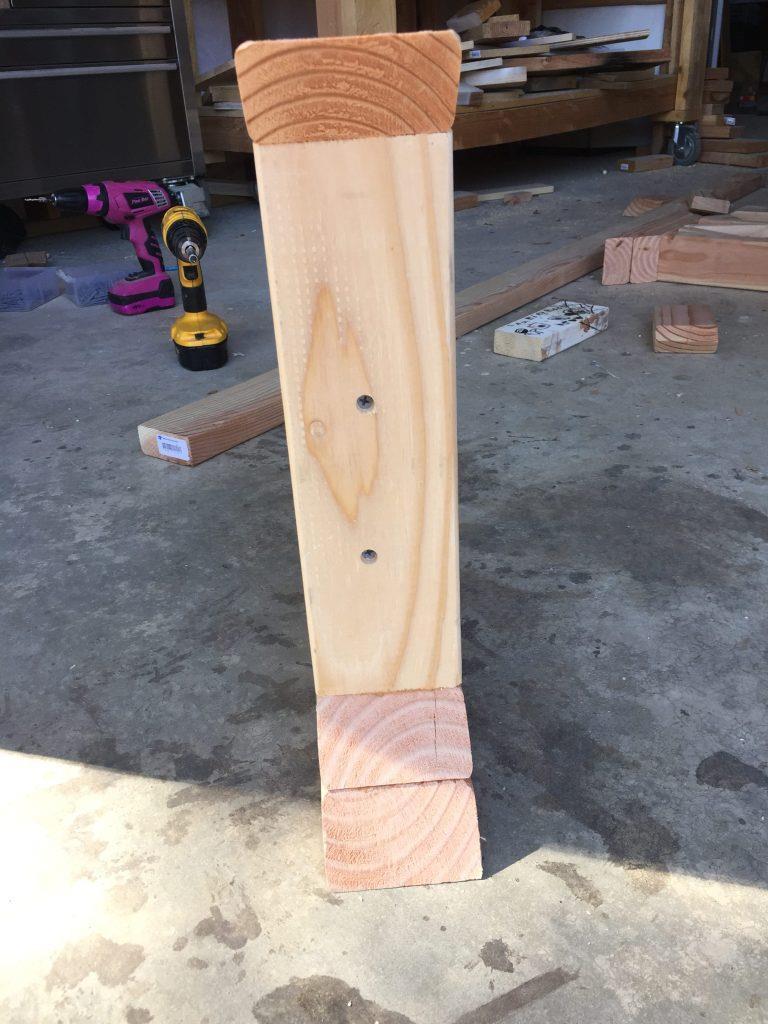
3 DIY Extra Long Wood Bench Instructions: 1. First, build the three legs: Cut six 2 4 boards to 14 long end to long end with each end cut at 45 degree angles from the 3 ½ side of the boards (see image below) Cut three 2 4 boards to 11 ¼, long end to long end with each end cut at 45 degree angle from the 3 ½ side of the board Cut six 2 4 boards to 12 in length each. A. Assemble the legs. For each leg, attach two boards to the top of one of the 11 1/4 boards with angles cut at each end. Use a countersink drill bit to pre-drill holes into the bottom of the 11 1/4, then add wood glue and attach the boards with 2 ½ exterior wood screws. PINSPIRATION MOMMY 3
4 PINSPIRATION MOMMY 4

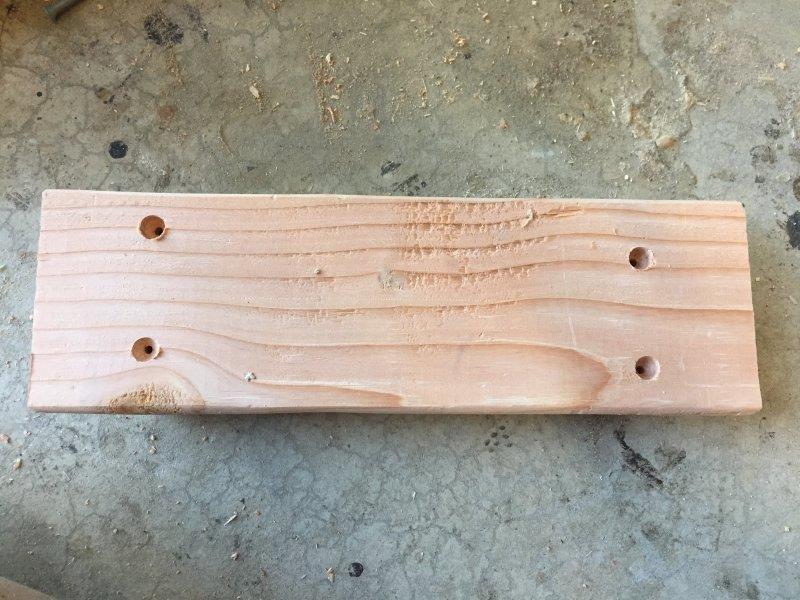
5 B. Next, attach a board on top of the two boards. Again, pre-drill with a countersink bit through the top of the 14 board, and then attach with wood glue and 2 1/2 wood screws. C. Attach another to the bottom of the 11 1/4 board. As before, predrill through the underside of the 14 board with a countersink bit. Then attach with wood glue and 2 1/2 exterior wood screws. PINSPIRATION MOMMY 5
6 PINSPIRATION MOMMY 6

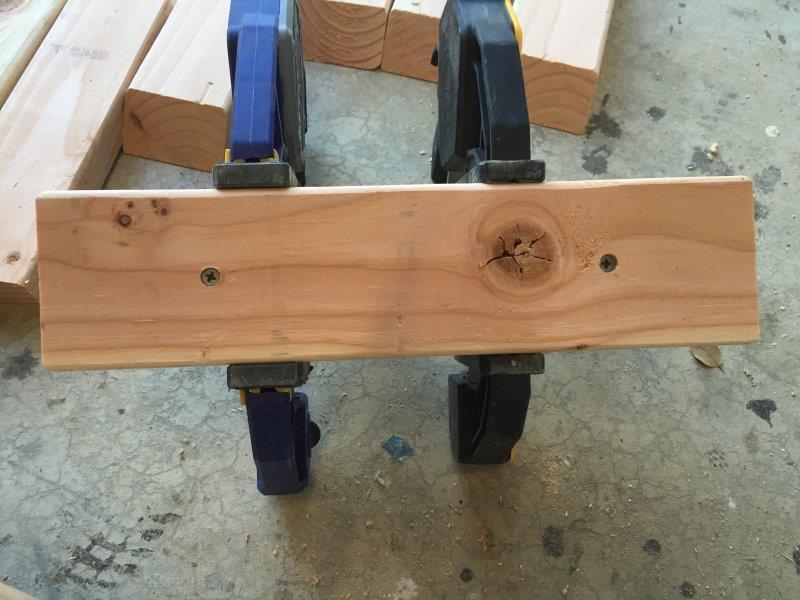
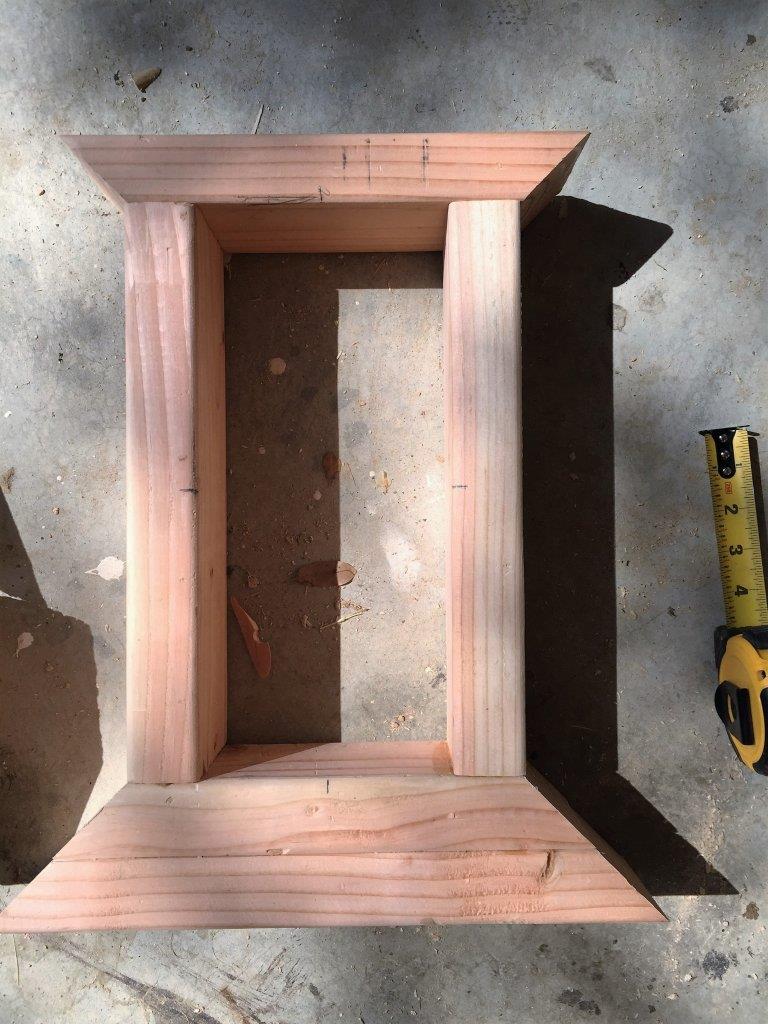
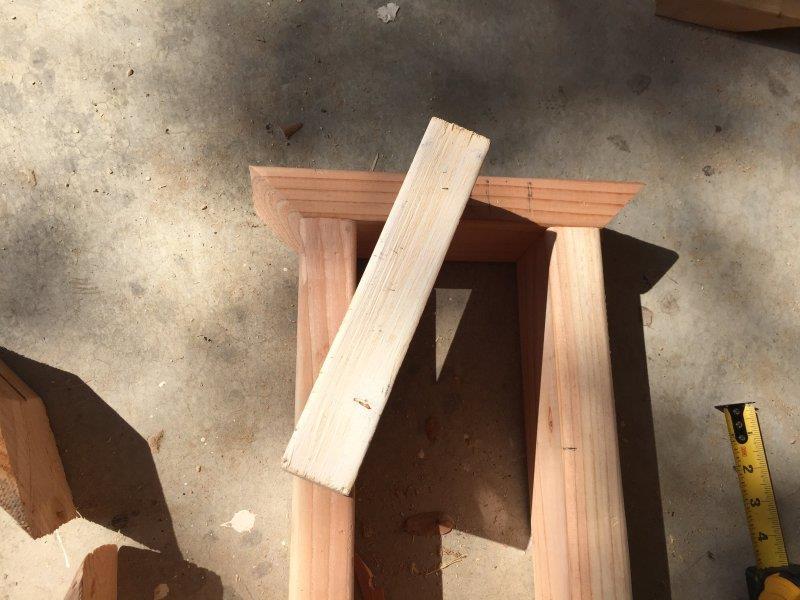
7 D. Now it s time to create the diamond design in the center of the legs (this matches the diamond design on the outdoor table that this bench is designed to match). 1. To do this, instead of calculating angles, mark the center point of each side of the rectangle in the center of the legs: 2. Next, hold a 2 4 so that it sits diagonally across the marks and using a pencil, mark the underside of the board to determine where to make the angle cuts. PINSPIRATION MOMMY 7

8 PINSPIRATION MOMMY 8

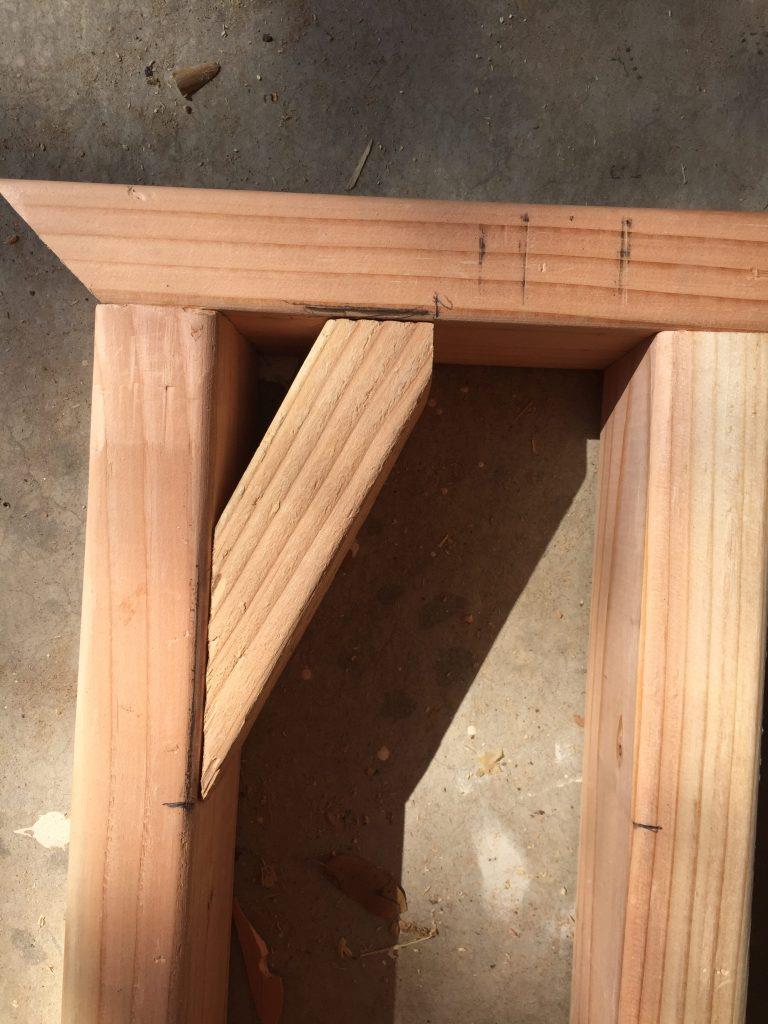
9 3. Once all four sides of the diamond are cut, attach them using wood glue and 2 1/2 exterior wood screws. (Pre-drill all holes with a countersink bit). Attach through the sides of the legs and through top board of the legs. the two lower boards will only be attached at the bottom by wood glue, only the top of those boards are screwed into place. PINSPIRATION MOMMY 9
10 PINSPIRATION MOMMY 10


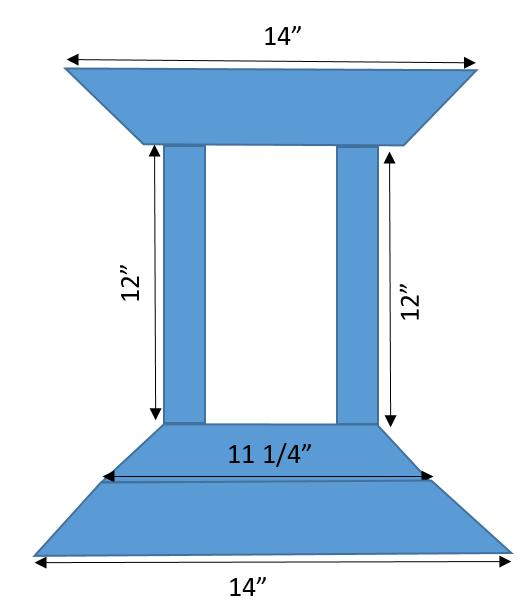
11 4. The three legs should now look like this: 2. Construct the top of the bench. A. Cut four 2 4 boards to 108 in length each. PINSPIRATION MOMMY 11
 pocket hole screws to attach the four")

12 B. Drill five 1 1/2 pocket holes into one of the long sides of three of the four boards. C. Use wood glue and 2 1/2 exterior (blue kote) pocket hole screws to attach the four boards together. 3. Build the frame. A. Cut six 2 4 boards to 45 in length each. B. Drill two 1 1/2 pocket holes into each end of one side of the board. PINSPIRATION MOMMY 12
: D.")

13 C. Using wood glue and 2 1/2 exterior pocket hole screws, attach two 45 boards between each of the legs (the boards should attach right before the angle cut on the 14 boards): D. Cut eight 2 4 boards to 4 3/8. E. Drill three 1 1/2 pocket holes into one side of each 4 3/8 board (drill two pocket holes in one direction, and drill the third pocket hole in the opposite direction): PINSPIRATION MOMMY 13


14 F. Use wood glue and 2 1/2 exterior pocket hole screws to attach the 4 3/8 boards to the 45 long boards making up the frame: PINSPIRATION MOMMY 14

: PINSPIRATION MOMMY")
15 G. Attach the two 45 boards across the bottom portion of the legs. Using wood glue and 2 1/2 exterior pocket hole screws, attach one in the center of the legs (attach to the 11 1/4 board making up the bench feet): PINSPIRATION MOMMY 15


16 4. Attach the bench seat top. A. Center the frame on the underside of the bench top. Using a countersink drill bit, drill several holes through the underside of the frame along the length of the bench. B. Using wood glue and 2 1/2 exterior wood screws, attach the frame to the bottom of the bench seat. PINSPIRATION MOMMY 16


17 5. Cut and attach the cross support boards. A. Because they have very odd angles, use the same method described above to mark the angles. Hold the 2x4s in the location they will be attached, and from behind, mark the location where the angles should be cut for the boards to fit properly. B. Attach the boards, first using a countersink drill bit to predrill the holes, then using wood glue and 2 1/2 exterior wood screws. 6. Perform finishing touches. A. Fill visible holes with wood filler or pocket hole plugs, and let dry. B. Sand the bench until smooth. C. Stain with Dark Walnut (or stain color of choice) and let dry completely. D. Apply a minimum of three coats of Spar Urethane Exterior finish. PINSPIRATION MOMMY 17
18 Have questions about these plans? Send me an at Happy Building! PINSPIRATION MOMMY 18
DIY Corner Bench with Built-in Table
 DIY Corner Bench with Built-in Table Free woodworking plans for building a corner bench with a built-in table in the center. Cost: ~$75 Difficulty: Intermediate PINSPIRATION MOMMY 1 TOOLS AND SUPPLIES:
DIY Bedroom Entertainment Center
 DIY Bedroom Entertainment Center Free woodworking plans for building a bedroom entertainment center that also serves as a laundry sorter. Perfect for bedroom with limited wall space. Cost: ~$250 Difficulty:
DIY X Panel Side Table
 DIY X Panel Side Table *Before beginning this project, please read through all of the plans as well as the blog post associated with this project. Always use safety precautions whenever using power tools
Simple Woodworking: Outdoor Pitch Chair
 Parts Lumber Front Front Leg Front Leg Drill three pocket holes on each end of the Front - one centered and two 3/4" from each side. Cut a 15-degree miter on one end of the Front Legs. It will be easier
DIY Outdoor Console Table Addicted2DIY.com
 DIY Outdoor Console Table Addicted2DIY.com *Before beginning this project, please read through all of the plans. Always use safety precautions whenever using power tools and follow the manufacturer s suggested
MyOutdoorPlans.com. By Julian King [2X4 GARDEN BENCH]
![MyOutdoorPlans.com. By Julian King [2X4 GARDEN BENCH]](/thumbs/75/72876801.jpg "MyOutdoorPlans.com. By Julian King [2X4 GARDEN BENCH]") MyOutdoorPlans.com By Julian King [2X4 GARDEN BENCH] CUT LIST A 2 pieces of 2 4 lumber 24 long, 2 pieces 32 1/2 long LEGS B 2 pieces of 2 4 lumber 45 long, 2 pieces 15 1/2 long, 1 piece 12 1/2 long SEAT
MyOutdoorPlans.com By Julian King [2X4 GARDEN BENCH] CUT LIST A 2 pieces of 2 4 lumber 24 long, 2 pieces 32 1/2 long LEGS B 2 pieces of 2 4 lumber 45 long, 2 pieces 15 1/2 long, 1 piece 12 1/2 long SEAT
Chief s Shop: Simple Woodworking Bench
 Chief s Shop: Simple Woodworking Bench Be sure to read the instructions and review the illustrations and accompanying video for this project BEFORE you start. Follow ALL SAFETY GUIDELINES AND RECOMMENDATIONS
Patio Table. Page 1 of 16
 Patio Table www.andrewharriswoodwork.com Page 1 of 16 Introduction This plan makes a table that is unit which is 95 ½ inches long and 49 inches wide. The distance from the underside of the top edging to
PROJECT PLANS PATIO PLANTER BOX
 PROJECT PLNS PTIO PLNTER BOX This great-looking planter makes the perfect place for your favorite plants and flowers. It s sized to hold an 18" round plastic pot, which you can pick up in any garden center.
MATERIALS: TOOLS: CUT LIST:
 MATERIALS: (3) 4x4x8 Ft. Boards (8) 2x4x8 Ft. Boards 2 ½-inch Pocket Screws 2 ½-inch Wood Screws 1-inch Wood Screws (16) Figure 8 Tabletop Fasteners Wood Glue Wood Filler TOOLS: Tape Measure Pencil Carpenter
Eco Office File Base. Materials and Tools: Free Plans to build an office file cabinet base
 Materials and Tools: Materials: 1 - Sheet 3/4 PureBond Hardwood Plywood (Available at the Home Depot) 1 - Sheet 1/4 PureBond Hardwood Plywood (Available at the Home Depot) 3-21 Drawer Slides, Euro Style
DIY RUSTIC HALL TREE
 DIY RUSTIC HALL TREE *Before beginning this project, please read through all of the plans as well as the blog post associated with this project. Always use safety precautions whenever using power tools
1 ¼-inch Pocket Screws Brad Nailer or Hammer 1 ¼-inch Brad Nails Clamps
 MATERIALS: TOOLS: (4) 2 x 6 x 8 Ft. Boards Tape Measure (2) 2 x 4 x 8 Ft. Boards Carpenter s Square (7) 1 x 4 x 8 Ft. Boards Pencil (2) 1 x 3 x 8 Ft. Boards Drill (1) Half Sheet of ¾-inch Thick Plywood
Simple Stackable Outdoor Chairs
 posted by Ana White [1] These simple chairs stack! And match our Simple Modern Outdoor Collection. Build a few to match the tables, or just extra seating for outdoors. About ProjectInspired By: West Elm
Build a Bigger Kid's Picnic Table
 posted by Ana White [1] Designed to fit bigger kids, this super sturdy picnic table is big enough to sit a small adult too! Super easy to build design has been built hundreds of times already! Special
DIY Wine Storage Cabinet
 DIY Wine Storage Cabinet ADDICTED2DIY.COM *Before beginning this project, please read through all of the plans and the blog post. When building this project, be sure to measure your wood and cut to fit.
Beginner Farm Table (2 Tools + $50 Lumber) [1]
![Beginner Farm Table (2 Tools + $50 Lumber) [1]](/thumbs/90/104463934.jpg "Beginner Farm Table (2 Tools + $50 Lumber) [1]") [1] Submitted by Ana White [2] on Mon, 2018-06-25 02:16 Page 1 of 36 [1] Additional Photos [3] [4] Page 2 of 36 [5] [6] I have been a long time user and fan of Rustoleum products. This post is sponsored
[1] Submitted by Ana White [2] on Mon, 2018-06-25 02:16 Page 1 of 36 [1] Additional Photos [3] [4] Page 2 of 36 [5] [6] I have been a long time user and fan of Rustoleum products. This post is sponsored
indicates a diagram detailing the dimensions of a project part and/or the placement for pocket holes, screws, nails, etc.
 What You'll Need lumber 1-1 x3x4 1-1 x3x8 2-1 x6x8 1-1 x 10 x 4 hardware/supplies (availability will vary) 2" wood screws 1 1/4" pocket hole screws wood glue paint/stain tools table saw miter saw jigsaw
4x4 Truss Benches [1]
![4x4 Truss Benches [1]](/thumbs/86/93457666.jpg "4x4 Truss Benches [1]") [1] Submitted by Ana White [2] on Wed, 2013-10-02 12:37 Page 1 of 14 Page 2 of 14 [1] Additional Photos [3] [4] Hi everyone! I'm so excited today to share with you brand new plans! Remember a little while
[1] Submitted by Ana White [2] on Wed, 2013-10-02 12:37 Page 1 of 14 Page 2 of 14 [1] Additional Photos [3] [4] Hi everyone! I'm so excited today to share with you brand new plans! Remember a little while
PROJECT PLANS HOBBY BENCH
 PROJECT PLANS HOBBY BENCH This great-looking bench provides the perfect place to pursue a variety of hobbies. It offers a large bench top with built-in trays for small items, plus shelves up above to hold
Happier Homemaker Farmhouse Table [1]
![Happier Homemaker Farmhouse Table [1]](/thumbs/93/112249864.jpg "Happier Homemaker Farmhouse Table [1]") [1] Submitted by Ana White [2] on Tue, 2013-04-23 11:55 [1] Additional Photos [3] Hey DIY Friends! We have a special plan treat for you today!!! Page 1 of 17 My new friend Melissa from The Happier Homemaker
[1] Submitted by Ana White [2] on Tue, 2013-04-23 11:55 [1] Additional Photos [3] Hey DIY Friends! We have a special plan treat for you today!!! Page 1 of 17 My new friend Melissa from The Happier Homemaker
Jewelry Cabinet. Materials: 5/8" brad nails 5-1" x 3" x 8' boards (or if not 2 1/2" wide. 1-4' x 8' sheet - 3/4" plywood. wood glue get 1x4's)
") 1 Jewelry Cabinet Materials: 1-4' x 8' sheet - 3/4" plywood 5/8" brad nails 5-1" x 3" x 8' boards (or if not 2 1/2" wide wood glue get 1x4's) sand paper 1-1" x 6" x 8' board wood filler 1/2 sheet - 3/16"
1 Jewelry Cabinet Materials: 1-4' x 8' sheet - 3/4" plywood 5/8" brad nails 5-1" x 3" x 8' boards (or if not 2 1/2" wide wood glue get 1x4's) sand paper 1-1" x 6" x 8' board wood filler 1/2 sheet - 3/16"
This indicates a diagram detailing the dimensions of a project part and/or the placement for pocket holes, screws, nails, etc.
 S i m p le Woodworking: What You'll Need v lumber 2-1 x 12 x 6 hardware/supplies (availability will vary) 1 1/4" pocket hole screws #18 x 1 1/2 brads or pocket hole plugs 12-inch continuous hinge magnetic
Grilling Table. Page 1 of 10
 Grilling Table www.andrewharriswoodwork.com Page 1 of 10 Introduction This plan makes a table 47 inches wide, 22 inches deep and 36 inches high with the top added. All my builds are made with pocket hole
DIY Farmhouse Cabinet
 DIY Farmhouse Cabinet Addicted2DIY.com *Before beginning this project, please read through all of the plans as well as the blog post associated with this project. Always use safety precautions whenever
Castle Bed. Page 1 of 24
 Castle Bed www.andrewharriswoodwork.com Page 1 of 24 Introduction This plan makes a twin bed that is 91 inches long and 60 inches wide. I have tried to ensure all steps are covered in these plans but if
diy outdoor bar from diyhuntress.com
 diy outdoor bar from diyhuntress.com 2 DIMENSIONS & DISCLAIMER: Please double check the overall dimensions for your specific build before starting. Please wear appropriate safety gear when operating power
Square X Base Pedestal Dining Table [1]
![Square X Base Pedestal Dining Table [1]](/thumbs/81/84185086.jpg "Square X Base Pedestal Dining Table [1]") [1] Submitted by Ana White [2] on Thu, 2013-07-11 12:11 [1] Additional Photos [3] [4] Page 1 of 22 [5] [6] [7] Hello everyone! Pretty happy today to introduce to you a brand new plan! My dear friend Brooke
[1] Submitted by Ana White [2] on Thu, 2013-07-11 12:11 [1] Additional Photos [3] [4] Page 1 of 22 [5] [6] [7] Hello everyone! Pretty happy today to introduce to you a brand new plan! My dear friend Brooke
Rustic X Coffee Table [1]
![Rustic X Coffee Table [1]](/thumbs/82/86923960.jpg "Rustic X Coffee Table [1]") [1] Submitted by Ana White [2] on Mon, 2012-07-09 12:40 [1] Additional Photos [3] [4] Page 1 of 12 [5] [6] [7] Hey hey! Happy Monday! Thanks so much with your patience with the site this morning. We are
[1] Submitted by Ana White [2] on Mon, 2012-07-09 12:40 [1] Additional Photos [3] [4] Page 1 of 12 [5] [6] [7] Hey hey! Happy Monday! Thanks so much with your patience with the site this morning. We are
ADULT. Adirondack / Muskoka Chair Plans
 ADULT Adirondack / Muskoka Chair Plans Materials List 3/4" x 9 1/2" (1.9cm x 24.1cm) redwood, cedar or pine boards. Six, 8' (2.44m) boards should make one chair depending on knots and layout. You can also
Shanty2Chic Porch Swing [1]
![Shanty2Chic Porch Swing [1]](/thumbs/89/100538159.jpg "Shanty2Chic Porch Swing [1]") [1] Submitted by Ana White [2] on Wed, 2013-06-12 12:48 Page 1 of 18 Page 2 of 18 [1] Additional Photos [3] Are you enjoying your summer? Would you enjoy your summer more if you could swing lazily in the
[1] Submitted by Ana White [2] on Wed, 2013-06-12 12:48 Page 1 of 18 Page 2 of 18 [1] Additional Photos [3] Are you enjoying your summer? Would you enjoy your summer more if you could swing lazily in the
Chest of Drawers Plans
 Chest of Drawers Plans www.andrewharriswoodwork.com Page 1 of 15 Introduction This plan makes a chest of drawers that is 50 inches at the widest point, 19 inches deep and 40.75 inches high. I have tried
Triple Pedestal Farmhouse Table [1]
![Triple Pedestal Farmhouse Table [1]](/thumbs/90/103867242.jpg "Triple Pedestal Farmhouse Table [1]") [1] Submitted by Ana White [2] on Fri, 2012-11-30 13:42 Page 1 of 24 Page 2 of 24 [1] Additional Photos [3] [4] [5] [6] [7] One hundred and twenty five dollars. Page 3 of 24 $125. That's what this table
[1] Submitted by Ana White [2] on Fri, 2012-11-30 13:42 Page 1 of 24 Page 2 of 24 [1] Additional Photos [3] [4] [5] [6] [7] One hundred and twenty five dollars. Page 3 of 24 $125. That's what this table
Modern Park Bench [1]
![Modern Park Bench [1]](/thumbs/85/93022239.jpg "Modern Park Bench [1]") [1] Submitted by Ana White [2] on Mon, 2014-06-02 13:07 [1] Additional Photos [3] [4] Page 1 of 20 [5] [6] One of the great things about DIY - besides saving money, getting what you want, and that you
[1] Submitted by Ana White [2] on Mon, 2014-06-02 13:07 [1] Additional Photos [3] [4] Page 1 of 20 [5] [6] One of the great things about DIY - besides saving money, getting what you want, and that you
PROJECT PLANS ROLLING LAUNDRY SORTER
 R PROJECT PLANS ROLLING LAUNDRY SORTER Sorting laundry certainly doesn t rank high on anyone s list. So, anything that makes this task easier is welcome. If that functionality can be mixed with a bit of
Simple White Outdoor Loveseat [1]
![Simple White Outdoor Loveseat [1]](/thumbs/75/72585352.jpg "Simple White Outdoor Loveseat [1]") [1] Submitted by Ana White [2] on Thu, 2011-06-09 03:05 [1] Some comments from our lovely readers on the matching sofa plan [3]... "Will you be doing the love seat? (Pretty please!)" "Would it be so hard
[1] Submitted by Ana White [2] on Thu, 2011-06-09 03:05 [1] Some comments from our lovely readers on the matching sofa plan [3]... "Will you be doing the love seat? (Pretty please!)" "Would it be so hard
Tryde End Table with Shelf - Updated Pocket Hole Plans [1]
![Tryde End Table with Shelf - Updated Pocket Hole Plans [1]](/thumbs/74/70809427.jpg "Tryde End Table with Shelf - Updated Pocket Hole Plans [1]") [1] Submitted by Ana White [2] on Tue, 2013-10-15 14:17 [1] Hi everyone! We are still chugging away at Momplex Unit Sewing Mom... so so so close! Page 1 of 13 But not quite there yet... And while I've
[1] Submitted by Ana White [2] on Tue, 2013-10-15 14:17 [1] Hi everyone! We are still chugging away at Momplex Unit Sewing Mom... so so so close! Page 1 of 13 But not quite there yet... And while I've
Materials and Tools: Printer s Triple Console Cabinet. Free Plans to build a Triple Console Cabinet
 Materials and Tools: Materials: 3 sets euro style bottom corner mount drawer slides, 16 length 3 sets inset hinges 24 cup style handles 8 2x2 @ 8 feet long 6 1x3 @ 8 feet long 6 1x2 @ 8 feet long 1 sheet
Sawhorse Outdoor Bench [1]
![Sawhorse Outdoor Bench [1]](/thumbs/90/101371109.jpg "Sawhorse Outdoor Bench [1]") [1] Submitted by Ana White [2] on Mon, 2013-06-24 15:09 Page 1 of 18 Page 2 of 18 [1] Additional Photos [3] Hi everyone! Thank you so much for all the plan love, pins and shares on the Outdoor Sawhorse
[1] Submitted by Ana White [2] on Mon, 2013-06-24 15:09 Page 1 of 18 Page 2 of 18 [1] Additional Photos [3] Hi everyone! Thank you so much for all the plan love, pins and shares on the Outdoor Sawhorse
DIY PATIO TABLE WITH BUILT-IN ICE BOXES
 DIY PATIO TABLE WITH BUILT-IN ICE BOXES courtesy of Remodelaholic.com Designed by Kruse s Workshop // Building Plans by Hertoolbelt.com Find the original tutorial and more details at www.remodelaholic.com/build-patio-table-ice-boxes
Chest of Drawers Plans
 Chest of Drawers Plans www.andrewharriswoodwork.com Page 1 of 12 Introduction This plan makes a chest of drawers from 2 by 4s and 2 by 6s for the top. The cabinet is 22 ½ inches at the widest point, 22
indicates a diagram detailing the dimensions of a project part and/or the placement for pocket holes, screws, nails, etc.
 ho m e o f f i c e de s k What You'll Need lumber 1-1 x2x4 4-1 x2x8 8-1 x3x8 1-3/4 x 4 x 8 sheet of plywood hardware/supplies (availability will vary) 1 1/4" brads Kreg 1 1/4" pocket hole screws wood glue
Armless 2x4 Sectional (Matches Ryobi Sofa and One Arm Pieces) [1]
![Armless 2x4 Sectional (Matches Ryobi Sofa and One Arm Pieces) [1]](/thumbs/87/97261079.jpg "Armless 2x4 Sectional (Matches Ryobi Sofa and One Arm Pieces) [1]") Armless 2x4 Sectional (Matches Ryobi Sofa and One Arm Pieces) [1] Submitted by Ana White [2] on Mon, 2015-06-08 15:17 Page 1 of 15 [1] Hi all!!! We are on the homestretch with our cabin project! It's a
Armless 2x4 Sectional (Matches Ryobi Sofa and One Arm Pieces) [1] Submitted by Ana White [2] on Mon, 2015-06-08 15:17 Page 1 of 15 [1] Hi all!!! We are on the homestretch with our cabin project! It's a
Adjustable Height Wood and Metal Stool [1]
![Adjustable Height Wood and Metal Stool [1]](/thumbs/80/80442751.jpg "Adjustable Height Wood and Metal Stool [1]") [1] Submitted by Ana White [2] on Mon, 2014-09-22 12:42 Page 1 of 23 [1] Additional Photos [3] Page 2 of 23 [4] [5] [6] [7] Hello Awesomest DIY Folks Ever, and Happy Monday! Toliy (who's been sorta interning
[1] Submitted by Ana White [2] on Mon, 2014-09-22 12:42 Page 1 of 23 [1] Additional Photos [3] Page 2 of 23 [4] [5] [6] [7] Hello Awesomest DIY Folks Ever, and Happy Monday! Toliy (who's been sorta interning
Kreg Tool Co. All Rights Reserved.
 Version 1 p. 1 Materials: Lumber: Qty: Board 2 2x2s 3 ft. long 2 1x2s 8 ft. long 2 1x3s 8 ft. long 6 1x6s 10 ft. long INSTRUCTIONS: Supplies: 1 1 / 4" Kreg Screws (coarse thread for softwoods, fine thread
Copyrighted Material Page 1
 Compare to: Pottery Barn Teen Storage Bed System Skill Level: Beginner Working with the rest of the components in the Storage Bed Collection, the Small Hutch fits on top of the Storage Headboard and will
This indicates a diagram detailing the dimensions of a project part and/or the placement for pocket holes, screws, nails, etc.
 S i m p le Woodworking: R u s t i c s i d e t ab l e What You'll Need v lumber 4-1 x 6 x 6 or reclaimed 1 x 6 x 6 fence pickets hardware/supplies (availability will vary) 1 1/4" pocket hole screws 1 1/4"
Armoire with Open Shelves and Magnetic Doors [1]
![Armoire with Open Shelves and Magnetic Doors [1]](/thumbs/77/75382834.jpg "Armoire with Open Shelves and Magnetic Doors [1]") [1] Submitted by Ana White [2] on Mon, 2011-08-22 18:48 Page 1 of 25 [1] Page 2 of 25 Additional Photos [3] [4] Necessity truly is the mother of invention. Last Sunday, I was counting on my scrap piece
[1] Submitted by Ana White [2] on Mon, 2011-08-22 18:48 Page 1 of 25 [1] Page 2 of 25 Additional Photos [3] [4] Necessity truly is the mother of invention. Last Sunday, I was counting on my scrap piece
This indicates a diagram detailing the dimensions of a project part and/or the placement for pocket holes, screws, nails, etc.
 S i m p le Woodworking: Bath Side Table What You'll Need v lumber 4-1- x 36-inch square dowels 1-1 x8x8 1-3/4-inch x 2- x 4-foot sheet of plywood hardware/supplies 1 1/4" pocket hole screws #18 x 1 1/2
ining Table Materials *Notes on Materials
 D ining Table We looked around for the perfect table for the dining room. Some were too big, some too small, and most were just too expensive. So we built this one, and we are happy with the result. It
Copyright 2010 Springbok Publishing All Rights Reserved- Page 1
 Copyright 2010 Springbok Publishing All Rights Reserved- www.woodensaddlerackplans.com Page 1 Legal Information All contents copyright 2010 by Springbok Publishing. All rights reserved. No part of this
Steel Framed Miter Saw Bench
 Steel Framed Miter Saw Bench Version 1.1 How to build Steel Framed Miter Saw Bench With easy to follow step-by-step instructions, you will be able to cut, assemble, and finish your very own steel miter
Closet Organizer from One Sheet of Plywood [1]
![Closet Organizer from One Sheet of Plywood [1]](/thumbs/75/71639922.jpg "Closet Organizer from One Sheet of Plywood [1]") [1] Submitted by Ana White [2] on Mon, 2013-03-25 11:42 [1] This closet is made from one sheet of plywood! Page 1 of 14 Wondering how to make a closet organizer system from one sheet of plywood? Check
[1] Submitted by Ana White [2] on Mon, 2013-03-25 11:42 [1] This closet is made from one sheet of plywood! Page 1 of 14 Wondering how to make a closet organizer system from one sheet of plywood? Check
This indicates a diagram detailing the dimensions of a project part and/or the placement for pocket holes, screws, nails, etc.
 S i m p le Woodworking: What You'll Need v lumber 1-2x4x8 9-2 x 4 x 10 1-2x6x8 2-2 x 6 x 10 1-2 x 10 x 8 2-4x4x8 hardware/supplies (availability will vary) 2 1/2" pocket hole screws 2 1/2" deck screws
OUTDOOR STOOL. ProWood Project Plan
 ProWood Project Plan OUTDOOR STOOL With ProWood Professional Grade pressure-treated wood, you can easily build this sturdy stool and complement your outdoor deck, patio or yard furniture and expand your
Fancy X Farmhouse Table [1]
![Fancy X Farmhouse Table [1]](/thumbs/78/78561809.jpg "Fancy X Farmhouse Table [1]") [1] Submitted by Ana White [2] on Mon, 2012-06-04 11:00 [1] Additional Photos [3] [4] Page 1 of 17 [5] We've been up to our old tricks again! Page 2 of 17 Page 3 of 17 Whitney from Shanty2Chic [6] and
[1] Submitted by Ana White [2] on Mon, 2012-06-04 11:00 [1] Additional Photos [3] [4] Page 1 of 17 [5] We've been up to our old tricks again! Page 2 of 17 Page 3 of 17 Whitney from Shanty2Chic [6] and
Want to reach a captive woodworking and crafting audience?
 Want to reach a captive woodworking and crafting audience? Then be a sponsor of Chief's Shop Plan of the Week Contact Chris Hill for more details chief@chiefs-shop.com 205-432-801 3 S i m p le Woodworking:
PROJECT PLANS COMPACT COAT RACK
 PROJT PLNS OMPT OT RK Not everyone has space for a mudroom, but everyone does need a place to hang coats and hats when they come in the door. With this coat rack, you ll get that hanging space without
PROJECT PLAN MODERN COFFEE TABLE
 BUILD IT WITH ROCKLER PROJECT PLAN MODERN COFFEE TABLE With its clean lines and striking geometry, this coffee table will lend iconic midcentury modern style to any living space. And you can build it yourself
Farmhouse Bench [1] Farmhouse Bench Published on Ana White (http://www.ana-white.com) Submitted by Ana White [2] on Wed, :31
![Farmhouse Bench [1] Farmhouse Bench Published on Ana White (http://www.ana-white.com) Submitted by Ana White [2] on Wed, :31](/thumbs/72/67125401.jpg "Farmhouse Bench [1] Farmhouse Bench Published on Ana White (http://www.ana-white.com) Submitted by Ana White [2] on Wed, :31") [1] Submitted by Ana White [2] on Wed, 2011-01-05 01:31 [1] Summary: To match our Farmhouse Table. This farmhouse bench is easy to build and is rustic and substantial. CategoriesProject Type: Bench [3]
[1] Submitted by Ana White [2] on Wed, 2011-01-05 01:31 [1] Summary: To match our Farmhouse Table. This farmhouse bench is easy to build and is rustic and substantial. CategoriesProject Type: Bench [3]
indicates a diagram detailing the dimensions of a project part and/or the placement for pocket holes, screws, nails, etc.
 f a r m h o u s e d i ni ng b e nc h What You'll Need lumber 6-2x3x8 6-1 x6x8 (availability will vary) Intermediate or equivalent 8/4 lumber planed to 1 1/2" for the 2x hardware/supplies 1 1/4" pocket
Benchright Farmhouse Table [1]
![Benchright Farmhouse Table [1]](/thumbs/85/91389531.jpg "Benchright Farmhouse Table [1]") [1] Submitted by Ana White [2] on Wed, 2011-07-20 13:24 Page 1 of 24 [1] While I know it's still July, and summer for most everyone else, yesterday, while helping out at the Momplex [3], I found myself
[1] Submitted by Ana White [2] on Wed, 2011-07-20 13:24 Page 1 of 24 [1] While I know it's still July, and summer for most everyone else, yesterday, while helping out at the Momplex [3], I found myself
Cedar Planters for less than $20! [1]
![Cedar Planters for less than $20! [1]](/thumbs/90/103037335.jpg "Cedar Planters for less than $20! [1]") [1] Submitted by Ana White [2] on Wed, 2012-08-08 12:20 [1] I've been wanting a few cedar planters for the front of my house, and had some leftover cedar fence pickets to use up. This was a quick and Page
[1] Submitted by Ana White [2] on Wed, 2012-08-08 12:20 [1] I've been wanting a few cedar planters for the front of my house, and had some leftover cedar fence pickets to use up. This was a quick and Page
Modern Coffee Table [1]
![Modern Coffee Table [1]](/thumbs/83/88601379.jpg "Modern Coffee Table [1]") [1] Submitted by jleakey [2] on Thu, 2013-12-26 10:03 Page 1 of 15 [1] Page 2 of 15 Additional Photos [3] [4] [5] [6] To build this project I used various tools. These included a Table Saw for all rip
[1] Submitted by jleakey [2] on Thu, 2013-12-26 10:03 Page 1 of 15 [1] Page 2 of 15 Additional Photos [3] [4] [5] [6] To build this project I used various tools. These included a Table Saw for all rip
Entrance Cabinet Plans
 Entrance Cabinet Plans www.andrewharriswoodwork.com Page 1 of 19 Introduction I have tried to ensure all steps are covered in these plans but if you find any errors in the plans or have a question then
DIYing a Wood Handrail [1]
![DIYing a Wood Handrail [1]](/thumbs/93/111665980.jpg "DIYing a Wood Handrail [1]") [1] Submitted by Ana White [2] on Tue, 2013-07-16 12:14 Page 1 of 35 [1] Our decking project is still on hold... and it's still a weather thingy. But its not rain this time. It's just too dang hot to be
[1] Submitted by Ana White [2] on Tue, 2013-07-16 12:14 Page 1 of 35 [1] Our decking project is still on hold... and it's still a weather thingy. But its not rain this time. It's just too dang hot to be
Saving Alaska Farmhouse Canopy Bed [1]
![Saving Alaska Farmhouse Canopy Bed [1]](/thumbs/75/71584792.jpg "Saving Alaska Farmhouse Canopy Bed [1]") [1] Submitted by Ana White [2] on Fri, 2014-07-11 14:14 [1] Happy Friday DIY Friends! I have some great news to share with you today! Page 1 of 20 DIY Network will be airing our Saving Alaska pilots this
[1] Submitted by Ana White [2] on Fri, 2014-07-11 14:14 [1] Happy Friday DIY Friends! I have some great news to share with you today! Page 1 of 20 DIY Network will be airing our Saving Alaska pilots this
Benchmark Media Console [1]
![Benchmark Media Console [1]](/thumbs/75/72387765.jpg "Benchmark Media Console [1]") [1] Submitted by Ana White [2] on Fri, 2011-10-07 13:31 [1] Here she is!!!! Excited to post this plan for you, enjoy the plans! Happy Buiding, Ana Summary: Make your own Pottery Barn inspired Benchwright
[1] Submitted by Ana White [2] on Fri, 2011-10-07 13:31 [1] Here she is!!!! Excited to post this plan for you, enjoy the plans! Happy Buiding, Ana Summary: Make your own Pottery Barn inspired Benchwright
indicates a diagram detailing the dimensions of a project part and/or the placement for pocket holes, screws, nails, etc.
 f a r m h o u s e d i ni ng c h a i r What You'll Need lumber Beginner 1-1 x2x4 1-1 x2x8 3-2x3x8 1-2x4x8 1-3/4 x 2 x 4 sheet of plywood (availability will vary) Intermediate Intermediate Beginner About
Redwood 3. Install the chair back Finishing A d i r o n d a c k C h a i r Grades Materials For Adirondack Chair Quantity Size Length 4.
 Adirondack Chair Adirondack Chair BUILD THE CHAIR FRAME The rounded wooden slats, oversized armrests and inviting slant-back design identify the classic Adirondack chair. Born a century ago in upstate
Rustic X End Table [1]
![Rustic X End Table [1]](/thumbs/74/70117734.jpg "Rustic X End Table [1]") Rustic X End Table [1] Submitted by Ana White [2] on Wed, 2012-08-15 02:03 [1] Hi everyone!!! What a treat we have today! Page 1 of 16 Remember this beautiful X Console Table, [3] built by Hillary? [4]
Rustic X End Table [1] Submitted by Ana White [2] on Wed, 2012-08-15 02:03 [1] Hi everyone!!! What a treat we have today! Page 1 of 16 Remember this beautiful X Console Table, [3] built by Hillary? [4]
Dresser. Materials & Tools FEATURING FORMALDEHYDE-FREE TECHNOLOGY. Free Plans to build a Dresser
 Free Plans to build a Dresser Materials & Tools Materials: 1-1/4 pocket hole screws 1-1/4 brad nails 3 sets of 18 drawer slides Drawer pulls Edge banding, optional Wood glue Sandpaper (100, 150, 220 grits)
How to Build a Recessed Medicine Cabinet
 How to Build a Recessed Medicine Cabinet See post for install info http://www.hertoolbelt.com/recessed-medicine-cabinet/ Materials 6 Inset Cabinet Door Hinges 3 Latches 1 sheet Beadboard or 1/4 plywood
indicates a diagram detailing the dimensions of a project part and/or the placement for pocket holes, screws, nails, etc.
 What You'll Need lumber 1-1 x 3 x 6 2-1 x3x8 1-1 x8x6 1-1 x 12 x 6 2-2 x 2 x 8* (availability will vary) *if2x2s ofthis size are not available, laminated two 1x2s to create 2x2s) hardware/supplies Kreg
Once you ve made this project, let us know how it went. We d love to see it and brag about you, OK?
 Build It: Let It Snow(flake) wooditsreal.com/2017/12/18/build-a-snowflake/ HANDMADE HOLIDAY Here s a way to bring something extra to your winter decor: build a simple, yet stunning snowflake. Keeping with
Trestle Table and Benches Materials List
 Project 18444EZ: Trestle Table and Benches In the early days of our country, trestle tables were popular because they could easily be disassembled and moved out of the way when not in use no small advantage
Entryway Locker 17 ½ 25 ½
 Copyright 2015 Shanty-2-Chic.com T Entryway Locker his old world entryway locker is loaded with possibilities. Two adjustable shelves allow you to customize the storage to fit your needs. Even better,
Roll-Away Patio Chair
 oll-way Patio hair Project Plan FO YOU STT This project, designed for the Kreg Jig H and Kreg Jig H Screws, uses 1 ½"-thick material, commonly called 2- by lumber. We recommend cedar for outdoor projects,
Husky Farmhouse Table [1]
![Husky Farmhouse Table [1]](/thumbs/90/103867159.jpg "Husky Farmhouse Table [1]") [1] Submitted by Ana White [2] on Mon, 2013-05-06 12:49 [1] Additional Photos Page 1 of 18 [3] [4] [5] [6] Hello DIY Friends! I hope you had a wonderful weekend! Can you believe it is still snowing up
[1] Submitted by Ana White [2] on Mon, 2013-05-06 12:49 [1] Additional Photos Page 1 of 18 [3] [4] [5] [6] Hello DIY Friends! I hope you had a wonderful weekend! Can you believe it is still snowing up
Becca Trunk Published on Ana White ( Becca Trunk [1] Submitted by Ana White [2] on Wed, :09.
![Becca Trunk Published on Ana White ( Becca Trunk [1] Submitted by Ana White [2] on Wed, :09.](/thumbs/92/110488163.jpg "Becca Trunk Published on Ana White ( Becca Trunk [1] Submitted by Ana White [2] on Wed, :09.") [1] Submitted by Ana White [2] on Wed, 2013-04-10 12:09 Page 1 of 12 Page 2 of 12 [1] Additional Photos [3] [4] Hello DIY Friends! Look what you can make with a 1/2 sheet of plywood! Page 3 of 12 Page
[1] Submitted by Ana White [2] on Wed, 2013-04-10 12:09 Page 1 of 12 Page 2 of 12 [1] Additional Photos [3] [4] Hello DIY Friends! Look what you can make with a 1/2 sheet of plywood! Page 3 of 12 Page
Brandy Scrap Wood Storage Bed with Drawers - KING [1]
![Brandy Scrap Wood Storage Bed with Drawers - KING [1]](/thumbs/95/123515628.jpg "Brandy Scrap Wood Storage Bed with Drawers - KING [1]") [1] Submitted by Ana White [2] on Mon, 2015-03-23 11:28 Page 1 of 20 [1] Additional Photos [3] Page 2 of 20 [4] [5] There's only eight days left to share your scrap wood project for a chance to win over
[1] Submitted by Ana White [2] on Mon, 2015-03-23 11:28 Page 1 of 20 [1] Additional Photos [3] Page 2 of 20 [4] [5] There's only eight days left to share your scrap wood project for a chance to win over
Wood Sawhorse. Description: Materials: Tools: Drawing/Photo: Name: Date:
 Wood Sawhorse Name: Date: Description: The project is a wood sawhorse that can be used for workspace for future projects. It requires layout and wood working/construction skills. Materials: 4-1x6x30 DF
indicates a diagram detailing the dimensions of a project part and/or the placement for pocket holes, screws, nails, etc.
 p a r t o ne : B a s e What You'll Need lumber 2-2x4x8 4-2x6x8 1-3/4-inch x 4- x 8-foot sheet of plywood hardware/supplies (availability will vary) 2 1/2" pocket hole screws 1 1/4" pocket hole screws 1
PROJECT PLANS EXPANDABLE CRAFT CENTER
 R PROJECT PLANS EXPANDABLE CRAFT CENTER Whether you re working on craft projects, sewing, or pursuing another hobby, this craft center offers a great place to work. It features a large work surface that
Brookfield Storage Bed Frame. Copyrighted Material. Page 1
 Compare to: Pottery Barn Kids Brookfield Storage Bed Frame Skill Level: Intermediate Brookfield Storage Bed Frame Matching the Brookstone Headboard, the storage bed takes advantage of ALL the space under
PLANS BY TOM BURY JOB BUDDY TOTAL DIMENSIONS: 44 X 18 X 14 DIFFICULTY LEVEL: INTERMEDIATE
 JOB BUDDY TOTAL DIMENSIONS: 44 X 18 X 14 DIFFICULTY LEVEL: INTERMEDIATE MATERIAL LIST: (5) 1 x4 x8 (2) 1 x4 x6 (1) 48 x48 3/4 plywood (1) 24 x24 metal mesh (1) 2 x 8 angle iron (1) 3 x 24 flat iron bar
Modern 2x2 Desk Base for Build Your Own Study Desk Plans [1]
![Modern 2x2 Desk Base for Build Your Own Study Desk Plans [1]](/thumbs/89/100760498.jpg "Modern 2x2 Desk Base for Build Your Own Study Desk Plans [1]") Modern 2x2 Desk Base for Build Your Own Study Desk Plans [1] Submitted by Ana White [2] on Sun, 2015-02-08 19:51 [1] Additional Photos [3] [4] Page 1 of 14 [5] [6] Hi everyone! Happy Monday!!! I'm at Ryobi
Modern 2x2 Desk Base for Build Your Own Study Desk Plans [1] Submitted by Ana White [2] on Sun, 2015-02-08 19:51 [1] Additional Photos [3] [4] Page 1 of 14 [5] [6] Hi everyone! Happy Monday!!! I'm at Ryobi
PROJECT PLANS OUTDOOR SERVING CART
 R PROJECT PLANS OUTDOOR SERVING CART Make outdoor entertaining easy with this serving cart. It offers lots of space for storing food, tableware, and outdoor supplies, plus it cradles bottles where they
Shoe Organizer Plans Our Home from Scratch
 Shoe Organizer Plans by Our Home from Scratch Our Home from Scratch LLC Page 1 Disclaimer Our Home from Scratch LLC and its legal owners cannot be held responsible for any loss, damage, injury or death
Home Depot Adirondack Side Table [1]
![Home Depot Adirondack Side Table [1]](/thumbs/89/98516046.jpg "Home Depot Adirondack Side Table [1]") [1] Submitted by Ana White [2] on Thu, 2013-06-20 12:13 [1] Hi Everyone!!! Today is THE day!!! I've been looking forward to this day for weeks, and it's finally here! Yep, it's Do-It-HERself Workshop Day!
[1] Submitted by Ana White [2] on Thu, 2013-06-20 12:13 [1] Hi Everyone!!! Today is THE day!!! I've been looking forward to this day for weeks, and it's finally here! Yep, it's Do-It-HERself Workshop Day!
Tryde Media Hutch. Copyrighted Material. Page 1
 Compare to: Pottery Barn Hyde Media Console Skill Level: Intermediate Tryde Media Hutch Following the great success of so many readers with the Tryde Collection, inspired by Pottery Barn s popular Hyde
Dining Cart [1] Dining Cart Published on Ana White ( Submitted by decorandthedog [2] on Sun, :53.
![Dining Cart [1] Dining Cart Published on Ana White ( Submitted by decorandthedog [2] on Sun, :53.](/thumbs/90/102395186.jpg "Dining Cart [1] Dining Cart Published on Ana White ( Submitted by decorandthedog [2] on Sun, :53.") [1] Submitted by decorandthedog [2] on Sun, 2014-03-16 17:53 [1] Summary: Page 1 of 13 Rustic, yet industrial dining cart, see more about the project at http://decorandthedog.net/decorandthedog/2014/1/19/diy-dining-cart-tu
[1] Submitted by decorandthedog [2] on Sun, 2014-03-16 17:53 [1] Summary: Page 1 of 13 Rustic, yet industrial dining cart, see more about the project at http://decorandthedog.net/decorandthedog/2014/1/19/diy-dining-cart-tu
Easy Five Cube Tower Bookshelf. Copyrighted Material. Page 1
 Compare to: Land of Nod Cube Collection, 5 Cube Tower Bookshelf Skill Level: Beginner Easy Five Cube Tower Bookshelf This fully framed five cube tower can hold everything from towels to boots to books
Rustic X Kitchen Island - Double [1]
![Rustic X Kitchen Island - Double [1]](/thumbs/95/124835629.jpg "Rustic X Kitchen Island - Double [1]") [1] Submitted by Ana White [2] on Mon, 2013-09-09 16:10 [1] I'm so glad you all liked the plans for the Small Rustic X Kitchen Island [3] built by Shanty2Chic [4]! Page 1 of 23 Page 2 of 23 Thanks for
[1] Submitted by Ana White [2] on Mon, 2013-09-09 16:10 [1] I'm so glad you all liked the plans for the Small Rustic X Kitchen Island [3] built by Shanty2Chic [4]! Page 1 of 23 Page 2 of 23 Thanks for
Square Pedestal Table [1]
![Square Pedestal Table [1]](/thumbs/90/101226129.jpg "Square Pedestal Table [1]") [1] Submitted by Ana White [2] on Fri, 2013-01-25 20:01 [1] Additional Photos [3] Page 1 of 27 [4] [5] Hi everyone and Happy Friday! Do you have lots of DIY plans this weekend? I hope so! Do you remember
[1] Submitted by Ana White [2] on Fri, 2013-01-25 20:01 [1] Additional Photos [3] Page 1 of 27 [4] [5] Hi everyone and Happy Friday! Do you have lots of DIY plans this weekend? I hope so! Do you remember
PROJECT PLANS WOODEN GIFT BOX
 PROJECT PLANS WOODEN GIFT BOX Make the gifts you give even more special by presenting them in this one-of-a-kind gift box. In fact, the box may be valued more than whatever it contains. The box is sized
Hudson Dresser [1] Hudson Dresser Published on Ana White ( Submitted by dan-k [2] on Fri, :43 [1]
![Hudson Dresser [1] Hudson Dresser Published on Ana White ( Submitted by dan-k [2] on Fri, :43 [1]](/thumbs/90/102626096.jpg "Hudson Dresser [1] Hudson Dresser Published on Ana White ( Submitted by dan-k [2] on Fri, :43 [1]") [1] Submitted by dan-k [2] on Fri, 2011-03-11 11:43 [1] If you plan on staining this piece, it is recommended that you stain all of the drawer face materials before assembly for a more professional look.
[1] Submitted by dan-k [2] on Fri, 2011-03-11 11:43 [1] If you plan on staining this piece, it is recommended that you stain all of the drawer face materials before assembly for a more professional look.
PLANS BY KELLEY FARMHOUSE DESIGNS LOFTED DORM ROOM BED
 PLANS BY KELLEY FARMHOUSE DESIGNS LOFTED DORM ROOM BED DIMENSIONS: 82" X 70" X 45" DIFFICULTY LEVEL: INTERMEDIATE TOOLS REQUIRED ONE+ Circular Saw ONE+ AirStrike 16GA Finish Nailer ONE+ Impact Driver ONE+
(28) 2 x 4 x 8 Ft. Boards Tape Measure (9) 2 x 6 x 8 Ft. Boards Pencil (6) 2 x 2 x 8 Ft. Boards Carpenter s Square (9) 1 x 3 x 8 Ft.
 2 x 4 x 8 Ft. Boards Tape Measure (9) 2 x 6 x 8 Ft. Boards Pencil (6) 2 x 2 x 8 Ft. Boards Carpenter s Square (9) 1 x 3 x 8 Ft.") MATERIALS: TOOLS: (28) 2 x 4 x 8 Ft. Boards Tape Measure (9) 2 x 6 x 8 Ft. Boards Pencil (6) 2 x 2 x 8 Ft. Boards Carpenter s Square (9) 1 x 3 x 8 Ft. Boards Drill 2 ½-inch Pocket Screws Circular Saw 2
MATERIALS: TOOLS: (28) 2 x 4 x 8 Ft. Boards Tape Measure (9) 2 x 6 x 8 Ft. Boards Pencil (6) 2 x 2 x 8 Ft. Boards Carpenter s Square (9) 1 x 3 x 8 Ft. Boards Drill 2 ½-inch Pocket Screws Circular Saw 2
Brooklyn Limestone Farmer's Market Stand [1]
![Brooklyn Limestone Farmer's Market Stand [1]](/thumbs/78/77151843.jpg "Brooklyn Limestone Farmer's Market Stand [1]") [1] Submitted by Ana White [2] on Mon, 2014-07-21 14:35 Page 1 of 15 Page 2 of 15 [1] Hi everyone! Happy Monday! I hope you had a great weekend. Today, I'm so happy to debut a brand new plan! My friend
[1] Submitted by Ana White [2] on Mon, 2014-07-21 14:35 Page 1 of 15 Page 2 of 15 [1] Hi everyone! Happy Monday! I hope you had a great weekend. Today, I'm so happy to debut a brand new plan! My friend