Steel Framed Miter Saw Bench
|
|
|
- Sophia Allen
- 6 years ago
- Views:
Transcription
1 Steel Framed Miter Saw Bench Version 1.1 How to build Steel Framed Miter Saw Bench With easy to follow step-by-step instructions, you will be able to cut, assemble, and finish your very own steel miter saw bench! Plan set preview: 11 pages 25 pictures Material list, cut list, and simple step-by-step instructions
2 Bill Of Materials Material 1 x3 Steel Tubing (1/8 Wall) Quantity 54.7 linear feet or linear inches. I purchased three (3) 28 foot sticks from my supplier. 1/2 MDF Two (2) 4 x8 sheets. 2 Angle Iron 6 Section. One (1) 1 section per leg. #10 self-tapping screws Three (3). One per Leg. Self-tapping Sheet Metal Screws per MDF top section. 4 Screws Fender Washers Eight (8). To secure unit to the wall. Eight (8). Used with the 4 screws. 2 x 4 Two (2). WorkshopAddict.com Copyright Page 2
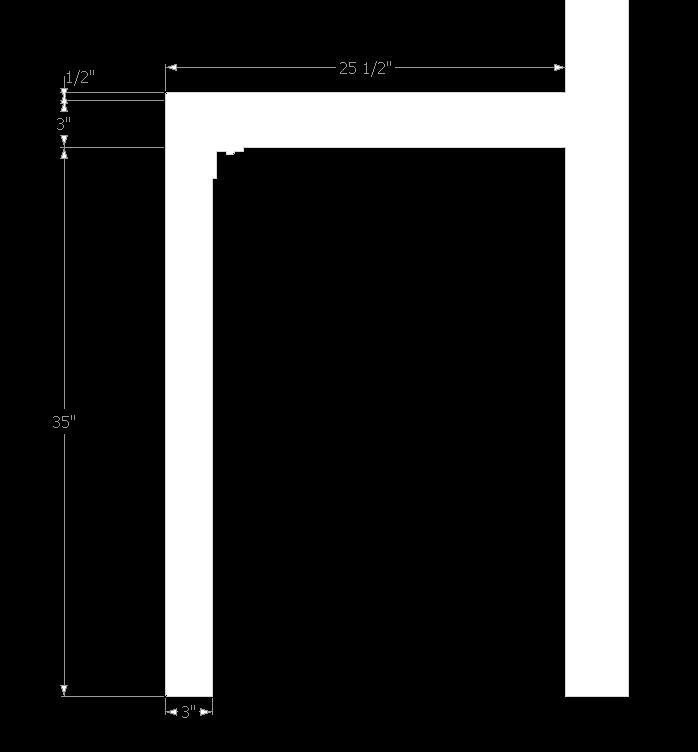
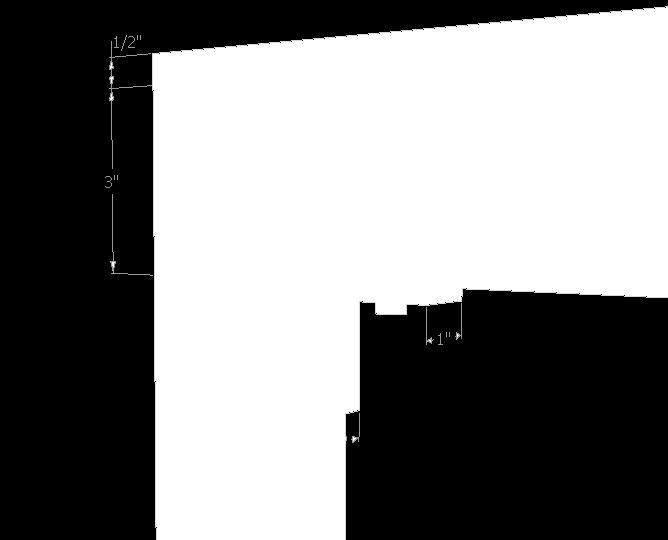
3 Cut List Part Quantity Dimensions Front/Back 1 x3 Steel Tubing Sides 1 x3 Steel Tubing Supports 1 x3 Steel Tubing Legs 1 x3 Steel Tubing 2 14 or 168 long /2 long /2 long 3 35 long 2 Angle Iron 3 1 section Top Section 1/2 MDF Temporary Legs 2 x4 3 7 long x 25 1/2 deep 4 35 long WorkshopAddict.com Copyright Page 3


4 Step 1: Metal Cutting Cut all 1 x3 square tubing parts to length using a metal cutting miter saw, band saw, or even a hack saw. *Note the 2 front/back and 2 sides are mitered. Length is to the long part of the miter. Using a Skil 12 Dry Cut Saw. Model SPT62MTC-01 Step 2: Welding! Using right angle jig, align the 4 perimeters parts (two front/ back and two sides) and tack the joints. Square the entire unit and then weld all 4 sections of each joint. *If possible, position the joint to create a horizontal weld. WorkshopAddict.com Copyright Page 4


5 Step 3: Internal Supports Insert the 7 internal supports and divide the space equally. Clamp them at a 90* angle and tack them all in place. This will allow the material to properly cool and prevent warping. Go back and fully weld all the supports. Using a Millermatic 211 MIG welder with advanced Auto Set Step 4: Grinder time! Use an angle grinder with a flap disk to grind all the welds nice and smooth. Take your time, the two surfaces need to be flush as the top will need to sit level. WorkshopAddict.com Copyright Page 5


6 Step 5: Temporary Legs Cut the four (4) 35 long 2 x4 temporary legs using a miter saw, circular saw, or even a hand saw. Mount two of them to the wall and set the remaining two near by for supporting the front. Step 6: Placing the metal frame With help, move the metal frame into place. Position the back of the unit on the two 2x4 s on the wall. While your helpers keep the unit tight against the wall, place the remaining two 2x4 s on the front. Helpers should not leave until it is secured with screws. WorkshopAddict.com Copyright Page 6


7 Step 7: Securing the metal frame to the wall Drill a clearance hole in the square tubing where a stud is on the wall. Attach the fender washer to the 4 screw and drive to secure the square tubing to the wall. Step 8: Angle Iron Time! Cut the 1 section of the 2 angle iron. Place one on the end of the leg so it is flush with the top. Weld it in place. Drill a hole in the flush part of the angle iron. Using the self-tapping screws, place the leg in place and secure to the top. WorkshopAddict.com Copyright Page 7


8 Step 9: Cut the top sections Cut the 1/2 MDF sections for the top to length and width using a table saw, circular saw, or even a hand saw. Step 10: Install the top sections Place the top sections on the top of the metal frame. Secure using self-tapping screw. WorkshopAddict.com Copyright Page 8


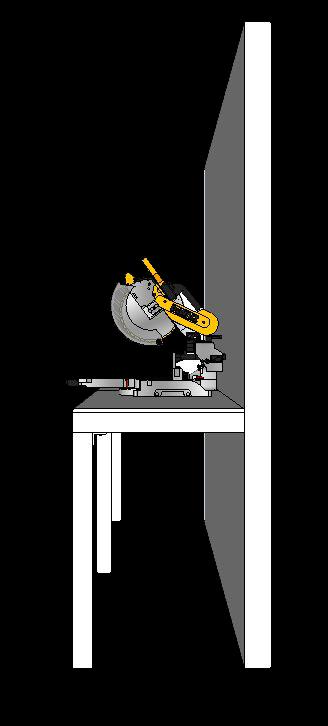
9 Step 11: Enjoy your miter saw station Your miter saw station is completed! Now you can start thinking of building storage underneath and purchasing or building your support wings for the miter saw itself. WorkshopAddict.com Copyright Page 9

10 WorkshopAddict.com Copyright Page 10
11 WorkshopAddict.com Copyright Page 11
Make a Portable Hibachi
 Metal Work Description The purpose of this activity plan is to introduce students to the metal shop through a practical activity. Students will gain valuable knowledge in using power tools and equipment
Sheet Metal Brake Plans for a 6' Sheet Metal Brake
 Sheet Metal Brake Plans for a 6' Sheet Metal Brake,1752'8&7,21 Thank you for purchasing the sheet metal brake plans. The plans include a complete list of material needed and easy to follow steps to build
MITER SAW SUPPORT WINGS PLAN
 MITER SAW SUPPORT WINGS PLAN Version 1.0 How to build support wings for your miter saw With easy to follow step-by-step instructions, you will be able to cut, assemble, and finish your very own support
Precision Steel Car s 100 T Steel Coil Car
 Precision Steel Car s 100 T Steel Coil Car Precision Steel Car www.precisionsteelcar.com info@precisionsteelcar.com Paul Vernon: (513) 571-5739 Revised 4/30/2009 Contents of Kit Main Tube Side Frame 2
Patio Table. Page 1 of 16
 Patio Table www.andrewharriswoodwork.com Page 1 of 16 Introduction This plan makes a table that is unit which is 95 ½ inches long and 49 inches wide. The distance from the underside of the top edging to
Boot Scraper. Description: Materials: Tools: Procedure: Name: Date:
 Boot Scraper Name: Date: Description: This boot scraper will be constructed out of mild steel. This project will utilize cold metal cutting with the hydraulic ironworker. Shielded Metal Arc welding will
Locker Pedestal Installation Instructions
 Locker Pedestal Installation Instructions LK-PED-INST-0314r1 Parts List Single Pedestal Back to Back Pedestal Horizontal Support Tube TS-169 Post Flange TS-190 Post Cap Fasteners Provided: #8 x ¾ round
Coil Winder Instructions.
 Page Coil Winder Instructions. Before we can build our wind turbine there are a few tools we need to make. We ll need to make moulds for the magnet rotors and the stator, and we need to make a coil winder.
Castle Bed. Page 1 of 24
 Castle Bed www.andrewharriswoodwork.com Page 1 of 24 Introduction This plan makes a twin bed that is 91 inches long and 60 inches wide. I have tried to ensure all steps are covered in these plans but if
6625 WEST WILSHIRE BLVD. OKLAHOMA CITY, OK (405) FAX (405)
 FAX (405)") INSTALLATION INSTRUCTIONS FOR BEDSIDE INNER REPAIR PANELS 67-72 GM FLEETSIDES This instruction illustrates the removal and replacement of the often rusted and damaged lower inner flanges on the 1967-1972
INSTALLATION INSTRUCTIONS FOR BEDSIDE INNER REPAIR PANELS 67-72 GM FLEETSIDES This instruction illustrates the removal and replacement of the often rusted and damaged lower inner flanges on the 1967-1972
Door Stop Bracket repair
 by Bill Robinson Door Stop Bracket repair If the threads that hold your Door Stop (footman loop) Bracket, or door strap bracket, are stripped and you strap is hanging similar to mine in the photo below,
Make a Safe. Description. Lesson Objectives. Assumptions. Terminology
 Youth Explore Trades Skills Make a Safe Description Welding is a vast area in the metalworking field and a widely used joining process for metal. In this activity plan students will learn how to MIG weld
How to Build a DIY Extra Long Wood Bench
 How to Build a DIY Extra Long Wood Bench Free woodworking plans for building a large, extra-long wood bench. This bench measures 9 in length and is designed to match the DIY Large Outdoor Dining Table,
Chief s Shop: Simple Woodworking Bench
 Chief s Shop: Simple Woodworking Bench Be sure to read the instructions and review the illustrations and accompanying video for this project BEFORE you start. Follow ALL SAFETY GUIDELINES AND RECOMMENDATIONS
1949 to 1954 Chevrolet Dual Master Cylinder Conversion
 1949 to 1954 Chevrolet Dual Master Cylinder Conversion This document is a one stop shop to getting your brake system updated on your old Chevy. Whether you re going with a disc conversion or just sticking
Master Your Terrain (307) Extreme Duty ROCK RAILZ Jeep Cherokee. Installation Instructions
 Extreme Duty ROCK RAILZ Jeep Cherokee. Installation Instructions") Master Your Terrain (307) 775 9565 www.tntcustoms.com Extreme Duty ROCK RAILZ Jeep Cherokee Installation Instructions Congratulations for purchasing a TNT. Extreme Duty Rock RailZ for your Jeep Cherokee.
Master Your Terrain (307) 775 9565 www.tntcustoms.com Extreme Duty ROCK RAILZ Jeep Cherokee Installation Instructions Congratulations for purchasing a TNT. Extreme Duty Rock RailZ for your Jeep Cherokee.
Copyright 1998 KDE Technologies
 Modular Computer Corner Desk Unit Copyright 1998 KDE Technologies http://members.tripod.com/~kdetech/ 1. Introduction 2. Plans Sheet one - Isometric Sheet two - Top Detail / Corner Unit Sheet three - Leg
Dehydrator Box Build Plan
 Dehydrator Box Build Plan Cut Sheet Metal 1. Using a foot shear or similar tool, cut all the sheet metal components to the correct dimensions. For dimensions, refer to drawings LS-101F (Top/Side Panel)
Assembly Instructions 10 X 10 Aluminum Roof Support
 Assembly Instructions 10 X 10 Aluminum Roof Support Aluminum Roof Support Bolt Package 16-5/16 X 2 ¼ SS Bolt 24-5/16 X 1 SS Bolt 40-5/16 SS Nylon Lock Nuts 16-5/16 SS Flat Washers 28-4 ½ Wood Screws 36-1
Important Note. Tools Required: Welder capable of fully welding 10 GA.135 steel
 INSTALLATION INSTRUCTIONS Frame Reinforcement Kit 11100 (Patent Pending) 1968-72 GM A-Body Coupe/Sedan Read Instructions FULLY before starting Installation Important Note Installation of this kit requires
Entrance Cabinet Plans
 Entrance Cabinet Plans www.andrewharriswoodwork.com Page 1 of 19 Introduction I have tried to ensure all steps are covered in these plans but if you find any errors in the plans or have a question then
Dewalt Organizer Storage Cabinet Plans
 Dewalt Organizer Storage Cabinet Plans Version 1.0 How to build a system to perfectly organize you Dewalt storage organizers. With easy to follow step-by-step instructions, you will be able to cut, assemble,
The Universal Table Saw Sled
 The Universal Table Saw Sled Do Precision Work Even with Inexpensive Table Saws! Table saw blades always tend to move the wood while the cut is being made. This is why it's so difficult to get accurate
Chest of Drawers Plans
 Chest of Drawers Plans www.andrewharriswoodwork.com Page 1 of 12 Introduction This plan makes a chest of drawers from 2 by 4s and 2 by 6s for the top. The cabinet is 22 ½ inches at the widest point, 22
Chest of Drawers Plans
 Chest of Drawers Plans www.andrewharriswoodwork.com Page 1 of 15 Introduction This plan makes a chest of drawers that is 50 inches at the widest point, 19 inches deep and 40.75 inches high. I have tried
Important Note. Tools Required: Welder capable of fully welding 10 GA.135 steel
 INSTALLATION INSTRUCTIONS Frame Reinforcement Kit 11102 (Patent Pending) 1964-67 GM A-Body Coupe/2dr Sedan Read Instructions FULLY before starting Installation Important Note Installation of this kit requires
SwingSafe Swing-Away Mailbox Support Diagram
 SwingSafe Swing-Away Mailbox Support Diagram Wood Mounting Plates Top Arm (B) Muffler Clamps (A) Carriage Bolts and Nuts Bottom Arm 4-Foot U-Channel Post USPS Recommended 42-44 Height Ground Slope Hex
BEST PRACTICE GUIDE. Socket Bases. Working with Concrete Slabs
 Working with Concrete Slabs When working with concrete slabs the barrier protection can be erected in three ways - with socket bases, adjustable slab edge brackets and multi slab clamps. Socket Bases 1
How to build a Ram for Challenge E: Twist-O-Rama
 How to build a Ram for Challenge E: Twist-O-Rama Notes The Ram is like the Structure Tester it is not Interference for a Team Manager or other non-team members to build it. Construction time is approximately
Trestle Table and Benches Materials List
 Project 18444EZ: Trestle Table and Benches In the early days of our country, trestle tables were popular because they could easily be disassembled and moved out of the way when not in use no small advantage
PRO CYCTM PRO CYC, INC. SYSTEM 1.5 FS
 ASSEMBLY INSTRUCTIONS Congratulations on your decision to use the world s most advanced and user-friendly cyclorama system. We have taken a great deal of care to create and ship your cyc, so please take
PRO CYC PRO CYC, INC. SYSTEM SUPER 1.5QS
 Assembly Instructions System Super 1.5QS Congratulations on your decision to use the world s most advanced and user-friendly cyclorama system. We have taken a great deal of care to create and ship your
Plans & Materials List for Handwashing Station
 Plans & Materials List for Handwashing Station Required Tools Arc Welder (mig or stick) Chop or metal band saw Grinder (bench and/or handheld) 3/8" Drill 1/8", 1/4", 5/16" Drill Bits Copper Pipe Cutter
Ford Pick Up Rear leaf Spring Kit Installation Instructions
 1948-1956 Ford Pick Up Rear leaf Spring Kit Installation Instructions 1-800-984-6259 www.totalcostinvolved.com Parts 48 inch leaf (2) springs (4) U-bolts 3/8-24 x l 1/4bolts (16) & nuts (2) 1/2-20 x 4
How to build a hockey stick bench
 How to build a hockey stick bench The hockey stick bench is a great piece of fully functional furniture that doesn t require a lot of sticks. Composite sticks are really strong, so even if you space them
VACUSEAL MODEL 200. HOT TUB PRODUCTS 233 Carrington Road Bethany CT
 VACUSEAL MODEL 200 J G F G H L HOT TUB PRODUCTS 233 Carrington Road Bethany CT 06524 860-469-2580 www.vacusealcoverlift.com www.hottubproducts.com Made in USA H K E D C I A P B 10 9 8 7 6 5 4 3 2 1 0 SPAS
Skybolt V2 Construction Manual
 Skybolt V2 Construction Manual Property of www.ppgplans.com Do not duplicate or make public. Warnings & Disclaimers. This product shows how to build a basic frame only for Powered Paragliding. It is the
1 ¼-inch Pocket Screws Brad Nailer or Hammer 1 ¼-inch Brad Nails Clamps
 MATERIALS: TOOLS: (4) 2 x 6 x 8 Ft. Boards Tape Measure (2) 2 x 4 x 8 Ft. Boards Carpenter s Square (7) 1 x 4 x 8 Ft. Boards Pencil (2) 1 x 3 x 8 Ft. Boards Drill (1) Half Sheet of ¾-inch Thick Plywood
Why are we giving this guidebook as a FREE download?
 Construction Guide Queen, Double & Twin Vertical 1 Note: This guide covers the construction steps for all 3 sizes of the vertical wall mount Easy DIY Murphy beds, Queen, Double and Twin. The construction
ALL SEASON PATIO COVER
 ALL SEASON PATIO COVER 61 Where the All Season Patio Cover is to be attached to the home, create a level line showing where the top of the mounting rail is to be located. Install each section with the
Computer Desk. Project designed by April Wilkerson
 Project designed by April Wilkerson Copyright WilkerDos.com 2018 Project plan Desk Page 2 of 16 Page 3 of 16 File cabinet Page 4 of 16 Metal base Page 5 of 16 Glue up Get started by gluing up boards for
Copyright 2010 Springbok Publishing All Rights Reserved- Page 1
 Copyright 2010 Springbok Publishing All Rights Reserved- www.woodensaddlerackplans.com Page 1 Legal Information All contents copyright 2010 by Springbok Publishing. All rights reserved. No part of this
k 5356 PINE AVE FRESNO, CA USA TOLL FREE: 877.4X4.TOYS WORLDWIDE:
 tacoma front shackle kit 110821-1-k kit contents 5356 PINE AVE FRESNO, CA 93727 USA TOLL FREE: 877.4X4.TOYS WORLDWIDE: 559.252.4950 WWW.TRAIL-GEAR.COM recommended tools Loctite Cutoff Wheel Welder Grinder
INSTALLATION INSTRUCTIONS. Level Rail With Cap: Page 2 Level Rail Without Cap: Page 8 Stair Rail: Page 12
 INSTALLATION INSTRUCTIONS Level Rail With Cap: Page 2 Level Rail Without Cap: Page 8 Stair Rail: Page 12 LEVEL RAIL WITH CAP The testing was performed in accordance with procedures and methods referenced
Design Update /29/2006
 Design Update 3 -- 8/29/2006 Since our first design we ve made many minor changes to key areas of the prayer bench, especially the folding hinge geometry. The general design remains the same, though the
Horizontal Cable Systems
 ALUMINUM RAILING INSTALLATION INSTRUCTIONS Horizontal Cable Systems 1) Check Contents Of Packages: Verify that all parts have arrived and that they match the packing list. 1A) Coastal applications: Confirm
LARGE PLYWOOD CUTTING GUIDE
 Copyright 2015 Shanty-2-Chic.com Workbench I f you are tight on space but large on ideas this bench is just what you need. Sturdy and mobile this bench has an ingenious fold out wing that gives you over
Horizontal Cable Systems
 ALUMINUM RAILING INSTALLATION INSTRUCTIONS v2012 orizontal Cable Systems 1) Check Contents Of Packages: Verify that all parts have arrived and that they match the packing list. 1A) Coastal applications:
Rorty No.2 Tube Bender.
 Copyright. This entire Manual is copyrighted to Rorty Design, with all rights reserved. No part may be transferred or copied by any means whatsoever, without the express written permission of Rorty Design.
69-70 Floor Pan Fixes
 Approx Time Needed For Completion: Approx 20 hrs Equipment Needed: - Work stand or table for initial cutting, welding and working - Cooper scraps for backing during welding (prevents blow through when
This review. prepares the student for nationally industry recognized assessments. A general overview of power tools is provided.
 This review prepares the student for nationally industry recognized assessments. A general overview of power tools is provided. Please follow the specific instructions provided by the manufacturer. PREREQUISITE:
How We Installed Our 3-Link Banana Bracket:
 How We Installed Our 3-Link Banana Bracket: General Description To avoid failure of your 3-link banana bracket, you will need to pay special attention to the installation. The clamp-on feature of the design
ALUMA-CLASSIC FENCE W1716 & W1720 INSTRUCTION MANUAL
 ALUMA-CLASSIC FENCE W1716 & W1720 INSTRUCTION MANUAL Phone: Phone: 1-360-734-3482 On-Line On-Line Technical Technical Support: Support: tech-support@woodstockint.com tech-support@shopfox.biz COPYRIGHT
A Captured Fastener, version 1.2
 A Captured Fastener, version 1.2 By R. G. Sparber Copyleft protects this document. 1 I needed to be able to fasten two pieces of 16 gage 1" steel tubing together. There shall be no loose parts and no tools
How to Build a Raised Bed Cold Frame
 How to Build a Raised Bed Cold Frame Protect your plants from frost with a cold frame that sits right on top of your existing 4' x 4' raised bed. The lid is held open with screen door closers, and the
Important Note: Why this guidebook is FREE?
 Easy DIY Murphy Bed Construction Guide 1 Important Note: This guide is a FREE SAMPLE of our Complete Construction Guidebook. With the help of this guide you will get familiar with the construction steps
How to Build a Fold- Down Greenhouse
 How to Build a Fold- Down Greenhouse This simple, inexpensive greenhouse folds down to protect your plants during early frosts and cold snaps, then can be raised up on warmer days. Made with PVC pipe and
ASSEMBLY INSTRUCTIONS FOR MAR-K BEDSIDES AND GM FLUSH TAILGATE WITH HANDLE
 ASSEMBLY INSTRUCTIONS FOR MAR-K BEDSIDES AND 41-53 GM FLUSH TAILGATE WITH HANDLE Build the box assembly according to the MAR-K assembly instructions. When installing the tailgate and latching mechanisms
Grilling Table. Page 1 of 10
 Grilling Table www.andrewharriswoodwork.com Page 1 of 10 Introduction This plan makes a table 47 inches wide, 22 inches deep and 36 inches high with the top added. All my builds are made with pocket hole
Hoop House Plans By Steve Robinson
 Hoop House Plans By Steve Robinson This Ebook is Shareware It is meant to be shared by farmers alike. I give you permission to share this EBook to as many people as you like. It can not be sold, but it
Jeep Cherokee Door XJ Set Part # Revision J
 Jeep Cherokee 84-96 4 Door XJ Set Part # 10911 Revision J 6-5-06 Step 1: Prior to Installation: A) Fit: Verify the fit of the flares to vehicle. (Some filing, sanding, or cutting may be necessary to ensure
Clayton Off Road COR COR COR
 Clayton Off Road COR-4806011 COR-4806021 COR-4806031 JEEP GRAND CHEROKEE WJ LONG ARM UPGRADE KITS (1999-2004 WJ) NOTES: This product requires general welding, fabrication and automotive mechanic skills.
AWNING / PATIO COVER INSTALLATION INSTRUCTIONS
 AWNING / PATIO COVER INSTALLATION INSTRUCTIONS Before You Begin Read the installation instructions thoroughly before beginning the installation procedure. Perspective In the Awning Instructions, Back means
Kwik-Lock. Installation Instructions. Attention Dealers: Please give this owners manual to the customer when the product is delivered.
 Serving the Truck & Trailer Industry Since 1944 Installation Instructions Attention Dealers: Please give this owners manual to the customer when the product is delivered. Call 800-535-9545 www.aeroindustries.com
10 x 10 Flat Top Two Tone Pergola
 0 x 0 Flat Top Two Tone Pergola Models: Bordeaux ASSEMBLY GUIDE OPTIONAL ACCESSORIES Arch Kit System ( Arches) Privacy Fence Panel System ( Panels & Middle Post) Bolt Down Bracket Kit ( for Pergola) Ver.0-00
`48-`56 Ford Pickup Rear leaf Spring Kit Installation Instructions Tech Line:
 `48-`56 Ford Pickup Rear leaf Spring Kit Installation Instructions Tech Line: 1-855-693-1259 www.totalcostinvolved.com CHECK ALL PARTS INCLUDED IN THIS KIT TO THE PARTS LIST BEFORE INSTALLING THE KIT.
CEB Main Frame: Assemble U-Channel
 CEB Main Frame: Assemble U-Channel Assemble the U-channel on your Compressed Earth Brick Press. Written By: Dozuki System 2017 opensourceecology.dozuki.com Page 1 of 11 INTRODUCTION Sketchup ModelAdditional
Section # /2" x 1 1/2" x 20" /4" x 15 3/4" x 82 1/2" /4" x 1 5/8" x 82 1/2"
 Hardware & Miscellaneous Items: A 2 3 1/2" chest handles B 7 3" T-hinges and screws C 4 1/4" T nuts D 4 1/4" x 2 1/2" Carage bolts E 2 1/4" x 2" Barrel Bolts F 2 1" x 5' Straps G 8 1/4" 3 1/2" Carage Bolts
Kreg Tool Co. All Rights Reserved.
 Version 1 p. 1 Materials: Lumber: Qty: Board 2 2x2s 3 ft. long 2 1x2s 8 ft. long 2 1x3s 8 ft. long 6 1x6s 10 ft. long INSTRUCTIONS: Supplies: 1 1 / 4" Kreg Screws (coarse thread for softwoods, fine thread
TUBULAR FRONT END KIT INSTALLATION INSTRUCTIONS MUSTANG
 TUBULAR FRONT END KIT INSTALLATION INSTRUCTIONS 1979 2004 MUSTANG Pre-Installation Notes & Recommendations: Before disassembly, remove anything within the engine bay that can be removed; this will give
Plans. Easy-to-Build Full-size Deluxe Murphy Bed Plan. For more plans, tools and hardware visit rockler.com
 Easy-to-Build Full-size Deluxe Murphy Bed Plan Build a full-size Deluxe Murphy Bed complete with decorative molding and matching side cabinets! Plans For more plans, tools and hardware visit rockler.com
Hose Hanger Cold Metal Work
 Hose Hanger Cold Metal Work Name: Date: Description: A cold metal project that gives students practice sheering, bending, drilling, and fastening steel. The hose hanger can be used for proper storage of
Bio-Sand Filtration Mould Construction Guidelines
 Bio-Sand Filtration Mould Construction Guidelines Adriaan Mol & Eric Fewster BioSandFilter.org December 19, 2007 Introduction On the following pages, you will find an illustrated construction guide that
INSTALLING T400 LOAD SENSORS
 INSTALLING T400 LOAD SENSORS The above illustrations represent the proper arrangement of Model T400 Load Sensor kit parts using either the Drill and Tap method or the Weld method. A proper installation
FIXED PANEL SLIDER QCI5241
 INSTALLATION INSTRUCTIONS FIXED PANEL SLIDER QCI5241 FRAMELESS PANEL / DOOR / PANEL FRAMELESS DOOR / PANEL QCI5241 REV. 0 Page 1 Certified 06/16/2016 Parts List *Quantities may vary QCI5241 REV. 0 Page
PAT installation of a Sun Dome over a in-ground
 PAT. 3766573 Installation of Sun Domes for in-ground pool GENERAL INSTRUCTIONS: STEP 1. Read thru the entire instructional materials before beginning any installation. You will find that the installation
Butterfly Leaf Dining Table Plans
 Butterfly Leaf Dining Table Plans Part 1 An attractive dining table with a secret: the leaf folds and stores inside the table. Season 1, Episode 7 P a g e 2 I first saw a butterfly leaf table in a back
This indicates a diagram detailing the dimensions of a project part and/or the placement for pocket holes, screws, nails, etc.
 S i m p le Woodworking: What You'll Need v lumber 2-1 x 12 x 6 hardware/supplies (availability will vary) 1 1/4" pocket hole screws #18 x 1 1/2 brads or pocket hole plugs 12-inch continuous hinge magnetic
Guild of Oregon Woodworkers Shop Safety Test
 Guild of Oregon Woodworkers Shop Safety Test You must pass the Test with an 80% or better and self-correct it to 100% Make sure you put the answers under the correct portion of the answer sheet for the
Assembly Instructions for: JEAN S ULTIMATE SWING SETS
 Assembly Instructions for: JEAN S ULTIMATE SWING SETS Thank you for purchasing Forever Redwood patio furniture. Forever Redwood is built by Old-Growth Again Restoration Forestry (OGA). OGA is dedicated
BSM, GSM & GSS. Joint Kit Instruction. (Modified for IMPACT) (NSF Certified) Curved Glass Fresh Meat Delicatessen and Seafood Merchandisers
 (NSF Certified) Curved Glass Fresh Meat Delicatessen and Seafood Merchandisers") BSM, GSM & GSS Joint Kit Instruction (Modified for IMPACT) (NSF Certified) Curved Glass Fresh Meat Delicatessen and Seafood Merchandisers February, 1999 JOINT ASSEMBLY PARTS LIST Item Quantity Description
BSM, GSM & GSS Joint Kit Instruction (Modified for IMPACT) (NSF Certified) Curved Glass Fresh Meat Delicatessen and Seafood Merchandisers February, 1999 JOINT ASSEMBLY PARTS LIST Item Quantity Description
(28) 2 x 4 x 8 Ft. Boards Tape Measure (9) 2 x 6 x 8 Ft. Boards Pencil (6) 2 x 2 x 8 Ft. Boards Carpenter s Square (9) 1 x 3 x 8 Ft.
 2 x 4 x 8 Ft. Boards Tape Measure (9) 2 x 6 x 8 Ft. Boards Pencil (6) 2 x 2 x 8 Ft. Boards Carpenter s Square (9) 1 x 3 x 8 Ft.") MATERIALS: TOOLS: (28) 2 x 4 x 8 Ft. Boards Tape Measure (9) 2 x 6 x 8 Ft. Boards Pencil (6) 2 x 2 x 8 Ft. Boards Carpenter s Square (9) 1 x 3 x 8 Ft. Boards Drill 2 ½-inch Pocket Screws Circular Saw 2
MATERIALS: TOOLS: (28) 2 x 4 x 8 Ft. Boards Tape Measure (9) 2 x 6 x 8 Ft. Boards Pencil (6) 2 x 2 x 8 Ft. Boards Carpenter s Square (9) 1 x 3 x 8 Ft. Boards Drill 2 ½-inch Pocket Screws Circular Saw 2
Making Pocket-Hole Joints
 Tips and Techniques 8 SAFETY FIRST Making Pocket-Hole Joints Before doing this activity, make sure you understand how to use all of the tools and materials safely. Adding pocket-hole screws to strengthen
Technicians of Terror. This is the air valve we make to use with our air
 These are pictures of our scissor prop. Technicians of Terror http://www.halloweenfear.com/scissorprop.html props. This is the air valve we make to use with our air This pictures the duel door closer cylinders
BPF Toyota Tundra Mesh Installation Guide
 BPF 2007-2009 Toyota Tundra Mesh Installation Guide www.bpfabricating.com Tools Required Philips Screw Driver Flat Head Screw Driver Dremel or Rotary Tool Hand Saw or Multi Max Adjustable Square Tape Measure
Section 6-C-4: SCREWS / HANDLE / SEAL
 Section 6-C-4: SCREWS / HANDLE / SEAL Canopy assembly unhinged from fuselage. External Handle 80625A36 In the closed position, the dot on the external handle is towards the front, the handle is horizontal
Dura-Lock Roof System
 DLR-14 Dura-Lock Roof System Assembly and Installation Instructions Read the instructions before starting the job. They explain the steps required to produce a finished product that will meet factory specifications.
PROJECT PLANS WOODEN GIFT BOX
 PROJECT PLANS WOODEN GIFT BOX Make the gifts you give even more special by presenting them in this one-of-a-kind gift box. In fact, the box may be valued more than whatever it contains. The box is sized
Place the vehicle on a hard level surface and use an appropriate jack and jack stands to raise the vehicle of the ground.
 1937-1939 Chevy Truck Rear Air Bag 4 - Link Kit Installation Instructions 1-866-925-1101 www.totalcostinvolved.com CHECK ALL PARTS INCLUDED IN THIS KIT TO THE PARTS LIST BEFORE INSTALLATING OF THE KIT.
INSTALLATION MANUAL IOWA MOLD TOOLING CO., INC. BOX 189, GARNER, IA MANUAL PART NUMBER:
 PARTS-1 Model 24562/28562 Crane INSTALLATION MANUAL IOWA MOLD TOOLING CO., INC. BOX 189, GARNER, IA 50438-0189 641-923-3711 MANUAL PART NUMBER: 99903701 Iowa Mold Tooling Co., Inc. is an Oshkosh Truck
Jeep Cherokee 4-Door XJ Set Part # Rev
 Jeep Cherokee 4-Door XJ Set Part # 10911 Rev-14 04-05-10 Step 1: Prior to Installation: A) Bushwacker only approves installing the flares according to these written instructions with the hardware provided.
DIY Full-Size Captain s Bed with Storage. Addicted2DIY.com
 DIY Full-Size Captain s Bed with Storage Addicted2DIY.com Before beginning this project Please read through all of the plans as well as the blog post associated with this project. Always use safety precautions
CAUTION: Before opening the crate place it flat on its side (not up right as show in the photo) Hardware included for assembling your gazebo:
 Hardware included for assembling your gazebo:") Octagon Wood Gazebo Kit Contents Hardware included for assembling your gazebo: 5/16" Lag Bolts Use to fasten post to floor 2 1/2" screws Use to fasten joist together fasten posts to outside joist fasten
Octagon Wood Gazebo Kit Contents Hardware included for assembling your gazebo: 5/16" Lag Bolts Use to fasten post to floor 2 1/2" screws Use to fasten joist together fasten posts to outside joist fasten
ClearSpan PolyMax Windbreak Wall
 ClearSpan PolyMax Windbreak Wall Photo may show a different but similar model. 2007 ClearSpan All Rights Reserved. Reproduction is prohibited without permission. Revision date: April 2007ldg STK# DIMENSIONS
Installation Instructions Universal Crossmember Kit - 60 Track Width BEFORE Measure Twice, Weld Once! II
 Installation Instructions Universal Crossmember Kit - 60 Track Width Please read these instructions completely BEFORE starting your installation. Remember the basic rule for a successful installation:
Shay Tender Frame Fabrication
 Shay Tender Frame Fabrication Nelson Riedel Nelson@NelsonsLocomotive.com Initial:3/15/03 Last Revised: 06/05/2004 This page shows additional detail on the tender frame members and some of the processes
INDEPENDENT FRONT SUSPENSION SWAP
 INDEPENDENT FRONT SUSPENSION SWAP 20 PHOTOS In this article we will show how to change out the old frame/front suspension of your 49, 50, and 51 Mercury / Ford to a new IFS unit. This high tech front suspension
Building dimensions supplied by the #1 supplier of cornhole bags and boards on the internet.
 Building dimensions supplied by www.cornhole-game.org, the #1 supplier of cornhole bags and boards on the internet. SUPPLIES QUANTITY (1) ½ FIBERBOARD (PLYWOOD) SHEET - 4 X 8 (3) 2 X 4 BOARDS - 8 LONG
7x --Tailstock Cam Lock
 7x --Tailstock Cam Lock By Magic Brian magicbrian40@yahoo.com Probably the most pleasing mod to have, but often not done through lack of milling facility s This version does NOT require a mill. MATERIALS
Two Panel Frameless Bypass Door
 INSTALLATION INSTRUCTIONS Two Frameless Bypass Door Series 00 Please Record Model Number From Carton Label Here Please read these instructions carefully to familiarize yourself with the required tools,