Kreg Tool Co. All Rights Reserved.
|
|
|
- Shawn King
- 6 years ago
- Views:
Transcription
1

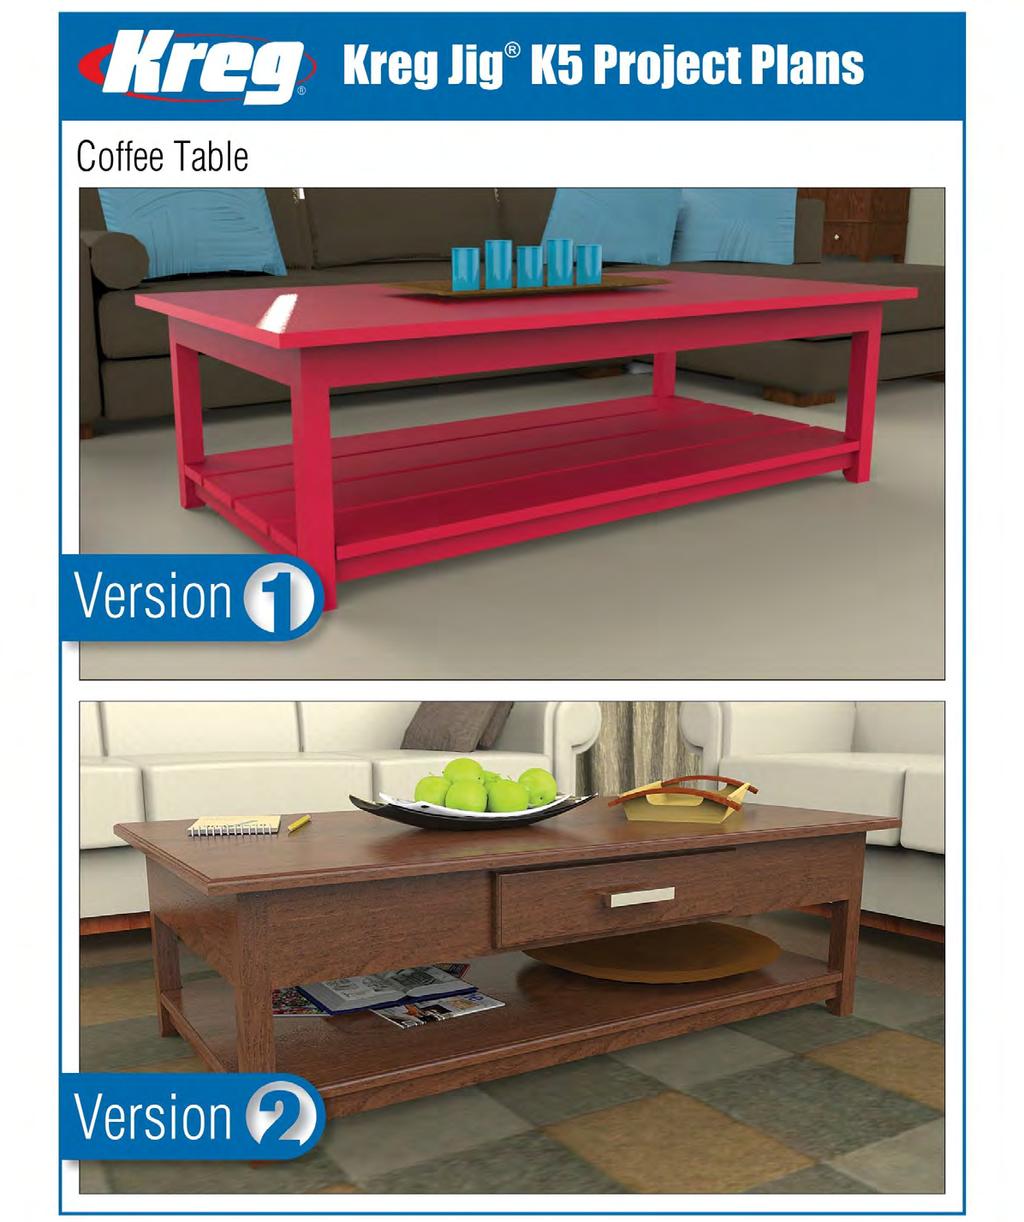
2 Version 1 p. 1
 wood glue (optional) primer/paint or stain/clear finish Tools: Kreg Jig miter saw or")


3 Materials: Lumber: Qty: Board 2 2x2s 3 ft. long 2 1x2s 8 ft. long 2 1x3s 8 ft. long 6 1x6s 10 ft. long INSTRUCTIONS: Supplies: 1 1 / 4" Kreg Screws (coarse thread for softwoods, fine thread for hardwoods) wood glue (optional) primer/paint or stain/clear finish Tools: Kreg Jig miter saw or circular saw jigsaw sander drill/driver Kreg Right Angle Clamp (optional) Kreg Face Clamp (optional) Before you begin building, take time to look over the Parts List, Cutting Diagram, and the illustrations to familiarize yourself with how the table goes together. You ll see that it s a straightforward assembly. The base has legs that are joined by aprons and rails. Stretchers help support the aprons and the rails, and serve as attachment points for the table top and shelf. The top is made by attaching boards edge-to-edge. The shelf is made up of a series of slats. It s also a good idea to cut the parts needed for each step as you go, rather than cutting everything all at once. This way, you if you should cut any parts incorrectly, you can either re-cut them or modify other parts to make up any differences. For all of the steps in this project, you ll be able to set up your Kreg Jig and Drill Bit Stop Collar for 3 / 4"-thick stock. Step 1: Build the End Assemblies Each end assembly consists of two legs, made from 2x2 boards, that are connected by an End Apron at the top and a Shelf End Rail near the bottom. 1. Start by cutting the two End Aprons and two Shelf End Rails to length, and then drilling pocket holes as shown. 2. Cut four Legs to length, and then cut the 45 miter at one end of each leg. 3. Lay out the legs as shown, and then drill pocket holes. Note that you ll need to create two matched pairs, so pay close attention to where you place the pocket holes. 4. Create two end assemblies by attaching the End Aprons and Shelf End Rails to the legs using 1 1 / 4" Kreg Screws. Note that the miters on the legs should face each other. Be sure to place 1 / 2"-thick scrap stock under the Shelf End Rails before attaching them. A Kreg Right Angle Clamp can be helpful for holding the parts together as you drive in screws. Version 1 p. 2


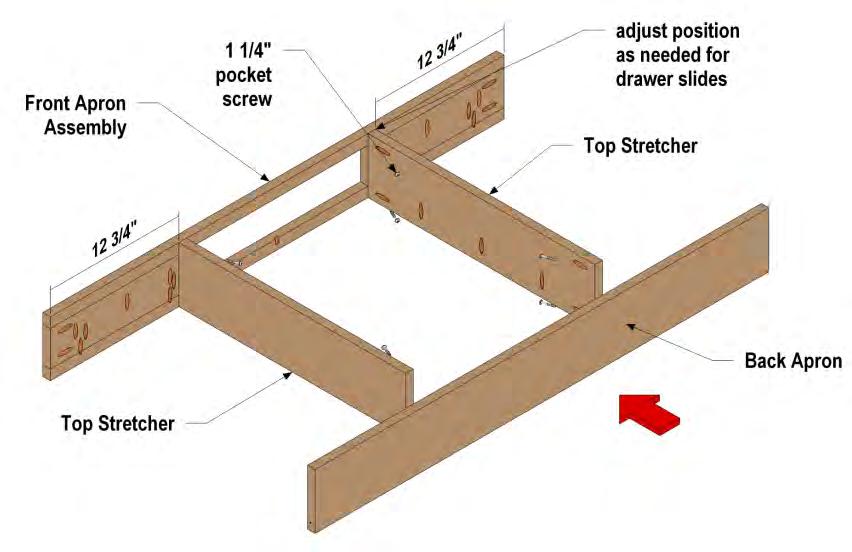
4 Step 2: Build the Top Apron Assembly The end assemblies get connected at the top by an Apron at the front and back. Stretchers running between the Aprons are used to help connect the table top later. 5. Cut two Front/Back Aprons and two Top Stretchers to length, and then drill pocket holes as shown. 6. Screw the Top Stretchers to the Front/back Aprons, making sure that all of the pocket holes along the edges are pointing in the same direction. Version 1 p. 3


5 Step 3: Build the Shelf Rail Assembly To further strengthen the coffee table and to support the slatted shelf that gets added later, the end assemblies also are connected by Rails at the front and back. Shelf Stretchers join the rails and will get used to attach the shelf slats later. 7. Cut two Shelf Front/Back Rails and two Shelf Stretchers to length, and then drill pocket holes as shown 8. Screw the Shelf Stretchers to the Front/Back Rails as shown, making sure that all of the pocket holes along the edges are pointing in the same direction. Step 4: Assemble the Table Base Now complete the table base by connecting the apron and rail assemblies to the end assemblies. 9. Lay out the table end assemblies and the apron and rail assemblies as shown so that you can assemble the table base. Be sure to support the shelf rail assembly on 1 / 2"-thick scrap stock. 10. Screw the aprons and rails to the legs as shown. Version 1 p. 4


6 Step 5: Create the Table Top Now you can create the solid-wood top for your table using 1x6 boards and Kreg Joinery. For the top, be sure to select boards that are flat and free from warp, twisting, or bowed edges. 11. Cut five 1x6 boards to length 12. Lay out and drill the pocket holes as shown to create two Edge Top Slats, two Mid Top Slats, and one Center Top Slat. 13. Connect the slats together to complete the top. Note: A Kreg Face Clamp can be helpful for holding the boards flush as you drive in screws. 14. Lay the table top face down, and then place the table base on the table top. Position the base so that the top overhangs at all four corners as shown. 15. Attach the table top by driving screws through the pockets in the aprons, stretchers, and legs, and into the table top slats. Version 1 p. 5


 rather than across the grain.")
7 Step 7: Add the Shelf Slats The shelf is also made from 1x6 boards, but instead of getting screwed together, they are mounted to the table base with gaps in between. 16. Start by cutting four 1x6 boards to length. 17. Designate two of the boards as Edge Shelf Slats, and cut notches at the corners as shown to fit around the table legs. 18. Install the shelf starting with the edge slats. Note that there should be a 1/8 gap between the notches and the legs. Drive screws through the pockets in the Shelf Rails and Stretchers and into the Edge Slats. 19. Attach the remaining two Shelf Slats after positioning them so that there are consistent gaps between the boards. Step 8: Finishing Touches If you used glue, Scrape off any glue and sand as needed. Then give the parts a final sanding. Whenever possible, always sand with the grain (along the length of the boards) rather than across the grain. This helps prevent unwanted scratches, which is especially important if you plan to stain or use a clear finish. If painting, apply two coats of primer (sanding between coats) and paint as desired. If staining, apply desired stain and clear finish, making sure to sand or rub with steel wool between coats. Version 1 p. 6

8 Finished Dimensions: Height: 15 3 / 4 Width: 51 1 / 2" Depth: 27 1 / 2" Parts List: Part Qty Size End Aprons 2 3 / 4" x 2 1 / 2" x 21" Shelf End Rails 2 3 / 4" x 1 1 / 2" x 21" Legs / 2" x 1 1 / 2" x 15" Top Stretchers 2 3 / 4" x 2 1 / 2" x 22 1 / 2" Front/Back Aprons 2 3 / 4" x 2 1 / 2" x 45" Shelf Stretchers 2 3 / 4" x 1 1 / 2" x 21 1 / 2" Shelf Front/Back Rails 2 3 / 4" x 1 1 / 2" x 45" Edge Top Slats 2 3 / 4" x 5 1 / 2" x 51 1 / 2" Mid Top Slats 2 3 / 4" x 5 1 / 2" x 51 1 / 2" Center Top Slat 1 3 / 4" x 5 1 / 2" x 51 1 / 2" Edge Shelf Slats 2 3 / 4" x 5 1 / 2" x 48" Center Shelf Slats 2 3 / 4" x 5 1 / 2" x 48" Cutting Diagram: Version 1 p. 7

9 Version 2 p. 1
 1\" Kreg Screws (coarse thread for softwoods, fine thread for")
 Kreg Face Clamp (optional) INSTRUCTIONS: Before you begin building, take time to look over the Parts List, Cutting Diagram, and the illustrations to")

10 Materials Lumber: Qty: Board 2 2x2s 3 ft. long 2 1x2s 8 ft. long 2 1x4 8 ft. long 1 1x6 8 ft. long 3 1x6 10 ft. long 2 1x8 10 ft. long 2 1/2x4 4 ft. long 1 1/4-inchx2x2-foot sheet of plywood Supplies: 1 1 / 4" Kreg Screws (coarse thread for softwoods, fine thread for hardwoods) 1" Kreg Screws (coarse thread for softwoods, fine thread for hardwoods) Two 16-inch drawer slides 1 drawer pull wood glue (optional) primer/paint or stain/clear finish Tools: Kreg Jig table saw miter saw router with a variety of bits router table jigsaw sander drill/driver Kreg Right Angle Clamp (optional) Kreg Face Clamp (optional) INSTRUCTIONS: Before you begin building, take time to look over the Parts List, Cutting Diagram, and the illustrations to familiarize yourself with how the table goes together. You ll see that it s a straightforward assembly. The base has legs that are joined at the top by wide aprons. A drawer in the front apron adds a handy place to store small items like television remotes. At the bottom, the legs are joined by rails. Stretchers help support the aprons and the rails, and serve as attachment points for the table top and shelf. The top and the shelf are both made by attaching boards edge-to-edge. It s also a good idea to cut the parts needed for each step as you go, rather than cutting everything all at once. This way, you if you should cut any parts incorrectly, you can either re-cut them or modify other parts to make up any differences. Set up your Kreg Jig and Drill Bit Stop Collar for 3 / 4"-thick stock unless otherwise indicated. Step 1: Build the End Assemblies Each end assembly consists of two legs, made from 2x2 boards, that are connected by an End Apron at the top and a Shelf End Rail near the bottom. 1. Start by cutting the two End Aprons and two Shelf End Rails to length, and then drilling pocket holes as shown. 2. Cut four Legs to length, and then cut the 45 miter at one end of each leg. 3. Lay out the legs as shown, and then drill pocket holes. Note that you ll need to create two matched pairs, so pay close attention to where you place the pocket holes. 4. Create two end assemblies by attaching the End Aprons and Shelf End Rails to the legs using 1 1 / 4" Kreg Screws. Note that the miters on the legs should face each other. Be sure to place 1 / 2"-thick scrap stock under the Shelf End Rails before attaching them. A Kreg Right Angle Clamp can be helpful for holding the parts together as you drive in screws. Version 2 p. 2


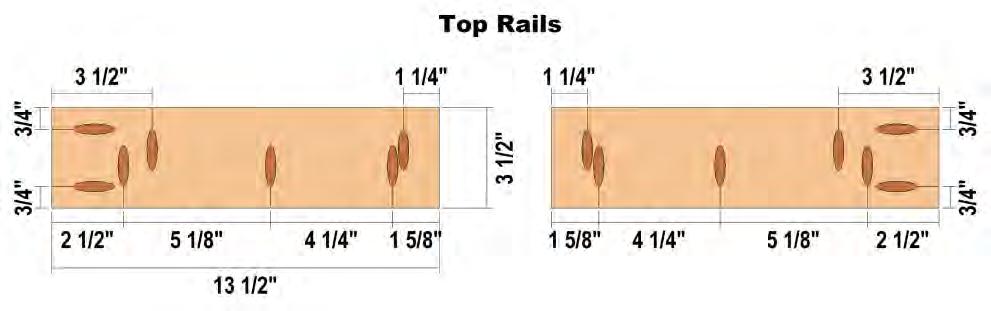
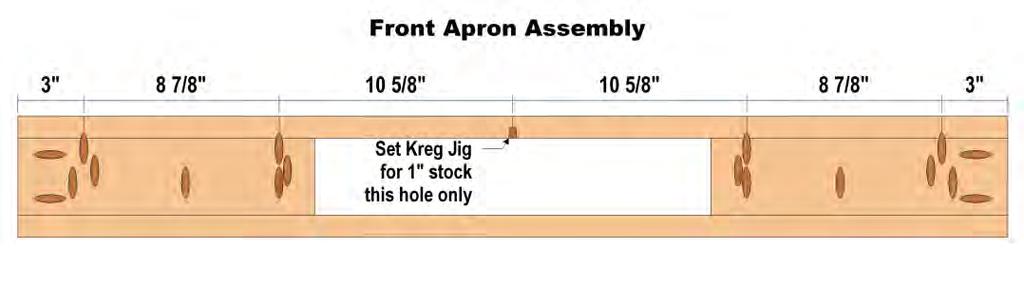
11 Step 2: Build the Top Apron Assembly The end assemblies get connected at the top by an Apron at the front and back. Stretchers running between the Aprons are used to help connect the table top later. The back apron and stretchers are simply cut to length from a 1x6 board. The front apron, though, is a little bit different. It has an opening to receive a drawer that gets built later. This apron is made using shorter 1x4 Top Rails that get connected to long Apron Strips. 5. Cut two Back Aprons and two Top Stretchers to length, and then drill pocket holes as shown. 6. Cut two Top Rails to length, and then drill pocket holes as shown. 7. Rip two 1"-wide Front Apron Strips and cut them to final length. 8. Attach the Top Rails to the Front Apron Strips by driving screws through the pocket holes in the rails and into the strips. 9. After assembling the Front Apron, drill a series of pocket holes, as shown, that will be used later to attach the table top. 10. Screw the Top Stretchers to the Front/back Aprons, making sure that all of the pocket holes along the edges are pointing in the same direction. Version 2 p. 3

12 Version 2 p. 4


13 Step 3: Build the Shelf Rail Assembly To further strengthen the coffee table and to support the shelf that gets added later, the end assemblies also are connected by Rails at the front and back. Shelf Stretchers join the rails and will get used to attach the shelf slats later. 11. Cut two Shelf Front/Back Rails and two Shelf Stretchers to length, and then drill pocket holes as shown 12. Screw the Shelf Stretchers to the Front/Back Rails as shown, making sure that all of the pocket holes along the edges are pointing in the same direction. Step 4: Assemble the Table Base Now complete the table base by connecting the apron and rail assemblies to the end assemblies. 13. Lay out the table end assemblies and the apron and rail assemblies as shown so that you can assemble the table base. Be sure to support the shelf rail assembly on 1 / 2"-thick scrap stock. 14. Screw the aprons and rails to the legs as shown. Step 5: Build a Simple Drawer The drawer for the table consists of a drawer box, made from 1 / 2"-thick stock, that has a groove to receive a plywood drawer bottom. Once assembled, the drawer box gets a 3 / 4"-thick drawer front installed. The drawer front is purposely larger than the drawer opening in the table apron. That way, the drawer front overhangs the opening to hide the gaps and the drawer slides you ll install. Version 2 p. 5


14 Before making the drawer, measure the opening in the Front Apron to make sure that it is the same size as shown in this plan. The drawer opening should be 18". The width of the assemble drawer box will be 17" 1" less than the width of the opening. This is correct, as it allows 1 / 2" on each side for the drawer slides, which are generally 1 / 2" thick. If the drawer opening in your apron isn t 18", you ll want to adjust your drawer box to fit by adjusting the length of the Drawer Ends as needed. Set up your Kreg Jig and Drill Bit Stop Collar for 1 / 2"-thick stock before drilling any of the pocket holes in the drawer. 15. Start by ripping two 1 / 2"x4-4 ft. long boards to 3 1 / 4" wide. 16. Create a groove in each of these boards, as shown, using either a table saw or a router equipped with a 1 / 4" straight bit. This groove will receive the plywood drawer bottom. 17. Cut two Drawer Ends and two Drawer Sides to length and drill pocket holes as shown. 18. Cut a Drawer Bottom to size. 19. Attach both drawer ends to one of the drawer sides. Slip the drawer bottom into place, and then install the remaining drawer end. 20. Cut a Drawer Front to size. If you wish to, add a decorative profile to the edges of the drawer front using a router (or router table) and the profile bit of your choice (such as a roundover, chamfer, ogee, etc.). 21. Center the drawer front on the drawer box and attach it by driving screws through the pockets in the drawer sides and into the drawer front. 22. Install drawer slides on the drawer and in the table base according to the slide manufacturer s instructions. Version 2 p. 6


15 Step 6: Create the Table Top Now you can create the solid-wood top for your table using 1x6 boards and Kreg Joinery. For the top, be sure to select boards that are flat and free from warp, twisting, or bowed edges. 23. Cut five 1x6 boards to length 24. Lay out and drill the pocket holes as shown to create two Edge Top Slats, two Mid Top Slats, and one Center Top Slat. Be sure your Kreg Jig and Drill Bit Stop Collar are set up for 3 / 4"-thick stock. 25. Connect the slats together to complete the top. Note: A Kreg Face Clamp can be helpful for holding the boards flush as you drive in screws. 26. If desired, rout a profile around the edge of the table top using the same profile bit you used on the drawer front. 27. Lay the table top face down, and then place the table base on the table top. Position the base so that the top overhangs at all four corners as shown. 28. Attach the table top by driving screws through the pockets in the aprons, stretchers, and legs, and into the table top slats. Version 2 p. 7
 from 1x8 boards. Notches at the corners allow the shelf to fit around the table legs. 29.")


16 Step 7: Add a Shelf The Shelf consists of four slats that are attached edge-to-edge to form a solid-wood panel. The slats are ripped to final width (6) from 1x8 boards. Notches at the corners allow the shelf to fit around the table legs. 29. Cut four Shelf Slats to width and length, and then drill pocket holes as shown to create a Front Edge Slat, a Back Edge Slat, and two Center Slats. 30. Attach the slats together using pocket screws. Note: A Kreg Face Clamp can be helpful for holding the boards flush as you drive in screws. 31. Cut notches at all four corners of the shelf, as shown. 32. Slip the shelf into the table base, and center it so that the gaps between the legs and the notches are consistent. 33. Attach the shelf by driving screws through the pockets in the rails and stretchers, and into the shelf slats. Version 2 p. 8


17 Step 8: Finishing Touches If you used glue, Scrape off any glue and sand as needed. Then give the parts a final sanding. Whenever possible, always sand with the grain (along the length of the boards) rather than across the grain. This helps prevent unwanted scratches, which is especially important if you plan to stain or use a clear finish. If painting, apply two coats of primer (sanding between coats) and paint as desired. If staining, apply desired stain and clear finish, making sure to sand with fine-grit sandpaper or rub with steel wool in between. Version 2 p. 9

18 Finished Dimensions: Height: 15 3/4 inches Width: 51 1/2 inches Depth: 27 1/2 inches Parts List: Table Part Quantity Size End Aprons 2 3 / 4" x 5 1 / 2" x 21" Shelf End Rails 2 3 / 4" x 1 1 / 2" x 21" Legs / 2" x 1 1 / 2" x 15" Top Stretchers 2 3 / 4" x 5 1 / 2" x 22 1 / 2" Top Rails 2 3 / 4" x 3 1 / 2" x 13 1 / 2" Front Apron Strips 2 3 / 4" x 1" x 45" Back Apron 1 3 / 4" x 5 1 / 2" x 45" Shelf Stretchers 2 3 / 4" x 1 1 / 2" x 21 1 / 2" Shelf Front/Back Rails 2 3 / 4" x 1 1 / 2" x 45" Edge Top Slats 2 3 / 4" x 5 1 / 2" x 51 1 / 2" Mid Top Slats 2 3 / 4" x 5 1 / 2" x 51 1 / 2" Center Top Slat 1 3 / 4" x 5 1 / 2" x 51 1 / 2" Back Edge Shelf Slat 1 3 / 4" x 6" x 48" Front Edge Shelf Slat 1 3 / 4" x 6" x 48" Center Shelf Slats 2 3 / 4" x 6" x 48" Drawer Part Quantity Size Drawer Ends 2 1 / 2" x 3 1 / 4" x 16" Drawer Sides 2 1 / 2" x 3 1 / 4" x 20" Drawer Bottom 1 1 / 4" x 16 3 / 8" x 19 3 / 8" Drawer Front / 4" x 4 1 / 2" x 19" Cutting Diagram: Version 2 p. 10
PROJECT PLANS EXPANDABLE CRAFT CENTER
 R PROJECT PLANS EXPANDABLE CRAFT CENTER Whether you re working on craft projects, sewing, or pursuing another hobby, this craft center offers a great place to work. It features a large work surface that
DIY X Panel Side Table
 DIY X Panel Side Table *Before beginning this project, please read through all of the plans as well as the blog post associated with this project. Always use safety precautions whenever using power tools
DIY Farmhouse Cabinet
 DIY Farmhouse Cabinet Addicted2DIY.com *Before beginning this project, please read through all of the plans as well as the blog post associated with this project. Always use safety precautions whenever
Chief s Shop: Simple Woodworking Bench
 Chief s Shop: Simple Woodworking Bench Be sure to read the instructions and review the illustrations and accompanying video for this project BEFORE you start. Follow ALL SAFETY GUIDELINES AND RECOMMENDATIONS
PROJECT PLANS HOBBY BENCH
 PROJECT PLANS HOBBY BENCH This great-looking bench provides the perfect place to pursue a variety of hobbies. It offers a large bench top with built-in trays for small items, plus shelves up above to hold
DIY Outdoor Console Table Addicted2DIY.com
 DIY Outdoor Console Table Addicted2DIY.com *Before beginning this project, please read through all of the plans. Always use safety precautions whenever using power tools and follow the manufacturer s suggested
DIY Wine Storage Cabinet
 DIY Wine Storage Cabinet ADDICTED2DIY.COM *Before beginning this project, please read through all of the plans and the blog post. When building this project, be sure to measure your wood and cut to fit.
DIY Full-Size Captain s Bed with Storage. Addicted2DIY.com
 DIY Full-Size Captain s Bed with Storage Addicted2DIY.com Before beginning this project Please read through all of the plans as well as the blog post associated with this project. Always use safety precautions
Eco Office File Base. Materials and Tools: Free Plans to build an office file cabinet base
 Materials and Tools: Materials: 1 - Sheet 3/4 PureBond Hardwood Plywood (Available at the Home Depot) 1 - Sheet 1/4 PureBond Hardwood Plywood (Available at the Home Depot) 3-21 Drawer Slides, Euro Style
DIY Rustic Dresser Addicted2DIY.com
 DIY Rustic Dresser Addicted2DIY.com *Before beginning this project, please read through all of the plans as well as the blog post associated with this project. Always use safety precautions whenever using
PROJECT PLANS MULTIPURPOSE WORK CENTER
 R PROJECT PLANS MULTIPURPOSE WORK CENTER This handy project can provide the work space you need anywhere in your home. Whether you need that work space in the shop, the garage, the basement, or in a laundry
Dresser. Materials & Tools FEATURING FORMALDEHYDE-FREE TECHNOLOGY. Free Plans to build a Dresser
 Free Plans to build a Dresser Materials & Tools Materials: 1-1/4 pocket hole screws 1-1/4 brad nails 3 sets of 18 drawer slides Drawer pulls Edge banding, optional Wood glue Sandpaper (100, 150, 220 grits)
Patio Table. Page 1 of 16
 Patio Table www.andrewharriswoodwork.com Page 1 of 16 Introduction This plan makes a table that is unit which is 95 ½ inches long and 49 inches wide. The distance from the underside of the top edging to
Materials and Tools: Printer s Triple Console Cabinet. Free Plans to build a Triple Console Cabinet
 Materials and Tools: Materials: 3 sets euro style bottom corner mount drawer slides, 16 length 3 sets inset hinges 24 cup style handles 8 2x2 @ 8 feet long 6 1x3 @ 8 feet long 6 1x2 @ 8 feet long 1 sheet
Porch. Swing. Build A. farmstead: project
 farmstead: project Porch Build A Swing Instructions Cut all parts to fit as you assemble the project and use the Parts List and Cutting Diagram as a guide for dimensions. When gluing pieces together, you
indicates a diagram detailing the dimensions of a project part and/or the placement for pocket holes, screws, nails, etc.
 f a r m h o u s e d i ni ng c h a i r What You'll Need lumber Beginner 1-1 x2x4 1-1 x2x8 3-2x3x8 1-2x4x8 1-3/4 x 2 x 4 sheet of plywood (availability will vary) Intermediate Intermediate Beginner About
Jeff Branch WOODWORKING YOU CAN BUILD A. By adding subtle design elements, a traditional furniture style becomes decidedly modern.
 Jeff Branch WOODWORKING YOU CAN BUILD A By adding subtle design elements, a traditional furniture style becomes decidedly modern. Jeff Branch WOODWORKING Publisher: Jeff Branch Editor: Jeff Branch Art
 America s leading woodworking authority To download these plans, you will need Adobe Reader installed on your computer. If you want to get a free copy, visit: http://adobe.com/ reader. Having trouble downloading
Mudroom Unit. Page 1 of 25
 Mudroom Unit www.andrewharriswoodwork.com Page 1 of 25 Introduction This plan makes a unit which is 66 ¾ inches tall, 39 ½ inches wide and 18 ½ inches deep. It was custom made for some friends to fit the
Tools: Drill/Driver Kreg Jig Miter Saw Jigsaw Circular Saw Adjustable Square Tape Measure Veneer Trimmer Sandpaper and Sander
 R PROJECT PLANS DROP-FRONT DESK Create a workspace almost anywhere with this drop-front desk. Mounted to a wall, it doesn t take up any floor space, which means you can hang it wherever you need to work.
Castle Bed. Page 1 of 24
 Castle Bed www.andrewharriswoodwork.com Page 1 of 24 Introduction This plan makes a twin bed that is 91 inches long and 60 inches wide. I have tried to ensure all steps are covered in these plans but if
Entrance Cabinet Plans
 Entrance Cabinet Plans www.andrewharriswoodwork.com Page 1 of 19 Introduction I have tried to ensure all steps are covered in these plans but if you find any errors in the plans or have a question then
PROJECT PLANS OUTDOOR SERVING CART
 R PROJECT PLANS OUTDOOR SERVING CART Make outdoor entertaining easy with this serving cart. It offers lots of space for storing food, tableware, and outdoor supplies, plus it cradles bottles where they
indicates a diagram detailing the dimensions of a project part and/or the placement for pocket holes, screws, nails, etc.
 What You'll Need lumber 1-1 x3x4 1-1 x3x8 2-1 x6x8 1-1 x 10 x 4 hardware/supplies (availability will vary) 2" wood screws 1 1/4" pocket hole screws wood glue paint/stain tools table saw miter saw jigsaw
Copyright 2010 Springbok Publishing All Rights Reserved- Page 1
 Copyright 2010 Springbok Publishing All Rights Reserved- www.woodensaddlerackplans.com Page 1 Legal Information All contents copyright 2010 by Springbok Publishing. All rights reserved. No part of this
woodworkersjournal.com MATERIAL LIST
 MATERIAL LIST T x W x L 1 Legs (2) 1 1 2" x 3 1 2" x 36 7 16" 2 End Uprights (2) 1 1 2" x 3 1 2" x 32 1 2" 3 Stringers (4) 1 1 2" x 3 1 2" x 42" 4 Top Cladding, Long (2) 3/4" x 7 1 4" x 65 3 4" 5 Side
Apartment Dining Table
 Jeff Branch WOODWORKING You Can Build an Apartment Dining Table By JEFF BRANCH H ave you ever found yourself wanting a new piece of furniture, but everything you see in stores is too big? Big furniture
(1) 2x4 Ft. Sheet of ¼-inch Plywood. 1 ¼-inch Wood Screws. 1 ¼-inch Brad Nails ¾-inch Brad Nails Wood Glue CUT LIST:
 2x4 Ft. Sheet of ¼-inch Plywood. 1 ¼-inch Wood Screws. 1 ¼-inch Brad Nails ¾-inch Brad Nails Wood Glue CUT LIST:") MATERIALS: (5) 1x3x8 Ft. Boards (3) 2x4x8 Ft. Boards (10) 1x4x8 Ft. Boards (1) 1x2x10 Ft. Board (1) 2x2x4 Ft. Board (2) 1x6x8 Ft. Boards (1) 4x8 Ft. Sheet of ¾-inch Plywood (1) 2x4 Ft. Sheet of ¼-inch
MATERIALS: (5) 1x3x8 Ft. Boards (3) 2x4x8 Ft. Boards (10) 1x4x8 Ft. Boards (1) 1x2x10 Ft. Board (1) 2x2x4 Ft. Board (2) 1x6x8 Ft. Boards (1) 4x8 Ft. Sheet of ¾-inch Plywood (1) 2x4 Ft. Sheet of ¼-inch
1 ¼-inch Pocket Screws Brad Nailer or Hammer 1 ¼-inch Brad Nails Clamps
 MATERIALS: TOOLS: (4) 2 x 6 x 8 Ft. Boards Tape Measure (2) 2 x 4 x 8 Ft. Boards Carpenter s Square (7) 1 x 4 x 8 Ft. Boards Pencil (2) 1 x 3 x 8 Ft. Boards Drill (1) Half Sheet of ¾-inch Thick Plywood
Chest of Drawers Plans
 Chest of Drawers Plans www.andrewharriswoodwork.com Page 1 of 15 Introduction This plan makes a chest of drawers that is 50 inches at the widest point, 19 inches deep and 40.75 inches high. I have tried
Making Pocket-Hole Joints
 Tips and Techniques 8 SAFETY FIRST Making Pocket-Hole Joints Before doing this activity, make sure you understand how to use all of the tools and materials safely. Adding pocket-hole screws to strengthen
Grilling Table. Page 1 of 10
 Grilling Table www.andrewharriswoodwork.com Page 1 of 10 Introduction This plan makes a table 47 inches wide, 22 inches deep and 36 inches high with the top added. All my builds are made with pocket hole
Hudson Dresser [1] Hudson Dresser Published on Ana White ( Submitted by dan-k [2] on Fri, :43 [1]
![Hudson Dresser [1] Hudson Dresser Published on Ana White ( Submitted by dan-k [2] on Fri, :43 [1]](/thumbs/90/102626096.jpg "Hudson Dresser [1] Hudson Dresser Published on Ana White ( Submitted by dan-k [2] on Fri, :43 [1]") [1] Submitted by dan-k [2] on Fri, 2011-03-11 11:43 [1] If you plan on staining this piece, it is recommended that you stain all of the drawer face materials before assembly for a more professional look.
[1] Submitted by dan-k [2] on Fri, 2011-03-11 11:43 [1] If you plan on staining this piece, it is recommended that you stain all of the drawer face materials before assembly for a more professional look.
MATERIALS: TOOLS: CUT LIST:
 MATERIALS: TOOLS: (2) 2x2x8 Ft. Boards Tape Measure (2) 1x4x8 Ft. Boards Pencil (4) 1x2x8 Ft. Boards Carpenter s Square (1) 4x4 Ft. Sheet of ¾-Inch Plywood Drill with 5/16-inch Drill Bit (1) 1 ½-inch Thick
PROJECT PLANS PATIO PLANTER BOX
 PROJECT PLNS PTIO PLNTER BOX This great-looking planter makes the perfect place for your favorite plants and flowers. It s sized to hold an 18" round plastic pot, which you can pick up in any garden center.
Reclaimed Wood Look Bedside Table [1]
![Reclaimed Wood Look Bedside Table [1]](/thumbs/91/105777701.jpg "Reclaimed Wood Look Bedside Table [1]") [1] Submitted by Ana White [2] on Thu, 2011-06-23 12:27 Page 1 of 18 [1] Additional Photos Page 2 of 18 [3] Featured photo by brick [4] This rustic three drawer nightstand is easy to build with off the
[1] Submitted by Ana White [2] on Thu, 2011-06-23 12:27 Page 1 of 18 [1] Additional Photos Page 2 of 18 [3] Featured photo by brick [4] This rustic three drawer nightstand is easy to build with off the
This indicates a diagram detailing the dimensions of a project part and/or the placement for pocket holes, screws, nails, etc.
 S i m p le Woodworking: Bath Side Table What You'll Need v lumber 4-1- x 36-inch square dowels 1-1 x8x8 1-3/4-inch x 2- x 4-foot sheet of plywood hardware/supplies 1 1/4" pocket hole screws #18 x 1 1/2
Shaker Classic Change the legs to change the look
 Shaker Classic Change the legs to change the look 2 Ways B Y C H R I S T I A N BECKSVOORT not long ago, a couple ordered a set of cherry side tables from me, one for each side of their pencil-post bed.
PROJECT PLANS BATHROOM WALL SHELF
 R PROJECT PLANS BATHROOM WALL SHELF Just about everybody needs more bathroom storage space, but it s one of the most-challenging rooms in the house to fit another item into. This wallmounted shelf makes
PROJECT PLAN TOOL CHEST
 BUILD IT WITH ROCKLER PROJECT PLAN TOOL CHEST FEATURING ROCKLER S BUILD QUESTIONS? Go to www.rockler.com or call 800-279-4441 Stock # Item 63420 1/4" x 24" x 30" Baltic Birch Plywood 63446 1/2" x 24" x
PROJECT PLANS ROLLING LAUNDRY SORTER
 R PROJECT PLANS ROLLING LAUNDRY SORTER Sorting laundry certainly doesn t rank high on anyone s list. So, anything that makes this task easier is welcome. If that functionality can be mixed with a bit of
Patrick's Beach Cottage Dresser [1]
![Patrick's Beach Cottage Dresser [1]](/thumbs/87/96188791.jpg "Patrick's Beach Cottage Dresser [1]") [1] Submitted by Ana White [2] on Fri, 2011-05-27 12:23 [1] Additional Photos Page 1 of 17 [3] Special thanks to Patrick for sharing his dresser with us. After so many of you requested plans, I'm so very
[1] Submitted by Ana White [2] on Fri, 2011-05-27 12:23 [1] Additional Photos Page 1 of 17 [3] Special thanks to Patrick for sharing his dresser with us. After so many of you requested plans, I'm so very
Patrol Box Plans by David J. Yarusso Troop 609
 Patrol Box Plans by David J. Yarusso Troop 609 Materials List: 1. One 4 x8 sheet of ½ thick cabinet grade (birch or oak) or AC plywood. If using AC grade, use the A grade surface on the outside for a clean
Modern Farmhouse Printer Cabinet. Addicted2DIY.com
 Modern Farmhouse Printer Cabinet Addicted2DIY.com Before beginning this project please read through all of the plans as well as the blog post associated with this project. Always use safety precautions
Easy Five Cube Tower Bookshelf. Copyrighted Material. Page 1
 Compare to: Land of Nod Cube Collection, 5 Cube Tower Bookshelf Skill Level: Beginner Easy Five Cube Tower Bookshelf This fully framed five cube tower can hold everything from towels to boots to books
indicates a diagram detailing the dimensions of a project part and/or the placement for pocket holes, screws, nails, etc.
 f a r m h o u s e d i ni ng b e nc h What You'll Need lumber 6-2x3x8 6-1 x6x8 (availability will vary) Intermediate or equivalent 8/4 lumber planed to 1 1/2" for the 2x hardware/supplies 1 1/4" pocket
indicates a diagram detailing the dimensions of a project part and/or the placement for pocket holes, screws, nails, etc.
 What You'll Need lumber 1-1 x 3 x 6 2-1 x3x8 1-1 x8x6 1-1 x 12 x 6 2-2 x 2 x 8* (availability will vary) *if2x2s ofthis size are not available, laminated two 1x2s to create 2x2s) hardware/supplies Kreg
Farmhouse X Console Table ANDREW LAINE HESITANTHANDYMAN.NET. Home Furnishing
 Farmhouse X Console Table Home Furnishing ANDREW LAINE HESITANTHANDYMAN.NET Lumber Shopping List: 2x3 Three 8 boards 1x4 Four 8 boards 2x4 One 10 board (One 8 board if you can adjust your measurements
BEN'S COUNTRY WOODSHOP SMALL MISSION TABLE Version 2
 BEN'S COUNTRY WOODSHOP SMALL MISSION TABLE Version 2 Cutting & Drilling Cut 2 top rails out of 1 x 3s. Each will be 8 1/2 long. Drill 1 pocket hole on the inside bottom center. This will connect the center
This indicates a diagram detailing the dimensions of a project part and/or the placement for pocket holes, screws, nails, etc.
 S i m p le Woodworking: What You'll Need v lumber 2-1 x 12 x 6 hardware/supplies (availability will vary) 1 1/4" pocket hole screws #18 x 1 1/2 brads or pocket hole plugs 12-inch continuous hinge magnetic
MATERIALS: TOOLS: CUT LIST:
 MATERIALS: (3) 4x4x8 Ft. Boards (8) 2x4x8 Ft. Boards 2 ½-inch Pocket Screws 2 ½-inch Wood Screws 1-inch Wood Screws (16) Figure 8 Tabletop Fasteners Wood Glue Wood Filler TOOLS: Tape Measure Pencil Carpenter
Shoe Organizer Plans Our Home from Scratch
 Shoe Organizer Plans by Our Home from Scratch Our Home from Scratch LLC Page 1 Disclaimer Our Home from Scratch LLC and its legal owners cannot be held responsible for any loss, damage, injury or death
3x2 Building. Instructions. Jackson Van Buren s
 Jackson Van Buren s 3x2 Building Instructions Lumber QTY 2 3 DESCRIPTION 1/2 x 2 x Plywood 8 x 2 x Stud Hardware QTY IMAGE DESCRIPTION 36 16 8 Coarse Drywall Screw 2 1/2 Deck Screw 3/8 x Carriage Bolt
indicates a diagram detailing the dimensions of a project part and/or the placement for pocket holes, screws, nails, etc.
 p a r t o ne : B a s e What You'll Need lumber 2-2x4x8 4-2x6x8 1-3/4-inch x 4- x 8-foot sheet of plywood hardware/supplies (availability will vary) 2 1/2" pocket hole screws 1 1/4" pocket hole screws 1
A Table for Four... with a View
 America s leading woodworking authority Step by Step construction instruction. A Table for Four... with a View A complete bill of materials. Exploded view and elevation drawings. How-to photos with instructive
Project 13586EZ: Writing Desk. Writing Desk Materials List
 Project 13586EZ: Writing Desk This writing desk will make a handsome addition to just about any room in the house. The one shown is made of cherry, a logical choice for a piece like this, but mahogany
How to Build a Recessed Medicine Cabinet
 How to Build a Recessed Medicine Cabinet See post for install info http://www.hertoolbelt.com/recessed-medicine-cabinet/ Materials 6 Inset Cabinet Door Hinges 3 Latches 1 sheet Beadboard or 1/4 plywood
diy outdoor bar from diyhuntress.com
 diy outdoor bar from diyhuntress.com 2 DIMENSIONS & DISCLAIMER: Please double check the overall dimensions for your specific build before starting. Please wear appropriate safety gear when operating power
Silverware Chest Plan
 Silverware Chest Plan 05L14.01 Introduction 1. Measure the space required for your cutlery before beginning this project to be sure that it will fit in the drawers and top compartment. The best way to
Roll-Away Patio Chair
 oll-way Patio hair Project Plan FO YOU STT This project, designed for the Kreg Jig H and Kreg Jig H Screws, uses 1 ½"-thick material, commonly called 2- by lumber. We recommend cedar for outdoor projects,
(28) 2 x 4 x 8 Ft. Boards Tape Measure (9) 2 x 6 x 8 Ft. Boards Pencil (6) 2 x 2 x 8 Ft. Boards Carpenter s Square (9) 1 x 3 x 8 Ft.
 2 x 4 x 8 Ft. Boards Tape Measure (9) 2 x 6 x 8 Ft. Boards Pencil (6) 2 x 2 x 8 Ft. Boards Carpenter s Square (9) 1 x 3 x 8 Ft.") MATERIALS: TOOLS: (28) 2 x 4 x 8 Ft. Boards Tape Measure (9) 2 x 6 x 8 Ft. Boards Pencil (6) 2 x 2 x 8 Ft. Boards Carpenter s Square (9) 1 x 3 x 8 Ft. Boards Drill 2 ½-inch Pocket Screws Circular Saw 2
MATERIALS: TOOLS: (28) 2 x 4 x 8 Ft. Boards Tape Measure (9) 2 x 6 x 8 Ft. Boards Pencil (6) 2 x 2 x 8 Ft. Boards Carpenter s Square (9) 1 x 3 x 8 Ft. Boards Drill 2 ½-inch Pocket Screws Circular Saw 2
135 ROLLTOP DESK 515
 135 ROLLTOP DESK 515 For the person who hates to clear off a desk, who wants to leave everything where it is overnight yet still have the clutter hidden, a rolltop desk is a godsend. The tambour hides
Jewelry Cabinet. Materials: 5/8" brad nails 5-1" x 3" x 8' boards (or if not 2 1/2" wide. 1-4' x 8' sheet - 3/4" plywood. wood glue get 1x4's)
") 1 Jewelry Cabinet Materials: 1-4' x 8' sheet - 3/4" plywood 5/8" brad nails 5-1" x 3" x 8' boards (or if not 2 1/2" wide wood glue get 1x4's) sand paper 1-1" x 6" x 8' board wood filler 1/2 sheet - 3/16"
1 Jewelry Cabinet Materials: 1-4' x 8' sheet - 3/4" plywood 5/8" brad nails 5-1" x 3" x 8' boards (or if not 2 1/2" wide wood glue get 1x4's) sand paper 1-1" x 6" x 8' board wood filler 1/2 sheet - 3/16"
DIY Bedroom Entertainment Center
 DIY Bedroom Entertainment Center Free woodworking plans for building a bedroom entertainment center that also serves as a laundry sorter. Perfect for bedroom with limited wall space. Cost: ~$250 Difficulty:
Chest of Drawers Plans
 Chest of Drawers Plans www.andrewharriswoodwork.com Page 1 of 12 Introduction This plan makes a chest of drawers from 2 by 4s and 2 by 6s for the top. The cabinet is 22 ½ inches at the widest point, 22
About.com :
 http://woodworking.about.com/gi/dynamic/offsite.htm?sit...//www.popularwoodworking.com/features/fea.asp%3fid=1088 (1 of 8)1/28/2004 12:05:01 AM Modern Storage Tower The last thing I want to do when starting
Project Plans Kreg Tool Company / BuildSomething. All Rights Reserved.
 BY Project Plans HARDWARE ORGANIZER How easy is it top keep screws, hardware, and other small items organized instead of in the way? Just cut six identically sized pieces of plywood, add a 1x2 cleat, and
This indicates a diagram detailing the dimensions of a project part and/or the placement for pocket holes, screws, nails, etc.
 S i m p le Woodworking: What You'll Need v lumber 1-2x4x8 9-2 x 4 x 10 1-2x6x8 2-2 x 6 x 10 1-2 x 10 x 8 2-4x4x8 hardware/supplies (availability will vary) 2 1/2" pocket hole screws 2 1/2" deck screws
Simple Woodworking: Outdoor Pitch Chair
 Parts Lumber Front Front Leg Front Leg Drill three pocket holes on each end of the Front - one centered and two 3/4" from each side. Cut a 15-degree miter on one end of the Front Legs. It will be easier
I love the outdoors. And I m impressed with whatever forces in the universe have made it possible for me to purchase a collapsible canvasand-metal
 Limbert Chair 9 I love the outdoors. And I m impressed with whatever forces in the universe have made it possible for me to purchase a collapsible canvasand-metal camp chair for under $20. But when you
Project 17884EZ: Shaker End Table
 Project 17884EZ: Shaker End Table With its clean, simple lines, this piece is unmistakably Shaker style. Ours is made from cherry, a wood commonly used by Shaker craftsman, but we ve also seen this piece
Kitchen Base Cabinet: Multiple Drawers Cabinets from Scratch
 Kitchen Base Cabinet: Multiple Drawers by Cabinets from Scratch Our Home from Scratch LLC Page 1 Disclaimer Our Home from Scratch LLC and its legal owners cannot be held responsible for any loss, damage,
MyOutdoorPlans.com. By Julian King [2X4 GARDEN BENCH]
![MyOutdoorPlans.com. By Julian King [2X4 GARDEN BENCH]](/thumbs/75/72876801.jpg "MyOutdoorPlans.com. By Julian King [2X4 GARDEN BENCH]") MyOutdoorPlans.com By Julian King [2X4 GARDEN BENCH] CUT LIST A 2 pieces of 2 4 lumber 24 long, 2 pieces 32 1/2 long LEGS B 2 pieces of 2 4 lumber 45 long, 2 pieces 15 1/2 long, 1 piece 12 1/2 long SEAT
MyOutdoorPlans.com By Julian King [2X4 GARDEN BENCH] CUT LIST A 2 pieces of 2 4 lumber 24 long, 2 pieces 32 1/2 long LEGS B 2 pieces of 2 4 lumber 45 long, 2 pieces 15 1/2 long, 1 piece 12 1/2 long SEAT
ENJOY THIS SELECTION FROM. Pocket Hole Joinery. Pocket Hole. Joinery Bookshelf Day bed Mirror/picture frame Dresser Bathroom vanity...and More!
 t ENJOY THIS SELECTION FROM Pocket Hole Joinery Pocket Hole Joinery Bookshelf Day bed Mirror/picture frame Dresser Bathroom vanity...and More! Mark EdMundson To purchase your copy of Pocket Hole Joinery,
indicates a diagram detailing the dimensions of a project part and/or the placement for pocket holes, screws, nails, etc.
 p i r at e ' s c he s t t oy box What You'll Need lumber 1-1x2x4 1-1x2x8 1-1x3x2 2-1x3x8 1-1x6x4 1-3/4 x 2 x 4 sheet of plywood 1-3/8 or 11/32 x 4 x 8 sheet of beadboard paneling 1-9/16 x 8 feet quarter
Easy Jewelry Box. Easy Jewelry Box 1
 This easy to build dresser style jewelry box is designed to use standard board sizes you may already have on hand. Drawers are lined in felt and have felt covered bottoms to glide smoothly on the shelves
Brookfield Storage Bed Frame. Copyrighted Material. Page 1
 Compare to: Pottery Barn Kids Brookfield Storage Bed Frame Skill Level: Intermediate Brookfield Storage Bed Frame Matching the Brookstone Headboard, the storage bed takes advantage of ALL the space under
Grade 11 Woods Lift Lid Coffee Table. Based on Under the big Top from Popular Mechanics Website
 Grade 11 Woods Lift Lid Coffee Table Based on Under the big Top from Popular Mechanics Website TABLE TOP 1. Select enough lumber to construct a top that is between 22 ½ and 24 wide after jointing. Ensure
Harriet Chair with Modifications
 Harriet Chair with Modifications This modification of the Harriet chair includes a slat back, padded seat, and is 2 inches wider than the original plan. The overall dimensions of the finished chair: 38
Workstation. Multipurpose. Shop Project
 Shop Project Multipurpose Workstation Rock-solid, practical, and inexpensive it s tough to beat this versatile workstation that you can make from one sheet of plywood.. I don t think a woodworker can ever
Kitchen Upper Cabinet: Single Door Cabinets from Scratch
 Kitchen Upper Cabinet: Single Door by Cabinets from Scratch Our Home from Scratch LLC Page 1 Disclaimer Our Home from Scratch LLC and its legal owners cannot be held responsible for any loss, damage, disappointment,
(2) 4 x 8 Ft. Sheets of ¾-inch Purebond Plywood Tape Measure (2) 4 x 8 Ft. Sheets of ¼-inch Purebond Plywood Pencil (1) 1 x 8 x 8 Ft.
 4 x 8 Ft. Sheets of ¾-inch Purebond Plywood Tape Measure (2) 4 x 8 Ft. Sheets of ¼-inch Purebond Plywood Pencil (1) 1 x 8 x 8 Ft.") MATERIALS: TOOLS: (2) 4 x 8 Ft. Sheets of ¾-inch Purebond Plywood Tape Measure (2) 4 x 8 Ft. Sheets of ¼-inch Purebond Plywood Pencil (1) 1 x 8 x 8 Ft. Board Carpenter s Square (1) 1 x 6 x 8 Ft. Board
MATERIALS: TOOLS: (2) 4 x 8 Ft. Sheets of ¾-inch Purebond Plywood Tape Measure (2) 4 x 8 Ft. Sheets of ¼-inch Purebond Plywood Pencil (1) 1 x 8 x 8 Ft. Board Carpenter s Square (1) 1 x 6 x 8 Ft. Board
Kitchen Upper Cabinet: Double Doors Cabinets from Scratch
 Kitchen Upper Cabinet: Double Doors by Cabinets from Scratch Our Home from Scratch LLC Page 1 Disclaimer Our Home from Scratch LLC and its legal owners cannot be held responsible for any loss, damage,
Castle loft bed [1] Additional Photos. Castle loft bed Published on Ana White (http://www.ana-white.com)
![Castle loft bed [1] Additional Photos. Castle loft bed Published on Ana White (http://www.ana-white.com)](/thumbs/76/73086219.jpg "Castle loft bed [1] Additional Photos. Castle loft bed Published on Ana White (http://www.ana-white.com)") [1] Submitted by fsmumford [2] on Tue, 2011-10-18 21:51 [1] Additional Photos [3] [4] Page 1 of 31 [5] [6] [7] Summary: I stumbled upon Ana s blog about a year ago. Since, like many of you, I have become
[1] Submitted by fsmumford [2] on Tue, 2011-10-18 21:51 [1] Additional Photos [3] [4] Page 1 of 31 [5] [6] [7] Summary: I stumbled upon Ana s blog about a year ago. Since, like many of you, I have become
Media Center Woodworking Plans Our Home from Scratch
 Media Center Woodworking Plans by Our Home from Scratch Our Home from Scratch LLC Page 1 Disclaimer Our Home from Scratch LLC and its legal owners cannot be held responsible for any loss, damage, injury
Media Console with DVD Drawer Storage, Cyndi Collection [1]
![Media Console with DVD Drawer Storage, Cyndi Collection [1]](/thumbs/72/67419420.jpg "Media Console with DVD Drawer Storage, Cyndi Collection [1]") Media Console with DVD Drawer Storage, Cyndi Collection [1] Submitted by Ana White [2] on Thu, 2011-05-12 15:32 [1] You see, I'm really quite greedy. I want to build everything, EVERYTHING for myself.
Media Console with DVD Drawer Storage, Cyndi Collection [1] Submitted by Ana White [2] on Thu, 2011-05-12 15:32 [1] You see, I'm really quite greedy. I want to build everything, EVERYTHING for myself.
Design Update /29/2006
 Design Update 3 -- 8/29/2006 Since our first design we ve made many minor changes to key areas of the prayer bench, especially the folding hinge geometry. The general design remains the same, though the
PROJECT PLANS WOODEN GIFT BOX
 PROJECT PLANS WOODEN GIFT BOX Make the gifts you give even more special by presenting them in this one-of-a-kind gift box. In fact, the box may be valued more than whatever it contains. The box is sized
Modern Coffee Table [1]
![Modern Coffee Table [1]](/thumbs/83/88601379.jpg "Modern Coffee Table [1]") [1] Submitted by jleakey [2] on Thu, 2013-12-26 10:03 Page 1 of 15 [1] Page 2 of 15 Additional Photos [3] [4] [5] [6] To build this project I used various tools. These included a Table Saw for all rip
[1] Submitted by jleakey [2] on Thu, 2013-12-26 10:03 Page 1 of 15 [1] Page 2 of 15 Additional Photos [3] [4] [5] [6] To build this project I used various tools. These included a Table Saw for all rip
DIY Corner Bench with Built-in Table
 DIY Corner Bench with Built-in Table Free woodworking plans for building a corner bench with a built-in table in the center. Cost: ~$75 Difficulty: Intermediate PINSPIRATION MOMMY 1 TOOLS AND SUPPLIES:
A Shaker Sewing Stand
 America s leading woodworking authority Step by Step construction instruction. A Shaker Sewing Stand A complete bill of materials. Exploded view and elevation drawings. How-to photos with instructive captions.
indicates a diagram detailing the dimensions of a project part and/or the placement for pocket holes, screws, nails, etc.
 ho m e o f f i c e de s k What You'll Need lumber 1-1 x2x4 4-1 x2x8 8-1 x3x8 1-3/4 x 4 x 8 sheet of plywood hardware/supplies (availability will vary) 1 1/4" brads Kreg 1 1/4" pocket hole screws wood glue
ARTS AND CRAFTS CHAIR
 ARTS AND CRAFTS CHAIR 491 MATERIALS LIST--DINING CHAIR Key No. Size and description (use) A 2 1-3/4 x 1-3/4 x 16-1/4'' oak (front leg) B 2 1-3/4 x 3-3/4 x 40-1/2'' oak (rear leg) C 1 1-3/4 x 3-3/16 x 15''
Bathroom Storage Unit. Wilkerdos.com
 Bathroom Storage Unit Wilkerdos.com Copyright 2015 Material List Quantity Item Notes 1 4 x 8 x 3/4 plywood Construction grade 1 2 x 4 x 1/2 plywood Construction grade 11" 7-1/2" Page 1 Some 1 1/4" brad
ARCHED AURORA NIGHTSTAND BY DARRELL PEART
 ARCHED AURORA NIGHTSTAND BY DARRELL PEART If my furniture making business were a corporation, the shareholders would have thrown me out a long time ago. My approach is impractical, because I d rather tinker
PLANS BY TOM BURY MURPHY WORKTABLE TOTAL DIMENSIONS: FOLDED UP 30 X 48 X 0 FOLDED DOWN 30 X 58 X 84
 MURPHY WORKTABLE TOTAL DIMENSIONS: FOLDED UP 30 X 48 X 0 FOLDED DOWN 30 X 58 X 84 MATERIALS LIST: (2) 2 x8 x8 (3) 2 x4 x8 (1) 1 x2 x8 (1) 48 x96 3/4 plywood (2) 1-1/2 x30 continuous hinge (1) Left-side
Kitchen Base Cabinet: Single Drawer with Double Doors Cabinets from Scratch
 Kitchen Base Cabinet: Single Drawer with Double Doors by Cabinets from Scratch Our Home from Scratch LLC Page 1 Disclaimer Our Home from Scratch LLC and its legal owners cannot be held responsible for
Entryway Locker 17 ½ 25 ½
 Copyright 2015 Shanty-2-Chic.com T Entryway Locker his old world entryway locker is loaded with possibilities. Two adjustable shelves allow you to customize the storage to fit your needs. Even better,
Rustic X Kitchen Island - Double [1]
![Rustic X Kitchen Island - Double [1]](/thumbs/95/124835629.jpg "Rustic X Kitchen Island - Double [1]") [1] Submitted by Ana White [2] on Mon, 2013-09-09 16:10 [1] I'm so glad you all liked the plans for the Small Rustic X Kitchen Island [3] built by Shanty2Chic [4]! Page 1 of 23 Page 2 of 23 Thanks for
[1] Submitted by Ana White [2] on Mon, 2013-09-09 16:10 [1] I'm so glad you all liked the plans for the Small Rustic X Kitchen Island [3] built by Shanty2Chic [4]! Page 1 of 23 Page 2 of 23 Thanks for
Display Case (for J&S)
") Display Case (for J&S) This is constructed of maple plywood with solid maple (soft maple) edge banding. It was made to fit between a door and a kitchen cabinet, and has an elegant circular taper between
Display Case (for J&S) This is constructed of maple plywood with solid maple (soft maple) edge banding. It was made to fit between a door and a kitchen cabinet, and has an elegant circular taper between