Once you have the strip wood cut then building can start!
|
|
|
- Lesley Morton
- 6 years ago
- Views:
Transcription
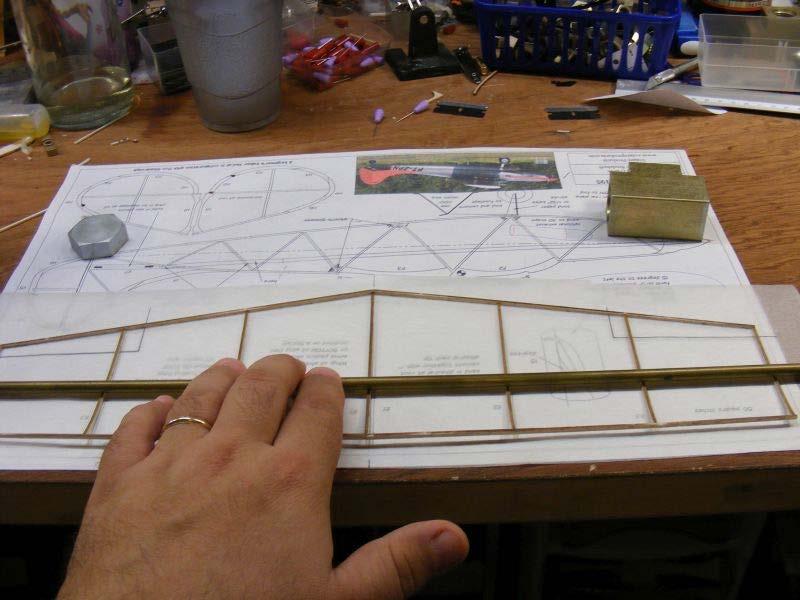
1 INTRODUCTION This thread is my detailed build of the new Turbo Cessna 195 short kit from Volaré products. This kit is intended for newcomers to indoor NoCal. George has picked and excellent subject for an indoor NoCal and with a little collaboration work the result is model that is built from 6# density hobby shop grade balsa, comes in at a weight of around 5 grams and can fly over 3 minutes in a school gym. Flight times of 5 minutes should be attainable in higher ceiling sites. I will keep updating this thread as I fly in different sites. Here is the laser cut short kit as received from Volaré Products. Two things to note is the kit includes precut wing spars and prop blades specifically for indoor flying. To finish the kit you will need some 6# density 1/16" sheet to cut some 1/16" x 1/16" strip wood for the fuselage profile and for the tail surfaces. Also some 6# density 1/4" thick wood for making the motorstick. 6# density wood is easy to find at any local hobby shop or craft store. I use as portable 500 gram x.01 gram digital scale which I bought online from Amazon for about $13 with free shipping. You are looking for 1/16" x 3" x 36" sheets that are around grams. For the motorstick material you want 1/4" x 3" x 36" sheets that weight around grams. One 3" x 36"sheet of the 1/4" will make over 20 NoCal motorsticks so one sheet will last a long time You will need to strip 2 or 3 pieces of 1/16" x 1/16" and one strip 5/16" wide form the 1/4" wood. For the 1/4" x 5/16" I use a Master Airscrew MAS4000 Balsa Stripper. For the thinner 1/16" x 1/16 I use a simple "push though" style balsa stripper. Once you have the strip wood cut then building can start! TAIL FEATHERS I started with the tail surfaces. All the parts for the stabilizer are labeled on the laser cut sheet. I find it easiest to cut the parts from the sheet and place them loosely in order so that when transferring to the building plan they are in the correct order. The plan is taped to some 1/2 foam insulation sheet. If you buy one of the 4ft x 8ft sheets you can cut them up into a lot of smaller building boards and pins push in very easy to the foam. The foam I use I bought at Lowes, and I take a razor blade with me to cut the big sheet in half so I can fit it into my car to take home. For building I use Duco household cement which I buy at my local Ace hardware store and I dilute it with acetone at a mix ratio of about 60% Duco and 40% acetone. This is a good mixture ratio for a model like this, it dries fast (15-20 minutes) and is strong. Do not assemble the kit with super glue as that will add a lot of weight. A Duco acetone mixture will evaporate the solvent away and will give a light strong glue joint. Super glues do not evaporate and the excess glue adds up during the entire build, like epoxy does. As a fun exercise weight one drop of cured super glue and then see how many drop of dried Duco/Acetone mix you need to equal the same weight of superglue. You will be quite surprised! Building the stab is rather straight forward. One thing to mention is that you want us use enough of the Duco glue on the edges of the laser cut pieces when assembling as


2 the Duco will be absorbed into the wood grain somewhat so make sure to apply enough glue. I like to apply the glue to the edge of the part then place the part on the plan one piece at a time. This way I know there is glue in the middle of the joint and not just on the top side and hoping the glue has wicked down far enough before drying. Once the laser cut outline was done, I then added in the 1/16" x 1/16" stripwood pieces. FUSELAGE For the profile fuselage you will need to bend one of the pieces of strip wood to follow the upper curve of the fuselage. As it is a rather gentle curve, no special template forming is required. I simply pull the wood through my finger tips at an angle to put a gentle bend in the wood (see photo). Using this technique you can get the curve to match the plan pretty closely. Alternately you can wet the strip and pin it down to the plan and let it air dry to get the desired curve. Which ever method you use is fine, just make sure the curved strip when dry is not trying to spring back to straight as that can distort the fuselage profile. Building the profile is rather easy. Just make sure to rub the plan with a bar of soap or wax so the glue does not stick to the plan. The laser cut parts are identified on the plan and I started by putting the laser parts on the plan (except the vertical stabilizer pieces) and then cutting the 1/16 sq strips to fit. Once the main fuselage was done I then built the vertical stabilizer/fin. I did it in two stages as I did not want to accidentally bump the


3 main fuselage section when it was drying. Once everything is glued and dried, just slide a double edge razor underneath to cut the profile free from the plan. WING The wing spars and ribs are all precut and located on the laser sheet. Take note that the wing spars are tapered and they will be standing on edge when building the wing. Since the wing plan form is tapered at the trailing edge, I like to sand end of the ribs with a little angle to match the rib to the taper. To do it I use a nail file and a little pressure is all that is needed. You have to be careful not to remove too much as you will shorten the rib with excessive sanding. Just a light touch with the nail file is all that is needed.


4 I use various size hex nuts and washers to hold the wood while building wings. I bought the hex nuts years ago at a local hardware store or you can get them online from shop supply warehouses like McMaster Carr. I find the hex nuts useful for many aspect of building so you may want to consider buying some. Alternatively pins can be used to hold the parts in place. Just make sure not to damage the spars with the pins. NOTE: The wing spars are on edge, not laying flat on the plan. Also note the spars are tapered, thickest at the root and thinnest at the tips. Once I have the wing all framed out the last step I do before gluing together is to make sure all the ribs are at the top of the wing spars as we want the wing covering to be smooth on top. I use the pointed end of a dental floss pick to gently lift the rib up until it is at the top of the wing spar. Now you can glue everything together. I use a rather large amount of the Duco/Acetone mix to allow it to seep down the side of the rib and spar (see photo). Once the wing is dry, remove from the plan and now you have all the balsa structure built. For those wanting to compare weights. Here are the weights of my uncovered structure as seen in this photo. Wing: 0.52 gr Profile fuselage: 0.66 gr Stabilizer: 0.28 gr MOTOR STICK The motor stick is cut from 1/4" sheet wood. You want wood close to 6# density and this sheet I have is 45 grams which is just over 6#. This motor stick is actually overkill for this design but it is a good starting point as it is very strong and will handle the motor stress if your build comes out a little higher in weight than my finished weight. I would not use sheets of wood heavier than this. I set my wood stripper to 5/16" wide and cut the full 36" length down the side of the sheet. Cut the blanks to 10.5" long and


5 weight the 3 pieces. One will most likely be lighter than the other two, use the lightest of the three blanks. My blank, 1/4" x 5/16" x 10.5", was 1.589grams before tapering. Next step we want to taper the blank a little. This will reduce weight yet maintain strength in both bending and twist. You want a stick with good torsional resistance to prevent excessive tail tilt at launch due to the stick twisting from motor torque. Start by marking the center of the stick at 5.25" and then 2" in front and 2 " behind the center mark. On the side of the stick draw a line 1/16" from the bottom of the stick on the front and back sides. This will be the taper of the motor stick. Using a razor plane or a sanding block (I use a razor plane first then finish up with a 320 grit sanding block), sand the bottom taper on the stick in the front and in the rear as seen in the photo. The ends will be now be 1/4" sq and the middle 4" long section 1/4" x 5/16". Once this taper is complete you will be doing another taper one the sides of the stick starting from the middle of the stick. This time the side taper will be about 1/32" per side at the front and the back. So when finished the ends will now be 1/4" high x 3/16" wide. I made a CAD drawing to show better how the two tapers look.

6 If you weigh the stick now you will see the weight has gone down about 0.5 grams from when you started. My tapered and sanded stick was around 1.1 grams. If you want flex the stick a little and feel how strong it is, go ahead and give it a try you will be surprised how stiff it is. At this point trim 1/4" off each end to get the stick to a 10" overall length. Now trim two pieces off scrap 1/4" stock and glue to the bottoms of the ends of the stick. These will be spacers for the rear hook and thrust bearing. Use full strength Duco right from the tube for this as you need the strength and also make sure to note the grain direction is perpendicular to the grain on the motor stick. Once these two spacers have dried, use a sanding block or razor blade and trim away any excess wood away on the sides. For the rear hook, sand the spacer until it is about 1/8" from the bottom of the stick. This will provide rubber clearance when unwinding. The rear hook is bent from.020" music wire. Glue the hook to the rear of the motor stick using the Duco/Acetone mix.


7 For the thrust bearing I chose to use a Harlan Science Olympiad pigtail thrust bearing. These are made from high grade aluminum and have a pigtail so props can be removed easily. These can be purchased from Ray Harlan, his website is Indoor Specialties and the Science Olympiad sized bearings are only $2.50 each. These are perfect for indoor NoCal as they accept.020" wire and are very strong! As an alternative to the purchased bearing, Volaré Products has a short video on how to make a NoCal thrust bearings by flattening some aluminum tubing, drilling the holes, and bending to shape with needle nose pliers. The spacer for the nose bearing needs to be adjusted so that the shaft of the prop will be 1/4" from the bottom of the stick. This is to provide the required clearance for the rubber when unwinding. Also note in the photo labeled "Sidethrust" the angle the bearing is pointed at. This will become right thrust once assembled to the model. The model will be flying to the right so the amount shown in the photo is how much is required to get a nice circling model. NoCals are difficult to fly to the left indoors as the props are large and there is no wing offset like there is on an indoor duration aircraft. So setting up to go right solves all the issues. It took me years and many models to finally learn this! The photo labeled "Downthrust" is how the bearing needs to be setup in that direction. There is no angle needed here as the motorstick when glued to the profile will have some down thrust built in. Once the spacer has been sized for the bearing, use the full strength Duco to glue the bearing on the stick. When placing the bearing on the stick, use a short length of.020" wire as a handle to hold the bearing as well as to line the bearing up for the correct thrust line as shown in the "Sidethrust" and "Downthrust" photos.


8 Once the glue has dried on the front bearing (give it about an hour since it is full strength glue), cut a few strips of 1/4" wide Esaki tissue. This will be used as a reinforcement. Apply some of the Duco/Acetone mix to the side of the stick by the bearing and glue the end of the tissue strip. Wait about 60 second to let the glue start to grip to the stick. Now apply glue along the path the tissue will take when you wrap it around the nose bearing. Once the glue is applied lightly pull the tissue and wrap it around. You want two wraps around the nose bearing. I use two separate pieces instead of trying to wrap once piece around two times. Once wrapped add a little more glue to the outside of the tissue paper as well. The idea is to saturate the tissue paper with glue. Also make sure the tissue fits snugly around the bearing, you do not want air gaps around the bearing. Repeat this tissue reinforcement for the rear hook as well. You will want to wrap tissue on both legs of the rear hook. I would not suggest using thread for these steps. Thread does not conform to the shape of the bearing and wire hook like tissue can. PRINTED TISSUE COVERING To print the tissue, you will have the choice of printing on 11" x 17" paper or on two regular 8.5" x 11", sheets. The files are located here:
9 I own a large format printer which can print 11" x 17" sheets so I chose to print the tissue in one piece. I first print the image on the paper so I can then cut a pieces of tissue to fit. The tissue piece I cut is always a rectangle so it feeds better in the printer. The I apply masking tape to the ends making sure to go past the width of the tissue and also off the edge of the piece of paper. Then I use a ruler and razor to trim the masking tape flush with the edge of the paper. So the tissue is only taped on the two edges. Now is the hard part if this is your first time printing tissue, you have to reload the page into your printer in the correct orientation so it will print on the side with the tissue. Some printers require the paper to be face up, or face down, or rotated etc. You must learn how your printer processes a page so what I do is take a sheet or paper, write 1,2,3,4 in each of the four corners on one side and A,B,C,D in each corner on the opposite side then load the page noting the orientation then print something on the paper. Once the page comes out you will then know how the paper has to be oriented to print on the tissue. The printing takes only a few second to complete. Once the page comes out I let it site for a few minutes to completely dry before handling as the tissue will usually be wet with ink and moving it around can bleed the colors. Once it is dry then I remove from the carried sheet. For the stabilizer, I decided to print some red tissue so the red would match as my Esaki red tissue was darker than the red which was printed. I used Microsoft paint which is a free program in Windows and created a simple red rectangle and printed that rectangle onto some tissue just like I did for the fuselage. Once the tissue is printed, the next step is to steam iron it. I use a clothing iron with a steam setting and set it to the highest temp steam setting and then add water into the iron. While it is heating I place the tissue on some paper towels. Once the iron is up to temp, I then irons the tissue letting the steam come out of the iron while ironing the tissue. The steam will slightly shrink the tissue (which is good) and after about 1 minute of steam ironing, I then change the setting to the highest temp setting with no steam. I then get new sheets of paper towel and place the tissue in between two layers of the paper tower. Now iron the tissue with the hot setting (no steam). As you iron you will see the bumps/texturing of the paper towers starting to flatten, you only have to iron about seconds. Then remove the tissue form between the towels. What you should see is very faint ripples/texture in the tissue that are transferred from the paper towels. These small bumps allow the tissue to shrink in higher temperature or lower humidity conditions without warping the structure. I find the budget paper towels best for this as they are usually not so soft so they transfer the bumps better than a higher quality paper towel. Now we are ready to cover. For covering NoCal models I like to use spray adhesive. I use 3M 77 Spray Adhesive. It can be bought at local craft stores or Lowe's or Home Depot. I highly suggest not using any other brand or 3M formula. 3M 77 sticks the best especially over the long term and is very tacky so very little is needed. Yes there are other brands and cheaper brands etc but 3M 77 is simply the best.

. Once you know it is working OK then spray the fuselage.")
10 Before applying the glue, make sure you are spraying the correct side. The printed tissue needs to be flipped over as the printed side will be on the left side of the model. To apply the spray adhesive, place the fuselage on some newspaper or cardboard on the ground and hold the can about 15" away. You may want to place some additional newspaper down to catch any overspray. I first do a quick test spray of the can onto an old cardboard box to make sure it is spraying a nice mist (a clean nozzle). Once you know it is working OK then spray the fuselage. The amount of glue you need is very little. It should take about 3 second to go from the nose to the back of the fuselage. That is all the glue you need. Any more your just adding weight. Once sprayed flip your can of 3M upside down to clear the nozzle by spraying onto an old box until all the adhesive is blown out of the nozzle. Forgetting this step can lead to a clogged nozzle rather quickly then you no longer get a nice even spray. Take the sprayed fuselage and carefully lay it on the tissue. Once on the tissue, use your finger to press the wood down to the tissue to get a good bond. Now do the same for the horizontal stabilizer. Once covered use a new double edge razor to trim off the excess tissue on the fuselage and stab. For the wing, the tissue was steamed and ironed as described before. I then added the aileron lines with a ruler and marking pen. The tissue was then placed over the plan to help with orientation when covering. The wing frame is sprayed in the same way, can 15" away and about 3 seconds from tip to tip. The frame should be attached at the trailing edge first then using a round dowel or brass rod roll the wing frame onto the covering. This will give a nice smooth covering to the wing. Once covered flip the wing over then gently press the paper to the frame with your fingers to get a good bond. Then trim off the excess tissue paper. Now we are ready for final assembly.


11 Here are my covered part weights: Stabilizer: 0.43 grams Wing: 0.94 grams Profile: 1.01 grams


 and use the Duco/acetone mix")
12 Adding dihedral to the wing. Use a new sharp razor and cut the tissue free on the left side of the center rib. Now with the right wing flat on the table, raise the left tip up 2" and hold it up in that position with blocks. The model will need 1/16" of washout in the left wing so use a ruler and adjust the blocks to measure 2" at the leading and 2 1/16" at the trailing edge. Or you can set 2" on both and then add a 1/16" sheet shim to the trailing edge block to lift it up the 1/16". Apply the Duco/Acetone mix to the dihedral joint and let it dry about 10 minutes then glue again as you want to make sure you have a strong joint. Now to fix the tissue at the center rib, just use a small scrap of 1/16" wood and replace the tissue as seen in the photos. Once the tissue is back over the center rib, apply a few small dabs of 50/50 white glue water mix. This will stick the tissue down. Lay the motor stick on the fuselage profile as shown on the plan (it will be angled down slightly to give some down thrust) and use the Duco/acetone mix to glue them together. I apply glue at every place the motor stick touches the fuselage profile. Once that has dried, you will need to make a tail boom from some scrap 1/16" sheet. I used the same


13 sheet wood I used for the 1/16" sq strips. You will need a piece about 6" long and it will taper from 1/4" to 1/16" over the 6" length. The tail boom is required to stiffen the tail section while in flight. Glue the tail boom to the back of the motor stick with an overlap as shown in the photo. You may need to use a weight or block to hold it in place while drying. Once dry trim the excess boom off that goes past the rudder hinge line. Now the last thing you will need to do is add in some right rudder. To do that take a razor and make some wedge shape nicks in the wood at the rudder hinge line, then bend the rudder to the right and then lay down on the building table with some 1/16" shim and then apply glue to the wedge cuts to secure the rudder setting.


 and repeat for the trailing edge.")
14 The wing should fit nicely into the recess on top of the fuselage right. Use some blocks to hold the fuselage and wing in position. Make sure the right wing has no wash in or washout and the left wing still has the 1/16" washout we added when putting in the dihedral. Glue the wing to the fuselage with the Duco/acetone mix and then after 10 minutes glue again as you want a strong joint here. Once the wing is dry then glue the right half stab to the fuselage then after it dries the other half stab. Note the small amount of right tail tilt when looking from the front of the model. This will help the model circle correctly when the winds are getting low. Take a scrap of 1/16" sq stick and glue it from the leading edge wing joint down to the motorstick (as seen in the photo) and repeat for the trailing edge. This will add a lot of strength as it distributes some of the loads from the wing to the strong motorstick. Without these sticks the fuselage profile has to take all the wing loads and that can result in the wing twisting while flying or when bumping object on the ceiling. If you watch the flight video you will see how strong the model is when it bumps object, having the wing secured with these extra two sticks helps a lot. Next are the landing gear legs and wheels. I used red marker to color my landing gear legs but to be accurate to the full size airplane you will need to color them light grey. All the grey markers I had looked almost black on wood so I decided to go with red instead.


15 The gear legs were glued together first with full strength Duco then glued to the bottom of the fuselage with full strength Duco. The main wheels and tail wheel were colored with red and black marker. The main wheels are glued on with a small dab of full strength Duco and note the wood grain goes up and down on the wheels. The full strength Duco sets up quickly, while it is setting up check to make sure the wheels are straight from the top and from the front. At this stage my model was 3.9 grams without the prop. PROPELLER The prop for this model is 10" diameter with 15" of pitch. The blades are included in the short kit; I lightly sanded them with some 400 grit sandpaper to smooth the blade surfaces a little. I also decorated the tips as I like how colored prop tips look when spinning. Soak the blades in hot water for about 5 minutes then tape them at a 15 degree angle to a can that is around 5" diameter. Use some tissue paper between the tape and the blades; do not put the masking tape directly on the wood. Also make sure to pull the tape tight so the blades are firmly held to the can. Bake in the oven at 250F for 20 minutes to form the blades. Remove from the oven and let it cool down to room temperature before removing the blades from the form.


16 The prop spar is made from a piece of bamboo skewer stick. You want a skewer stick that is around 3/32" to 1/8" diameter. Like balsa some bamboo can be quite heavy so when you buy a bag of skewers weight a few of the pieces and make the spar from the lightest stick you find. Cut a 4" long piece of the skewer and mark the center where the prop shaft will go. The prop blades have a 1/16" wide cutout where the spar will go, since the skewer I used was 1/8" diameter, I had to widen the slots so the spar would fit inside. So make the slots as large as needed to fit your specific bamboo. Now drill the skewer with a.022" drill bit for the prop shaft. Bend a prop shaft from.020" wire and install in the prop spar making sure there is enough space for the hook to fit into the bearing with a little clearance past the end of the bearing for the rubber. Bend the front of the prop shaft with two 90 degree bends to allow it to "hook" onto the spar as seen in the photo, use some medium CA to hold the prop shaft to the bamboo and with a toothpick, wick a little CA into the area where the prop shaft goes into the bamboo spar. This will fill in the gap around the.020" wire and the.022" diameter hole. My finished prop spar/hook assembly was just under 0.50 grams. Now the prop blades need to be mounted to the spar at the correct angle to get 15" pitch. I decided to make a simple jig to hold the blades for my prop. To make the jig first cut a 1.25" x 1.25" square from some 1/16" sheet and cut diagonally to make two 45 degree triangles. Draw a vertical line in the center of the leg of the triangle (as seen in the photo). Then on one triangle draw a line in the middle now going horizontal. It will form a 5/8" x 5/8" square. Cut away the extra wood so you have just the 5/8" square. Using some more 1/16" sheet as a base (approximately 1.5" x 6" long), glue the 5/8" square to the end of the sheet and then glue the triangle at a distance of 2 3/8" away from the square (see photo). The triangle must hang off the edge of the sheet like shown in the photo. Notice the vertical black line on the triangle is on the edge of the


17 balsa sheet. The 2 3/8" distance and 45 degree angle will be what sets the blades at 15" of pitch. Once you have the fixture ready you can now put the prop together. Use a small strip of tape to hold the prop shaft to the fixture (on the side of the 5/8" sq). Now I added a couple little 45 degree legs to hold the fixture when gluing this is optional but I wanted to mention it (see photo) Place one blade on the fixture and position it on the spar making sure the blade is resting on the 45 degree triangle. I used the top head of a pin underneath to help hold the blade (you can see it in the photo). Apply the Duco/acetone mix on this joint and reglue about 10 minutes later as you want a strong joint. Once dry just rotate the completed blade away then you can work on the second blade.


18 Once the blades are dry then add a Teflon washer to the prop shaft. I use ETFE tubing and cut a piece for the thrust washer for NoCals. ETFE can be bought from Mcmaster Carr it costs about $4.50 a foot for.020" ID x 1/16" OD and that will make a lot of thrust washers. My finished prop was 0.85 grams.
WRIGHT FLYER 1 INSTRUCTIONS FOR THE D10LC KIT
 WRIGHT FLYER 1 INSTRUCTIONS FOR THE D10LC KIT Manufactured in the USA by Easy Built Models PO Box 681744, Prattville, AL 36068-1744 Visit us at www.easybuiltmodels.com Easy Built Models GLUE METHODS Always
FUSELAGE CONSTRUCTION
 FUSELAGE CONSTRUCTION Note: prior to building and gluing on the work surface use protective covering on your building surface. (wax paper or clear wrap) Fit the laser cut Fuselage Front and Fuselage Rear
C-180 Builder s Manual
 C-180 Builder s Manual. May 20, 2002 Last revised July 11, 2002 Copyright! 2002 Douglas Binder, Mountain Models www.mountainmodels.com sales@mountainmodels.com (719) 630-3186 1 Required Equipment! Xacto
Citabria Pro. Aerobatic Parkflyer. by Joel Dirnberger
 Citabria Pro Aerobatic Parkflyer by Joel Dirnberger Revision C: December 21, 2004 Citabria Pro Building Instructions Length: Wingspan: Wing Area: Flying Weight: Wing Loading: Functions: Specifications:
THE STREAMLINER! A super Class D fuselage model
 THE STREAMLINER! A super Class D fuselage model by CHRISTIAN D. BERGER THE two most important characteristics of a contest model are its climb, and gliding ability. For, after all, you have to get up high
Building a WorId Record Fuselage Model
 Building a WorId Record Fuselage Model How You Can Build and Fly the Model With Which the Author Established a World's Record of 41 Minutes and 19 Seconds By WILLIAM YING The finished model ready to fly
Hobby Lobby Zip Supplementary instructions Please refer to the included drawings while using these assembly instructions
 Materials needed: 15 or 30 minute epoxy Medium CA Masking tape Scotch tape Servo Tape Wax paper Tools Needed: Pencil or marker Flat building surface Hobby knife or razor blade 7/64" or 3mm drill bit 3/16"
Piper Cherokee /3 scale. Construction Manual
 Piper Cherokee 140 1/3 scale Construction Manual STAB CONSTRUCTION 1. Remove foam cores from cradle and place on flat surface. Inspect pieces before you epoxy halves together making sure leading and trailing
The model boasts of twin fuselages and three fins
 An Experimental Twin Tractor One of the Most Unique and Finest Fliers Ever Presented. If You Want Something Different, Build and Fly This One By FELIX GUTMANN The model boasts of twin fuselages and three
An All-Balsa Sportster
 An All-Balsa Sportster A REMARKABLE FLIER OF UNIQUE DESIGN THAT WILL GIVE YOU MANY ENJOYABLE BUILDING AND FLYING HOURS By STAN D. MARSH Contributions by Felix Gutmann This model was designed primarily
Your kit contains the following parts. Please check your kit for any missing or damaged parts before starting construction.
 Your kit contains the following parts Please check your kit for any missing or damaged parts before starting construction COMPLETE KIT PARTS LIST 1 Plan Sheet #1 1 Plan Sheet #2 2 Decal Sheet 2 White Tissue
(Build Instructions)
") (Build Instructions) Specifications * Wingspan: 58cm * Length: 50cm * Flying Weight: 59 grams * Channels: 3 (Rudder Elevator Throttle) * Suggested Receiver: 4Ch Micro * Motor: 8mm GearDrive * Prop: GWS
(Build Instructions) Specifications * Wingspan: 58cm * Length: 50cm * Flying Weight: 59 grams * Channels: 3 (Rudder Elevator Throttle) * Suggested Receiver: 4Ch Micro * Motor: 8mm GearDrive * Prop: GWS
ParkJet Builder s Manual
 ParkJet Builder s Manual Thank you for purchasing the ParkJet. The ParkJet is a profile ducted fan airplane that can be flown in a larger park. The ParkJet was initially designed by Scott Stoops and modified
LANDING GEAR. 1. Fit landing gear into slots on bottom of fuselage.
 LANDING GEAR 1. Fit landing gear into slots on bottom of fuselage. 4. Use channel-lock pliers to press blind nuts into position (note: drilled hole should be slightly smaller than shaft of blind nut for
Magpie. Foam Trainer. Magpie Specifications
 Magpie Foam Trainer Magpie Specifications Length: 34in. Wingspan (SF): 46in. Wing Area (SF): 414in 2 Wingspan (SP): 40in. Wing Area (SP): 360in 2 Weight (without battery): 12oz. Thank you for purchasing
Building Tips This model can be built using the following types of adhesives:
 Page 1 Building Tips This model can be built using the following types of adhesives: Epoxy (with or without microballons) Odorless cyanoacrylate (CA) with accelerator UHU Creativ for Styrofoam (or UHU
PITTS S2S CONSTRUCTION
 PITTS S2S CONSTRUCTION FUSELAGE CONSTRUCTION 1) Place the right fuselage side over the plan and mark the former positions. Place the left side over the right side and mark the former positions. Glue F1
Stream NXT - assembly instructions
 Stream NXT - assembly instructions Recommended settings CG (measured from root leading edge): Speed/launch camber (+down, near the wing root): Cruise camber (+down, near the wing root): Thermal camber
THE APOGEE A 100-INCH AMA DURATION SAILPLANE FROM DYNAFLITE
 THE APOGEE A 100-INCH AMA DURATION SAILPLANE FROM DYNAFLITE Apogee is the intermediate sailplane designed to be competitive in AMA duration contests. Effective spoilers, rudder and full flying stabilizer
NASTY Build Guide. Supplies needed
 NASTY Build Guide Supplies needed Blucore or Depron Foam. Blucore (Fan Fold Foam) is available at Lowes. Approximately $25 for 50 feet of Blucore. Depron can be ordered on the internet for slightly more.
The "Indoor Cabin" Nationals Winner BY HENRY STRUCK
 Two views of the little ship and the trophy it won The "Indoor Cabin" Nationals Winner BY HENRY STRUCK Struck winds motor out of plane. Ballas "holds" Struck hooks motor in fuselage by meansof "rod" shown
A large prop insures high performance. Cleverly designed to give a realistic appearance
 Cleverly designed to give a realistic appearance A large prop insures high performance A Vought Fighter That Flies Complete Data from Which You Can Build an Excellent Performing Flying Scale Model of the
A Flying Belanca Aircruiser How You Can Build a Flying Scale Model of a Famous Cargo Plane That Includes Many Fine Details of Construction
 It performs well with a flying propeller The finished model with scale propeller A Flying Belanca Aircruiser How You Can Build a Flying Scale Model of a Famous Cargo Plane That Includes Many Fine Details
COMET 24" HELLCAT REPRODUCTION ASSEMBLY GUIDE
 COMET 24" HELLCAT REPRODUCTION A RUBBER POWERED 24" WING SPAN MODEL BY PAUL BRADLEY ASSEMBLY GUIDE AUGUST 2016 CHANGES MADE TO THE ORIGINAL The following changes were made to the original Comet kit structural
Thank you for your purchase of the Lee Ulinger, FoamtanaS, Yak-55, or Extra 330 3D Depron foam, Aerobatic airplane.
 Thank you for your purchase of the Lee Ulinger, FoamtanaS, Yak-55, or Extra 330 3D Depron foam, Aerobatic airplane. Tools you will need to build Recommended additional items: #11 hobby knife Motor: Hacker
BUILDING THE FUSELAGE FRAME 6
 KIT 305 DHC-2 BEAVER COPYRIGHT 2011 BY PAUL K. GUILLOW, INC. WWW.GUILLOW.COM Before starting the construction of your model, study the plan and construction procedure carefully so that you will have a
96 WING SPAN SPITFIRE (COPYRIGHT PROTECTED 2014) ALL RIGHTS RESERVED
 ALL RIGHTS RESERVED") 96 WING SPAN SPITFIRE (COPYRIGHT PROTECTED 2014) ALL RIGHTS RESERVED GENERAL INSTRUCTIONS Should you elect to use the recommended Door Skin, which is 1/8 mahogany plywood measuring 36 x 88. Have it cut
96 WING SPAN SPITFIRE (COPYRIGHT PROTECTED 2014) ALL RIGHTS RESERVED GENERAL INSTRUCTIONS Should you elect to use the recommended Door Skin, which is 1/8 mahogany plywood measuring 36 x 88. Have it cut
FLITZEBOGEN-2 Assembly instructions
 FLITZEBOGEN-2 Assembly instructions Trim the end of the fuselage to the length of 925mm from the nose. Be careful to avoid splitting the carbon fibers. Sand the base of the stab mount in preparation for
SZD-10 bis CZAPLA ASSEMBLY MANUAL IN PICTURES
 1 RUDDER Plan and parts: 2 Assembly steps: Photo above: glue together rudder spar, ribs and trailing edge. Clamp spar to a flat surface (chipboard on the photo) and make sure the straight aligment of the
E-AERO EPP PITTS KIT From BP HOBBIES. Parts Included in kit
 E-AERO EPP PITTS KIT From BP HOBBIES Parts Included in kit Thank you for purchasing the BP Hobbies/E-aero EPP Pitts. Please take the time to read through the instruction manual before beginning the build.
By HARRY BARR... A cute little rubber job that is easy to build and fly. Full-size plans on next two pages.
 By HARRY BARR... A cute little rubber job that is easy to build and fly. Full-size plans on next two pages. "Hangar Rat" owes its existence to the "Sig Parasol," a simple, easy-to-fly, tissue-covered profile
EPP Rebel Z 35. White Red w/ Blue Orange w/ Blue Orange w/burgundy Other. Specs. Color - Bottom White Black Checkers Silver Checkers Other Checkers
 EPP Rebel Z 35 Specs AUW ~10.0oz Width 35.28 Length 34.67 Wing Area 1.44 sqft Horz Area 2.35 sqft Vert Area.91 sqft
4. Bevel the LE face of HS1-HS11 to match the horizontal stab leading edge sweep angle.
 BEFORE YOU BUILD 1. Unroll each sheet of the plans. Roll them inside out so that they will lie flat on the building surface. 2. Assemble the tools that you will need to build each section so that they
COMET SENIOR DART REPRODUCTION ASSEMBLY GUIDE
 COMET SENIOR DART REPRODUCTION A RUBBER POWERED 24" WING SPAN MODEL BY PAUL BRADLEY ASSEMBLY GUIDE JANUARY 2018 CHANGES MADE TO THE ORIGINAL The following changes were made to the original Comet kit structural
Build and fly this exact scale 43-in. control-line version of the popular Cessna private plane.
 Seeing double? Clever photography gives that illusion but actually it s only the model 140 in the foreground. Author Stahl (right) does fly both the job he is holding and his real Cessna 14 pictured in
Taylorcraft Indoor / Cul-De-Sac Flyer
 Taylorcraft Indoor / Cul-De-Sac Flyer Taylocraft Specifications Wingspan: 28.0 in. Wing Area: 117 sq. in. Weight (Ready to Fly): 3.0 3.1 oz. Wing Loading: 3.7 3.8 oz. / sq. ft. LIABILITY RELEASE In that
Dandy Sport Builder s Manual
 Dandy Sport Builder s Manual Thank you for purchasing the Dandy Sport. The Dandy Sport has been designed as an easy to build aileron trainer. Take your time and enjoy building this plane. Specifications:
Parts Identification
 We are excited to introduce the Model Aero Aqua Sport. This is an excellent sport flyer, equally at home flying from grass fields, water, or even snow! The unique V-tail gives the Aqua Sport a distinctive
STRATOSPHERE CONTEST MODEL
 STRATOSPHERE CONTEST MODEL A Super-Duration Fuselage Plane With Extremely High Power-Weight Ratio It Has Made a Flight of Thirty- Five Minutes Construction of the light hut strong frame work is simple
34" PELICAN by CRASH TEST HOBBY
 34" PELICAN by CRASH TEST HOBBY The Pelican is a 34" trainer that can level its own wings and put its nose on the horizon once trimmed and balanced. It can handle more wind than most EZ flying planes in
Cleveland Quickie Luscombe Silvaire
 Cleveland Quickie Luscombe Silvaire This plan package is not a 100% copy of the original kit. As you make your way through the instructions you will see the differences. Here s just a few of them: The
S.E.5a (Build Instructions)
") S.E.5a (Build Instructions) Specifications Wingspan: 38 cm Length: 31cm Flying Weight: 41 Channels: 3 (Rudder Elevator Throttle) Suggested Receiver: 3Ch Brick Motor: 7mm Geared Motor Airframe Only Kit
S.E.5a (Build Instructions) Specifications Wingspan: 38 cm Length: 31cm Flying Weight: 41 Channels: 3 (Rudder Elevator Throttle) Suggested Receiver: 3Ch Brick Motor: 7mm Geared Motor Airframe Only Kit
35 Magnum. Instruction Manual
 EPP EPP 35 35 Magnum Rebel Z Instruction Manual This is how your kit will arrive When cutting the hardware package open use caution. The contents are semi-coiled to fit in the box. They will spring open
Specifications Wingspan: 43cm Flying Weight: 33 grams (with battery) Channels: 3 Suggested Receiver: 4Ch Micro Motor: 7mm Brushed Geardrive
 Channels: 3 Suggested Receiver: 4Ch Micro Motor: 7mm Brushed Geardrive") Specifications Wingspan: 43cm Flying Weight: 33 grams (with battery) Channels: 3 Suggested Receiver: 4Ch Micro Motor: 7mm Brushed Geardrive Airframe Kit (Included Contents) * Airframe Parts Sheets (Depron)
Specifications Wingspan: 43cm Flying Weight: 33 grams (with battery) Channels: 3 Suggested Receiver: 4Ch Micro Motor: 7mm Brushed Geardrive Airframe Kit (Included Contents) * Airframe Parts Sheets (Depron)
SASKATOON, Saskatchewan
 CONSTRUCTION GUIDE AVRO ARROW (CONTEST VERSION) Copyright, Bill Jones, 2004 SASKATOON, Saskatchewan This is a work in progress, so there are a couple of rough areas ( I ll point out those that I m aware
INCLUDED IN THIS KIT: SPECIFICATION: NEEDED BUILDING TOOLS: REQUIRED EQUIPMENT:
 Please review this entire manual before beginning assembly. By doing so it will help you better understand each step as you progress in the actual building of your kit, and you will do a better job in
ULS Cherokee. Ultra Low Speed aircraft for indoor RC flying. Zippkits. Specifications: Required to complete:
 Zippkits ULS Cherokee Ultra Low Speed aircraft for indoor RC flying. Specifications: Span- 28 inches Wing Area- 151 Sq/In Wing Loading- 3.0 ounces/ft Weight- 3.5 ounces RTF Build time- 1-2 Hours Radio-
RESolution V2 Manual
 RESolution V2 Manual Note for the German Manual: Yellow Bottle thick CA Pink Bottle Med CA Blue tube 5 minute Epoxy Green tube 90 Minute Epoxy Construction of the Fuselage Step 1: Cover the plan with a
Building the Fairchild "24" by JOSEPH S. OTT Model Editor
 Building the Fairchild "24" by JOSEPH S. OTT Model Editor The completed Fairchild "24" is the most faithful copy of the full size machine that has yet been produced. Showing the undersurfaces and the structure
Super Sky Surfer 2000 Assembly Instructions
 Super Sky Surfer 2000 Assembly Instructions Note: Plug and Play version of the Sky Surfer comes with fuselage pre-glued and motor/servos installed. If you wish to route antennas or wires through the tail,
SE5a Wing Panels rev 1.0
 SE5a Wing Panels rev 1.0 The top and bottom wings are different. They might look the same but the bottom wing has one less rib and some rib spacing difference. This is due to where the wooden interplane
Continue gluing the remaining top parts ensuring the angled piece is glued well. Set aside and let dry. See photo below
 Radiator rev 1.1 The SE5a s radiator is one of the most recognized radiators in WW1. It is one of the components that defines the SE5a. The original SE5a has seen multiple radiator designs used during
THE SWALLOW. An interesting, simple, all-balsa speedster of crashproof design. by MALCOLM J. ABZUG
 THE SWALLOW An interesting, simple, all-balsa speedster of crashproof design. by MALCOLM J. ABZUG DESIGNED primarily for the purpose of testing a new type of monocoque fuselage design, the Swallow proved
Sky Eagle. User Guide. Cautionary and Warning Statements
 Sky Eagle User Guide 60089 V0613 Cautionary and Warning Statements This kit is designed and intended for educational purposes only. Use only under the direct supervision of an adult who has read and understood
Building the T-D Coupe
 Efficient because of excellent streamlining The finished plane is extremely realistic Building the T-D Coupe A Sleek Gas Job That Is Simple To Build and Noted for Consistent Flights By THEODORE DYKZEUL
Nationals Flying Scale "Champ" Not Only National Winner but a Realistic Plane That Flies Two Minutes Consistently By HENRY STRUCK
 The little "big" plane that won at the 1941 Nationals, with its striking appearance and performance. Nationals Flying Scale "Champ" Not Only National Winner but a Realistic Plane That Flies Two Minutes
SPUNKY ASSEMBLY MANUAL
 SPUNKY ASSEMBLY MANUAL Please read the tips section at the back of this manual regarding the use of laser cut parts. The proper removal and preparation of these parts is important. When laser cut, some
White Red w/ Blue Orange w/ Blue Burgundy w/ Orange Other
 Specs AUW ~6.5oz Width 32.875 Length 29.50 Wing Area 1.35 sqft Horz Area 2.22 sqft Vert Area 1.26 sqft Suggested Hardware ~25g 90 watt Motor 12 amp ESC Servos 6g+ (4) 2s LiPo (300-500mAh) 4ch Radio/Rx
90 WING SPAN P-51D MUSTANG (COPYRIGHT PROTECTED 2014) ALL RIGHTS RESERVED
 ALL RIGHTS RESERVED") 90 WING SPAN P-51D MUSTANG (COPYRIGHT PROTECTED 2014) ALL RIGHTS RESERVED GENERAL INSTRUCTIONS This design is basically an enlargement of the very popular fun scale Mustang 60 Size. You can build it light
90 WING SPAN P-51D MUSTANG (COPYRIGHT PROTECTED 2014) ALL RIGHTS RESERVED GENERAL INSTRUCTIONS This design is basically an enlargement of the very popular fun scale Mustang 60 Size. You can build it light
INCLUDED IN THIS KIT: SPECIFICATION: NEEDED BUILDING TOOLS: REQUIRED EQUIPMENT:
 Please review this entire manual before beginning assembly. By doing so it will help you better understand each step as you progress in the actual building of your kit, and you will do a better job in
2010 F1D Build (HipPocketAeronautics) replies #90 to #170 F1D Motorstick Construction by Steve Brown
 replies #90 to #170 F1D Motorstick Construction by Steve Brown") F1D Construction Last revised 7/9/2015 MOTOR STICK Please study these resources for building a F1D motor stick. Although some of the techniques we use will be different, these resources provide much helpful
F1D Construction Last revised 7/9/2015 MOTOR STICK Please study these resources for building a F1D motor stick. Although some of the techniques we use will be different, these resources provide much helpful
Cover the wing trailing edge and the aileron leading edge with strapping tape as shown.
 Cover the wing trailing edge and the aileron leading edge with strapping tape as shown. The aileron hinges are done using strapping tape on the top and bottom surfaces of the ailerons as shown. Make sure
Tough warrior. The author's many years of intensive competition are your guarantee of a sturdy, fliable design with all "bugs" eliminated.
 Tough warrior. The author's many years of intensive competition are your guarantee of a sturdy, fliable design with all "bugs" eliminated. LAST month we described the construction of the fuselage and motor
Fokker Dr1 Master Instructions
 Fokker Dr1 Master Instructions Rev 1 Congratulations on your new project. This Dr1 kit is the finest to date. The construction of the plane is similar and exactly like the original. Take your time and
Magpie AP. Aerial Photography Airplane
 Magpie AP Aerial Photography Airplane Magpie Specifications Length: 36in. Wingspan: 54in. Wing Area: 486in 2 Weight (without battery): 19 oz. Thank you for purchasing the Magpie AP. This model is an elevator/rudder
Bob Hildebrand s Kitten. The Kitten. By Bob Hildebrand
 Bob Hildebrand s Kitten The Kitten By Bob Hildebrand HERE S A 100 SQ. IN JOB WITH WAKEFIELD PERFORMANCE AYE there, laddie,,arre ye Scotch we' th' rubberrr? If you are the kind who doesn't appreciate the
High performance 90mm fiberglass jet
 High performance 90mm fiberglass jet Assembly manual For intermediate and advanced fliers only! Specs Wingspan: 1255mm Fuselage length: 1250mm Flying weight: 2600-3000g Wing area: 22.6 dm² Wing loading:
Aerospace Speciality Products
 Specifications:! Length: 18.75"/47.6 cm! Diameter: 0.98"/24.9 mm! Weight: 1.5 oz/44 gm! Streamer Recovery! Recommended Engines:!! A8-3; B4-4; B6-4; C6-5! Skill Level: Beginner This is a model rocket kit
Instruction Manual. Specification:
 Instruction Manual H I G Specification: Wingspan: 133 cm (52.3 inches) Length : 104 cm (40.9 inches) Weight : 1830gr Engine : 25-32 two stroke Radio : 4 channel - 4 servo H W I N G KIT CONTENTS: We have
1/16" Square balsa strip stock is used for the fuselage and tail surfaces structure. 10T 11T 11B (2) 10B. Pec Bea. Wingspan - 18"
 10B. Pec Bea. Wingspan - 18") 1/16" Square balsa strip stock is used for the fuselage and tail surfaces structure. 10T 9T 8 11T 12 7T 6T F-1 7 11 (2) 10 9 6 13 Pec ea CAD Drawing by Paul radley Sheet 1 of 8 Nose plug is a lamination
1/16" Square balsa strip stock is used for the fuselage and tail surfaces structure. 10T 9T 8 11T 12 7T 6T F-1 7 11 (2) 10 9 6 13 Pec ea CAD Drawing by Paul radley Sheet 1 of 8 Nose plug is a lamination
Build this little "Chihuahua" A miniature engine in a little ship... But the combination produces big time performance. by David D.
 Build this little "Chihuahua" A miniature engine in a little ship... But the combination produces big time performance. by David D. Grant Up and Atom! "Chihuahua" has a snappy climb. Small and compact,
Millennium RC presents The New and Improved (now even easier to build and cover!) SSX X-Trainer Build Kit
 SSX X-Trainer Build Kit") Millennium RC presents The New and Improved (now even easier to build and cover!) SSX X-Trainer Build Kit Wing span: Approx. 42 Wing Area: 504 sq. in. Wing Loading: 6.71 oz/ sq. ft. Introduction: The Slow
Millennium RC presents The New and Improved (now even easier to build and cover!) SSX X-Trainer Build Kit Wing span: Approx. 42 Wing Area: 504 sq. in. Wing Loading: 6.71 oz/ sq. ft. Introduction: The Slow
A Flying Grumman Fighter How You Can Build a Model of One of the Latest U.S. Navy Fighters That Is an Excellent Flier By WILLIAM WINTER
 A Flying Grumman Fighter How You Can Build a Model of One of the Latest U.S. Navy Fighters That Is an Excellent Flier By WILLIAM WINTER The completed model is faithful to scale and detail THE Grumman F3F-1
FORWARD FUSELAGE SIDES & REAR TOP SKINS
 FORWARD FUSELAGE SIDES & REAR TOP SKINS WORK REPORT Step No. Check Parts / Tools Qty Preparations. 1 [ ] 6F5-3 Upper Front Longerons 2 2 [ ] 6F5-5 Heel Support 1 3 [ ] 6F5-2 Front Floor Skin 1 3 [ ] Firewall
ALBATROSS by CRASHTESTHOBBY.COM
 ALBATROSS by CRASHTESTHOBBY.COM The Albatross is a unique slow flyer designed to put its nose on the horizon and level its own wings without a pilot. It is very quiet and designed to use inexpensive electronics.
LoLo. A sporty parkflyer with an Old Timer flair! Designed by: Tres Wright Kitted by: Park Scale Models
 LoLo A sporty parkflyer with an Old Timer flair! Designed by: Tres Wright Kitted by: Park Scale Models http://www.parkscalemodels.com/ Assembly Instructions General Information The laser cutting process
Instruction Manual book
 Instruction Manual book ITEM CODE BH53. SPECIFICATION Wingspan : 1,250mm 49.21 in. Length : 930mm 36.61in. Weight : 1.1kg 2.42 Lbs. Parts listing required (not included). Battery: 3 CELLS-LI-POLY-11.1V-2,500
THE DUCK BY LOUIS GARAMI A rubber-powered amphibian.
 THE DUCK BY LOUIS GARAMI A rubber-powered amphibian. The Duck takes off easily from water. The landing gear folds upward for water flying, is locked in place by rubber band. Right-The ship is light but
Pfalz E1 Monoplane 48 EZ Build Version
 Pfalz E1 Monoplane 48 EZ BUILD Pfalz E1 Monoplane 48 EZ Build Version R/C Scale Model Instructions CONTACT INFORMATION Designed by M.K. Bengtson Prototype by Robert Hoffman Manufactured and Distributed
Fokker D8 Master Instructions
 Fokker D8 Master Instructions Rev 1 Congratulations on your new project. The Fokker D8 is a marvellous subject that highlights the success of a monoplane design. The construction of the plane is similar
84 WING SPAN MESSERSCHMITT BF-109
 84 WING SPAN MESSERSCHMITT BF-109 (COPYRIGHT PROTECTED 2014) ALL RIGHTS RESERVED MEISTER 84 ME-109 SIERRA GEAR UPDATE PLEASE NOTE: THE MAIN GEAR MOUNTING PLATE FROM SIERRA IS NOT SQUARE. YOU HAVE TO ROUND
10. Wing prep and subassembly
 Date Section Objective: Construct and fabricate the sub-assemblies of the wing panel. Required Parts: Wing left 11gal PN104-300, Wing right 1gal PN104-400, Wing left 15 gal option PN104-322, Wing right
1. Build the bottom first - make sure your table is flat. Build the entire plane using foam safe CA and kicker. The best technique is to spray kicker
 Wxá zç uç `tçué 1. Build the bottom first - make sure your table is flat. Build the entire plane using foam safe CA and kicker. The best technique is to spray kicker on one part and apply a sparing amount
Note - the nose ribs and are thinner than the main ribs. These nose ribs will use a thinner rib cap than the ribs. This is per design.
 Stabilizer rev 1.2 The SE5a stabilizer is the heartbeat of the tail and is recreated like the full scale version. All tail pieces depend on the stabilizer. It uses the steel fittings, pulleys, inspection
Switchback Sport Builder s Manual
 Switchback Sport Builder s Manual Thank you for purchasing the Switchback Sport. The Switchback Sport has been designed for the novice to intermediate pilot who wants a plane with good performance that
Max Launch Abort System Prod. No *Kevlar is a registered trademark of Dupont
 Flying Model Parts List Max Launch Abort System Prod. No. 3014 A 11820 - Body Tube 3.5 Diam x 5.5" Long B 11824 - Orange Capsule Base Shoulder Ring C 16032 - Laser-cut Ring motor mount rear D 16033 - Laser-cut
HIGH-END TECHNOLOGY. Electric ducted fan Starfighter
 HIGH-END TECHNOLOGY RC Electric ducted fan Starfighter First we want to thank and congratulate you with your decision in buying one of our Kits. The Starfighter puts together very easily so there is not
Tools and Tips: ( 1 )
") Tools and Tips: As you build instructions will show in my many picture manual how to assemble. You can use your own methods as you desire, my results are very good. A smooth, flat work surface is very
Tools and Tips: As you build instructions will show in my many picture manual how to assemble. You can use your own methods as you desire, my results are very good. A smooth, flat work surface is very
Plastic Trainer-19. I have tried to only use materials available from the big box building centers like Home Depot, Rona (Canada) and Lowe s.
 and Lowe s.") Plastic Trainer-19 I have tried to only use materials available from the big box building centers like Home Depot, Rona (Canada) and Lowe s. The picture above shows the prototypes with an original Cox
Plastic Trainer-19 I have tried to only use materials available from the big box building centers like Home Depot, Rona (Canada) and Lowe s. The picture above shows the prototypes with an original Cox
Revolution 3D-mini ARF
 Revolution 3D-mini ARF 1 Included Hardware 4 Dubro Micro Control Horns #DUB848 2.32 x 18" Linkage Wire (Music Wire) 1 1.5 x 1.25 x 1/8 Balsa Ply (for motor mount) 1 5" piece of Velcro (Optional recommended,
Overview. What the event is about Critical takeaways BRIEF overview of rules Resources Building Record Keeping First flights, initial trim
 Basic Wright Stuff By Jeff Anderson MSO Board Member Robocross National Event Supervisor Contributor, flying event rules Ford Motor Company Engineer jander14@ford.com janderson@twmi.rr.com 313-805-6108
A Flying Twin Motor DOUGLAS DB-7 A Realistic Model Bomber. This Is Easy to Build and Fly
 A Flying Twin Motor DOUGLAS DB-7 A Realistic Model Bomber. This Is Easy to Build and Fly By SIDNEY STRUHL A fine flyer; just like the full-size plane Twin motors give a long and steady flight The three-wheel
the wire, less is better. And make sure the bends on each truss wire are in line with the other. See the next photo.
 The following information and photographs are what I did to build the kit. Your methods and needs may differ from this which is fine. There is no right or wrong way if you are used to scratch building.
Stearman PT-17 KIT WARRANTY
 Stearman PT-17 KIT # K-306 Assembly Instructions Version 2 02-17-16 Designed by Tom Herr WARRANTY Sig Manufacturing Co, Inc. guarantees this kit to be free from defects in both material and workmanship
Cardboard Model Buildings
 Cardboard Model Buildings Get more model kits from http://www.modelbuildings.org PRINTING & ASSEMBLY TIPS: These OO designs can easily be resized by reducing the print percentage as follows: OO scale is
1/6 PA-25 PAWNEE. *Specifications are subject to change without notice.*
 1/6 PA-25 PAWNEE INSTRUCTION MANUAL [ A335 Kit ] Wing Span : 72 in / 1830 mm Wing Area : 736 sq in / 47.5 sq dm Flying Weight : 6.6 lbs / 3000 g Fuselage Length : 48 in / 1220 mm Requires : "Glow Power"
Combat plane for Open B Lanier R/C Inc. P.O. Box 458 Oakwood, GA Phone Fax copyright 2003 Lanier R/C
 Combat plane for Open B Lanier R/C Inc. P.O. Box 458 Oakwood, GA. 30566 Phone 770 532 6401 Fax 770 532 2163 copyright 2003 Lanier R/C Important information: Please inspect the plane before beginning to
Falke Build Instructions
 A totally unofficial translation of the Falke Build Instructions The Falke (falcon) mini DLG is produced and marketed by Modellbau Thiele, Germany (www.modellbau-thiele.de), email webmaster@modellbau-thiele.de.
VT-ALLROUNDER V4 1500MM CORO 3/4 Channel Trainer Airplane
 Congratulations on your purchase of the VT- AllRounder 1500MM Trainer Airplane Kit.. Hope these build instructions help you complete the build. Though the build itself doesn't take much time, just be sure
DRAWING KEY FOLD TYPES A B C EDGE BEVEL REFERENCE/ OPTIONAL
 RR Finch B DRAWING KEY FOLD TYPES A B C A - FOLD (ABOVE) B - FOLD (BESIDE) C - FOLD (COVER) LINE TYPE/COLOR SYMBOLS PART NUMBER CUT 50% SCORE CREASE NAME MATERIAL MODEL - VERSION QUANTITY 45 DOUBLE BEVEL