DARK SOULS START INSERT. Assembly Instructions for: k, r g
|
|
|
- Heather Eaton
- 5 years ago
- Views:
Transcription

1 Assembly Instructions for: les e r rk s work more k, r re g ga me DARK SOULS QUICK START INSERT Dark Souls the Board Game is a registered trademark of SteamForged Games Ltd. Any mention of Dark Souls is for reference purposes only. ALL RIGHTS RESERVED by their respective trademark holders. No challenge to any intellectual property rights is intended or implied by


2 General Assembly Instructions The following are basic instructions for any of the Quick Start Inserts: All panels are labeled with an Alphabet letter (A, B, C, etc.). First sort all panels into piles by their letters before you begin to assemble. Layout the parts in the diagrams provided, to ensure you have all the parts Glue only the edges that come into contact with the wood (remove excess immediately) Allow 24 hours to dry before using Tips & Tricks Assembly Supplies Some of the parts might need to be slightly sanded on the edges for a perfect fit. Sometimes tapping the pieces with a small amount of force (with a mallet) helps create a tighter fit. Taping the outside corners of the boxes helps it hold in place while the glue is drying. If you break a part, don t hesitate calling we always carry spares you just need to cover shipping. (most spares can be send in an envelope, if so we don t charge for shipping) Beacon 527 or wood-glue (we recommend supper-glue) Painters blue tape (painter s tape helps protect the finish) Rubber mallet (or something to tap the pieces together) Cotton swap/ Q-tip (or something to wipe the excess glue)
3

4
5 QUICK START INSERT FOR Recommended Assembly Sequence 1. Glue and slide piece into hole at angle shown 2. Slide piece into place perpendicular with short end of main base board 3. Glue and slide piece (red piece) into assembly at angle shown 4. Slide and lightly bend piece to lock into base plate and piece in instruction #1. (Glue areas where wood connects) 5. Glue and insert long divider piece into piece in instruction #4, as well as left side wall Fog Spark Dial Aggro 2. First Activation Traps Condition Tokens
6 QUICK START INSERT FOR Recommended Assembly Sequence 1. Glue and insert thin long pieces into previously assembled section (Glue both ends) 2. Glue and assemble side wall and crater base plate 3. Glue and assemble from and back walls and other side wall 3. Dials Fog Spark Dial Aggro First Activation Traps Condition Tokens 2.
7 QUICK START INSERT FOR Glue Locations: Fog Spark Dial Aggro First Activation Condition Tokens Traps
8 QUICK START INSERT FOR Glue Locations: Dials Fog Spark Dial Aggro First Activation Condition Tokens Traps

9 QUICK START INSERT FOR
10 Enemies Winged Knight Titanite Demon Gargoyle Boreal Outrider Dragon Slayer Executioner Dancer QUICK START INSERT FOR Recommended Assembly Sequence 1. Glue and assemble all side pieces (text faces out.) 2. Optionally glue, and insert, all center dividers 1. 2.
11 QUICK START INSERT FOR Glue Locations: Dancer Dragon Slayer Executioner Boreal Outrider Gargoyle Titanite Demon Winged Knight Enemies
12 QUICK START INSERT FOR Updated Photo Coming
13 QUICK START INSERT FOR Recommended Assembly Sequence 1. Glue and assemble all side pieces to base plate. 1. Enemies
14 QUICK START INSERT FOR Glue Locations: Enemies

15 Updated Photo Coming
16 Recommended Assembly Sequence 1. Glue and assemble all side pieces to base plate. 1. Enemies/ Characters
17 Glue Locations: Enemies/ Characters

18
19 Recommended Assembly Sequence 1. Glue and assemble all side pieces (text faces out.) 2. Optionally glue, and insert, center divider Treasure Deck Encounter Deck
20 Glue Locations: Treasure Deck Encounter Deck

21
22 Recommended Assembly Sequence 1. Glue and assemble enter divider into side walls 2. Glue and assemble side walls and end walls to base plate 3. DO NOT GLUE preasure fit lid 2. Wounds 1. Souls 3. *Do not glue, this lid is preasure fit
23 Glue Locations: Wounds Souls

24
25 Recommended Assembly Sequence 1. Glue and assemble center divider into side walls 2. Glue and assemble side walls and end walls to base plate 3. DO NOT GLUE preasure fit lid 4. Repeat for the three other identical bins Assassin 3. *Do not glue, this lid is preasure fit
26 Glue Locations: Assassin

27
28 Recommended Assembly Sequence 1. Glue and assemble center divider into Base Plate 2. Glue and assemble side walls and end walls to base plate 3. DO NOT GLUE preasure fit lid 2. Gravestones Treasure Chests barrels 1.
29 Glue Locations: Gravestones Treasure Chests barrels
30
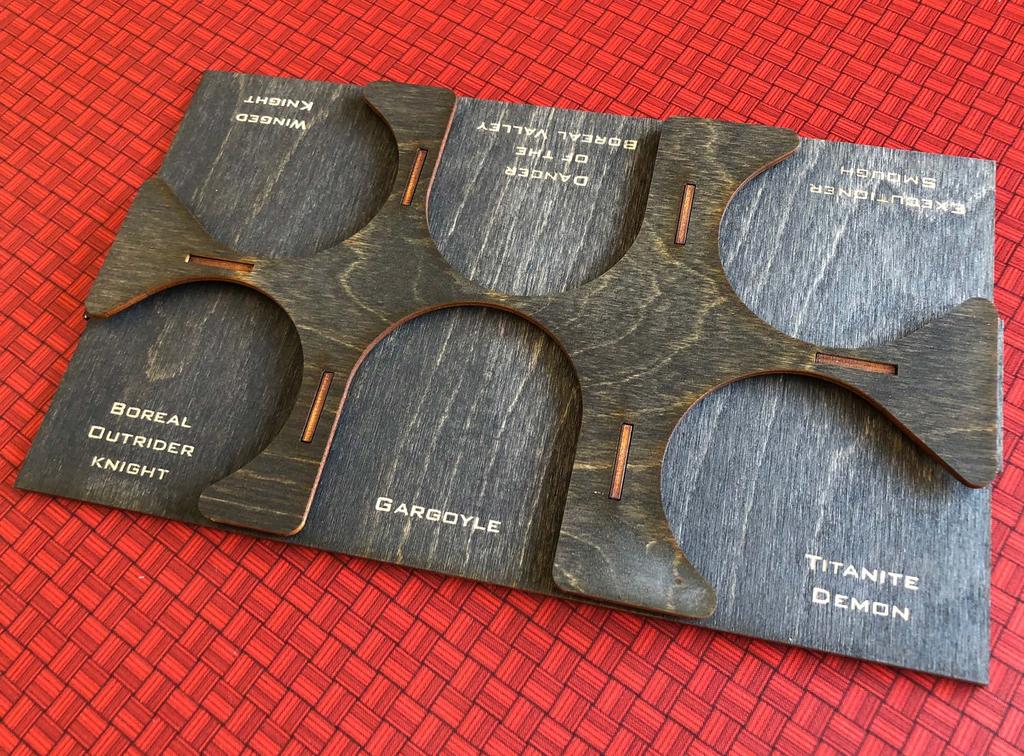
31 Winged Knight Recommended Assembly Sequence 1. Glue and assemble all small pieces into base plate 2. Glue tops of all small pieces and assemble top piece 2. Dancer of the Boreal Valley Executioner Smough 1. Boreal Outrider knight Gargoyle Titanite Demon
32 Winged Knight Glue Locations: Executioner Smough Dancer of the Boreal Valley Boreal Outrider knight Gargoyle Titanite Demon

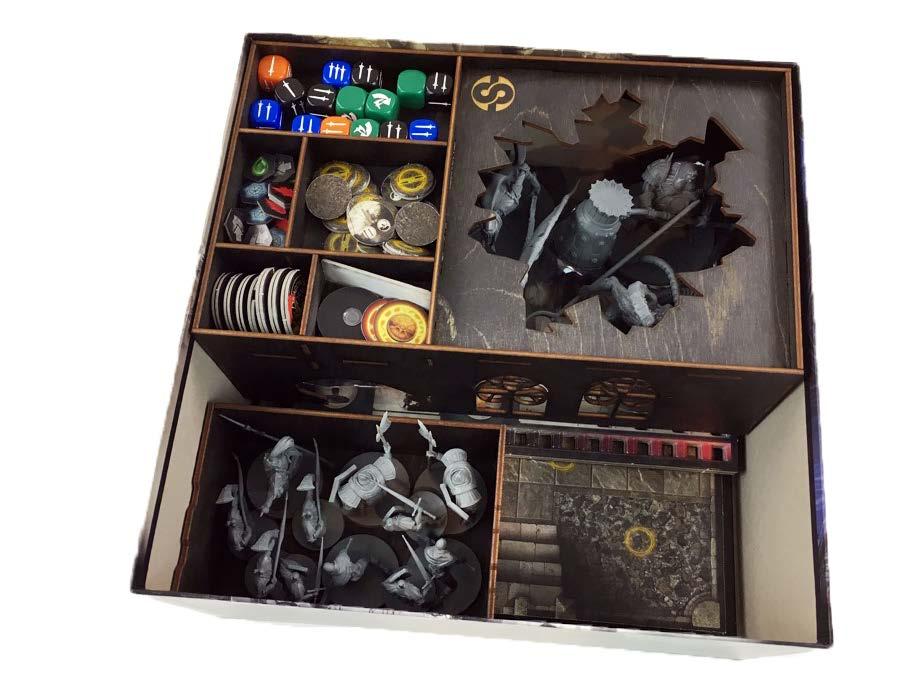
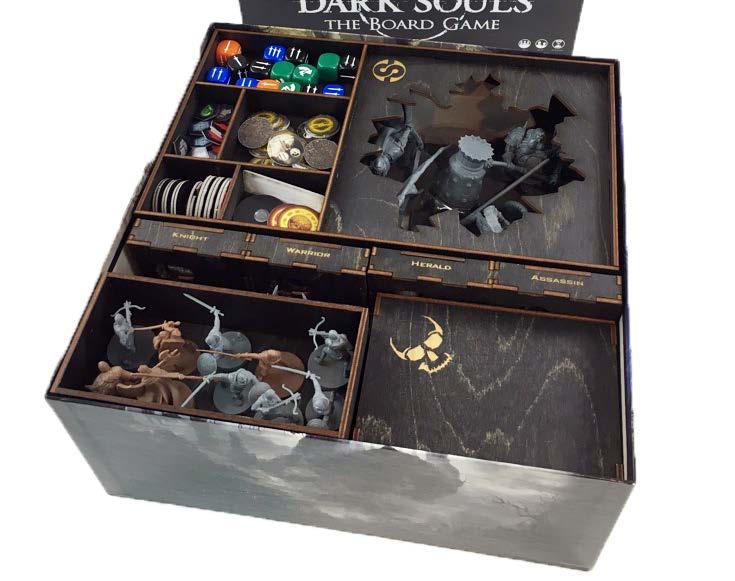

33 Layout in Box
Eldritch Horror Expansion START INSERT. Assembly Instructions for:
 Assembly Instructions for: less work, more game Eldritch Horror Expansion QUICK START INSERT Eldritch Horror is a registered trademark of Fantasy Flight Games. Any mention of Eldritch Horror is for reference
Assembly Instructions to make the box organiser for the board game Perditions Mouth
 Assembly Instructions to make the box organiser for the board game Perditions Mouth With a craft knife and sandpaper, remove the pieces from the sheets of plywood as you do each tray. The pieces are almost
FUSELAGE CONSTRUCTION
 FUSELAGE CONSTRUCTION Note: prior to building and gluing on the work surface use protective covering on your building surface. (wax paper or clear wrap) Fit the laser cut Fuselage Front and Fuselage Rear
Shelf Divider Top Panel. Trim Piece
 Page 1 Shelf Divider Top Panel SCAN FOR ASSEMBLY VIDEO Side Panel Long Shelf Panel Side Panel Bottom Panel Trim Piece Package Contents *Please verify that you have the correct number of parts before proceeding.
Build the. Steam Locomotive. Pack 06
 Build the Steam Locomotive Pack 06 Build the Steam Locomotive Contents Step by step Stage 38: The boiler band Stage 39: Sand spreader pipe main cocks Stage 40: Building up the dome Stage 41: The sand spreader
Laminate Cabinet Installation Instructions
 Laminate Cabinet Installation Instructions www.easygaragestorage.com/installation How To Use These Instructions Thank you for your purchase! Please read each step of this manual thoroughly to ensure proper
Clearview Railing System Installation Instructions
 Clearview Railing System Installation Instructions Disclaimer: AGS Stainless, Inc. has its Clearview Railing Systems designed by a professional engineer to meet the requirements of the latest national
SE5a Instrument Board part 2 - rev 1.1
 SE5a Instrument Board part 2 - rev 1.1 Fuel (Petrol) Valve This valve uses two circular name plates, eight brass screws, one black plastic base, copper wire and two black plastic risers. You can pick any
#11179 Wellington ARBOR
 #11179 Wellington ARBOR Assembly INSTRUCTIONS TOOLS NEEDED Tape Measure Variable Speed Drill with #2 Phillips Bit (recommended) or Phillips Screwdriver Hammer or Mallet ARBOR SIDE PANEL ASSEMBLY (Refer
CMT Enlock Jig Owner s Manual
 Thank you for purchasing the CMT Enlock Jig. This jig will simplify joinery in your shop, and on the job site. Please read the instructions thoroughly before using the Enlock Jig. Router requirements A
Assembly. Insert stem and then fix/lock using the grub screw as in picture.
 Assembly Parts list: (Boxed set) Body inc hinge plate x1 M33 x 3.5 16 tpi + depth stop collar x1 1 stem + collar x1 HSS cutter x1 Bristol handle x1 Twist handle x1 4mm Allen key x1 3mm Allen key x 1 Instruction
THE DIPPING TECHNIQUE
 THE DIPPING TECHNIQUE An Alternative Finishing Technique By B. L. Herm Ely INTRODUCTION: A good finish should excite the senses. When touched with the finger tips, the finish should feel silky smooth.
PROJECT PLAN TOOL CHEST
 BUILD IT WITH ROCKLER PROJECT PLAN TOOL CHEST FEATURING ROCKLER S BUILD QUESTIONS? Go to www.rockler.com or call 800-279-4441 Stock # Item 63420 1/4" x 24" x 30" Baltic Birch Plywood 63446 1/2" x 24" x
steamforged.com/darksouls-expansions-rules
 The Four Kings The Four Kings Now dwellers of the bleak and lonely Abyss, the Four Kings at one time were great leaders amongst men, the rulers of New Londo. As that once-proud kingdom now lies in ruins,
Wooden Faceplates. Tapping on the Lathe
 Wooden Faceplates There are lots of turning jobs where spending some time on set-up makes the turning go quicker and easier. Making Wooden Faceplates is one way to make set-ups and jigs for turning. As
Instructions to build the Hexapod in plywood
 Instructions to build the Hexapod in plywood Author: Jørgen Vendorf Disclaimer The author can in no regards be held responsible for anything regarding this instruction, drawings or anything that goes wrong
Star Bright Chest of Drawers L3938
 Thank you for shopping with GLTC, we hope you enjoy having this product in your home. We know assembling furniture, toys or accessories is not everyone s favourite way to spend their time, so we ve tried
JUNIOR CERTIFICATE 2005 MATERIALS TECHNOLOGY (WOOD) MARKING SCHEME ORDINARY LEVEL SECTION A
 MARKING SCHEME ORDINARY LEVEL SECTION A") JUNIOR CERTIFICATE 2005 MATERIALS TECHNOLOGY (WOOD) MARKING SCHEME ORDINARY LEVEL SECTION A NOTE Please ensure that totals for each question are divided by two before entering marks on marking sheets.
JUNIOR CERTIFICATE 2005 MATERIALS TECHNOLOGY (WOOD) MARKING SCHEME ORDINARY LEVEL SECTION A NOTE Please ensure that totals for each question are divided by two before entering marks on marking sheets.
1104. Clean up the door striker plates with a hand grinder using a wire brush and WD-40.
 Chapter 31 - Misc. Putting VW Back Together (Video Clip 31) 1104. Clean up the door striker plates with a hand grinder using a wire brush and WD-40. 1105. Install both door striker plates on the VW body
Rugged Ridge Engine Transmission Skid Plate JK
 Installation Time: 1-2 Hours Tools Required: Rugged Ridge Engine Transmission Skid Plate 2012-2017 JK Sockets: 16mm, 17mm, 18mm deep well Socket Wrench Wrenches: 16mm, 18mm Torque Wrench Drill ½ Drill
TeacherGeek Launcher Example Build
 LAUNCHER EXAMPLE BUILD TeacherGeek Launcher Example Build TeacherGeek, 2011 LAUNCHER EXAMPLE BUILD TeacherGeek 2 LAUNCHER BASE PARTS A B D F E C G LAUNCHER EXAMPLE BUILD TeacherGeek 3 ASSEMBLING THE LAUNCHER
Print template tiles and put together with clear tape to complete template.
 Print template tiles and put together with clear tape to complete template. Cut each pattern out with scissors or use a razor and strait edge ruler. Use the ruler as a guide for the razor to get nice strait
Package contains. Required tools and consumables:
 Thank you for purchasing the TriTrix MTM Transmission Line cabinet kit. This cabinet kit was precision cut using CNC machinery for the best possible fit and finish. With a little time and patience, your
Masterpiece Module Kits N T-trak Module Kit Assembly Instructions
 Masterpiece Module Kits N T-trak Module Kit Assembly Instructions For tips, watch Instructional Video at http://www.youtube.com/watch?v=fklebffclau Tools Required flat, sturdy work surface Quality grade
Charlotte Dressing Table & Stool Set L4294
 Thank you for shopping with GLTC, we hope you enjoy having this product in your home. We know assembling furniture, toys or accessories is not everyone s favourite way to spend their time, so we ve tried
How to Use Scotch Photo Splits Applicator for Scrapbooking
 How to Use Scotch Photo Splits Applicator for Scrapbooking This is a versatile scrapbooking design can be created for either a boy or a girl infant or toddler by just changing the color scheme of the paper,
Fortress Fe Posts must always be secured to the deck framing. Fortress Fe Posts should never be attached to only the deck boards.
 Installation Instructions for Fortress Horizontal Cable Panel System with UB-05 Brackets and Fe Posts It is the responsibility of the installer to meet all code and safety requirements, and to obtain all
HANDRAIL HEIGHT PER LOCAL CODE AUTORITY
 WITH WOOD END CAPS PLEASE READ PLEASE READ THESE INSTRUCTIONS THOROUGHLY PRIOR TO BEGINNING THE INSTALLATION! 3" [77.3mm] THIS INSTRUCTION SHEET IS INTENDED TO PROVIDE A SPECIFIC GUIDE TO FOLLOW FOR THE
Cook's Corner Kitchen Assembly Instructions
 Assembly Instructions 00 Melissa & Doug, LLC All rights reserved 0 We care about your comments Please call us! -800-84-948 www.melissaanddoug.com PARTS D A E I ( pieces) Q N B F J R ( pieces) S ( pieces)
'Mutiny' Ozone Reactor Kit
 'Mutiny' Ozone Reactor Kit Skill Level: Beginner Tools Required: Scissors or razor blade Other Materials: Teflon tape Time to Build: Approximately 1 hour not including drying time Version: 2012 spray nozzle
Copyright 2010, by Walker Edison Furniture Co., LLC. All rights reserved.
 General Assembly Guidelines I. Insure that all parts and hardware are available before beginning assembly. II. III. IV. Follow each step carefully to insure the proper assembly of this product. Two people
1Smooth pieces 4, 5 and 6, using
 Yamato: Step-by-step 109 Machine-guns, anti-aircraft guns and decking h e f a b c g d e f a Anti-aircraft gun base x 2 b Anti-aircraft gun (bottom) x 2 c Anti-aircraft gun (top) x 2 d Machine-gun base
#11179 Wellington ARBOR
 #11179 Wellington ARBOR Assembly INSTRUCTIONS TOOLS NEEDED Tape Measure Variable Speed Drill with #2 Phillips Bit (recommended) or Phillips Screwdriver Hammer or Mallet ARBOR SIDE PANEL ASSEMBLY (Refer
Figure A. Figure B. Figure C. Figure D
 Xsite 1 Power/Data Tile and Components Tools Required Tape Measure Cordless Drill/Driver #2 Phillips Screw driver bit Rubber Mallet Flat Blade Screwdriver Figure A Hardware Required Provided as shown Installation
Fortress Fe Posts must always be secured to the deck framing. Fortress Fe Posts should never be attached to only the deck boards.
 Installation Instructions for FortressCable H-Series Stair Panels with Simplified Stair Bracket SSB-05 and Fe Posts It is the responsibility of the installer to meet all code and safety requirements, and
ASPEN STYLE. ORNAMENTAL GATE INSTALLATION GUIDE 3 Rails, Pressed Top/Flat Bottom Model No. EGBR5842-N2P
 1 ASPEN STYLE ORNAMENTAL GATE INSTALLATION GUIDE 3 Rails, Pressed Top/Flat Bottom Model No. EGBR5842-N2P INSTALLATION VIDEO AVAILABLE AT: video01.xcelfence.com Item Description Gate installation and assembly
ASPEN STYLE. ORNAMENTAL FENCE INSTALLATION GUIDE 3 Rails, Pressed Top/Flat Bottom Model No. NBR7958-NPF
 1 ASPEN STYLE ORNAMENTAL FENCE INSTALLATION GUIDE 3 Rails, Pressed Top/Flat Bottom Model No. NBR7958-NPF INSTALLATION VIDEO AVAILABLE AT: video01.xcelfence.com Item Description Fence installation and assembly
HANDRAIL HEIGHT PER LOCAL CODE AUTORITY
 WOOD END CAPS PLEASE READ PLEASE READ THESE INSTRUCTIONS THOROUGHLY PRIOR TO BEGINNING THE HRWS-6CSLBW INSTALLATION! 3 1/16" [77.7mm] THIS INSTRUCTION SHEET IS INTENDED TO PROVIDE A SPECIFIC GUIDE TO FOLLOW
Cleaning the cutter blade
 Cleaning the cutter blade < Daily maintenance > In order to use this printer in good condition, please perform the daily maintenance. Note the following when performing the maintenance. Do not lubricate
PROJECT PLANS WOODEN GIFT BOX
 PROJECT PLANS WOODEN GIFT BOX Make the gifts you give even more special by presenting them in this one-of-a-kind gift box. In fact, the box may be valued more than whatever it contains. The box is sized
Photographic Print Finishing and Mounting
 Photographic Print Finishing and Mounting Finishing and Mounting Print Finishing Finishing and mounting (or matting) the photograph is important because it clarifies to viewers your intentions to consider
Page 1 of 18. SunRail System Installation Instructions
 Page 1 of 18 SunRail System Installation Instructions Page 2 of 18 SunRail Stainless Steel Railing Installation Guide Table of Contents Before You Begin 3 Installing Surface Mount Bases for a Two Rail
Sky Eagle. User Guide. Cautionary and Warning Statements
 Sky Eagle User Guide 60089 V0613 Cautionary and Warning Statements This kit is designed and intended for educational purposes only. Use only under the direct supervision of an adult who has read and understood
Pirate Ship. page 1. Instructions
 Pirate Ship page 1 Instructions 1. Use the large square pegboard for your project. If you re using a clear pegboard, slide the actual-size pattern underneath it. Place all the beads for the design. 2.
1. Build the bottom first - make sure your table is flat. Build the entire plane using foam safe CA and kicker. The best technique is to spray kicker
 Wxá zç uç `tçué 1. Build the bottom first - make sure your table is flat. Build the entire plane using foam safe CA and kicker. The best technique is to spray kicker on one part and apply a sparing amount
SHOREMASTER DOCK SECTIONS Instructions and Safety Tips
 SHOREMASTER DOCK SECTIONS Instructions and Safety Tips Infinity RS Infinity TS9 Infinity RS Floating FTS9 PUT SAFETY FIRST To prevent serious personal injury or death, study and fully understand the proper
Poppins Toy Chest. A few important pointers before you start: Please read the instructions right through before you start, and check
 Thank you for shopping with GLTC, we hope you enjoy having this product in your home. We know assembling furniture, toys or accessories is not everyone s favourite way to spend their time, so we ve tried
10 x 10 Flat Top Two Tone Pergola
 0 x 0 Flat Top Two Tone Pergola Models: Bordeaux ASSEMBLY GUIDE OPTIONAL ACCESSORIES Arch Kit System ( Arches) Privacy Fence Panel System ( Panels & Middle Post) Bolt Down Bracket Kit ( for Pergola) Ver.0-00
SAN FELIPE: Step by Step Pack 2
 Pack 2 Your parts Stern reinforcement Bulkheads The poop deck Bulkhead planks Planks Tools and equipment Knife Pencil Wood glue Sandpaper File a Using leftover 5 x 5-mm wooden strips, measure and cut beams
Tools and Tips: ( 1 )
") Tools and Tips: As you build instructions will show in my many picture manual how to assemble. You can use your own methods as you desire, my results are very good. A smooth, flat work surface is very
Tools and Tips: As you build instructions will show in my many picture manual how to assemble. You can use your own methods as you desire, my results are very good. A smooth, flat work surface is very
Assembly Instructions for Busted Bricks Marble Machine #1
 Assembly Instructions for Busted Bricks Marble Machine #1 Ver. 2 instructions Page number 1 Required for assembly: Wood glue (PVA or aliphatic resin recommended) and/or Cyanoacrylate (CA) glue Clamps or
1Take the keel (3) and
 and") 1 The hull and the bridge 1Take the keel (3) and apply PVA wood glue in the second slot from the left: a toothpick may make it easier. Take care: the left end is the one that has a projection. THE HULL
1 The hull and the bridge 1Take the keel (3) and apply PVA wood glue in the second slot from the left: a toothpick may make it easier. Take care: the left end is the one that has a projection. THE HULL
Assembly instructions
 Nerdy Gurdy Assembly instructions This manual describes how to assemble a Nerdy Gurdy. Go to http://www.nerdygurdy.nl for more info about these instruments. Jaap Brand The Netherlands January 2018 General
The Castle House Assembly Instructions By Laser Dollhouse Designs
 The Castle House Assembly Instructions By Laser Dollhouse Designs HOUSE PARTS First floor slots labeled 1A-1G First floor Walls labeled 1A-1G First floor interior door frames (4) Wall 1A frames (6) Main
LANDING GEAR. 1. Fit landing gear into slots on bottom of fuselage.
 LANDING GEAR 1. Fit landing gear into slots on bottom of fuselage. 4. Use channel-lock pliers to press blind nuts into position (note: drilled hole should be slightly smaller than shaft of blind nut for
Getting to Know: Model BL30A. A-Line Series. Baby Lock Consumer Helpline:
 Getting to Know: A-Line Series Model BL30A Baby Lock Consumer Helpline: 800-33-40 www.babylock.com Model BL30A Molly loves her DIY, individual style, and she always encourages you to add your own touch.
PRO 400 M401 MFP M425 CF-280A/X TONER CARTRIDGE REMANUFACTURING INSTRUCTIONS
 HP PRO 400 M401 MFP M425 CF-280A/X TONER CARTRIDGE REMANUFACTURING INSTRUCTIONS HP CF-280A/X TONER CARTRIDGE REMANUFACTURING THE HP LASERJET PRO 400 M401/MFP M425 (CF-280A/X) TONER CARTRIDGE By Mike Josiah
Dropship N1138 SOME KITS HAVE THE FOLLWING MATERIAL:
 Dropship N1138 Please watch the FAQ/Tricks and Tips video BEFORE you start putting this model together on our website under the instructions page http://impudentmortal.com/instructions/ It will answer
FLEXITEEK INSTALLATION INSTRUCTIONS
 an Advanced Plastic Fabrications Company 99 marcus Blvd., 631.244.3620 631.231.4466fax FLEXITEEK INSTALLATION INSTRUCTIONS Before you begin, take your new Flexiteek deck out of the shipping package and
Scissor Stool. Written By: Feitan
 Scissor Stool If the stool is going to be kept indoors simply rub all the pieces with a Minwax WipeOn Poly before assembling the stool. If it is going to go outdoors use Minwax SparUrathane and coat all
Nanton Grain Mill Assembly
 ( 1 ) Nanton Grain Mill Assembly Locate package for assembling storage building. These are cut from 1/8 masonite. Inspect and lightly sand edges where it will be bonded. Use white glue or CA glue to bond.
Fortress Al HOME posts must always be secured to the deck framing. Fortress Al HOME posts should never be attached to only the deck boards.
 Installation Instructions for Fortress Al HOME Traditional Adjustable Panels with Simplified and Al HOME Posts It is the responsibility of the installer to meet all code and safety requirements, and to
PILOT SEAT AND HARNESS
 1. Locate the following parts PILOT SEAT AND HARNESS #84 threading needle, 1 each #88 lacing cord, 1 each #119 aluminum seat, 1 each #120 plywood, pilot seat bottom, 1 each #121 wood screw, 3 each #293
Build the Spitfire: Step-By-step. Pack 3 Stages 21-30
 Pack Stages 2-0 Contents Stage Page Number 2 72-74 22 75-78 2 79-8 24 82-84 25 85-88 26 89-9 27 92-94 28 95-97 29 98-00 0 0-05 Editorial and design by Continuo Creative, 9-4 North Road, London N7 9DP All
Instructions & Parts SM100B SM400 K025S1 K005
 Instructions & Parts SM100B SM400 K025S1 K005 Table of Contents 2 SM100B/SM400 Manual Engraver Machine Diagram Pantograph Operation Setup & Layout Engraving & Changing Cutters Adjusting Depth of Cut &
Metal Aircraft Landing Light Installation Instructions
 Metal Aircraft Landing Light Installation Instructions This landing light kit was designed for the Thorp T-18 as a method of installing a halogen landing light in the leading edge of the outer bay of the
Fortress Fe Posts must always be secured to the deck framing. Fortress Fe Posts should never be attached to only the deck boards.
 Installation Instructions for FortressCable H-Series Cable Panel System With UB-05 Brackets and Fe Posts It is the responsibility of the installer to meet all code and safety requirements, and to obtain
" BASE CABINET
 INSTALLATION GUIDE INSTALLATION GUIDE Before You Begin Installing Your Kitchen Cabinets 1. Read through installation guide to understand all steps and gather tools needed. 2. Verify that all of the hardware,
Item # GUN, 12 PISTOL CABINET WITH STORAGE
 Item # 37-0046 9-GUN, 12 PISTOL CABINET WITH STORAGE Tools Needed For Assembly: Screwdriver Drill Assembly Tips: If you are using an electric screwdriver for assembly, set it at low torque and do not over-tighten
Laney chair. assembly instructions
 Laney chair assembly instructions Smooth & Wrinkle-Free Fabric Covers: In addition to these printed instructions, you may want to watch our beauty tips videos on the customer service page of our website.
STOL CH 701. Layout the cut line along the bend tangent line on the web. 7V6-1 and 7V6-2SP
 Layout the cut line along the bend tangent line on the web. 7V6-1 and 7V6-2SP ORIENTATION: 90 degree flange is up Layout the bend line, 20mm from the end. Ref. bottom right diagram 7-V-6 Use a square to
Model CR146. ArrowAntennas.com Simply the Best. Corner Reflector for 146 MHz. (307)
") 911 E. Fox Farm Rd. #2 Cheyenne, WY 82007 ArrowAntennas.com Simply the Best (307) 222-4712 info@arrowantennas.com Corner Reflector for 146 MHz Guarantee No hassle refund If you are not completely satisfied
911 E. Fox Farm Rd. #2 Cheyenne, WY 82007 ArrowAntennas.com Simply the Best (307) 222-4712 info@arrowantennas.com Corner Reflector for 146 MHz Guarantee No hassle refund If you are not completely satisfied
See pages 5-6 for template and instructions. Gear up with this never land pirate hat and let the swashbuckling begin!
 Treasure crafts Ahoy ye pirates! Here be some super fun pirate crafts for you and your crew! Make all these piratey crafts by printing the pages of this Treasure Crafts kit. You will need: Scissors» Tape»
Installation Guide Acoustic Wall Panel
 Installation Guide Acoustic Wall Panel Contents Preface 2 Adhesive Method 3 Fast Mount Method 4 Adhesive Method 5 Direct Fix Method 6 Magnet Method 7 Preface Wall Preparation Before beginning the installation
ALIEN ENCLOSURES CAMARO AND FIREBIRD Trunk Panel Kit Instructions
 ALIEN ENCLOSURES 67-69 CAMARO AND FIREBIRD Trunk Panel Kit Instructions TYPICAL TOOLS & MATERIALS NEEDED FOR UPHOLSTERY 2 Yards of Main Panel Material 1.5 Yards of Backer Material 3 yards of foam backing
Basic Stenciling Techniques
 Metal Stencil Techniques For each technique you ll need the equipment listed in addition to your stencil and removable tape. To avoid bending your stainless steel stencils, keep them flat at all times.
room the activity room for Toddlers & Preschoolers
 the activity room June s HALLOWEEN Activity Plans Bonus for Toddlers Week of & Activity Preschoolers Plans for Toddlers & Preschoolers H A N D S O N A S W E G R O W. C O M Bonus Week: Supply List Full
MISCELLANEOUS CABINET REPAIRS
 MISCELLANEOUS CABINET REPAIRS 167 168 NOTES MISCELLANEOUS CABINET REPAIRS Cabinet Panel Repairs 175 SIDE PANEL REPLACEMENT - GDM SERIES INSTALLATION INSTRUCTIONS Tools Required 1/8" drill Rivet Tool Silicone
MH60/MH72 DESK HUTCH IMPORTANT!
 MH60/M2 DESK HUTCH IMPORTANT! Assembly may require the assistance of another person. Before you begin assembly: READ THE DIRECTIONS all the way through one time. This will speed up the process and help
I Heart Us. Scrapbooking Workshops Your Way. 3 layouts. (P) = portrait (L) = landscape. Gather photos (15 total) Project 1. Project 2 Project 3
 = portrait (L) = landscape. Gather photos (15 total) Project 1. Project 2 Project 3") Scrapbooking Workshops Your Way I Heart Us 3 layouts (P) = portrait (L) = landscape Gather photos (5 total) 3µ3 3 µ (P) µ µ 6 (L) 5 µ 7 (P) 5 µ 7 (L) Project Project 2 Project 3 3 2 Getting Started: Gather
Scrapbooking Workshops Your Way I Heart Us 3 layouts (P) = portrait (L) = landscape Gather photos (5 total) 3µ3 3 µ (P) µ µ 6 (L) 5 µ 7 (P) 5 µ 7 (L) Project Project 2 Project 3 3 2 Getting Started: Gather
For Barrel Tapers. Installation and Operating Instructions for use with table saws and large disk sanders
 Tim s Taper Tool For Barrel Tapers Installation and Operating Instructions for use with table saws and large disk sanders Your taper tool is capable of making barrel tapered shafts. The term barrel is
Advanced Gothic Dungeon Pieces
 Advanced Gothic Dungeon Pieces Basing Your Dungeon Pieces......1 Construction Guidelines......2 Peak Hall......3 Modular Doorways......4 Modular Gates......5 Stair Piece......6 Stair Room......7 Opening
Kam Aero 43% Extra 300.
 Stab Sheeting Kam Aero 43% Extra 300. Stabs / Elevator: Make your skins using the same method as you did for the fuselage foam parts. The stabs require 8 sheets (4 per stab) of 4 x 48 A grain sheeting.
Mortise & Tenon Routing Procedures
 See Appendix I for complete joint specifications and guide and bit selection FMT PRO CHAPTER 4 Mortise & Tenon Routing Procedures Single Mortise & Tenon, Test Production Procedures Production Procedures
SASKATOON, Saskatchewan
 CONSTRUCTION GUIDE AVRO ARROW (CONTEST VERSION) Copyright, Bill Jones, 2004 SASKATOON, Saskatchewan This is a work in progress, so there are a couple of rough areas ( I ll point out those that I m aware
2017 UPDATED INSTALLATION INSTRUCTIONS
 2017 UPDATED INSTALLATION INSTRUCTIONS with square composite or round metal balusters Manufactured by fiberondecking.com 800.573.8841 Horizon Railing 6 ft. and 8 ft. Installation Instructions Required
Installation Instructions Palladium Wall Panels - Demountable Factory Finished Edges and Field Cut Edges
 Please read all instructions before installing Palladium Wall Panel System. 1. Before installation: a. Acclimate Palladium Panels, reveals, adhesives and wall substrates to room temperature 24 hours before
POST INSTALL INSTRUCTIONS
 POST INSTALL INSTRUCTIONS Layout your deck or patio to optimize the railing sections and posts. Use speed square for placement of post. Important to have blocking below decking and fastened to or through
How-to-Install. Laminate Countertops and Sheet Laminate. FREE brochure Reverso en español
 FREE brochure Reverso en español How-to-Install Laminate Countertops and Easy to install instructions provided inside Multiple colors available for unique design options Durable and easy to care for Accessory
(Toll Free); 7am-7pm Pacific Time, Monday-Saturday. Assembly instructions for: SUN GAZEBO WITH SLIDING DOORS
; 7am-7pm Pacific Time, Monday-Saturday. Assembly instructions for: SUN GAZEBO WITH SLIDING DOORS") 866.332.2403 (Toll Free); 7am-7pm Pacific Time, Monday-Saturday Assembly instructions for: SUN GAZEBO WITH SLIDING DOORS CONTENT OF BOXES QUANTITY DESCRIPTION DRAWING Quantity will vary Window wall panels
866.332.2403 (Toll Free); 7am-7pm Pacific Time, Monday-Saturday Assembly instructions for: SUN GAZEBO WITH SLIDING DOORS CONTENT OF BOXES QUANTITY DESCRIPTION DRAWING Quantity will vary Window wall panels
Windsor Arbor. Parts List: General Information: Tools required: Assembly & installation Instructions
 Windsor Arbor Assembly & installation Instructions Parts List: General Information:» Read through carefully before beginning assembly.» When assembling components, place on a clean, flat, non-abrasive
Construction Guide for Quick Build F-22 Raptor Design by Tomas Hellberg
 Construction Guide for Quick Build F-22 Raptor Design by Tomas Hellberg This kit is very simple to put together. The biggest danger in messing up this kit is gluing the pieces to your work bench. But before
TYPHOON ASSEMBLY AND INSTALLATION INSTRUCTIONS
 TYPHOON ASSEMBLY AND INSTALLATION INSTRUCTIONS CORPORATE HEADQUARTERS WESTERN SALES AND MANUFACTURING PLANT P.O. Box 400 1017 SW Berg Parkway Canby, Oregon 97013 Phone: (503) 266-2231 Fax: (503) 266-4334
Project Skill Level: INTERMEDIATE Plywood Used: CANPLY EXTERIOR Good Two Sides (G2S) or precision sanded Aspen
 or precision sanded Aspen") Project Skill Level: INTERMEDIATE Plywood Used: CANPLY EXTERIOR Good Two Sides (G2S) or precision sanded Aspen MATERIALS LIST: (1) ¾" x 4 ft x 8 ft plywood panel (20) #8 x 2" Robertson or Phillips wood
Project Skill Level: INTERMEDIATE Plywood Used: CANPLY EXTERIOR Good Two Sides (G2S) or precision sanded Aspen MATERIALS LIST: (1) ¾" x 4 ft x 8 ft plywood panel (20) #8 x 2" Robertson or Phillips wood
3Insert the second rod no. 4
 Yamato: Step-by-step 37 The stern block and searchlight control towers a b c d e f Recommended tools and materials Wood glue Sandpaper (no. 800 grain) Metal file Putty Craft knife For metal: Super Glue
PLAYLAND 72 SPIRAL SLIDE 3.5 Posts, 3.5 Posts / 48 Grid and 5 Posts
 PLAYLAND 72 SPIRAL SLIDE 3.5 Posts, 3.5 Posts / 48 Grid and 5 Posts USER GROUP: 2-12 RECOMMENDED CREW: 2 people TOOLS REQUIRED: T-30 TORX tool (supplied by manufacturer) T-45 TORX tool (supplied by manufacturer)
Full Height Diamond bin. Package Contents
 Page 1 Package Contents *Please verify that you have the correct number of parts before proceeding. Depending on the model you purchased, your bundle should contain the following: tools for assembly Required
Tools and Tips: ( 1 )
") Tools and Tips: As you build the book will show in my many picture manual how to assemble. You can use your own methods as you desire, but these worked best for me. A smooth, flat work surface is very
Tools and Tips: As you build the book will show in my many picture manual how to assemble. You can use your own methods as you desire, but these worked best for me. A smooth, flat work surface is very
Dusty Harp Pickup for lever harps
 q P10 for 24 30 string harps q P20 for 32 40 string harps Dusty Harp Pickup for lever harps Installation Kit Contents and Diagram of Pickup A. Pickup Element B. Grommet C. Pickup Harness D. Jack E. F.
How to Install Decklids and Tailbases
 All decklids and tailbases are installed in the same general way. Follow these step by step instructions to hang them the way the pros do. 1. Open the shipping containor and check for any damage to the