Assembly Instructions for Busted Bricks Marble Machine #1
|
|
|
- Beverly Griffin
- 6 years ago
- Views:
Transcription

1 Assembly Instructions for Busted Bricks Marble Machine #1 Ver. 2 instructions Page number 1
2 Required for assembly: Wood glue (PVA or aliphatic resin recommended) and/or Cyanoacrylate (CA) glue Clamps or weights, rubber bands Sandpaper It is recommended that you apply varnish or sealer to the finished marble machine, especially if you live in areas with high humidity. Polyurethane varnish is a good choice. If you manage to drop some of the balls on the floor (inevitable!) then DO NOT be tempted to pick them up with a magnet. This can cause the balls to become magnetised and they will then stick together which will impair the operation of the marble machine. Please note: Before you start assembly it is a good idea to study the pictures in these instruction so you know how it goes together. You can dry assemble the lifter initially. Page number 2


3 Kit contents Page number 3

4 Page number 4

5 Camshaft assembly Use the supplied jigs and 2mm rods to ensure the cams are properly aligned on the 3mm axle. The shorter of the two 3mm axles should be used for the camshaft. The axle should protrude 3mm from the jig at one end as shown below. Layer the cams and spacers with the application of wood glue between each part. Use rubber bands to hold the assembly together while the glue sets. Page number 5


6 Base assembly All the parts can be glued together in one go and the parts held in place with rubber bands while the glue dries. If you don't want the text to be visible, simply turn the part so it face inwards. You will notice that one of the cut-outs on the top of the base is longer than the others. This should face left as shown in the picture below. Frame assembly Use glue sparingly you don't want a lot of glue to go inside the frame as this can interfere with the movement of the steps. Any excess glue can be wiped off with a damp rag. Place 3-4 washers on each end of the camshaft and slide it in place between the frame ends. Check the fit. If there is a lot of play add another washer. It must not feel tight between the frames though. If you are right handed, the short free end of the cranks should face right. If you are left handed it should face left. All pictures show the marble machine assembled for right handed cranking. Page number 6

7 Now glue the front and rear frame pieces in place. The tabs/slot differ in size so you cannot attach them the wrong way round. Next glue the uprights to the base. Hold the frame pieces together with rubber bands while the glue sets. Page number 7


8 Glue the top, front and bottom track supports to the frame Page number 8


9 Steps assembly Each step consists of two parts. Apply wood glue sparingly and assemble the stack using the 2mm rods to ensure good alignment. Be careful you don't get glue on the surfaces that shouldn't be joined! Clamp the parts or wrap with rubber bands and allow the glue to dry. One part is marked. This is so you can identify front from back when you sand the slope into the steps. Once the steps are dry, sand the sides and chamfer the corners slightly. This prevents binding. You may also need to sand the faces that rub together to ensure they do not bind. Use a fine grade sandpaper. The smoother the steps are the better and it is recommended that you apply a light coat of varnish or MDF sealer and rub them down with fine sandpaper when dry. This makes the surfaces smoother. Now it's time to tackle the top of the steps. These need to be at an angle so the balls easily roll from step to step. Wrap sandpaper around a dowel or pen 5-7mm in diameter and sand the top of the steps at approximately a 5-7 degree angle. If you have a Dremel type tool with a small diameter sanding drum use that but be careful not to remove too much material from a step so it cannot reach above the next step up. Place the steps in the frame from time to time and check that they match up. When a lower step is in its top position it should still be a bit taller than the next step up so the ball will roll from step to step. If you accidentally sand off too much then a piece of scrap plywood can be glued to the bottom of the step and you can then proceed to sand the top until it aligns with the other steps. Page number 9


10 If you find you have sanded the steps too thin so they are a very lose fit in the frame you can add a couple of layers of tape to the lower step Page number 10

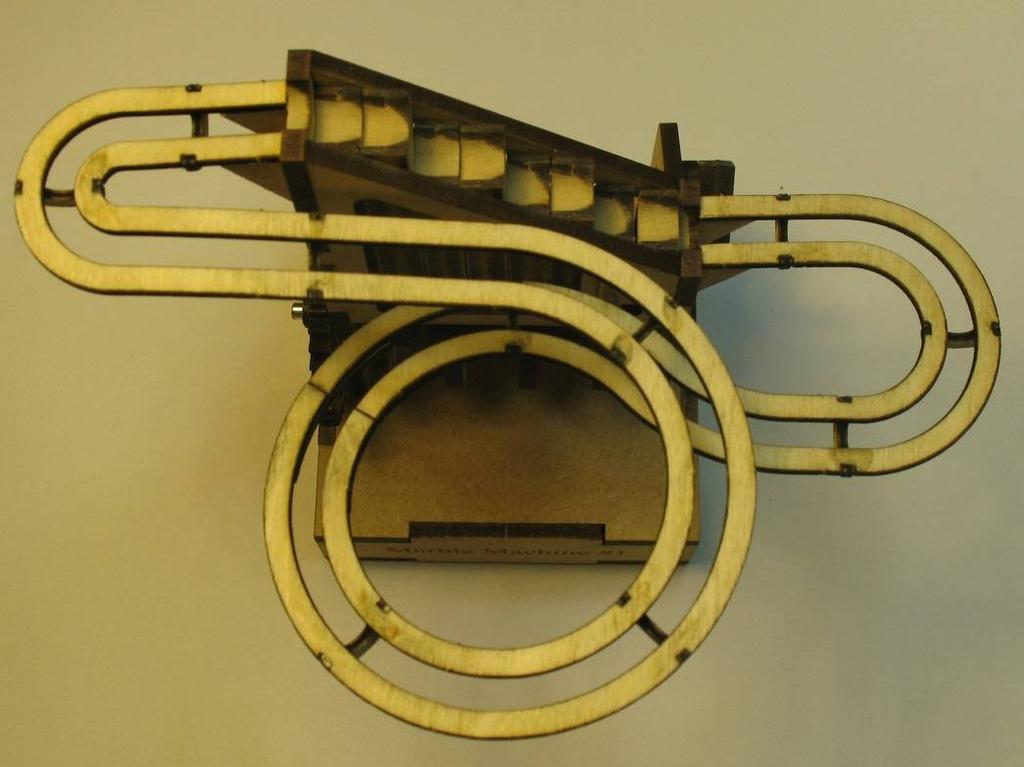
11 Track assembly Do not remove the tracks from the retaining sheet at this stage. They should be left in place until the track joiners are glued in place. However the piece between the tracks should be removed before the track spreaders are fitted. Use a sharp knife to cut the retaining tabs. The track spreaders should be mounted on the opposite side of the side with the O and I engraved. Double check orientation before assembling the track so you don't end up with a track the won't fit on the front of the lifter! Remove the track spreaders from the sheet. Glue them to the tracks with wood glue. A fast way to do this is to put a good sized blob of glue on a scrap piece of paper and then dip the spreaders in the glue before mounting them in the cut outs in the track. Once the glue is completely dry you can carefully cut the tracks free from the sheet. Now you can join the two track halves with the joiners marked O and I. O is for the outside track, I for the inside track. The track section with the tight bend should sit at the top of the lifter frame and the wider bend at the bottom of the lifter frame. This keeps the balls rolling at the right speed so they neither stall nor fly off the track. If you switch to wide-top/narrowbottom (I know sounds funny) then the balls will not roll as intended. It is easiest to first glue the joiners to one section and let the glue dry rather than joining the track sections in one go. Use clamps to hold the parts together or weigh them down while the glue dries. Once the tracks sections are joined, sand the joint so it is smooth and Page number 11


12 level. Protruding edges could cause the balls to come off the track. Page number 12


13 Final assembly The track should be glued to the frame in two stages. If you use CA glue you can simply hold the parts in place while the glue sets. If using wood glue you will need a scrap of MDF and some rubber bands to hold the track in place while the glue dries. Start by glueing the track to the lower track support and the side support. Once dry you can glue the track to the upper track support. When the track is glued in place, sand the tops of the uprights at an angle so the balls run smoothly off the steps and onto the steps. Place a washer on the protruding crankshaft. Fit the large gear and doubler onto the shaft. A tiny drop of CA glue between the gear and doubler will suffice to keep the gear in place on the shaft. Take care not to get glue into the bearing hole. Insert the crank handle shaft Page number 13

. The short 3mm crank handle can be glued in place or left a loose fit.")
14 between the frames and place a washer at each end. Fit the small gear and doubler onto the shaft. The crank arm pieces are glued together and secured on the axle with a drop of CA. Note that there is a double between the frame and the crank arm (there are two doublers in the sheet, one is a spare in case you break one when removing them from the sheet). The short 3mm crank handle can be glued in place or left a loose fit. Place the completed marble machine on a level surface, drop 6-8 balls on the track and crank away to your hearts content! Page number 14

15 Page number 15

16 Page number 16
Assembly instructions for the Simple Marble Machine
 Assembly instructions for the Simple Marble Machine Page number 1 Parts layout Page number 2 Please note: All the assembly can be done with PVA glue. Don't apply it from the bottle or tube but put a blob
Clock 35 - Toyland. Construction instructions for Clock 35
 This clock has been designed for children, it is a stand-alone unit and can be positioned on a shelf or cabinet out of the reach of very young hands who may be tempted to touch. The clock is shown in two
PROJECT PLANS WOODEN GIFT BOX
 PROJECT PLANS WOODEN GIFT BOX Make the gifts you give even more special by presenting them in this one-of-a-kind gift box. In fact, the box may be valued more than whatever it contains. The box is sized
PITTS S2S CONSTRUCTION
 PITTS S2S CONSTRUCTION FUSELAGE CONSTRUCTION 1) Place the right fuselage side over the plan and mark the former positions. Place the left side over the right side and mark the former positions. Glue F1
(Build Instructions)
") (Build Instructions) Specifications * Wingspan: 58cm * Length: 50cm * Flying Weight: 59 grams * Channels: 3 (Rudder Elevator Throttle) * Suggested Receiver: 4Ch Micro * Motor: 8mm GearDrive * Prop: GWS
(Build Instructions) Specifications * Wingspan: 58cm * Length: 50cm * Flying Weight: 59 grams * Channels: 3 (Rudder Elevator Throttle) * Suggested Receiver: 4Ch Micro * Motor: 8mm GearDrive * Prop: GWS
WRIGHT FLYER 1 INSTRUCTIONS FOR THE D10LC KIT
 WRIGHT FLYER 1 INSTRUCTIONS FOR THE D10LC KIT Manufactured in the USA by Easy Built Models PO Box 681744, Prattville, AL 36068-1744 Visit us at www.easybuiltmodels.com Easy Built Models GLUE METHODS Always
Continue gluing the remaining top parts ensuring the angled piece is glued well. Set aside and let dry. See photo below
 Radiator rev 1.1 The SE5a s radiator is one of the most recognized radiators in WW1. It is one of the components that defines the SE5a. The original SE5a has seen multiple radiator designs used during
Obtained from Omarshauntedtrail.com
 DaveintheGrave's Halloween Props Animated Crawling Skeleton Build a life-size skeleton torso that realistically crawls across the lawn one arm at a time. 1. Motor Base and Linkage Assembly BASE - I used
1. Build the bottom first - make sure your table is flat. Build the entire plane using foam safe CA and kicker. The best technique is to spray kicker
 Wxá zç uç `tçué 1. Build the bottom first - make sure your table is flat. Build the entire plane using foam safe CA and kicker. The best technique is to spray kicker on one part and apply a sparing amount
Australian Vintage Radio Society Inc.
 Australian Vintage Radio Society Inc. (Incorporated in Victoria A0050003S) P.O. Box 3099, Syndal L.P.O., Victoria, 3150, Australia. Cabinet assembly instructions for the AVRS 10 th Anniversary construction
General Purpose Flat Wagon
 General Purpose Flat Wagon This is a freelance model of a flat wagon used by any number of railways for transporting large and awkward loads. The kit includes optional load securing rings and a pair of
!! " # $ % & '! ( ) * +, -
 * +, -") !! " # $ % & '! ( ) * +, - North Pegasus This carton contains: (1) Instruction package. Response Curves North Creek Cabinet Handbook North Creek Wiring Guide (2) 6 oz. Rolls of Dacron stuffing. (1) Tube
!! " # $ % & '! ( ) * +, - North Pegasus This carton contains: (1) Instruction package. Response Curves North Creek Cabinet Handbook North Creek Wiring Guide (2) 6 oz. Rolls of Dacron stuffing. (1) Tube
SZD-10 bis CZAPLA ASSEMBLY MANUAL IN PICTURES
 1 RUDDER Plan and parts: 2 Assembly steps: Photo above: glue together rudder spar, ribs and trailing edge. Clamp spar to a flat surface (chipboard on the photo) and make sure the straight aligment of the
The Yike-a-cycle MechaniCard
 Instructions for Assembling The Yike-a-cycle MechaniCard Thank you very much for purchasing the Yike a cycle MechaniCard kit! This is the very first in my series of mailable kinetic sculptures. The parts
How to assemble the Reims Gueux Pit End Modules #005
 How to assemble the Reims Gueux Pit End Modules #005 Depending on which kit you have purchased you will either have a pair of end sections, some centre sections or both. We will describe building of the
Kitchen Step Stool. Premium Plan. In this plan you ll find: America s leading woodworking authority
 America s leading woodworking authority Premium Plan In this plan you ll find: Step-by-step construction instruction. A complete bill of materials. Construction drawings and related photos. Tips to help
Building Tips This model can be built using the following types of adhesives:
 Page 1 Building Tips This model can be built using the following types of adhesives: Epoxy (with or without microballons) Odorless cyanoacrylate (CA) with accelerator UHU Creativ for Styrofoam (or UHU
Desktop Trebuchet Kit Assembly Instructions
 Desktop Trebuchet Kit Assembly Instructions Contents of package (drawings are not to scale for clarity, parts that have duplicates are indicated with total number of that part to be found, example: 2X
Kentucky 4H Wood Science Plans Notebook. Plans Level 1
 Kentucky 4H Wood Science Plans Notebook Plans Level 1 MATERIALS NEEDED: 1 piece wood 3/4" x 2 x 2 1 piece wood 3/4" x 3 x 3 1/2" 1 wooden spring-type clothespin 2-1 1/2" nails 1-1/2 woodscrew Wood Glue
Adjustable Hammered Dulcimer Stand
 Adjustable Hammered Dulcimer Stand Musicmaker s Kits (Hwy 36 behind Joseph s Restaurant) P.O. Box 2117 Stillwater MN 55082 651 439 9120 www.harpkit.com PARTS LIST: 1 Set of Assembly Instructions A. 2 front
Citabria Pro. Aerobatic Parkflyer. by Joel Dirnberger
 Citabria Pro Aerobatic Parkflyer by Joel Dirnberger Revision C: December 21, 2004 Citabria Pro Building Instructions Length: Wingspan: Wing Area: Flying Weight: Wing Loading: Functions: Specifications:
MINI COASTER. Assembly. Instructions LET S GET THIS ROLLING!
 MINI COASTER Assembly Instructions LET S GET THIS ROLLING! At Tinkineer we are constantly working to improve your maker experience. You may observe that the shape of a part differs slightly from how it
Cockpit Kit. Full Depth - Builds Quickly - Light Weight READ THROUGH THIS INSTRUCTION MANUAL FIRST. IT CONTAINS IM- laser cut wood kit
 The Savage Light Sukhoi Su- 27 Cockpit Kit contains everything you need to build a full depth semi scale Su-27 cockpit, yet adds less than an ounce to your finished model s weight (not including pilot).
FUSELAGE CONSTRUCTION
 FUSELAGE CONSTRUCTION Note: prior to building and gluing on the work surface use protective covering on your building surface. (wax paper or clear wrap) Fit the laser cut Fuselage Front and Fuselage Rear
SPUNKY ASSEMBLY MANUAL
 SPUNKY ASSEMBLY MANUAL Please read the tips section at the back of this manual regarding the use of laser cut parts. The proper removal and preparation of these parts is important. When laser cut, some
COMET SENIOR DART REPRODUCTION ASSEMBLY GUIDE
 COMET SENIOR DART REPRODUCTION A RUBBER POWERED 24" WING SPAN MODEL BY PAUL BRADLEY ASSEMBLY GUIDE JANUARY 2018 CHANGES MADE TO THE ORIGINAL The following changes were made to the original Comet kit structural
SASKATOON, Saskatchewan
 CONSTRUCTION GUIDE AVRO ARROW (CONTEST VERSION) Copyright, Bill Jones, 2004 SASKATOON, Saskatchewan This is a work in progress, so there are a couple of rough areas ( I ll point out those that I m aware
C-180 Builder s Manual
 C-180 Builder s Manual. May 20, 2002 Last revised July 11, 2002 Copyright! 2002 Douglas Binder, Mountain Models www.mountainmodels.com sales@mountainmodels.com (719) 630-3186 1 Required Equipment! Xacto
Step by Step Wing Bagging
 Step by Step Wing Bagging By Evan Shaw 073 589 9339 evanevshaw@gmail.com Preparing the Leading Edge 1. Cut cores. (Cutting of wing cores is covered in another article elsewhere) 2. Sand the LE to a nice
3Insert the second rod no. 4
 Yamato: Step-by-step 37 The stern block and searchlight control towers a b c d e f Recommended tools and materials Wood glue Sandpaper (no. 800 grain) Metal file Putty Craft knife For metal: Super Glue
Induku Wooden Models. Orrery. Assembly Instructions
 Induku Wooden Models Orrery Assembly Instructions 2 Thank you for shopping at Induku Design. I hope you enjoy building the Orrery as much as I did making it! For any questions or comments, please contact
Project: Trebuchet Overview: This medieval launcher would reek. Materials: 3/4 plywood, 2 of 5/8 threaded. Minimum Cutting Area: 2 sheets of plywood
 Project: Trebuchet Overview: This medieval launcher would reek havoc on enemies castles. However, the modern day conversion using 20lbs of weight will easily through a tennis ball the length of a gymnasium.
Robert Bosch GmbH. Lounge light fixture
 Lounge light fixture Nice and relaxing Lounge light fixture Light has an important effect on mood. This cool light fixture is perfect for creating a cosy lounge atmosphere. 1 Introduction This cool light
Aerospace Speciality Products
 Specifications:! Length: 18.75"/47.6 cm! Diameter: 0.98"/24.9 mm! Weight: 1.5 oz/44 gm! Streamer Recovery! Recommended Engines:!! A8-3; B4-4; B6-4; C6-5! Skill Level: Beginner This is a model rocket kit
MILL LANE SIDINGS MLS052 Stock Storage Cassette System Kit For Peco Code 80 Flexible Track (not included)
") Parts MILL LAN SIINS MLS052 Stock Storage Cassette System Kit or Peco Code 80 lexible Track (not included) A x1 x2 C x1 x6 x2 x1 x1 Parts and are only required to join two cassettes into one luing The
Parts MILL LAN SIINS MLS052 Stock Storage Cassette System Kit or Peco Code 80 lexible Track (not included) A x1 x2 C x1 x6 x2 x1 x1 Parts and are only required to join two cassettes into one luing The
Build the Spitfire: Step-By-step. Pack 7 Stages 61-71
 Pack 7 Stages 61-71 1 Stage Contents Page Number 61 212-215 62 216-218 63 219-221 64 222-224 65 225-228 66 229-231 67 232-235 68 236-238 69 239-241 70 242-245 71 246-249 Editorial and design by Continuo
Central New York Rocket Team Challenge 2018 Rocket Assembly Instructions
 Central New York Rocket Team Challenge 2018 Rocket Assembly Instructions Note: These instructions vary from those provided by the manufacturer of the rocket kits. There is also considerable varying discussion
How to assemble the Reims Gueux Pit Centre Module #005
 How to assemble the Reims Gueux Pit Centre Module #005 We recommend quick drying super glue for our models. Just a few drops on the joining edges, press and hold them for a few seconds and the connection
The Lansdowne One Car Garage Assembly Instruction by Laser Dollhouse Designs
 The Lansdowne One Car Garage Assembly Instruction by Laser Dollhouse Designs NOTE 1: Please do a dry assembly using only tape to hold house together. This will get you familiar with parts, location, and
Assembly instructions
 Nerdy Gurdy Assembly instructions This manual describes how to assemble a Nerdy Gurdy. Go to http://www.nerdygurdy.nl for more info about these instruments. Jaap Brand The Netherlands January 2018 General
Wind Turbine Experimenter s Kit User Guide
 Wind Turbine Experimenter s Kit User Guide 42284 V0116 Cautionary and Warning Statements This kit is designed and intended for educational purposes only. Use only under the direct supervision of an adult
How To Create An Entertainment Unit
 How To Create An Entertainment Unit Materials required: 2 x Pine Panels - 1800mm x 450mm x 18mm 4 x Pine Panels - 310mm x 450mm x 18mm 1 x Pine Panels - 650mm x 450mm x 18mm 6 x Bun feet (your choice of
INSTRUCTIONS TRAMP STEAMER
 Preparation Once you clear some table space you will need a hobby knife and glue (PVA, wood glue, hobby glue) and a file or small piece of sandpaper to be used for cleaning up any tiny imperfections. It
A Day House. A View of One Way to Finish the Exterior of The Day House. Read these instructions all the way through before beginning this project.
 A Day House A View of One Way to Finish the Exterior of The Day House Read these instructions all the way through before beginning this project. General Comments For the purposes of this project, the standard
ParkJet Builder s Manual
 ParkJet Builder s Manual Thank you for purchasing the ParkJet. The ParkJet is a profile ducted fan airplane that can be flown in a larger park. The ParkJet was initially designed by Scott Stoops and modified
The Original Wing Mailer Care & Operation
 Care & Operation Since its invention in the 1880 s, the hand-operated original has been the mainstay of newspaper mailrooms, the tried-and-true workhorse that can be used on its own or as a back-up for
EXTREME LOAD no. TWO
 1602 - EXTREME LOAD no. TWO Kit Features: 22' 4 " x 14' x 3'-6 Oversize Load 49mm (1.9") actual height Bolt Head Details Welded Load Mounting Fins Painting Handles Tools Required: Hobby Knife Tweezers
NOT ALLOW YOUNG CHILDREN TO PLAY WITH THIS TOY UNSUPERVISED.
 SNAPPING ALLIGATOR This wooden toy is great for parents or grandparents to play with young children. Hold by the tail and move the alligator slowly along with the front wheel slightly off the ground and
Taylorcraft Indoor / Cul-De-Sac Flyer
 Taylorcraft Indoor / Cul-De-Sac Flyer Taylocraft Specifications Wingspan: 28.0 in. Wing Area: 117 sq. in. Weight (Ready to Fly): 3.0 3.1 oz. Wing Loading: 3.7 3.8 oz. / sq. ft. LIABILITY RELEASE In that
The Stirling WarWolf Trebuchet Kit RLT.com Industries Copyright, 2007
 The Stirling WarWolf Trebuchet Kit RLT.com Industries Copyright, 2007 If any part of these instructions are unreadable, you can download a PDF version from http://www.rlt.com/instructions/stirlingwarwolf.pdf
Hobby Lobby Zip Supplementary instructions Please refer to the included drawings while using these assembly instructions
 Materials needed: 15 or 30 minute epoxy Medium CA Masking tape Scotch tape Servo Tape Wax paper Tools Needed: Pencil or marker Flat building surface Hobby knife or razor blade 7/64" or 3mm drill bit 3/16"
Trebuchet Construction Instructions
 Trebuchet Construction Instructions Follow these instructions step by step to create your trebuchet. Materials: Trebuchet Template (6 pages cardstock) Trebuchet Template (1 page paper) One unsharpened
Woodcraft, 210 Wood County Industrial Park, P.O. Box 1686, Parkersburg, WV
 Hancock Wall Clock Assembly Instructions 77A50 07/28/94 Product #C7611X Introduction Before beginning the assembly of your Woodcraft precut clock kit, read these instructions and become familiar with the
TF Model Jet Ranger 700
 TF Model Jet Ranger 700 Assembly Instructions for Jet ranger 700 For Trex 700 E Thank you for purchasing TF Model's 700 Jet Ranger. Please read through this assembly manual carefully before proceeding
Instructables Butcher Block Top
 Instructables Butcher Block Top Project Overview: This project requires basic woodworking skills and access to woodworking machines. Woodworking machines have sharp cutting edges and are NOT forgiving.
Ben Franklin 5&10 Store
 Ben Franklin 5&10 Store RIVER LEAF MODELS, LLC RIVER LEAF MODELS, LLC Thank you for purchasing the Ben Franklin 5&10 structure kit. Your kit includes everything you need to assemble the final product.
The Portable Open Source 3D Printer
 http://web.archive.org/web/201502142011/http://www.tantillus.org/build_3.html Page 1 of 12 captures 12 Oct 12 - Feb 15 The Portable Open Source 3D Printer Home Start Case X/Y Axis Extruder Z Axis Electronics
The Rubley Building Instructions for Assembly of the N scale kit. v1.1
 The Rubley Building Instructions for Assembly of the N scale kit. v1.1 Kit Contents: 197 ea. laser cut 1/16" acrylic parts. 1ea. adhesive backed.020 styrene part. 10 ea..060 x 1" styrene alignment pins.
Gallium 03 Installation Instructions & Parts List
 Gallium 03 Installation Instructions & Parts List Illustration Gallium 03, H1 Handle Left Hand: Open Out 04/05/2016 Revision 1.1 Page 1 of 19 IMPORTANT This shower screen / enclosure must be installed
Designed for Vectric by Michael Tyler
 Project Tutorial Compatible with Current Version of: Featuring compatibility with nearly all CNC Machines Hinged Spoon Rest Designed for Vectric by Michael Tyler It is our pleasure to provide our customers
Contents. Build the Spitfire: Step-By-step
 Pack 2 Stages -20 Contents Stage Page Number 8-0 2 - - 7 8-50 5 5-5 6 5-57 7 58-60 8 6-6 9 6-67 20 68-7 Editorial and design by Continuo Creative, 9- North Road, London N7 9DP All rights reserved 20 De
Instructions for Turning Laminated Bracelets
 Instructions for Turning Laminated Bracelets 1. Start with Design 1. Make a paper template circle for the bracelet. Use this to check the fit on the person you are making the bracelet for. After checking
TOOLS You will need some tools. Mostly, they re tools you probably have around the house, anyway.
 INTRODUCTION Congratulations on your purchase of your RAS Kit. While it can be a great challenge for an inexperienced builder, with care and attention to details, it can produce an excellent instrument
Elastic-powered Bus : Assembly Instructions
 Elastic-powered Bus : Assembly Instructions Assembly Instructions 1. Carefully cut out the parts. 2. Fold along the dotted lines, making mountain or valley folds as indicated. 3. Attach the glue spots
Building Instructions Diva cabin boat
 Building Instructions Diva cabin boat Order no. 3093/00 aero-naut Modellbau Stuttgarterstr. 18-22 D-72766 Reutlingen / Germany http://www.aero-naut.com 1 For pictured building instructions please see the
The Park Hotel Instructions for Assembly of N Scale Kit
 The Park Hotel Instructions for Assembly of N Scale Kit Kit Contents: 198 ea. Laser Cut Acrylic Parts, 2 ea. Chimney Parts Sheets, 1 ea.2".040 styrene rod, 5 ea. Sidewalk Parts, 14 ea. Cast Resin Dormers,
Stearman PT-17 KIT WARRANTY
 Stearman PT-17 KIT # K-306 Assembly Instructions Version 2 02-17-16 Designed by Tom Herr WARRANTY Sig Manufacturing Co, Inc. guarantees this kit to be free from defects in both material and workmanship
136 PLYWOOD DESK 522
 136 PLYWOOD DESK 522 Simple in design and inexpensive, this plywood desk is made from a single 4- x 8-foot panel. Plywood is available with many hardwood veneers; it can also be covered with plastic laminate,
13. Flying controls. The aileron quick-connect system will also be installed and rigged with the wings attached to the cockpit module.
 13. Flying controls This section covers the installation of the pitch and roll control systems into the cockpit module before its bonding into the bottom fuselage moulding. The aileron quick-connect system
Pre-Paint>Fuselage>Empennage>Fit elevator. Objectives of this task: Materials required: Prepare the horizontal stabiliser and the elevator
 Pre-Paint>Fuselage>Empennage>Fit elevator Objectives of this task: To fit the elevator to the horizontal stabiliser, to fit the trim tabs to the elevator and the end caps to the elevator and the horizontal
Safety First! Use eye protection, always! Use ear protection with loud power tools. Stay with children while they work!
 TM TM ART TABLE Safety First! Use eye protection, always! Use ear protection with loud power tools Stay with children while they work! Follow tool manufacturers safety guidelines Page 1 ART TABLE Page
Hotel Belvedere Instructions for Assembly of the HO scale kit. v1.1
 Hotel Belvedere Instructions for Assembly of the HO scale kit. v1.1 Kit Contents: 319 ea. laser cut.090" acrylic parts. 132 ea. laser cut.060" acrylic parts. 8 ea. window glass templates 8 ea. window glazing
ADVANCED ROCKETRY. Page 01. What you will need to build the Quest MEAN GREEN. Parts and exploded view of the Quest MEAN GREEN. Prod No.
 ADANCED Prod No. 5013 * What you will need to build the Quest MEAN GREEN Hobby Knife * Pencil Straight Edge Aliphatic Resin Wood Sanding Sealer & Brush Spray Paint Parts and exploded view of the Quest
the wire, less is better. And make sure the bends on each truss wire are in line with the other. See the next photo.
 The following information and photographs are what I did to build the kit. Your methods and needs may differ from this which is fine. There is no right or wrong way if you are used to scratch building.
Removing Right-Side. Components. Right-Side. Components. Click Here to Go Back AT THIS POINT
 Click Here to Go Back NOTE: There is an oil passage beneath the driven gear/drive gear assembly. This passage should be plugged prior to removing the driven gear and drive gear. Failure to do so could
North London Railway (NLR) Ballast Wagon
 Ballast Wagon") North London Railway (NLR) Ballast Wagon Laser cut kit Gauge 3 (13.5mm scale) Adhesive, buffers, wheels, couplings not included Diagram3d: www.diag3d.com Page 1 Contents Chassis Parts This kit contains
North London Railway (NLR) Ballast Wagon Laser cut kit Gauge 3 (13.5mm scale) Adhesive, buffers, wheels, couplings not included Diagram3d: www.diag3d.com Page 1 Contents Chassis Parts This kit contains
Assembly Instructions
 Assembly Instructions Parts Included: 1 Nose Cone 1 Body Tube 3 1/8 Balsa Fins 1 Thrust Ring 1 Motor Tube 1 Motor Hook 1 Motor Sleeve 2 Centering Rings 1 Launch Lug 1 Kevlar Shock Cord (yellow) 1 Elastic
Making a Cement Upper Molding Surface for Compression Molding of Shape&Roll Prosthetic Foot Cores
 Making a Cement Upper Molding Surface for Compression Molding of Shape&Roll Prosthetic Foot Cores Andrew Hansen, PhD Steven Steer, MS Kerice Tucker Elizabeth Klodd Craig Heckathorne, MS Northwestern University
The Fyfe Building Instructions for Assembly of the N scale kit.
 The Fyfe Building Instructions for Assembly of the N scale kit. Kit Contents: 150 each laser cut 1/16" acrylic parts. 6 each 020 adhesive backed part 6 each column caps 2 each decorative canopy 1 each.125"
woodworkersjournal.com MATERIAL LIST
 MATERIAL LIST T x W x L 1 Legs (2) 1 1 2" x 3 1 2" x 36 7 16" 2 End Uprights (2) 1 1 2" x 3 1 2" x 32 1 2" 3 Stringers (4) 1 1 2" x 3 1 2" x 42" 4 Top Cladding, Long (2) 3/4" x 7 1 4" x 65 3 4" 5 Side
Written By: Brook Drumm
 Simple 1401 Assembly For kits produced between 1/15/14-6/1/14. This guide is for kits with the Fan Shroud. Instructions for metal and wood extruder (and bed) included below. Written By: Brook Drumm TOOLS:
TF Model Jet Ranger 700
 TF Model Jet Ranger 700 Assembly Instructions for Jet ranger 700 For Trex 600 E mechanic Thank you for purchasing TF Model's 700 Jet Ranger. Please read through this assembly manual carefully before proceeding
Cardboard Model Buildings
 Cardboard Model Buildings Get more model kits from http://www.modelbuildings.org PRINTING & ASSEMBLY TIPS: These OO designs can easily be resized by reducing the print percentage as follows: OO scale is
By HARRY BARR... A cute little rubber job that is easy to build and fly. Full-size plans on next two pages.
 By HARRY BARR... A cute little rubber job that is easy to build and fly. Full-size plans on next two pages. "Hangar Rat" owes its existence to the "Sig Parasol," a simple, easy-to-fly, tissue-covered profile
Hudson Dresser [1] Hudson Dresser Published on Ana White ( Submitted by dan-k [2] on Fri, :43 [1]
![Hudson Dresser [1] Hudson Dresser Published on Ana White ( Submitted by dan-k [2] on Fri, :43 [1]](/thumbs/90/102626096.jpg "Hudson Dresser [1] Hudson Dresser Published on Ana White ( Submitted by dan-k [2] on Fri, :43 [1]") [1] Submitted by dan-k [2] on Fri, 2011-03-11 11:43 [1] If you plan on staining this piece, it is recommended that you stain all of the drawer face materials before assembly for a more professional look.
[1] Submitted by dan-k [2] on Fri, 2011-03-11 11:43 [1] If you plan on staining this piece, it is recommended that you stain all of the drawer face materials before assembly for a more professional look.
Metroboard Pulley Replacement Procedure
 Metroboard Pulley Replacement Procedure 1) Remove the two transmission cover screws (1/8 allen driver). Then remove the transmission cover. Note there is a split lock washer and flat washer as well, so
Edge 540 V3 35CC. Scheme A. Item No:L G Specifications. Flying Weight
 Edge 540 V3 35CC Item No:L G035016 Specifications Wing Span Length Wing Area Flying Weight Glow Gasoline Electric Radio Description 76 (1930mm) 74 (1879mm) 1200sq in(77.4sqdm) 9.9 12lbs(4.5 5.5kg) 91 1.20(2C)
Small 45 Roof Houses 1 or 2 Story 1 /24 th Scale Patterns
 BA GARDEN TOWNS 45 Roof Houses 10" x 10" 1 or Story Scaled and easy to read patterns and instructions for wood houses. Yard and Garden Buildings Compatible with Garden Railroads or a delight for any child's
Aliphatic Resin Wood Glue. Launch Lug. Part #10009 Kevlar* Cord. Part #J0053
 ADANCED Prod No. 5014 * What you will need to build the Quest Lil GRUNT Hobby Knife * Pencil Straight Edge Aliphatic Resin Wood Sanding Sealer & Brush Spray Paint Parts and exploded view of the Quest Lil
Wooden Frame Type Instruction Manual
 Wooden Frame TypeInstruction Manual Thank you for selecting our product. Before starting installation, please read this manual thoroughly to ensure correct installation. Please keep this manual at hand
Pro-Doweling Kit USER S MANUAL #840. Visit us at
 Pro-Doweling Kit USER S MANUAL #840 99 Washington Street Melrose, MA 02176 Phone 781-665-1400 Toll Free 1-800-517-8431 Visit us at www.testequipmentdepot.com Please read this manual carefully and thoroughly
Specifications Wingspan: 43cm Flying Weight: 33 grams (with battery) Channels: 3 Suggested Receiver: 4Ch Micro Motor: 7mm Brushed Geardrive
 Channels: 3 Suggested Receiver: 4Ch Micro Motor: 7mm Brushed Geardrive") Specifications Wingspan: 43cm Flying Weight: 33 grams (with battery) Channels: 3 Suggested Receiver: 4Ch Micro Motor: 7mm Brushed Geardrive Airframe Kit (Included Contents) * Airframe Parts Sheets (Depron)
Specifications Wingspan: 43cm Flying Weight: 33 grams (with battery) Channels: 3 Suggested Receiver: 4Ch Micro Motor: 7mm Brushed Geardrive Airframe Kit (Included Contents) * Airframe Parts Sheets (Depron)
Bearing Overhaul Instructions for: Tallboy (.1) 2009
 2009") Bearing Overhaul Instructions for: Tallboy (.1) 2009 Tools Needed: 7900 Removal Tool 7902 Removal Tool 7900/7902/6902 Press Tool Grease Gun (included with frame) (2) ll/16" or adjustable wrenches 9/16"
Bearing Overhaul Instructions for: Tallboy (.1) 2009 Tools Needed: 7900 Removal Tool 7902 Removal Tool 7900/7902/6902 Press Tool Grease Gun (included with frame) (2) ll/16" or adjustable wrenches 9/16"
Making Simple Bookbinding Equipment
 Tony Firman 20 1 2 19 Notes Tony Firman Tony Firman Bookbinding 18 3 : 2012 Tony Firman Bookbinding P.O. Box 507 Haslet, TX 76052 www.tonyfirmanbookbinding.com 4. When all the tapes have been pinned in
BUILDING A STORM DOOR
 BUILDING A STORM DOOR BY NEAL BARRETT Illustrations by George Retseck If you're in the market for a storm door, you probably know that there are many styles and models available. However, most of them
Robert Bosch GmbH. Minimalist washstand
 Minimalist washstand Neat and tidy Minimalist washstand Minimalist design in the bathroom is in fashion. And rightly so, as this washstand proves: because less is more! 1 Introduction Here s an idea to
Post-Paint>Fuselage>Interior>Controls>Fit rudder pedals
 Post-Paint>Fuselage>Interior>Controls>Fit rudder pedals Objectives of this task: To fit the rudder pedals and steering links to the aircraft, and fit the rudder cable to the rudder pedals and set the deflection
AUTOMATIC ADVANCE MANUAL
 AUTOMATIC ADVANCE MANUAL AVL Looms, Inc. 3851 Morrow Lane, Suite #9 Chico, CA 95928-8305 530 893-4915 530 893-1372 fax # info@avlusa.com www.avlusa.com Copyright 2009 TABLE OF CONTENTS Page # I. Parts.........................
HOGNOSE PSALTERY KIT Assembly Instructions
 HOGNOSE PSALTERY KIT Assembly Instructions WOOD PARTS 1 Plywood Top (Soundhold Pre-Cut) 1 Plywood Bottom 2 Pin Blocks 1 Short Side 1 Long Side 1 Bridge 1 Scrap of Plywood HARDWARE 1 L-Handle Tuning Wrench
PRO 400 M401 MFP M425 CF-280A/X TONER CARTRIDGE REMANUFACTURING INSTRUCTIONS
 HP PRO 400 M401 MFP M425 CF-280A/X TONER CARTRIDGE REMANUFACTURING INSTRUCTIONS HP CF-280A/X TONER CARTRIDGE REMANUFACTURING THE HP LASERJET PRO 400 M401/MFP M425 (CF-280A/X) TONER CARTRIDGE By Mike Josiah