Construction Guide for Quick Build F-22 Raptor Design by Tomas Hellberg
|
|
|
- Roderick Charles
- 5 years ago
- Views:
Transcription


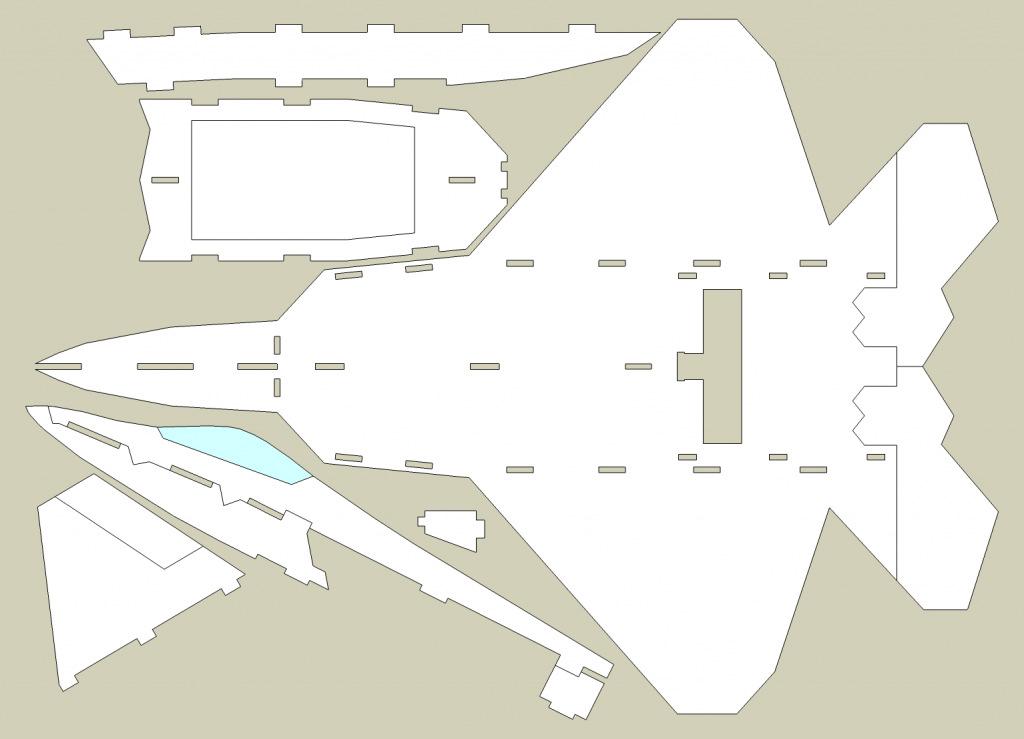
1 Construction Guide for Quick Build F-22 Raptor Design by Tomas Hellberg


2 This kit is very simple to put together. The biggest danger in messing up this kit is gluing the pieces to your work bench. But before you begin, take a couple of minutes to read over this entire construction guide as well as the parts in your kit. It s just a 3D puzzle with all interlocking pieces. Total construction time is about 2 hours and then you can take as much time on your finishing as you want. Glue: We recommend using 5 minute epoxy for gluing in the carbon fiber wing spar and UHU Creativ glue for foam for just about every other joint. But you can use 5 minute epoxy on the entire plane and it really won t make a big difference. For a real quick build, you could even use hot glue on everything but the carbon spar, but we think that is not a great option. One more thing: we recommend you dry build you entire plane using some tape to hold everything together. It lets you see how things fit and lets you plan out your build. Plus, if you are planning on doing any painting, IT MIGHT BE EASIER TO PAINT IT BEFORE YOU PUT IT TOGETHER. Last but not least, we want to thank Tomas Hellberg for giving us permission to kit this awesome design. Now onto the build! in your wing using masking tape or 1. The carbon spar. The carbon spar is painters tape as shown. NOTE: You important because it gives your plane the might have to extend the slot a bit with a needed strength on the wings to sharp hobby knife. withstand all the forces of nature. So take your time on this. Also, this step has a good chance you could glue the wing to your workbench. Don t do this. It won t improve the aerodynamics of your workbench. Use some wax paper, or some extra tape or just be careful. Get your wing out, your 5 minute epoxy, some masking tape and your carbon rod. NOTE: This picture is a different wing, but the process is the same. Then flip the wing over, mask on either side of the slot to prevent excess epoxy from getting all over your wing. Next, figure out which side of the wing will be the top side. Mask over the slot


3 Now, mix up a good amount of epoxy and stir well. The key with epoxy is to really get it mixed well. So mix it like crazy. We recommend using a small cup made of paper or something so you can bend the lip to make like a little spout, but any container will do. Next, and this is important, make sure your rod is NOT in the slot. The picture above shows it in the slot but we were just test fitting the rod. Then pour in the epoxy the length of the slot and even it out within the slot. Insert rod and mash down hard. Wipe away any excess epoxy that oozes out. It helps if you have a good piece of card board or something to use as a squeegee. 2. Front fuselage assembly. Next, we recommend using epoxy for this step too, it makes the rest of the assembly go a little quicker if you have a nice rigid joint here. Mix up a bit of epoxy and spread on one side of the joint and push it together. Make sure here not to glue to the table again. Really, this happens a lot. NOTE: Below is what your airplane should look like. Now remember about gluing your wing to the table? Now is a good time to check if your tape on the bottom blew a hole in it and leaked epoxy all over the place. If so, wipe it up and make sure you don t glue the wing down. Can you tell we have glued our wing down a time or two? Okay, don t wait too long, like 5 minutes and remove your tape. That is pretty much the hardest part, and you are done!


4 3. Next, let s get the canopy and forward lower fuse pieces and connect them. We used UHU Creativ for foam glue for all other joints from this point forward unless noted. Make sure you attach the canopy (big piece) to the top of your wing (as discussed the first steps). Attach the lower and upper piece through the slots. 4. Bottom Fuse. To prepare to mount the bottom fuse piece, first locate the little piece that bridges the gap between the wing and the bottom fuse. Glue into place as pictured. You may want to use epoxy on this small piece, since the motor mount attaches to it. Next, attach the bottom fuse piece. It will not be attached well, as it sort of floats, but make sure it is centered and on straight. Doing this first, makes it easier to attach the intake pieces later. 5. Engine Intakes. Find the two pieces that make up the engine intakes. Now because this is an F-22, and because all the cuts on your kit are at right angles, this part takes a bit of patience, and a little trim work on your part. No big deal. You will need a sharp hobby knife or razor blade. Sharp being the key word. If you insert the intakes pieces into the tabs, you will notice a


5 considerable gap between the edges of the intake pieces and the bottom fuse piece you just attached. This is because the intake pieces angle inward to meet up. In order to allow the pieces to tilt inward, you may have to trim out the slots in the main body/wing of the model. We just trimmed the corner on both sides of the wing to allow the tabs to better tilt inside the slot. See Picture below. This step can take a bit of time, but just take it slow and dry fit each side using some masking tape or pins. Then glue up each side, making sure you glue the intakes sides to both the body/wing and the bottom fuse piece. This is where a contact cement like UHU Creativ comes in handy. some light weight spackle if you want to improve the appearance of the aircraft. 6. Front Intakes: This step is very similar to the side intakes, requiring you to trim a bit to make them angle correctly. 7. Vertical Tails. The F-22 also has angled vertical tails that roughly follow the same angle as the side fuselage pieces you mounted in step 5. If you flip your plane over, you will notice the tabs extend through the top of the slots slightly. Trim or sand as desired. You can fill in any gaps with


6 Insert the tail piece into the slots on the top of your model and again, trim a bit to allow some free movement or just work the foam a bit to achieve an outward angle, matching the angle of the intakes. Glue into place. You may want to use epoxy here as well. It is important to get the tails at the same angle, though if they are a little off, it won t matter much. So don t panic. 9. Hatch construction. This is the part that might take some creativity on your part. The hatch piece can be attached about a million different ways. Velcro, magnets, and good old fashioned duct tape just to name a few. But you will need to use some scrap pieces of foam (included) to let the hatch stay in place. See below. NOTE: Picture is not of your plane, but the process is the same. 10. Motor Mount. In you kit you should have a ply piece and a little foam disk that match up. Go ahead and laminate them together with some epoxy. Then, mount it to the motor area using epoxy. 11. Taileron Prep. You will need to attach your tailerons next. First you will need to bevel the edge so the hinge works properly. See pictures. Using hinge tape (not provided) or some 3M scotch tape, attach the ailerons to the body. You may need to sand these pieces a bit to make sure they do not rub on each other in the middle.

 you can see the beveled gap")


7 Study the pictures below. NOTE: Again, different plane, same process. Here (below) you can see the beveled gap in the taileron to allow for free movement positioned on the bottom of the plane. Servo and control horn mounting. This is all about preference. You can mount your servos pretty much wherever, but we prefer under the wing and right over the CF rod. This gets all the wires inside the box on the plane and makes it easy. 12. Connect up your electronics and paint as desired.
8 Note on finishing. We coated our entire airplane with some Minwax water based polyeurathane. It came in a spray can. We did about 2 coats and it worked great. Then we just used regular spray paint and some masking tape to finish it off. The Minwax protected the foam from the foam eating regular spray paint. It was like a force field in a spray can. The bottom line here is test out your paint on some spare foam or only use foam safe paint. It will melt your airplane if you are not careful. Recommended Set Up. First, what we mean by recommendation. It s what we used and it works well. So you can use a different combo if you like. Also, with just Tailerons, this plane, and all the Quick Builds perform great, but if you really want to increase roll rate, add in some ailerons, just tie them directly to the tailerons and you will be in business. Rocket Motor: Grayson Hobby GH Brushless Motor and 30 AMP ESC Parkjet Combo 3cell 1320 Thunder Power Battery 6 x 4 Prop 2 HS-55 Servos Parkflyer Motor: Scorpion Outrunner 3cell 1320 Thunder Power Battery 7x6 Prop 2 HS-55 Servos Center of Gravity Location is 3.25 rear of the wing break (wing break is shown below)

9 For more information on this model please see the RC Groups discussion thread:
10
Construction Guide for Quick Build MIG-29 Design by Tomas Hellberg
 Construction Guide for Quick Build MIG-29 Design by Tomas Hellberg This kit is very simple to put together. The biggest danger in messing up this kit is gluing the pieces to your work bench. But before
NASTY Build Guide. Supplies needed
 NASTY Build Guide Supplies needed Blucore or Depron Foam. Blucore (Fan Fold Foam) is available at Lowes. Approximately $25 for 50 feet of Blucore. Depron can be ordered on the internet for slightly more.
Parts Identification
 We are excited to introduce the Model Aero Aqua Sport. This is an excellent sport flyer, equally at home flying from grass fields, water, or even snow! The unique V-tail gives the Aqua Sport a distinctive
Revolution 3D-mini ARF
 Revolution 3D-mini ARF 1 Included Hardware 4 Dubro Micro Control Horns #DUB848 2.32 x 18" Linkage Wire (Music Wire) 1 1.5 x 1.25 x 1/8 Balsa Ply (for motor mount) 1 5" piece of Velcro (Optional recommended,
INCLUDED IN THIS KIT: SPECIFICATION: NEEDED BUILDING TOOLS: REQUIRED EQUIPMENT:
 Please review this entire manual before beginning assembly. By doing so it will help you better understand each step as you progress in the actual building of your kit, and you will do a better job in
(Build Instructions)
") (Build Instructions) Specifications * Wingspan: 58cm * Length: 50cm * Flying Weight: 59 grams * Channels: 3 (Rudder Elevator Throttle) * Suggested Receiver: 4Ch Micro * Motor: 8mm GearDrive * Prop: GWS
(Build Instructions) Specifications * Wingspan: 58cm * Length: 50cm * Flying Weight: 59 grams * Channels: 3 (Rudder Elevator Throttle) * Suggested Receiver: 4Ch Micro * Motor: 8mm GearDrive * Prop: GWS
INCLUDED IN THIS KIT: SPECIFICATION: NEEDED BUILDING TOOLS: REQUIRED EQUIPMENT:
 Please review this entire manual before beginning assembly. By doing so it will help you better understand each step as you progress in the actual building of your kit, and you will do a better job in
Building Tips This model can be built using the following types of adhesives:
 Page 1 Building Tips This model can be built using the following types of adhesives: Epoxy (with or without microballons) Odorless cyanoacrylate (CA) with accelerator UHU Creativ for Styrofoam (or UHU
Thank you for your purchase of the Lee Ulinger, FoamtanaS, Yak-55, or Extra 330 3D Depron foam, Aerobatic airplane.
 Thank you for your purchase of the Lee Ulinger, FoamtanaS, Yak-55, or Extra 330 3D Depron foam, Aerobatic airplane. Tools you will need to build Recommended additional items: #11 hobby knife Motor: Hacker
E-AERO EPP PITTS KIT From BP HOBBIES. Parts Included in kit
 E-AERO EPP PITTS KIT From BP HOBBIES Parts Included in kit Thank you for purchasing the BP Hobbies/E-aero EPP Pitts. Please take the time to read through the instruction manual before beginning the build.
ULS Cherokee. Ultra Low Speed aircraft for indoor RC flying. Zippkits. Specifications: Required to complete:
 Zippkits ULS Cherokee Ultra Low Speed aircraft for indoor RC flying. Specifications: Span- 28 inches Wing Area- 151 Sq/In Wing Loading- 3.0 ounces/ft Weight- 3.5 ounces RTF Build time- 1-2 Hours Radio-
Specifications Wingspan: 43cm Flying Weight: 33 grams (with battery) Channels: 3 Suggested Receiver: 4Ch Micro Motor: 7mm Brushed Geardrive
 Channels: 3 Suggested Receiver: 4Ch Micro Motor: 7mm Brushed Geardrive") Specifications Wingspan: 43cm Flying Weight: 33 grams (with battery) Channels: 3 Suggested Receiver: 4Ch Micro Motor: 7mm Brushed Geardrive Airframe Kit (Included Contents) * Airframe Parts Sheets (Depron)
Specifications Wingspan: 43cm Flying Weight: 33 grams (with battery) Channels: 3 Suggested Receiver: 4Ch Micro Motor: 7mm Brushed Geardrive Airframe Kit (Included Contents) * Airframe Parts Sheets (Depron)
Venturi EVO 2 FPV. Thank you for purchasing the Venturi EVO FPV wing
 Thank you for purchasing the Venturi EVO FPV wing The Venturi FPV is designed for First Person Viewing (FPV) and for UAV/Drone experimentation. There is a power system for this model, see the website for
Hobby Lobby Zip Supplementary instructions Please refer to the included drawings while using these assembly instructions
 Materials needed: 15 or 30 minute epoxy Medium CA Masking tape Scotch tape Servo Tape Wax paper Tools Needed: Pencil or marker Flat building surface Hobby knife or razor blade 7/64" or 3mm drill bit 3/16"
SGTalon s Enterprise-A Foamie Build Guide. SGTalon s. Enterprise. Enterprise--A. Assembly Instructions
 SGTalon s Enterprise SGTalon s Enterprise--A Enterprise Assembly Instructions Page 1 4-13-2013 SGTalon s Enterprise *******Recommended Hardware******** 2.6oz 250w Motor and Speed Control with 8x6 prop
1. Build the bottom first - make sure your table is flat. Build the entire plane using foam safe CA and kicker. The best technique is to spray kicker
 Wxá zç uç `tçué 1. Build the bottom first - make sure your table is flat. Build the entire plane using foam safe CA and kicker. The best technique is to spray kicker on one part and apply a sparing amount
SAAB JAS 39 Gripen. Building Instructions Designed by: Steve Shumate. Taken From:
 SAAB JAS 39 Gripen Building Instructions Designed by: Steve Shumate Taken From: http://www.rcgroups.com/forums/showthread.php?t=308830&page=1 Lightly tack glue the paper templates to the foam sheets using
Super Sky Surfer 2000 Assembly Instructions
 Super Sky Surfer 2000 Assembly Instructions Note: Plug and Play version of the Sky Surfer comes with fuselage pre-glued and motor/servos installed. If you wish to route antennas or wires through the tail,
6mmFlyRC.com Super Bandit Assembly Instructions
 Assembly Instructions Start the assembly with forward fuselage. Lay the two fuselage sides down on a flat surface and glue the foam corner doublers to the locations shown on the plans. Make sure to make
INCLUDED IN THIS KIT: SPECIFICATION: NEEDED BUILDING TOOLS: REQUIRED EQUIPMENT:
 Please review this entire manual before beginning assembly. By doing so it will help you better understand each step as you progress in the actual building of your kit, and you will do a better job in
High performance 90mm fiberglass jet
 High performance 90mm fiberglass jet Assembly manual For intermediate and advanced fliers only! Specs Wingspan: 1255mm Fuselage length: 1250mm Flying weight: 2600-3000g Wing area: 22.6 dm² Wing loading:
Citabria Pro. Aerobatic Parkflyer. by Joel Dirnberger
 Citabria Pro Aerobatic Parkflyer by Joel Dirnberger Revision C: December 21, 2004 Citabria Pro Building Instructions Length: Wingspan: Wing Area: Flying Weight: Wing Loading: Functions: Specifications:
uin RC FPRC ZERO Specificationss Empty Weight
 Flying Pengu uin RC FPRC ZERO Specificationss Wing Span 42.75 (1085 mm) Fuselage length 30.5 ( 775 mm) Empty Weight 9.5 10 oz. (150 160g) Estimated Flying Weight 20 255 oz. (320 400g) Wing Area: 151 sq.
Precut Wingola Kit Instructions
 Precut Wingola Kit Instructions Below is the precut option. Battery compartment, Receiver and Servo Trays are cut for mini radio gear. This is the uncut version. It has the placement laid out for the radio,
INCLUDED IN THIS KIT: SPECIFICATION: NEEDED BUILDING TOOLS: REQUIRED EQUIPMENT:
 Please review this entire manual before beginning assembly. By doing so it will help you better understand each step as you progress in the actual building of your kit, and you will do a better job in
Print template tiles and put together with clear tape to complete template.
 Print template tiles and put together with clear tape to complete template. Cut each pattern out with scissors or use a razor and strait edge ruler. Use the ruler as a guide for the razor to get nice strait
I hope you enjoy the Spirit as much as I have. Scott DeTray Model Aero
 We are excited to introduce the Model Aero Spirit. Inspired by the magnificent Northrop Grumman B-2 Spirit Stealth Bomber, the Spirit is a great flyer, on land or water. It tracks like an arrow and is
3D Fun Flyer Build Guide 30 Span
 3D Fun Flyer Build Guide 30 Span Designed by Me_Wantee RC Groups Thread http://www.rcgroups.com/forums/showthread.php?t=659911&pp=25 My Setup Motor Axi 2212/34 Prop 10 x 4.7 Speedie 18A Servos are eflight
HIGH-END TECHNOLOGY. Electric ducted fan Starfighter
 HIGH-END TECHNOLOGY RC Electric ducted fan Starfighter First we want to thank and congratulate you with your decision in buying one of our Kits. The Starfighter puts together very easily so there is not
Taylorcraft Indoor / Cul-De-Sac Flyer
 Taylorcraft Indoor / Cul-De-Sac Flyer Taylocraft Specifications Wingspan: 28.0 in. Wing Area: 117 sq. in. Weight (Ready to Fly): 3.0 3.1 oz. Wing Loading: 3.7 3.8 oz. / sq. ft. LIABILITY RELEASE In that
Millennium RC presents The New and Improved (now even easier to build and cover!) SSX X-Trainer Build Kit
 SSX X-Trainer Build Kit") Millennium RC presents The New and Improved (now even easier to build and cover!) SSX X-Trainer Build Kit Wing span: Approx. 42 Wing Area: 504 sq. in. Wing Loading: 6.71 oz/ sq. ft. Introduction: The Slow
Millennium RC presents The New and Improved (now even easier to build and cover!) SSX X-Trainer Build Kit Wing span: Approx. 42 Wing Area: 504 sq. in. Wing Loading: 6.71 oz/ sq. ft. Introduction: The Slow
FUSELAGE CONSTRUCTION
 FUSELAGE CONSTRUCTION Note: prior to building and gluing on the work surface use protective covering on your building surface. (wax paper or clear wrap) Fit the laser cut Fuselage Front and Fuselage Rear
ParkJet Builder s Manual
 ParkJet Builder s Manual Thank you for purchasing the ParkJet. The ParkJet is a profile ducted fan airplane that can be flown in a larger park. The ParkJet was initially designed by Scott Stoops and modified
RYAN STA SAFETY PRECAUTIONS. "Sport Scale E-Power ARF" For Intermediate and Advanced Fliers. This radio control model is not a toy!
 RYAN STA "Sport Scale E-Power ARF" For Intermediate and Advanced Fliers. SAFETY PRECAUTIONS This radio control model is not a toy! First-time builders should seek advice from people with model building
Eva. Extremely Versatile Airframe
 Eva Extremely Versatile Airframe Eva Specifications Length: 32 Weight (without battery): ~12oz. Revision History Date Revision Notes/Comments 6/3/05 Document initial creation. Thank you for purchasing
Ÿ Battery Strap Ÿ Paper Knife Ÿ Elevon Throw Gauge Ÿ Instructional Manual. Building Tools:
 Congratulations on your purchase of the TuffBirds Spec Racer Flying Wing. We Hope these build instructions will help you complete the build easily. Though the build itself doesn't take much time, just
VT-ALLROUNDER V4 1500MM CORO 3/4 Channel Trainer Airplane
 Congratulations on your purchase of the VT- AllRounder 1500MM Trainer Airplane Kit.. Hope these build instructions help you complete the build. Though the build itself doesn't take much time, just be sure
EPP Rebel Z 35. White Red w/ Blue Orange w/ Blue Orange w/burgundy Other. Specs. Color - Bottom White Black Checkers Silver Checkers Other Checkers
 EPP Rebel Z 35 Specs AUW ~10.0oz Width 35.28 Length 34.67 Wing Area 1.44 sqft Horz Area 2.35 sqft Vert Area.91 sqft
ALBATROSS by CRASHTESTHOBBY.COM
 ALBATROSS by CRASHTESTHOBBY.COM The Albatross is a unique slow flyer designed to put its nose on the horizon and level its own wings without a pilot. It is very quiet and designed to use inexpensive electronics.
28in Super EVA Foam. F-22 Raptor Kit. Specifications. Wingspan: 27.5in (700mm) Length: 38.3in (975mm) Flying Weight: Approx. 1.
 Length: 38.3in (975mm) Flying Weight: Approx. 1.") 28in Super EVA Foam F-22 Raptor Kit Specifications Wingspan: 27.5in (700mm) Length: 38.3in (975mm) Flying Weight: Approx. 1.2lbs (530g) Dear Customer, Congratulations on your purchase of 28in F22 Raptor
28in Super EVA Foam F-22 Raptor Kit Specifications Wingspan: 27.5in (700mm) Length: 38.3in (975mm) Flying Weight: Approx. 1.2lbs (530g) Dear Customer, Congratulations on your purchase of 28in F22 Raptor
Mamba. Combat Wing Glider
 Mamba Combat Wing Glider Congratulations for your purchase of the Mamba radio-controlled combat glider! The Mamba is a very fast and agile glider and yet it can stay up in very light winds when built correctly.
F-16 Falcon 70mm EDF
 F-16 Falcon 70mm EDF Instruction manual Specifications: Winspan: 640 mm Length: 990 mm Weight: 900-1100 gram Ducted fans 70mm x 1 Required tools and components:. 4 ch. Computer Radio system w/ 2 servos.
PITTS S2S CONSTRUCTION
 PITTS S2S CONSTRUCTION FUSELAGE CONSTRUCTION 1) Place the right fuselage side over the plan and mark the former positions. Place the left side over the right side and mark the former positions. Glue F1
Combat Foamie. An electric powered model made from sheet foam for full contact combat matches. Designed by. Plan by Paul Bradley. Jerry W.
 Combat Foamie An electric powered model made from sheet foam for full contact combat matches Designed by Jerry W. Hagood Plan by Paul Bradley July 2010 Combat Foamie Top View 22.9 CG is 7.3 back from nose
T-15 EDF INSTRUCTION MANUAL. Wingspan.31in. Weight..2.5 lb. EDF...70mm 12 Blade ToughJets, LLC Kittery, ME Page 1 of 22.
 TM T-15 EDF INSTRUCTION MANUAL Specifications Wingspan.31in Length..41.75in Wing Area 515 sq in EDF...70mm 12 Blade Weight..2.5 lb Radio...3 channel Motor...Brushless Battery 14.8v 2200mah 40c 2013 ToughJets,
LoLo. A sporty parkflyer with an Old Timer flair! Designed by: Tres Wright Kitted by: Park Scale Models
 LoLo A sporty parkflyer with an Old Timer flair! Designed by: Tres Wright Kitted by: Park Scale Models http://www.parkscalemodels.com/ Assembly Instructions General Information The laser cutting process
1/6 PA-25 PAWNEE. *Specifications are subject to change without notice.*
 1/6 PA-25 PAWNEE INSTRUCTION MANUAL [ A335 Kit ] Wing Span : 72 in / 1830 mm Wing Area : 736 sq in / 47.5 sq dm Flying Weight : 6.6 lbs / 3000 g Fuselage Length : 48 in / 1220 mm Requires : "Glow Power"
DRAFT COPY BUILDING INSTRUCTIONS FOR BLACKBURN BUCCANEER S2 VERSION 1 (BETA BUILD) BY MARK DOUGLAS
 BY MARK DOUGLAS") BUILDING INSTRUCTIONS FOR BLACKBURN BUCCANEER S2 VERSION 1 (BETA BUILD) BY MARK DOUGLAS COPYRIGHT MARK DOUGLAS 2011 THIS IS A "SHORT" KIT FOR EXPERIENCED BUILDERS AND FLYERS ONLY, DESIGNED BY A SHED DWELLING
BUILDING INSTRUCTIONS FOR BLACKBURN BUCCANEER S2 VERSION 1 (BETA BUILD) BY MARK DOUGLAS COPYRIGHT MARK DOUGLAS 2011 THIS IS A "SHORT" KIT FOR EXPERIENCED BUILDERS AND FLYERS ONLY, DESIGNED BY A SHED DWELLING
Building a Giant Scale Electric EINDECKER Part 2
 Building a Giant Scale Electric EINDECKER Part 2 John Bernard N1KUB AMA 58903 IMAA 28971 In Part-1 of this series, we explored the 100 Eindecker kit from SR Batteries and started building the fuselage.
34" PELICAN by CRASH TEST HOBBY
 34" PELICAN by CRASH TEST HOBBY The Pelican is a 34" trainer that can level its own wings and put its nose on the horizon once trimmed and balanced. It can handle more wind than most EZ flying planes in
Sbach 1,2m 3D/aerobatic EPP model Building instructions
 Sbach 1,2m 3D/aerobatic EPP model Building instructions Please refer to the Diagram sheet Diagrams A, B Press 2 carbon strips (1x3x1000 mm) into the grooves in the sides of the fuselage central part (the
Piper Cherokee /3 scale. Construction Manual
 Piper Cherokee 140 1/3 scale Construction Manual STAB CONSTRUCTION 1. Remove foam cores from cradle and place on flat surface. Inspect pieces before you epoxy halves together making sure leading and trailing
FLITZEBOGEN-2 Assembly instructions
 FLITZEBOGEN-2 Assembly instructions Trim the end of the fuselage to the length of 925mm from the nose. Be careful to avoid splitting the carbon fibers. Sand the base of the stab mount in preparation for
Zeon PDF Driver Trial
 Opus retro-fit tray assembly kit Features: CNC machined G10/FR4 fiberglass tray assembly. CNC machined G10/FR4 fiberglass replacement control horns. Milled aluminum servo mount system Servo mount is pre-drilled
Designed in 2005 by Bernard Burton. Assembly manual Bernard Burton DRAFT 1
 Designed in 2005 by Bernard Burton Assembly manual 2005 - Bernard Burton DRAFT 1 The plans can be requested via this link http://www.gundersonaerodesign.com/m12plansreq.htm The laser kit is available here
MiniacRC MIGHTY MINI P40 WARHAWK
 Hand-Cutting and Skins) MiniacRC MIGHTY MINI P40 WARHAWK FliteTest style RC model Build Instructions Make sure that the orientation for molded pieces such as the scoop rings and landing gear housings are
Corvus Racer CC
 Corvus Racer 540 35CC Item No:L-G035008 Specifications Wing Span Length Wing Area Flying Weight Glow Gasoline Electric Radio mm mm 1200sq in (77.4sqdm) 9.9-12lbs(4.5-5.5kg) 91-1.20(2C) 1.10-1.40(4C) 20-40cc
Cover the wing trailing edge and the aileron leading edge with strapping tape as shown.
 Cover the wing trailing edge and the aileron leading edge with strapping tape as shown. The aileron hinges are done using strapping tape on the top and bottom surfaces of the ailerons as shown. Make sure
EPP EAGLE THE RC RAPTOR
 EPP EAGLE THE RC RAPTOR Installation Manual FLYEAGLE2007@GMAIL.COM TM Step 1: Verify that all the EPP Eagle pieces are included in the Kit. Before we start. Step 2: Identify the pieces need to assemble
4. Bevel the LE face of HS1-HS11 to match the horizontal stab leading edge sweep angle.
 BEFORE YOU BUILD 1. Unroll each sheet of the plans. Roll them inside out so that they will lie flat on the building surface. 2. Assemble the tools that you will need to build each section so that they
HIGH-END TECHNOLOGY. Electric ducted fan rafale
 HIGH-END TECHNOLOGY RC Electric ducted fan rafale First we want to thank and congratulate you with your decision in buying one of our Kits. The Rafale puts together very easily so there is not much explanation
ORIGAMI E2. An electric powered model made from sheet foam based on the configuration of a paper glider. Concept and general arrangement by
 ORIGAMI E2 An electric powered model made from sheet foam based on the configuration of a paper glider. Concept and general arrangement by Jack Pignolo Plan by Paul Bradley February 2010 ORIGAMI E2 38
Sirius instruction manual
 Sirius instruction manual Thank you for purchasing the eagle wing plane.the sirius is designed for First-Person-Vision (FPV) application spec ifically. Due to the high wingand push prop design, the on-board
Z II Basic Build Instructions
 Z II Basic Build Instructions Kit Contents: (2) Precision EPOR molded wing panels (2) Custom balsa pieces (trailing edge) (6) Fiber glass reinforcement spars (1) CNC T-6 aluminum motor plate Corrugated
Magpie. Foam Trainer. Magpie Specifications
 Magpie Foam Trainer Magpie Specifications Length: 34in. Wingspan (SF): 46in. Wing Area (SF): 414in 2 Wingspan (SP): 40in. Wing Area (SP): 360in 2 Weight (without battery): 12oz. Thank you for purchasing
Stream NXT - assembly instructions
 Stream NXT - assembly instructions Recommended settings CG (measured from root leading edge): Speed/launch camber (+down, near the wing root): Cruise camber (+down, near the wing root): Thermal camber
DRAWING KEY FOLD TYPES A B C EDGE BEVEL REFERENCE/ OPTIONAL
 RR Finch B DRAWING KEY FOLD TYPES A B C A - FOLD (ABOVE) B - FOLD (BESIDE) C - FOLD (COVER) LINE TYPE/COLOR SYMBOLS PART NUMBER CUT 50% SCORE CREASE NAME MATERIAL MODEL - VERSION QUANTITY 45 DOUBLE BEVEL
Model Aero Aqua Cat, Aqua Cat SE, and Aqua Jet Build Guide
 Model Aero Polaris Model Aero Aqua Cat, Aqua Cat SE, and Aqua Jet Build Guide Note: Aqua Cat SE and Aqua Jet specific instructions are at the end of the build guide. Some photos may depict the Polaris
S.E.5a (Build Instructions)
") S.E.5a (Build Instructions) Specifications Wingspan: 38 cm Length: 31cm Flying Weight: 41 Channels: 3 (Rudder Elevator Throttle) Suggested Receiver: 3Ch Brick Motor: 7mm Geared Motor Airframe Only Kit
S.E.5a (Build Instructions) Specifications Wingspan: 38 cm Length: 31cm Flying Weight: 41 Channels: 3 (Rudder Elevator Throttle) Suggested Receiver: 3Ch Brick Motor: 7mm Geared Motor Airframe Only Kit
SwitchBack Senior. SwitchBack Senior Specifications
 SwitchBack Senior SwitchBack Senior Specifications Wingspan: 55.4 in. Length: 41 in. Wing Area: 597 sq. in. Weight (Ready to Fly): 34 to 37 oz. Wing Loading: 8.2 to 8.9 oz. / sq. ft. Version 1.05, March
Designed by Steve Shumate Adapted from the North Star design by Laddie Mikulasko
 Model Aero Polaris Specifications: Designed by Steve Shumate Adapted from the North Star design by Laddie Mikulasko Wing area: 343 sq in Span: 29.0" Length: 38.4" Weight RTF: 18 to 22 oz (prototype weighed
Wing. Gently bend the top of the wing over. With the paper removed, it should produce a nice curve.
 Fuselage Remove the paper in the four areas shown. Basically, from the trailing edge of the canard forward in the three nose segments and on the rear bottom of the fuse. Normal B fold for the sides but
35 Magnum. Instruction Manual
 EPP EPP 35 35 Magnum Rebel Z Instruction Manual This is how your kit will arrive When cutting the hardware package open use caution. The contents are semi-coiled to fit in the box. They will spring open
WRIGHT FLYER 1 INSTRUCTIONS FOR THE D10LC KIT
 WRIGHT FLYER 1 INSTRUCTIONS FOR THE D10LC KIT Manufactured in the USA by Easy Built Models PO Box 681744, Prattville, AL 36068-1744 Visit us at www.easybuiltmodels.com Easy Built Models GLUE METHODS Always
Required Tools: Hobby Knife (# M917) Philips #1 Screwdriver Sanding Block (150grit) Pliers/Wire Cutters
 Philips #1 Screwdriver Sanding Block (150grit) Pliers/Wire Cutters") Thanks for choosing the Combat Wings - XE2 as your next or first model airplane. The XE2 s wings are made from 100% EPP (expanded polypropylene) foam which is extremely durable. For this reason, the XE2
Thanks for choosing the Combat Wings - XE2 as your next or first model airplane. The XE2 s wings are made from 100% EPP (expanded polypropylene) foam which is extremely durable. For this reason, the XE2
MOUNTAIN MODELS P-51 Mustang. 1/12 Scale Electric Park Flyer. Copyright Mountain Models
 1 MOUNTAIN MODELS www.mountainmodels.com P-51 Mustang 1/12 Scale Electric Park Flyer Wingspan: 37, Wing Area: 254 sq. in., Weight: 15 to 19.5 oz Instructions Version 1.4, May 23, 2007 Kit Contents: 2 1.
White Red w/ Blue Orange w/ Blue Burgundy w/ Orange Other
 Specs AUW ~6.5oz Width 32.875 Length 29.50 Wing Area 1.35 sqft Horz Area 2.22 sqft Vert Area 1.26 sqft Suggested Hardware ~25g 90 watt Motor 12 amp ESC Servos 6g+ (4) 2s LiPo (300-500mAh) 4ch Radio/Rx
Corvus Racer Colour schemes. AeroPlus RC Copyright 2013 All Rights Reserved
 Corvus Racer 540 59 Item No:A E050003 Specifications WING SPAN: 59"(1500mm) LENGTH: 54.1"(1374mm) WING AREA: 654sq.in.(42.2sq.dm.) FLYING WEIGHT: 4.6 5.3lbs(2000 2300g) Electric:Brushless outrunner 8Oz.
Sky Eagle. User Guide. Cautionary and Warning Statements
 Sky Eagle User Guide 60089 V0613 Cautionary and Warning Statements This kit is designed and intended for educational purposes only. Use only under the direct supervision of an adult who has read and understood
43in EPP Acrocub Instruction Manual
 43in EPP Acrocub Instruction Manual Specifications Wingspan: 43.3in (1100mm) Length: 41.3in (1050mm) Flying Weight: Approx. 1.5lb (670g) Dear Customer, Congratulations on your purchase of 43in EPP Acrocub
Cobra X Q Construction Tips Construction: Bel y pan
 Cobra X Q Construction Tips : The white plastic in this kit is high impact styrene. It can be painted with most types of coatings if light coats are applied this is necessary due to the thickness of the
A Piaggio-inspired park flyer
 Clark Salisbury's SkyTwin A Piaggio-inspired park flyer B efore I discuss building the SkyTwin, I should explain my reasons for designing, building, and flying such an aircraft. I have always been fascinated
32 Crack Yak-55. Twisted Hobbys Specifications. Rev: v004a 1
 32 Crack Yak-55 By RC Factory Specifications Wing span 32 / Length 31 AUW 160-175g (with Landing Gear) 50-70w outrunner motor (19g 24g) 6-12 amp ESC / 2s 360 450mAh battery 4 ch radio / 2x 4g servos /
Kam Aero 43% Extra 300.
 Stab Sheeting Kam Aero 43% Extra 300. Stabs / Elevator: Make your skins using the same method as you did for the fuselage foam parts. The stabs require 8 sheets (4 per stab) of 4 x 48 A grain sheeting.
Kodo build guide 1.4
 Kodo build guide 1.4 Please do not share files that you bought Development of a new plane and support of the old ones is very time consuming. Only with your help I can focus fully on this project and spend
JTM 90mm EDF Viper Jet Installation Manual
 JTM 90mm EDF Viper Jet Installation Manual Provided by ERJets www.erjets.com 1 Disclaimer: Welcome onboard! This radio controlled jet is not a toy. It has the capability of flying in high speed and therefore
Instruction manual. ALOUETTE 3 For 600 size
 Instruction manual ALOUETTE 3 For 600 size Dear customer, Thank you for purchasing a Smartmodel fuselage All our team wishes you a lot of fun for building and good flights. For 600 size or 50 Nitro power
The BIPE NX Assembly Manual
 The BIPE NX Assembly Manual Specifications Wing Span: 34 inches Wing Area: 550 in 2 Fuselage Length: 36 inches Weight (ready to fly): 20 to 24 oz. Wing Loading: 5.2 to 6.3 oz/ft 2 Designed by Jim Vigani
JAE Mini Sprint. Fast Electric Outrigger. A Zippkits R/C Boat. Building Instructions
 Z I P P M A N U FA C T U R I N G JAE Mini Sprint Fast Electric Outrigger A Zippkits R/C Boat Building Instructions 2011 Zipp Manufacturing - Frankfort, New York 13340 www.zippkits.com Toll Free (866) 922-ZIPP
LANDING GEAR. 1. Fit landing gear into slots on bottom of fuselage.
 LANDING GEAR 1. Fit landing gear into slots on bottom of fuselage. 4. Use channel-lock pliers to press blind nuts into position (note: drilled hole should be slightly smaller than shaft of blind nut for
Assembly Manual / Airframe 65 Vyper SAFETY in Assembly SAFETY in Flying
 1 Assembly Manual / Airframe 65 Vyper Thank you for purchasing this 3DHobbyShop ARF RC aircraft. If you have any issues, questions, concerns or problems during assembly, please contact our tech department
TWEETY 25 INSTRUCTION MANUAL. Almost Ready to Fly Nitro/Electric Aerobat FEATURES SPECIFICATIONS
 TWEETY 25 Almost Ready to Fly Nitro/Electric Aerobat INSTRUCTION MANUAL SPECIFICATIONS FEATURES WINGSPAN: 45.7 (1160mm) LENGTH: 38.6 (980mm) WING AREA: 370 sq in(24 sq dm) FLYING WEIGHT: Approx. 3.3 lbs
C-180 Builder s Manual
 C-180 Builder s Manual. May 20, 2002 Last revised July 11, 2002 Copyright! 2002 Douglas Binder, Mountain Models www.mountainmodels.com sales@mountainmodels.com (719) 630-3186 1 Required Equipment! Xacto
Cheeper Assembly instruction
 1. Equipment, materials and tools for assembly.......2 2. Assembly.....3 3. Setting of the model.....11 1. Equipment, materials and tools for assembly 1 Wing; 2 Fuselage; 3 Stabilizer; 4 Fin; 5 Dowel for
第 4 页, 共 17 页. 3. Epoxy the wood block to the servo tray base on the mark line. Accessory part lists for wing installation.
 第 1 页, 共 17 页 第 2 页, 共 17 页 第 3 页, 共 17 页 Accessory part lists for wing installation. 3. Epoxy the wood block to the servo tray base on the mark line. 1. Ready for assemble the wing servos. 4. Epoxy the
Preliminary pilot information
 Recommended RC-components: Preliminary pilot information RC-component suggestions for Freestyler 3, V-tail version FLAPS AILERONS V-tail receiver battery low-cost HS85 MG HS85 MG HS81 MG SMC 14 4 x AA
This pictorial document contains assembly recommendations including some fit and finish details that will be helpful when building this airplane
 This pictorial document contains assembly recommendations including some fit and finish details that will be helpful when building this airplane Problems found with this kit and a flight performance review
MercurE Mini Old Timer Electric Model
 MercurE Mini Old Timer Electric Model MercurE Specifications Wingspan: 31.6 in. Length: 20.6 in. Wing Area: 153 sq. in. Weight (Ready to Fly): 4.9 to 5.4 oz. Wing Loading: 4.6 5.1 oz. / sq. ft. Version
FOKKER D.VII 1:7.4. No.EP-46K. MTH HOBBY PRODUCTS INDUSTRIAL CO., LTD. MTH HOBBY 2015
 No.EP-46K FOKKER D.VII 1:7.4 MTH HOBBY PRODUCTS INDUSTRIAL CO., LTD. www.mth.com.tw mthhobby@mth.com.tw MTH HOBBY 2015 SPECIFICATION: Wing span: 1200mm Wing area: 41 dm Length: 990mm Weight: 1400g, including
LANIER Dominator INSTRUCTIONS
 ADDITIONAL EQUIPMENT NEEDED TO COMPLETE YOUR DOMINATOR 500 General 3.2 to 4.2 Size two stroke R/C engine, muffler, and engine mount Gas or glow fuel line Minimum of 4 channel radio set required (4-5) 70