Contest Field Border Construction Manual
|
|
|
- Timothy Simpson
- 5 years ago
- Views:
Transcription

1 Contest Field Border Construction Manual
2 TABLE OF CONTENTS Section 1 Field Construction...3 Section 2 Bill of Materials 3 Section 3 Construction.. 4 Step 1 - Layout...4 Step 2 - Bottom...4 Step 3 1 st Sidewall...5 Step 4 2 nd Sidewall...5 Step 5 Corner Braces...6 Step 6 Remaining Sidewalls...6 Step 7 Center Wall...6 Step 8 Mats...6 Larger Pictures...8 Revision History
3 Section 1 Field Construction The field used in the Code 3 competition is a fairly simple frame designed to keep robots from leaving the field of play, providing a physical alignment barrier that can be used by the robot, providing game-specific facilities, and ensuring a consistent field surface under the competition mat. The field is a required element in this year s game. The field is composed of standard components that can be purchased at any Lowe s or Home Depot home improvement stores. These components DO NOT REQUIRE ANY CUTTING, so if a table saw or similar tool is used to build the field then it is most likely not going to be correct. Please read the ENTIRE instructions before starting. Section 2 Bill of Materials Here is a list of items you will need to purchase: Quantity Part Dimensions Length Notes 1 3/4" birch plywood sheet 4'x8' -- Birch is required as it provides a smooth, straight surface and the plywood has exact dimensions. 6 lumber 1"x6" 4' Actual size: 0.75" x 5.5", 4 feet long 2 lumber 1"x6" 8' Actual size: 0.75" x 5.5", 8 feet long 1 lumber 1"x4" 4' Actual size: 0.75" x 3.5", 4 feet long 8 corner braces 2" -- Usually come in a pack of 4 with 3/4" long screws (so 2 packs needed total) 50 wood screws #10 1 1/4" Get screws and countersink bits to match. 1 countersink w/ bit tool Countersink tools with drill bits can countersink AND drill pilot holes. Necessary for this project. It is important to purchase a countersink tool for this project; we will be drilling into the bottom and sides of wood, and we do not want to scratch furniture with protruding screws. You can buy countersink bits with drill bits also attached to them, which makes the process of drilling a countersink and a pilot hole one easy step. The countersink drill bit is about $5, and comes in multiple bit sizes if you purchase #10 wood screws, you need a #10 countersink bit. #10 wood screws are the recommended size screws, but any size you can get between #6 and #12 will do. 3
.")

4 Corner braces are another important item. It will be assumed that the corner braces will come with their own screws, no more than 3/4 in length. I purchased Home-Depot brand corner braces, (EverBilt 2 corner braces, 4 pieces per pack). It really doesn t matter what corner braces you purchase, so long as they re strong we use the corner braces for additional support for the walls and that the screws used do not protrude from the wood on the other side. Section 3 Construction Building the field structure can be performed in a couple easy steps: Step 1 - Lay out the 3/4 birch plywood with a smooth side facing down. On the top of the plywood, place four 1 x6 x4 lumber boards lengthwise so that the 4 length of the lumber spans the 4 length of the plywood. Two of these boards should be placed on the ends of the 8 span of the plywood, and the remaining two should be placed 24.5 apart from those. This will create a 25 gap in the center of the board. These boards will be used later to mount the walls of the frame to the boards. It is important to place the end lumber boards flush with the 3 sides of the plywood that they share, and it is also important that the boards be placed as straight as possible. It would be advisable to use simple clamps to hold the wood in place, as the next step may get messy of they aren t secured in place. Step 2 -Drill countersink/pilot holes in the wood BEFORE drilling the screws into the wood. If you do not drill pilot holes FIRST, the wood may crack and/or split. Two screws should be placed 2 into each lumber board, 1.5 from the side of the board. This should be duplicated on both sides of the board. 2 additional screws should be put 24 into the board, 1.5 from the sides. Additional screws may be placed as desired, so long as the screws are placed in one-inch multiples (no half-inch measurements). Perform the same actions on all 4 boards. These will serve as the feet for the board, and will also act as 4


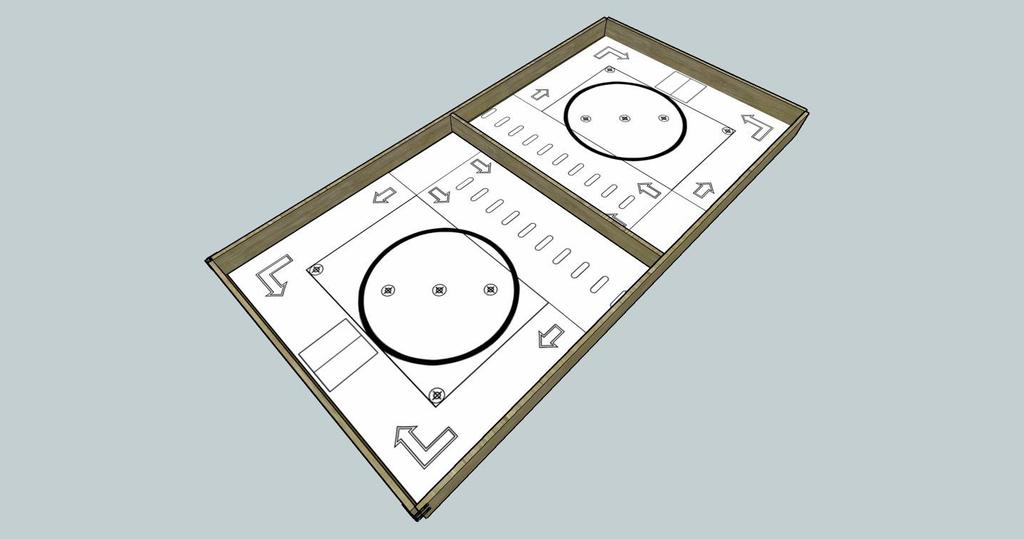
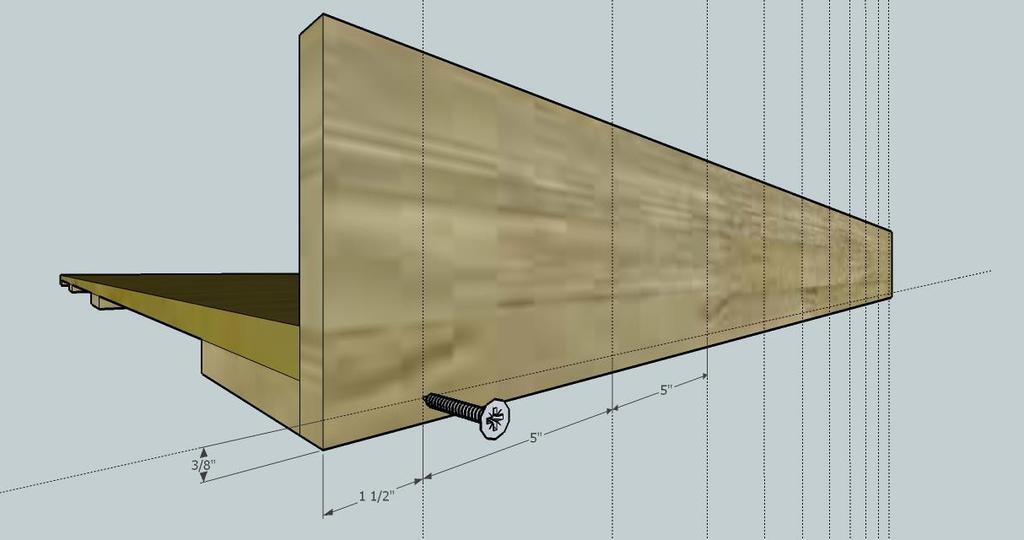
5 the mounting surface for the walls (you NEVER want to screw into the side of plywood, as the ply will separate and damage the plywood). This is where the board clamps will come in handy; as you re drilling countersink/pilot holes it s easy to bump the lumber boards and throw the pilot hole alignment out of whack. Step 3 - Flip the plywood board over, and mount the first 4 side wall. You want to mount a 4 1 x6 board to the side of the `feet you created in the previous two steps. Remember, it is NOT WISE to drill into the side of plywood, so only drill into the side of the lumber boards we mounted to the underside of the plywood. You want to drill pilot holes 3/8 from the bottom of the board, and in intervals starting at 1.5 into the board then continuing in 5 inch increments. In the image, only the first screw is shown, and screws should be placed at each guide line increment (10 total in this step). Note that the side-wall board will be completely flush up against the 4 side of the plywood, and flush to the bottom of the lumber foot of the board. Step 4 Now mount an adjacent 8 1 x6 side wall board to the structure. Again, you will be mounting screws 3/8 from the bottom of the board, in the pattern shown. On this 8 side of the board, you are mounting the wall to the 5.5 side of the 1 x6 lumber board `feet. For optimal mounting, screw two screws 1 and 2 from the edge of the board, and then 1 and 2 from the opposite edge, leaving a 1.5 gap between the two center screws. Do this 4 times (16 total screws in this step) on this side of the 8 board. Once completed, this will leave a 3/4" square gap between the 8 and 4 side of the boards. This is expected, and will be strengthened in the next step. 5
.")

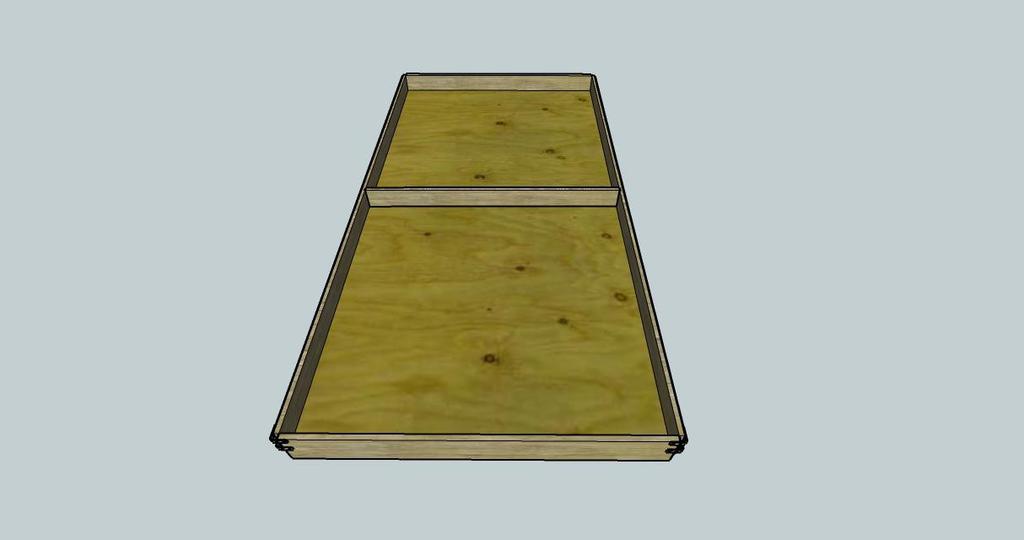
6 Step 5 Time to strengthen the walls. At the top of the boards, and then again 2 from the top, place corner braces on the outside of the walls. This will provide the walls with extra strength, while at the same time not affecting the performance of a robot (and we didn t have to cut boards down to provide excess wood for mounting). Use the provided screws (if 3/4 in length or less) to mount the corner brace to the wood. If desired, additional (or longer) braces may be used. Step 6 This is merely a wash, rinse, and repeat step. Perform steps 3, 4, and 5 as necessary to mount the two remaining side walls using the 4 and 8 1 x6 boards and the rest of the corner braces. This will create roughly 4 tall walls surrounding the playing field. The actual height of the wall may vary depending on how close the thickness of the plywood is to 3/4"; it is quite common for the plywood thickness to be slightly less than 3/4", which will make the inner height of the walls slightly larger than 4. Step 7 Now to mount the center wall between the two 4 x4 fields. As you ve probably realized the mats used in Code 3 are EXACTLY 4 x4, and the plywood we re using is EXACTLY 8 x4 long. This doesn t really provide any room to place a center wall between the two robot playing areas. To compensate for this, we will use the 4 long 1 x4 board. The actual size of the board is 0.75 x3.5, and what we ll do is mount the board flush to the TOP of the outer walls. This means there will be approximately 1/2" of open space under the board; the board will not rest on the surface of the playing field. Attempt to center the board over the center of the playing field; a tolerance of 1 is allowed robots wanting to use walls as alignment barriers can use any of the other side walls to do so. By mounting the center wall above the playing surface, it allows the mats to snugly sit on the playing surface. Drive screws through the 8 outer walls uniformly to mount the center board in place. 3 screws on each side should be sufficient. Step 8 Place the mats on the board. You may use a thin double-sided tape to adhere the outer edges of the mats to the plywood surface. It is recommended that you clean the plywood surface first, however, as there will most likely be sawdust on the wood from drilling the pilot holes. Align the mats with the outer field corners (and not to center). 6
7 7

8 Larger Pictures 8

9 9
10 10
How to build a Ram for Challenge E: Twist-O-Rama
 How to build a Ram for Challenge E: Twist-O-Rama Notes The Ram is like the Structure Tester it is not Interference for a Team Manager or other non-team members to build it. Construction time is approximately
Entrance Cabinet Plans
 Entrance Cabinet Plans www.andrewharriswoodwork.com Page 1 of 19 Introduction I have tried to ensure all steps are covered in these plans but if you find any errors in the plans or have a question then
Grade 11 Woods Lift Lid Coffee Table. Based on Under the big Top from Popular Mechanics Website
 Grade 11 Woods Lift Lid Coffee Table Based on Under the big Top from Popular Mechanics Website TABLE TOP 1. Select enough lumber to construct a top that is between 22 ½ and 24 wide after jointing. Ensure
How to Build a Raised Bed Cold Frame
 How to Build a Raised Bed Cold Frame Protect your plants from frost with a cold frame that sits right on top of your existing 4' x 4' raised bed. The lid is held open with screen door closers, and the
woodworkersjournal.com MATERIAL LIST
 MATERIAL LIST T x W x L 1 Legs (2) 1 1 2" x 3 1 2" x 36 7 16" 2 End Uprights (2) 1 1 2" x 3 1 2" x 32 1 2" 3 Stringers (4) 1 1 2" x 3 1 2" x 42" 4 Top Cladding, Long (2) 3/4" x 7 1 4" x 65 3 4" 5 Side
Patrol Box Plans by David J. Yarusso Troop 609
 Patrol Box Plans by David J. Yarusso Troop 609 Materials List: 1. One 4 x8 sheet of ½ thick cabinet grade (birch or oak) or AC plywood. If using AC grade, use the A grade surface on the outside for a clean
Hudson Dresser [1] Hudson Dresser Published on Ana White ( Submitted by dan-k [2] on Fri, :43 [1]
![Hudson Dresser [1] Hudson Dresser Published on Ana White ( Submitted by dan-k [2] on Fri, :43 [1]](/thumbs/90/102626096.jpg "Hudson Dresser [1] Hudson Dresser Published on Ana White ( Submitted by dan-k [2] on Fri, :43 [1]") [1] Submitted by dan-k [2] on Fri, 2011-03-11 11:43 [1] If you plan on staining this piece, it is recommended that you stain all of the drawer face materials before assembly for a more professional look.
[1] Submitted by dan-k [2] on Fri, 2011-03-11 11:43 [1] If you plan on staining this piece, it is recommended that you stain all of the drawer face materials before assembly for a more professional look.
LARGE PLYWOOD CUTTING GUIDE
 Copyright 2015 Shanty-2-Chic.com Workbench I f you are tight on space but large on ideas this bench is just what you need. Sturdy and mobile this bench has an ingenious fold out wing that gives you over
CCC Project Manual WEDGE RAMPS
 CCC Project Manual WEDGE RAMPS Project Components & How-To s Wedge Ramp Components Dimensions Length: Make wedge ramps 4 long (half sheet of plywood) when possible. Any shorter and the ramp may too steep.
 America s leading woodworking authority To download these plans, you will need Adobe Reader installed on your computer. If you want to get a free copy, visit: http://adobe.com/ reader. Having trouble downloading
A Magazine Rack with a Top
 A Magazine Rack with a Top Introduction: I have never come across a good free plan for a magazine rack. Yet almost all homes have one. So this is one of the few items I have made on my own, as I don t
The image above is intended to give you an idea of what the dovecote will look like when finished.
 Thank you for buying my book, I hope it is useful and enjoyable in your quest to building your own dovecote. This book will give you step-by step instructions on how to build your own dovecote also included
Copyright 2010 Springbok Publishing All Rights Reserved- Page 1
 Copyright 2010 Springbok Publishing All Rights Reserved- www.woodensaddlerackplans.com Page 1 Legal Information All contents copyright 2010 by Springbok Publishing. All rights reserved. No part of this
Direct Importers of the Finest Exotic Hardwood Decking, Lumber, & Flooring
 Direct Importers of the Finest Exotic Hardwood Decking, Lumber, & Flooring These Instructions can be found online at: http://www.advantagelumber.com/how-to/buildwoodstoragebox.html Material List 72 FEET
I love the outdoors. And I m impressed with whatever forces in the universe have made it possible for me to purchase a collapsible canvasand-metal
 Limbert Chair 9 I love the outdoors. And I m impressed with whatever forces in the universe have made it possible for me to purchase a collapsible canvasand-metal camp chair for under $20. But when you
This book, or portions of it, may not be duplicated, resold, or redistributed in any way, without the expressed written consent of Stay Tooned, Inc.
 Copyright 2006 - Stay Tooned, Inc. All rights reserved worldwide. This book, or portions of it, may not be duplicated, resold, or redistributed in any way, without the expressed written consent of Stay
Build Instructions for Towers of Doom
 Build Instructions for Towers of Doom 1. Measure and cut 4 x 8 sheet of plywood in half (or ask Home Depot to do it!). You will use one 4 x 4 sheet for the course base. 2. Attach a support frame to the
MITER SAW SUPPORT WINGS PLAN
 MITER SAW SUPPORT WINGS PLAN Version 1.0 How to build support wings for your miter saw With easy to follow step-by-step instructions, you will be able to cut, assemble, and finish your very own support
It can be either a 2½ seater bench seat (2 adult and a kid), or a 5 seater picnic table.
, or a 5 seater picnic table.") Page 1 Folding picnic table in both bench-seat and picnic table mode Introduction Description A single bench seat that can be changed into a picnic table with ease. This 'Bench come Picnic Table' is ideal
Page 1 Folding picnic table in both bench-seat and picnic table mode Introduction Description A single bench seat that can be changed into a picnic table with ease. This 'Bench come Picnic Table' is ideal
Pivot-Door Downdraft Cabinet Plans
 Pivot-Door Downdraft Cabinet Plans Finished Cabinet Closed Open Exploded View Introduction This simple downdraft-style dust collection cabinet is a great way to keep your shop cleaner and keep your router
DIY Field Guide ANDYMARK, INC.
 ANDYMARK, INC. Intro For the 2014-2015 FTC Game Cascade Effect, teams can purchase official field hardware from AndyMark, or they can build do-it-yourself (DIY) versions of the same hardware. The competitions
Harriet Chair with Modifications
 Harriet Chair with Modifications This modification of the Harriet chair includes a slat back, padded seat, and is 2 inches wider than the original plan. The overall dimensions of the finished chair: 38
Dura-Lock Roof System
 DLR-14 Dura-Lock Roof System Assembly and Installation Instructions Read the instructions before starting the job. They explain the steps required to produce a finished product that will meet factory specifications.
Making a Laser Shoot Surface for Science Olympiad Optics Events Alan Chalker November 7, 2010
 Making a Laser Shoot Surface for Science Olympiad Optics Events Alan Chalker alan@chalker.org November 7, 2010 Materials needed: Box of 2 deck screws (~$2 @ Home Depot) Box of #4 x ½ wood screws (~$2 @
Chapter 23. Garage Construction
 Chapter 23. Garage Construction 23.1 ESTABLISHING CHALK LINES 23.2 MEASURING AND CUTTING WALL PLATES 23.3 MARKING WINDOW & DOOR LOCATIONS ON EXTERIOR WALL PLATES 23.4 MARKING STUDS ON EXTERIOR WALL PLATES
BEN'S COUNTRY WOODSHOP SMALL MISSION TABLE Version 2
 BEN'S COUNTRY WOODSHOP SMALL MISSION TABLE Version 2 Cutting & Drilling Cut 2 top rails out of 1 x 3s. Each will be 8 1/2 long. Drill 1 pocket hole on the inside bottom center. This will connect the center
Ways to get the most out of your
 5 Ways to get the most out of your router table When you mount a router on a table, you expand your shop s potential. To help you take advantage of this potential, we assembled five router table techniques
FLOW HIVE ASSEMBLY GUIDE. If we look after the bees they will look after us, and the honey really is an amazing bonus. Flow Hive Hybrid 3 Frame
 AUSTRALIAN MADE If we look after the bees they will look after us, and the honey really is an amazing bonus. FLOW HIVE ASSEMBLY GUIDE Flow Hive Hybrid 3 Frame Read all instructions first. If you are unfamiliar
How To Create An Entertainment Unit
 How To Create An Entertainment Unit Materials required: 2 x Pine Panels - 1800mm x 450mm x 18mm 4 x Pine Panels - 310mm x 450mm x 18mm 1 x Pine Panels - 650mm x 450mm x 18mm 6 x Bun feet (your choice of
Eco Office File Base. Materials and Tools: Free Plans to build an office file cabinet base
 Materials and Tools: Materials: 1 - Sheet 3/4 PureBond Hardwood Plywood (Available at the Home Depot) 1 - Sheet 1/4 PureBond Hardwood Plywood (Available at the Home Depot) 3-21 Drawer Slides, Euro Style
Wanderlust Suitcase Vanity
 Wanderlust Suitcase Vanity If you re like me, you re always up for an adventure. When I saw some examples of DIY reclaimed suitcases, paired with the exciting new Wanderlust embroidery design collection,
Display Case (for J&S)
") Display Case (for J&S) This is constructed of maple plywood with solid maple (soft maple) edge banding. It was made to fit between a door and a kitchen cabinet, and has an elegant circular taper between
Display Case (for J&S) This is constructed of maple plywood with solid maple (soft maple) edge banding. It was made to fit between a door and a kitchen cabinet, and has an elegant circular taper between
136 PLYWOOD DESK 522
 136 PLYWOOD DESK 522 Simple in design and inexpensive, this plywood desk is made from a single 4- x 8-foot panel. Plywood is available with many hardwood veneers; it can also be covered with plastic laminate,
Klamp Trak. Instructions (39052)
") Klamp Trak TM Instructions (39052) ITEM# KKS1020 - Klamp Trak TM Getting Started There are three main methods for installing Klamp Trak in your workshop. In all three methods, your goal will be to construct
Klamp Trak TM Instructions (39052) ITEM# KKS1020 - Klamp Trak TM Getting Started There are three main methods for installing Klamp Trak in your workshop. In all three methods, your goal will be to construct
Butterfly Leaf Dining Table Plans
 Butterfly Leaf Dining Table Plans Part 1 An attractive dining table with a secret: the leaf folds and stores inside the table. Season 1, Episode 7 P a g e 2 I first saw a butterfly leaf table in a back
Building Instructions
 Building Instructions Tools Required Tape measure Straight edge Pencil/pen Jigsaw Table Saw Circular Saw Electric drill 1 Hole saw bit Saw horses/table Protractor Staple gun Caulk gun Paint brush Wrenches
Can-Do Can Crusher. America s leading woodworking authority. Step by Step construction instruction. A complete bill of materials.
 America s leading woodworking authority Can-Do Can Crusher Step by Step construction instruction. A complete bill of materials. Exploded view and elevation drawings. How-to photos with instructive captions.
Jeff Branch WOODWORKING YOU CAN BUILD A. By adding subtle design elements, a traditional furniture style becomes decidedly modern.
 Jeff Branch WOODWORKING YOU CAN BUILD A By adding subtle design elements, a traditional furniture style becomes decidedly modern. Jeff Branch WOODWORKING Publisher: Jeff Branch Editor: Jeff Branch Art
MyOutdoorPlans.com. By Julian King [2X4 GARDEN BENCH]
![MyOutdoorPlans.com. By Julian King [2X4 GARDEN BENCH]](/thumbs/75/72876801.jpg "MyOutdoorPlans.com. By Julian King [2X4 GARDEN BENCH]") MyOutdoorPlans.com By Julian King [2X4 GARDEN BENCH] CUT LIST A 2 pieces of 2 4 lumber 24 long, 2 pieces 32 1/2 long LEGS B 2 pieces of 2 4 lumber 45 long, 2 pieces 15 1/2 long, 1 piece 12 1/2 long SEAT
MyOutdoorPlans.com By Julian King [2X4 GARDEN BENCH] CUT LIST A 2 pieces of 2 4 lumber 24 long, 2 pieces 32 1/2 long LEGS B 2 pieces of 2 4 lumber 45 long, 2 pieces 15 1/2 long, 1 piece 12 1/2 long SEAT
CONTINUED. TABLE TOPS: 1. Sort one 2x6x8 piece from your lumber. 2. Measure and mark two 48 pieces from each, then cut.
 # Materials: Quantity Each: Total Quantity: x4x8 7 x6x8 1 TIPS FOR SUCCESSFUL PREP WORK: Before starting, carefully read through the entire instruction sheet. Refer to the material list to the left and
ANA WHITE PLATFORM BED: RYOBI 2017 PROJECT #5 Page 1 of 15. Description:
 Page 1 of 15 Description: We built this platform bed with storage side for our pre-teen daughter s room, and she couldn t be happier. The bed is very comfortable, and the storage piece adds style and function.
DIY Rectangle Loom Information - Rogers Pin Arrangement Plan
 DIY Rectangle Loom Information - Rogers Pin Arrangement Plan 1. Principles of Continuous Yarn Weaving A woven fabric done with continuous yarn weaving is simply a series of interlocking loops. This is
Entryway Locker 17 ½ 25 ½
 Copyright 2015 Shanty-2-Chic.com T Entryway Locker his old world entryway locker is loaded with possibilities. Two adjustable shelves allow you to customize the storage to fit your needs. Even better,
Chapter 22. Shed Construction
 Chapter 22. Shed Construction 22.1 BUILDING SHED FLOOR 22.2 BUILDING SHED WALLS 22.3 BUILDING SHED ROOF 22.4 ASSEMBLING SHED Tools needed by volunteers: Hammer Nail apron Tape measure Square Utility knife
1 ¼-inch Pocket Screws Brad Nailer or Hammer 1 ¼-inch Brad Nails Clamps
 MATERIALS: TOOLS: (4) 2 x 6 x 8 Ft. Boards Tape Measure (2) 2 x 4 x 8 Ft. Boards Carpenter s Square (7) 1 x 4 x 8 Ft. Boards Pencil (2) 1 x 3 x 8 Ft. Boards Drill (1) Half Sheet of ¾-inch Thick Plywood
Shop-Made Miter Clamps
 *Editor s note: In the photos showing the table saw, the blade guard has been removed for clarity. I try to be as self-sufficient as possible, so I like to manufacture my own tools whenever I can. I designed
The Universal Table Saw Sled
 The Universal Table Saw Sled Do Precision Work Even with Inexpensive Table Saws! Table saw blades always tend to move the wood while the cut is being made. This is why it's so difficult to get accurate
WALL MOUNT LOCKER ASSEMBLY. 208 Chestnut St, Reading, PA (610)
") WALL MOUNT LOCKER ASSEMBLY 208 Chestnut St, Reading, PA 19602 (610)376-2666 Locker Assembly Wall Mount: locker Installation Introduction: Before beginning, check to ensure the floor is level, and the wall
WALL MOUNT LOCKER ASSEMBLY 208 Chestnut St, Reading, PA 19602 (610)376-2666 Locker Assembly Wall Mount: locker Installation Introduction: Before beginning, check to ensure the floor is level, and the wall
indicates a diagram detailing the dimensions of a project part and/or the placement for pocket holes, screws, nails, etc.
 p i r at e ' s c he s t t oy box What You'll Need lumber 1-1x2x4 1-1x2x8 1-1x3x2 2-1x3x8 1-1x6x4 1-3/4 x 2 x 4 sheet of plywood 1-3/8 or 11/32 x 4 x 8 sheet of beadboard paneling 1-9/16 x 8 feet quarter
TM TM DOG HOUSE Age 9+
 TM TM DOG HOUSE Age 9+ Safety First! Use eye protection, always! Use ear protection with loud power tools Stay with kids while they work! Follow tool manufacturers safety guidelines This project is recommended
Building and installing dividing walls, by Tobias Sternberg
 Building and installing dividing walls, by Tobias Sternberg This instruction sets out to show one way to build and install simple dividing walls for studio spaces. I have written it as clearly as possible.
make something original Mobile Workstand Shelf support (2) Caster extension (2) Leveling feet (4) Rigid caster (2)
 Caster extension (2) Leveling feet (4) Rigid caster (2)") Mobile Workstand Panel (2) Leg (4) Long frame member (2) Crossmember (6) Shelf (1) Shelf support (2) Caster extension (2) Leveling feet (4) Rigid caster (2) THIS IS NOT THE COMPLETE PLAN: it is merely
Mobile Workstand Panel (2) Leg (4) Long frame member (2) Crossmember (6) Shelf (1) Shelf support (2) Caster extension (2) Leveling feet (4) Rigid caster (2) THIS IS NOT THE COMPLETE PLAN: it is merely
129 KITCHEN BASE CABINET 480
 129 KITCHEN BASE CABINET 480 There are two sorts of kitchen cabinets: base cabinets, which sit on the floor, and wall cabinets. Base cabinets provide both storage space and work surfaces. They often house
Kreg Tool Co. All Rights Reserved.
 Version 1 p. 1 Materials: Lumber: Qty: Board 2 2x2s 3 ft. long 2 1x2s 8 ft. long 2 1x3s 8 ft. long 6 1x6s 10 ft. long INSTRUCTIONS: Supplies: 1 1 / 4" Kreg Screws (coarse thread for softwoods, fine thread
gravity feeder GRAVITY FEEDER
 Z5979i_pg066-077.indd 68 3//10 4:09:48 PM gravity feeder USING A TRIED-AND-TRUE DESIGN, GRAVITY feeders can hold a large amount of chow. The wide opening at the bottom accommodates a seed mix containing
Hinge Mortising Jig. One of the make it or break it parts of building a. 6 ShopNotes No. 74
 Hinge Mortising Jig A Mortise for a Hinge. Quick, clean, and accurate that s the only way to describe the mortise you get with a trim router and this hinge mortising jig. One of the make it or break it
U. M. ARMY Texas Conference. Wheel Chair Ramp Manual
 U. M. ARMY Texas Conference Wheel Chair Ramp Manual June 2014 U. M. ARMY Texas Conference Building & Repair Tips Wheelchair Ramps Complete a site survey to determine the design and layout of the ramp.
Perfect Tapers. on the Tablesaw. Make tapered legs of all types, quickly and safely
 Perfect Tapers on the Tablesaw Make tapered legs of all types, quickly and safely B Y S T E V E L A T T A 30 F I N e W o o D W o r K I N G COPYRIGHT 2012 by The Taunton Press, Inc. Copying and distribution
Plans. Easy-to-Build Full-size Deluxe Murphy Bed Plan. For more plans, tools and hardware visit rockler.com
 Easy-to-Build Full-size Deluxe Murphy Bed Plan Build a full-size Deluxe Murphy Bed complete with decorative molding and matching side cabinets! Plans For more plans, tools and hardware visit rockler.com
CONTENTS TOOL LIST U P S I D E I N N O V A T I O N S, L L C RAMP AND STEP SYSTEM ASSEMBLY INSTRUCTIONS. Revised: June 2013
 U P S I D E I N N O V A T I O N S, L L C RAMP AND STEP SYSTEM ASSEMBLY INSTRUCTIONS TOOL LIST Required Tools: - Reciprocating Saw with Metal Cutting Blade - Drill - 7/16 Drill Bit for Metal Drilling -
Playground Assembly Instructions
 Before You Begin Playground Assembly Instructions Locate the playground set on firm, level ground. Assemble the playground on or close to its permanent location Two people are recommended to assemble the
Cowper From Steve Wolverton on the T&TTT forum, Feb 2005 For Reference Only Do not use to build a trailer. Check on Teardrop and Tiny Travel Trailers
 Cowper From Steve Wolverton on the T&TTT forum, Feb 2005 For Reference Only Do not use to build a trailer. Check on Teardrop and Tiny Travel Trailers for up to date building information; http://www.mikenchell.com/forums
GENERAL NOTES: Page 1 of 9
 Laminating A Zia Into A Turning Blank by W. H. Kloepping, Jan. 2009 This describes how a zia (the New Mexico state symbol) can be laminated into a turning blank. Materials needed: Square Turning Block
A Day House. A View of One Way to Finish the Exterior of The Day House. Read these instructions all the way through before beginning this project.
 A Day House A View of One Way to Finish the Exterior of The Day House Read these instructions all the way through before beginning this project. General Comments For the purposes of this project, the standard
3400 to 3440 Scarfing Sled Owners Manual Please Read Carefully!
 3400 to 3440 Scarfing Sled Owners Manual Please Read Carefully! Parts List: Please identify and verify that you have all of the hardware shown. Please refer to photos in the instructions for the parts
Shop Projects. Plans NOW. Each Built from One Sheet of Plywood!
 Plans NOW www.plansnow.com 5 Shop Projects Each Built from One Sheet of Plywood! Tool Tote - Sawhorse - Workbench - Wood Bin - Wall Cabinet PLUS: 7 SHOP SECRETS Working with Plywood Dread the thought of
Skybolt V2 Construction Manual
 Skybolt V2 Construction Manual Property of www.ppgplans.com Do not duplicate or make public. Warnings & Disclaimers. This product shows how to build a basic frame only for Powered Paragliding. It is the
#P2-21 Victorian Wall Pocket Organize and decorate all at the same time with this handy wall pocket. 12 tall.
 Victorian Wall Pocket Organize and decorate all at the same time with this handy wall pocket. 12 tall. Cut on dashed line for Back Cut on solid line for Frame only. Stock: 1/8-1/4, cut 1 each Left pattern
Sort 4 (four) 2x6x12 pieces and cut to 126 1/2" for a total of 4 (four) 126 1/2" pieces.
 2x6x12 pieces and cut to 126 1/2 for a total of 4 (four) 126 1/2 pieces.") # Materials: Quantity Each: Total Quantity: xx8 6 x6x8 1 x6x1 1 TIPS FOR SUCCESSFUL PREP WORK: Before starting, carefully read through the entire instruction sheet. Refer to the material list to the left
# Materials: Quantity Each: Total Quantity: xx8 6 x6x8 1 x6x1 1 TIPS FOR SUCCESSFUL PREP WORK: Before starting, carefully read through the entire instruction sheet. Refer to the material list to the left
Chief s Shop: Simple Woodworking Bench
 Chief s Shop: Simple Woodworking Bench Be sure to read the instructions and review the illustrations and accompanying video for this project BEFORE you start. Follow ALL SAFETY GUIDELINES AND RECOMMENDATIONS
Garden Bridge. c D E. All dimensions are in mm- Arch Tread Handrail' Post Reinforcement brace. Written & designed by David Watkins.
 Garden Bridge Written & designed by David Watkins Slmple by design yet decorative by nature. This ornate Garden Bridge will rest proudly amongst most garden backdrops. The fiddliest step in this project
WOOD TOY NEWS. July 23, 2013 Tuesday
 WOOD TOY NEWS Make your own perfect turntable for spray painting toys with these useful tips. And it s fast, fun and easy to build! by Imants Udris Watch the video on our website at : http://www.toymakingplans.com/website/how-to/
Building the ArcadeCab Trackball/Single-Player Controller
 Building the ArcadeCab Trackball/Single-Player Controller Introduction This help document details the construction of the original ArcadeCab Ultra- Trackball controller. It is based on my construction
7 x 14 flybed tramp. VISIT LINK BELOW FOR INSTALL VIDEO
 in-ground installation instructions & user guide 7 x 14 flybed tramp VISIT LINK BELOW FOR INSTALL VIDEO https://www.maxairtrampolines.com/pages/support-information-videos Page 2 TABLE OF CONTENTS Materials,
Installation Instructions For Slider Casement Air Conditioners
 Installation Instructions For Slider Casement Air Conditioners NOTE: These instructions describe installation in a typical wood framed window with a wood SLIDE-BY sash, or installation in a metal CASEMENT
rmoire Materials Hardware
 A rmoire No house ever has enough storage space, and I built this armoire to satisfy a couple of needs. Inside the armoire is a shelf large enough for the television. Under the shelf are six drawers that
Vinyl Gazebo Instructions
 P a g e 1 Vinyl Gazebo Instructions 10 Vinyl Gazebo Shown Thank you for the purchase of your New Gazebo. Depending on the size of your Gazebo, installation can usually be completed in 1 to 2 days. These
Thank you for purchasing these easel plans. I think you will find this to be a fun, easy to build project that will serve you for years to come.
 Construction Plans for The Basic Wooden Easel Updated August, 2002 Thank you for purchasing these easel plans. I think you will find this to be a fun, easy to build project that will serve you for years
Router Table. Construction
 Router Table A router table is an invaluable tool. The problem, however, is that ready-built router tables are usually relatively expensive and too narrow for many projects. This router table provides
ENJOY THIS SELECTION FROM. Woodworking 101. Includes Step-by-Step Instructions for 8 Projects. Woodworking
 W ENJOY THIS SELECTION FROM Woodworking 101 Includes Step-by-Step Instructions for 8 Projects Woodworking 101 Aimé Fraser, Matthew Teague, and Joe Hurst-Wajszczuk To purchase your copy of Woodworking 101,
Castle loft bed [1] Additional Photos. Castle loft bed Published on Ana White (http://www.ana-white.com)
![Castle loft bed [1] Additional Photos. Castle loft bed Published on Ana White (http://www.ana-white.com)](/thumbs/76/73086219.jpg "Castle loft bed [1] Additional Photos. Castle loft bed Published on Ana White (http://www.ana-white.com)") [1] Submitted by fsmumford [2] on Tue, 2011-10-18 21:51 [1] Additional Photos [3] [4] Page 1 of 31 [5] [6] [7] Summary: I stumbled upon Ana s blog about a year ago. Since, like many of you, I have become
[1] Submitted by fsmumford [2] on Tue, 2011-10-18 21:51 [1] Additional Photos [3] [4] Page 1 of 31 [5] [6] [7] Summary: I stumbled upon Ana s blog about a year ago. Since, like many of you, I have become
12x8 Floating Dock Plans RollingBarge.com
 12x8 Floating Dock Plans RollingBarge.com Congratulations! You are about to build the first floating dock designed around pressure treated plywood trusses. 1 If you use the materials suggested, and you
Birdhouse Plan Combo Pack
 Birdhouse Plan Combo Pack Two Quick and Creative Projects for Your Yard PROJECT 17 Old Plane Birdhouse BY CHRISTOPHER SCHWARZ Every woodworker should spruce up the yard (or the shop) with this simple birdhouse.
INSTALLATION GUIDE SLIMLINE ROOF LANTERN 4 PANE CONFIGURATION
 INSTALLATION GUIDE SLIMLINE ROOF LANTERN 4 PANE CONFIGURATION SLIMLINE STEP-BY-STEP INSTALLATION GUIDE Thank you for choosing Roof Maker, we hope you are delighted with your new rooflight. Our roof lanterns
Timber projects. This section contains plans and instructions for three timber projects.
 Project Saw horse Timber projects This section contains plans and instructions for three timber projects. The projects are suggested for students to practise skills use tools from the course and make something
Pre-Paint>Fuselage>Empennage>Fit elevator. Objectives of this task: Materials required: Prepare the horizontal stabiliser and the elevator
 Pre-Paint>Fuselage>Empennage>Fit elevator Objectives of this task: To fit the elevator to the horizontal stabiliser, to fit the trim tabs to the elevator and the end caps to the elevator and the horizontal
How to Build a Simple Corner Trellis
 How to Build a Simple Corner Trellis This simple corner trellis does double duty as both a sturdy support for your plants and a beautiful edible landscaping element in your yard. Use it to grow cucumbers,
PROJECT PLAN OUTFEED TABLE
 BUILD IT WITH ROCKLER PROJECT PLAN OUTFEED TABLE BUILD Stock # Item 00 ' Universal T-Track () 0 T-Track Intersection Kit 70 JIG IT Universal Drawer Slide Jig 0 " Drawer Slides () 77 Auto-Adjust Jig Clamp
REGENCY TIMBER BUILDINGS
 REGENCY TIMBER BUILDINGS TEL 01948 830460 UNIT 22 PENLEY IND EST, PENLEY.WREXHAM. LL13 0LQ 1 Garage fitting instructions Tools needed handsaw, hammer, Stanley knife with hook blade, tape measure, battery
SE5a Wing Panels rev 1.0
 SE5a Wing Panels rev 1.0 The top and bottom wings are different. They might look the same but the bottom wing has one less rib and some rib spacing difference. This is due to where the wooden interplane
Mudroom Unit. Page 1 of 25
 Mudroom Unit www.andrewharriswoodwork.com Page 1 of 25 Introduction This plan makes a unit which is 66 ¾ inches tall, 39 ½ inches wide and 18 ½ inches deep. It was custom made for some friends to fit the
CollegeBedLofts.com Plans for: Loft Bed - Bunk Bed - High Rise Platform Bed
 CollegeBedLofts.com Plans for: Loft Bed - Bunk Bed - High Rise Platform Bed High Rise Platform Bed Page 1 of 14 Thank you for ordering our Plans. If you decide at a later date to purchase some of the individual
Office Towers 83 ¼ 35 ½ 18 ¼
 Copyright 2015 Shanty-2-Chic.com T Office Towers his towering hutch will be admired for years to come. Inspired by rustic, high end furniture found in boutique showrooms it will impress all who see it...especially
BUTCHER BLOCK MICROWAVE OVEN STAND
 BUTCHER BLOCK MICROWAVE OVEN STAND 828 The butcher block has fallen out of favor in recent years, replaced by the countertop cutting board in an attempt to save space. This design, however, makes the butcher
MUTINEER AND BUCCANEER TOP-MOUNTED CENTERBOARD HANGERS. Note, drawing not to scale Bob DeRoeck May 31, 05
 MUTINEER AND BUCCANEER TOP-MOUNTED CENTERBOARD HANGERS Note, drawing not to scale Bob DeRoeck May 31, 05 Holes for #10 selftapping SS screws (pan head). 5.75 1 Bend line Aluminum plate, series 5000 or
ining Table Materials *Notes on Materials
 D ining Table We looked around for the perfect table for the dining room. Some were too big, some too small, and most were just too expensive. So we built this one, and we are happy with the result. It
Hoop House Plans By Steve Robinson
 Hoop House Plans By Steve Robinson This Ebook is Shareware It is meant to be shared by farmers alike. I give you permission to share this EBook to as many people as you like. It can not be sold, but it
Above are the offsets for the plywood panels.
 DinkyDink Plans Bottom Panel Half Station X Y X2 Y2 1 1/4 3/4 0 11 5/16 2 4 9/16 4 12 9/16 3 11 11/16 1/4 11 7/16 14 1/2 4 18 5/8 1/16 18 5/8 15 11/16 5 25 3/4 0 25 3/4 16 5/16 6 32 13/16 0 32 13/16 16
14 x 14 super quad. VISIT LINK BELOW FOR INSTALL VIDEO
 in-ground installation instructions & user guide 14 x 14 super quad VISIT LINK BELOW FOR INSTALL VIDEO https://www.maxairtrampolines.com/pages/support-information-videos Page 2 TABLE OF CONTENTS Materials,
Important Note: Why this guidebook is FREE?
 Easy DIY Murphy Bed Construction Guide 1 Important Note: This guide is a FREE SAMPLE of our Complete Construction Guidebook. With the help of this guide you will get familiar with the construction steps